lock Acura MDX 2007 Navigation Manual
[x] Cancel search | Manufacturer: ACURA, Model Year: 2007, Model line: MDX, Model: Acura MDX 2007Pages: 166, PDF Size: 4.21 MB
Page 3 of 166
2Navigation System
Table of Contents
Direction List ................................. 57
EXIT INFO (Freeway Exit Information).......... 58
Split Screen Guidan ce .................. 58
Map Scale ...................................... 60
Map Orientation ............................ 61
Destination Icon ............................ 62
Landmark and Incident Icons ........ 62
Showing Icons on the M ap .............. 65
Icon Options .................................... 65
Going Off the Route ...................... 67
Off-road Tracking.......................... 67
Viewing/Saving the Current Location ..................................... 68
Pop-ups and Disclaimers ............... 69
Changing the Route ....................... 70
Change Route By Screen ................. 70
Cancel Current Route ...................... 70
Change Routing Method .................. 70
Detour .............................................. 70
Avoid Streets .................................... 71
Search Waypoint on Route .............. 71
Back to Current Route ..................... 72
Changing Your Destination ........... 73
Find Nearest (Voice command) ....... 73
Go Home (Voice command) ............ 73 Using Interface Dial to Change
Destination ................................... 73
Entering a Destination from the Menu Screen (while on route) ................ 74
Continue Trip Screen .....................74
AcuraLink Messages .....................75
Information Features ................ 76
Information Screen ........................76
Messages........................................76
Voice Command Help ...................76
Cellular Phonebook .......................77
Map Legend ...................................77
Calendar ........................................78
Entering Your Schedule ................... 78
Key to Zagat Ratings .....................79
Calculator.......................................80
Unit Conversion ............................... 81
Roadside Assistance ......................81
System Set-up ............................. 82
Setup Mode ...................................82
Setup Screen (first) ........................82
Brightness ....................................... 82
Contrast .......................................... 83
Black Level ...................................... 83
Volume ............................................ 83
Interface Dial Feedbac k ................. 83 Guidance Prompts ..............
............ 83
Setup Screen (second)....................84
Personal Information .....................84
Address Book ................................. 85
Edit/Delete an Address .................... 88
Home Address ................................. 88
PIN Number .................................... 88
Previous Destinations ...................... 89
Basic Settings ................................90
Units (mile or km) ........................... 90
Voice Recognition Feedback .......... 90
Voice ............................................... 90
Routing & Guidance .....................91
Rerouting ........................................ 91
Unverified Area Routing ................. 92
Edit Avoid Area................................ 96
Edit Waypoint Search Area ............. 98
Guidance Mode .......... ..................... 99
Clock Adjustment .........................99
Auto Daylight ................................ 100
Auto Time Zone ............................. 100
Time Adjustment ........................... 101
Vehicle .........................................101
Off-road Tracking ...... ................... 101
Correct Vehicle Position................ 102
Color ............................................103
Map Color ..................................... 103
Menu Color ................................... 103
Page 12 of 166
Navigation System11
Getting Started
(Display mode) button
Switches the display between Day
mode, Night mode, and OFF. See
page 104.
AUDIO button
Press to display the audio screen.
For more information on audio system
features, see the Audio section of the
Owner’s Manual. Interface Dial/ENTER
button
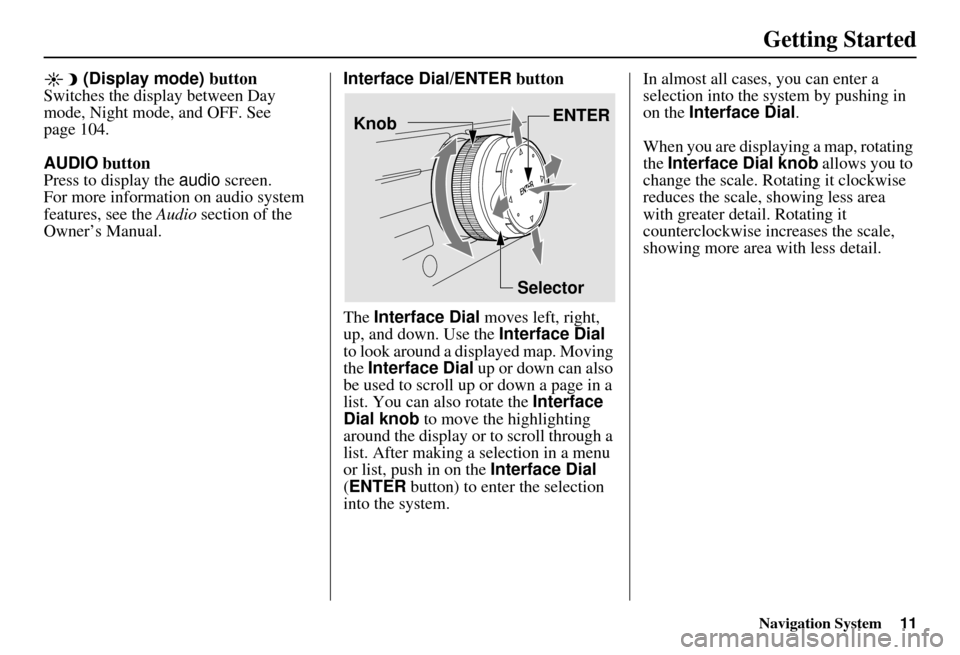
The Interface Dial moves left, right,
up, and down. Use the Interface Dial
to look around a displayed map. Moving
the Interface Dial up or down can also
be used to scroll up or down a page in a
list. You can also rotate the Interface
Dial knob to move the highlighting
around the display or to scroll through a
list. After making a selection in a menu
or list, push in on the Interface Dial
(ENTER button) to enter the selection
into the system. In almost all cases
, you can enter a
selection into the system by pushing in
on the Interface Dial .
When you are displaying a map, rotating
the Interface Dial knob allows you to
change the scale. Rotating it clockwise
reduces the scale, showing less area
with greater detail. Rotating it
counterclockwise increases the scale,
showing more area with less detail.
Selector ENTER
Knob
Page 13 of 166
12Navigation System
Getting Started
Screen
All selections and instructions are
displayed on the screen. The Display is
not a “touch screen” - you enter
information into the system either by
voice or by using the Interface Dial.
Clean the screen with a soft, damp cloth.
You may use a mild cleanser intended
for use on liquid crystal displays
(LCDs). Harsher chemicals may
damage the screen.
NOTE:
Whenever you shift to R (reverse), the
rear view is shown on the navigation
system screen. See page 107.Lower Display
Shows a summary of the audio and
climate control information, as well as
the time. This summary is helpful as a
confirmation when adjusting audio or
climate by voice.
The audio summary consists of the
radio, frequency, and volume.
The climate status consists of the
driver’s and passenger’s temperature
displays. The time is automatically set
by the navigation system. Settings can
be adjusted in Setup (see Clock
Adjustment on page 99).
Page 19 of 166
18Navigation System
Getting Started
If you press the CANCEL button, the
message will be displayed the next time
you start the vehicle.
NOTE:
The system will display the current
message and any older or previously
unread messages, with the newest
message listed first.HandsFreeLink™
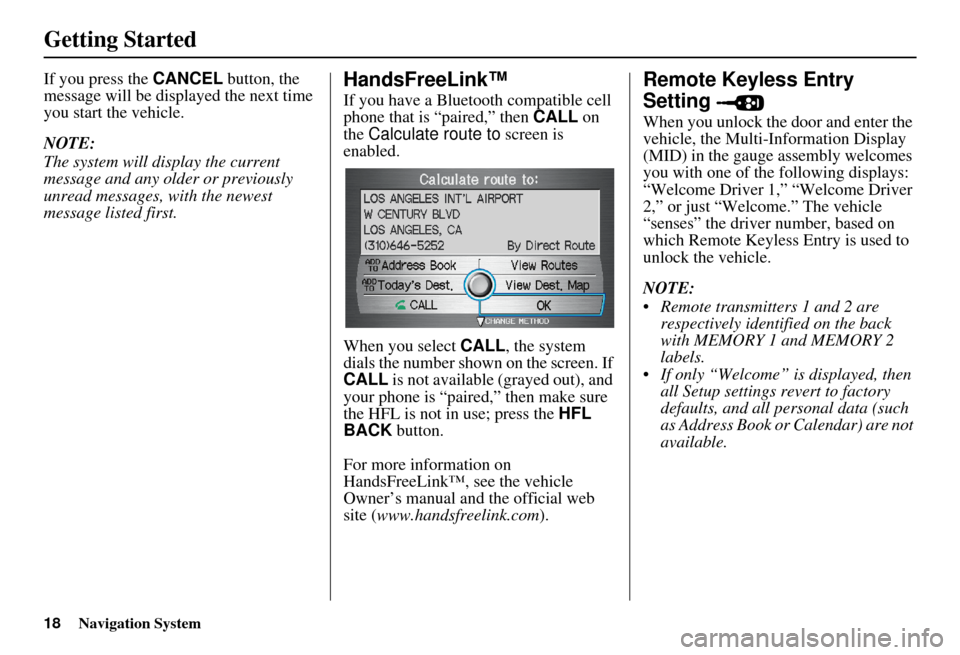
If you have a Bluetooth compatible cell
phone that is “paired,” then CALL on
the Calculate route to screen is
enabled.
When you select CALL, the system
dials the number shown on the screen. If
CALL is not available (grayed out), and
your phone is “paired,” then make sure
the HFL is not in use; press the HFL
BACK button.
For more information on
HandsFreeLink™, see the vehicle
Owner’s manual and the official web
site ( www.handsfreelink.com ).
Remote Keyless Entry
Setting
When you unlock the door and enter the
vehicle, the Multi-Information Display
(MID) in the gauge assembly welcomes
you with one of the following displays:
“Welcome Driver 1,” “Welcome Driver
2,” or just “Welcome.” The vehicle
“senses” the driver number, based on
which Remote Keyless Entry is used to
unlock the vehicle.
NOTE:
Remote transmitters 1 and 2 are respectively identified on the back
with MEMORY 1 and MEMORY 2
labels.
If only “Welcome” is displayed, then all Setup settings revert to factory
defaults, and all personal data (such
as Address Book or Calendar) are not
available.
Page 20 of 166
Navigation System19
Getting Started
The navigation system uses the driver
number (as recognized by the MID) to
personalize the navigation system. For
example, if Driver 1 unlocks the
vehicle, the “Driver 1” Personal address
book and other navigation settings are
automatically loaded when the vehicle
is started. There is no way to change
from one driver’s settings to the others
while driving.
Throughout this manual, the icon
“ ” is used to indicate features
that are dependent on the “Driver
number” as displayed on the MID
“Welcome” display. When the Remote Keyless Entry is
deliberately “unlinked,” (as when giving
the key to a valet) the MID will display
“Welcome.” Then th
e following occurs:
Some settings (e.g., the “Personal Address Book” and the “Calendar”
Information feature), are not
selectable (buttons grayed out).
Setup values (like volume, brightness, etc.) may be changed but
are not remembered the next time you
restart the vehicle.
NOTE:
The MDX Owner’s Manual has
additional information regarding
“linking” and “unlinking” for the
Remote Keyless Entry.
Page 27 of 166
26Navigation System
Getting Started
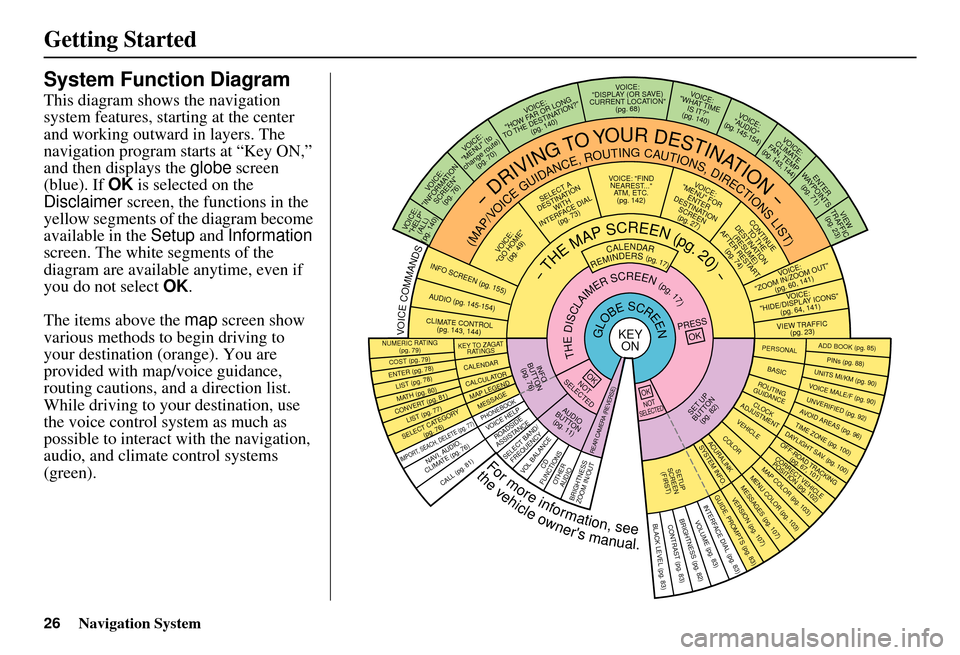
System Function Diagram
This diagram shows the navigation
system features, starting at the center
and working outward in layers. The
navigation program starts at “Key ON,”
and then displays the globe screen
(blue). If OK is selected on the
Disclaimer screen, the functions in the
yellow segments of the diagram become
available in the Setup and Information
screen. The white segments of the
diagram are available anytime, even if
you do not select OK.
The items above the map screen show
various methods to begin driving to
your destination (orange). You are
provided with map/voice guidance,
routing cautions, and a direction list.
While driving to your destination, use
the voice control system as much as
possible to interact with the navigation,
audio, and climat e control systems
(green).
REMINDERS(pg.17)CALENDAR
-THEMAPSCREEN(pg.20)-
(MAP/VOICEGUIDANCE,ROUTINGCAUTIONS,DIRECTIONSLIST)
-DRIVINGTOYOURDESTINATION-
VOI CE:
"HELP" (ALL)
(pg. 140)
VOICE:
"INFORMATION SCREEN"(pg. 76)
VOICE:
"MENU" (to
change route) (pg. 70)
VOICE:
"HOW FAR OR LONG
TO THE DESTINATION?" (pg. 140)
VOICE:
"DISPLAY (OR SAV E )
CURRENT LOCA TION"
(pg. 68)VOICE:
"WHAT TIME IS IT?"
(pg. 140)
VOICE:
"AUDIO"
(pg. 145-154)
VOI CE:
CLIMATE
FAN, TEMP
(pg. 143, 144)
ENTER
WAYPOINTS (pg. 71)
VIEW
TRAFFIC (pg. 23)
VOI CE:
"ZOOM IN/ZOOM OUT" (pg. 60, 141)
VOICE:
"HIDE/DISPLAY ICONS "
(pg. 64, 141)
VIEW TRAFFIC (pg. 23)
ADD BOOK (pg. 85)PINs (pg. 88)UNITS MI/KM (pg. 90)VOICE MALE/F (pg. 90)UNVERIFIED (pg. 92)AVO ID AREAS (pg. 96)TIME ZONE (pg. 100)DAYLIGHT SAV. (pg. 100)OFF-ROAD TRA CKING
(pg. 67, 10 1)CORRECT VEHICLE
POSITION (pg. 102)MAP COLOR (pg. 103)MENU COLOR (pg. 103)
GUIDE. PROMPTS (pg. 83)VERSION (pg. 107)MESSAGES (pg. 107)
BRIGHTNESS (pg. 82)VOLUME (pg. 83)INTERFACE DIAL (pg. 83)
CALL (pg. 81)
COST (pg. 79)
NUMERIC RAT I N G
(pg. 79)
ENTER (pg. 78)LIST (pg. 78 )MATH (pg. 80)CONVERT (pg. 81)LIST (pg. 77)
NAVI, AUDIO,
CLIMATE (pg. 7 6 )
SELECT CATEGORY (pg. 76)
IMPORT , SEACH, DELETE (pg. 77)
PRESS
OK
NOT
SELECTEDOK
NOTSELECTED
OK
ROADSIDE
ASSISTANCE
KEY T O ZAGAT
RATINGS
CALENDARCALCULA TORMAP LEGEND
PHONEBOOKMESSAGE
VOICE HELP
SELECT BAND/
FREQUENCYVOL BALANCECD
FUNCTIONSOTHER AUD IOBRIGHTNESS
ZOOM IN/OUT
SET UP
BUTTON (pg. 82)AUDIO
BUTTON (pg. 11)
INFO
BUTTON (pg. 76)
REAR CAMERA (REVERSE)
THEDISCLAIMERSCREEN(pg.17)
VOI CE: "FIND
NEARES T..."
AT M , ETC.
(pg. 142)
SELECT A
DESTINATION WITH
INTERFACE DIAL (pg. 73)
VOICE:
"GO HOME" (pg. 49)
VOICE:
"MENU" FOR ENTER
DESTINATION SCREEN(pg. 27)
CONTINUE TO THE
DESTINATION (RESUME)
AFTER RESTART (pg. 74)
GLOBESCREENKEYONPERSONAL
BASICROUTING
GUIDANCE
CLOCK
ADJUSTMENTVEHICLECOLORACU RALINKSYSTEM INFO .
SETUP
SCREEN (FIRS T)
VOICECOMMANDSINFO SCREEN (pg. 155)
AUDIO (pg. 145-154)
CLIMATE CONTR OL
(pg. 143, 144 )
Formoreinformation,see
thevehicleowner'smanual.
BLACK LEVEL (pg. 83)CONTRAST (pg. 83)
Page 63 of 166
62Navigation System
Destination Icon
The destination icon only shows the
approximate location of the destination.
This occurs because a city block can
have as many as 100 possible addresses
(for example, the 1400 block is followed
by the 1500 block.) Since most cities
use only a portion of the 100 possible
addresses (for example, in the 1400
block, the addresses may only go up to
1425 before the 1500 block starts).
Therefore, the address 1425 will be
shown a quarter of the way down the
block by the system instead of near the
end of the block where the destination is
actually located.
Tip:
When on a route, you can view a map
showing your destination. Using voice
control, say “Display destination map.”
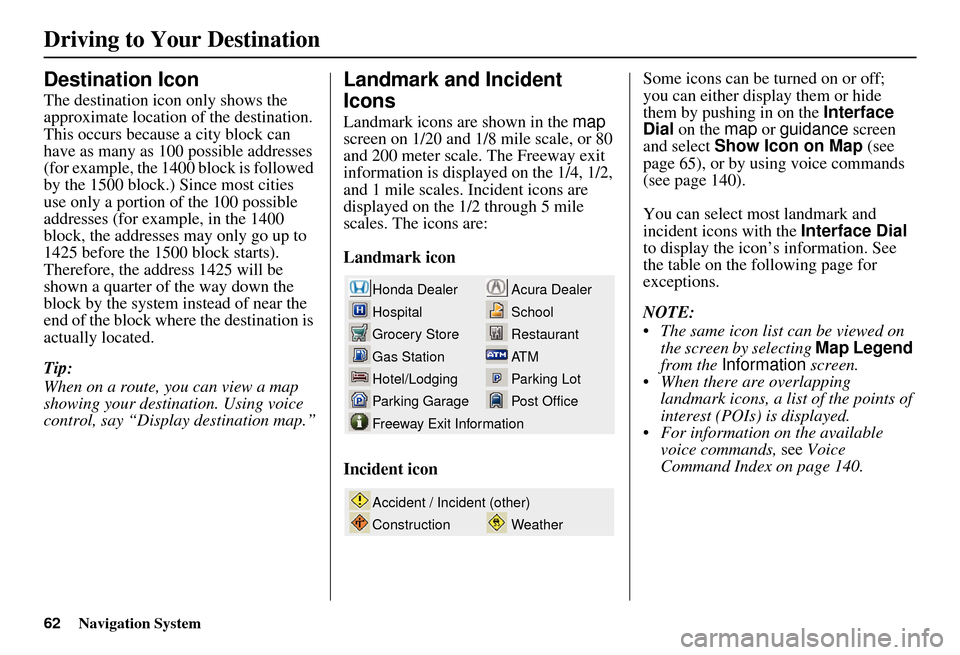
Landmark and Incident
Icons
Landmark icons are shown in the map
screen on 1/20 and 1/8 mile scale, or 80
and 200 meter scale. The Freeway exit
information is displayed on the 1/4, 1/2,
and 1 mile scales. Incident icons are
displayed on the 1/2 through 5 mile
scales. The icons are:
Landmark icon
Incident icon Some icons can be turned on or off;
you can either display them or hide
them by pushing in on the
Interface
Dial on the map or guidance screen
and select Show Icon on Map (see
page 65), or by using voice commands
(see page 140).
You can select most landmark and
incident icons with the Interface Dial
to display the icon’s information. See
the table on the following page for
exceptions.
NOTE:
The same icon list can be viewed on the screen by selecting Map Legend
from the Information screen.
When there are overlapping landmark icons, a list of the points of
interest (POIs) is displayed.
For information on the available voice commands, see Voice
Command Index on page 140.
Acura Dealer
School
Restaurant
AT M
Parking Lot
Post OfficeHonda Dealer
Hospital
Grocery Store
Gas Station
Hotel/Lodging
Parking Garage
Freeway Exit Information
Weather
Accident / Incident (other)
Construction
Driving to Your Destination
Page 100 of 166
Navigation System99
System Set-up
For “Places along the route,” the system
looks in front of yo u within a corridor
width specified by your values for “On
Freeways” or “On Surface Street.” The
system checks the upcoming area, based
on your input.
For “Places around the destination,” the
system searches outwards in a spiral
from the destination. In this case,
specific search values are not needed;
the matches are displayed in order of
distance from destination.
NOTE:
These settings do not affect the search
range used for the voice commands like,
“Find nearest gas station,” that are
also available wh en viewing the map
screen.Guidance Mode
Allows you to select the guidance
display mode: Single Screen or Split
Screen .
The factry default is Single Screen.
NOTE:
The Guidance Mode can also be
selected on the Icon Selection screen.
See Showing Icons on the Map on
page 65.
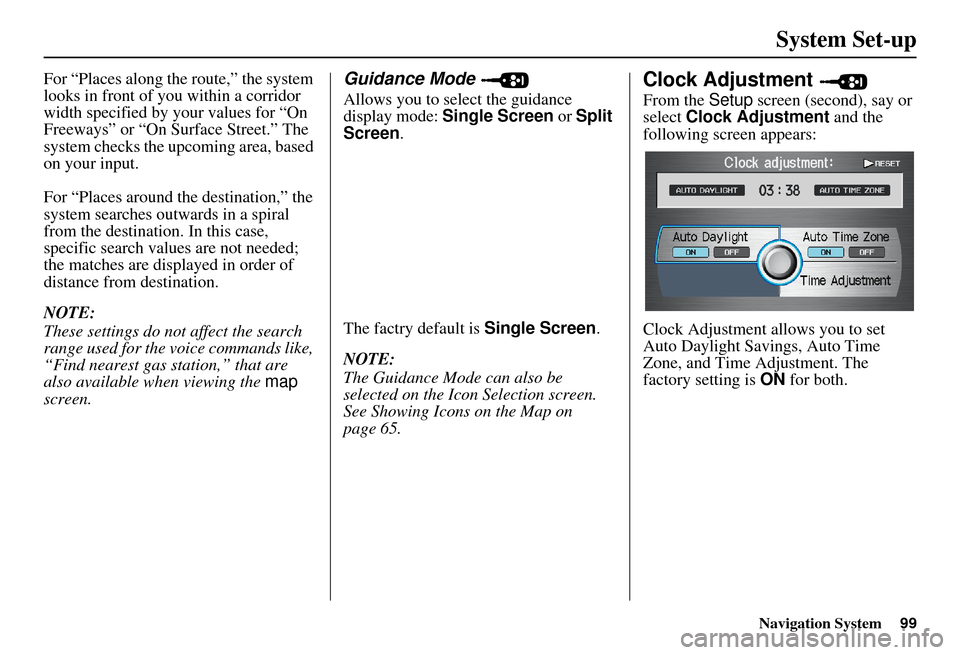
Clock Adjustment
From the Setup screen (second), say or
select Clock Adjustment and the
following screen appears:
Clock Adjustment allows you to set
Auto Daylight Savings, Auto Time
Zone, and Time Adjustment. The
factory setting is ON for both.
Page 101 of 166
100Navigation System
System Set-up
Auto Daylight
Sets automatic daylight saving time ON
or OFF . If you reside in a state or area
where daylight saving time is not used,
then you may want to turn this feature
off.
NOTE:
If you set Auto Daylight to ON, the Auto
Daylight function is activated even in an
area that does not adopt the Auto
Daylight system.
The federal government has mandated
that, starting in 2007, daylight savings
time will change in March & November
instead of the old schedule in April &
October. The new government daylight
savings time schedule is subject to
review and possible cancellation in
2008. At the time your navi DVD was
produced, the navi is programmed to
change its clock in April/October. The
dates that the navi switches between
standard and daylight savings time are
stored in the navi software, and is not
triggered by GPS satellite signals.
Therefore your navi clock will change
based on the old daylight savings time
schedule (April/October). To minimize
inconvenience caused by the new law,
we recommend the following:
1. The
Clock adjustment screen in the
Setup, set Auto Daylight to OFF.
2. When it is time to adjust the clock for daylight savings time, go to the Clock
adjustment screen in the Setup.
3. Select Time Adjustment and
simply adjust the navi time using the
Interface Dial by one hour.
Auto Time Zone
Sets automatic time zone selection by
GPS ON or OFF . If you are driving
across the country and passing through
time zones, then this feature will
automatically set the time to the time
zone you are traveling through.
However, if you live and work in two
different time zones, you may want to
turn this feature off.
NOTE:
When driving near a time zone
boundary, the displa yed time zone may
fluctuate between the two zone times.
Page 103 of 166
102Navigation System
System Set-up
Correct Vehicle Position
The system relies on satellites for
positioning information. Buildings,
tunnels, and other objects can block or
reflect these signals, requiring the
system to use “dead reckoning” to
determine your location and direction.
This can sometimes lead to small errors
in positioning, such as showing you on
an adjacent street.
NOTE:
Using this function to adjust vehicle
position is not recommended. When the
system acquires a GPS signal, it will
automatically place the vehicle in the
correct location.
If you choose to do this, follow these
steps:
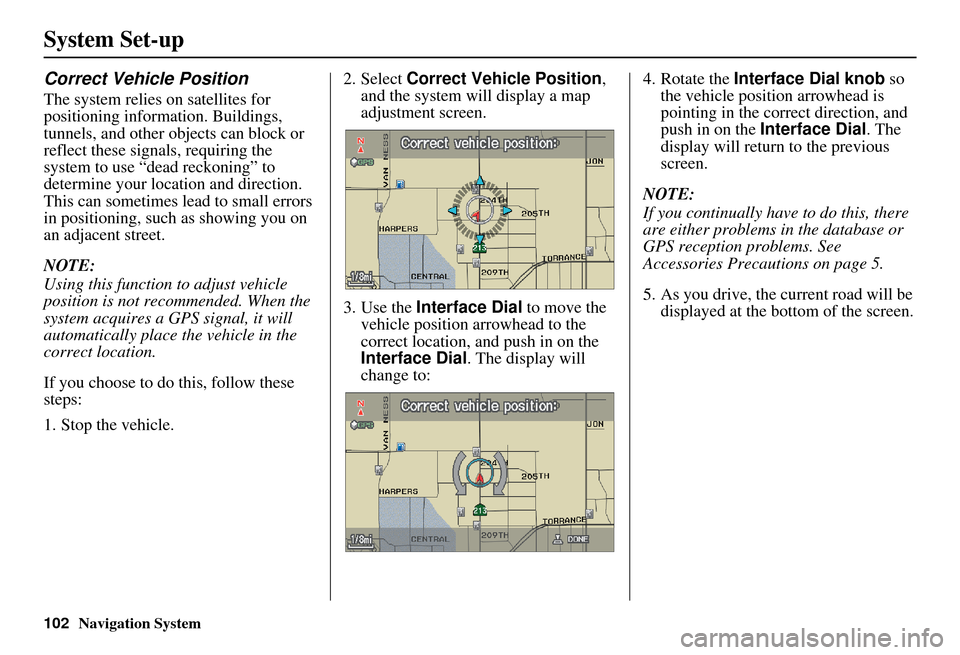
1. Stop the vehicle.2. Select
Correct Vehicle Position ,
and the system will display a map
adjustment screen.
3. Use the Interface Dial to move the
vehicle position arrowhead to the
correct location, and push in on the
Interface Dial . The display will
change to: 4. Rotate the
Interface Dial knob so
the vehicle position arrowhead is
pointing in the correct direction, and
push in on the Interface Dial . The
display will return to the previous
screen.
NOTE:
If you continually have to do this, there
are either problems in the database or
GPS reception problems. See
Accessories Precautions on page 5.
5. As you drive, the current road will be displayed at the bottom of the screen.