navigation update Acura MDX 2007 Navigation Manual
[x] Cancel search | Manufacturer: ACURA, Model Year: 2007, Model line: MDX, Model: Acura MDX 2007Pages: 166, PDF Size: 4.21 MB
Page 4 of 166
Navigation System3
Table of Contents
Switching Display Mode ................ 104
AcuraLink/Messages ................... 107
System Information ..................... 107
Rear View Camera ...................... 107
Rear View Camera Brightness
Adjustment .................................. 108
System Initialization .................109
System Initialization .................... 109
Entering the Security Code.......... 109
GPS Initialization ........................ 110
Map Matching ............................. 110
System Limitations ...................111
Database Limitations ...............113
Customer Assistance ................114
Reporting Errors .......................... 114
Acura Automobile Customer Service ...................................... 114
Visiting Your Dealer ................... 115
Obtaining a Navigation Update DVD ......................................... 116
Changing the DVD ...................... 116
PC Card ....................................... 117
Coverage Areas ........................ 118
Map Coverage..............................118
U.S. Detailed Cover age Areas ....... 118
Canada Detailed Coverage Areas . 122
Frequently Asked Questions... 128
Troubleshooting ....................... 136
Glossary .................................... 137
Glossary .......................................137
Voice Command Index ............ 140
Global Commands .......................140
Navigation General Commands...140
Navigation Display Commands ...141
Find Place Commands .................142
Climate Control Commands ........143
Temperature Voice Commands ...144
Radio Voice Commands ..............145
CD Voice Commands ..................145
DVD Voice Commands (for 6 Disc Changer) .................146
MP3/WMA Voice Commands (for 6 Disc Changer) .................146
Single CD Voice Commands (for DVD Player) ......................147 Single DVD Voice Commands
(for DVD Player) ......................148
Single MP3/WMA Voice Commands (for DVD Player) ...149
Rear Radio Voice Commands .....150
Rear CD Voice Commands (for 6 Disc Changer) .................150
Rear DVD Voice Commands (for 6 Disc Changer) .................151
Rear MP3/WMA Voice Commands
(for 6 Disc Changer) .................152
Rear Single CD Voice Commands (for DVD Player) ...152
Rear Single DVD Voice Commands (for DVD Player) ...153
Rear Single MP3/WMA Voice Commands (for DVD Player) ...154
Information Screen Voice Commands ................................155
Setup Screen (first) Commands ...155
On-Screen Commands .................156
On-Screen Spelling Assist .............. 156
Index ........................................ 160
Page 11 of 166
10Navigation System
Getting Started
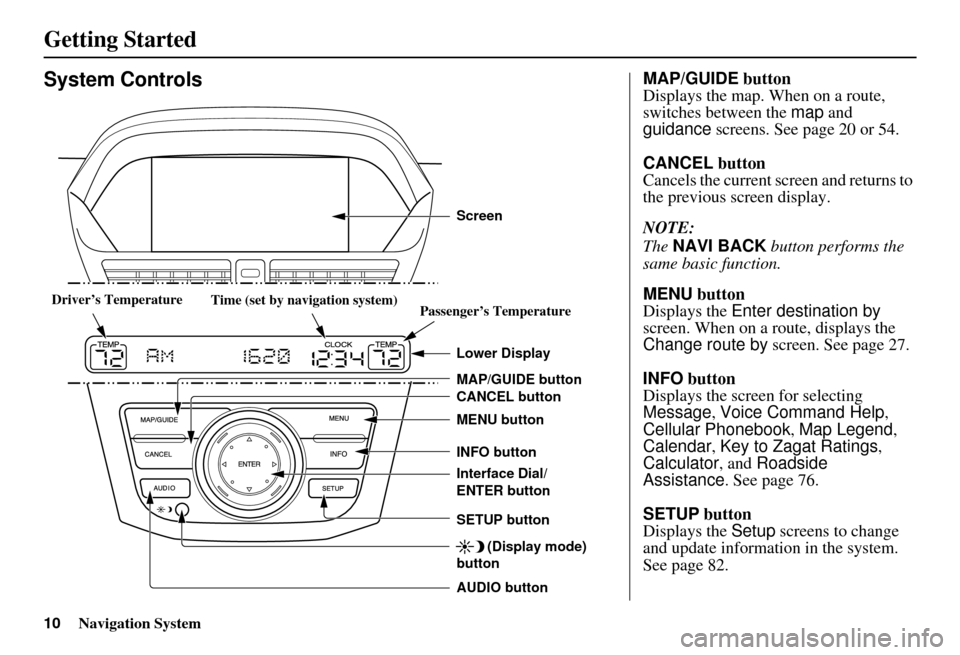
System Controls
CANCEL button
SETUP button INFO button
Interface Dial/
ENTER button MENU button
AUDIO button MAP/GUIDE button Lower Display Screen
(Display mode)
button
Passenger’s Temperature
Driver’s Temperature
Time (set by navigation system)
MAP/GUIDE button
Displays the map. When on a route,
switches between the map and
guidance screens. See page 20 or 54.
CANCEL button
Cancels the current screen and returns to
the previous screen display.
NOTE:
The NAVI BACK button performs the
same basic function.
MENU button
Displays the Enter destination by
screen. When on a route, displays the
Change route by screen. See page 27.
INFO button
Displays the screen for selecting
Message , Voice Command Help ,
Cellular Phonebook , Map Legend,
Calendar , Key to Zagat Ratings ,
Calculator , and Roadside
Assistance. See page 76.
SETUP button
Displays the Setup screens to change
and update information in the system.
See page 82.
Page 22 of 166
Navigation System21
Getting Started
Map Screen Description
Zoom In/Out
Rotate the Interface Dial knob to
change the map scale. Zooming in
increases the detail, while zooming out
gives you a wide area view. After
changing the scale, give the system a
few moments to update the display.
Map Scrolling
To view other map areas, move the
Interface Dial left, right, up, or down.
The map will shift in that direction. To
return the map to your current location,
press either the MAP/GUIDE, the
CANCEL , or the NAVI BACK button.
The display automatically changes to
the map screen when you reach your
destination. Press the MENU button to
return to the Enter destination by
screen.
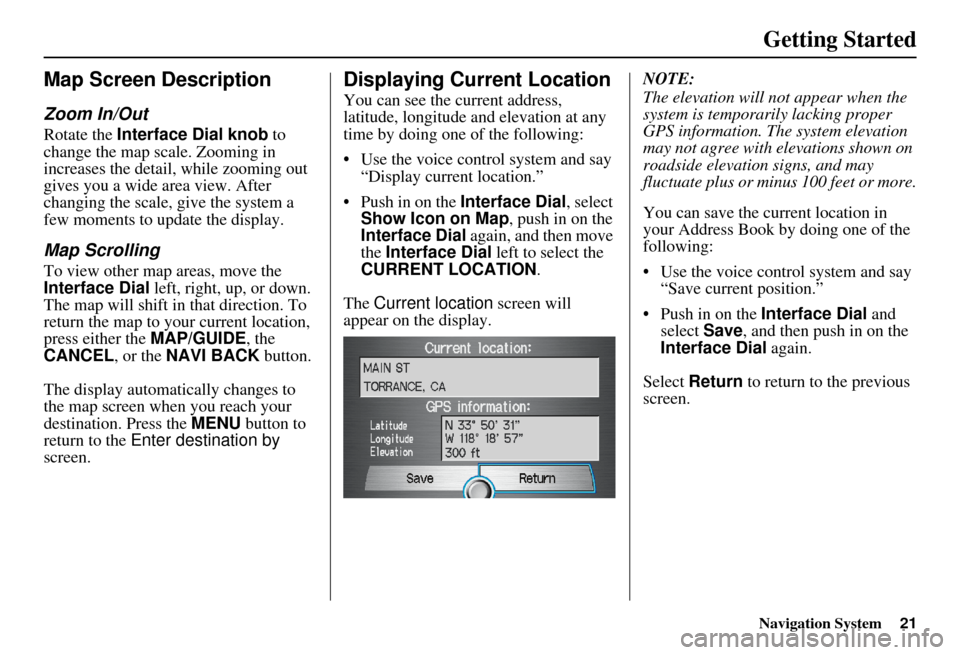
Displaying Current Location
You can see the current address,
latitude, longitude and elevation at any
time by doing one of the following:
Use the voice control system and say “Display current location.”
Push in on the Interface Dial, select
Show Icon on Map , push in on the
Interface Dial again, and then move
the Interface Dial left to select the
CURRENT LOCATION .
The Current location screen will
appear on the display. NOTE:
The elevation will not appear when the
system is temporarily lacking proper
GPS information. Th
e system elevation
may not agree with elevations shown on
roadside elevation signs, and may
fluctuate plus or minus 100 feet or more.
You can save the current location in
your Address Book by doing one of the
following:
Use the voice control system and say “Save current position.”
Push in on the Interface Dial and
select Save, and then push in on the
Interface Dial again.
Select Return to return to the previous
screen.
Page 23 of 166
22Navigation System
Getting Started
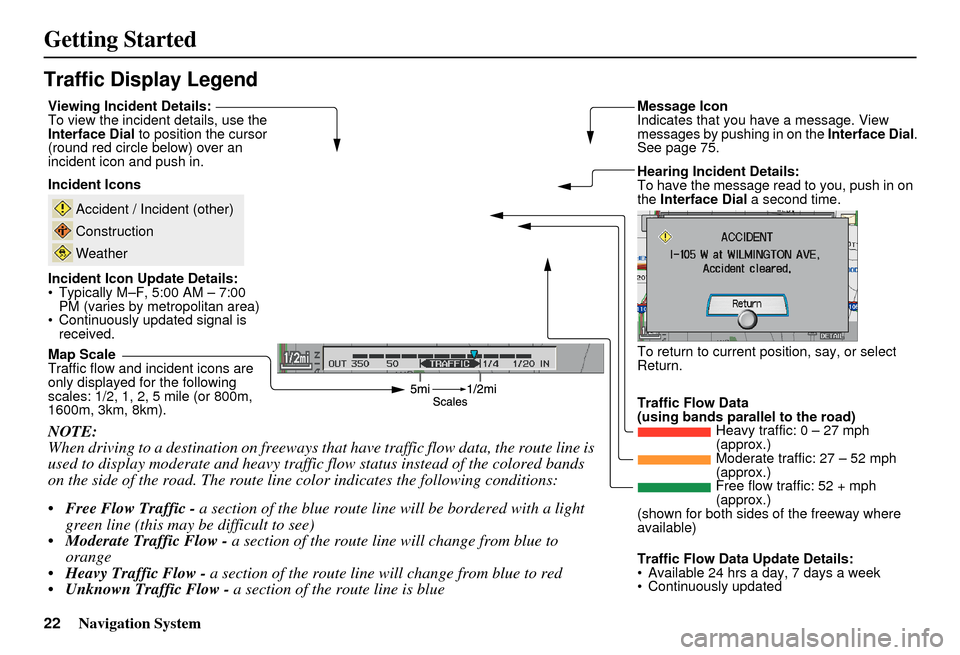
Traffic Display Legend
NOTE:
When driving to a destination on freeways that have traffic flow data, the route line is
used to display moderate and heavy traffic flow status instead of the colored bands
on the side of the road. The route line color indicates the following conditions:
Free Flow Traffic - a section of the blue route line will be bordered with a light
green line (this may be difficult to see)
Moderate Traffic Flow - a section of the route line will change from blue to
orange
Heavy Traffic Flow - a section of the route line will change from blue to red
Unknown Traffic Flow - a section of the route line is blue
Map Scale
Traffic flow and incident icons are
only displayed for the following
scales: 1/2, 1, 2, 5 mile (or 800m,
1600m, 3km, 8km). Incident Icons
Incident Icon Update Details:
Typically M–F, 5:00 AM – 7:00 PM (varies by metropolitan area)
Continuously updated signal is received.
Accident / Incident (other)
Construction
Weather
Traffic Flow Data
(using bands parallel to the road) Heavy traffic: 0 – 27 mph
(approx.)
Moderate traffic: 27 – 52 mph
(approx.)
Free flow traffic: 52 + mph
(approx.)
(shown for both sides of the freeway where
available)
Viewing Incident Details:
To view the incident
details, use the
Interface Dial to position the cursor
(round red circle below) over an
incident icon and push in. Hearing Incident Details:
To have the message read to you, push in on
the Interface Dial a second time.
To return to current position, say, or select
Return. Message Icon
Indicates that you have a message. View
messages by pushing in on the Interface Dial.
See page 75.
Traffic Flow Data Update Details:
Available 24 hrs a day, 7 days a week
Continuously updated
Page 26 of 166
Navigation System25
Getting Started
Listing Traffic Incidents by Voice
Control
From the map screen (any scale), say
“Display traffic incidents,” or “Display
traffic list.” A list of all incidents within
the metro traffic area will be displayed.
Incidents are listed by distance from
your current position outward in all
directions. To view an incident details,
select an incident from the list, and push
in on the Interface Dial .
Listing Traffic Incidents from the
“Map Menu”
Select Traffic Incidents from the Map
menu . A list of all incidents within the
metro traffic area will be displayed. See
Map Menu on page 56.
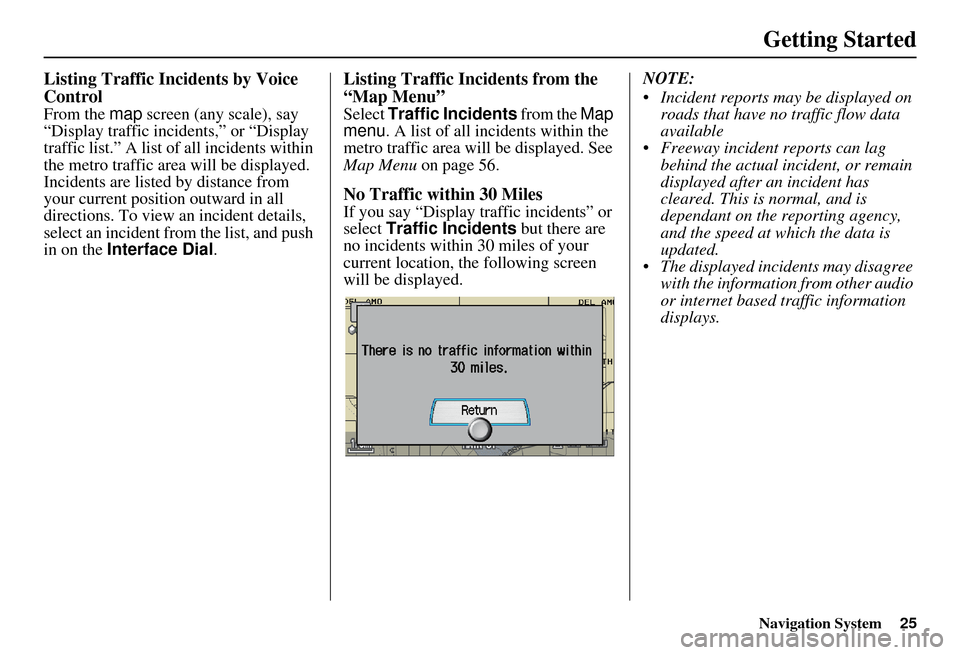
No Traffic within 30 Miles
If you say “Display traffic incidents” or
select Traffic Incidents but there are
no incidents within 30 miles of your
current location, the following screen
will be displayed. NOTE:
Incident reports may be displayed on
roads that have no traffic flow data
available
Freeway incident reports can lag behind the actual incident, or remain
displayed after an incident has
cleared. This is normal, and is
dependant on the reporting agency,
and the speed at which the data is
updated.
The displayed incidents may disagree with the information from other audio
or internet based traffic information
displays.
Page 61 of 166
60Navigation System
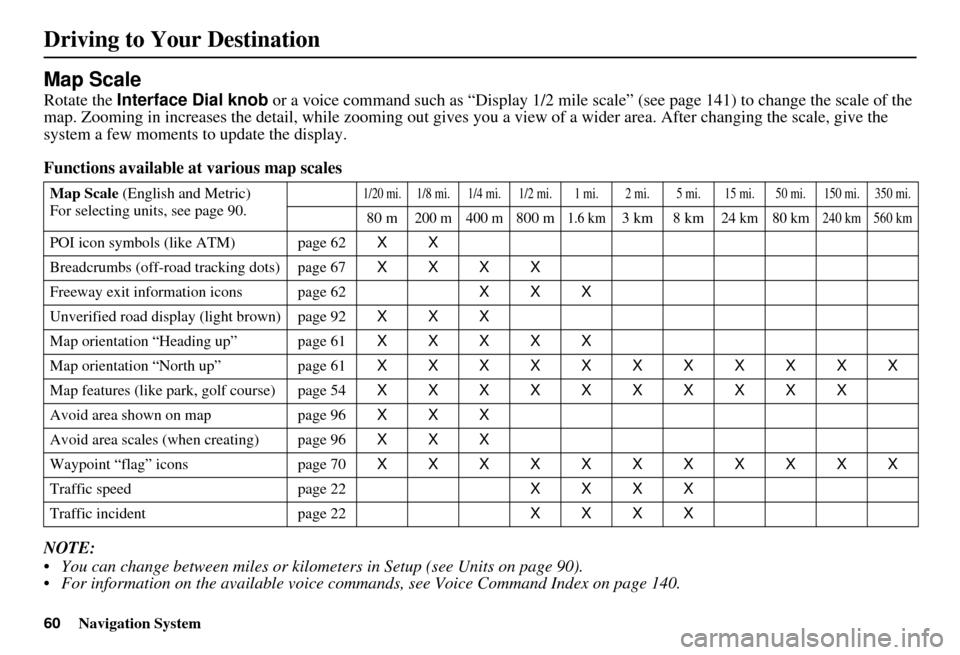
Map Scale
Rotate the Interface Dial knob or a voice command such as “Display 1/2 mile scale” (see page 141) to change the scale of the
map. Zooming in increases the detail, whil e zooming out gives you a view of a wider area. After changing the scale, give the
system a few moments to update the display.
Functions available at various map scales
NOTE:
You can change between miles or kilometers in Setup (see Units on page 90).
For information on the available voice commands, see Voice Command Index on page 140.
Map Scale (English and Metric)
For selecting uni ts, see page 90.1/20 mi.1/8 mi. 1/4 mi. 1/2 mi. 1 mi. 2 mi. 5 mi. 15 mi. 50 mi. 150 mi. 350 mi.
80 m200 m 400 m800 m1.6 km3km 8km24 km 80 km240 km 560 km
POI icon symbols (like ATM) page 62 XX
Breadcrumbs (off-road tracking dots) page 67 XXXX
Freeway exit info rmation icons page 62 XXX
Unverified road displa y (light brown) page 92 XXX
Map orientation “Heading up” page 61 XXXXX
Map orientation “North up” page 61 XXXXXXXXXXX
Map features (like pa rk, golf course) page 54 XXXXXXXXXX
Avoid area shown on map page 96 XXX
Avoid area scales (when creating) page 96 XXX
Waypoint “flag” icons page 70 XXXXXXXXXXX
Traffic speed page 22 XXXX
Traffic incident page 22 XXXX
Driving to Your Destination
Page 83 of 166
82Navigation System
System Set-up
Setup Mode
The Setup function consists of two main
screens, that allows you to change and
update information in the system. To
display the Setup screens, use the voice
control system and say “Setup” or press
the SETUP button, and then select an
item, or say or select MORE in the
upper right corner of the screen.
On any of the Setup screens, you can
use the voice control system to select
any item on the screen. NOTE:
If some items appear to be grayed
out, and cannot be selected, it is
because you did not select OK on the
initial Disclaimer screen. See System
Start-up on page 17.
Setup items in this manual with the symbol indicate that the
display settings depend on what
“Driver #” was displayed on the MID
when the vehicle was started. See
Remote Keyless Entry Setting on
page 18.
If only “Welcome” is displayed, then all Setup settings revert to factory
defaults, and all personal data (such
as Address Book or Calendar) are not
available.
For information on the available voice commands, see Voice
Command Index on page 155.
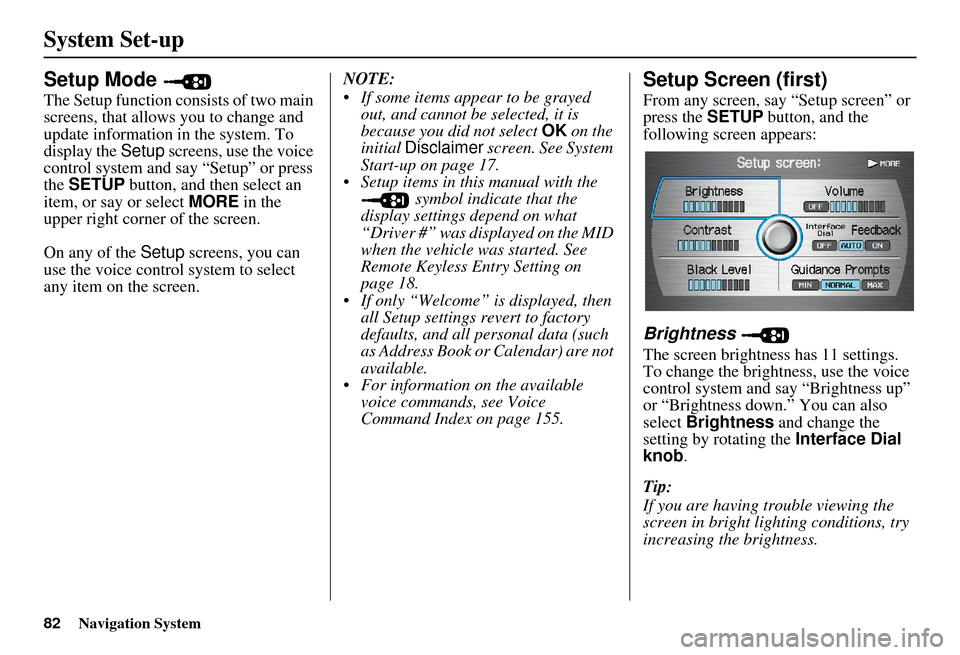
Setup Screen (first)
From any screen, say “Setup screen” or
press the SETUP button, and the
following screen appears:
Brightness
The screen brightness has 11 settings.
To change the brightness, use the voice
control system and say “Brightness up”
or “Brightness down.” You can also
select Brightness and change the
setting by rotating the Interface Dial
knob .
Tip:
If you are having trouble viewing the
screen in bright lighting conditions, try
increasing the brightness.
Page 108 of 166
Navigation System107
System Set-up
AcuraLink/Messages
For complete details on setting up your
AcuraLink messaging, refer to the
AcuraLink section in your Owner’s
manual. Or, you can go to the Owner
Link section on the MDX page in
www.acura.com.
System Information
From the Setup screen (second), say or
select System Information and the
following screen appears:
Displays the information on the
navigation system software. This
information is for dealer use only. For
ordering updates, use the version
number stamped on the label (as Ver.
X.XX) of the navigation DVD. See
Obtaining a Navigation Update DVD on
page 116.
When finished, say or select Return to
return to the previous screen.
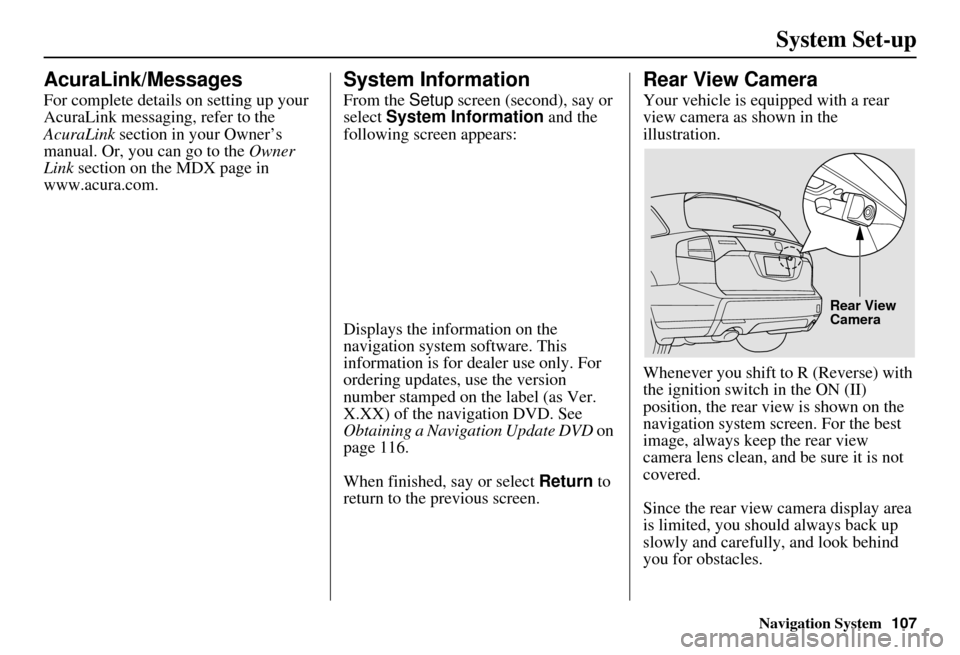
Rear View Camera
Your vehicle is equipped with a rear
view camera as shown in the
illustration.
Whenever you shift to R (Reverse) with
the ignition switch in the ON (II)
position, the rear view is shown on the
navigation system screen. For the best
image, always keep the rear view
camera lens clean, and be sure it is not
covered.
Since the rear view camera display area
is limited, you should always back up
slowly and carefully, and look behind
you for obstacles.
Rear View
Camera
Page 114 of 166
Navigation System113
Database Limitations
You will find that some points of
interest (POI) may be missing when you
search the database. This can be caused
if at the time the database was gathered,
the name was misspelled, the place was
improperly categorized, or the POI
change is not yet in the database. This
means you may not find places listed
that you know exist. This is also true for
police agencies and hospitals. In
outlying areas, facilities listed may not
be the closest. Always check with local
information sources if you need law
enforcement or hospital services.
Every effort has been made to verify
that the system’s database was accurate
at the time it was created. However,
businesses do fail or move to new
locations, and new businesses start in
the old locations. For this reason, you
may occasionally find “inaccurate”
information when you select and drive
to a point of interest (for example, a
restaurant is now a jewelry store). The
number of these inaccuracies increases
the longer you go without an update. The digitized map database reflects
conditions as they existed at various
points in time before production.
Accordingly, your
DVD may contain
inaccurate or inco mplete data or
information due to the passage of time,
road construction, ch anging conditions,
or other causes.
In addition, this database does not
include, analyze, pr ocess, consider, or
reflect any of the following categories
of information:
Neighborhood quality or safety
Population density
Availability or proximity of law enforcement
Emergency, rescue, medical, or other assistance
Construction work, zones, or hazards
Road and lane closures
Legal restrictions (such as vehicular type, weight, load, height, and speed
restrictions)
Road slope or grade Bridge height, width, weight, or other
limits
Road, traffic or traffic facilities safety, or conditions
Weather conditions
Special events
Pavement characteristics or conditions
Traffic congestion
Travel time
We assume no liability for any incident
that may result from an error in the
program, or from changed conditions
not noted above.
Copyrights
infoUSA-Data: Certain business data provided by infoUS A, Inc., Omaha,
Nebraska, Copyright © 2003, All
Rights Reserved.
EXIT-Data: © ZENRIN CO., LTD. 2003. All Rights Reserved.
ZAGAT SURVEY: Copyright © [2003] Zagat Survey, LLC. All rights
reserved.
Page 115 of 166
114Navigation System
Customer Assistance
Reporting Errors
Occasionally, you may encounter
database errors.
If the error pertains to freeways and main “verified” roads shown in black
on the map, then report it either
online at
http://update.navteq.com/, or to
Acura Customer Services.
If the error involves a light brown “unverified” road, then do not report
it. These areas have not been verified,
and are provided for reference only
(see Map Overview on page 6).
For errors in points of interest (POI), like a business that has changed their
name, do not report them. Keep in
mind that depending on when the data
was collected, and when your DVD
was purchased, the database can be
out of date. The business may have
not reported the change(s), or not be
in the database at all. Update
Navigation DVDs are available for
purchase, usually in the fall of each
year. If the error does not involve the
database, such as if the vehicle
position icon does not follow the
road, screen error messages, or other
GPS related errors, see Frequently
Asked Questions on page 128, System
Limitations on page 111 , or
Troubleshooting on page 136.
Acura Automobile Customer
Service
Telephone: (800) 382-2238
Fax: (310) 783-3535
Acura Navi
America Honda Motor Co., Inc.
Acura Client Services
MS 500-2N-7E
1919 Torrance Blvd.
Torrance, CA 90501-2746
If you desire more detailed information
on detailed map coverage, contact any
Acura dealer. Map coverage
information is at the Navigation DVD
order link, “ordering a Navigation
DVD” at: www.acura.com. The link is
found in “ACURA STORE.” Check the
“Coverage MAPS” link.