turn signal Acura MDX 2007 Navigation Manual
[x] Cancel search | Manufacturer: ACURA, Model Year: 2007, Model line: MDX, Model: Acura MDX 2007Pages: 166, PDF Size: 4.21 MB
Page 6 of 166
Navigation System5
Introduction
The navigation system is easy to use.
The locations of many places of
business and entertainment are already
entered in the system. You can select
any of them as a destination by using the
Interface Dial or voice control.
There are several ways to enter a
destination, such as by point of interest
(POI), by address, by phone number,
and by selecting it from the map. The
last 50 destinations are saved for reuse
at a later date. The system also allows
you to store a home address to simplify
returning home from your destination.Accessories Precautions
If you have front window tinting
installed, be aware that if the tint has
metallic properties, it can seriously
degrade or prevent GPS reception. This
is because the GPS antenna is located
under the dashboard.
If you plan to install electronic
components such as radar detectors,
vehicle location devices, remote
starters, additional amplifiers, or other
audio components, ensure that they are
not located near the navigation control
unit under the driver’s seat, near the
navigation display in the dash, or near
the GPS antenna under the dashboard.
Signal noise emanating from these
devices can cause intermittent
disruption of the navigation system.
Important Safety Information
The navigation system can distract your
attention from the road if you focus on
the screen or operate the system’s
controls while driving.
Enter as much information as possible
into the system before you begin
driving, or when the vehicle is stopped.
Then, as you drive, listen to the audio
instructions and use voice commands
when possible.
Page 23 of 166
22Navigation System
Getting Started
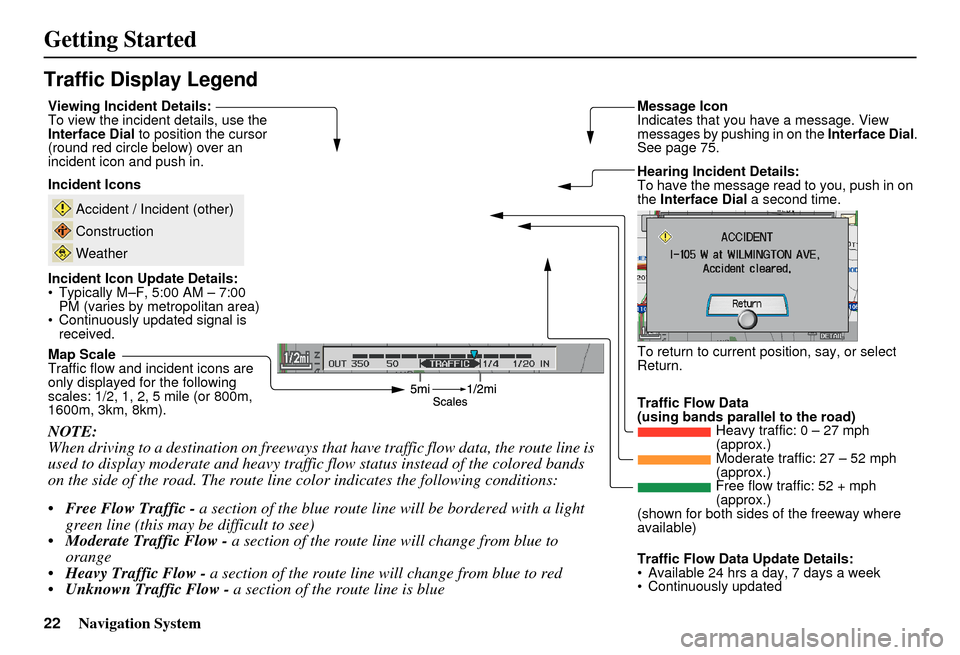
Traffic Display Legend
NOTE:
When driving to a destination on freeways that have traffic flow data, the route line is
used to display moderate and heavy traffic flow status instead of the colored bands
on the side of the road. The route line color indicates the following conditions:
Free Flow Traffic - a section of the blue route line will be bordered with a light
green line (this may be difficult to see)
Moderate Traffic Flow - a section of the route line will change from blue to
orange
Heavy Traffic Flow - a section of the route line will change from blue to red
Unknown Traffic Flow - a section of the route line is blue
Map Scale
Traffic flow and incident icons are
only displayed for the following
scales: 1/2, 1, 2, 5 mile (or 800m,
1600m, 3km, 8km). Incident Icons
Incident Icon Update Details:
Typically M–F, 5:00 AM – 7:00 PM (varies by metropolitan area)
Continuously updated signal is received.
Accident / Incident (other)
Construction
Weather
Traffic Flow Data
(using bands parallel to the road) Heavy traffic: 0 – 27 mph
(approx.)
Moderate traffic: 27 – 52 mph
(approx.)
Free flow traffic: 52 + mph
(approx.)
(shown for both sides of the freeway where
available)
Viewing Incident Details:
To view the incident
details, use the
Interface Dial to position the cursor
(round red circle below) over an
incident icon and push in. Hearing Incident Details:
To have the message read to you, push in on
the Interface Dial a second time.
To return to current position, say, or select
Return. Message Icon
Indicates that you have a message. View
messages by pushing in on the Interface Dial.
See page 75.
Traffic Flow Data Update Details:
Available 24 hrs a day, 7 days a week
Continuously updated
Page 96 of 166
Navigation System95
System Set-up
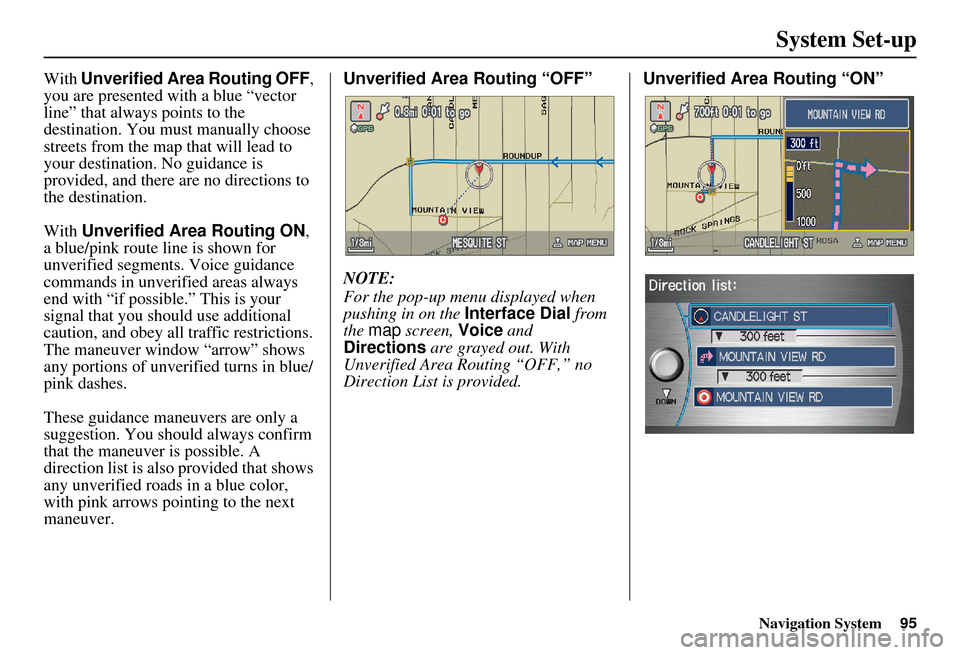
With Unverified Area Routing OFF ,
you are presented with a blue “vector
line” that always points to the
destination. You must manually choose
streets from the map that will lead to
your destination. No guidance is
provided, and there are no directions to
the destination.
With Unverified Area Routing ON ,
a blue/pink route line is shown for
unverified segments. Voice guidance
commands in unverified areas always
end with “if possible.” This is your
signal that you should use additional
caution, and obey all traffic restrictions.
The maneuver window “arrow” shows
any portions of unverified turns in blue/
pink dashes.
These guidance maneuvers are only a
suggestion. You should always confirm
that the maneuver is possible. A
direction list is also provided that shows
any unverified roads in a blue color,
with pink arrows pointing to the next
maneuver. Unverified Area Routing “OFF”
NOTE:
For the pop-up menu displayed when
pushing in on the
Interface Dial from
the map screen, Voice and
Directions are grayed out. With
Unverified Area Routing “OFF,” no
Direction List is provided. Unverified Area
Routing “ON”
Page 101 of 166
100Navigation System
System Set-up
Auto Daylight
Sets automatic daylight saving time ON
or OFF . If you reside in a state or area
where daylight saving time is not used,
then you may want to turn this feature
off.
NOTE:
If you set Auto Daylight to ON, the Auto
Daylight function is activated even in an
area that does not adopt the Auto
Daylight system.
The federal government has mandated
that, starting in 2007, daylight savings
time will change in March & November
instead of the old schedule in April &
October. The new government daylight
savings time schedule is subject to
review and possible cancellation in
2008. At the time your navi DVD was
produced, the navi is programmed to
change its clock in April/October. The
dates that the navi switches between
standard and daylight savings time are
stored in the navi software, and is not
triggered by GPS satellite signals.
Therefore your navi clock will change
based on the old daylight savings time
schedule (April/October). To minimize
inconvenience caused by the new law,
we recommend the following:
1. The
Clock adjustment screen in the
Setup, set Auto Daylight to OFF.
2. When it is time to adjust the clock for daylight savings time, go to the Clock
adjustment screen in the Setup.
3. Select Time Adjustment and
simply adjust the navi time using the
Interface Dial by one hour.
Auto Time Zone
Sets automatic time zone selection by
GPS ON or OFF . If you are driving
across the country and passing through
time zones, then this feature will
automatically set the time to the time
zone you are traveling through.
However, if you live and work in two
different time zones, you may want to
turn this feature off.
NOTE:
When driving near a time zone
boundary, the displa yed time zone may
fluctuate between the two zone times.
Page 103 of 166
102Navigation System
System Set-up
Correct Vehicle Position
The system relies on satellites for
positioning information. Buildings,
tunnels, and other objects can block or
reflect these signals, requiring the
system to use “dead reckoning” to
determine your location and direction.
This can sometimes lead to small errors
in positioning, such as showing you on
an adjacent street.
NOTE:
Using this function to adjust vehicle
position is not recommended. When the
system acquires a GPS signal, it will
automatically place the vehicle in the
correct location.
If you choose to do this, follow these
steps:
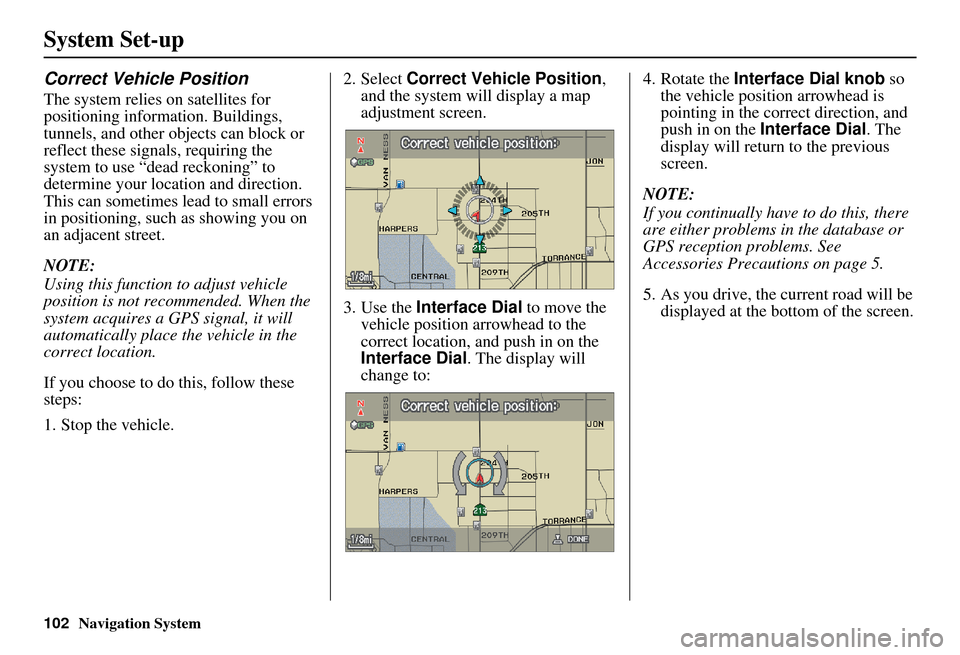
1. Stop the vehicle.2. Select
Correct Vehicle Position ,
and the system will display a map
adjustment screen.
3. Use the Interface Dial to move the
vehicle position arrowhead to the
correct location, and push in on the
Interface Dial . The display will
change to: 4. Rotate the
Interface Dial knob so
the vehicle position arrowhead is
pointing in the correct direction, and
push in on the Interface Dial . The
display will return to the previous
screen.
NOTE:
If you continually have to do this, there
are either problems in the database or
GPS reception problems. See
Accessories Precautions on page 5.
5. As you drive, the current road will be displayed at the bottom of the screen.
Page 111 of 166
110Navigation System
System Initialization
GPS Initialization
Depending on the length of time the
battery was disconnected, your system
may require GPS initialization. If it
does, the following screen appears:
If this procedure is not necessary, the
system proceeds directly to the
Disclaimer screen (see page 17).
During initialization, the system
searches for all available GPS satellites,
and obtains their orbital information.
During this procedure the vehicle
should be out in th e open with a clear
view of the sky. If the navigation system finds the
satellites properly, this box clears, and
changes to the
Disclaimer screen. If
within ten minutes the system fails to
locate a sufficient number of satellites to
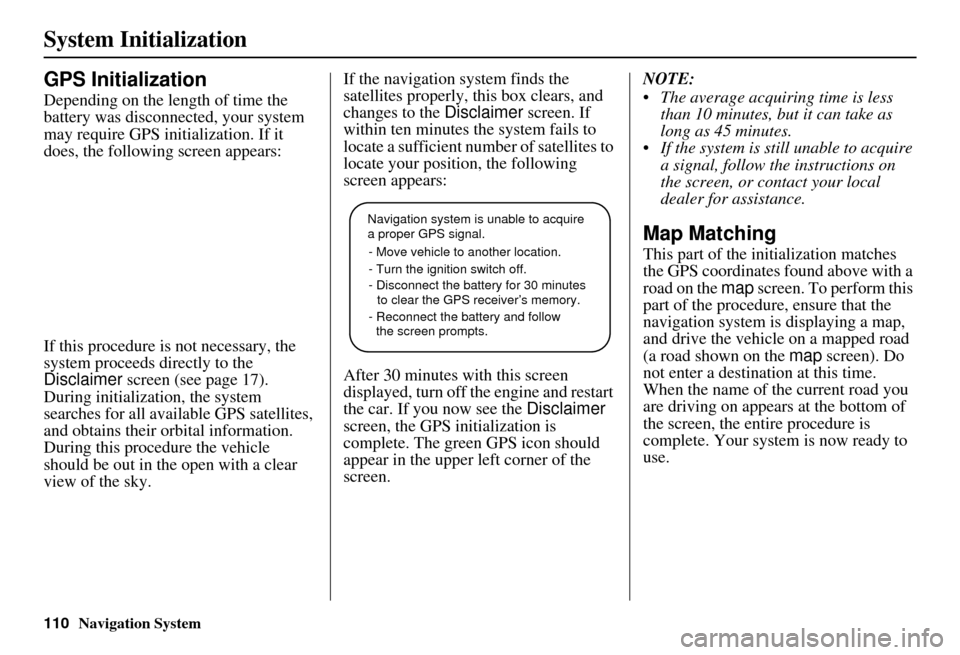
locate your position, the following
screen appears:
After 30 minutes with this screen
displayed, turn off the engine and restart
the car. If you now see the Disclaimer
screen, the GPS initialization is
complete. The green GPS icon should
appear in the upper left corner of the
screen. NOTE:
The average acquiring time is less
than 10 minutes, but it can take as
long as 45 minutes.
If the system is still unable to acquire a signal, follow the instructions on
the screen, or contact your local
dealer for assistance.
Map Matching
This part of the initialization matches
the GPS coordinates found above with a
road on the map screen. To perform this
part of the procedure, ensure that the
navigation system is displaying a map,
and drive the vehicle on a mapped road
(a road shown on the map screen). Do
not enter a destina tion at this time.
When the name of the current road you
are driving on appears at the bottom of
the screen, the entire procedure is
complete. Your system is now ready to
use.
Navigation system is unable to acquire
a proper GPS signal.
- Move vehicle to another location.
- Turn the ignition switch off.
- Disconnect the battery for 30 minutes
to clear the GPS receiver’s memory.
- Reconnect the battery and follow
the screen prompts.
Page 132 of 166
Navigation System131
Frequently Asked Questions
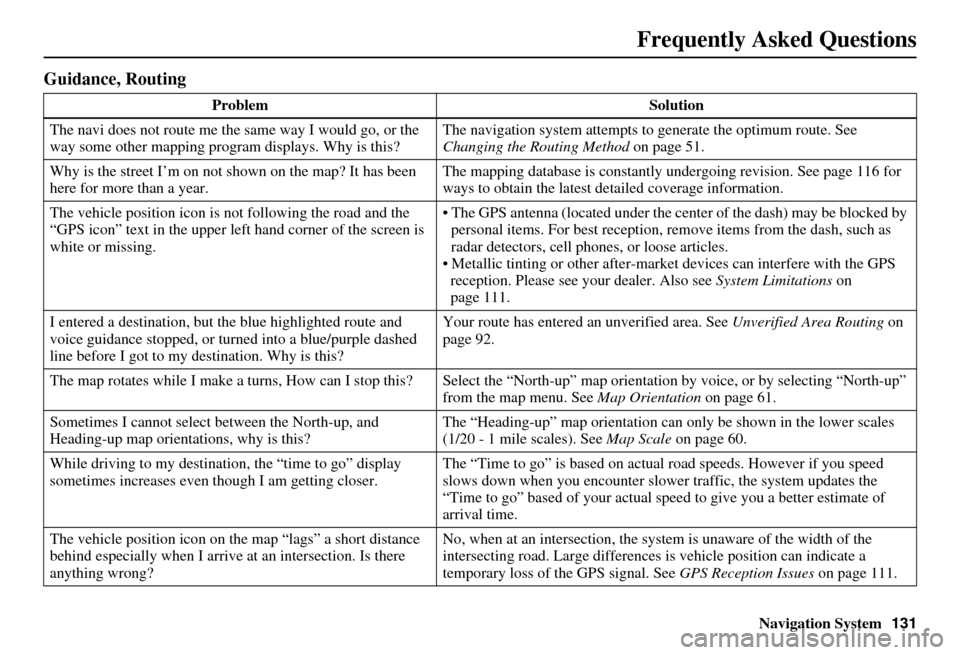
Guidance, Routing
Problem Solution
The navi does not route me the same way I would go, or the
way some other mapping progr am displays. Why is this? The navigation system attempts to
generate the optimum route. See
Changing the Routing Method on page 51.
Why is the street I’m on not shown on the map? It has been
here for more than a year. The mapping database is
constantly undergoing revision. See page 116 for
ways to obtain the latest de tailed coverage information.
The vehicle position icon is not following the road and the
“GPS icon” text in the upper left hand corner of the screen is
white or missing. The GPS antenna (located under the center of the dash) may be blocked by
personal items. For best reception, remove items from the dash, such as
radar detectors, cell phone s, or loose articles.
Metallic tinting or other after-marke t devices can interfere with the GPS
reception. Please see your dealer. Also see System Limitations on
page 111.
I entered a destination, but th e blue highlighted route and
voice guidance stopped, or turned into a blue/purple dashed
line before I got to my destination. Why is this? Your route has entered
an unverified area. See Unverified Area Routing on
page 92.
The map rotates while I make a turns, How can I stop this? Select the “North-up” map orientation by voice, or by selecting “North-up”
from the map menu. See Map Orientation on page 61.
Sometimes I cannot select between the North-up, and
Heading-up map orientations, why is this? The “Heading-up” map orientation can
only be shown in the lower scales
(1/20 - 1 mile scales). See Map Scale on page 60.
While driving to my destinati on, the “time to go” display
sometimes increases even though I am getting closer. The “Time to go” is based on actual
road speeds. However if you speed
slows down when you encounter slower traffic, the system updates the
“Time to go” based of your actual spee d to give you a better estimate of
arrival time.
The vehicle position icon on the map “lags” a short distance
behind especially when I arrive at an intersection. Is there
anything wrong? No, when at an intersection, the syst
em is unaware of the width of the
intersecting road. Large differences is vehicle position can indicate a
temporary loss of the GPS signal. See GPS Reception Issues on page 111.
Page 137 of 166
136Navigation System
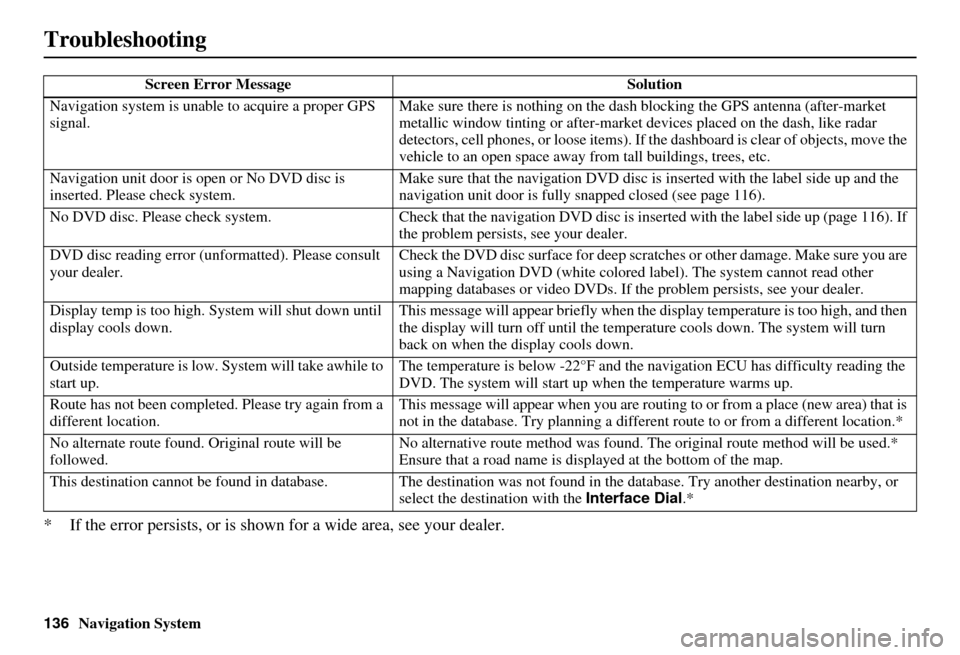
Troubleshooting
* If the error persists, or is shown for a wide area, see your dealer.
Screen Error MessageSolution
Navigation system is unabl e to acquire a proper GPS
signal. Make sure there is nothing on the dash
blocking the GPS antenna (after-market
metallic window tinting or after-market devices placed on the dash, like radar
detectors, cell phones, or loos e items). If the dashboard is clear of objects, move the
vehicle to an open space away from tall buildings, trees, etc.
Navigation unit door is ope n or No DVD disc is
inserted. Please check system. Make sure that the navigati
on DVD disc is inserted with the label side up and the
navigation unit door is fully snapped closed (see page 116).
No DVD disc. Please check syst em.Check that the navigation DVD disc is inserted with the label side up (page 116). If
the problem persists, see your dealer.
DVD disc reading error (unf ormatted). Please consult
your dealer. Check the DVD disc surface for deep scratches or other damage. Make sure you are
using a Navigation DVD (white colored la
bel). The system cannot read other
mapping databases or video DVDs. If the problem persists, see your dealer.
Display temp is too high. Sy stem will shut down until
display cools down. This message will appear briefly when the
display temperature is too high, and then
the display will turn off until the temper ature cools down. The system will turn
back on when the display cools down.
Outside temperature is low. System will take awhile to
start up. The temperature is below -22°F and the navigation ECU has difficulty reading the
DVD. The system will start up
when the temperature warms up.
Route has not been completed. Please try again from a
different location. This message will appear when you are routi
ng to or from a place (new area) that is
not in the database. Try planning a different route to or from a different location.*
No alternate route found. Original route will be
followed. No alternative route method was found. The
original route method will be used.*
Ensure that a road name is displayed at the bottom of the map.
This destination cannot be found in database. The destination was not found in the data base. Try another destination nearby, or
select the destination with the Interface Dial.*
Page 138 of 166
Navigation System137
Glossary
Glossary
The following is a glossary of terms
pertaining to the voice recognition
navigation system.
Average Fuel - The average fuel
economy value as displayed by the
Trip computer screen.
Avoid Area - Areas you wish to avoid
can be entered into the system, and
will be avoided while routing.
Breadcrumbs - Off road tracking dots
that can be followe d on the map to
retrace your route back to a mapped
(digitized) road. This function can be
turned on/off in Setup screen
(second).
Database - This consists of the map
data, and the POI (Points Of Interest)
data stored on the DVD.
DCA - Detailed Coverage Area. The
main metropolitan areas in the lower
48 states, and southern Canada are
mapped to this level. See page 118
for a list of these areas. Digitized Road -
A road that appears on
the navigation screen. The road name
will appear at the bottom of the
navigation screen. If the user drives
“off road,” the navigation system will
display “breadcrumbs,” depending on
how far you drive from a mapped
road.
Disclaimer Screen - Screen containing
cautionary information. It is meant to
be read carefully and acknowledged
by the customer when using the
navigation system.
DVD or DVD-ROM - Digital Versatile
Disc. The navigation program and
database resides on this disc. For
information on how to order a
replacement or update DVD, see
page 116.
Elapsed Time - Elapsed Time for the
current trip as displayed by the Trip
computer screen. FAQ -
Frequently Asked Questions. See
page 128 for a list of the customer
FAQs, and troubleshooting
information.
GPS - Global Positioning System. A
network of 24 satellites in orbit
around the earth. The navigation
system can simultaneously receive
signals from up to 12 satellites to
accurately position the vehicle on the
map.
GPS Antenna - Located in the center of
the dash. Electronic items operating
in this general location can interfere
with the GPS signal.
HFL - HandsFreeLink. Your vehicle is
equipped with this feature, which
uses Bluetooth technology as a
wireless link between the vehicle and
your Bluetooth compatible cell
phone.
Icon - Symbol representing Points of
Interest (POI) that can be displayed
on the map.
Page 140 of 166
Navigation System139
Glossary
Unverified Streets - These streets have
not been verified for turn restrictions,
one-way, etc. They are shown in light
brown on the map. Unverified streets
may be missing from the map, shown
in the wrong location, or have an
incorrect name or address range.
Vehicle Speed Sensor - Provides speed
signal to the navigation system for
moving the VP icon on the map.
Verified Streets - These streets consist
of the detailed metropolitan coverage
areas, and all other inter-town
connection roads. These roads are
shown in black on the map.
Voice Control - See VR.
VP - Vehicle Position. When in map
mode, this circular icon shows the
vehicle position on the map. Push in
on the Interface Dial , select Show
Icon on Map , move the Interface
Dial left to select Current
Position . It shows the latitude,
longitude, and elevation of your
current position. VR -
Voice Recognition. This allows
voice control of many of the
navigation functions. The hardware
consists of the microphone, voice
control switch ( NAVI TALK/NAVI
BACK buttons), and the front
speakers.
Waypoint - A temporary destination
you may enter with on route (e.g., a
gas station, ATM, etc.). See page 71.
Yaw Rate Sensor - Senses when the
vehicle makes a turn, which makes
the VP change direction on the map
as you turn.
Zagat Ratings - Restaurant ratings information prov ided by Zagat
Survey. See Information screen on
page 76 for an explanation of the
ratings.