dashboard Acura MDX 2011 User Guide
[x] Cancel search | Manufacturer: ACURA, Model Year: 2011, Model line: MDX, Model: Acura MDX 2011Pages: 609, PDF Size: 12.7 MB
Page 134 of 609
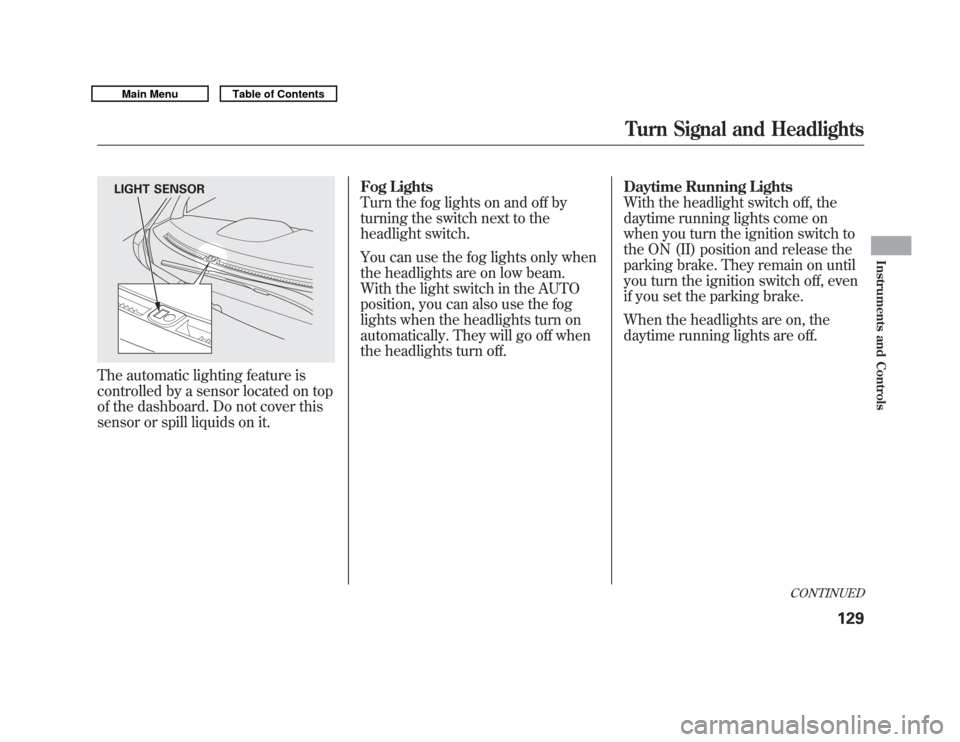
The automatic lighting feature is
controlled by a sensor located on top
of the dashboard. Do not cover this
sensor or spill liquids on it.Fog Lights
Turn the fog lights on and off by
turning the switch next to the
headlight switch.
You can use the fog lights only when
the headlights are on low beam.
With the light switch in the AUTO
position, you can also use the fog
lights when the headlights turn on
automatically. They will go off when
the headlights turn off.
Daytime Running Lights
With the headlight switch off, the
daytime running lights come on
when you turn the ignition switch to
the ON (II) position and release the
parking brake. They remain on until
you turn the ignition switch off, even
if you set the parking brake.
When the headlights are on, the
daytime running lights are off.
LIGHT SENSOR
CONTINUED
Turn Signal and Headlights
129
Instruments and Controls
10/06/29 11:59:04 11 ACURA MDX MMC North America Owner's M 50 31STX640 enu
Page 189 of 609
Recirculation ButtonWhen the indicator in the button is on,
air from the vehicle's interior is sent
throughout the system again. When the
indicator is off, air is brought in from the
outside of the vehicle (fresh air mode).
The outside air intakes for the climate
control system are at the base of the
windshield. Keep this area clear of leaves
and other debris.
The system should be left in fresh air
mode under almost all conditions.
Keeping the system in recirculation
mode, particularly with the A/C off, can
cause the windows to fog up.
Switch to recirculation mode when
driving through dusty or smoky
conditions, then return to fresh air mode.Rear Window Defogger ButtonThis button turns the rear window
defogger off and on (see page 131).
Pushing this button also turns the
power mirror heaters on and off.
Mode ControlUse the mode control button to
select the vents the air flows from.
Some air will flow from the
dashboard vents in all modes.
Air flows from the center and
corner vents in the dashboard.Airflow is divided between the
vents in the dashboard and the floor
vents.Air flows from the floor vents.Airflow is divided between the
floor and corner vents and the
defroster vents at the base of the
windshield.
Windshield Defroster ButtonThis button directs the main airflow
to the windshield for faster
defrosting. It also overrides any
mode selection you may have made. When you select
, the system
automatically switches to fresh air
mode and turns on the A/C. For
faster defrosting, manually set the
fan speed to high. You can also
increase airflow to the windshield by
closing the corner vents on the
dashboard. To close the vents, rotate
the wheel under each corner vent.
When you turn off
by pressing
the button again, the system returns
to its former settings.
For your safety, make sure you have
a clear view through all the windows
before driving.
When the indicator in the button is
on, the front passenger's and rear
passenger compartment
temperatures cannot be set
separately from the driver's.
Climate Control System18410/06/29 11:59:04 11 ACURA MDX MMC North America Owner's M 50 31STX640 enu
Page 194 of 609

Sunlight and Temperature
SensorsTo regulate the interior temperature
and humidity, the climate control
system has two sensors. A sunlight
sensor is located in the top of the
dashboard and a temperature/
humidity sensor is next to the
steering column. Do not cover the
sensors or spill any liquid on them.
SUNLIGHT SENSOR
TEMPERATURE/HUMIDITY SENSOR
Climate Control System
189
Features
10/06/29 11:59:04 11 ACURA MDX MMC North America Owner's M 50 31STX640 enu
Page 343 of 609
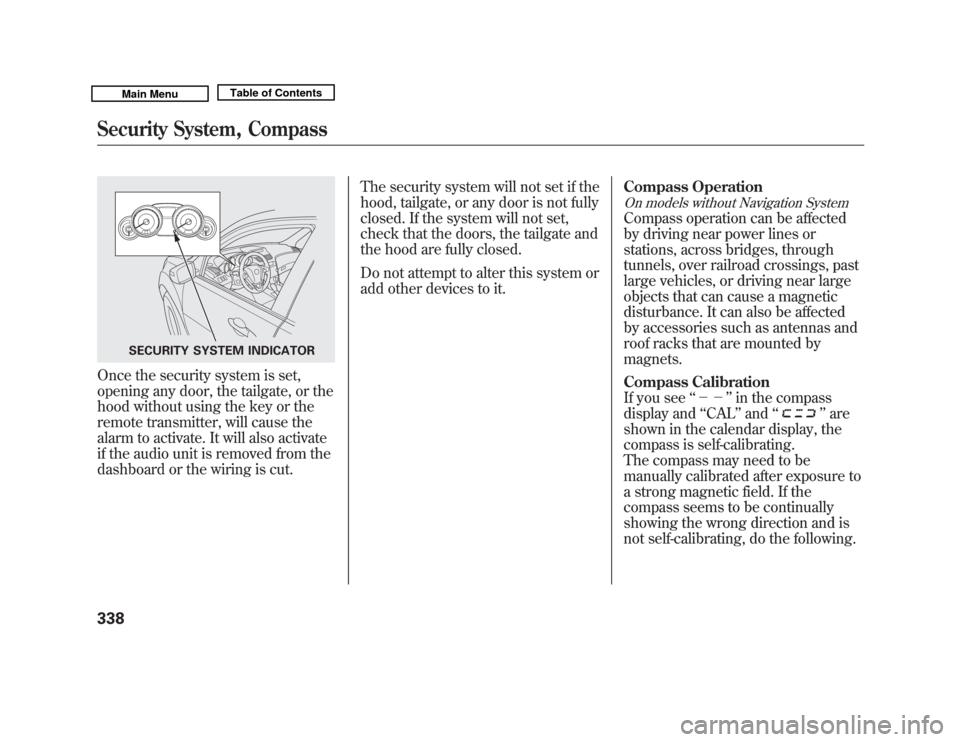
Once the security system is set,
opening any door, the tailgate, or the
hood without using the key or the
remote transmitter, will cause the
alarm to activate. It will also activate
if the audio unit is removed from the
dashboard or the wiring is cut.The security system will not set if the
hood, tailgate, or any door is not fully
closed. If the system will not set,
check that the doors, the tailgate and
the hood are fully closed.
Do not attempt to alter this system or
add other devices to it.
Compass Operation
On models without Navigation SystemCompass operation can be affected
by driving near power lines or
stations, across bridges, through
tunnels, over railroad crossings, past
large vehicles, or driving near large
objects that can cause a magnetic
disturbance. It can also be affected
by accessories such as antennas and
roof racks that are mounted by
magnets.
Compass Calibration
If you see
‘‘-- ’’in the compass
display and ‘‘CAL ’’and ‘‘
’’are
shown in the calendar display, the
compass is self-calibrating.
The compass may need to be
manually calibrated after exposure to
a strong magnetic field. If the
compass seems to be continually
showing the wrong direction and is
not self-calibrating, do the following.
SECURITY SYSTEM INDICATOR
Security System, Compass33810/06/29 11:59:04 11 ACURA MDX MMC North America Owner's M 50 31STX640 enu
Page 368 of 609

Using HFLHFL ButtonsHFL Talk button-Press and
release to give a command or answer
a call.
HFL Back button -Press and
release to end a call, go back to the
previous command, or cancel the
command.
Voice Control Tips●
Air or wind noise from the
dashboard and side vents and all
windows may interfere with the
microphone. Adjust or close them
as necessary.
●
Press and release the HFL Talk
button each time you want to make
a command. After the beep, speak
in a clear, natural tone.
●
Try to reduce all background
noise. If the microphone picks up
voices other than yours,
commands may be misinterpreted.
●
Many commands can be spoken
together. For example, you can say
‘‘ Call 123-456-7890 ’’or ‘‘Dial Peter. ’’
HFL TALK BUTTON
HFL BACK BUTTON
MICROPHONE
CONTINUED
Bluetooth
®
HandsFreeLink
®
363
Features
10/06/29 11:59:04 11 ACURA MDX MMC North America Owner's M 50 31STX640 enu
Page 385 of 609
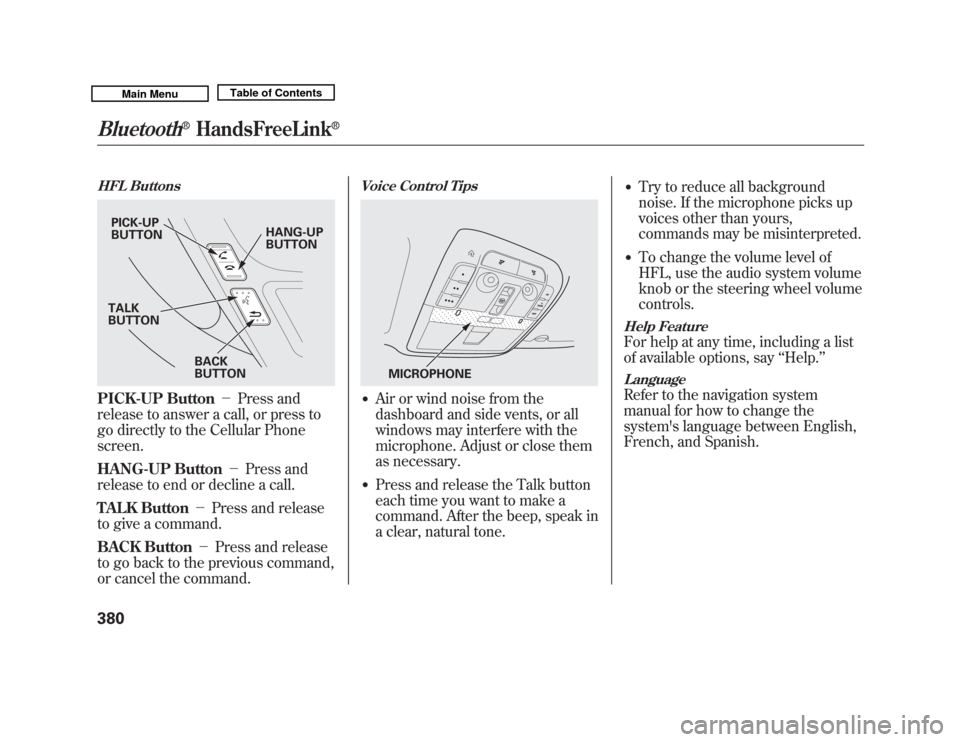
HFL ButtonsPICK-UP Button-Press and
release to answer a call, or press to
go directly to the Cellular Phone
screen.
HANG-UP Button -Press and
release to end or decline a call.
TALK Button -Press and release
to give a command.
BACK Button -Press and release
to go back to the previous command,
or cancel the command.
Voice Control Tips●
Air or wind noise from the
dashboard and side vents, or all
windows may interfere with the
microphone. Adjust or close them
as necessary.
●
Press and release the Talk button
each time you want to make a
command. After the beep, speak in
a clear, natural tone.
●
Try to reduce all background
noise. If the microphone picks up
voices other than yours,
commands may be misinterpreted.
●
To change the volume level of
HFL, use the audio system volume
knob or the steering wheel volume
controls.
Help FeatureFor help at any time, including a list
of available options, say ‘‘Help. ’’LanguageRefer to the navigation system
manual for how to change the
system's language between English,
French, and Spanish.
PICK-UP
BUTTON HANG-UP
BUTTON
BACK
BUTTON
TALK
BUTTON
MICROPHONE
Bluetooth
®
HandsFreeLink
®
38010/06/29 11:59:04 11 ACURA MDX MMC North America Owner's M 50 31STX640 enu
Page 426 of 609
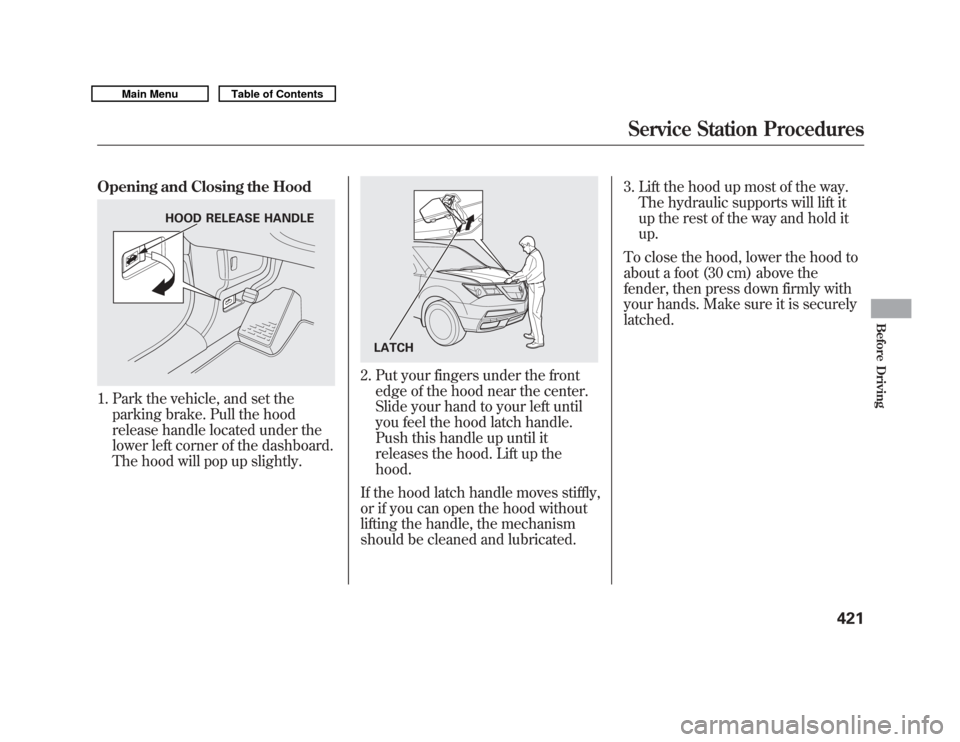
Opening and Closing the Hood1. Park the vehicle, and set theparking brake. Pull the hood
release handle located under the
lower left corner of the dashboard.
The hood will pop up slightly.
2. Put your fingers under the frontedge of the hood near the center.
Slide your hand to your left until
you feel the hood latch handle.
Push this handle up until it
releases the hood. Lift up the
hood.
If the hood latch handle moves stiffly,
or if you can open the hood without
lifting the handle, the mechanism
should be cleaned and lubricated. 3. Lift the hood up most of the way.
The hydraulic supports will lift it
up the rest of the way and hold it
up.
To close the hood, lower the hood to
about a foot (30 cm) above the
fender, then press down firmly with
your hands. Make sure it is securely
latched.
HOOD RELEASE HANDLE
LATCH
Service Station Procedures
421
Before Driving
10/06/29 11:59:04 11 ACURA MDX MMC North America Owner's M 50 31STX640 enu
Page 462 of 609

OverviewIf equippedThe collision Mitigation braking
system™(CMBS ™) can assist the
driver when there is a possibility of
colliding with the vehicle in front of
yours. It is designed to reduce the
speed of your vehicle before an
unavoidable collision occurs and, if
possible, to alert you to a potential
collision while there is time for the
driver to prevent it. Here is a brief
description of what the CMBS can
do: When your speed is above 10 mph
(15 km/h), the CMBS is monitoring
the vehicle ahead of you with radar.
When your vehicle is approaching
the vehicle ahead of yours too
quickly, the system may activate one
or more of the following: a visual
alert, an audible alert, apply the
brakes and e-pretensioners to tighten
the front seat belts - first as a
warning, then to prepare for an
impending crash. (see page 24).
The CMBS consists of a radar sensor
in the front grille, a brake actuator in
the engine compartment, an
indicator on the instrument panel,
seat belt e-pretensioners on the front
seats, and an on/off button on the
dashboard.RADAR SENSOR
BRAKE
ACTUATOR SEAT BELT
e-PRETENSIONERS
CONTINUED
Collision Mitigation Braking System
™(CMBS™ )
457
Driving
10/06/29 11:59:04 11 ACURA MDX MMC North America Owner's M 50 31STX640 enu
Page 466 of 609
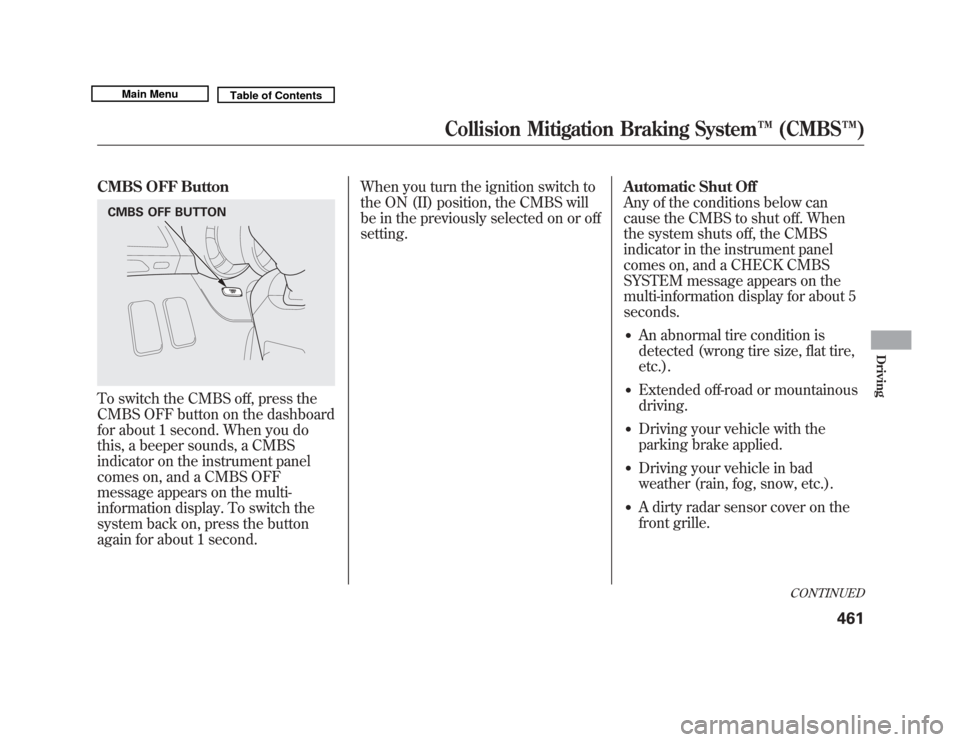
CMBS OFF ButtonTo switch the CMBS off, press the
CMBS OFF button on the dashboard
for about 1 second. When you do
this, a beeper sounds, a CMBS
indicator on the instrument panel
comes on, and a CMBS OFF
message appears on the multi-
information display. To switch the
system back on, press the button
again for about 1 second.When you turn the ignition switch to
the ON (II) position, the CMBS will
be in the previously selected on or off
setting.
Automatic Shut Off
Any of the conditions below can
cause the CMBS to shut off. When
the system shuts off, the CMBS
indicator in the instrument panel
comes on, and a CHECK CMBS
SYSTEM message appears on the
multi-information display for about 5
seconds.
●
An abnormal tire condition is
detected (wrong tire size, flat tire,
etc.).
●
Extended off-road or mountainous
driving.
●
Driving your vehicle with the
parking brake applied.
●
Driving your vehicle in bad
weather (rain, fog, snow, etc.).
●
A dirty radar sensor cover on the
front grille.
CMBS OFF BUTTON
CONTINUED
Collision Mitigation Braking System
™(CMBS™ )
461
Driving
10/06/29 11:59:04 11 ACURA MDX MMC North America Owner's M 50 31STX640 enu
Page 564 of 609
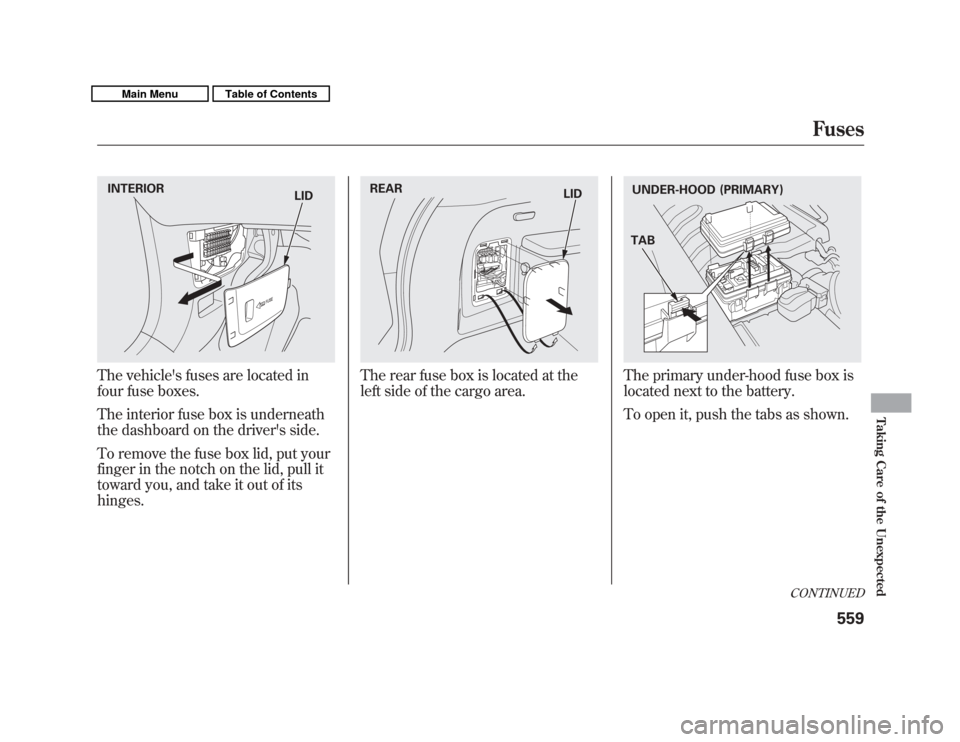
The vehicle's fuses are located in
four fuse boxes.
The interior fuse box is underneath
the dashboard on the driver's side.
To remove the fuse box lid, put your
finger in the notch on the lid, pull it
toward you, and take it out of its
hinges.
The rear fuse box is located at the
left side of the cargo area.
The primary under-hood fuse box is
located next to the battery.
To open it, push the tabs as shown.
INTERIORLID
REAR LID
UNDER-HOOD (PRIMARY)
TAB
CONTINUED
Fuses
559
Taking Care of the Unexpected
10/06/29 11:59:04 11 ACURA MDX MMC North America Owner's M 50 31STX640 enu