reverse Acura MDX 2011 User Guide
[x] Cancel search | Manufacturer: ACURA, Model Year: 2011, Model line: MDX, Model: Acura MDX 2011Pages: 609, PDF Size: 12.7 MB
Page 170 of 609

3. Push the appropriate edge of theadjustment switch to move the
mirror right, left, up, or down.
4. When you finish, move the selector switch to the center (off)
position. This turns the adjustment
switch off to keep your settings. Reverse Tilt Door Mirror
Both outside door mirrors have a
reverse tilt feature. When in reverse,
the selected mirror will tilt down
slightly to improve your view as you
parallel park. Shifting out of reverse
will return the mirror to its original
position.
●
To tilt the driver's mirror, place the
selector switch in the left position.
●
To tilt the passenger's mirror,
place the switch in the right
position.
●
To turn the feature off, place the
switch in the center position.
Outside mirror positions can be
stored in the driving position
memory system (see page 166). Heated Mirrors
The outside mirrors are heated to
remove fog and frost. With the
ignition switch in the ON (II)
position, turn on the heaters by
pressing the button. The indicator in
the button comes on as a reminder.
Press the button again to turn the
heaters off. Pressing this button also
turns the rear window defogger on
and off.
HEATED MIRROR BUTTON
Mirrors
165
Instruments and Controls
10/06/29 11:59:04 11 ACURA MDX MMC North America Owner's M 50 31STX640 enu
Page 336 of 609

If you forget the password, select
‘‘Password,’’ and press the
button
10 times.
The display changes as shown above.
If you want to use the default
password (1111), select ‘‘Yes, ’’and
press the ENTER button.
The message ‘‘Default password
setting applied ’’is displayed for 5
seconds. Remote Control
The rear control panel can be
detached from the ceiling unit and
used as a remote control. To remove
it from the ceiling unit, press the
release button. The control panel will
swing down partway. Pivot it down
further past the detent until it
detaches from the hinge. To reinstall
it, reverse the procedure.RELEASE BUTTON
CONTINUED
Rear Entertainment System
331
Features
10/06/29 11:59:04 11 ACURA MDX MMC North America Owner's M 50 31STX640 enu
Page 338 of 609

Playable DVDsThere are various types of DVDs
available. Some of them are not
compatible with your system.
The DVD player in your rear
entertainment system can play DVDs
and CDs bearing the above marks on
their packages or jackets.The DVD player can also play discs
recorded in MP3/WMA formats and
DTS CDs.
Those packages or jackets should
also bear the designation of
‘‘1’’ or
‘‘ ALL ’’. DVD-ROMs cannot be played
in this system.
This product incorporates copyright
protection technology that is
protected by U.S. patents and other
intellectual property rights.
Use of this copyright protection
technology must be authorized by
Macrovision, and is intended for
home and other limited viewing uses
only unless otherwise authorized by
Macrovision.
Reverse engineering or disassembly
is prohibited. Protecting DVDs
The tips on how to handle and
protect DVDs are basically the same
as those for compact discs. Refer to
‘‘
Protecting Your Discs ’’on page 244.
CONTINUED
Rear Entertainment System
333
Features
10/06/29 11:59:04 11 ACURA MDX MMC North America Owner's M 50 31STX640 enu
Page 365 of 609

The HomeLink
®Universal
Transceiver built into your vehicle can
be programmed to operate up to three
remote controlled devices around
your home, such as garage doors,
lighting, or home security systems.
General Safety InformationBefore programming your HomeLink
to operate a garage door opener,
confirm that the opener has an
external entrapment protection
system, such as an ‘‘electronic eye, ’’or
other safety and reverse stop features.
If your garage door was manufactured
before April 1, 1982, you may not be
able to program HomeLink to operate
it. These units do not have safety
features that cause the motor to stop
and reverse it if an obstacle is
detected during closing, increasing
the risk of injury. Do not use
HomeLink with any garage door
opener that lacks safety stop and
reverse features. Units manufactured between April 1,
1982 and January 1, 1993 may be
equipped with safety stop and reverse
features. If your unit does not have an
external entrapment protection
system, an easy test to confirm the
function and performance of the safety
stop and reverse feature is to lay a 2
╳
4 under the closing door. The door
should stop and reverse upon
contacting the piece of wood.
As an additional safety feature, garage
door openers manufactured after
January 1, 1993 are required to have
external entrapment protection
systems, such as an electronic eye,
which detect an object obstructing the
door.
Important Safety PrecautionsRefer to the safety information that came
with your garage door opener to test that
the safety features are functioning
properly. If you do not have this
information, contact the manufacturer of
the equipment.
Before programming HomeLink to a
garage door or gate opener, make sure
that people and objects are out of the way
of the device to prevent potential injury or
damage.
When programming a garage door opener,
park just outside the garage.Training HomeLinkBefore you begin
- If you just
received your vehicle and have not
trained any of the buttons in
HomeLink before, you should erase
any previously learned codes before
training the first button.
To do this, press and hold the two
outside buttons on the HomeLink
transceiver for about 20 seconds,
until the red indicator flashes.
Release the buttons, then proceed to
step 1.
HomeLink
®
Universal Transceiver
36010/06/29 11:59:04 11 ACURA MDX MMC North America Owner's M 50 31STX640 enu
Page 419 of 609

On models with navigation systemRefer to the navigation system
manual for operation of the rearview
camera.
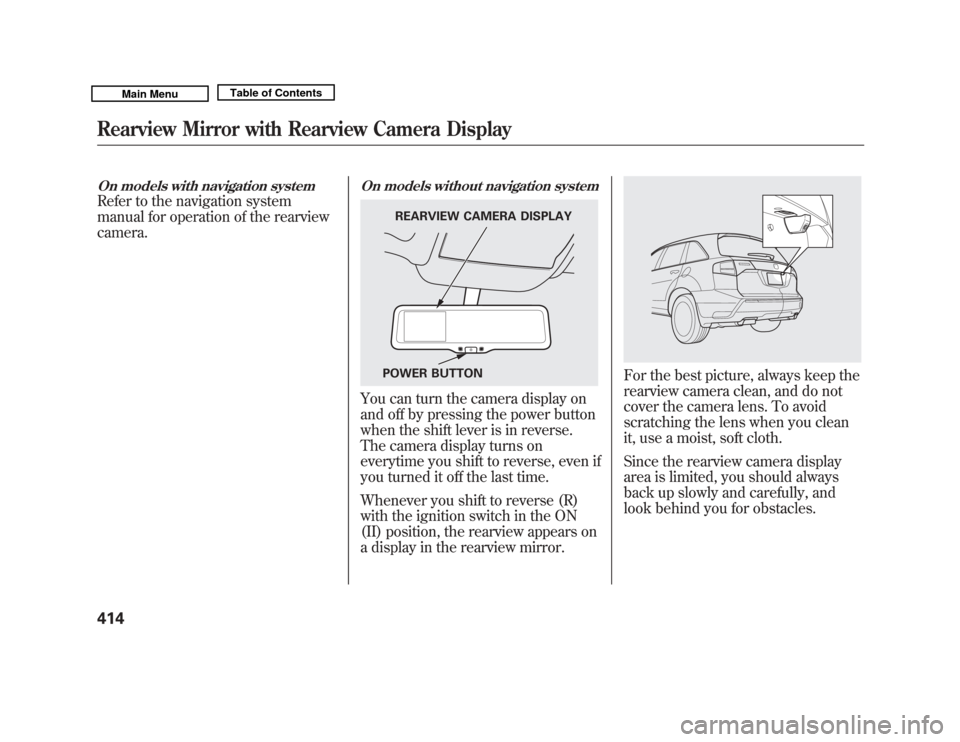
On models without navigation systemYou can turn the camera display on
and off by pressing the power button
when the shift lever is in reverse.
The camera display turns on
everytime you shift to reverse, even if
you turned it off the last time.
Whenever you shift to reverse (R)
with the ignition switch in the ON
(II) position, the rearview appears on
a display in the rearview mirror.
For the best picture, always keep the
rearview camera clean, and do not
cover the camera lens. To avoid
scratching the lens when you clean
it, use a moist, soft cloth.
Since the rearview camera display
area is limited, you should always
back up slowly and carefully, and
look behind you for obstacles.
REARVIEW CAMERA DISPLAY
POWER BUTTON
Rearview Mirror with Rearview Camera Display41410/06/29 11:59:04 11 ACURA MDX MMC North America Owner's M 50 31STX640 enu
Page 420 of 609

If the engine has just been started, it
may take a short time for the system
to display the rearview.
The camera display brightness is
adjusted automatically by sensors. If
you use the camera display
continuously at high temperatures,
the image will gradually dim.
The rearview mirror will be hot when
you use the camera display for an
extended period of time.
If a bright light (such as sunlight) is
reflected on the mirror, the image
may be difficult to see.
Rearview Camera Guide Line
The camera display has parking
guide lines that indicate distance
from your vehicle.
1st Line 20in (0.5m)
2nd Line 39in (1m)
3rd Line 79in (2m)
4th Line 118in (3m)
NOTE●
The rearview camera has a unique
lens that makes objects appear
closer than they actually are.
●
The rearview camera display has a
limited coverage, and the size and
position of objects may appear
different than they actually are.
Make sure to check the
surrounding area carefully.
To turn off the guide lines, press and
hold the power button for more than
3 seconds. The guide lines appear
every time you shift to reverse, even
if you turned them off the last time.
SCREEN DISPLAY
ACTUAL DISTANCE 1st line2nd line
4th line 3rd line
Rearview Mirror with Rearview Camera Display
415
Features
10/06/29 11:59:04 11 ACURA MDX MMC North America Owner's M 50 31STX640 enu
Page 444 of 609

To avoid transmission damage, come
to a complete stop before shifting
into Park. You must also press the
release button to shift into park. The
shift lever must be in Park before
you can remove the key from the
ignition switch.
Reverse (R)-Press the brake
pedal and the release button on the
front of the shift lever to shift from
Park to reverse. To shift from reverse
to neutral, come to a complete stop,
and then shift. Press the release
button before shifting into reverse
from neutral.
Neutral (N) -Use neutral if you
need to restart a stalled engine, or if
it is necessary to stop briefly with the
engine idling. Shift to the Park
position if you need to leave your
vehicle for any reason. Press on the
brake pedal when you are moving
the shift lever from neutral to
another gear. Drive (D)
-Use this position for
your normal driving. The
transmission automatically selects a
suitable gear (1 through 6) for your
speed and acceleration. You may
notice the transmission shifting up at
higher engine speeds when the
engine is cold. This helps the engine
warm up faster. S Position (S)
-To shift into the S
position, press the release button on
the front of the shift lever, and move
the lever to S. This position is similar
to D, except only gears from first to
fifth are selected. (When shifting up
automatically, the vehicle speed is
higher than when in the D position.)
The S position keeps the
transmission from cycling between
fourth, fifth, and sixth gears in stop-
and-go driving.
With the shift lever in D or S, you
can also use the paddle shifters to
shift the transmission up or down.
Once you begin to use the paddle
shifters in S, the transmission will no
longer upshift or downshift
automatically. For more information
of driving with the paddle shifters,
see page 443.
CONTINUED
Automatic Transmission
439
Driving
10/06/29 11:59:04 11 ACURA MDX MMC North America Owner's M 50 31STX640 enu
Page 474 of 609

VSA and Tire Sizes
Driving with varying tire or wheel
sizes may cause the VSA to
malfunction. When replacing tires,
make sure they are of the same size
and type as your original tires (see
page 539).
If you install winter tires, make sure
they are the same size as those that
were originally supplied with your
vehicle. Exercise the same caution
during winter driving as you would if
your vehicle was not equipped with
VSA.Hill Start Assist
Your vehicle is equipped with a hill
start assist feature to help prevent
the vehicle from rolling on steep
inclines as you move your foot from
the brake pedal to the accelerator.
This feature starts operating a few
seconds after you are in any drive
gear position (when faced uphill) or
in reverse (when faced downhill).
This feature requires that the vehicle
has come to a complete stop before it
can work.
Hill start assist may not hold a
heavily loaded vehicle, such as when
your vehicle is connected to a trailer,
or prevent your vehicle from rolling
downhill on a very steep or slippery
slope.
Vehicle Stability Assist (VSA
®), aka Electronic Stability Control (ESC), System
469
Driving
10/06/29 11:59:04 11 ACURA MDX MMC North America Owner's M 50 31STX640 enu
Page 502 of 609

If the water is deeper than the wheel
hubs, some additional service may be
required. This service is not covered
by your warranties.
If You Get Stuck
If you get stuck, carefully try to go in
the direction (forward or reverse)
that you think will get you unstuck.
Do not spin the tires at high speeds.
It will not help you get out and may
cause damage to the transmission or
SH-AWD system.
If you are still unable to free yourself,
your vehicle is equipped with front
and rear tow hooks designed for this
purpose.
Use a nylon strap to attach the MDX
to the recovery vehicle and carefully
take out the slack in the strap. Once
the strap is tight, the recovery
vehicle should apply force.
Remember that the recovery vehicle
needs good traction to avoid
becoming stuck, too.You should never use a jack to try to
get unstuck. Your vehicle could
easily slip off the jack and hurt you or
someone else.
Towing a Trailer Off-Road
You may be able to safely tow a
lightweight trailer (such as a
motorcycle or small tent trailer) off-
road if you follow these guidelines:
●
Do not exceed 1,000 lbs (450 kg)
or a tongue weight of 100 lbs (45
kg).
●
Stay on smooth, level dirt roads,
and avoid driving in hilly terrain.
●
Allow extra room for starting,
stopping, and turning.
●
Slow down if you encounter bumps
or other obstacles.
Off-Highway Driving Guidelines
497
Driving
10/06/29 11:59:04 11 ACURA MDX MMC North America Owner's M 50 31STX640 enu
Page 604 of 609

Light Bulbs
.............................
521
Schedule
.................................
508
Spark Plugs
.............................
573
Timing Belt
.............................
520
Tires
.......................................
538
Wiper Blades
..........................
530
Replacing Seat Belts After a Crash
........................................
25
Reporting Safety Defects
............
588
Reserve Tank, Engine Coolant
............................
422, 514
Restraint, Child
............................
39
Reverse Gear Position
................
439
Rotation, Tire
.............................
538
S
Safety Belts
..............................
9, 21
Safety Defects, Reporting
...........
588
Safety Features
..............................
8
Airbags
...............................
10, 26
Door Locks
..............................
12
Head Restraints
........................
15
Seat Belts
........................
9, 16, 21
Seats & Seat-Backs
..............
14, 15 Safety Labels, Location of
.............
61
Safety Messages
..........................
iii
Seat Belt e-pretensioners
..............
24
Seat Belts
.................................
9, 21
Additional Information
.............
21
Advice for Pregnant Women
....
19
Automatic Seat Belt Tensioners
...........................
23
Cleaning
..................................
528
e-pretensioner
..........................
24
Lap/Shoulder Belt
..............
16, 22
Maintenance
............................
25
Reminder Indicator and Beeper
.............................
21, 66
System Components
................
21
Use During Pregnancy
.............
19
Wearing a Lap/Shoulder Belt
..................................
16, 22
Seat Heaters and Seat Ventilation
..............................
157
Seats
..........................................
148
Adjusting the Second Seat
.......
152
Air Ventilation
.........................
157
Folding the Second Seat
..........
152
Folding the Third Seat
............
153
Head Restraints
.......................
149 Heaters
...................................
156
Position Memory
....................
166
Third Row Access
...................
153
Seats, Adjusting the
...................
148
Security System
.........................
337
Security System Indicator
............
75
Sensors Driver's Seat Position Sensor
...
30
Front Passenger's Weight Sensors
................................
30
Impact Sensors
........................
26
Serial Number
............................
570
Service Intervals
.........................
501
Service Manual (U.S. only)
........
589
Service Station Procedures
........
419
SH-AWD
®...................................
446
Indicator
...................................
71
Shifting the Automatic Transmission
..........................
438
Shift Lever Position Indicators
...
437
Shift Lock Release
......................
440
Side Airbags
.................................
32
How the Side Airbag Off Indicator Works
...................
35
How Your Side Airbags Work
..
32
CONTINUED
Index
IX
INDEX
10/06/29 11:59:04 11 ACURA MDX MMC North America Owner's M 50 31STX640 enu