turn signal Acura MDX 2011 Owner's Guide
[x] Cancel search | Manufacturer: ACURA, Model Year: 2011, Model line: MDX, Model: Acura MDX 2011Pages: 609, PDF Size: 12.7 MB
Page 236 of 609
Receiving XM Radio Service
If your XM Radio service has expired
or you purchased your vehicle from a
previous owner, you can listen to a
sampling of the broadcasts available
on XM Radio. With the ignition
switch in the ACCESSORY (I) or the
ON (II) position, press thebutton. A variety of music types and
styles will play.
If you decide to purchase XM Radio
service, contact XM Radio atwww.xmradio.com,
or at 1-800-852-
9696. In Canada, contact XM
CANADA
®www.xmradio.ca,
or call 1-
877-209-0079. You will need to give
them your radio I.D. number and
your credit card number. To get your
radio I.D. number, turn the TUNE
knob until ‘‘0 ’’ appears in the display.
Your I.D. will appear in the display. After you have registered with XM
Radio, keep your audio system in the
XM Radio mode while you wait for
activation. This should take about 30
minutes.
While waiting for activation, make
sure your vehicle remains in an open
area with good reception. Once your
audio system is activated, CAT
(category) or CH (channel) will
appear in the audio display, and
you'll be able to listen to XM Radio
broadcasts. XM Radio will continue
to send an activation signal to your
vehicle for at least 12 hours from the
activation request. If the service has
not been activated after 36 hours,
contact XM
®Radio. In Canada,
contact XM CANADA
®.
Playing the XM
®
Radio (Models with navigation system)
231
Features
10/06/29 11:59:04 11 ACURA MDX MMC North America Owner's M 50 31STX640 enu
Page 307 of 609
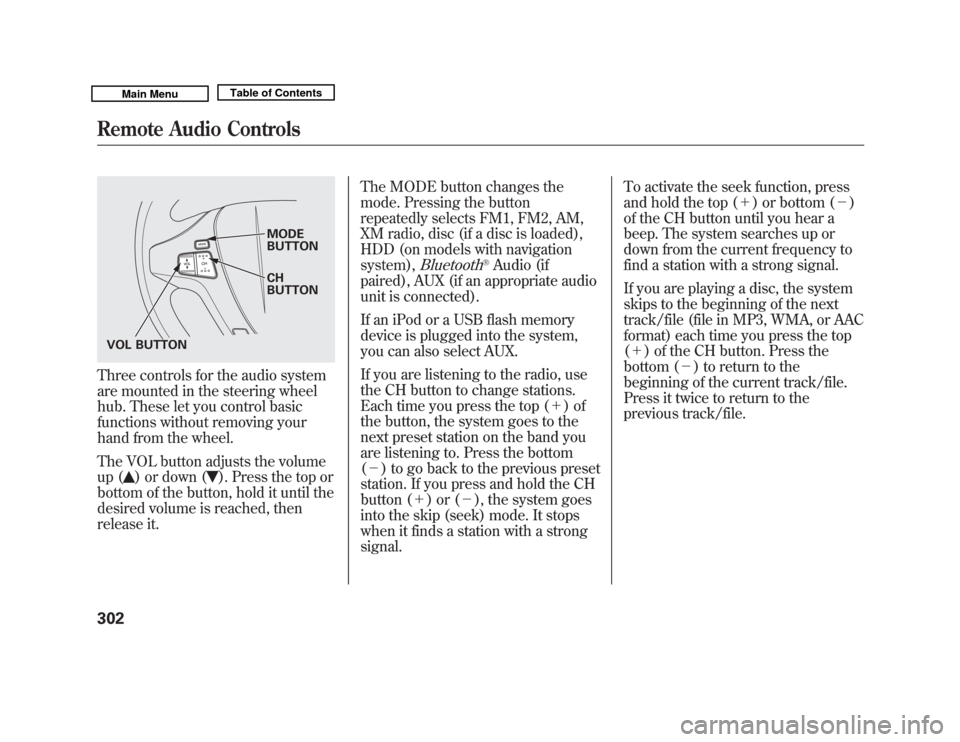
Three controls for the audio system
are mounted in the steering wheel
hub. These let you control basic
functions without removing your
hand from the wheel.
The VOL button adjusts the volume
up (
) or down (
). Press the top or
bottom of the button, hold it until the
desired volume is reached, then
release it. The MODE button changes the
mode. Pressing the button
repeatedly selects FM1, FM2, AM,
XM radio, disc (if a disc is loaded),
HDD (on models with navigation
system),
Bluetooth
®Audio (if
paired), AUX (if an appropriate audio
unit is connected).
If an iPod or a USB flash memory
device is plugged into the system,
you can also select AUX.
If you are listening to the radio, use
the CH button to change stations.
Each time you press the top (+ )of
the button, the system goes to the
next preset station on the band you
are listening to. Press the bottom
(- ) to go back to the previous preset
station. If you press and hold the CH
button (+ )or(-), the system goes
into the skip (seek) mode. It stops
when it finds a station with a strong
signal. To activate the seek function, press
and hold the top (+
) or bottom (-)
of the CH button until you hear a
beep. The system searches up or
down from the current frequency to
find a station with a strong signal.
If you are playing a disc, the system
skips to the beginning of the next
track/file (file in MP3, WMA, or AAC
format) each time you press the top
(+ ) of the CH button. Press the
bottom (- ) to return to the
beginning of the current track/file.
Press it twice to return to the
previous track/file.
MODE
BUTTON
CH
BUTTON
VOL BUTTON
Remote Audio Controls30210/06/29 11:59:04 11 ACURA MDX MMC North America Owner's M 50 31STX640 enu
Page 311 of 609
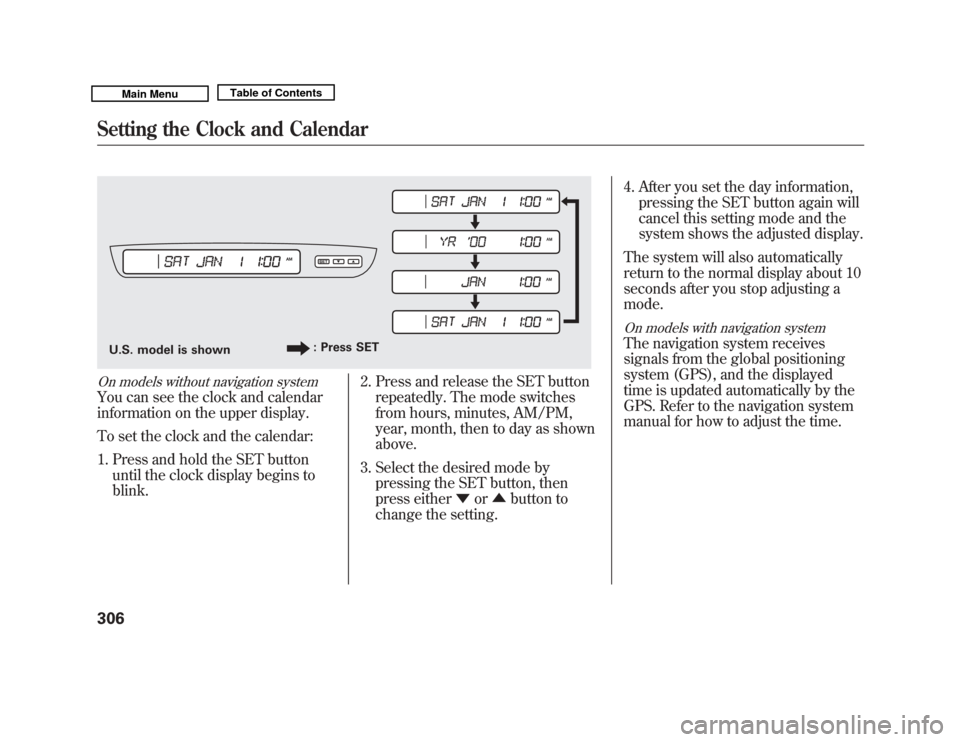
On models without navigation systemYou can see the clock and calendar
information on the upper display.
To set the clock and the calendar:1. Press and hold the SET button until the clock display begins to
blink. 2. Press and release the SET button
repeatedly. The mode switches
from hours, minutes, AM/PM,
year, month, then to day as shown
above.
3. Select the desired mode by pressing the SET button, then
press either ▼or▲ button to
change the setting. 4. After you set the day information,
pressing the SET button again will
cancel this setting mode and the
system shows the adjusted display.
The system will also automatically
return to the normal display about 10
seconds after you stop adjusting a
mode.
On models with navigation systemThe navigation system receives
signals from the global positioning
system (GPS), and the displayed
time is updated automatically by the
GPS. Refer to the navigation system
manual for how to adjust the time.
U.S. model is shown : Press SETSetting the Clock and Calendar30610/06/29 11:59:04 11 ACURA MDX MMC North America Owner's M 50 31STX640 enu
Page 454 of 609
Your vehicle is equipped with a tire
pressure monitoring system (TPMS)
that turns on every time you start the
engine and monitors the pressure in
your tires while driving.
Each tire has its own pressure
sensor. If the air pressure of a tire
becomes significantly low, the sensor
in that tire immediately sends a
signal that causes the low tire
pressure/TPMS indicator in the
instrument panel to come on. If this
happens, you will see which tire is
losing pressure on the multi-
information display along with a
‘‘CHECK TIRE PRESSURE ’’
message.
Low Tire Pressure/
TPMS Indicator
When the low tire pressure/TPMS
indicator is on, one or more of your
tires is significantly underinflated.
You should stop and check your tires
as soon as possible, and inflate them
to the proper pressure as indicated
on the vehicle's tire information
placard.
It is possible that the pressures
shown on the multi-information
display and the pressures you
manually measure are slightly
different.
If the difference is significant or you
cannot make the low tire pressure/
TPMS indicator and message on the
multi-information display go out after
inflating the tires to the specified
values, have your dealer check the
system as soon as possible. If you think you can safely drive a
short distance to a service station,
proceed slowly to the station, then
inflate the tire to the recommended
pressure.
If the tire is flat, or if the tire pressure
is too low to continue driving, replace
the tire with the compact spare tire
(see page 545).
Driving on a significantly under-
inflated tire causes the tire to
overheat and can lead to tire failure.
Under-inflation also reduces fuel
efficiency and tire tread life, and may
affect the vehicle's handling and
stopping ability.
Because tire pressure varies by
temperature and other conditions,
the low tire pressure/TPMS
indicator may come on unexpectedly.
CONTINUED
Tire Pressure Monitoring System (TPMS)
449
Driving
10/06/29 11:59:04 11 ACURA MDX MMC North America Owner's M 50 31STX640 enu
Page 478 of 609

The BSI alert indicator starts to blink
as a reminder if you move the turn
signal lever in the direction of the
detected vehicle.
Radar sensors, located underneath
each corner of the rear bumper,
detect objects. Do not cover this area
with labels or stickers of any kind.
Always keep this area is free of any
kind of dirt every time you get in the
vehicle.
Impacts to the radar sensors or the
area around them can affect system
performance. If an impact occurs,
have the system checked by your
dealer.
LEVERINDICATOR
ILLUMINATE BLINK
CONTINUED
Blind Spot Information System (BSI)
473
Driving
10/06/29 11:59:04 11 ACURA MDX MMC North America Owner's M 50 31STX640 enu
Page 494 of 609

Trailer LightsTrailer lights and equipment must
comply with federal, state, province,
and local regulations. Check trailer
light requirements for the areas
where you plan to tow, and use only
equipment designed for your vehicle.
Your vehicle is equipped with a
connector to install an optional trailer
lighting connector that mates with
your vehicle. You can get this
optional connector from your dealer.Refer to the above illustration for
wiring information.
We recommend that you have your
dealer install an Acura wiring
harness and converter. This harness
has been designed for your vehicle.If you use a non-Acura trailer lighting
harness and converter, you can get
the mating connector and pins that
mate with the connector in your
vehicle from your dealer.
Since lighting and wiring vary with
trailer type and brand, you should
also have a qualified mechanic install
a suitable connector between the
vehicle and the trailer.
ACCESSORY OPTION TRAILER BACK-UP LIGHT
BACK-UP LIGHT (ꭥ)
BRAKE
DIAGNOSTIC
ELECTRIC BRAKE
TRAILER HAZARD
LIGHT
TAILLIGHTS
\b B CHARGE
LEFT TURN
SIGNAL
RIGHT TURN
SIGNAL ILLUMINATION
LIGHTS
CONTINUED
Towing a Trailer
489
Driving
10/06/29 11:59:04 11 ACURA MDX MMC North America Owner's M 50 31STX640 enu
Page 498 of 609

Under these conditions, trailer
stability assist begins to stabilize the
vehicle/trailer combination by
reducing the vehicle speed. The
control unit sends signals to
selectively apply the brakes and
regulate the engine output. The
brake lights of your vehicle will be
turned on automatically by the
system even if you do not keep the
pressure on the brake pedal.
When the brakes are applied, the
trailer's brake lights come on along
with the vehicle brake lights.
When the trailer stability assist
activates, you will see the VSA
system indicator blink. There may
also be some noise from the VSA
hydraulic system.Trailer stability assist cannot prevent
a loss of control. Always reduce the
vehicle speed and steer firmly. Do
not brake suddenly or make quick
steering motion. It could cause the
trailer to jackknife or turn over and
the system becomes ineffective.
Trailer stability assist cannot prevent
swaying that can occur in crosswinds
and in normal and emergency
driving maneuvers. It helps only to
stabilize the vehicle/trailer
combination in these conditions,
after the oscillation becomes severe.
Trailer stability assist will also be
ineffective while driving at high
speed or towing a trailer with a high
center of gravity.
Always obey the recommended
speed limits for towing a trailer, see
page 491.Trailer Stability Assist Failure
The control unit monitors the VSA
circuitry and the braking system. If
there is a problem with the brake
lighting system, the trailer stability
assist function shuts down and the
‘‘
CHECK TRAILER STABILITY
ASSIST ’’message appears on the
multi-information display.
If you see this message, have your
vehicle checked at your dealer as
soon as possible.
CONTINUED
Trailer Stability Assist
493
Driving
10/06/29 11:59:04 11 ACURA MDX MMC North America Owner's M 50 31STX640 enu
Page 528 of 609
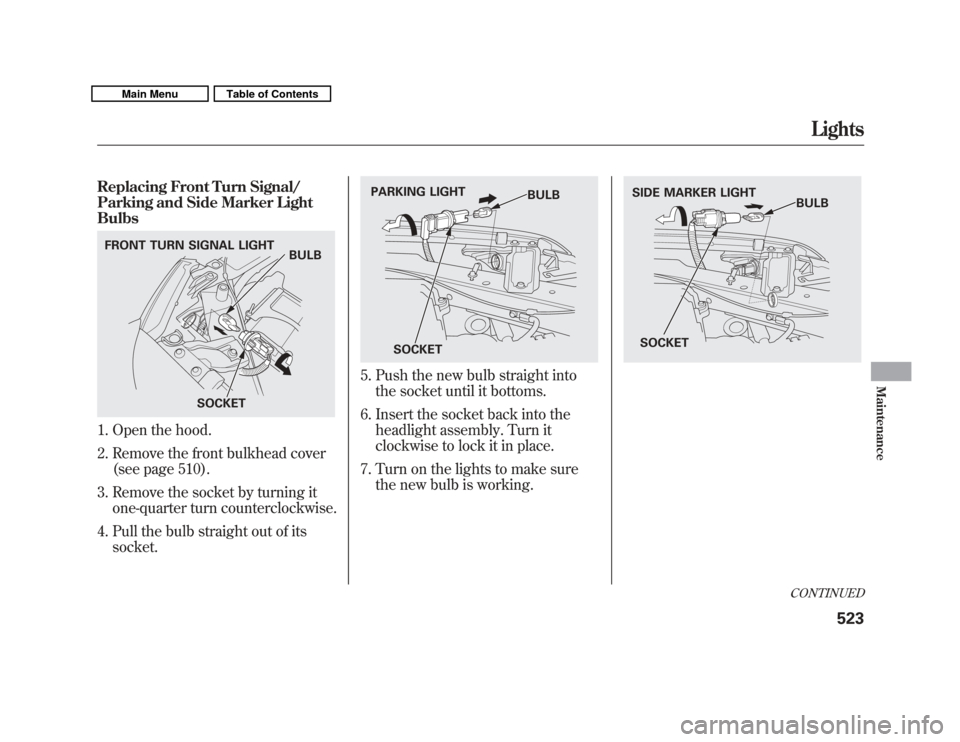
Replacing Front Turn Signal/
Parking and Side Marker Light
Bulbs1. Open the hood.
2. Remove the front bulkhead cover(see page 510).
3. Remove the socket by turning it one-quarter turn counterclockwise.
4. Pull the bulb straight out of its socket.
5. Push the new bulb straight intothe socket until it bottoms.
6. Insert the socket back into the headlight assembly. Turn it
clockwise to lock it in place.
7. Turn on the lights to make sure the new bulb is working.
FRONT TURN SIGNAL LIGHT BULB
SOCKET
BULB
PARKING LIGHT
SOCKET
SIDE MARKER LIGHT BULB
SOCKET
CONTINUED
Lights
523
Maintenance
10/06/29 11:59:04 11 ACURA MDX MMC North America Owner's M 50 31STX640 enu
Page 530 of 609
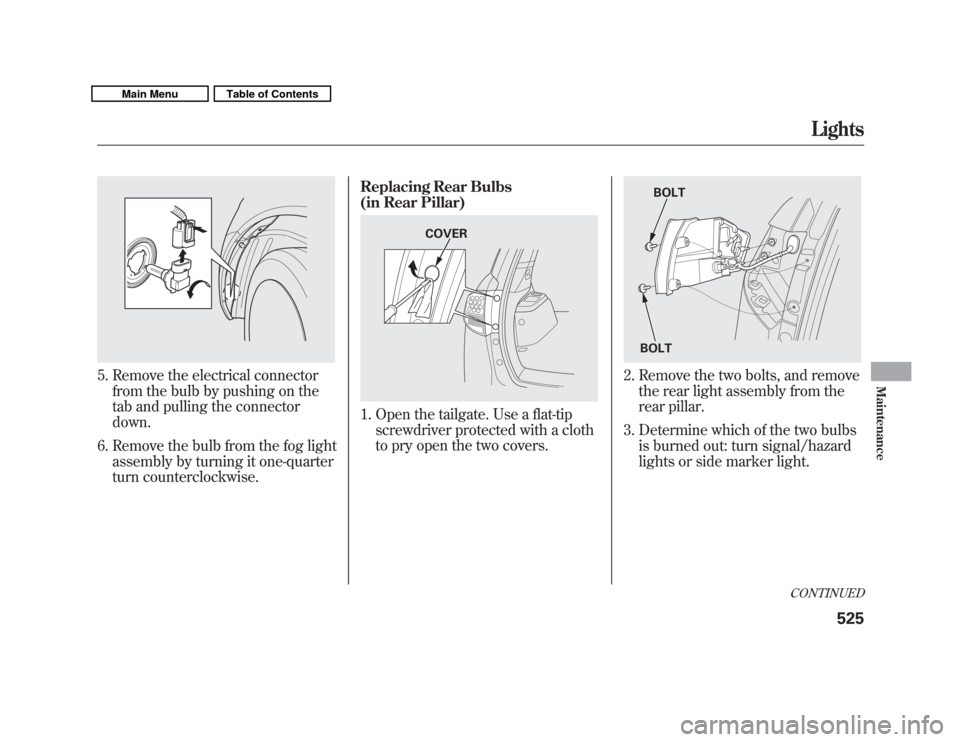
5. Remove the electrical connectorfrom the bulb by pushing on the
tab and pulling the connector
down.
6. Remove the bulb from the fog light assembly by turning it one-quarter
turn counterclockwise. Replacing Rear Bulbs
(in Rear Pillar)
1. Open the tailgate. Use a flat-tip
screwdriver protected with a cloth
to pry open the two covers.
2. Remove the two bolts, and removethe rear light assembly from the
rear pillar.
3. Determine which of the two bulbs is burned out: turn signal/hazard
lights or side marker light.
COVER
BOLT
BOLT
CONTINUED
Lights
525
Maintenance
10/06/29 11:59:04 11 ACURA MDX MMC North America Owner's M 50 31STX640 enu
Page 532 of 609
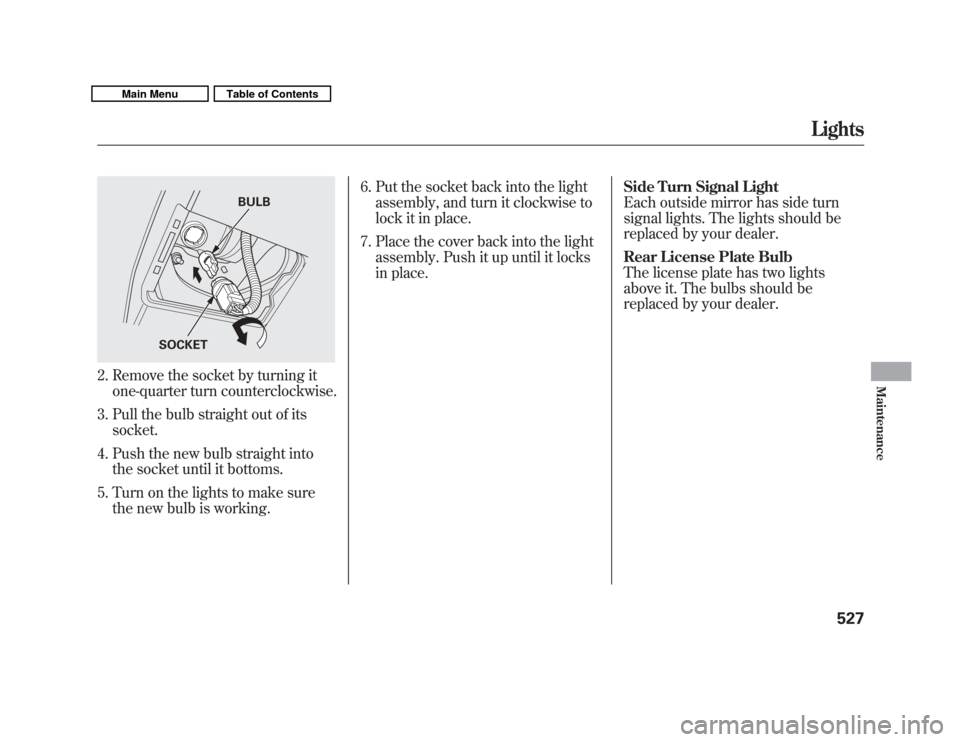
2. Remove the socket by turning itone-quarter turn counterclockwise.
3. Pull the bulb straight out of its socket.
4. Push the new bulb straight into the socket until it bottoms.
5. Turn on the lights to make sure the new bulb is working. 6. Put the socket back into the light
assembly, and turn it clockwise to
lock it in place.
7. Place the cover back into the light assembly. Push it up until it locks
in place. Side Turn Signal Light
Each outside mirror has side turn
signal lights. The lights should be
replaced by your dealer.
Rear License Plate Bulb
The license plate has two lights
above it. The bulbs should be
replaced by your dealer.
BULB
SOCKET
Lights
527
Maintenance
10/06/29 11:59:04 11 ACURA MDX MMC North America Owner's M 50 31STX640 enu