light Acura MDX 2012 Owners Manual
[x] Cancel search | Manufacturer: ACURA, Model Year: 2012, Model line: MDX, Model: Acura MDX 2012Pages: 621, PDF Size: 11.15 MB
Page 536 of 621
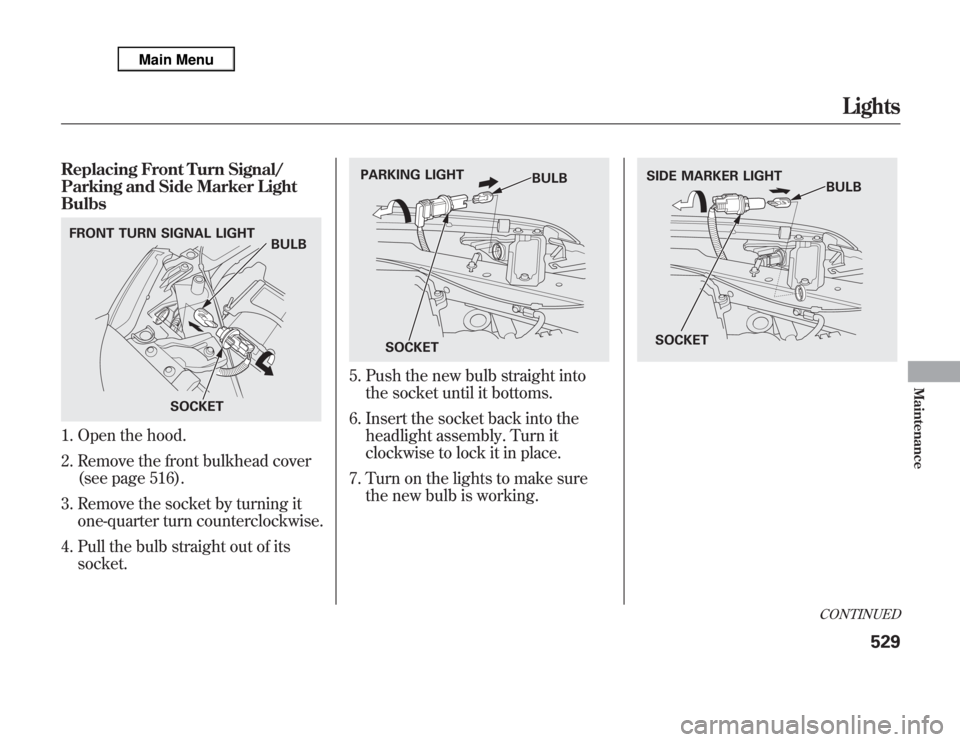
Replacing Front Turn Signal/
Parking and Side Marker Light
Bulbs1. Open the hood.
2. Remove the front bulkhead cover
(see page 516).
3. Remove the socket by turning it
one-quarter turn counterclockwise.
4. Pull the bulb straight out of its
socket.
5. Push the new bulb straight into
the socket until it bottoms.
6. Insert the socket back into the
headlight assembly. Turn it
clockwise to lock it in place.
7. Turn on the lights to make sure
the new bulb is working.
FRONT TURN SIGNAL LIGHT
BULB
SOCKET
BULB PARKING LIGHT
SOCKET
SIDE MARKER LIGHT
BULB
SOCKET
CONTINUED
Lights
529
Maintenance
Page 537 of 621
Replacing Front Fog/Daytime
Running Light Bulbs
Your vehicle uses halogen light
bulbs. When replacing a bulb, handle
it by its plastic case, and protect the
glass from contact with your skin or
hard objects. If you touch the glass,
clean it with denatured alcohol and a
clean cloth.Halogen bulbs get very hot when lit.
Oil, perspiration, or a scratch on the
glass can cause the bulb to overheat
and shatter.
1. To change the bulb on the driver's
side, start the engine, turn the
steering wheel all the way to the
right, then turn off the engine. To
change the bulb on the
passenger's side, turn the steering
wheel to the left.
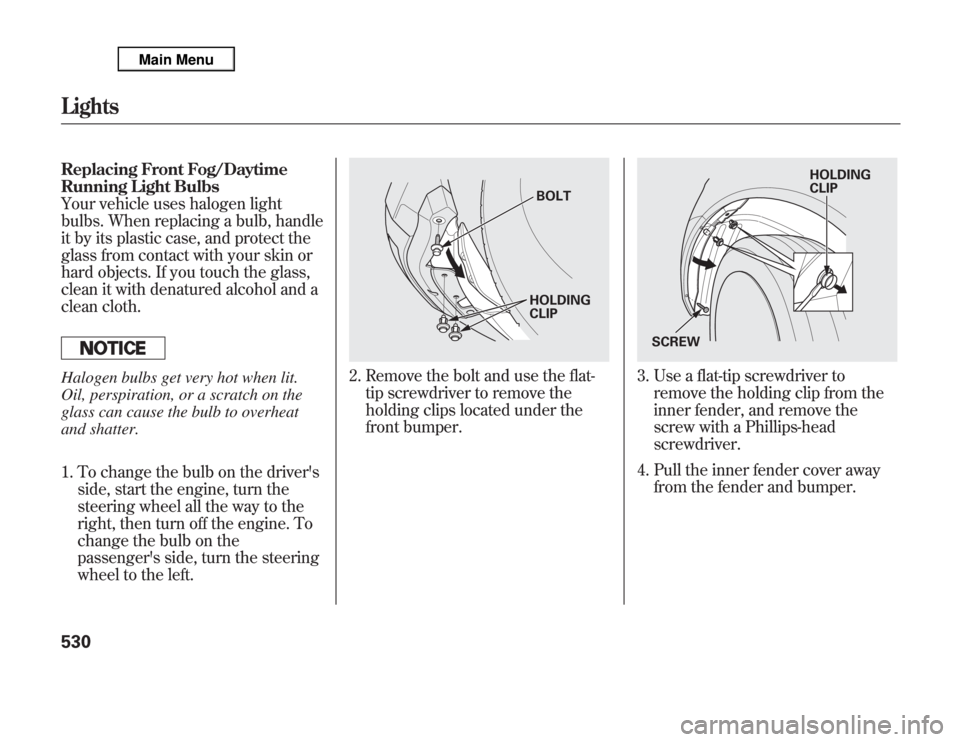
2. Remove the bolt and use the flat-
tip screwdriver to remove the
holding clips located under the
front bumper.
3. Use a flat-tip screwdriver to
remove the holding clip from the
inner fender, and remove the
screw with a Phillips-head
screwdriver.
4. Pull the inner fender cover away
from the fender and bumper.
BOLT
HOLDING
CLIP
HOLDING
CLIP
SCREW
Lights530
Page 538 of 621
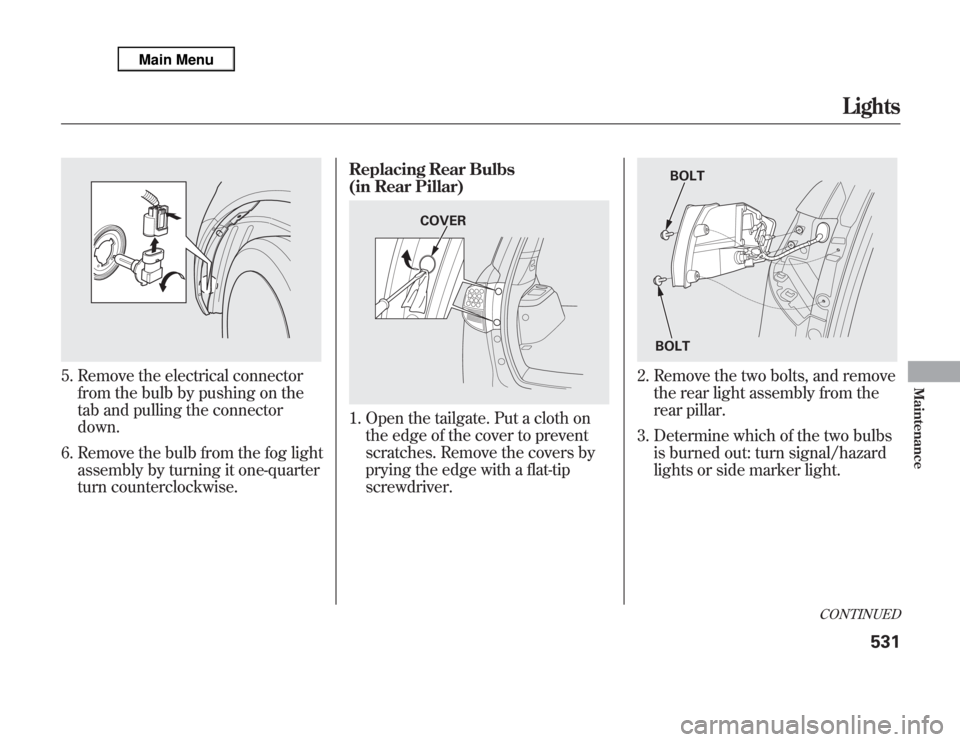
5. Remove the electrical connector
from the bulb by pushing on the
tab and pulling the connector
down.
6. Remove the bulb from the fog light
assembly by turning it one-quarter
turn counterclockwise.Replacing Rear Bulbs
(in Rear Pillar)
1. Open the tailgate. Put a cloth on
the edge of the cover to prevent
scratches. Remove the covers by
prying the edge with a flat-tip
screwdriver.
2. Remove the two bolts, and remove
the rear light assembly from the
rear pillar.
3. Determine which of the two bulbs
is burned out: turn signal/hazard
lights or side marker light.
COVER
BOLT
BOLT
CONTINUED
Lights
531
Maintenance
Page 539 of 621
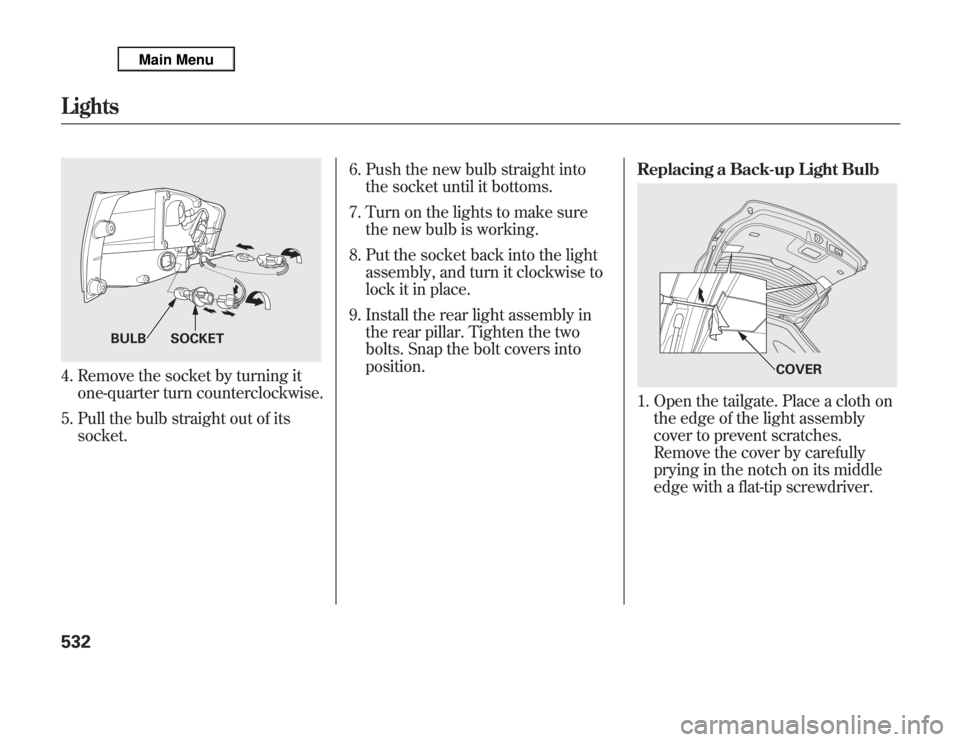
4. Remove the socket by turning it
one-quarter turn counterclockwise.
5. Pull the bulb straight out of its
socket.6. Push the new bulb straight into
the socket until it bottoms.
7. Turn on the lights to make sure
the new bulb is working.
8. Put the socket back into the light
assembly, and turn it clockwise to
lock it in place.
9. Install the rear light assembly in
the rear pillar. Tighten the two
bolts. Snap the bolt covers into
position.Replacing a Back-up Light Bulb
1. Open the tailgate. Place a cloth on
the edge of the light assembly
cover to prevent scratches.
Remove the cover by carefully
prying in the notch on its middle
edge with a flat-tip screwdriver.
BULB SOCKET
COVER
Lights532
Page 540 of 621
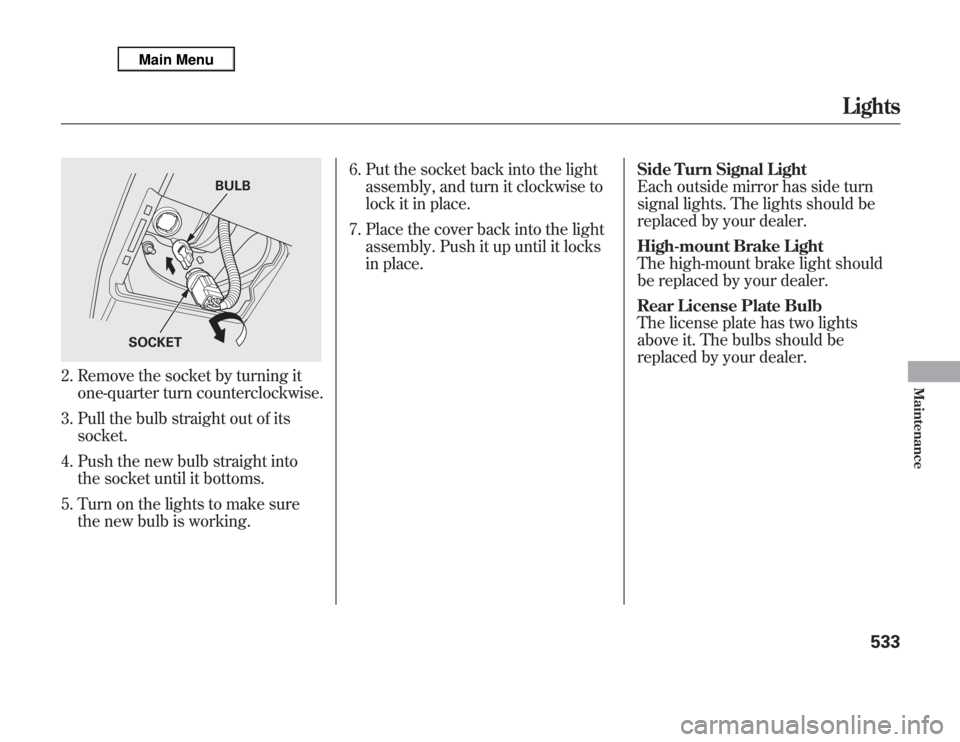
2. Remove the socket by turning it
one-quarter turn counterclockwise.
3. Pull the bulb straight out of its
socket.
4. Push the new bulb straight into
the socket until it bottoms.
5. Turn on the lights to make sure
the new bulb is working.6. Put the socket back into the light
assembly, and turn it clockwise to
lock it in place.
7. Place the cover back into the light
assembly. Push it up until it locks
in place.Side Turn Signal Light
Each outside mirror has side turn
signal lights. The lights should be
replaced by your dealer.
High-mount Brake Light
The high-mount brake light should
be replaced by your dealer.
Rear License Plate Bulb
The license plate has two lights
above it. The bulbs should be
replaced by your dealer.
BULB
SOCKET
Lights
533
Maintenance
Page 555 of 621

If you need to park your vehicle for
an extended period (more than 1
month), there are several things you
should do to prepare it for storage.
Proper preparation helps prevent
deterioration and makes it easier to
get your vehicle back on the road. If
possible, store your vehicle indoors.ŌŚÅ
Fill the fuel tank.
ŌŚÅ
Wash and dry the exterior
completely.
ŌŚÅ
Clean the interior. Make sure the
carpeting, floor mats, etc., are
completely dry.
ŌŚÅ
Leave the parking brake off. Put
the transmission in Park.
ŌŚÅ
Block the rear wheels.
ŌŚÅ
If the vehicle is to be stored for a
longer period, it should be
supported on jackstands so the
tires are off the ground.
ŌŚÅ
Leave one window open slightly (if
the vehicle is being stored
indoors).
ŌŚÅ
Disconnect the battery.
ŌŚÅ
Support the front and rear wiper
blade arms with a folded towel or
rag so they do not touch the
windshield.
ŌŚÅ
To minimize sticking, apply a
silicone spray lubricant to all door
and tailgate seals. Also, apply a
vehicle body wax to the painted
surfaces that mate with the door
and tailgate seals.
ŌŚÅ
Cover the vehicle with a
ŌĆśŌĆśbreathableŌĆÖŌĆÖcover, one made from
a porous material such as cotton.
Non-porous materials, such as
plastic sheeting, trap moisture,
which can damage the paint.
ŌŚÅ
If possible, periodically run the
engine until it reaches full
operating temperature (the cooling
fans cycle on and off twice).
Preferably, do this once a month.
Vehicle Storage548
Page 558 of 621

If you have a flat tire while driving,
stop in a safe place to change it.
Drive slowly along the shoulder until
you get to an exit or an area to stop
that is far away from the traffic lanes.
The vehicle can easily roll off
the jack, seriously injuring
anyone underneath.
Follow the directions for
changing a tire exactly, and
never get under the vehicle
when it is supported only by the
jack.
1. Park the vehicle on firm, level, and
non-slippery ground. Put the
transmission in Park. Apply the
parking brake.
2. Turn on the hazard warning lights,
and turn the ignition switch to the
LOCK (0) position. Have all
passengers get out of the vehicle
while you change the tire.
3. Open the tailgate.4. Push the rear edge of the handle
to raise the handle loop and pull up
the loop to raise the cargo area
floor.
CARGO AREA
FLOOR
TOOLS
SPARE TIREJACK
CONTINUED
Changing a Flat Tire
551
Taking Care of the Unexpected
Page 564 of 621

Diagnosing why the engine won't
start falls into two areas, depending
on what you hear when you turn the
ignition switch to the START (III)
position:ŌŚÅ
You hear nothing, or almost
nothing. The engine's starter
motor does not operate at all, or
operates very slowly.
ŌŚÅ
You can hear the starter motor
operating normally, or the starter
motor sounds like it is spinning
faster than normal, but the engine
does not start up and run.
Nothing Happens or the Starter
Motor Operates Very Slowly
When you turn the ignition switch to
the START (III) position, you do not
hear the normal noise of the engine
trying to start. You may hear a
clicking sound, a series of clicks, or
nothing at all.Check these things:
ŌŚÅ
Check the transmission interlock.
The transmission must be in Park
or neutral or the starter will not
operate.
ŌŚÅ
Turn the ignition switch to the ON
(II) position. Turn on the
headlights, and check their
brightness. If the headlights are
very dim or do not come on at all,
the battery is discharged. See
Jump Startingon page 558.
ŌŚÅ
Turn the ignition switch to the
START (III) position. If the
headlights do not dim, check the
condition of the fuses. If the fuses
are OK, there is probably
something wrong with the
electrical circuit for the ignition
switch or starter motor. You will
need a qualified technician to
determine the problem. See
Emergency Towingon page 572.If the headlights dim noticeably or
go out when you try to start the
engine, either the battery is
discharged or the connections are
corroded. Check the condition of
the battery and terminal
connections (see page 547). You
can then try jump starting the
vehicle from a booster battery (see
page 558).
The Starter Operates Normally
In this case, the starter motor's speed
sounds normal, or even faster than
normal, when you turn the ignition
switch to the START (III) position,
but the engine does not run.
ŌŚÅ
Are you using a properly coded
key? An improperly coded key will
cause the immobilizer system
indicator in the instrument panel
to blink rapidly (see page 74).
CONTINUED
If the Engine Won't Start
557
Taking Care of the Unexpected
Page 565 of 621

ŌŚÅ
Are you using the proper starting
procedure? Refer toStarting the
Engineon page 442.
ŌŚÅ
Do you have fuel? Check the fuel
gauge; the warning indicator may
not be working.
ŌŚÅ
There may be an electrical
problem, such as no power to the
fuel pump. Check all the fuses (see
page 566).
If you find nothing wrong, you will
need a qualified technician to find the
problem. SeeEmergency Towingon
page 572.Jump Starting
Although this seems like a simple
procedure, you should take several
precautions.
A battery can explode if you do
not follow the correct
procedure, seriously injuring
anyone nearby.
Keep all sparks, open flames,
and smoking materials away
from the battery.
You cannot start your vehicle by
pushing or pulling it.
To Jump Start Your Vehicle:1. Open the hood, and check the
physical condition of the battery.
In very cold weather, check the
condition of the electrolyte. If it
seems slushy or frozen, do not try
jump starting until it thaws.If a battery sits in extreme cold, the
electrolyte inside can freeze. Attempting
to jump start with a frozen battery can
cause it to rupture.
2. Turn off all the electrical
accessories: heater, A/C, climate
control, audio system, lights, etc.
Put the transmission in neutral or
Park, and set the parking brake.
If the Engine Won't Start, Jump Starting558
Page 571 of 621

U.S. Canada
The brake system
indicator normally
comes on when you turn the ignition
switch to the ON (II) position, and as
a reminder to check the parking
brake. It will stay on if you do not
fully release the parking brake.
If the brake system indicator comes
on while driving, the brake fluid level
is probably low. Press lightly on the
brake pedal to see if it feels normal. If
it does, check the brake fluid level
the next time you stop at a service
station (see page 525).
You will also see aŌĆśŌĆśLOW BRAKE
FLUIDŌĆÖŌĆÖmessage on the multi-
information display (see page 87).If the fluid level is low, take your
vehicle to a dealer, and have the
brake system inspected for leaks or
worn brake pads.
However, if the brake pedal does not
feel normal, you should take
immediate action. A problem in one
part of the system's dual circuit
design will still give you braking at
two wheels. You will feel the brake
pedal go down much farther before
the vehicle begins to slow down, and
you will have to press harder on the
pedal.
You will also see aŌĆśŌĆśCHECK BRAKE
SYSTEMŌĆÖŌĆÖmessage on the multi-
information display (see page 87).Slow down by shifting to a lower
gear, and pull to the side of the road
when it is safe. Because of the long
distance needed to stop, it is
hazardous to drive the vehicle. You
should have it towed, and repaired as
soon as possible (seeEmergency
Towingon page 572).
If you must drive the vehicle a short
distance in this condition, drive
slowly and carefully.
If the ABS indicator and the VSA
system indicator come on with the
brake system indicator, have your
vehicle inspected by your dealer
immediately.
Brake System Indicator564