lock Acura MDX 2012 User Guide
[x] Cancel search | Manufacturer: ACURA, Model Year: 2012, Model line: MDX, Model: Acura MDX 2012Pages: 621, PDF Size: 11.15 MB
Page 61 of 621
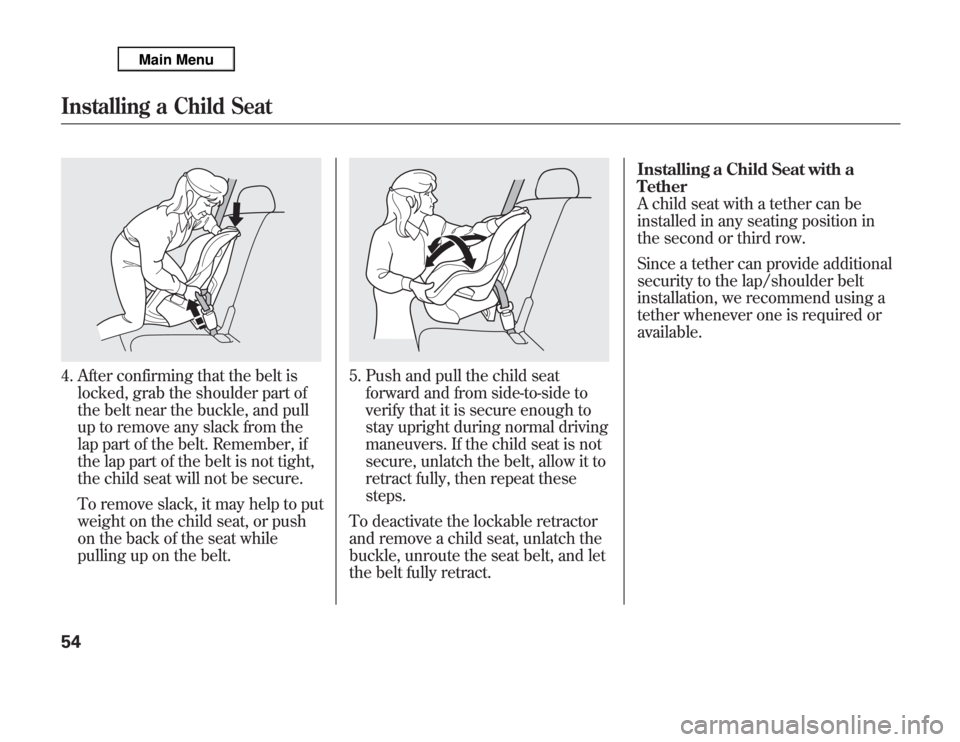
4. After confirming that the belt is
locked, grab the shoulder part of
the belt near the buckle, and pull
up to remove any slack from the
lap part of the belt. Remember, if
the lap part of the belt is not tight,
the child seat will not be secure.
To remove slack, it may help to put
weight on the child seat, or push
on the back of the seat while
pulling up on the belt.
5. Push and pull the child seat
forward and from side-to-side to
verify that it is secure enough to
stay upright during normal driving
maneuvers. If the child seat is not
secure, unlatch the belt, allow it to
retract fully, then repeat these
steps.
To deactivate the lockable retractor
and remove a child seat, unlatch the
buckle, unroute the seat belt, and let
the belt fully retract.Installing a Child Seat with a
Tether
A child seat with a tether can be
installed in any seating position in
the second or third row.
Since a tether can provide additional
security to the lap/shoulder belt
installation, we recommend using a
tether whenever one is required or
available.
Installing a Child Seat54
Page 72 of 621
This section gives information about
the controls and displays that
contribute to the daily operation of
your vehicle. All the essential
controls are within easy reach.Control Locations
..........................
66
Instrument Panel
..........................
67
Instrument Panel Indicators
..........
68
Gauges
..........................................
78
Multi-Information Display
.............
79
Controls Near the Steering
Wheel
.....................................
125
Windshield Wipers and
Washers
..............................
126
Rear Window Wiper and
Washer
...............................
127
Turn Signal and Headlights
........
128
Hazard Warning Button
..............
132
Rear Window Defogger
...............
132
Instrument Panel Brightness
......
133
Steering Wheel Adjustments
.......
134
Keys and Locks
...........................
136
Immobilizer System
....................
138
Ignition Switch
............................
139
Door Locks
.................................
140
Childproof Door Locks
............
141
Tailgate
.......................................
141
Power Tailgate
........................
142
Remote Transmitter
....................
145Seats
...........................................
149
Detachable Anchor
.................
155
Seat Heaters
................................
157
Seat Heaters and Seat
Ventilation
...............................
158
Power Windows
..........................
160
Moonroof
....................................
163
Parking Brake
.............................
164
Mirrors
.......................................
165
Driving Position Memory
System
....................................
168
Interior Lights
.............................
170
Interior Convenience Items
.........
173
Beverage Holders
...................
174
Console Compartment
............
175
Storage Compartment
.............
175
Glove Box
...............................
175
Sunglasses Holder
..................
176
Sun Visor
................................
176
Vanity Mirror
..........................
177
Accessory Power Sockets
.......
177
AC Power Outlet
.....................
178
Instruments and Controls
65
Instruments and Controls
Page 73 of 621
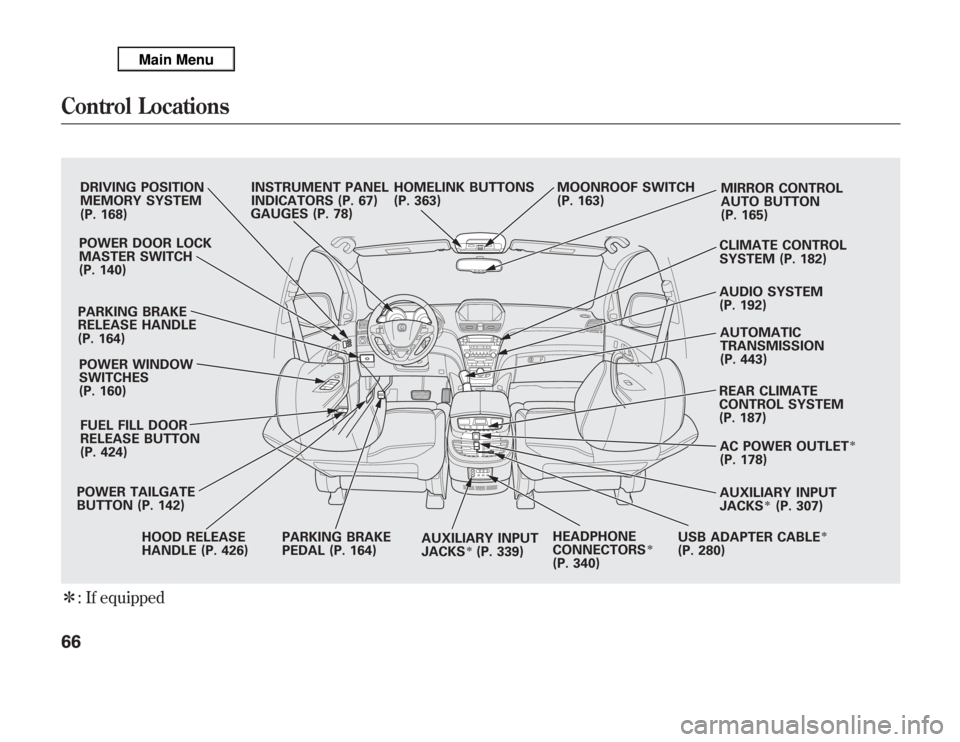
ᤳ: If equipped
DRIVING POSITION
MEMORY SYSTEM
(P. 168)
POWER DOOR LOCK
MASTER SWITCH
(P. 140)
PARKING BRAKE
RELEASE HANDLE
(P. 164)
POWER WINDOW
SWITCHES
(P. 160)
FUEL FILL DOOR
RELEASE BUTTON
(P. 424)
POWER TAILGATE
BUTTON (P. 142)
HOOD RELEASE
HANDLE (P. 426)PARKING BRAKE
PEDAL (P. 164)AUXILIARY INPUT
JACKS
ᤳ(P. 339)HEADPHONE
CONNECTORS
ᤳ
(P. 340)REAR CLIMATE
CONTROL SYSTEM
(P. 187)AUTOMATIC
TRANSMISSION
(P. 443) AUDIO SYSTEM
(P. 192) CLIMATE CONTROL
SYSTEM (P. 182)MIRROR CONTROL
AUTO BUTTON
(P. 165) MOONROOF SWITCH
(P. 163) HOMELINK BUTTONS
(P. 363) INSTRUMENT PANEL
INDICATORS (P. 67)
GAUGES (P. 78)
AC POWER OUTLET
ᤳ
(P. 178)
AUXILIARY INPUT
JACKS
ᤳ(P. 307)
USB ADAPTER CABLE
ᤳ
(P. 280)
Control Locations66
Page 74 of 621
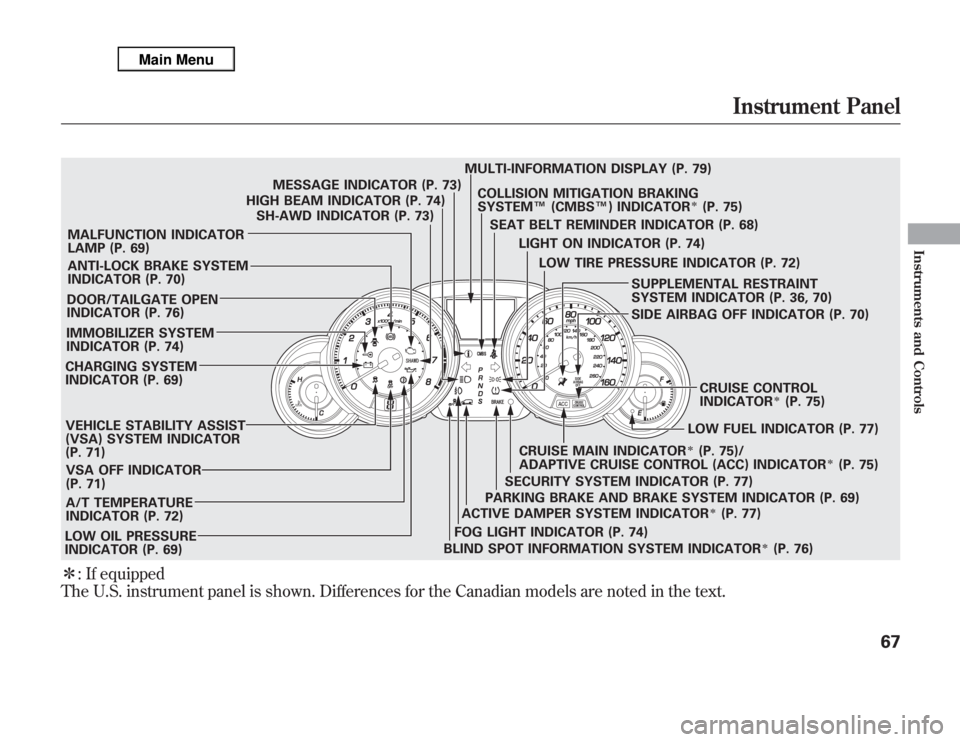
ᤳ: If equipped
The U.S. instrument panel is shown. Differences for the Canadian models are noted in the text.
MESSAGE INDICATOR (P. 73)
HIGH BEAM INDICATOR (P. 74)
SH-AWD INDICATOR (P. 73)
ANTI-LOCK BRAKE SYSTEM
INDICATOR (P. 70)
FOG LIGHT INDICATOR (P. 74) DOOR/TAILGATE OPEN
INDICATOR (P. 76)
IMMOBILIZER SYSTEM
INDICATOR (P. 74)
CHARGING SYSTEM
INDICATOR (P. 69)
VEHICLE STABILITY ASSIST
(VSA) SYSTEM INDICATOR
(P. 71)
SECURITY SYSTEM INDICATOR (P. 77)
ACTIVE DAMPER SYSTEM INDICATOR
ᤳ(P. 77) PARKING BRAKE AND BRAKE SYSTEM INDICATOR (P. 69)LOW FUEL INDICATOR (P. 77) SEAT BELT REMINDER INDICATOR (P. 68) COLLISION MITIGATION BRAKING
SYSTEM™(CMBS™) INDICATOR
ᤳ(P. 75)
SUPPLEMENTAL RESTRAINT
SYSTEM INDICATOR (P. 36, 70)
CRUISE MAIN INDICATOR
ᤳ(P. 75)/
ADAPTIVE CRUISE CONTROL (ACC) INDICATOR
ᤳ(P. 75) MALFUNCTION INDICATOR
LAMP (P. 69)
VSA OFF INDICATOR
(P. 71)
A/T TEMPERATURE
INDICATOR (P. 72)
BLIND SPOT INFORMATION SYSTEM INDICATOR
ᤳ(P. 76) CRUISE CONTROL
INDICATORᤳ(P. 75) MULTI-INFORMATION DISPLAY (P. 79)
LOW TIRE PRESSURE INDICATOR (P. 72)
LOW OIL PRESSURE
INDICATOR (P. 69)LIGHT ON INDICATOR (P. 74)
SIDE AIRBAG OFF INDICATOR (P. 70)
Instrument Panel
67
Instruments and Controls
Page 77 of 621

Supplemental Restraint
System Indicator
This indicator comes on briefly when
you turn the ignition switch to the
ON (II) position. If it comes on at any
other time, it indicates a potential
problem with your front airbags. This
indicator will also alert you to a
potential problem with your airbag
system components. You will also
see a‘‘CHECK AIRBAG SYSTEM’’
message on the multi-information
display (see page 87). For more
information, see page 36.
U.S. Canada
Side Airbag Off
Indicator
This indicator comes on when you
turn the ignition switch to the ON
(II) position. If it comes on at any
other time, it indicates that the
passenger's side airbag has
automatically shut off. You will also
see a‘‘PASSENGER SIDE AIRBAG
OFF’’message on the multi-
information display (see page 87).
For more information, see page 36.
Anti-lock Brake System
(ABS) Indicator
This indicator normally comes on for
a few seconds when you turn the
ignition switch to the ON (II)
position. If this indicator comes on at
any other time, there is a problem in
the ABS. If this happens, take the
vehicle to your dealer to have it
checked. With this indicator on, your
vehicle still has normal braking
ability but no anti-lock function. You
will also see a‘‘CHECK ABS
SYSTEM’’message on the multi-
information display (see page 88).
For more information, see page 461.
Instrument Panel Indicators70
Page 81 of 621

Immobilizer System
Indicator
This indicator comes on briefly when
you turn the ignition switch to the
ON (II) position. It will then go off if
you have inserted a properly coded
ignition key. If it is not a properly
coded key, the indicator will blink,
and the engine's fuel system will be
disabled (see page 138).
Lights On Indicator
This indicator reminds you that the
exterior lights are on. It comes on
when the light switch is in either the
or
position. This indicator will
also come on when the light switch is
in AUTO and the lights turn on
automatically. If you turn the ignition
switch to the ACCESSORY (I) or the
LOCK (0) position without turning
off the light switch, this indicator will
remain on. A reminder chime will
also sound when you open the
driver's door.
Fog Light Indicator
This indicator comes on when you
turn on the fog lights. For more
information, see page 130.High Beam Indicator
This indicator comes on with the
high beam headlights. For more
information, see page 128.
Instrument Panel Indicators74
Page 82 of 621

Adaptive Cruise Control
(ACC) Indicator
On models with adaptive cruise control
(ACC)This indicator normally comes on for
a few seconds when you turn the
ignition switch to the ON (II)
position.
When you push the MAIN button on
the steering wheel, this indicator
comes on green. You will also see
‘‘ACC’’on the multi-information
display.
If the indicator comes on amber,
there is a problem with the ACC
system. You will also see a‘‘CHECK
ACC SYSTEM’’message on the
multi-information display (see page
88). Take your vehicle to your dealer
to have it checked. For more
information, see page 348.
Cruise Main Indicator
On models without adaptive cruise
control (ACC)This indicator comes on when you
turn on the cruise control system by
pressing the CRUISE button (see
page 345).
Cruise Control Indicator
On models without adaptive cruise
control (ACC)This indicator comes on when you
set the cruise control. See page 345
for information on operating the
cruise control.
Collision Mitigation
Braking System™
(CMBS™) Indicator
On models with collision mitigation
braking system™(CMBS™)This indicator normally comes on for
a few seconds when you turn the
ignition switch to the ON (II)
position. It also comes on as a
reminder that you have turned off the
collision mitigation braking system™
(CMBS™).
The CMBS indicator also comes on if
dirt or other debris blocks the radar
sensor in the front grille. You will
also see a‘‘CHECK CMBS RADAR
SENSOR’’message on the multi-
information display. When you clean
the radar sensor, the indicator
should go off the next time you turn
the ignition switch to the ON (II)
position.
CONTINUED
Instrument Panel Indicators
75
Instruments and Controls
Page 97 of 621

Customize SettingsWhen the main menu displays
‘‘Keyless Memory Settings™,’’you
can customize some vehicle control
settings.
To enter the customizing mode,
press the SEL/RESET button.
To change the settings, the ignition
switch must be in the ON (II)
position, and the vehicle must be
stopped with the transmission in
Park.If you turn the ignition switch to the
ACCESSORY (I) or the LOCK (0)
position, or move the shift lever out
of Park, the display will change to the
normal screen.
You can customize some vehicle
control settings for‘‘DRIVER 1’’and
‘‘DRIVER 2’’separately. If‘‘DRIVER
1’’or‘‘DRIVER 2’’is not displayed,
customizing is not possible.
To have the driver's ID detected,
make sure your remote transmitter is
linked to the system (see Keyless
Memory Settings™on page 148).
If you want the settings as they were
when the vehicle left the factory,
select DEFAULT ALL, as described
on page 93.
If you want to change any vehicle
control settings, select CHG
SETTING, then press the SEL/
RESET button.
Refer to the table on the following
pages about the settings you want to
customize.
Multi-Information Display90
Page 99 of 621

Group Setup Menu Item Description Setting Option Page
LIGHTING SETUP
(P. 110)INTERIOR LIGHT
DIMMING TIMEChanges how long (in seconds) the interior lights stay
on after you close the doors and the tailgate.60 sec 15 sec 111
30 sec
ᤳ
HEADLIGHT
AUTO OFF TIMERChanges how long (in seconds) the exterior lights stay
on after you close the driver's door.60 sec
112 30 sec 0 sec
15 sec
ᤳ
AUTO LIGHT
SENSITIVITYChanges the timing of when the headlights come on.
The headlight switch needs to be in the AUTO
position.MAX LOW
113 HIGH MIN
MID
ᤳ
DOOR/WINDOW
SETUP
(P. 115)AUTO DOOR LOCK Changes the setting of when to automatically lock the
doors.SHIFT FROM P
116 WITH VEH SPD
ᤳ
OFF
AUTO DOOR UNLOCK Changes the setting of when to automatically unlock
the driver's/all the doors.SHIFT TO P
ᤳ
DRIVER
DOOR/ALL
DOORS
117 IGN OFF
OFF
KEY AND REMOTE
UNLOCK MODEChanges which doors unlock with the remote
transmitter on a first push.DRIVER DOOR
ᤳ
119
ALL DOORS
KEYLESS LOCK
ACKNOWLEDGMENTThe exterior lights flash each time you press the
LOCK or UNLOCK button. A beeper will also sound
when you press the LOCK button twice.ON
ᤳ
120 OFF
SECURITY RELOCK TIMER Changes how long it takes (in seconds) for the doors
to relock and the security system to set after you
unlock but do not open the door.90 sec
121 60 sec
30 sec
ᤳ
WIPER SETUP
(P. 123)WIPER ACTION Changes the wiper operation between two settings
when the wiper switch is in the INT position.INTERMITTENT 123
WITH VEH SPD
ᤳ
DEFAULT ALL
(P. 93)Set/Cancel all the customized settings as default. SET 93
CANCEL
ᤳ: Default setting
Multi-Information Display92
Page 111 of 621
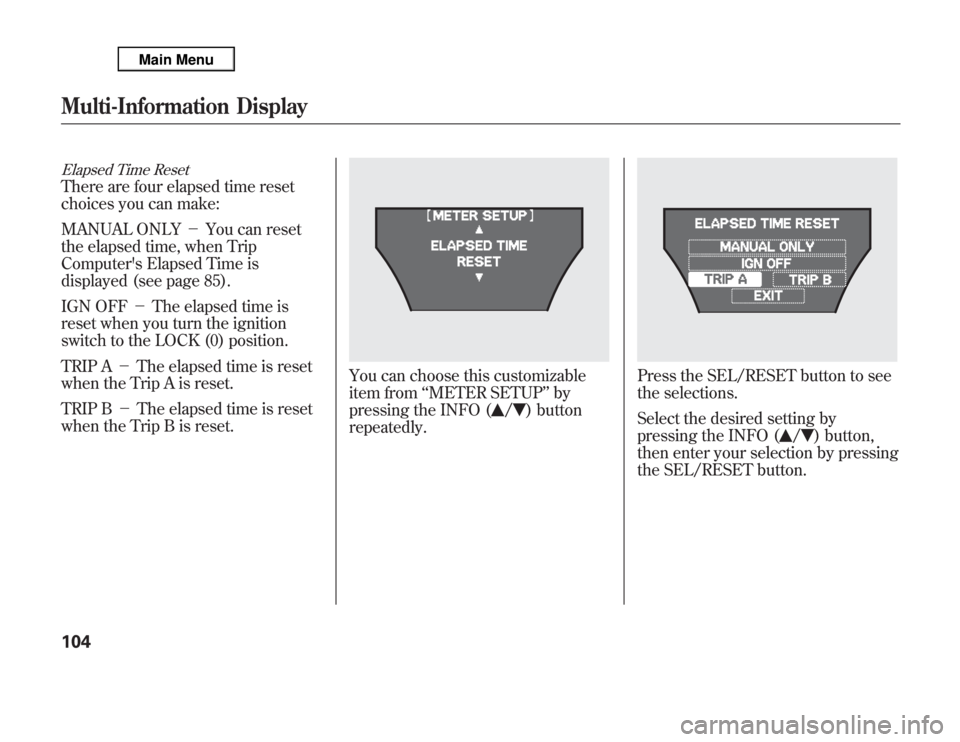
Elapsed Time ResetThere are four elapsed time reset
choices you can make:
MANUAL ONLY-You can reset
the elapsed time, when Trip
Computer's Elapsed Time is
displayed (see page 85).
IGN OFF-The elapsed time is
reset when you turn the ignition
switch to the LOCK (0) position.
TRIP A-The elapsed time is reset
when the Trip A is reset.
TRIP B-The elapsed time is reset
when the Trip B is reset.
You can choose this customizable
item from‘‘METER SETUP’’by
pressing the INFO (
/
) button
repeatedly.
Press the SEL/RESET button to see
the selections.
Select the desired setting by
pressing the INFO (
/
) button,
then enter your selection by pressing
the SEL/RESET button.
Multi-Information Display104