lights Acura MDX 2012 Owner's Guide
[x] Cancel search | Manufacturer: ACURA, Model Year: 2012, Model line: MDX, Model: Acura MDX 2012Pages: 621, PDF Size: 11.15 MB
Page 153 of 621

If you push the same button again
while the tailgate is opening or
closing, three beeps sound, the
tailgate stops moving, reverses
direction and stops in the fully
opened or fully closed position.
PANIC’╝ŹPress and hold this
button for about 1 second to attract
attention; the horn will sound, and
the exterior lights will flash for about
30 seconds. To cancel panic mode,
press any other button on the remote
transmitter, or turn the ignition
switch to the ON (II) position. Panic
mode does not work when the key is
in the ignition switch.
Remote Transmitter CareŌŚÅ
Avoid dropping or throwing the
transmitter.
ŌŚÅ
Protect the transmitter from
extreme temperatures.
ŌŚÅ
Do not immerse the transmitter in
any liquid.
ŌŚÅ
If you lose a transmitter, the
replacement needs to be
reprogrammed by your dealer.
Replacing the Transmitter Battery
If it takes several pushes on the
button to lock or unlock the doors
and the tailgate, replace the battery
as soon as possible.
Battery type: CR1616
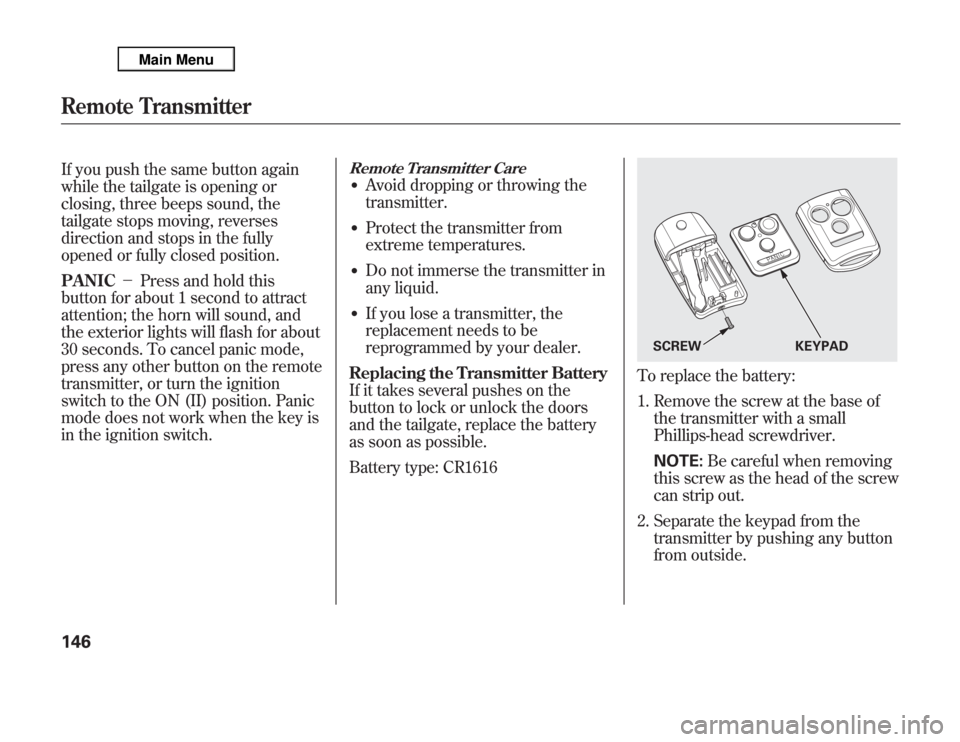
To replace the battery:
1. Remove the screw at the base of
the transmitter with a small
Phillips-head screwdriver.
NOTE:Be careful when removing
this screw as the head of the screw
can strip out.
2. Separate the keypad from the
transmitter by pushing any button
from outside.
SCREW KEYPAD
Remote Transmitter146
Page 172 of 621

Keep the inside and outside mirrors
clean and adjusted for best visibility.
Be sure to adjust the mirrors before
you start driving.
The inside mirror can automatically
darken to reduce glare. To turn on
this feature, press the button on the
bottom of the mirror. The AUTO
indicator comes on as a reminder.
When it is on, the mirror darkens
when it senses the headlights of a
vehicle behind you, then returns to
normal visibility when the lights are
gone. Press the button again to turn
off this feature.
There is also a sensor on the back of
the mirror. Items hung on the mirror
may block this sensor and affect its
performance.
INDICATOR
AUTO BUTTONSENSOR
CONTINUEDMirrors
165
Instruments and Controls
Page 177 of 621

To stop the system's automatic
adjustment, do any of these actions:ŌŚÅ
Press any button on the control
panel: MEMO, 1, or 2.
ŌŚÅ
Push any of the adjustment
switches for the seat.
ŌŚÅ
Shift out of Park.
ŌŚÅ
Adjust the outside mirrors.
If desired, you can use the
adjustment switches to change the
positions of the seat, steering wheel
or outside mirrors after they are in
their memorized position. If you
change the memorized position, the
indicator in the memory button will
go out. To keep this driving position
for later use, you must store it in the
driving position memory.Light Control Buttons
Your vehicle has the light control
buttons on the front ceiling. With
these buttons, you can select three
positions: OFF, Door (door activated
position), and ON. To select a
position, press the appropriate
button.
When you press the DOOR button,
the green indicator in the button
comes on as a reminder.To turn off the setting, press the OFF
button.
OFF position:ŌŚÅ
The front individual map lights can
be turned on and off by pressing
each map light button (
).
ŌŚÅ
The second and third row
individual map lights cannot be
turned on.
Front
ON
DOOR ACTIVATE
OFF
Second and Third row Front
MAP LIGHT BUTTONS
Driving Position Memory System, Interior Lights170
Page 178 of 621

Door (Door activated position):ŌŚÅ
The individual map lights in the
front, second and third row come
on when any door is opened, when
the remote transmitter is used to
unlock the doors (see page 145).
When the doors are closed, each
light can be turned on and off by
pushing the map light button (
).
After all doors are closed tightly, the
lights dim slightly, then fade out in
about 30 seconds.
To change theŌĆśŌĆśINTERIOR LIGHT
DIMMING TIMEŌĆÖŌĆÖsetting, see page
111.
ON position:ŌŚÅ
All the individual map lights come
on and stay on.Individual Map Lights
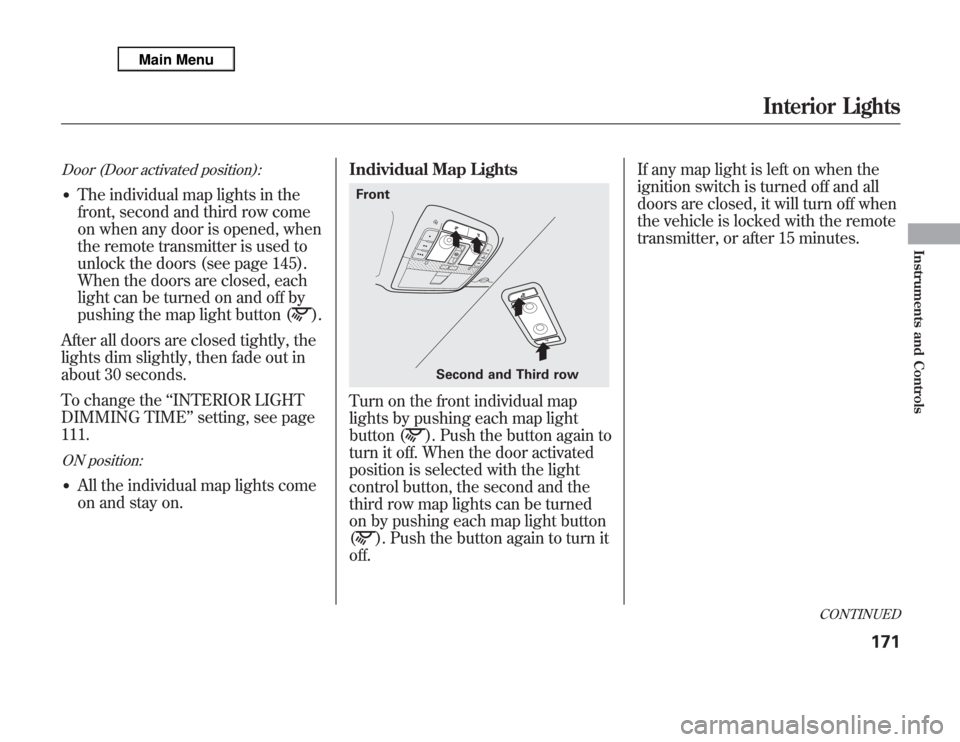
Turn on the front individual map
lights by pushing each map light
button (
). Push the button again to
turn it off. When the door activated
position is selected with the light
control button, the second and the
third row map lights can be turned
on by pushing each map light button
(
). Push the button again to turn it
off.If any map light is left on when the
ignition switch is turned off and all
doors are closed, it will turn off when
the vehicle is locked with the remote
transmitter, or after 15 minutes.
Second and Third row Front
CONTINUED
Interior Lights
171
Instruments and Controls
Page 179 of 621

Courtesy LightsThe courtesy lights between the
front map lights come on when the
parking lights are turned on. To
adjust its brightness, press either of
the instrument panel brightness
control buttons (’╝ŗor’╝Ź) with the
ignition switch in the ON (II)
position.Tailgate Lights
The lights in the tailgate have an on-
off switch to control if the lights
come on when the tailgate is opened.
The tailgate lights do not come on
when any other doors are opened.Individual Interior Lights
The courtesy lights in all four doors
come on when you open any door.
The light around the ignition switch
comes on when any door is opened.
After you close the door, the ignition
switch light stays on for about 30
seconds regardless of the interior
light dimming time setting (see page
111).
COURTESY LIGHT
Interior Lights172
Page 203 of 621

Adjusting the Sound
Press the TUNE (SOUND) knob
repeatedly to display the BASS,
TREBLE, FADER, BALANCE,
SUBWOOFER, CENTER, and SVC
(speed-sensitive volume
compensation) settings.
BASS’╝ŹAdjusts the bass.
TREBLE’╝ŹAdjusts the treble.
FADER’╝ŹAdjusts the front-to-back
strength of the sound.
BALANCE’╝ŹAdjusts the side-to-
side strength of the sound.
SUBWOOFER’╝ŹAdjusts the
strength of sound from the
subwoofer speaker.
CENTER’╝ŹAdjusts the strength of
sound from the center speaker.SVC’╝ŹAdjusts the volume level
based on the vehicle speed.
Each mode is shown in the display as
it changes. Turn the TUNE knob to
adjust the setting to your liking.
When the level reaches the center,
you will seeŌĆśŌĆśCŌĆÖŌĆÖin the display.
The system will return to the audio
display about 5 seconds after you
stop adjusting a mode.
Speed-sensitive Volume
Compensation (SVC)The SVC mode controls the volume
based on vehicle speed. The faster
you go, the louder the audio volume
becomes. As you slow down, the
audio volume decreases.
The SVC has four modes: SVC OFF,
SVC LOW, SVC MID, and SVC
HIGH. Turn the TUNE knob to
adjust the setting to your liking. If
you feel the sound is too loud,
choose low. If you feel the sound is
too quiet, choose high.Audio System Lighting
You can use the instrument panel
brightness control buttons to adjust
the illumination of the audio system
(see page 133). The audio system
illuminates when the parking lights
are on, even if the radio is off.
Playing the AM/FM Radio (Models without navigation system)196
Page 348 of 621

The security system helps to protect
your vehicle and valuables from
theft. The horn sounds and a
combination of headlights, position
lights, side marker lights and
taillights flashes if someone attempts
to break into your vehicle or remove
the audio unit. This alarm continues
for two minutes, then the system
resets. To deactivate the system
before the two minutes have elapsed,
unlock the driver's door with the key
or the remote transmitter.
The security system automatically
sets 15 seconds after you lock the
doors, hood, and tailgate. For the
system to activate, you must lock the
doors from the outside with the key,
or use driver's lock tab, door lock
master switch, or remote transmitter.
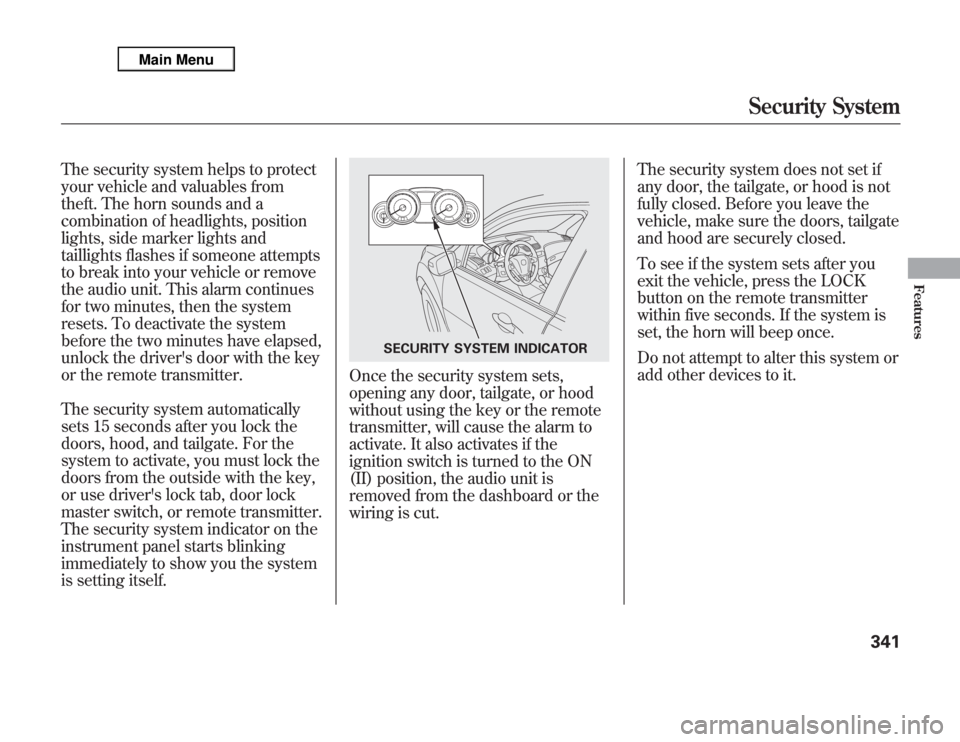
The security system indicator on the
instrument panel starts blinking
immediately to show you the system
is setting itself.
Once the security system sets,
opening any door, tailgate, or hood
without using the key or the remote
transmitter, will cause the alarm to
activate. It also activates if the
ignition switch is turned to the ON
(II) position, the audio unit is
removed from the dashboard or the
wiring is cut.The security system does not set if
any door, the tailgate, or hood is not
fully closed. Before you leave the
vehicle, make sure the doors, tailgate
and hood are securely closed.
To see if the system sets after you
exit the vehicle, press the LOCK
button on the remote transmitter
within five seconds. If the system is
set, the horn will beep once.
Do not attempt to alter this system or
add other devices to it.
SECURITY SYSTEM INDICATOR
Security System
341
Features
Page 438 of 621

Modifying your vehicle, or installing
non-Acura accessories, may make
your vehicle unsafe. Before you
make any modifications or add any
accessories, be sure to read the
following information.
Accessories
Your dealer has Acura accessories
that allow you to personalize your
vehicle. These accessories have been
designed and approved for your
vehicle, and are covered by warranty.
Although non-Acura accessories may
fit on your vehicle, they may not
meet factory specifications, and could
adversely affect your vehicle's
handling, stability, and reliability.
Improper accessories or
modifications can affect your
vehicle's handling, stability, and
performance, and cause a
crash in which you can be hurt
or killed.
Follow all instructions in this
owner's manual regarding
accessories and modifications.
When properly installed, cellular
phones, alarms, two-way radios, and
low-powered audio systems should
not interfere with your vehicle's
computer controlled systems, such
as your airbags, anti-lock brakes, and
tire pressure monitoring system.Before installing any accessory:
ŌŚÅ
Make sure the accessory does not
obscure any lights, or interfere
with proper vehicle operation or
performance.
ŌŚÅ
Be sure electronic accessories do
not overload electrical circuits (see
page 566) or interfere with proper
operation of your vehicle.
ŌŚÅ
Do not install accessories on the
side pillars or across the rear
windows. Accessories installed in
these areas may interfere with
proper operation of the side
curtain airbags.
ŌŚÅ
Before installing any electronic
accessory, have the installer
contact your dealer for assistance.
If possible, have your dealer
inspect the final installation.
CONTINUED
Accessories and Modifications
431
Before Driving
Page 448 of 621

You should do the following checks
and adjustments before you drive
your vehicle.
1. Make sure all windows, mirrors,
and outside lights are clean and
unobstructed. Remove frost, snow,
or ice.
2. Check that the hood is fully
closed.
3. Visually check the tires. If a tire
looks low, use a gauge to check its
pressure.
4. Check that any items you may be
carrying are stored properly or
fastened down securely.
5. Check the seat adjustment (see
page 149).6. Check the adjustment of the inside
and outside mirrors (see page
165).
7. Check the steering wheel
adjustment (see page 134).
8. Make sure the doors and tailgate
are securely closed and locked.
9. Fasten your seat belt. Check that
your passengers have fastened
their seat belts (see page 16).10. When you start the engine, check
the gauges and indicators in the
instrument panel, and the
messages on the multi-information
display (see pages 67, 78 and 87).
Preparing to Drive
441
Driving
Page 461 of 621

Always use the parking brake when
you park your vehicle. Make sure the
parking brake is set firmly, or your
vehicle may roll if it is parked on an
incline.
Set the parking brake before you put
the transmission in Park. This keeps
the vehicle from moving and putting
pressure on the parking mechanism
in the transmission.Parking Tips
ŌŚÅ
Make sure the moonroof and the
windows are closed.
ŌŚÅ
Turn off the lights.
ŌŚÅ
Place any packages, valuables, etc.
in the cargo area or take them with
you.
ŌŚÅ
Lock the doors and the tailgate.
ŌŚÅ
Never park over dry leaves, tall
grass, or other flammable
materials. The hot three way
catalytic converter could cause
these materials to catch on fire.
ŌŚÅ
If the vehicle is facing uphill, turn
the front wheels away from the
curb.
ŌŚÅ
If the vehicle is facing downhill,
turn the front wheels toward the
curb.
ŌŚÅ
Check the indicator on the
instrument panel to verify that the
security system is set.
ŌŚÅ
Make sure the parking brake is
fully released before driving away.
Driving with the parking brake
partially set can overheat or
damage the rear brakes.
Parking454