head restraint Acura MDX 2014 Owner's Manual
[x] Cancel search | Manufacturer: ACURA, Model Year: 2014, Model line: MDX, Model: Acura MDX 2014Pages: 500, PDF Size: 11.72 MB
Page 8 of 500
7Quick Reference Guide
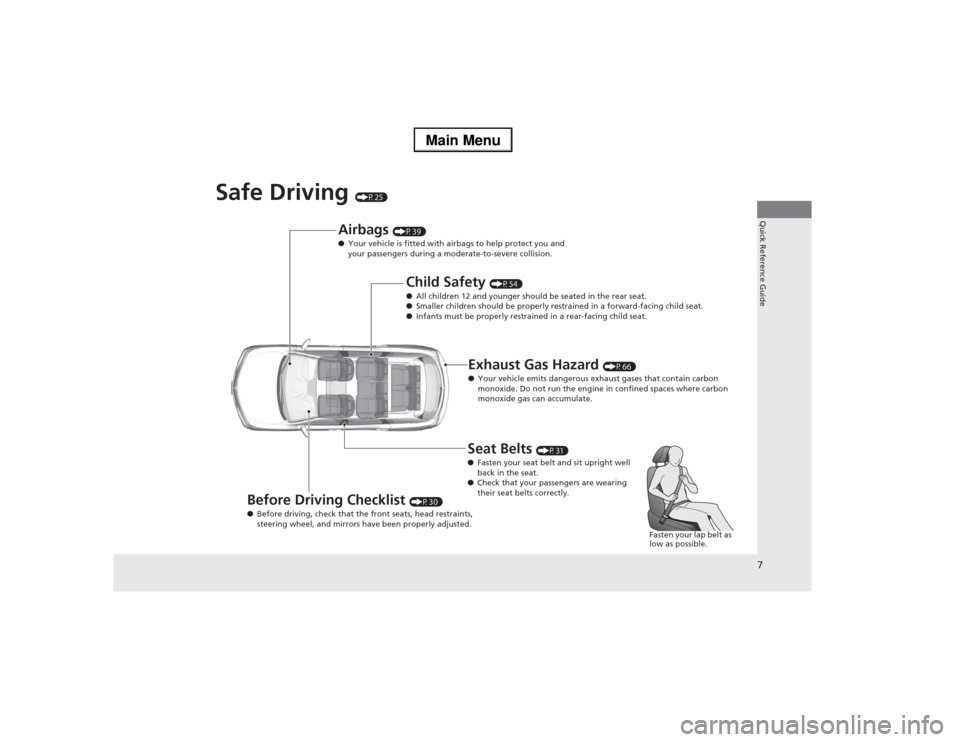
Safe Driving
(P25)
Airbags
(P39)
●Your vehicle is fitted with airbags to help protect you and
your passengers during a moderate-to-severe collision.
Child Safety
(P54)
●All children 12 and younger should be seated in the rear seat.
●Smaller children should be properly restrained in a forward-facing child seat.
●Infants must be properly restrained in a rear-facing child seat.
Exhaust Gas Hazard
(P66)
●Your vehicle emits dangerous exhaust gases that contain carbon
monoxide. Do not run the engine in confined spaces where carbon
monoxide gas can accumulate.
Before Driving Checklist
(P30)
●Before driving, check that the front seats, head restraints,
steering wheel, and mirrors have been properly adjusted.
Seat Belts
(P31)
●Fasten your seat belt and sit upright well
back in the seat.
●Check that your passengers are wearing
their seat belts correctly.
Fasten your lap belt as
low as possible.
Page 30 of 500
29
uuFor Safe DrivinguYour Vehicle’s Safety Features
Continued
Safe Driving
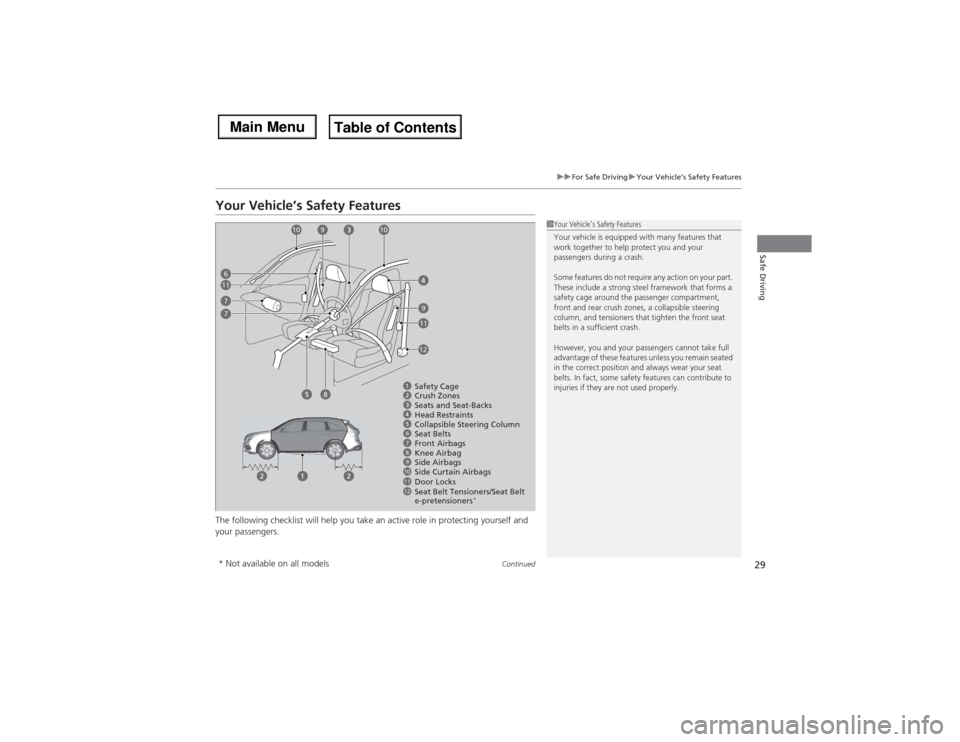
Your Vehicle’s Safety FeaturesThe following checklist will help you take an active role in protecting yourself and
your passengers.
1Your Vehicle’s Safety Features
Your vehicle is equipped with many features that
work together to help protect you and your
passengers during a crash.
Some features do not require any action on your part.
These include a strong steel framework that forms a
safety cage around the passenger compartment,
front and rear crush zones, a collapsible steering
column, and tensioners that tighten the front seat
belts in a sufficient crash.
However, you and your passengers cannot take full
advantage of these features unless you remain seated
in the correct position and always wear your seat
belts. In fact, some safety features can contribute to
injuries if they are not used properly.
67891012Safety Cage
Crush Zones
Seats and Seat-Backs
Head Restraints
Collapsible Steering Column
Seat Belts
Front Airbags
Side Curtain Airbags
Door Locks Side Airbags11Seat Belt Tensioners/Seat Belt
e-pretensioners
*
67
89
9
10
11
11
12
7
Knee Airbag
10
* Not available on all models
Page 31 of 500
uuFor Safe DrivinguYour Vehicle’s Safety Features
30Safe Driving
For the safety of you and your passengers, make a habit of checking these items
each time before you drive.
•After everyone has entered the vehicle, be sure all doors and the tailgate are
closed and locked. Locking the doors and the tailgate helps prevent an occupant
from being ejected and an outsider from unexpectedly opening a door or the
tailgate.
2Locking/Unlocking the Doors from the Inside P. 124
•Adjust your seat to a position suitable for driving. Be sure the front seats are
adjusted as far to the rear as possible while allowing the driver to control the
vehicle. Sitting too close to a front airbag can result in serious or fatal injury in a
crash.
2Adjusting the Seats P. 161
•Adjust head restraints to the proper position. Head restraints are most effective
when the center of the head restraint aligns with the center of your head. Taller
persons should adjust their head restraint to the highest position.
2Adjusting the Head Restraints P. 164
•Always wear your seat belt, and make sure you wear it properly. Confirm that any
passengers are properly belted as well.
2Fastening a Seat Belt P. 34
•Protect children by using seat belts or child seats according to a child’s age, height
and weight.
2Child Safety P. 54
■Safety Checklist
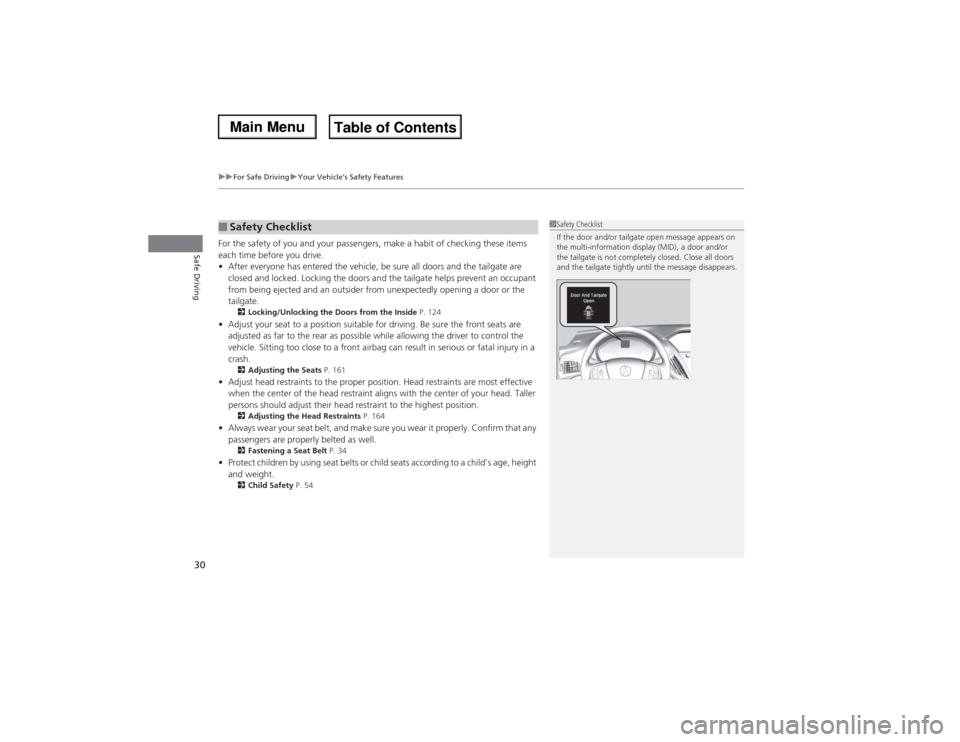
1Safety Checklist
If the door and/or tailgate open message appears on
the multi-information display (MID), a door and/or
the tailgate is not completely closed. Close all doors
and the tailgate tightly until the message disappears.
Page 43 of 500
42
uuAirbagsuTypes of Airbags
Safe Driving
Types of AirbagsYour vehicle is equipped with four types of airbags:
•Front airbags: Airbags in front of the driver’s and front passenger’s seats.
•Driver’s knee airbag: Airbag under the steering column.
•Side airbags: Airbags in the driver’s and front passenger’s seat-backs.
•Side curtain airbags: Airbags above the side windows.
Each is discussed in the following pages.Front Airbags (SRS)The front SRS airbags inflate in a moderate-to-severe frontal collision to help protect
the head and chest of the driver and/or front passenger.
SRS (Supplemental Restraint System) indicates that the airbags are designed to
supplement seat belts, not replace them. Seat belts are the occupant’s primary
restraint system.
The front airbags are housed in the center of the steering wheel for the driver, and
in the dashboard for the front passenger. Both airbags are marked SRS AIRBAG.■Housing Locations
1Types of Airbags
The airbags can inflate whenever the power mode is
in ON.
After an airbag inflates in a crash, you may see a
small amount of smoke. This is from the combustion
process of the inflator material and is not harmful.
People with respiratory problems may experience
some temporary discomfort. If this occurs, get out of
the vehicle as soon as it is safe to do so.1Front Airbags (SRS)
Dual-Stage, Multiple-Threshold Front Airbags
(SRS)
Your vehicle is equipped with dual-stage, multiple-
threshold front airbags (SRS).
During a frontal crash severe enough to cause one or
both front airbags to deploy, the airbags can inflate
at different rates, depending on the severity of the
crash, whether or not the seat belts are latched, and/
or other factors. Frontal airbags are designed to
supplement the seat belts to help reduce the
likelihood of head and chest injuries in frontal
crashes.
Page 45 of 500

44
uuAirbagsuFront Airbags (SRS)
Safe Driving
■When front airbags should not deploy
Minor frontal crashes: Front airbags were designed to supplement seat belts and
help save lives, not to prevent minor scrapes, or even broken bones that might occur
during a less than moderate-to-severe frontal crash.
Side impacts: Front airbags can provide protection when a sudden deceleration
causes a driver or front passenger to move toward the front of the vehicle. Side
airbags and side curtain airbags have been specifically designed to help reduce the
severity of injuries that can occur during a moderate-to-severe side impact which
can cause the driver or passenger to move toward the side of the vehicle.
Rear impacts: Head restraints and seat belts are your best protection during a rear
impact. Front airbags cannot provide any significant protection and are not designed
to deploy in such collisions.
Rollovers: Seat belts, and in vehicles equipped with a rollover sensor, side airbags,
and side curtain airbags offer the best protection in a rollover. Because front airbags
could provide little if any protection, they are not designed to deploy during a
rollover.■When front airbags deploy with little or no visible damage
Because the airbag system senses sudden deceleration, a strong impact to the
vehicle framework or suspension might cause one or more of the airbags to deploy.
Examples include running into a curb, the edge of a hole, or other low fixed object
that causes a sudden deceleration in the vehicle chassis. Since the impact is
underneath the vehicle, damage may not be readily apparent.■When front airbags may not deploy, even though exterior damage
appears severe
Since crushable body parts absorb crash energy during an impact, the amount of
visible damage does not always indicate proper airbag operation. In fact, some
collisions can result in severe damage but no airbag deployment because the airbags
would not have been needed or would not have provided protection even if they
had deployed.
Page 61 of 500
uuChild SafetyuSafety of Infants and Small Children
60Safe Driving
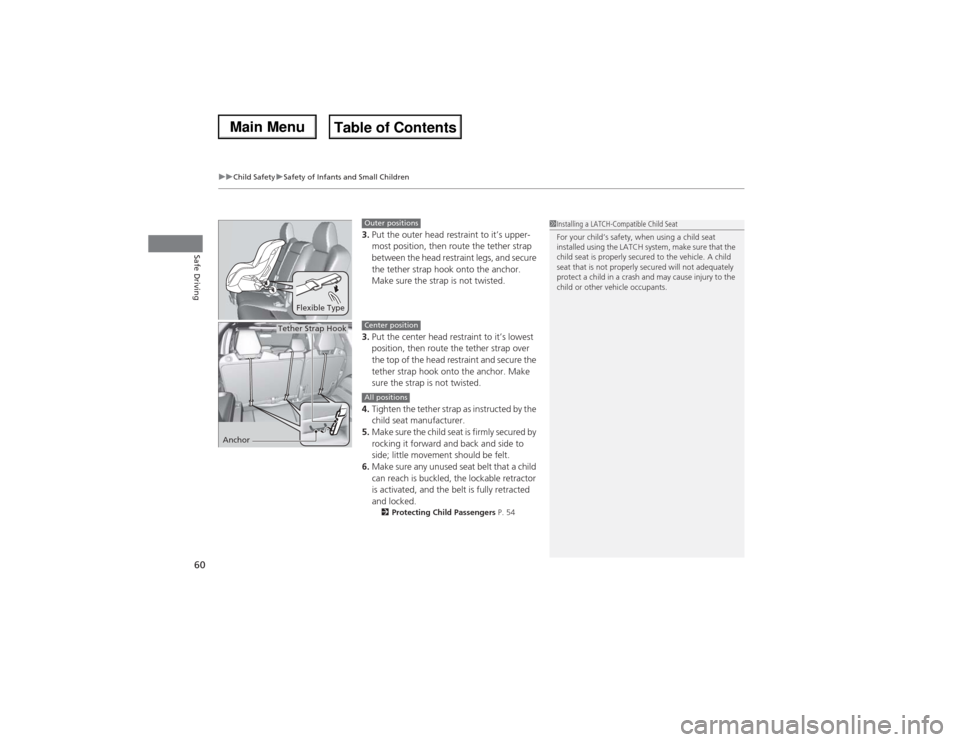
3.Put the outer head restraint to it’s upper-
most position, then route the tether strap
between the head restraint legs, and secure
the tether strap hook onto the anchor.
Make sure the strap is not twisted.
3.Put the center head restraint to it’s lowest
position, then route the tether strap over
the top of the head restraint and secure the
tether strap hook onto the anchor. Make
sure the strap is not twisted.
4.Tighten the tether strap as instructed by the
child seat manufacturer.
5.Make sure the child seat is firmly secured by
rocking it forward and back and side to
side; little movement should be felt.
6.Make sure any unused seat belt that a child
can reach is buckled, the lockable retractor
is activated, and the belt is fully retracted
and locked.
2Protecting Child Passengers P. 54
Flexible Type
Outer positions
1Installing a LATCH-Compatible Child Seat
For your child’s safety, when using a child seat
installed using the LATCH system, make sure that the
child seat is properly secured to the vehicle. A child
seat that is not properly secured will not adequately
protect a child in a crash and may cause injury to the
child or other vehicle occupants.
Tether Strap Hook
Anchor
Center positionAll positions
Page 64 of 500
63
uuChild SafetyuSafety of Infants and Small Children
Safe Driving
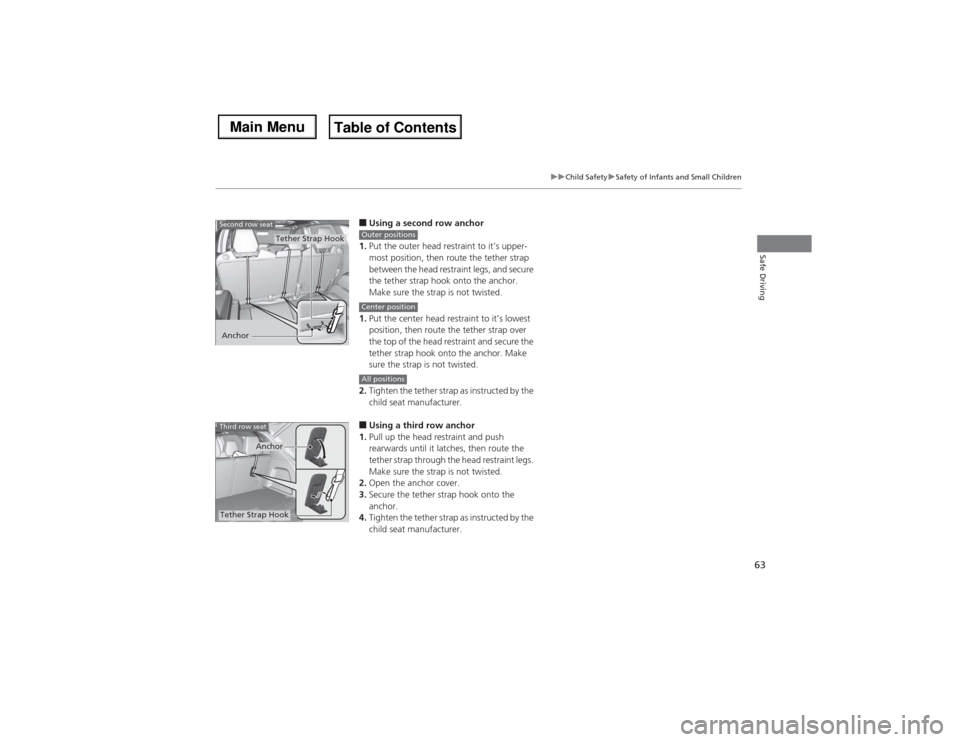
■Using a second row anchor
1.Put the outer head restraint to it’s upper-
most position, then route the tether strap
between the head restraint legs, and secure
the tether strap hook onto the anchor.
Make sure the strap is not twisted.
1.Put the center head restraint to it’s lowest
position, then route the tether strap over
the top of the head restraint and secure the
tether strap hook onto the anchor. Make
sure the strap is not twisted.
2.Tighten the tether strap as instructed by the
child seat manufacturer.■Using a third row anchor
1.Pull up the head restraint and push
rearwards until it latches, then route the
tether strap through the head restraint legs.
Make sure the strap is not twisted.
2.Open the anchor cover.
3.Secure the tether strap hook onto the
anchor.
4.Tighten the tether strap as instructed by the
child seat manufacturer.
AnchorSecond row seat
Tether Strap Hook
Outer positionsCenter positionAll positions
Tether Strap Hook
Anchor
Third row seat
Page 165 of 500

uuAdjusting the SeatsuAdjusting the Seat Positions
164Controls
Your vehicle is equipped with head restraints
in all seating positions.
Head restraints are most effective for
protection against whiplash and other rear-
impact crash injuries when the center of the
back of the occupant’s head rests against the
center of the restraint. The tops of the
occupant’s ears should be level with the
center height of the restraint.
■Adjusting the front and second row outer head restraint positions
To raise the head restraint: Pull it upward.
To lower the head restraint: Push it down
while pressing the release button.■Adjusting the Head Restraints
1Adjusting the Head Restraints
In order for the head restraint system to work
properly:•Do not hang any items on the head restraints, or
from the restraint legs.•Do not place any objects between an occupant and
the seat-back.•Install each restraint in its proper location.
3
WARNING
Improperly positioning head restraints
reduces their effectiveness and increases
the likelihood of serious injury in a crash.
Make sure head restraints are in place and
positioned properly before driving.
Position head in the center
of the head restraint.
Page 166 of 500

Continued
165
uuAdjusting the SeatsuAdjusting the Seat Positions
Controls
A passenger sitting in the second row center
seating position should adjust the height of
their head restraint to an appropriate position
before the vehicle begins moving.
To raise the head restraint:
Pull it upward.
To lower the head restraint:
Push it down while pressing the release
button.
Head restraints can be removed for cleaning or repair.
To remove a head restraint:
Pull the restraint up as far as it will go. Then push the release button, and pull the
restraint up and out.
To reinstall a head restraint:
Insert the legs back in place, then adjust the head restraint to an appropriate height
while pressing the release button. Pull up on the restraint to make sure it is locked
in position.
■Changing the Second Row Center Seat Head Restraint
Position■Removing and Reinstalling the Head Restraints
1Removing and Reinstalling the Head Restraints
3
WARNING
Failure to reinstall, or correctly reinstall, the
head restraints can result in severe injury
during a crash.
Always replace the head restraints before
driving.
Front and second row head restraints
Page 167 of 500

166
uuAdjusting the SeatsuAdjusting the Seat Positions
Controls
A passenger in the third row seating position
should put the head restraint in the upright
position before the vehicle begins moving.
To fold down the head restraint:
Pull the handle.
To put the head restraint back in the
upright position:
Pull up the head restraint and push rearward
until it latches.
■Folding Down the Third Row Head Restraint
Handle