Accessory mode Acura MDX 2014 User Guide
[x] Cancel search | Manufacturer: ACURA, Model Year: 2014, Model line: MDX, Model: Acura MDX 2014Pages: 500, PDF Size: 11.72 MB
Page 156 of 500

155
uuOperating the Switches Around the Steering WheeluDriving Position Memory System
Continued
Controls
Driving Position Memory SystemYou can store two driver’s seat (except for power lumbar), steering wheel and door
mirror positions with the driving position memory system.
When you unlock and open the driver’s door with a remote transmitter, or keyless
access system, the seat and door mirrors adjust automatically to one of the two
preset positions.
The steering wheel will move to the stored position when you set the power mode
to ACCESSORY.
The MID shows you which remote transmitter you used to unlock the vehicle when
you enter.
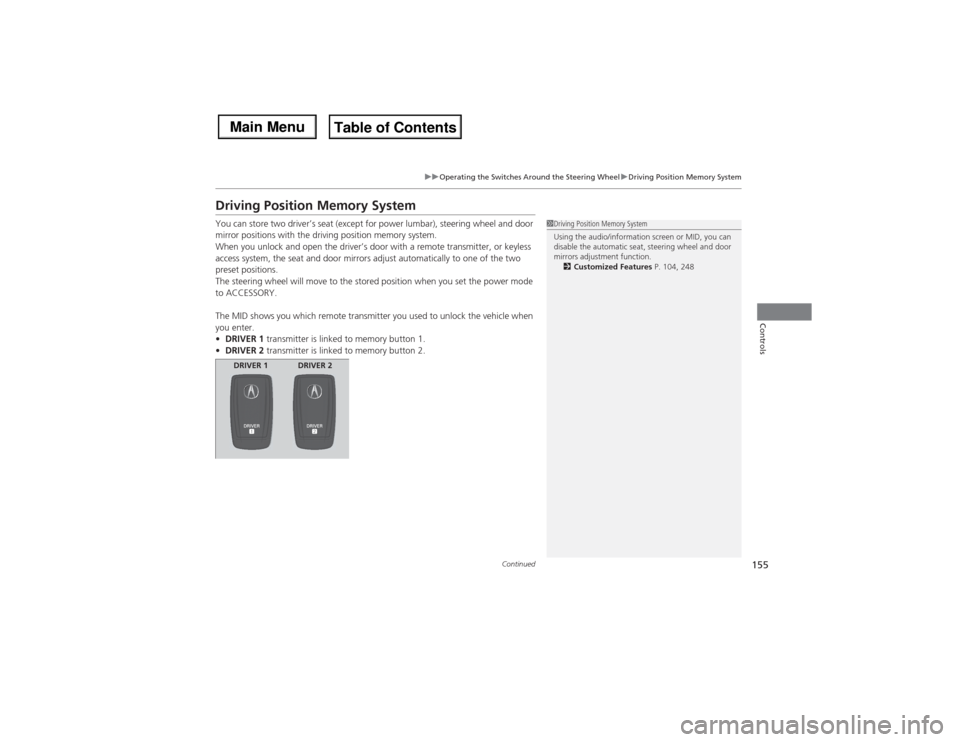
•DRIVER 1 transmitter is linked to memory button 1.
•DRIVER 2 transmitter is linked to memory button 2.
1Driving Position Memory System
Using the audio/information screen or MID, you can
disable the automatic seat, steering wheel and door
mirrors adjustment function.
2Customized Features P. 104, 248
DRIVER 1 DRIVER 2
Page 173 of 500

172Controls
Interior Lights/Interior Convenience ItemsInterior Lights
■ON
The interior lights come on regardless of
whether the doors are open or closed.■Door activated
The interior lights come on in the following
situations:
•When any doors are opened.
•You unlock the driver’s door.
•When the power mode is set to VEHICLE
OFF (LOCK).■OFF
The interior lights remain off regardless of
whether the tailgate or the doors are open or
closed.
■Interior Light Switches
1Interior Light Switches
In the door activated position, the interior lights fade
out and go off about 30 seconds after the doors are
closed.
The lights go off after 30 seconds in the following
situations:•When you unlock the driver’s door but do not open
it.•When you set the power mode to VEHICLE OFF
(LOCK) but do not open a door.
You can change the interior lights dimming time.
2Customized Features P. 104, 248
The interior lights go off immediately in the following
situations:•When you lock the driver’s door.•When you close the driver’s door in ACCESSORY
mode.•When you set the power mode to ON.
If you leave any doors open in VEHICLE OFF (LOCK)
mode, the interior lights go off after about 15
minutes.
When the interior light switch is in ON, if you close
the tailgate and all doors in VEHICLE OFF (LOCK)
mode, the interior lights go off after about 30
minutes.
However, when the battery is weaken, the interior
lights go off after about 30 minutes if any door is
open.
Door Activated Position
Off
On
Page 179 of 500

uuInterior Lights/Interior Convenience ItemsuInterior Convenience Items
178Controls
The accessory power sockets can be used when the power mode is in ACCESSORY
or ON.
■Accessory power socket (center pocket)
Open the lid and the cover to use it.■Accessory power socket (console
compartment)
Pull the handle and open the cover to use it.
■Accessory Power Sockets
1Accessory Power SocketsNOTICEDo not insert an automotive type cigarette lighter
element.
This can overheat the power socket.
The accessory power sockets are designed to supply
power for 12 volt DC accessories that are rated 180
watts or less (15 amps).
To prevent battery drain, only use the power socket
with the engine running.
Page 180 of 500

Continued
179
uuInterior Lights/Interior Convenience ItemsuInterior Convenience Items
Controls
■Accessory power socket (cargo area)
Open the cover to use it.
The AC power outlet can be used when the engine is running.
Open the cover to use it. Plug in the appliance
slightly, turn it 90° clockwise, then push it all
the way.
■AC Power Outlet
*
1AC Power Outlet
*
NOTICEDo not use the AC power outlet for electric
appliances that require high initial peak wattage,
such as cathode-ray tube type televisions,
refrigerators, electric pumps, etc. It is not suitable for
devices that process precise data, such as medical
equipment, and that require an extremely stable
power supply, such as microcomputer-controlled
electric blankets, touch sensor lamps, etc.
The AC power outlet is designed to supply power for
up to 115 volt appliances that are rated 150 watts or
less.
Continued use of any electric appliance/device
exceeding these ratings may result in damage to the
appliance/device.
* Not available on all models
Page 204 of 500

203Features
Audio System Basic OperationTo use the audio system, the power mode must be in ACCESSORY or ON.
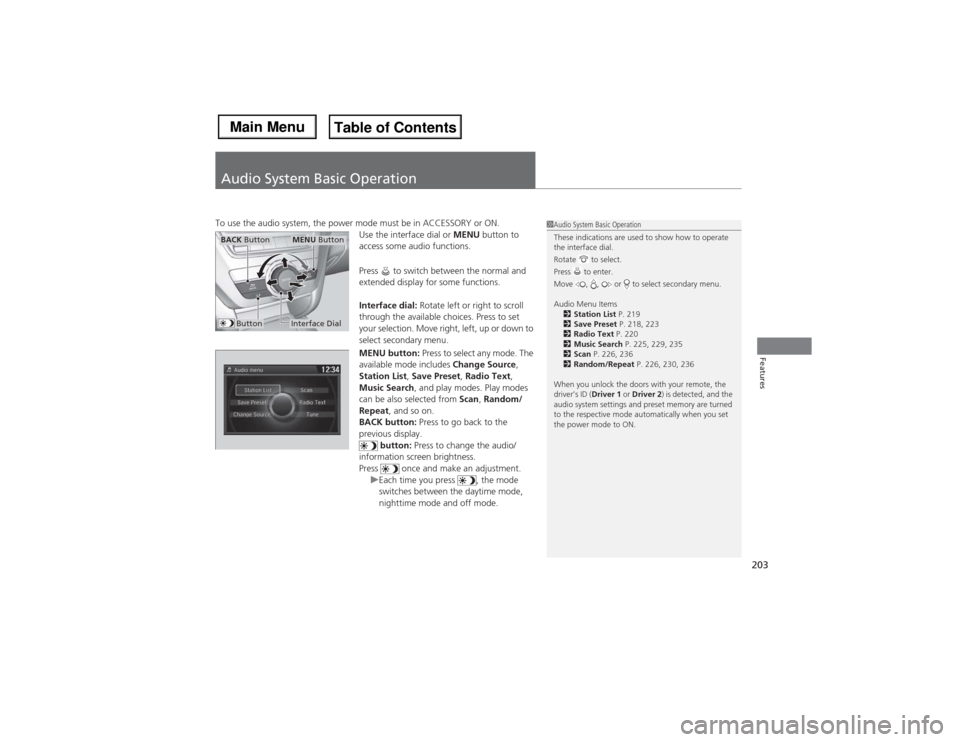
Use the interface dial or MENU button to
access some audio functions.
Press to switch between the normal and
extended display for some functions.
Interface dial: Rotate left or right to scroll
through the available choices. Press to set
your selection. Move right, left, up or down to
select secondary menu.
MENU button: Press to select any mode. The
available mode includes Change Source,
Station List, Save Preset, Radio Text,
Music Search, and play modes. Play modes
can be also selected from Scan, Random/
Repeat, and so on.
BACK button: Press to go back to the
previous display.
button: Press to change the audio/
information screen brightness.
Press once and make an adjustment.
uEach time you press , the mode
switches between the daytime mode,
nighttime mode and off mode.
1Audio System Basic Operation
These indications are used to show how to operate
the interface dial.
Rotate to select.
Press to enter.
Move , , or to select secondary menu.
Audio Menu Items
2Station List P. 219
2Save Preset P. 218, 223
2Radio Text P. 220
2Music Search P. 225, 229, 235
2Scan P. 226, 236
2Random/Repeat P. 226, 230, 236
When you unlock the doors with your remote, the
driver’s ID (Driver 1 or Driver 2) is detected, and the
audio system settings and preset memory are turned
to the respective mode automatically when you set
the power mode to ON.
Interface DialMENU Button
BACK Button
Button
Page 271 of 500

270
uuBluetooth® HandsFreeLink®uHFL Menus
Features
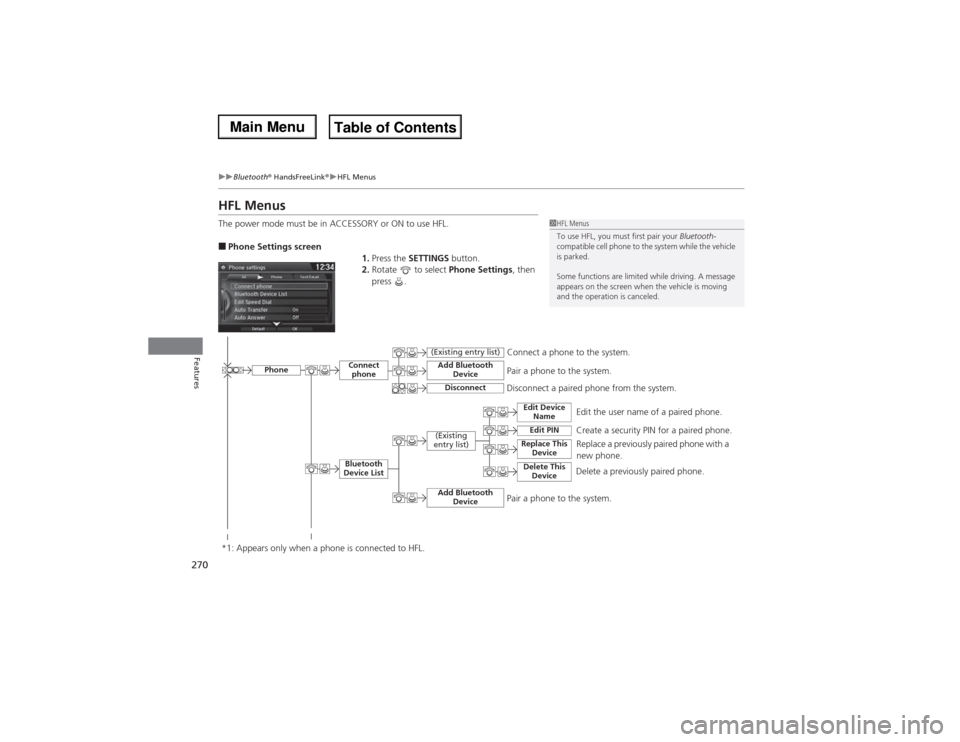
HFL MenusThe power mode must be in ACCESSORY or ON to use HFL.■Phone Settings screen
1.Press the SETTINGS button.
2.Rotate to select Phone Settings, then
press .
1HFL Menus
To use HFL, you must first pair your Bluetooth-
compatible cell phone to the system while the vehicle
is parked.
Some functions are limited while driving. A message
appears on the screen when the vehicle is moving
and the operation is canceled.
Edit the user name of a paired phone.
Phone
Edit Device
Name
Connect
phoneBluetooth
Device List
(Existing
entry list)
Replace This
Device
Add Bluetooth
Device
Disconnect a paired phone from the system.Connect a phone to the system.
*1: Appears only when a phone is connected to HFL.
Disconnect
(Existing entry list)
Pair a phone to the system.
Edit PIN
Create a security PIN for a paired phone.
Replace a previously paired phone with a
new phone.
Delete This
Device
Delete a previously paired phone.
Add Bluetooth
Device
Pair a phone to the system.
Page 328 of 500

327
uuWhen DrivinguPrecautions While Driving
Driving
Precautions While DrivingUtility vehicles have a significantly higher rollover rate than other types of vehicles.
To prevent rollovers or loss of control:
•Take corners at slower speeds than you would with a passenger vehicle.
•Avoid sharp turns and abrupt maneuvers whenever possible.
•Do not modify your vehicle in any way that you would raise the center of gravity.
•Do not carry heavy cargo on the roof.
Avoid driving in deep water and on flooded roads. This can damage the engine,
driveline, or cause electrical component failure.
If there is a strong impact with something under the vehicle, stop in a safe location.
Check the underside of the vehicle for damage or any fluid leaks.■Driving Guidelines for Your Utility Vehicle■In Rain■Other Precautions
1Precautions While DrivingNOTICEDo not operate the shift lever while pressing the
accelerator pedal. You could damage the
transmission.NOTICEIf you repeatedly turn the steering wheel at an
extremely low speed, or hold the steering wheel on
the full left or right position for a while, the system
heats up. The system goes into a protective mode,
and limits its performance. The steering wheel
becomes harder and harder to operate. Once the
system cools down, the EPS system is restored.
Repeated operation under these conditions can
eventually damage the system.
If the power mode is set to ACCESSORY or VEHICLE
OFF (LOCK) while driving, the engine will shut down
and all steering and brake power assist functions will
stop, making it difficult to control the vehicle.
Do not put the shift lever in
(N, as you will lose
engine braking (and acceleration) performance.
During the first 600 miles (1,000 km) of operation,
avoid sudden acceleration or full throttle operation so
as not to damage the engine or powertrain.
Avoid hard braking for the first 200 miles (300 km).
You should also follow this when the brake pads are
replaced.
Page 459 of 500

458
uuEngine Does Not StartuIf the Keyless Access Remote Battery is Weak
Handling the Unexpected
If the Keyless Access Remote Battery is WeakIf the beeper sounds, the To Start, Hold Remote Near Start Button message
appears on the MID, the indicator on the ENGINE START/STOP button flashes, and
the engine won’t start, start the engine as follows.
1.Touch the center of the ENGINE START/
STOP button with the A logo on the keyless
access remote while the indicator on the
ENGINE START/STOP button is flashing.
The buttons on the keyless access remote
should be facing you.
uThe indicator flashes for about 30
seconds.
2.Depress the brake pedal and press the
ENGINE START/STOP button within 10
seconds after the beeper sounds and the
indicator changes from flashing to on.
uIf you don’t depress the pedal, the mode
will change to ACCESSORY.
Page 460 of 500

459
uuEngine Does Not StartuEmergency Engine Stop
Handling the Unexpected
Emergency Engine StopThe ENGINE START/STOP button may be used to stop the engine due to an
emergency situation even while driving. If you must stop the engine, do either of the
following operations:
•Press and hold the ENGINE START/STOP button for about two seconds.
•Firmly press the ENGINE START/STOP button two times.
•The steering wheel will not lock. The power mode changes to VEHICLE OFF with
the shift lever in
(P, and to ACCESSORY with the shift lever in any position other
than
(P.
•Because turning off the engine also disables the power assist the engine provides
to the steering and braking systems, it will require significantly more physical
effort and time to steer and slow the vehicle. Downshift gears and use both feet
on the brake pedal, if necessary, to slow the vehicle and stop immediately in a
safe place.
1Emergency Engine StopNOTICEDo not press the button while driving unless it is
absolutely necessary for the engine to be switched
off.
Page 473 of 500

472
uuFusesuFuse Locations
Handling the Unexpected
Located on the lower side panel. Take off
the cover to open.
Fuse locations are shown on the cover.■Passenger’s Side Interior Fuse
BoxCoverFuse Label
■Circuit protected and fuse rating
Circuit Protected
Amps
1
Right e-pretensioner
*
(30 A)
2
Rear Passenger’s Side
Power Window
20 A
3
ACM
20 A
4
Front DEF
*
(15 A)
5
AVS/Seat Heaters
20 A
6
Front Passenger’s Power
Window
20 A
7
Passenger’s Power Seat
Sliding
20 A
8
Passenger’s Power Seat
Reclining
20 A
9
Passenger’s Lumber
*
(7.5 A)
10
−
−
11
HSW
*
(10 A)
12
−
−
13
−
−
14
Rear Accessory Power
Socket
20 A
15
Console Accessory Power
Socket
20 A
16
−
−
17
−
−
18
Premium AMP
30 A
19
SRS1
10 A
20
Passenger’s ECU
7.5 A
21
SVTM4
7.5 A
22
−
−
23
−
−
24
IG1 OPDS
7.5 A
25
Illumination
7.5 A
26
Left e-pretensioner
*
(30 A)
27
Front Accessory Power
Socket
20 A
28
AC Inverter
(30 A)
Circuit Protected
Amps
* Not available on all models