tire pressure Acura MDX 2014 Owner's Guide
[x] Cancel search | Manufacturer: ACURA, Model Year: 2014, Model line: MDX, Model: Acura MDX 2014Pages: 500, PDF Size: 11.72 MB
Page 389 of 500
388Maintenance
Before Performing MaintenanceInspection and MaintenanceFor your safety, perform all listed inspections and maintenance to keep your vehicle
in good condition. If you become aware of any abnormality (noise, smell, insufficient
brake fluid, oil residue on the ground, etc.), have your vehicle inspected by a dealer.
(Note, however, that service at a dealer is not mandatory to keep your warranties in
effect.) Refer to the separate maintenance booklet for detailed maintenance and
inspection information.■Daily inspections
Perform inspections before long distance trips, when washing the vehicle, or when
refueling.■Periodic inspections
•Check the brake fluid level monthly.2Checking the Brake Fluid P. 406
•Check the tire pressure monthly. Examine the tread for wear and foreign objects.
2Checking and Maintaining Tires P. 417
•Check the operation of the exterior lights monthly.
2Replacing Light Bulbs P. 407
•Check the condition of the wiper blades at least every six months.
2Checking and Maintaining Wiper Blades P. 413
■Types of Inspection and Maintenance
1Inspection and Maintenance
Maintenance, replacement, or repair of
emissions control devices and systems may be
done by any automotive repair establishment or
individuals using parts that are “certified” to
EPA standards.
According to state and federal regulations, failure to
perform maintenance on the maintenance main
items marked with # will not void your emissions
warranties. However, all maintenance services should
be performed in accordance with the intervals
indicated by the multi-information display (MID).
2Maintenance Service Items P. 393
If you want to perform complex maintenance tasks
that require more skills and tools, you can purchase a
subscription to the Service Express website at
www.techinfo.honda.com.
2Authorized Manuals P. 489
If you want to perform maintenance yourself, make
sure that you have the necessary tools and skills first.
After performing maintenance, update the records in
the separate maintenance booklet.U.S. models
Page 418 of 500

417Maintenance
Checking and Maintaining TiresChecking TiresTo safely operate your vehicle, your tires must be of the proper type and size, in
good condition with adequate tread, and properly inflated.■Inflation guidelines
Properly inflated tires provide the best combination of handling, tread life, and comfort.
Refer to the driver’s doorjamb label or specification’s page for the specified pressure.
Underinflated tires wear unevenly, adversely affect handling and fuel economy, and
are more likely to fail from overheating.
Overinflated tires make your vehicle ride harshly, are more prone to road hazards,
and wear unevenly.
Every day before you drive, look at each of the tires. If one looks lower than the
others, check the pressure with a tire gauge.
At least once a month and before long trips, use a gauge to measure the pressure in
all tires, including the spare. Even tires in good condition can lose 1 to 2 psi (10 to
20 kPa, 0.1 to 0.2 kgf/cm
2) per month.
■Inspection guidelines
Every time you check inflation, also examine the tires and valve stems.
Look for:
•Bumps or bulges on the side or in the tread. Replace the tire if you find any cuts,
splits, or cracks in the side of the tire. Replace it if you see fabric or cord.
•Remove any foreign objects and inspect for air leaks.
•Uneven tread wear. Have a dealer check the wheel alignment.
•Excessive tread wear.2Wear Indicators P. 422
•Cracks or other damage around valve stem.
1Checking Tires
Measure the air pressure when tires are cold. This
means the vehicle has been parked for at least three
hours, or driven less than 1 mile (1.6 km). If
necessary, add or release air until the specified
pressure is reached.
If checked when hot, tire pressure can be as much as
4–6 psi (30–40 kPa, 0.3–0.4 kgf/cm
2) higher than if
checked when cold.
Have a dealer check the tires if you feel a consistent
vibration while driving. New tires and any that have
been removed and reinstalled should be properly
balanced.
3
WARNING
Using tires that are excessively worn or
improperly inflated can cause a crash in
which you can be seriously hurt or killed.
Follow all instructions in this owner’s
manual regarding tire inflation and
maintenance.
Page 419 of 500

418
uuChecking and Maintaining TiresuTire and Loading Information Label
Maintenance
Tire and Loading Information LabelThe label attached to the driver’s doorjamb provides necessary tire and loading
information.Tire Labeling
The tires that came on your vehicle have a
number of markings. Those you should be
aware of are described below.
Whenever tires are replaced, they should be replaced with tires of the same size.
1Tire and Loading Information Label
The tire and loading information label attached to the
driver’s doorjamb contains:aThe number of people your vehicle can carry.bThe total weight your vehicle can carry. Do not
exceed this weight.cThe original tire sizes for front, rear, and spare.dThe proper cold tire pressure for front, rear, and
spare.
Label
ExampleExample
Tire Size
Tire
Identification
Number (TIN)
Maximum
Tire Load
Maximum
Tire Pressure
Tire Size■Tire Sizes
1Tire Sizes
Following is an example of tire size with an
explanation of what each component means.
P235/60R18 102V
P: Vehicle type (P indicates passenger vehicle).
235: Tire width in millimeters.
60: Aspect ratio (the tire’s section height as a
percentage of its width).
R: Tire construction code (R indicates radial).
18: Rim diameter in inches.
102: Load index (a numerical code associated with
the maximum load the tire can carry).
V: Speed symbol (an alphabetical code indicating the
maximum speed rating).
Page 420 of 500

419
uuChecking and Maintaining TiresuTire Labeling
Maintenance
The tire identification number (TIN) is a group of numbers and letters that look like
the example in the side column. TIN is located on the sidewall of the tire.
Cold Tire Pressure – The tire air pressure when the vehicle has been parked for at
least three hours or driven less than 1 mile (1.6 km).
Load Rating – Means the maximum load that a tire is rated to carry for a given
inflation pressure.
Maximum Inflation Pressure – The maximum tire air pressure that the tire can
hold.
Maximum Load Rating – Means the load rating for a tire at the maximum
permissible inflation pressure for that tire.
Recommended Inflation Pressure – The cold tire inflation pressure recommended
by the manufacturer.
Treadwear Indicators (TWI) – Means the projections within the principal grooves
designed to give a visual indication of the degrees of wear of the tread.■Tire Identification Number (TIN)■Glossary of Tire Terminology
1Tire Identification Number (TIN)DOT B97R FW6X 2209
DOT: This indicates that the tire meets all
requirements of the U.S. Department of
Transportation.
B97R: Manufacturer’s identification mark.
FW6X: Tire type code.
22 09: Date of manufacture.
Year
Week
Page 423 of 500

422
uuChecking and Maintaining TiresuWear Indicators
Maintenance
Wear Indicators
The groove where the wear indicator is
located is 1/16 inch (1.6 mm) shallower than
elsewhere on the tire. If the tread has worn so
that the indicator is exposed, replace the tire.
Worn out tires have poor traction on wet
roads.
Tire Service LifeThe life of your tires is dependent on many factors, including driving habits, road
conditions, vehicle loading, inflation pressure, maintenance history, speed, and
environmental conditions (even when the tires are not in use).
In addition to regular inspections and inflation pressure maintenance, it is
recommended that you have annual inspections performed once the tires reach five
years old. All tires, including the spare, should be removed from service after 10
years from the date of manufacture, regardless of their condition or state of wear.
Example of a Wear
Indicator mark
Page 424 of 500

423
uuChecking and Maintaining TiresuTire and Wheel Replacement
Maintenance
Tire and Wheel ReplacementReplace your tires with radials of the same size, load range, speed rating, and
maximum cold tire pressure rating (as shown on the tire’s sidewall). Using tires of a
different size or construction can cause the ABS and VSA® (vehicle stability assist)
system to work incorrectly.
It is best to replace all four tires at the same time. If that isn’t possible, replace the
front or rear tires in pairs.
If you replace a wheel, only use TPMS specified wheels approved for your vehicle.
Make sure that the wheel’s specifications match those of the original wheels.
1Tire and Wheel Replacement
3
WARNING
Installing improper tires on your vehicle can
affect handling and stability. This can cause
a crash in which you can be seriously hurt or
killed.
Always use the size and type of tires
recommended in this owner’s manual.
Page 438 of 500
437
Handling the Unexpected
This chapter explains how to handle unexpected troubles.
Tools
Types of Tools .................................. 438
If a Tire Goes Flat
Changing a Flat Tire
*....................... 439
Temporarily Repairing a Flat Tire
*..... 446
Engine Does Not Start
Checking the Engine ........................ 457
If the Keyless Access Remote Battery is
Weak ............................................. 458
Emergency Engine Stop ................... 459
Jump Starting.................................... 460
Shift Lever Does Not Move.............. 462Overheating
How to Handle Overheating............. 463
Indicator, Coming On/Blinking
If the Low Oil Pressure Indicator Comes
On ............................................. 465If the Charging System Indicator Comes
On ................................................. 465
If the Malfunction Indicator Lamp Comes
On or Blinks ................................... 466If the Brake System Indicator (Red) Comes
On .................................................... 467
If the Speed-Sensitive Electric Power Steering
(EPS) System Indicator Comes On ........... 467If the Low Tire Pressure/TPMS Indicator
Comes On or Blinks ....................... 468
Fuses
Fuse Locations ................................. 469
Inspecting and Changing Fuses ........ 474
Emergency Towing........................... 475
When You Cannot Unlock the Fuel Fill
Door................................................. 476When You Cannot Open the Tailgate
.. 477
* Not available on all models
Page 440 of 500

439
Continued
Handling the Unexpected
If a Tire Goes FlatChanging a Flat Tire
*
If a tire goes flat while driving, grasp the steering wheel firmly, and brake gradually
to reduce speed. Then, stop in a safe place. Replace the flat tire with a compact
spare tire. Go to a dealer as soon as possible to have the full-size tire repaired or
replaced.
1.Park the vehicle on firm, level, non-slippery surface and apply the parking brake.
2.Move the shift lever to
(P.
3.Turn on the hazard warning lights and set the power mode to VEHICLE OFF
(LOCK).
1Changing a Flat Tire
*
Periodically check the tire pressure of the compact
spare. It should be set to the specified pressure.
Specified Pressure: 60 psi (420 kPa, 4.2 kgf/cm
2)
When driving with the compact spare tire, keep the
vehicle speed under 50 mph (80 km/h). Replace with
a full-size tire as soon as possible.
The compact spare tire and wheel in your vehicle are
specifically for this model.
Do not use them with another vehicle.
Do not use another type of compact spare tire or
wheel with your vehicle.
Do not mount tire chains on a compact spare tire.
If a chain-mounted front tire goes flat, remove one of
the full-size rear tires and replace it with the compact
spare tire. Remove the flat front tire and replace it
with the full-size tire that was removed from the rear.
Mount the tire chains on the front tire.
Do not use a puncture-repairing agent on a flat tire,
as it can damage the tire pressure sensor.
* Not available on all models
Page 446 of 500
445
uuIf a Tire Goes FlatuChanging a Flat Tire
*
Handling the Unexpected
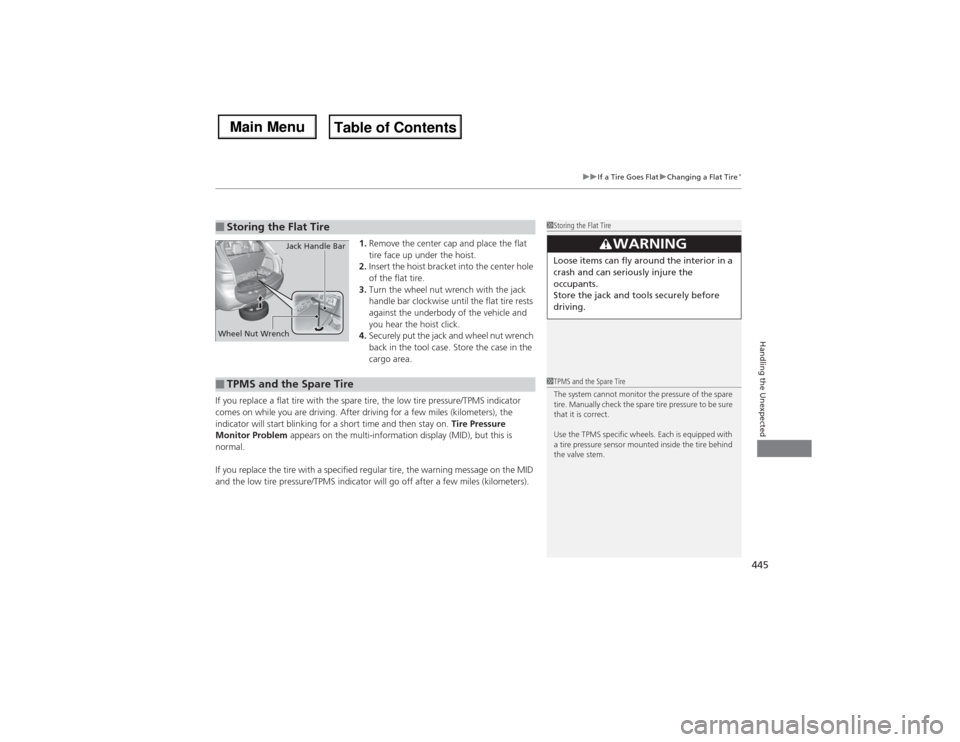
1.Remove the center cap and place the flat
tire face up under the hoist.
2.Insert the hoist bracket into the center hole
of the flat tire.
3.Turn the wheel nut wrench with the jack
handle bar clockwise until the flat tire rests
against the underbody of the vehicle and
you hear the hoist click.
4.Securely put the jack and wheel nut wrench
back in the tool case. Store the case in the
cargo area.
If you replace a flat tire with the spare tire, the low tire pressure/TPMS indicator
comes on while you are driving. After driving for a few miles (kilometers), the
indicator will start blinking for a short time and then stay on. Tire Pressure
Monitor Problem appears on the multi-information display (MID), but this is
normal.
If you replace the tire with a specified regular tire, the warning message on the MID
and the low tire pressure/TPMS indicator will go off after a few miles (kilometers).
■Storing the Flat Tire
1Storing the Flat Tire
3
WARNING
Loose items can fly around the interior in a
crash and can seriously injure the
occupants.
Store the jack and tools securely before
driving.
Wheel Nut WrenchJack Handle Bar■TPMS and the Spare Tire
1TPMS and the Spare Tire
The system cannot monitor the pressure of the spare
tire. Manually check the spare tire pressure to be sure
that it is correct.
Use the TPMS specific wheels. Each is equipped with
a tire pressure sensor mounted inside the tire behind
the valve stem.
Page 447 of 500

446
uuIf a Tire Goes FlatuTemporarily Repairing a Flat Tire
*
Handling the Unexpected
Temporarily Repairing a Flat Tire
*
If the tire has a large cut or is otherwise severely damaged, you will need to have the
vehicle towed. If the tire only has a small puncture, from a nail for instance, you can
use the temporary tire repair kit so that you can drive to the nearest service station
for a more permanent repair.
If a tire goes flat while driving, grasp the steering wheel firmly, and brake gradually
to reduce speed. Then stop in a safe place.
1.Park the vehicle on a firm, level, and non-slippery surface and apply the parking
brake.
2.Move the shift lever to
(P.
3.Turn on the hazard warning lights and set the power mode to VEHICLE OFF
(LOCK).
■Getting Ready to Temporarily Repair the Flat Tire
1Temporarily Repairing a Flat Tire
*
The kit should not be used in the following situations.
Instead, contact a dealer or a roadside assistant to
have the vehicle towed.•The tire sealant has expired.•More than two tires are punctured.•The puncture or cut is larger than 3/16 inch (4mm).•The tire side wall is damaged or the puncture is
outside the contact area.•Damage has been caused by driving with the tire
extremely under inflated.•The tire bead is no longer seated.•The rim is damaged.
Do not remove a nail or screw that punctured the
tire. If you remove it from the tire, you may not be
able to repair the puncture using the kit.NOTICEDo not use a puncture-repairing agent other than the
one provided in the kit that came with your vehicle. If
a different agent is used, you may permanently
damage the tire pressure sensor.
When the puncture is:
Kit Use
Smaller than 3/16 inch
(4 mm)
Yes
Larger than 3/16 inch
(4 mm)
No
Contact
Area
Instruction
Manual
Air Only Hose (Black)Speed Restriction Label Repair Notification Label Pressure Relief
ButtonInflator Switch
Selector Switch
SEALANT/AIR side Sealant/Air Hose (Clear)AIR ONLY side
Power Plug Pressure Gauge
Tire Sealant
Expiration Date* Not available on all models