engine Acura MDX 2014 Service Manual
[x] Cancel search | Manufacturer: ACURA, Model Year: 2014, Model line: MDX, Model: Acura MDX 2014Pages: 500, PDF Size: 11.72 MB
Page 183 of 500

uuInterior Lights/Interior Convenience ItemsuInterior Convenience Items
182Controls
If the power mode is in ON:
Seat heater - The HI setting heats the seats
faster than the LO setting.
Seat ventilation
* - The HI setting ventilates
the seats faster than the LO setting.
1.Select .
2.Change the setting with one of the
following:
The Heat/Cool* level indicators: Select your
desired level setting. The left is for a LO
setting, the center is for a MID setting, and
to the right for a HI setting.
(+/(-: To go up or down one level at a
time.
AUTO*: The system automatically selects
the setting most suitable to the ambient
environment.
OFF: Turn off the system.
When a comfortable temperature is reached
while using the seat heaters in HI, select MID
or LO to keep the seat warm.
■Front Seat Heaters and Seat Ventilation
*
1Front Seat Heaters and Seat Ventilation
*
Do not use the seat heaters and the seat ventilation
even in LO when the engine is off. Under such
conditions, the battery may be weakened, making
the engine difficult to start.
3
WARNING
Heat induced burns are possible when
using seat heaters.
Persons with a diminished ability to sense
temperature (e.g., persons with diabetes,
lower-limb nerve damage, or paralysis) or
with sensitive skin should not use seat
heaters.
Models with seat ventilationModels without seat ventilation* Not available on all models
Page 184 of 500

Continued
183
uuInterior Lights/Interior Convenience ItemsuInterior Convenience Items
Controls
The power mode must be in ON to use the
seat heaters. The HI setting heats the seats
faster than the LO setting.
Press the seat heater button:
Once - The HI setting (three indicators on)
Twice - The MID setting (two indicators on)
Three times - The LO setting
Four times - The OFF setting (no indicators on)
■Second Row Outer Seat Heaters
*
1Second Row Outer Seat Heaters
*
Do not use the seat heaters even in LO when the
engine is off. Under such conditions, the battery may
be weakened, making the engine difficult to start.
3
WARNING
Heat induced burns are possible when
using seat heaters.
Persons with a diminished ability to sense
temperature (e.g., persons with diabetes,
lower-limb nerve damage, or paralysis) or
with sensitive skin should not use seat
heaters.
* Not available on all models
Page 186 of 500
185
Continued
Controls
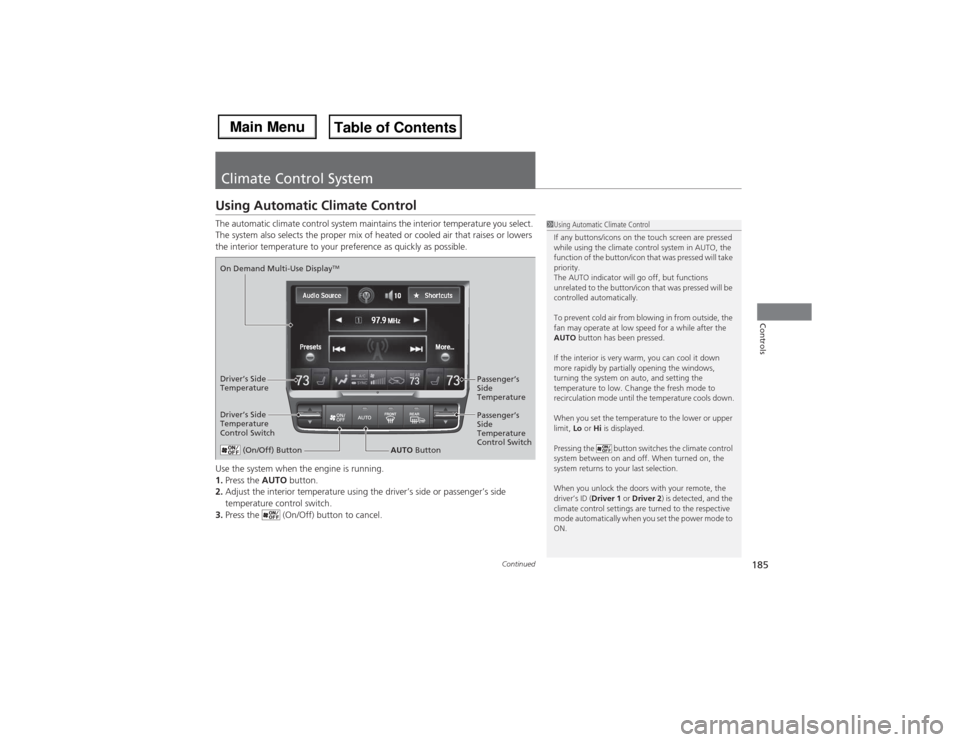
Climate Control SystemUsing Automatic Climate ControlThe automatic climate control system maintains the interior temperature you select.
The system also selects the proper mix of heated or cooled air that raises or lowers
the interior temperature to your preference as quickly as possible.
Use the system when the engine is running.
1.Press the AUTO button.
2.Adjust the interior temperature using the driver’s side or passenger’s side
temperature control switch.
3.Press the (On/Off) button to cancel.
1Using Automatic Climate Control
If any buttons/icons on the touch screen are pressed
while using the climate control system in AUTO, the
function of the button/icon that was pressed will take
priority.
The AUTO indicator will go off, but functions
unrelated to the button/icon that was pressed will be
controlled automatically.
To prevent cold air from blowing in from outside, the
fan may operate at low speed for a while after the
AUTO button has been pressed.
If the interior is very warm, you can cool it down
more rapidly by partially opening the windows,
turning the system on auto, and setting the
temperature to low. Change the fresh mode to
recirculation mode until the temperature cools down.
When you set the temperature to the lower or upper
limit, Lo or Hi is displayed.
Pressing the button switches the climate control
system between on and off. When turned on, the
system returns to your last selection.
When you unlock the doors with your remote, the
driver’s ID (Driver 1 or Driver 2) is detected, and the
climate control settings are turned to the respective
mode automatically when you set the power mode to
ON.
(On/Off) Button
AUTO Button On Demand Multi-Use Display
TM
Driver’s Side
Temperature
Control SwitchPassenger’s
Side
Temperature
Control Switch Passenger’s
Side
Temperature Driver’s Side
Temperature
Page 193 of 500
192
uuClimate Control SystemuRear Climate Control System
Controls
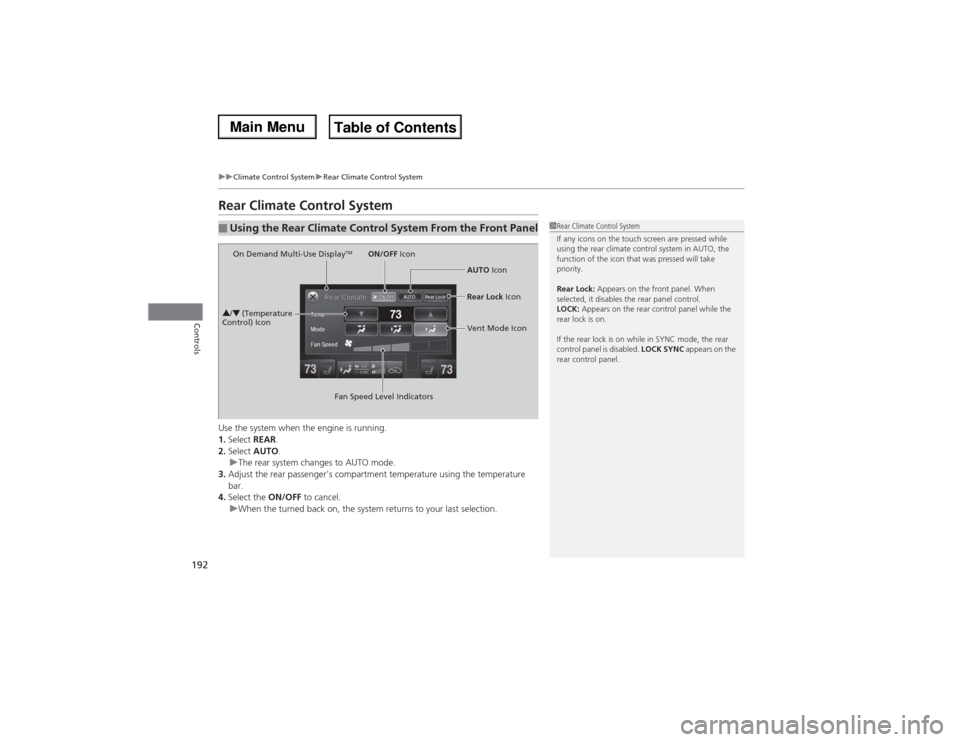
Rear Climate Control SystemUse the system when the engine is running.
1.Select REAR.
2.Select AUTO.
uThe rear system changes to AUTO mode.
3.Adjust the rear passenger’s compartment temperature using the temperature
bar.
4.Select the ON/OFF to cancel.
uWhen the turned back on, the system returns to your last selection.■Using the Rear Climate Control System From the Front Panel
1Rear Climate Control System
If any icons on the touch screen are pressed while
using the rear climate control system in AUTO, the
function of the icon that was pressed will take
priority.
Rear Lock: Appears on the front panel. When
selected, it disables the rear panel control.
LOCK: Appears on the rear control panel while the
rear lock is on.
If the rear lock is on while in SYNC mode, the rear
control panel is disabled. LOCK SYNC appears on the
rear control panel.
On Demand Multi-Use Display
TM
3/4 (Temperature
Control) Icon
Fan Speed Level IndicatorsON/OFF Icon
AUTO Icon
Rear Lock Icon
Vent Mode Icon
Page 196 of 500
195
uuClimate Control SystemuRear Climate Control System
Controls
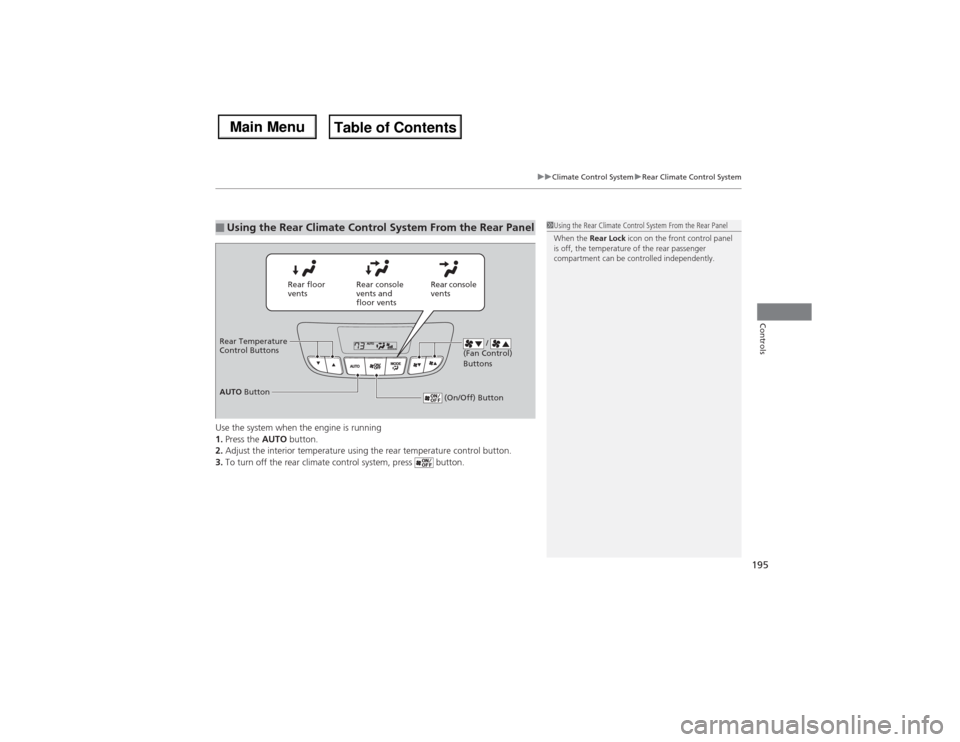
Use the system when the engine is running
1.Press the AUTO button.
2.Adjust the interior temperature using the rear temperature control button.
3.To turn off the rear climate control system, press button.■Using the Rear Climate Control System From the Rear Panel
1Using the Rear Climate Control System From the Rear Panel
When the Rear Lock icon on the front control panel
is off, the temperature of the rear passenger
compartment can be controlled independently.
Rear floor
ventsRear console
vents and
floor ventsRear console
vents
/
(Fan Control)
Buttons
(On/Off) Button
Rear Temperature
Control ButtonsAUTO Button
Page 258 of 500
257
uuCustomized Featuresu
Continued
Features
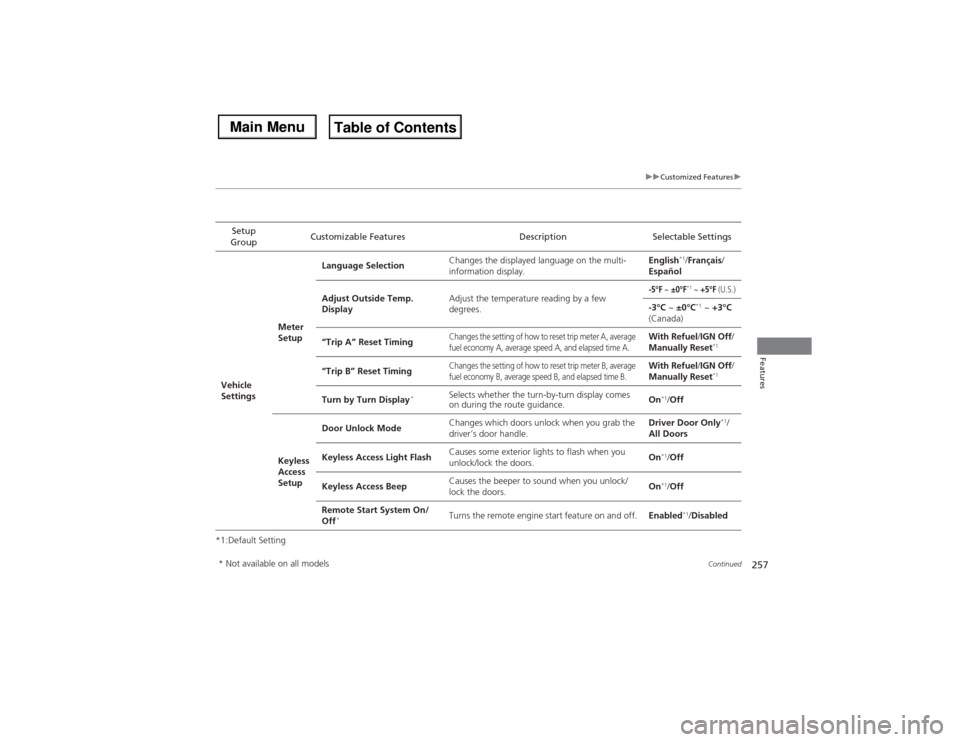
*1:Default SettingSetup
GroupCustomizable Features Description Selectable SettingsVehicle
SettingsMeter
SetupLanguage SelectionChanges the displayed language on the multi-
information display.English
*1/Français/
Español
Adjust Outside Temp.
DisplayAdjust the temperature reading by a few
degrees.
-5°F
~ ±0°F
*1 ~ +5°F
(U.S.)
-3°C ~ ±0°C
*1 ~ +3°C
(Canada)
“Trip A” Reset Timing
Changes the setting of how to reset trip meter A, average
fuel economy A, average speed A, and elapsed time A.
With Refuel/IGN Off/
Manually Reset
*1
“Trip B” Reset Timing
Changes the setting of how to reset trip meter B, average
fuel economy B, average speed B, and elapsed time B.
With Refuel/IGN Off/
Manually Reset
*1
Turn by Turn Display
*
Selects whether the turn-by-turn display comes
on during the route guidance.On
*1/Off
Keyless
Access
SetupDoor Unlock ModeChanges which doors unlock when you grab the
driver’s door handle.Driver Door Only
*1/
All Doors
Keyless Access Light FlashCauses some exterior lights to flash when you
unlock/lock the doors.On
*1/Off
Keyless Access BeepCauses the beeper to sound when you unlock/
lock the doors.On*1/Off
Remote Start System On/
Off
*
Turns the remote engine start feature on and off.Enabled
*1/Disabled
* Not available on all models
Page 261 of 500
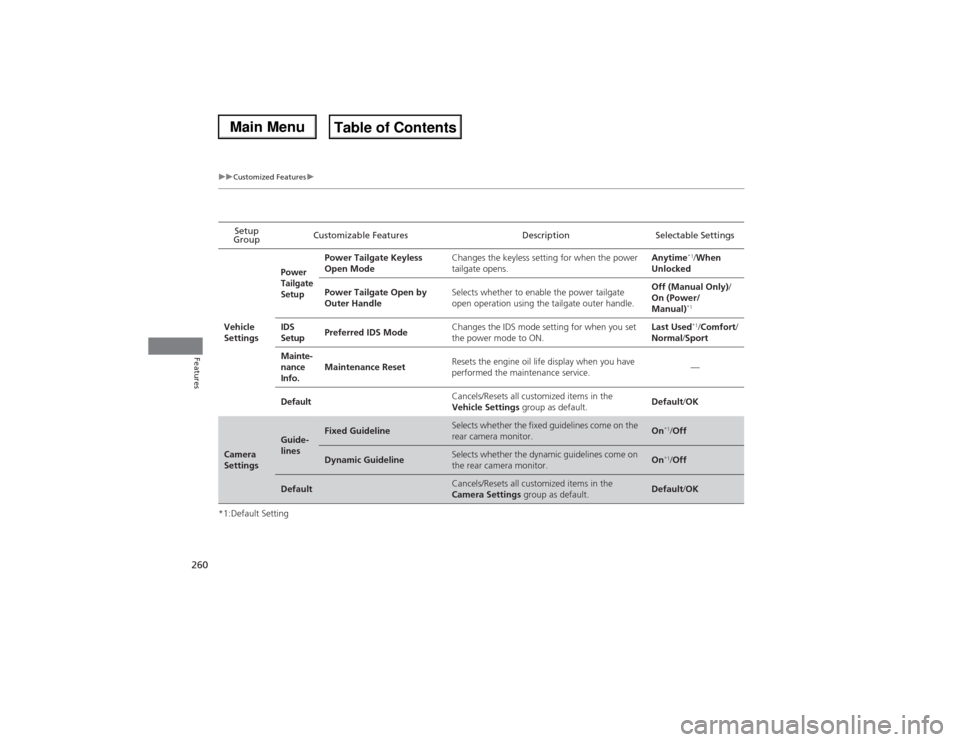
260
uuCustomized Featuresu
Features
*1:Default SettingSetup
GroupCustomizable Features Description Selectable Settings
Vehicle
Settings
Power
Tailgate
Setup
Power Tailgate Keyless
Open ModeChanges the keyless setting for when the power
tailgate opens.Anytime
*1/When
Unlocked
Power Tailgate Open by
Outer HandleSelects whether to enable the power tailgate
open operation using the tailgate outer handle. Off (Manual Only)/
On (Power/
Manual)*1
IDS
SetupPreferred IDS ModeChanges the IDS mode setting for when you set
the power mode to ON.Last Used
*1/Comfort/
Normal/Sport
Mainte-
nance
Info.Maintenance ResetResets the engine oil life display when you have
performed the maintenance service.—
DefaultCancels/Resets all customized items in the
Vehicle Settings group as default.Default/OK
Camera
Settings
Guide-
lines
Fixed Guideline
Selects whether the fixed guidelines come on the
rear camera monitor.
On
*1/Off
Dynamic Guideline
Selects whether the dynamic guidelines come on
the rear camera monitor.
On
*1/Off
Default
Cancels/Resets all customized items in the
Camera Settings group as default.
Default/OK
Page 304 of 500

303
Driving
This chapter discusses driving, refueling, and information on items such as accessories.
Before Driving
Driving Preparation .......................... 304
Maximum Load Limit........................ 307
Towing a Trailer................................ 309
Off-Highway Driving Guidelines..... 320
When Driving
Starting the Engine .......................... 322
Precautions While Driving................. 327
Automatic Transmission ................... 328
Shifting ............................................ 329
Integrated Dynamics System (IDS)..... 333
Cruise Control ................................. 334
Adaptive Cruise Control (ACC) with Low
Speed Follow (LSF)
*......................... 337Forward Collision Warning (FCW)
*.. 346
Lane Departure Warning (LDW)
*..... 350
Lane Keeping Assist System (LKAS)*.. 353
VSA® (Vehicle Stability Assist), aka ESC
(Electronic Stability Control), System .. 358Agile Handling Assist System............ 360
Blind Spot Information (BSI) System
*... 361
Super Handling-All Wheel DriveTM (SH-
AWD®)
*......................................... 363
Tire Pressure Monitoring System (TPMS) ... 363Tire Pressure Monitoring System (TPMS) -
Required Federal Explanation ......... 365
Braking
Brake System ................................... 367Anti-lock Brake System (ABS) ........... 369
Brake Assist System ......................... 370
Collision Mitigation Braking System
TM
(CMBS
TM)*..................................... 371
Parking Your Vehicle
When Stopped ................................ 377
Parking Sensor System
*................... 378
Multi-View Rear Camera*................ 382
Refueling
Fuel Information .............................. 383
How to Refuel ................................. 384
Fuel Economy.................................... 385
Accessories and Modifications........ 386
* Not available on all models
Page 305 of 500

304Driving
Before DrivingDriving PreparationCheck the following items before you start driving.
•Make sure there are no obstructions on the windows, door mirrors, exterior
lights, or other parts of the vehicle.
uRemove any frost, snow, or ice.
uRemove any snow on the roof, as this can slip down and obstruct your field of
vision while driving. If frozen solid, remove ice once it has softened.
uWhen removing ice from around the wheels, be sure not to damage the wheel
or wheel components.
•Make sure the hood is securely closed.
uIf the hood opens while driving, your front view will be blocked.
•Make sure the tires are in good condition.
uCheck air pressure, check for damage and excessive wear.
2Checking and Maintaining Tires P. 417
•Make sure there are no people or objects behind or around the vehicle.
uThere are blind spots from the inside.■Exterior Checks
1Exterior ChecksNOTICEWhen doors are frozen shut, use warm water around
the door edges to melt any ice. Do not try to force
them open, as this can damage the rubber trim
around the doors. When done, wipe dry to avoid
further freezing.
Do not pour warm water into the key cylinder.
You will be unable to insert key if the water freezes in
the hole.
Heat from the engine and exhaust can ignite
flammable materials left under the hood, causing a
fire. If you’ve parked your vehicle for an extended
period, inspect and remove any debris that may have
collected, such as dried grass and leaves that have
fallen or have been carried in for use as a nest by a
small animal.
Also check under the hood for leftover flammable
materials after you or someone else has performed
maintenance on your vehicle.
Page 310 of 500

309
Continued
Driving
Towing a TrailerTowing PreparationYour vehicle can tow a trailer if you carefully observe the load limits, use the proper
equipment, and follow the towing guidelines. Check the load limits before driving.
■Total trailer weight
Do not exceed the maximum allowable
weight of the trailer, cargo, and everything in
or on it shown in the table.
Towing loads in excess of this can seriously
affect vehicle handling and performance and
can damage the engine and drivetrain.
Each weight limit is calculated based on the following conditions:
•Occupants fill seats from the front of the vehicle to the back
•Each occupant weights 150 lbs (68 kg)
•Each occupant has 15 lbs (7 kg) of cargo in the cargo area
Any additional weight, cargo or accessories reduce the maximum trailer weight and
maximum tongue load.
■Towing Load Limits
1Towing Load Limits
Check if all loads are within limits at a public scale.
If a public scale is not available, add the estimated
weight of your cargo load to the weight of your
trailer (as quoted by the manufacturer), and then
measure the tongue load with an appropriate scale or
tongue gauge or estimate it based on cargo
distribution.
Refer to the trailer owner’s manual for additional
information.
Break-in Period
Avoid towing a trailer during your vehicle’s first 600
miles (1,000 km).
Never exceed the gross weight ratings.
Gross weight information
2Vehicle Specifications P. 480
3
WARNING
Exceeding any load limit or improperly
loading your vehicle and trailer can cause a
crash in which you can be seriously hurt or
killed.
Check the loading of your vehicle and
trailer carefully before starting to drive.
Total Load
Number of
occupants
4WD models with
ATF cooler
4WD models
without ATF cooler
2WD models
2
5,000 lbs (2,268 kg)
3,500 lbs (1,588 kg)
3,500 lbs (1,588 kg)
3
4,750 lbs (2,155 kg)
3,250 lbs (1,474 kg)
3,250 lbs (1,474 kg)
4
4,500 lbs (2,041 kg)
3,000 lbs (1,361 kg)
3,000 lbs (1,361 kg)
5
4,250 lbs (1,928 kg)
2,750 lbs (1,247 kg)
2,750 lbs (1,247 kg)
6
4,000 lbs (1,814 kg)
2,500 lbs (1,134 kg)
2,500 lbs (1,134 kg)
7
Towing not recommended