control arm Acura MDX 2014 Owner's Manual
[x] Cancel search | Manufacturer: ACURA, Model Year: 2014, Model line: MDX, Model: Acura MDX 2014Pages: 500, PDF Size: 11.72 MB
Page 9 of 500
8Quick Reference Guide
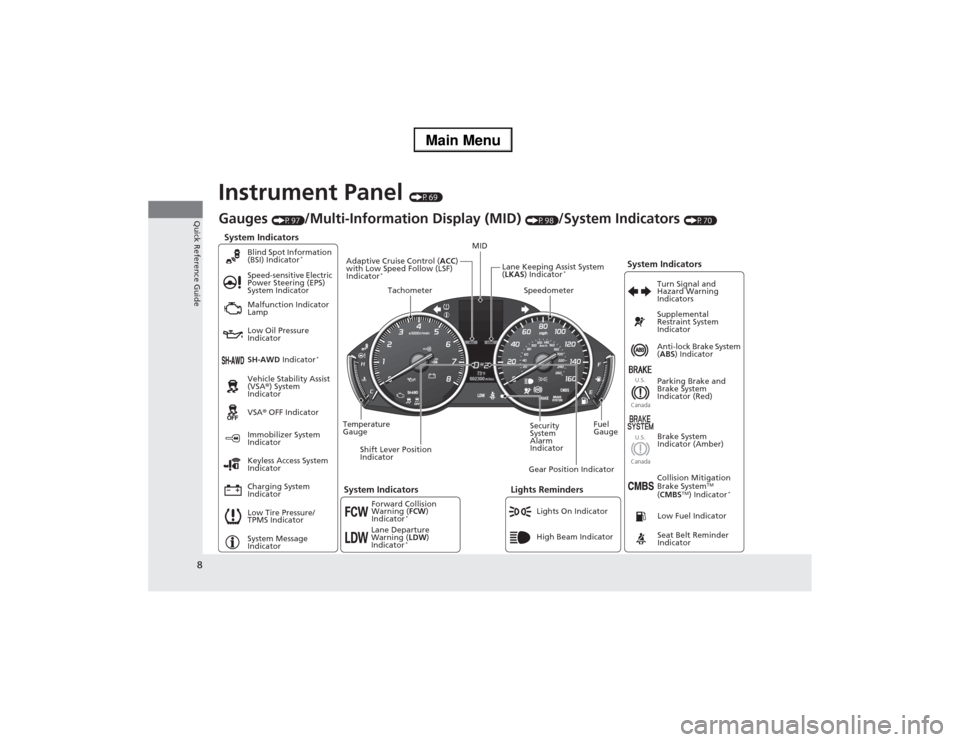
Instrument Panel
(P69)
System Indicators
Malfunction Indicator
Lamp
Low Oil Pressure
Indicator
Charging System
IndicatorAnti-lock Brake System
(ABS) Indicator
Vehicle Stability Assist
(VSA®) System
Indicator
VSA® OFF Indicator Speed-sensitive Electric
Power Steering (EPS)
System Indicator
Lights Reminders
Lights On Indicator
High Beam Indicator Immobilizer System
Indicator
Seat Belt Reminder
Indicator
System Indicators
System Message
IndicatorParking Brake and
Brake System
Indicator (Red) Supplemental
Restraint System
Indicator
Low Fuel Indicator
Gauges
(P97)
/Multi-Information Display (MID)
(P98)
/System Indicators
(P70)
Low Tire Pressure/
TPMS IndicatorTurn Signal and
Hazard Warning
Indicators
Keyless Access System
Indicator
Temperature
GaugeSecurity
System
Alarm
IndicatorFuel
Gauge
Tachometer
MID
Speedometer
Shift Lever Position
IndicatorGear Position IndicatorBrake System
Indicator (Amber)
SH-AWD Indicator
*
Blind Spot Information
(BSI) Indicator
*
System Indicators
Collision Mitigation
Brake System
TM
(CMBS
TM) Indicator
*
Forward Collision
Warning (FCW)
Indicator
*
Lane Departure
Warning (LDW)
Indicator
*
Lane Keeping Assist System
(LKAS) Indicator
*
Adaptive Cruise Control (ACC)
with Low Speed Follow (LSF)
Indicator
*
U.S.
CanadaU.S.
Canada
Page 42 of 500
41
uuAirbagsuAirbag System Components
Safe Driving
Airbags can pose serious hazards. To do their job, airbags must inflate with
tremendous force. So, while airbags help save lives, they can cause burns, bruises,
and other minor injuries, and sometimes even fatal ones if occupants are not
wearing their seat belts properly and sitting correctly.
What you should do: Always wear your seat belt properly, and sit upright and as
far back from the steering wheel as possible while allowing full control of the
vehicle. A front passenger should move their seat as far back from the dashboard as
possible.
Remember, however, that no safety system can prevent all injuries or deaths that
can occur in a severe crash, even when seat belts are properly worn and the airbags
deploy.
Do not place hard or sharp objects between yourself and a front airbag.
Carrying hard or sharp objects on your lap, or driving with a pipe or other sharp
object in your mouth, can result in injuries if your front airbag inflates.
Do not attach or place objects on the front and driver’s knee airbag covers.
Objects on the covers marked SRS AIRBAG could interfere with the proper
operation of the airbags or be propelled inside the vehicle and hurt someone if the
airbags inflate.■Important Facts About Your Airbags
1Important Facts About Your Airbags
Do not attempt to deactivate your airbags. Together,
airbags and seat belts provide the best protection.
When driving, keep hands and arms out of the
deployment path of the front airbag by holding each
side of the steering wheel. Do not cross an arm over
the airbag cover.
Page 79 of 500
78
uuIndicatorsu
Instrument Panel
Indicator
Name
On/Blinking
Explanation
Message
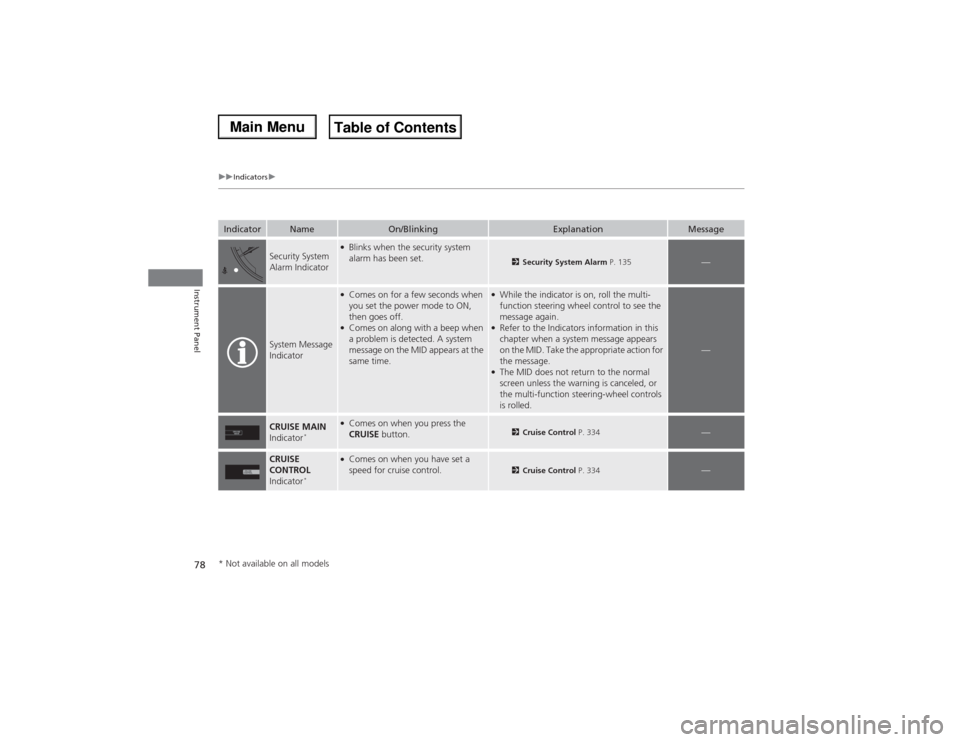
Security System
Alarm Indicator
●Blinks when the security system
alarm has been set.
2Security System Alarm P. 135
—
System Message
Indicator
●Comes on for a few seconds when
you set the power mode to ON,
then goes off.●Comes on along with a beep when
a problem is detected. A system
message on the MID appears at the
same time.
●While the indicator is on, roll the multi-
function steering wheel control to see the
message again.●Refer to the Indicators information in this
chapter when a system message appears
on the MID. Take the appropriate action for
the message.●The MID does not return to the normal
screen unless the warning is canceled, or
the multi-function steering-wheel controls
is rolled.
—
CRUISE MAIN
Indicator
*
●Comes on when you press the
CRUISE button.
2Cruise Control P. 334
—
CRUISE
CONTROL
Indicator
*
●Comes on when you have set a
speed for cruise control.
2Cruise Control P. 334
—
* Not available on all models
Page 114 of 500
113
Controls
This chapter explains how to operate the various controls necessary for driving.
Clock.................................................. 114
Locking and Unlocking the Doors
Key Types and Functions .................. 115
Locking/Unlocking the Doors from the
Outside .......................................... 117
Low Keyless Access Remote Signal
Strength......................................... 123
Locking/Unlocking the Doors from the
Inside ............................................. 124
Childproof Door Locks ..................... 126
Auto Door Locking/Unlocking .......... 127
Opening and Closing the Tailgate... 128
Security System
Immobilizer System .......................... 135Security System Alarm...................... 135
Opening and Closing the Windows... 138
Opening and Closing the Moonroof
.. 140
Operating the Switches Around the
Steering Wheel
ENGINE START/STOP Button............. 141
Turn Signals ..................................... 144
Light Switches.................................. 145
Daytime Running Lights ................... 148
Wipers and Washers ........................ 149
Brightness Control ........................... 153
Defogger/Heated Door Mirror .......... 154
Driving Position Memory System ...... 155
Adjusting the Steering Wheel........... 157Adjusting the Mirrors
Interior Rearview Mirror ................... 158
Power Door Mirrors ......................... 159
Adjusting the Seats
Adjusting the Seat Positions ............. 161
Rear Seats........................................ 168
Armrest ........................................... 171
Interior Lights/Interior Convenience Items
Interior Lights .................................. 172
Interior Convenience Items .............. 174
Climate Control System
Using Automatic Climate Control .... 185
Rear Climate Control System ........... 192
Automatic Climate Control Sensors ... 196
Page 136 of 500
135
Continued
Controls
Security SystemImmobilizer SystemThe immobilizer system prevents a key that has not been pre-registered from
starting the engine. Each key contains electronic transmitters that use electronic
signals to verify the key.
Pay attention to the following when pressing the ENGINE START/STOP button:
•Do not allow objects that emit strong radio waves near the ENGINE START/
STOP button.
•Make sure the key is not covered by or touching a metal object.
•Do not bring a key from another vehicle’s immobilizer system with the keyless
access remote.Security System AlarmThe security system alarm activates when the tailgate, hood, or doors are opened
without the key, remote transmitter or keyless access system.■When the security system alarm activates
The horn sounds intermittently, and all of the exterior lights flash.■To deactivate the security system alarm
Unlock the vehicle using the key, remote transmitter, or keyless access system. The
system, along with the horn and flashing lights, is deactivated.
1Immobilizer SystemNOTICELeaving the keyless access remote in the vehicle can
result in theft or accidental movement of the vehicle.
Always take the key with you whenever you leave the
vehicle unattended.
Do not alter the system or add other devices to it.
Doing so may damage the system and make your
vehicle inoperable.1Security System Alarm
The security alarm continues for a maximum of two
minutes until the security system alarm deactivates.
Page 137 of 500

uuSecurity SystemuSecurity System Alarm
136Controls
■Setting the security system alarm
The security system alarm automatically sets when the following conditions have
been met:
•The power mode is set to VEHICLE OFF (LOCK).
•The hood is closed.
•All doors and the tailgate are locked from outside with the key, remote
transmitter, or keyless access system.■When the security system alarm sets
The security system alarm indicator in the instrument panel blinks. When the
blinking interval changes after about 15 seconds, the security system alarm is set.■To cancel the security system alarm
The security system alarm is canceled when the vehicle is unlocked using the key,
remote transmitter, keyless access system, or the power mode is set to ON. The
security system alarm indicator goes off at the same time.
1Security System Alarm
Do not set the security system alarm when someone
is in the vehicle or a window is open. The system can
accidentally activate when unlocking the door with
the lock tab.
If the battery goes dead after you have set the
security system alarm, the security alarm may go off
once the battery is recharged or replaced.
If this occurs, deactivate the security system alarm by
unlocking a door using the key, remote transmitter,
or keyless access system.
Do not attempt to alter this system or add another
device to it.
Page 138 of 500

137
uuSecurity SystemuSecurity System Alarm
Controls
■The panic button on the remote
transmitter
If you press the panic button for
approximately one second, the following will
occur for about 30 seconds:
•The horn sounds.
•Some exterior lights flash.
■Canceling panic mode
Press any button on the remote transmitter, or set the power mode to ON.■Panic Mode
Panic
Button
Page 150 of 500

149
uuOperating the Switches Around the Steering WheeluWipers and Washers
Continued
Controls
Wipers and Washers
The windshield wipers and washers can be
used when the power mode is in ON.■MIST
The wipers run at high speed until you release
the lever.■Wiper switch (OFF, INT
*, LO, HI)
Change the wiper switch setting according to
the amount of rain.
■Adjusting the delay
Turn the adjustment ring to adjust the wiper
delay.■Washer
Sprays while you pull the lever toward you.
When you release the lever, the wipers make
two or three more sweeps before stopping.
■Windshield Wipers/Washers
1Wipers and WashersNOTICEDo not use the wipers when the windshield is dry.
The windshield will get scratched, or the rubber
blades will get damaged.NOTICEIn cold weather, the blades may freeze to the
windshield, becoming stuck.
Operating the wipers in this condition may damage
the wipers. Use the defroster to warm the
windshield, then turn the wipers on.
If the vehicle speeds up while the wipers are
operating intermittently, the length of the wipe
interval shortens.
When the vehicle starts moving, the wipers make a
single sweep.
When the vehicle speeds up, the wiper operation’s
shortest delay setting ( ) and the LO setting become
the same.
Turn the washers off if no washer fluid comes out.
The pump may get damaged.
The wiper motor may stop motor operation
temporarily to prevent an overload. Wiper operation
will return to normal within a few minutes, once the
circuit has returned to normal.
Intermittent Time
Adjustment Ring
MISTINT: Low speed with intermittentOFFLO: Low speed wipeHI: High speed wipePull to
use
washer.
Long delay
Short delay
* Not available on all models
Page 170 of 500
Continued
169
uuAdjusting the SeatsuRear Seats
Controls
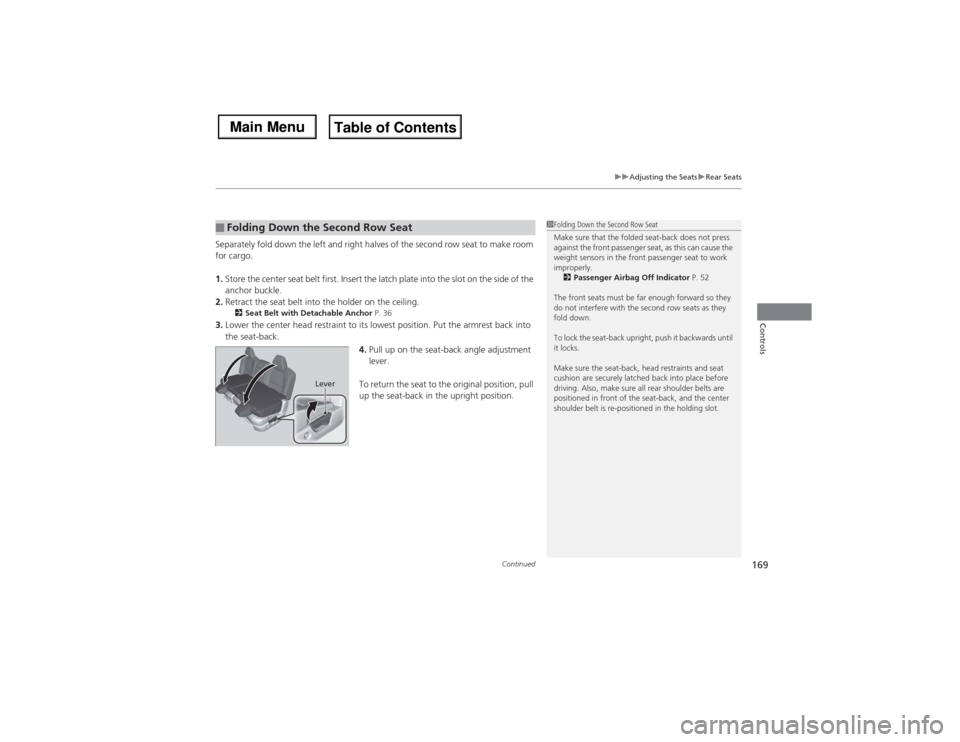
Separately fold down the left and right halves of the second row seat to make room
for cargo.
1.Store the center seat belt first. Insert the latch plate into the slot on the side of the
anchor buckle.
2.Retract the seat belt into the holder on the ceiling.
2Seat Belt with Detachable Anchor P. 36
3.Lower the center head restraint to its lowest position. Put the armrest back into
the seat-back.
4.Pull up on the seat-back angle adjustment
lever.
To return the seat to the original position, pull
up the seat-back in the upright position.■Folding Down the Second Row Seat
1Folding Down the Second Row Seat
Make sure that the folded seat-back does not press
against the front passenger seat, as this can cause the
weight sensors in the front passenger seat to work
improperly.
2Passenger Airbag Off Indicator P. 52
The front seats must be far enough forward so they
do not interfere with the second row seats as they
fold down.
To lock the seat-back upright, push it backwards until
it locks.
Make sure the seat-back, head restraints and seat
cushion are securely latched back into place before
driving. Also, make sure all rear shoulder belts are
positioned in front of the seat-back, and the center
shoulder belt is re-positioned in the holding slot.
Lever
Page 172 of 500

171
uuAdjusting the SeatsuArmrest
Controls
Armrest
The console lid can be used as an armrest.
To adjust:
Slide the armrest to a desired position.
Pull down the armrest in the center seat-back.
■Using the Front Seat Armrest■Using the Rear Seat Armrest