cooling Acura MDX 2015 Owner's Guide
[x] Cancel search | Manufacturer: ACURA, Model Year: 2015, Model line: MDX, Model: Acura MDX 2015Pages: 79, PDF Size: 16.44 MB
Page 28 of 79

48 || 49
veHICLe CoNTroLS
veHICLe CoNTroLS
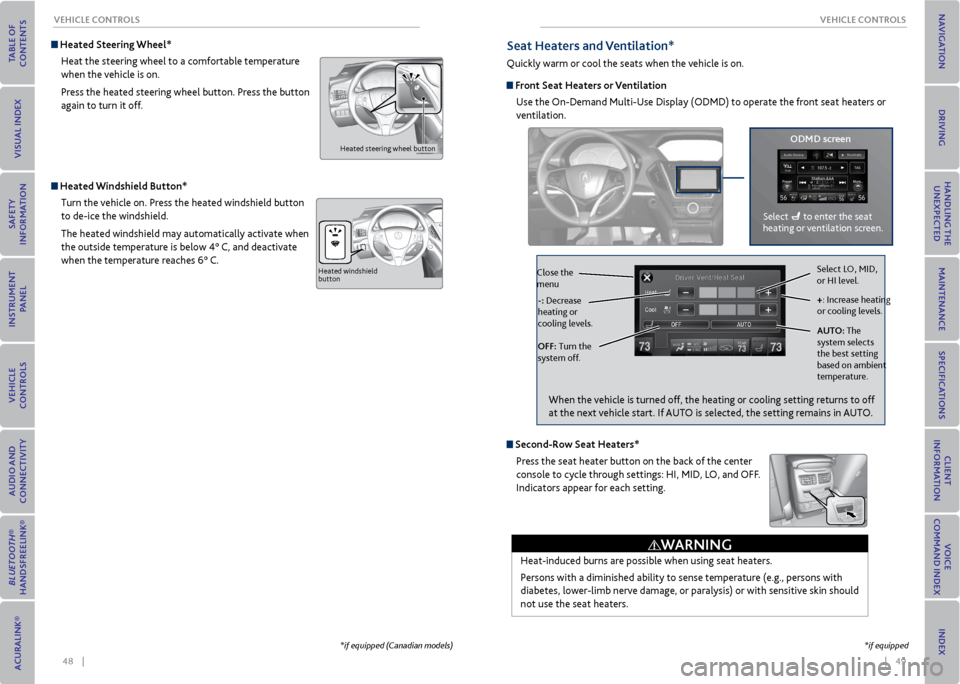
Heated Steering Wheel*
Heat the steering wheel to a comfortable temperature
when the vehicle is on.
Press the heated steering wheel button. Press the button
again to turn it off.
Heated steering wheel button
Heated Windshield Button*Turn the vehicle on. Press the heated windshield button
to de-ice the windshield.
The heated windshield may automatically activate when
the outside temperature is below 4° C, and deactivate
when the temperature reaches 6° C.
Heated windshield
button
*if equipped (Canadian models)
Seat Heaters and ventilation*
Quickly warm or cool the seats when the vehicle is on.
Front Seat Heaters or ventilation
Use the On-Demand Multi-Use Display (ODMD) to operate the front seat heaters or
ventilation.
Select LO, MID,
or HI level.
+: Increase heating
or cooling levels.
AUT o: The
system selects
the best setting
based on ambient
temperature.
oFF: Turn the
system off. -: Decrease
heating or
cooling levels.
Close the
menu
oDmD screen
Select to enter the seat
heating or ventilation screen.
*if equipped
Second-r ow Seat Heaters*
Press the seat heater button on the back of the center
console to cycle through settings: HI, MID, LO, and OFF.
Indicators appear for each setting.
Heat-induced burns are possible when using seat heaters.
Persons with a diminished ability to sense temperature (e.g., persons with
diabetes, lower-limb nerve damage, or paralysis) or with sensitive skin should
not use the seat heaters.
WArNING
When the vehicle is turned off, the heating or cooling setting returns to off
at the next vehicle start. If AUTO is selected, the setting remains in AUTO.
Page 59 of 79

110 || 111
HANDLING THe UNexPeCTeD
HANDLING THe UNexPeCTeD
overheating
If the temperature gauge needle is at the H mark, the engine suddenly loses power, or
steam or spray comes out from under the hood, your engine is overheating.
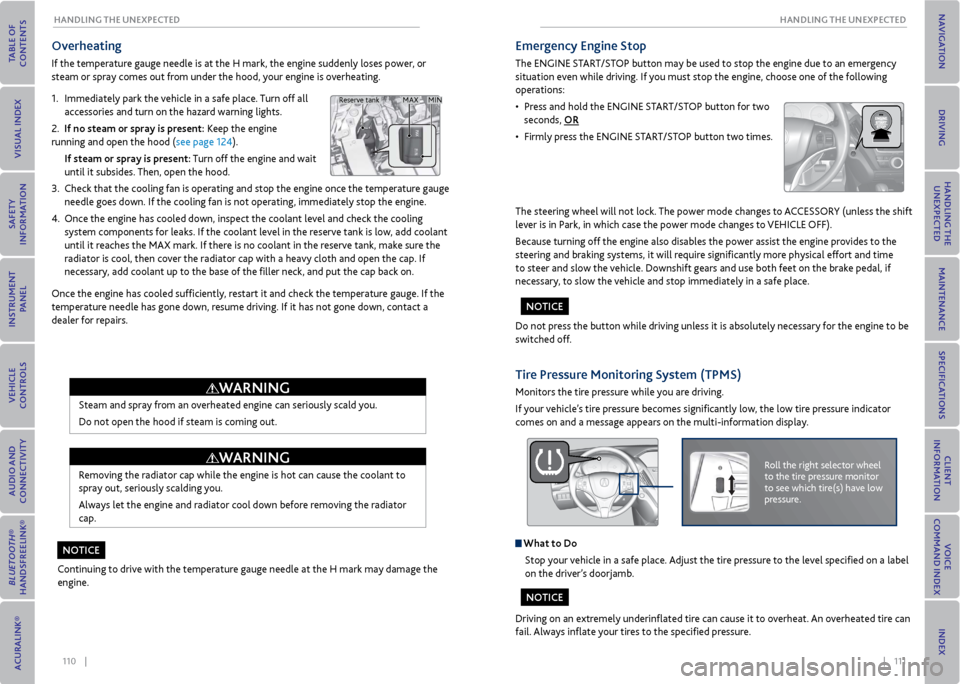
1. Immediately park the vehicle in a safe place. Turn off all
accessories and turn on the hazard warning lights.
2. If no steam or spray is present: Keep the engine
running and open the hood (see page 124).
If steam or spray is present: Turn off the engine and wait
until it subsides. Then, open the hood.
3. Check that the cooling fan is operating and stop the engine once the temperature gauge
needle goes down. If the cooling fan is not operating, immediately stop the engine.
4. Once the engine has cooled down, inspect the coolant level and check the cooling
system components for leaks. If the coolant level in the reserve tank is low, add coolant
until it reaches the MAX mark. If there is no coolant in the reserve tank, make sure the
radiator is cool, then cover the radiator cap with a heavy cloth and open the cap. If
necessary, add coolant up to the base of the filler neck, and put the cap back on.
Once the engine has cooled sufficiently, restart it and check the temperature gauge. If the
temperature needle has gone down, resume driving. If it has not gone down, contact a
dealer for repairs.
Steam and spray from an overheated engine can seriously scald you.
Do not open the hood if steam is coming out.
Removing the radiator cap while the engine is hot can cause the coolant to
spray out, seriously scalding you.
Always let the engine and radiator cool down before removing the radiator
cap.
Continuing to drive with the temperature gauge needle at the H mark may damage the
engine.
MAX MIN
Reserve tank
WArNING
WArNING
No TICe
emergency engine Stop
The ENGINE START/STOP button may be used to stop the engine due to an emergency
situation even while driving. If you must stop the engine, choose one of the following
operations:
• Press and hold the ENGINE START/STOP button for two
seconds, or
• Firmly press the ENGINE START/STOP button two times.
The steering wheel will not lock. The power mode changes to ACCESSORY (unless the shift
lever is in Park, in which case the power mode changes to VEHICLE OFF).
Because turning off the engine also disables the power assist the engine provides to the
steering and braking systems, it will require significantly more physical effort and time
to steer and slow the vehicle. Downshift gears and use both feet on the brake pedal, if
necessary, to slow the vehicle and stop immediately in a safe place.
Do not press the button while driving unless it is absolutely necessary for the engine to be
switched off.
Tire Pressure monitoring System (TPmS)
Monitors the tire pressure while you are driving.
If your vehicle’s tire pressure becomes significantly low, the low tire pressure indicator
comes on and a message appears on the multi-information display.
Roll the right selector wheel
to the tire pressure monitor
to see which tire(s) have low
pressure.
What to Do Stop your vehicle in a safe place. Adjust the tire pressure to the level specified on a label
on the driver’s doorjamb.
Driving on an extremely underinflated tire can cause it to overheat. An overheated tire can
fail. Always inflate your tires to the specified pressure.
No TICe
NoTICe
Page 63 of 79

118 || 119
HANDLING THe UNexPeCTeD
HANDLING THe UNexPeCTeD
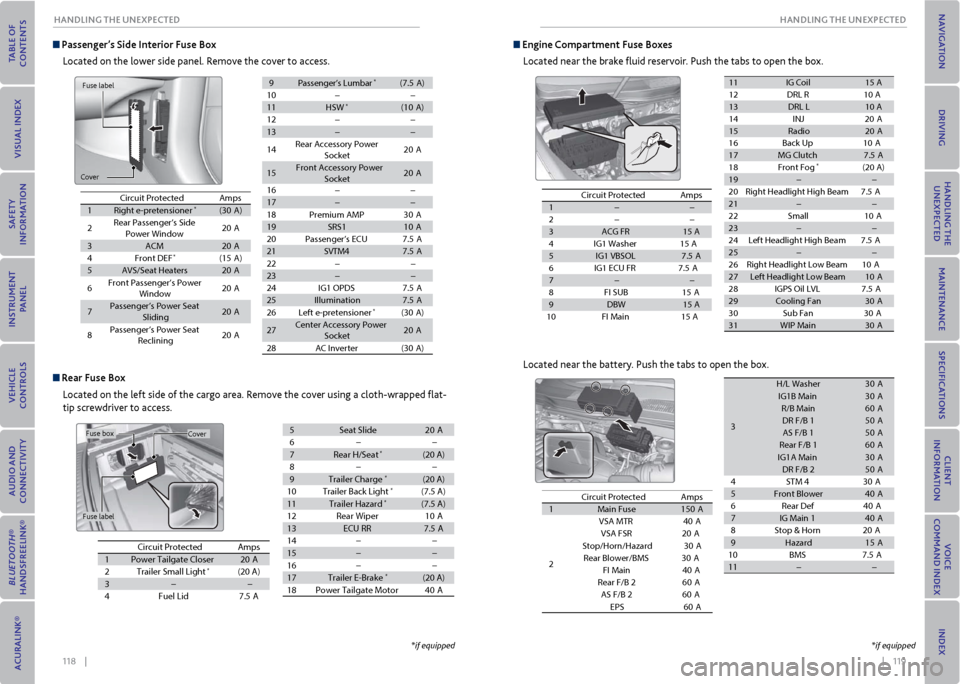
Passenger’s Side Interior Fuse Box
Located on the lower side panel. Remove the cover to access.
Circuit Protecte dAmps
1Right e-pretensione r*(30A)
2Rear Passenger’s Side
Power Window20 A
3ACM20A
4Front DEF*(15A )
5AVS/Seat Heaters20A
6Front Passenger’s Power
Windo w20A
7Passenger’s Power Seat
Slidin g20A
8Passenger’s Power Seat
Reclinin g20A
9Passenger’s Lumbar*(7.5 A)
10��
11HSW*(10A )
12��
13��
14Rear Accessory Power
Socket20A
15Front Accessory Power
Socke t20A
16��
17��
18Premium AMP30 A
19SRS110A
20Passenger’s ECU7.5 A
21SVTM47.5A
22��
23��
24IG1 OPD S7.5A
25Illumination7.5A
26Left e-pretensioner*(30A )
27 Center Accessory Power
Socket20A
28AC Inverter(30A )
rear Fuse Box
Located on the left side of the cargo area. Remove the cover using a cloth-wrapped flat-
tip screwdriver to access.
Circuit Protecte dAmps
1Power Tailgate Closer20A
2Trailer Small Ligh t*(20 A)
3��
4Fuel Lid7.5A
5Seat Slid e20A
6��
7Rear H/Seat*(20 A)
8��
9Trailer Charge*(20 A)
10Trailer Back Ligh t*(7.5 A)
11Trailer Hazard*(7.5 A)
12Rear Wiper10A
13ECU RR7.5A
14��
15��
16��
17Trailer E-Brake*(20 A)
18Power Tailgate Motor40A
Fuse label
Cover
Cover
Fuse label
Fuse box
*if equipped
Circuit Protecte dAmps
1��
2��
3ACG FR15 A
4I G1 Washer1 5 A
5IG1 VBSO L7.5A
6I G1 ECU FR 7.5A
7��
8F I SUB1 5A
9DBW15 A
10 FI Main 15 A
11IG Coil15 A
12 DRL R10 A
13DRL L10 A
14 IN
J20A
15Radio20A
16 Back Up 10A
17MG Clutch7.5A
18 Front Fog*(20 A)
19��
20 Right Headlight High Beam 7.5A
21��
22 Smal
l10A
23��
24 Left Headlight High Bea m7.5A
25��
26 Right Headlight Low Beam 10A
27Left Headlight Low Beam10A
28 IGPS Oil LVL 7.5A
29Cooling Fan30 A
30 Sub Fan 30A
31WIP Mai n30A
Located near the battery. Push the tabs to open the box.
Circuit Protecte dAmps
1Main Fuse150A
2
VSA MT R40A
VSA FSR 20A
Stop/Horn/Hazard 30A
Rear Blower/BMS 30A
FI Main 40A
Rear F/B 26 0A
AS F/B 26 0A
EPS 60A
3
H/L Washer30A
IG1B Main30A
R/B Main60A
DR F/B 150A
AS F/B 150A
Rear F/B 160A
IG1A Main30A
DR F/B 250A
4S TM
430A
5Front Blower40A
6R ear De
f40A
7IG Main 140A
8S top & Horn 20A
9Hazar d15A
10 BMS 7.5A
11��
engine Compartment Fuse Boxes
Located near the brake fluid reservoir. Push the tabs to open the box.
*if equipped
Page 67 of 79

126 || 127
mAINTeNANCe
mAINTeNANCe
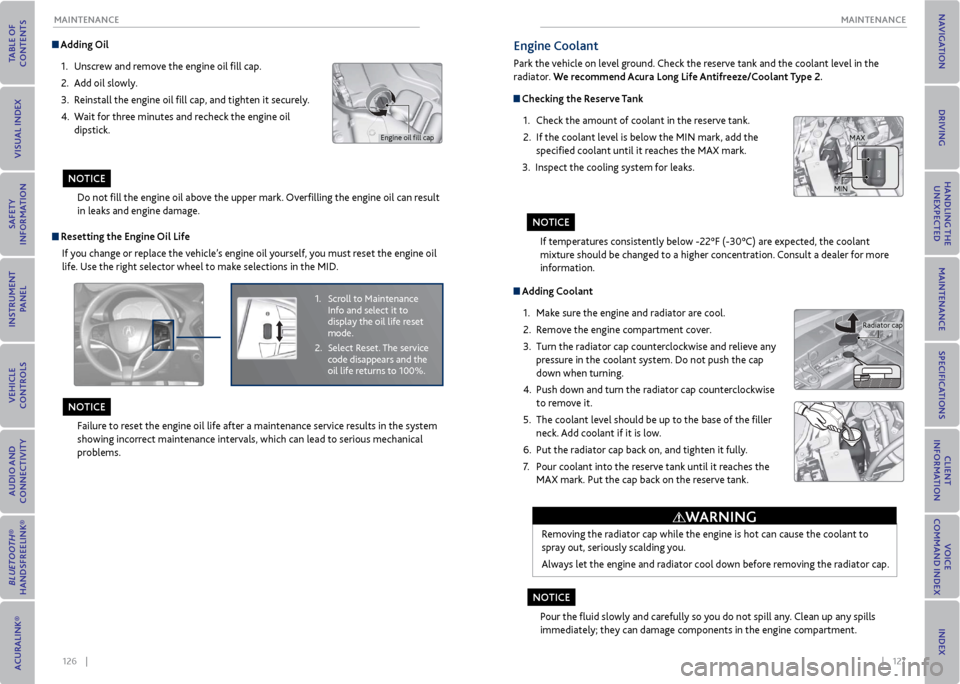
Adding oil
1. Unscrew and remove the engine oil fill cap.
2. Add oil slowly.
3. Reinstall the engine oil fill cap, and tighten it securely.
4. Wait for three minutes and recheck the engine oil
dipstick.
Do not fill the engine oil above the upper mark. Overfilling the engine oil can result
in leaks and engine damage.
Engine oil fill cap
r esetting the engine oil Life
If you change or replace the vehicle’s engine oil yourself, you must reset the engine oil
life. Use the right selector wheel to make selections in the MID.
Failure to reset the engine oil life after a maintenance service results in the system
showing incorrect maintenance intervals, which can lead to serious mechanical
problems.
1. Scroll to Maintenance
Info and select it to
display the oil life reset
mode.
2. Select Reset. The service
code disappears and the
oil life returns to 100%.
No TICe
NoTICe
Adding Coolant
1. Make sure the engine and radiator are cool.
2. Remove the engine compartment cover.
3. Turn the radiator cap counterclockwise and relieve any
pressure in the coolant system. Do not push the cap
down when turning.
4. Push down and turn the radiator cap counterclockwise
to remove it.
5. The coolant level should be up to the base of the filler
neck. Add coolant if it is low.
6. Put the radiator cap back on, and tighten it fully.
7. Pour coolant into the reserve tank until it reaches the
MAX mark. Put the cap back on the reserve tank.
Removing the radiator cap while the engine is hot can cause the coolant to
spray out, seriously scalding you.
Always let the engine and radiator cool down before removing the radiator cap.
Pour the fluid slowly and carefully so you do not spill any. Clean up any spills
immediately; they can damage components in the engine compartment.
Radiator cap
WArNING
engine Coolant
Park the vehicle on level ground. Check the reserve tank and the coolant level in the
radiator. We recommend Acura Long Life Antifreeze/Coolant Type 2.
Checking the reserve Tank
1. Check the amount of coolant in the reserve tank.
2. If the coolant level is below the MIN mark, add the
specified coolant until it reaches the MAX mark.
3. Inspect the cooling system for leaks.
If temperatures consistently below -22°F (-30°C) are expected, the coolant
mixture should be changed to a higher concentration. Consult a dealer for more
information.
MAX
MIN
No TICe
NoTICe