display Acura MDX 2015 Owner's Guide
[x] Cancel search | Manufacturer: ACURA, Model Year: 2015, Model line: MDX, Model: Acura MDX 2015Pages: 79, PDF Size: 16.44 MB
Page 3 of 79
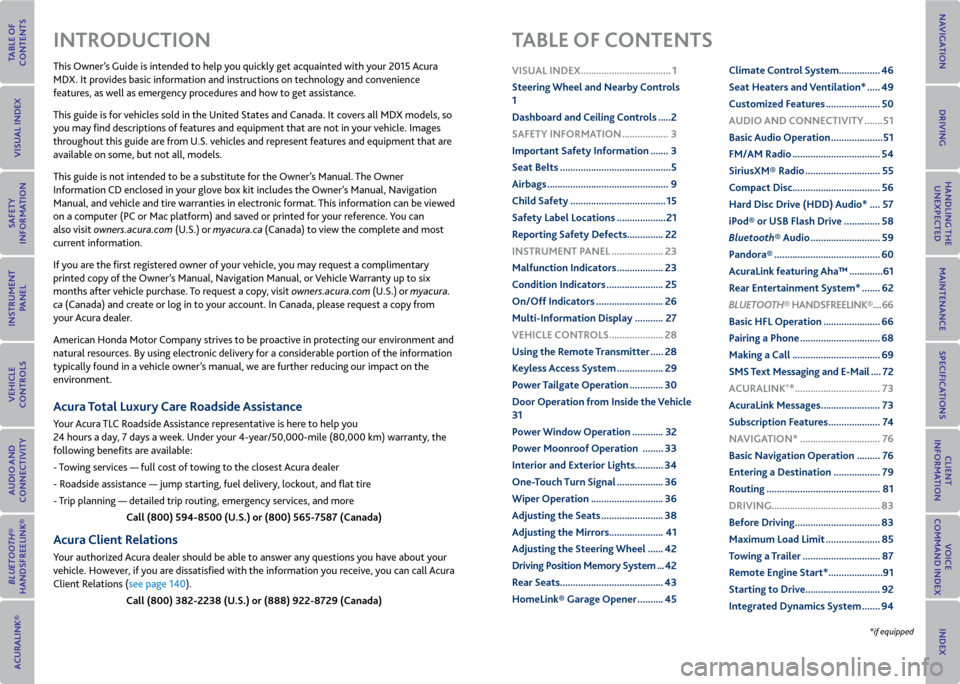
This Owner’s Guide is intended to help you quickly get acquainted with your 2015 Acura
MDX. It provides basic information and instructions on technology and convenience
features, as well as emergency procedures and how to get assistance.
This guide is for vehicles sold in the United States and Canada. It covers all MDX models, so
you may find descriptions of features and equipment that are not in your vehicle. Images
throughout this guide are from U.S. vehicles and represent features and equipment that are
available on some, but not all, models.
This guide is not intended to be a substitute for the Owner’s Manual. The Owner
Information CD enclosed in your glove box kit includes the Owner’s Manual, Navigation
Manual, and vehicle and tire warranties in electronic format. This information can be viewed
on a computer (PC or Mac platform) and saved or printed for your reference. You can
also visit owners.acura.com (U.S.) or myacura.ca (Canada) to view the complete and most
current information.
If you are the first registered owner of your vehicle, you may request a complimentary
printed copy of the Owner’s Manual, Navigation Manual, or Vehicle Warranty up to six
months after vehicle purchase. To request a copy, visit owners.acura.com (U.S.) or myacura.
ca (Canada) and create or log in to your account. In Canada, please request a copy from
your Acura dealer.
American Honda Motor Company strives to be proactive in protecting our environment and
natural resources. By using electronic delivery for a considerable portion of the information
typically found in a vehicle owner’s manual, we are further reducing our impact on the
environment.
Acura Total Luxury Care r oadside Assistance
Your Acura TLC Roadside Assistance representative is here to help you
24 hours a day, 7 days a week. Under your 4-year/50,000-mile (80,000 km) warranty, the
following benefits are available:
- Towing services — full cost of towing to the closest Acura dealer
- Roadside assistance — jump starting, fuel delivery, lockout, and flat tire
- Trip planning — detailed trip routing, emergency services, and more
Call (800) 594-8500 (U.S.) or (800) 565-7587 (Canada)
Acura Client relations
Your authorized Acura dealer should be able to answer any questions you have about your
vehicle. However, if you are dissatisfied with the information you receive, you can call Acura
Client Relations (see page 140).
Call (800) 382-2238 (U.S.) or (888) 922-8729 (Canada)
INTroDUCTIoN TABLe oF CoNTeNTS
*if equipped
vISUAL INDex ...................................1
Steering Wheel and Nearby Controls
1
Dashboard and Ceiling Controls ..... 2
SAFeTy INFormATIoN .................. 3
Important Safety Information ....... 3
Seat Belts ........................................... 5
Airbags ............................................... 9
Child Safety ..................................... 15
Safety Label Locations ................... 21
r eporting Safety Defects .............. 22
INSTrUmeNT P ANeL .................... 23
malfunction Indicators .................. 23
Condition Indicators ...................... 25
on/off Indicators .......................... 26
multi-Information Display ........... 27
veHICLe CoNTroLS ..................... 28
Using the remote Transmitter ..... 28
Keyless Access System .................. 29
Power Tailgate operation ............. 30
Door operation from Inside the v ehicle
31
Power Window operation ............ 32
Power moonroof operation ........33
Interior and exterior Lights ...........34
one-Touch Turn Signal .................. 36
Wiper operation ............................ 36
Adjusting the Seats ........................ 38
Adjusting the mirrors..................... 41
Adjusting the Steering Wheel ...... 42
Driving Position memory System ... 42
r ear Seats ........................................ 43
HomeLink® Garage opener .......... 45Climate Control System
................46
Seat Heaters and ventilation* ..... 49
Customized Features ..................... 50
AUDIo AND CoNNeCTIvITy ....... 51
Basic Audio operation .................... 51
Fm/Am radio .................................. 54
Siriusxm® radio ............................. 55
Compact Disc .................................. 56
Hard Disc Drive (HDD) Audio* .... 57
iPod® or USB Flash Drive .............. 58
Bluetooth® Audio ........................... 59
Pandora® ......................................... 60
AcuraLink featuring Aha™ ............. 61
r ear entertainment System* ....... 62
Bluetooth® HANDSFreeLINK ®.... 66
Basic HFL operation ...................... 66
Pairing a Phone ............................... 68
making a Call .................................. 69
SmS Text messaging and e-mail .... 72
A CUrALINK
®* ................................. 73
AcuraLink messages ....................... 73
Subscription Features .................... 74
NA vIGATIoN* ............................... 76
Basic Navigation operation ......... 76
entering a Destination .................. 79
r outing ............................................ 81
DrIvING .......................................... 83
Before Driving ................................. 83
maximum Load Limit ..................... 85
Towing a Trailer .............................. 87
r emote engine Start* ..................... 91
Starting to Drive ............................. 92
Integrated Dynamics System ....... 94
Page 4 of 79
| 1
vISUAL INDex
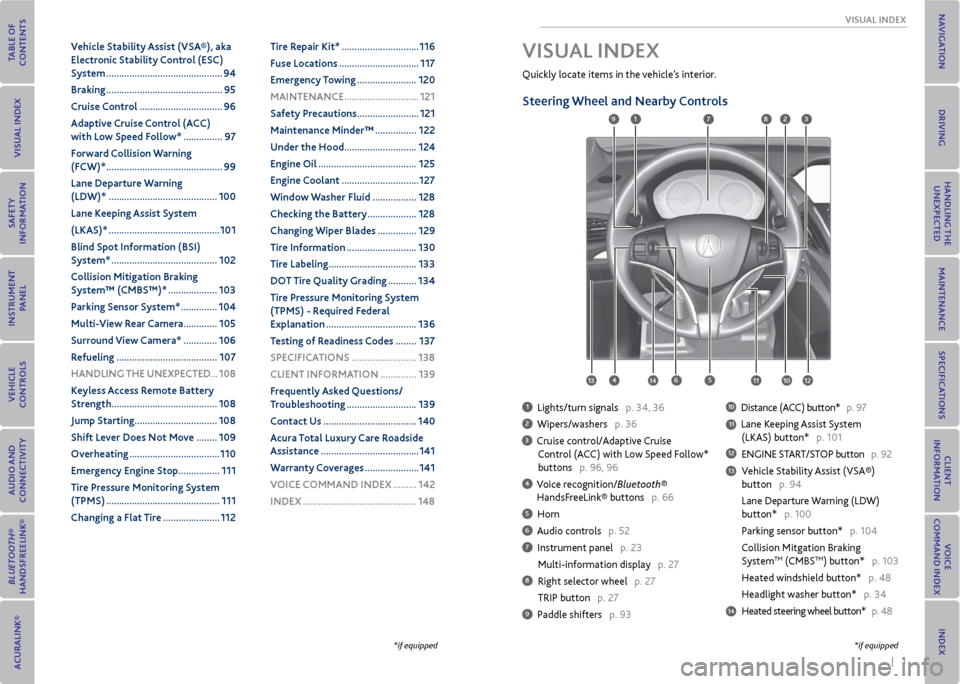
Quickly locate items in the vehicle’s interior.
Steering Wheel and Nearby Controls
1 Lights/turn signals p. 34, 36
2 Wipers/washers p. 36
3 Cruise control/Adaptive Cruise
Control (ACC) with Low Speed Follow*
buttons p. 96, 96
4 Voice recognition/Bluetooth®
HandsFreeLink® buttons p. 66
5 Horn
6 Audio controls p. 52
7 Instrument panel p. 23
Multi-information display p. 27
8 Right selector wheel p. 27
TRIP button p. 27
9 Paddle shifters p. 93
10 Distance (ACC) button* p. 97
11 Lane Keeping Assist System
(LKAS) button* p. 101
12 ENGINE START/STOP button p. 92
13 Vehicle Stability Assist (VSA®)
button p. 94
Lane Departure Warning (LDW)
button* p. 100
Parking sensor button* p. 104
Collision Mitgation Braking
System
TM (CMBSTM) button* p. 103
Heated windshield button* p. 48
Headlight washer button* p. 34
14 Heated steering wheel button* p. 48
vISUAL INDex
1
45
9
61011
7283
131412
*if equipped*if equipped
v ehicle Stability Assist (vSA®), aka
electronic Stability Control (eSC)
System ............................................. 94
Braking ............................................. 95
Cruise Control ................................ 96
Adaptive Cruise Control (ACC)
with Low Speed Follow* ............... 97
Forward Collision Warning
(FCW)* ............................................. 99
Lane Departure Warning
(LDW)* .......................................... 100
Lane Keeping Assist System
(LKAS)* ........................................... 101
Blind Spot Information (BSI)
System* ......................................... 102
Collision mitigation Braking
System™ (CmBS™)* ................... 103
Parking Sensor System* .............. 104
multi- view rear Camera ............. 105
Surround view Camera* ............. 106
r efueling ....................................... 107
HANDLING THe UNexPeCTeD ...108
Keyless Access r emote Battery
Strength ......................................... 108
Jump Starting ................................ 108
Shift Lever Does Not move ........ 109
overheating ................................... 110
emergency engine Stop ................ 111
Tire Pressure monitoring System
(TPmS) ............................................ 111
Changing a Flat Tire ...................... 112Tire r
epair Kit* .............................. 116
Fuse Locations ............................... 117
emergency Towing ....................... 120
mAINTeNANCe ............................. 121
Safety Precautions ........................ 121
maintenance minder™ ................ 122
Under the Hood ............................ 124
engine oil ...................................... 125
engine Coolant .............................. 127
Window Washer Fluid ................. 128
Checking the Battery ................... 128
Changing Wiper Blades ............... 129
Tire Information ........................... 130
Tire Labeling .................................. 133
Do T Tire Quality Grading ........... 134
Tire Pressure monitoring System
(TPmS) - r equired Federal
explanation ................................... 136
Testing of readiness Codes ........ 137
SPeCIFICATIoNS ......................... 138
CLIeNT INFormATIoN .............. 139
Frequently Asked Questions/
Troubleshooting ........................... 139
Contact Us .................................... 140
Acura Total Luxury Care r oadside
Assistance ...................................... 141
Warranty Coverages ..................... 141
v oICe CommAND INDex ......... 142
INDex ............................................ 148
Page 5 of 79
2 || 3
SAFeTy
vISUAL INDex
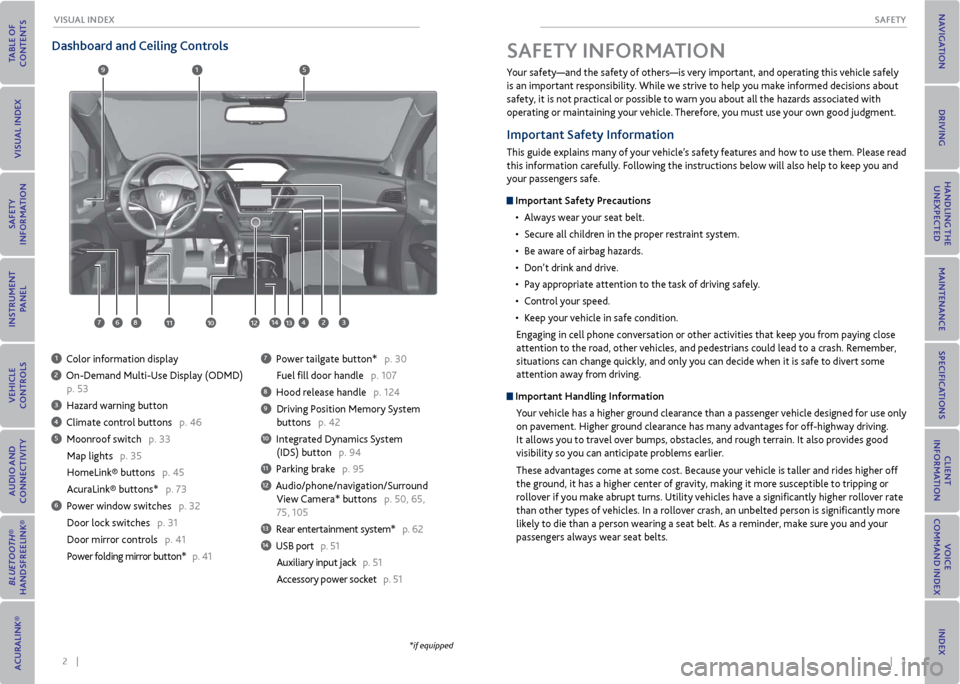
Dashboard and Ceiling Controls
1 Color information display
2 On-Demand Multi-Use Display (ODMD)
p. 53
3 Hazard warning button
4 Climate control buttons p. 46
5 Moonroof switch p. 33
Map lights p. 35
HomeLink® buttons p. 45
AcuraLink® buttons* p. 73
6 Power window switches p. 32
Door lock switches p. 31
Door mirror controls p. 41
Power folding mirror button* p. 41
7 Power tailgate button* p. 30
Fuel fill door handle p. 107
8 Hood release handle p. 124
9 Driving Position Memory System
buttons p. 42
10 Integrated Dynamics System
(IDS) button p. 94
11 Parking brake p. 95
12 Audio/phone/navigation/Surround
View Camera* buttons p. 50, 65,
75, 105
13 Rear entertainment system* p. 62
14 USB port p. 51
Auxiliary input jack p. 51
Accessory power socket p. 51
1
281134
5
67
9
1012
Your safety—and the safety of others—is very important, and operating this vehicle safely
is an important responsibility. While we strive to help you make informed decisions about
safety, it is not practical or possible to warn you about all the hazards associated with
operating or maintaining your vehicle. Therefore, you must use your own good judgment.
Important Safety Information
This guide explains many of your vehicle’s safety features and how to use them. Please read
this information carefully. Following the instructions below will also help to keep you and
your passengers safe.
Important Safety Precautions
• Always wear your seat belt.
• Secure all children in the proper restraint system.
• Be aware of airbag hazards.
• Don’t drink and drive.
• Pay appropriate attention to the task of driving safely.
• Control your speed.
• Keep your vehicle in safe condition.
Engaging in cell phone conversation or other activities that keep you from paying close
attention to the road, other vehicles, and pedestrians could lead to a crash. Remember,
situations can change quickly, and only you can decide when it is safe to divert some
attention away from driving.
Important Handling Information Your vehicle has a higher ground clearance than a passenger vehicle designed for use only
on pavement. Higher ground clearance has many advantages for off-highway driving.
It allows you to travel over bumps, obstacles, and rough terrain. It also provides good
visibility so you can anticipate problems earlier.
These advantages come at some cost. Because your vehicle is taller and rides higher off
the ground, it has a higher center of gravity, making it more susceptible to tripping or
rollover if you make abrupt turns. Utility vehicles have a significantly higher rollover rate
than other types of vehicles. In a rollover crash, an unbelted person is significantly more
likely to die than a person wearing a seat belt. As a reminder, make sure you and your
passengers always wear seat belts.
SAFeTy INFormATIoN
13
*if equipped
14
Page 9 of 79
10 || 11
SAFeTy
SAFeTy
Side Airbags
The side airbags help protect the upper torso and pelvis of the driver or a front passenger
during a moderate-to-severe side impact. They are housed in the outside edge of the
driver’s and front passenger’s seat-backs. Both are marked SIDe AIrBAG.
Side Curtain Airbags
Side curtain airbags help protect the head and torso of the driver and passengers in outer
seating positions during a moderate-to-severe side impact. The side curtain airbags
equipped in this vehicle are also designed to help reduce the likelihood of partial and
complete ejection of vehicle occupants through side windows in crashes, particularly
rollover crashes.
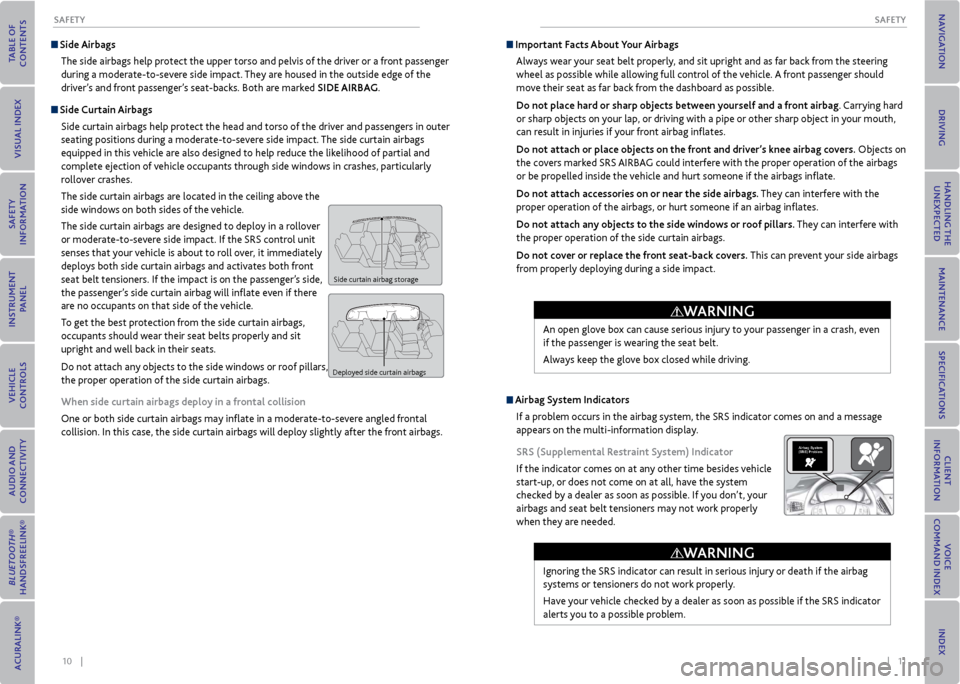
The side curtain airbags are located in the ceiling above the
side windows on both sides of the vehicle.
The side curtain airbags are designed to deploy in a rollover
or moderate-to-severe side impact. If the SRS control unit
senses that your vehicle is about to roll over, it immediately
deploys both side curtain airbags and activates both front
seat belt tensioners. If the impact is on the passenger’s side,
the passenger’s side curtain airbag will inflate even if there
are no occupants on that side of the vehicle.
To get the best protection from the side curtain airbags,
occupants should wear their seat belts properly and sit
upright and well back in their seats.
Do not attach any objects to the side windows or roof pillars, as they can interfere with
the proper operation of the side curtain airbags.
When side curtain airbags deploy in a frontal collision
One or both side curtain airbags may inflate in a moderate-to-severe angled frontal
collision. In this case, the side curtain airbags will deploy slightly after the front airbags.
Side curtain airbag storage
Deployed side curtain airbags
Important Facts About your Airbags
Always wear your seat belt properly, and sit upright and as far back from the steering
wheel as possible while allowing full control of the vehicle. A front passenger should
move their seat as far back from the dashboard as possible.
Do not place hard or sharp objects between yourself and a front airbag. Carrying hard
or sharp objects on your lap, or driving with a pipe or other sharp object in your mouth,
can result in injuries if your front airbag inflates.
Do not attach or place objects on the front and driver’s knee airbag covers. Objects on
the covers marked SRS AIRBAG could interfere with the proper operation of the airbags
or be propelled inside the vehicle and hurt someone if the airbags inflate.
Do not attach accessories on or near the side airbags. They can interfere with the
proper operation of the airbags, or hurt someone if an airbag inflates.
Do not attach any objects to the side windows or roof pillars. They can interfere with
the proper operation of the side curtain airbags.
Do not cover or replace the front seat-back covers. This can prevent your side airbags
from properly deploying during a side impact.
Ignoring the SRS indicator can result in serious injury or death if the airbag
systems or tensioners do not work properly.
Have your vehicle checked by a dealer as soon as possible if the SRS indicator
alerts you to a possible problem.
Airbag System
(SRS) Problem
WArNING
Airbag System Indicators
If a problem occurs in the airbag system, the SRS indicator comes on and a message
appears on the multi-information display.
SrS (Supplemental r estraint System) Indicator
If the indicator comes on at any other time besides vehicle
start-up, or does not come on at all, have the system
checked by a dealer as soon as possible. If you don’t, your
airbags and seat belt tensioners may not work properly
when they are needed. An open glove box can cause serious injury to your passenger in a crash, even
if the passenger is wearing the seat belt.
Always keep the glove box closed while driving.
WArNING
Page 15 of 79
22 || 23
INSTrUmeNT P
ANeL
SAFeTy
r eporting Safety Defects
In the U.S.
If you believe that your vehicle has a defect which could cause a crash or could cause
injury or death, you should immediately inform the National Highway Traffic Safety
Administration (NHTSA) in addition to notifying American Honda Motor Co., Inc.
If NHTSA receives similar complaints, it may open an investigation, and if it finds that
a safety defect exists in a group of vehicles, it may order a recall and remedy campaign.
However, NHTSA cannot become involved in individual problems between you, your dealer,
or American Honda Motor Co., Inc.
To contact NHTSA, you may call the Vehicle Safety Hotline toll-free at 1-888-327-
4236 (TTY: 1-800-424-9153); go to http://www.safercar.gov; or write to: Administrator,
NHTSA, 1200 New Jersey Avenue, SE., Washington, DC 20590. You can also obtain other
information about motor vehicle safety from http://www.safercar.gov .
In Canada
If you believe that your vehicle has a defect which could cause a crash or could cause injury
or death, you should immediately inform Honda Canada, Inc., and you may also inform
Transport Canada.
If Transport Canada receives similar complaints, it may open an investigation, and if it
finds that a safety defect exists in a group of vehicles, it may lead to a recall and remedy
campaign. However, Transport Canada cannot become involved in individual problems
between you, your dealer, or Honda Canada, Inc.
To contact Transport Canada’s Defect Investigations and Recalls Division, you may call
1-800-333-0510. For more information on reporting safety defects or about motor vehicle
safety, go to http://www.tc.gc.ca/roadsafety . Learn about the indicators and displays related to driving the vehicle.
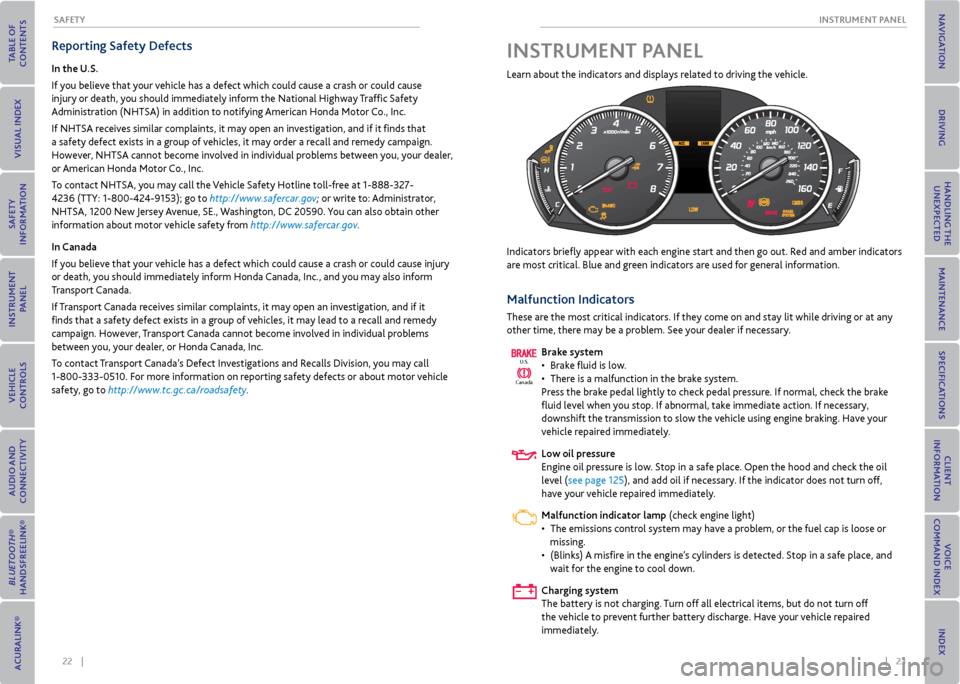
Indicators briefly appear with each engine start and then go out. Red and amber indicators
are most critical. Blue and green indicators are used for general information.
malfunction Indicators
These are the most critical indicators. If they come on and stay lit while driving or at any
other time, there may be a problem. See your dealer if necessary.
Brake system
• Brake fluid is low.
• There is a malfunction in the brake system.
Press the brake pedal lightly to check pedal pressure. If normal, check the brake
fluid level when you stop. If abnormal, take immediate action. If necessary,
downshift the transmission to slow the vehicle using engine braking. Have your
vehicle repaired immediately.
Low oil pressure
Engine oil pressure is low. Stop in a safe place. Open the hood and check the oil
level (see page 125), and add oil if necessary. If the indicator does not turn off,
have your vehicle repaired immediately.
malfunction indicator lamp (check engine light)
• The emissions control system may have a problem, or the fuel cap is loose or
missing.
• (Blinks) A misfire in the engine’s cylinders is detected. Stop in a safe place, and
wait for the engine to cool down.
Charging system
The battery is not charging. Turn off all electrical items, but do not turn off
the vehicle to prevent further battery discharge. Have your vehicle repaired
immediately.
Ca nada
U.S.
INSTrUmeNT P
ANeL
Page 16 of 79
24 || 25
INSTrUmeNT P
ANeL
INSTrUmeNT P ANeL
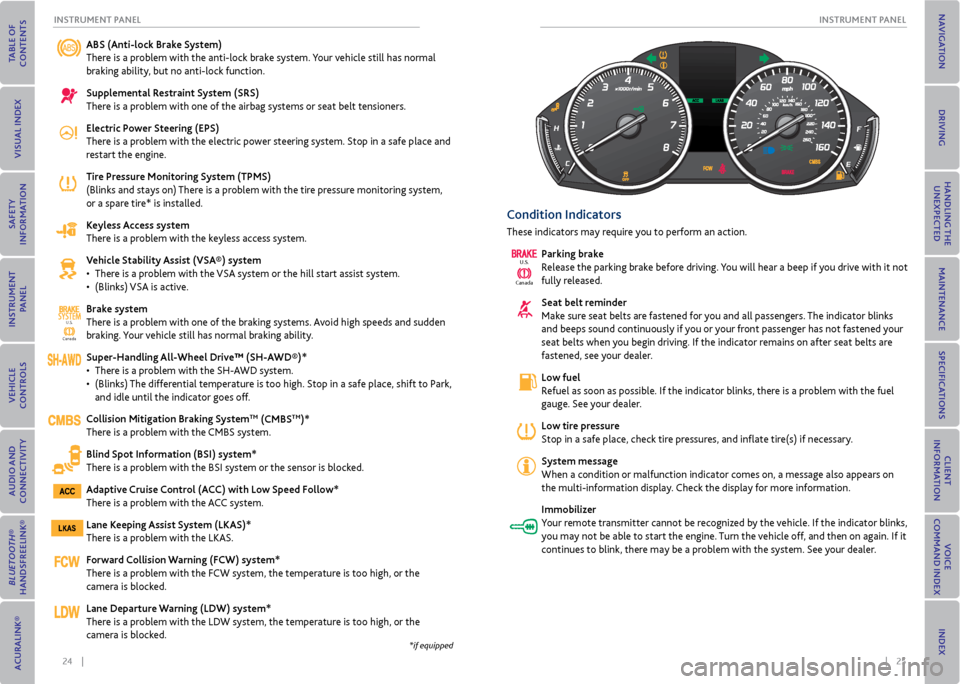
ABS (Anti-lock Brake System)
There is a problem with the anti-lock brake system. Your vehicle still has normal
braking ability, but no anti-lock function.
Supplemental restraint System (SrS)
There is a problem with one of the airbag systems or seat belt tensioners.
electric Power Steering (ePS)
There is a problem with the electric power steering system. Stop in a safe place and
restart the engine.
Tire Pressure monitoring System (TPmS)
(Blinks and stays on) There is a problem with the tire pressure monitoring system,
or a spare tire* is installed.
Keyless Access system
There is a problem with the keyless access system.
v ehicle Stability Assist (vSA®) system
• There is a problem with the VSA system or the hill start assist system.
• (Blinks) VSA is active.
Brake system
There is a problem with one of the braking systems. Avoid high speeds and sudden
braking. Your vehicle still has normal braking ability.
Super-Handling All-Wheel Drive™ (SH-AWD®)*
• There is a problem with the SH-AWD system.
• (Blinks) The differential temperature is too high. Stop in a safe place, shift to Park,
and idle until the indicator goes off.
Collision mitigation Braking System
Tm (CmBSTm)*
There is a problem with the CMBS system.
Blind Spot Information (BSI) system*
There is a problem with the BSI system or the sensor is blocked.
Adaptive Cruise Control (ACC) with Low Speed Follow*
There is a problem with the ACC system.
Lane Keeping Assist System (LKAS)*
There is a problem with the LKAS.
Forward Collision Warning (FCW) system*
There is a problem with the FCW system, the temperature is too high, or the
camera is blocked.
Lane Departure Warning (LDW) system*
There is a problem with the LDW system, the temperature is too high, or the
camera is blocked.
Ca nada
U.S.
SYSTEM
Condition Indicators
These indicators may require you to perform an action.
Parking brake
Release the parking brake before driving. You will hear a beep if you drive with it not
fully released.
Seat belt reminder
Make sure seat belts are fastened for you and all passengers. The indicator blinks
and beeps sound continuously if you or your front passenger has not fastened your
seat belts when you begin driving. If the indicator remains on after seat belts are
fastened, see your dealer.
Low fuel
Refuel as soon as possible. If the indicator blinks, there is a problem with the fuel
gauge. See your dealer.
Low tire pressure
Stop in a safe place, check tire pressures, and inflate tire(s) if necessary.
System message
When a condition or malfunction indicator comes on, a message also appears on
the multi-information display. Check the display for more information.
Immobilizer
Your remote transmitter cannot be recognized by the vehicle. If the indicator blinks,
you may not be able to start the engine. Turn the vehicle off, and then on again. If it
continues to blink, there may be a problem with the system. See your dealer.
Canada
U.S.
*if equipped
Page 17 of 79
26 || 27
INSTrUmeNT P
ANeL
INSTrUmeNT P ANeL
on/off Indicators
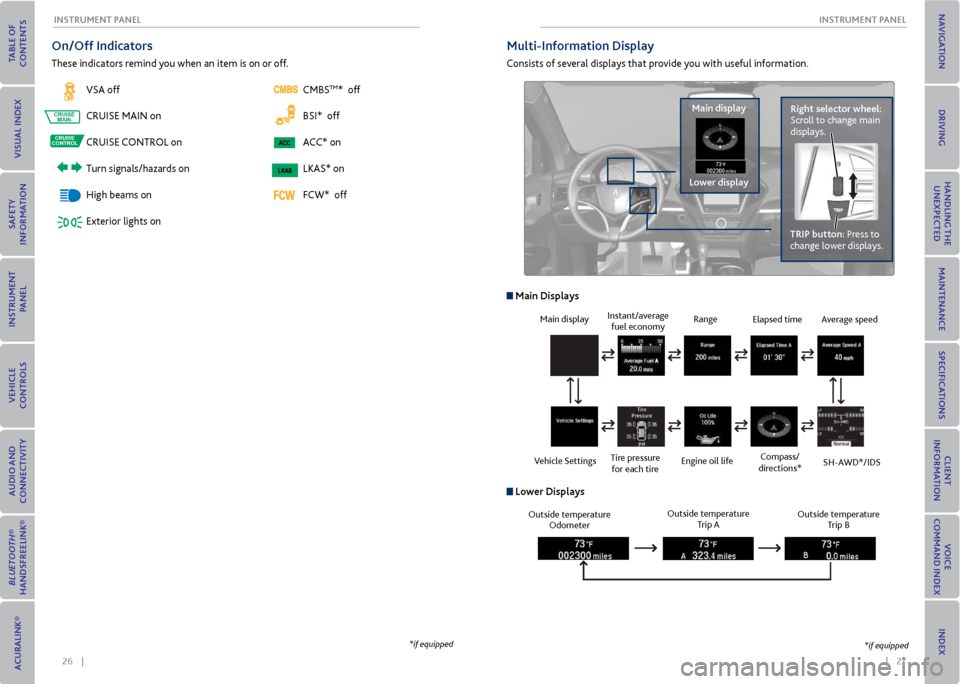
These indicators remind you when an item is on or off.
VSA off
CRUISE MAIN on
CRUISE CONTROL on
Turn signals/hazards on
High beams on
Exterior lights on CMBS
TM* off
BSI* off
ACC* on
LKAS* on
FCW* off
CRUISE MAINCRUISE
CONTROL
CRUISE MAINCRUISE
CONTROL
multi-Information Display
Consists of several displays that provide you with useful information.
right selector wheel:
Scroll to change main
displays.
main display
Lower display TrIP button: Press to
change lower displays.
Main display
Vehicle Settings Instant/average
fuel economy
Tire pressure for each tire Range
Engine oil life
main Displays
Outside temperature Odometer Outside temperature
Trip A Outside temperature
Trip B
Lower Displays
Elapsed time
Compass/
directions*Average speed
SH-AWD*/IDS
*if equipped *if equipped
Page 27 of 79
46 || 47
veHICLe CoNTroLS
veHICLe CoNTroLS
Climate Control System
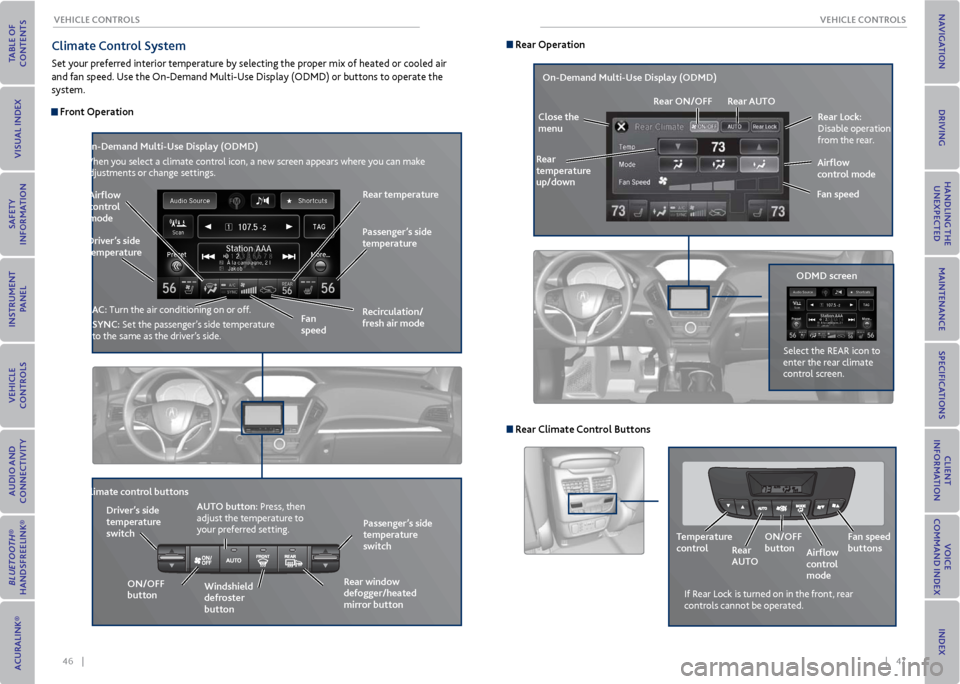
Set your preferred interior temperature by selecting the proper mix of heated or cooled air
and fan speed. Use the On-Demand Multi-Use Display (ODMD) or buttons to operate the
system.
Front operation
r ecirculation/
fresh air mode
Driver’s side
temperature
on-Demand multi-Use Display (oDmD)
When you select a climate control icon, a new screen appears where you can make
adjustments or change settings.
Airflow
control
mode
AC: Turn the air conditioning on or off.
SyNC: Set the passenger’s side temperature
to the same as the driver’s side. Fan
speedr
ear temperature
Passenger’s side
temperature
Windshield
defroster
button
Driver’s side
temperature
switch
Climate control buttons
oN/oFF
button AUT
o button: Press, then
adjust the temperature to
your preferred setting.
rear window
defogger/heated
mirror button Passenger’s side
temperature
switch
r ear operation
rear Lock:
Disable operation
from the rear.
r ear
temperature
up/down
on-Demand multi-Use Display (oDmD)
Close the
menu r
ear oN/oFF rear AUT o
Fan speedAirflow
control mode
If Rear Lock is turned on in the front, rear
controls cannot be operated.
oDmD screen
Select the REAR icon to
enter the rear climate
control screen.
r
ear Climate Control Buttons
Temperature
control
rear
AUT ooN/oFF
button
Airflow
control
modeFan speed
buttons
Page 28 of 79
48 || 49
veHICLe CoNTroLS
veHICLe CoNTroLS
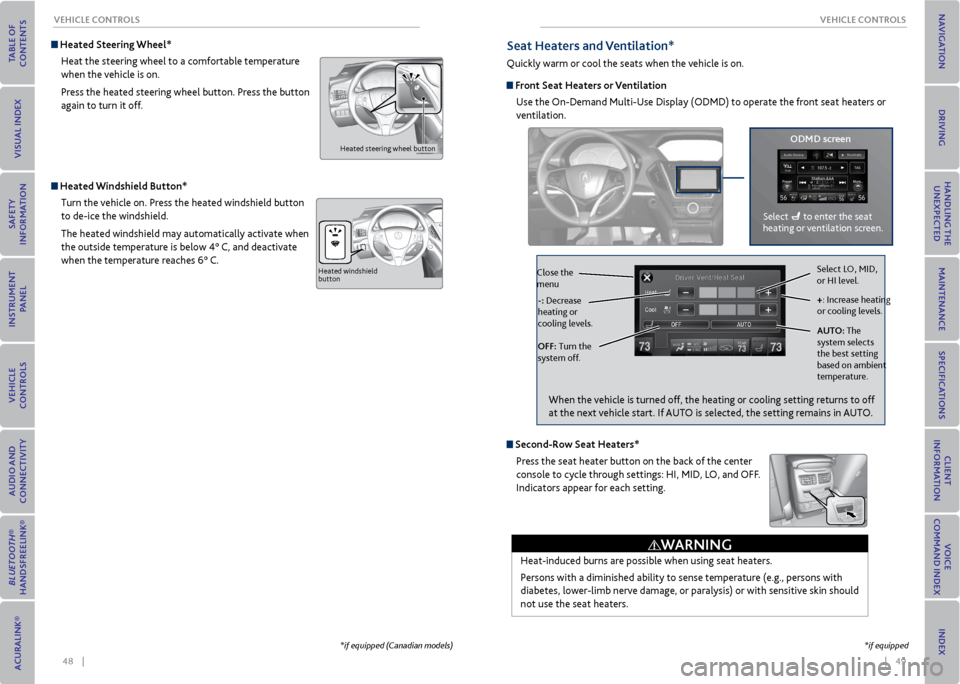
Heated Steering Wheel*
Heat the steering wheel to a comfortable temperature
when the vehicle is on.
Press the heated steering wheel button. Press the button
again to turn it off.
Heated steering wheel button
Heated Windshield Button*Turn the vehicle on. Press the heated windshield button
to de-ice the windshield.
The heated windshield may automatically activate when
the outside temperature is below 4° C, and deactivate
when the temperature reaches 6° C.
Heated windshield
button
*if equipped (Canadian models)
Seat Heaters and ventilation*
Quickly warm or cool the seats when the vehicle is on.
Front Seat Heaters or ventilation
Use the On-Demand Multi-Use Display (ODMD) to operate the front seat heaters or
ventilation.
Select LO, MID,
or HI level.
+: Increase heating
or cooling levels.
AUT o: The
system selects
the best setting
based on ambient
temperature.
oFF: Turn the
system off. -: Decrease
heating or
cooling levels.
Close the
menu
oDmD screen
Select to enter the seat
heating or ventilation screen.
*if equipped
Second-r ow Seat Heaters*
Press the seat heater button on the back of the center
console to cycle through settings: HI, MID, LO, and OFF.
Indicators appear for each setting.
Heat-induced burns are possible when using seat heaters.
Persons with a diminished ability to sense temperature (e.g., persons with
diabetes, lower-limb nerve damage, or paralysis) or with sensitive skin should
not use the seat heaters.
WArNING
When the vehicle is turned off, the heating or cooling setting returns to off
at the next vehicle start. If AUTO is selected, the setting remains in AUTO.
Page 29 of 79
50 || 51
AUDIo AND CoNNeCTIvITy
veHICLe CoNTroLS
*if equipped
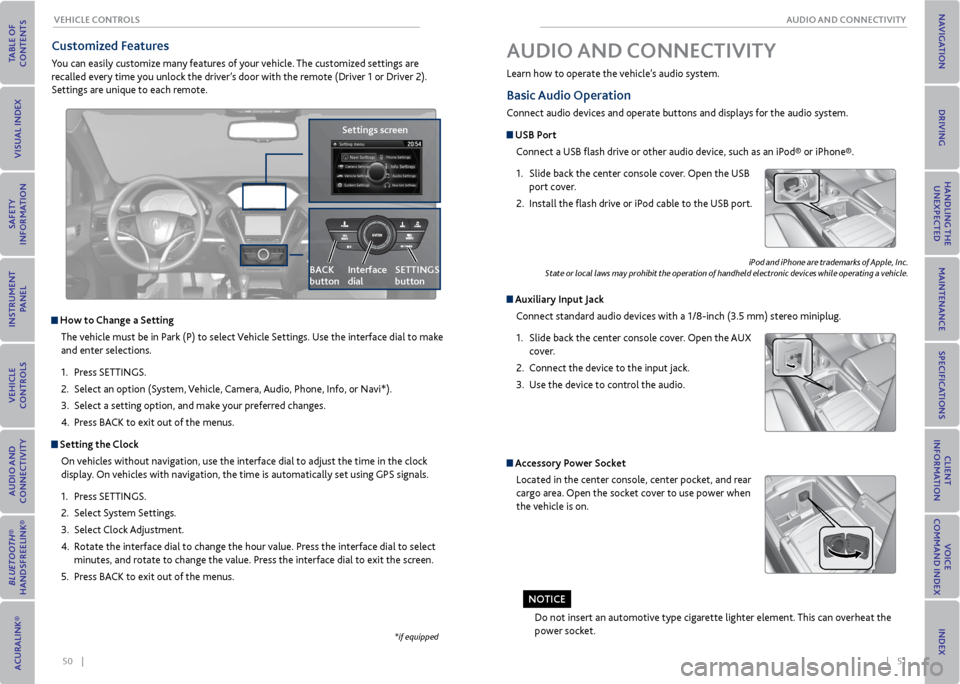
Customized Features
You can easily customize many features of your vehicle. The customized settings are
recalled every time you unlock the driver’s door with the remote (Driver 1 or Driver 2).
Settings are unique to each remote.
How to Change a Setting
The vehicle must be in Park (P) to select Vehicle Settings. Use the interface dial to make
and enter selections.
1. Press SETTINGS.
2. Select an option (System, Vehicle, Camera, Audio, Phone, Info, or Navi*).
3. Select a setting option, and make your preferred changes.
4. Press BACK to exit out of the menus.
Setting the Clock
On vehicles without navigation, use the interface dial to adjust the time in the clock
display. On vehicles with navigation, the time is automatically set using GPS signals.
1. Press SETTINGS.
2. Select System Settings.
3. Select Clock Adjustment.
4. Rotate the interface dial to change the hour value. Press the interface dial to select
minutes, and rotate to change the value. Press the interface dial to exit the screen.
5. Press BACK to exit out of the menus.
Settings screen
BACK
button
Interface
dial SeTTINGS
button
Basic
Audio operation
Connect audio devices and operate buttons and displays for the audio system.
USB Port
Connect a USB flash drive or other audio device, such as an iPod® or iPhone®.
1. Slide back the center console cover. Open the USB
port cover.
2. Install the flash drive or iPod cable to the USB port.
Auxiliary Input Jack
Connect standard audio devices with a 1/8-inch (3.5 mm) stereo miniplug.
1. Slide back the center console cover. Open the AUX
cover.
2. Connect the device to the input jack.
3. Use the device to control the audio.
iPod and iPhone are trademarks of Apple, Inc.
State or local laws may prohibit the operation of handheld electronic devices while operating a vehicle.
AUDIo AND CoNNeCTIvITy
Learn how to operate the vehicle’s audio system.
Accessory Power Socket
Located in the center console, center pocket, and rear
cargo area. Open the socket cover to use power when
the vehicle is on.
Do not insert an automotive type cigarette lighter element. This can overheat the
power socket.
No TICe