mirror Acura MDX 2015 Owner's Guide
[x] Cancel search | Manufacturer: ACURA, Model Year: 2015, Model line: MDX, Model: Acura MDX 2015Pages: 79, PDF Size: 16.44 MB
Page 3 of 79
This Owner’s Guide is intended to help you quickly get acquainted with your 2015 Acura
MDX. It provides basic information and instructions on technology and convenience
features, as well as emergency procedures and how to get assistance.
This guide is for vehicles sold in the United States and Canada. It covers all MDX models, so
you may find descriptions of features and equipment that are not in your vehicle. Images
throughout this guide are from U.S. vehicles and represent features and equipment that are
available on some, but not all, models.
This guide is not intended to be a substitute for the Owner’s Manual. The Owner
Information CD enclosed in your glove box kit includes the Owner’s Manual, Navigation
Manual, and vehicle and tire warranties in electronic format. This information can be viewed
on a computer (PC or Mac platform) and saved or printed for your reference. You can
also visit owners.acura.com (U.S.) or myacura.ca (Canada) to view the complete and most
current information.
If you are the first registered owner of your vehicle, you may request a complimentary
printed copy of the Owner’s Manual, Navigation Manual, or Vehicle Warranty up to six
months after vehicle purchase. To request a copy, visit owners.acura.com (U.S.) or myacura.
ca (Canada) and create or log in to your account. In Canada, please request a copy from
your Acura dealer.
American Honda Motor Company strives to be proactive in protecting our environment and
natural resources. By using electronic delivery for a considerable portion of the information
typically found in a vehicle owner’s manual, we are further reducing our impact on the
environment.
Acura Total Luxury Care r oadside Assistance
Your Acura TLC Roadside Assistance representative is here to help you
24 hours a day, 7 days a week. Under your 4-year/50,000-mile (80,000 km) warranty, the
following benefits are available:
- Towing services — full cost of towing to the closest Acura dealer
- Roadside assistance — jump starting, fuel delivery, lockout, and flat tire
- Trip planning — detailed trip routing, emergency services, and more
Call (800) 594-8500 (U.S.) or (800) 565-7587 (Canada)
Acura Client relations
Your authorized Acura dealer should be able to answer any questions you have about your
vehicle. However, if you are dissatisfied with the information you receive, you can call Acura
Client Relations (see page 140).
Call (800) 382-2238 (U.S.) or (888) 922-8729 (Canada)
INTroDUCTIoN TABLe oF CoNTeNTS
*if equipped
vISUAL INDex ...................................1
Steering Wheel and Nearby Controls
1
Dashboard and Ceiling Controls ..... 2
SAFeTy INFormATIoN .................. 3
Important Safety Information ....... 3
Seat Belts ........................................... 5
Airbags ............................................... 9
Child Safety ..................................... 15
Safety Label Locations ................... 21
r eporting Safety Defects .............. 22
INSTrUmeNT P ANeL .................... 23
malfunction Indicators .................. 23
Condition Indicators ...................... 25
on/off Indicators .......................... 26
multi-Information Display ........... 27
veHICLe CoNTroLS ..................... 28
Using the remote Transmitter ..... 28
Keyless Access System .................. 29
Power Tailgate operation ............. 30
Door operation from Inside the v ehicle
31
Power Window operation ............ 32
Power moonroof operation ........33
Interior and exterior Lights ...........34
one-Touch Turn Signal .................. 36
Wiper operation ............................ 36
Adjusting the Seats ........................ 38
Adjusting the mirrors..................... 41
Adjusting the Steering Wheel ...... 42
Driving Position memory System ... 42
r ear Seats ........................................ 43
HomeLink® Garage opener .......... 45Climate Control System
................46
Seat Heaters and ventilation* ..... 49
Customized Features ..................... 50
AUDIo AND CoNNeCTIvITy ....... 51
Basic Audio operation .................... 51
Fm/Am radio .................................. 54
Siriusxm® radio ............................. 55
Compact Disc .................................. 56
Hard Disc Drive (HDD) Audio* .... 57
iPod® or USB Flash Drive .............. 58
Bluetooth® Audio ........................... 59
Pandora® ......................................... 60
AcuraLink featuring Aha™ ............. 61
r ear entertainment System* ....... 62
Bluetooth® HANDSFreeLINK ®.... 66
Basic HFL operation ...................... 66
Pairing a Phone ............................... 68
making a Call .................................. 69
SmS Text messaging and e-mail .... 72
A CUrALINK
®* ................................. 73
AcuraLink messages ....................... 73
Subscription Features .................... 74
NA vIGATIoN* ............................... 76
Basic Navigation operation ......... 76
entering a Destination .................. 79
r outing ............................................ 81
DrIvING .......................................... 83
Before Driving ................................. 83
maximum Load Limit ..................... 85
Towing a Trailer .............................. 87
r emote engine Start* ..................... 91
Starting to Drive ............................. 92
Integrated Dynamics System ....... 94
Page 5 of 79
2 || 3
SAFeTy
vISUAL INDex
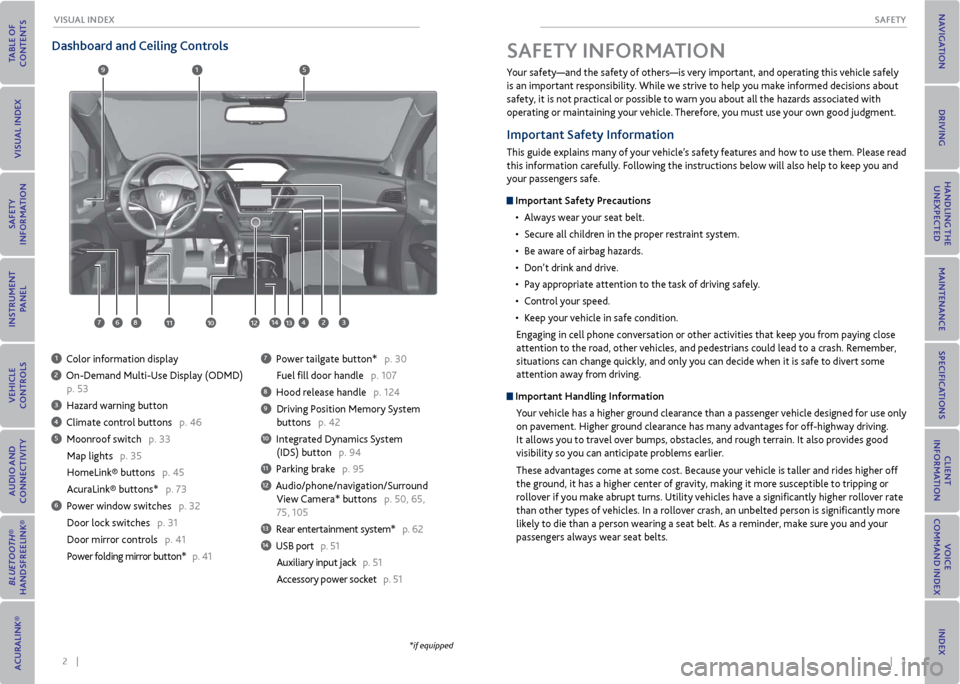
Dashboard and Ceiling Controls
1 Color information display
2 On-Demand Multi-Use Display (ODMD)
p. 53
3 Hazard warning button
4 Climate control buttons p. 46
5 Moonroof switch p. 33
Map lights p. 35
HomeLink® buttons p. 45
AcuraLink® buttons* p. 73
6 Power window switches p. 32
Door lock switches p. 31
Door mirror controls p. 41
Power folding mirror button* p. 41
7 Power tailgate button* p. 30
Fuel fill door handle p. 107
8 Hood release handle p. 124
9 Driving Position Memory System
buttons p. 42
10 Integrated Dynamics System
(IDS) button p. 94
11 Parking brake p. 95
12 Audio/phone/navigation/Surround
View Camera* buttons p. 50, 65,
75, 105
13 Rear entertainment system* p. 62
14 USB port p. 51
Auxiliary input jack p. 51
Accessory power socket p. 51
1
281134
5
67
9
1012
Your safety—and the safety of others—is very important, and operating this vehicle safely
is an important responsibility. While we strive to help you make informed decisions about
safety, it is not practical or possible to warn you about all the hazards associated with
operating or maintaining your vehicle. Therefore, you must use your own good judgment.
Important Safety Information
This guide explains many of your vehicle’s safety features and how to use them. Please read
this information carefully. Following the instructions below will also help to keep you and
your passengers safe.
Important Safety Precautions
• Always wear your seat belt.
• Secure all children in the proper restraint system.
• Be aware of airbag hazards.
• Don’t drink and drive.
• Pay appropriate attention to the task of driving safely.
• Control your speed.
• Keep your vehicle in safe condition.
Engaging in cell phone conversation or other activities that keep you from paying close
attention to the road, other vehicles, and pedestrians could lead to a crash. Remember,
situations can change quickly, and only you can decide when it is safe to divert some
attention away from driving.
Important Handling Information Your vehicle has a higher ground clearance than a passenger vehicle designed for use only
on pavement. Higher ground clearance has many advantages for off-highway driving.
It allows you to travel over bumps, obstacles, and rough terrain. It also provides good
visibility so you can anticipate problems earlier.
These advantages come at some cost. Because your vehicle is taller and rides higher off
the ground, it has a higher center of gravity, making it more susceptible to tripping or
rollover if you make abrupt turns. Utility vehicles have a significantly higher rollover rate
than other types of vehicles. In a rollover crash, an unbelted person is significantly more
likely to die than a person wearing a seat belt. As a reminder, make sure you and your
passengers always wear seat belts.
SAFeTy INFormATIoN
13
*if equipped
14
Page 24 of 79
40 || 41
veHICLe CoNTroLS
veHICLe CoNTroLS
For a head restraint system to work properly:
• Do not hang any items on the head restraints or from the restraint legs.
• Do not place any object between an occupant and the seat-back.
• Install each restraint in its proper location.
Improperly positioning head restraints reduces their effectiveness and
increases the likelihood of serious injury in a crash.
Make sure head restraints are in place and positioned properly before driving.
Failure to reinstall, or correctly reinstall, the head restraints can result in
severe injury during a crash.
Always replace the head restraints before driving.
WArNING
WArNING
Floor matsPosition the front and rear seat floor mats properly and
anchor them. If they are not properly positioned, the floor
mats can interfere with the front seat functions.
Do not put additional floor mats on top of the anchored
mats.
Unlock
Lock
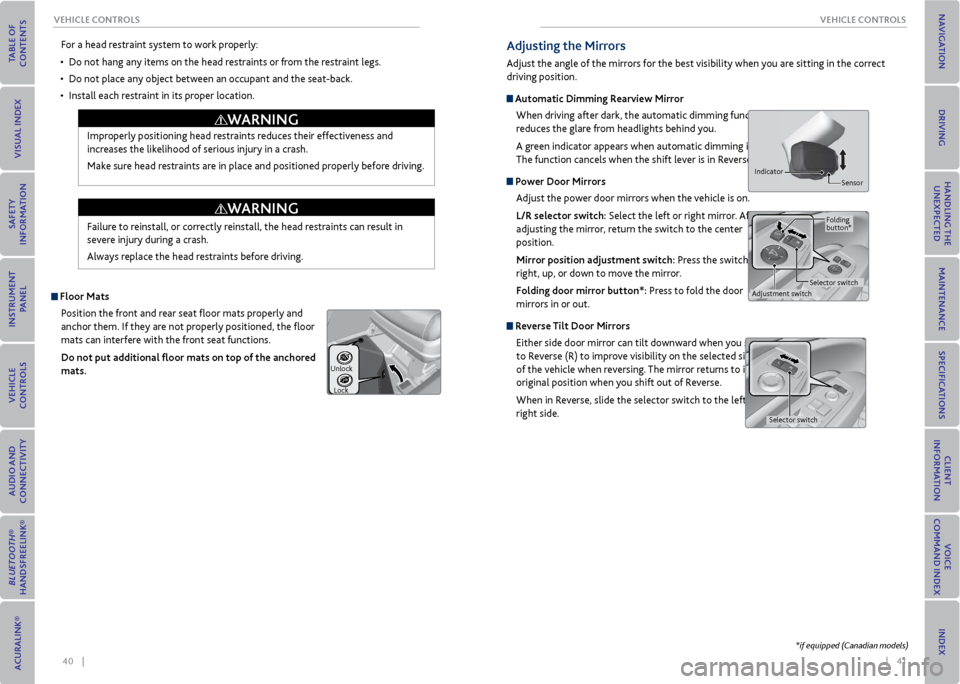
Adjusting the mirrors
Adjust the angle of the mirrors for the best visibility when you are sitting in the correct
driving position.
Automatic Dimming r earview mirror
When driving after dark, the automatic dimming function
reduces the glare from headlights behind you.
A green indicator appears when automatic dimming is on.
The function cancels when the shift lever is in Reverse (R).
Power Door mirrors Adjust the power door mirrors when the vehicle is on.
L/r selector switch: Select the left or right mirror. After
adjusting the mirror, return the switch to the center
position.
mirror position adjustment switch: Press the switch left,
right, up, or down to move the mirror.
Folding door mirror button*: Press to fold the door
mirrors in or out.
r everse Tilt Door mirrors
Either side door mirror can tilt downward when you shift
to Reverse (R) to improve visibility on the selected side
of the vehicle when reversing. The mirror returns to its
original position when you shift out of Reverse.
When in Reverse, slide the selector switch to the left or
right side.
Indicator Sensor
Adjustment switchSelector switchFolding
button*
Selector switch
*if equipped (Canadian models)
Page 25 of 79
42 || 43
veHICLe CoNTroLS
veHICLe CoNTroLS
Driving Position memory System
You can store two driver’s seat, steering wheel, and door mirror positions into memory
when the vehicle is on. When you unlock and open the driver’s door with a remote
transmitter, the items adjust automatically to one of the two preset positions.
1. Adjust the seat, steering wheel, and mirrors to your
preferred positions.
2. Press SET.
3. Press and hold memory button 1 or 2. You will hear two
beeps when the memory is set.
Press one of the memory buttons to recall previously
stored positions.
Lumbar positions cannot be stored.
Memory button 1
Memory button 2
SET button
Adjusting the Steering Wheel
The steering wheel height and distance from your body can be adjusted so that you can
comfortably grip the steering wheel in an appropriate driving posture.
Press and hold the adjustment switch to move the steering
wheel in, out, up, or down.
Adjusting the steering wheel position while driving may cause you to lose
control of the vehicle and be seriously injured in a crash.
Adjust the steering wheel only when the vehicle is stopped.
WArNING
Adjustment switch
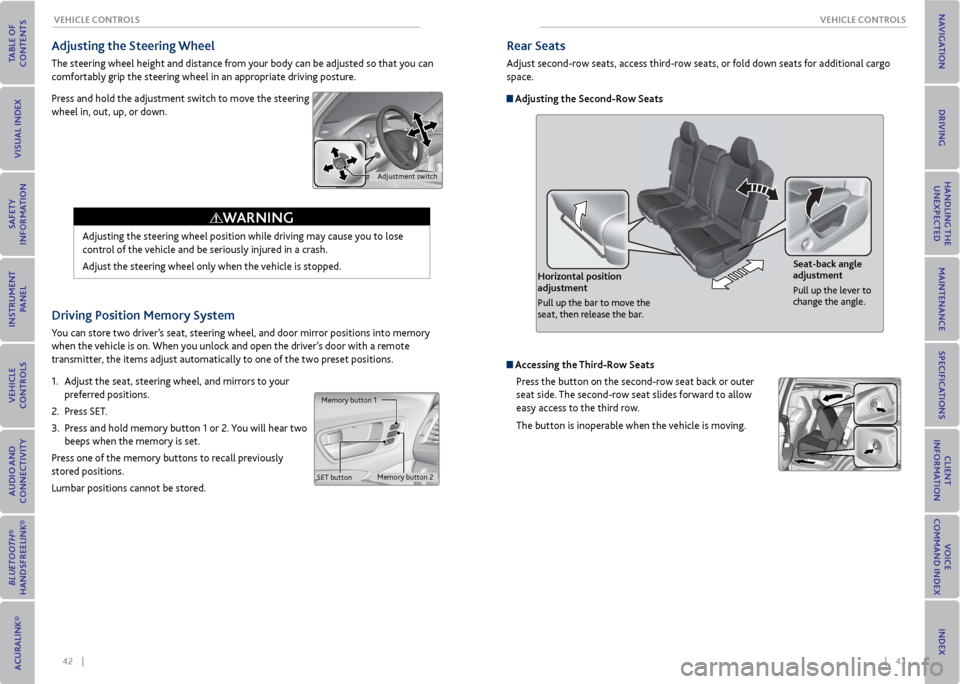
rear Seats
Adjust second-row seats, access third-row seats, or fold down seats for additional cargo
space.
Adjusting the Second-row Seats
Horizontal position
adjustment
Pull up the bar to move the
seat, then release the bar. Seat-back angle
adjustment
Pull up the lever to
change the angle.
Accessing the
Third-row Seats
Press the button on the second-row seat back or outer
seat side. The second-row seat slides forward to allow
easy access to the third row.
The button is inoperable when the vehicle is moving.
Page 27 of 79
46 || 47
veHICLe CoNTroLS
veHICLe CoNTroLS
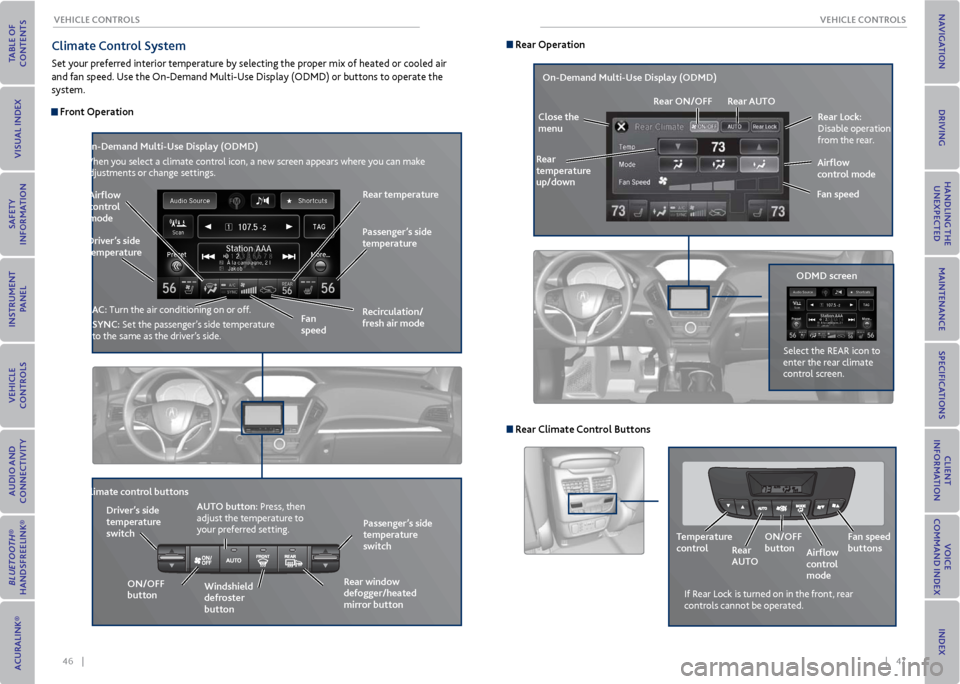
Climate Control System
Set your preferred interior temperature by selecting the proper mix of heated or cooled air
and fan speed. Use the On-Demand Multi-Use Display (ODMD) or buttons to operate the
system.
Front operation
r ecirculation/
fresh air mode
Driver’s side
temperature
on-Demand multi-Use Display (oDmD)
When you select a climate control icon, a new screen appears where you can make
adjustments or change settings.
Airflow
control
mode
AC: Turn the air conditioning on or off.
SyNC: Set the passenger’s side temperature
to the same as the driver’s side. Fan
speedr
ear temperature
Passenger’s side
temperature
Windshield
defroster
button
Driver’s side
temperature
switch
Climate control buttons
oN/oFF
button AUT
o button: Press, then
adjust the temperature to
your preferred setting.
rear window
defogger/heated
mirror button Passenger’s side
temperature
switch
r ear operation
rear Lock:
Disable operation
from the rear.
r ear
temperature
up/down
on-Demand multi-Use Display (oDmD)
Close the
menu r
ear oN/oFF rear AUT o
Fan speedAirflow
control mode
If Rear Lock is turned on in the front, rear
controls cannot be operated.
oDmD screen
Select the REAR icon to
enter the rear climate
control screen.
r
ear Climate Control Buttons
Temperature
control
rear
AUT ooN/oFF
button
Airflow
control
modeFan speed
buttons
Page 45 of 79
82 || 83
DrIvING
NA vIGATIoN
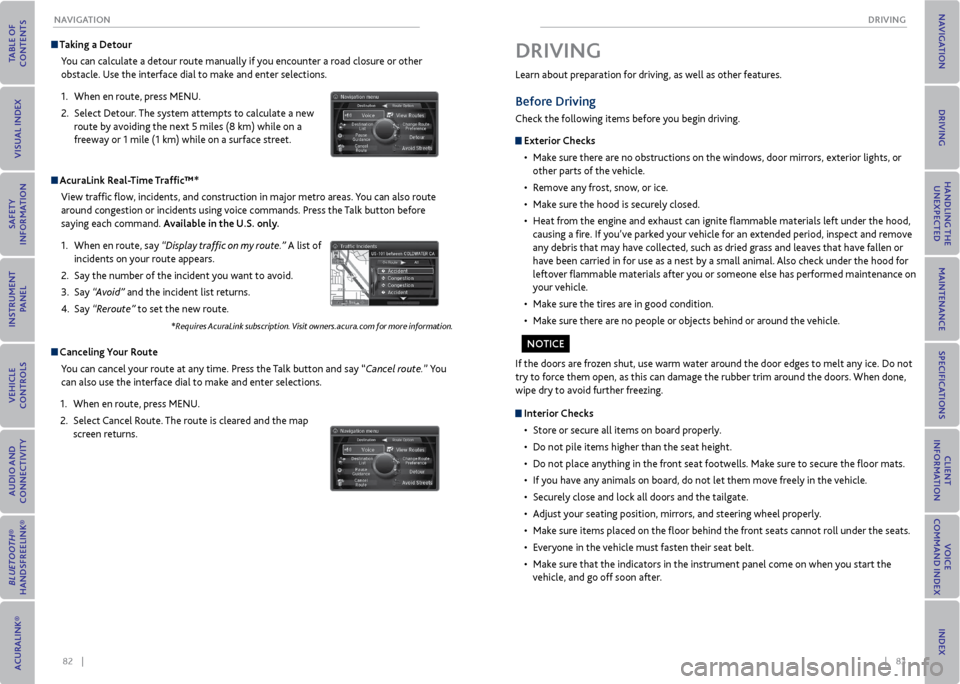
Taking a Detour
You can calculate a detour route manually if you encounter a road closure or other
obstacle. Use the interface dial to make and enter selections.
1. When en route, press MENU.
2. Select Detour. The system attempts to calculate a new
route by avoiding the next 5 miles (8 km) while on a
freeway or 1 mile (1 km) while on a surface street.
AcuraLink r eal-Time Traffic™*
View traffic flow, incidents, and construction in major metro areas. You can also route
around congestion or incidents using voice commands. Press the Talk button before
saying each command. Available in the U.S. only.
1. When en route, say “Display traffic on my route.” A list of
incidents on your route appears.
2. Say the number of the incident you want to avoid.
3. Say “Avoid” and the incident list returns.
4. Say “Reroute” to set the new route.
*Requires AcuraLink subscription. Visit owners.acura.com for more information.
Canceling y our route
You can cancel your route at any time. Press the Talk button and say “Cancel route.” You
can also use the interface dial to make and enter selections.
1. When en route, press MENU.
2. Select Cancel Route. The route is cleared and the map
screen returns.
Learn about preparation for driving, as well as other features.
Before Driving
Check the following items before you begin driving.
exterior Checks
• Make sure there are no obstructions on the windows, door mirrors, exterior lights, or
other parts of the vehicle.
• Remove any frost, snow, or ice.
• Make sure the hood is securely closed.
• Heat from the engine and exhaust can ignite flammable materials left under the hood,
causing a fire. If you’ve parked your vehicle for an extended period, inspect and remove
any debris that may have collected, such as dried grass and leaves that have fallen or
have been carried in for use as a nest by a small animal. Also check under the hood for
leftover flammable materials after you or someone else has performed maintenance on
your vehicle.
• Make sure the tires are in good condition.
• Make sure there are no people or objects behind or around the vehicle.
DrIvING
If the doors are frozen shut, use warm water around the door edges to melt any ice. Do not
try to force them open, as this can damage the rubber trim around the doors. When done,
wipe dry to avoid further freezing.
Interior Checks
• Store or secure all items on board properly.
• Do not pile items higher than the seat height.
• Do not place anything in the front seat footwells. Make sure to secure the floor mats.
• If you have any animals on board, do not let them move freely in the vehicle.
• Securely close and lock all doors and the tailgate.
• Adjust your seating position, mirrors, and steering wheel properly.
• Make sure items placed on the floor behind the front seats cannot roll under the seats.
• Everyone in the vehicle must fasten their seat belt.
• Make sure that the indicators in the instrument panel come on when you start the
vehicle, and go off soon after.
No TICe
Page 53 of 79
98 || 99
DrIvING
DrIvING
Improper use of ACC with LSF can lead to a crash.
Use ACC with LSF only when driving on expressways or freeways and in good
weather conditions.
Exiting a vehicle that has been stopped while the ACC with LSF system is
operating can result in the vehicle moving without operator control. Always
make sure the shift lever is in Park (P) before exiting the vehicle.
A vehicle that moves without operator control can cause a crash, resulting in
serious injury or death.
Never exit a vehicle when the vehicle is stopped by ACC with LSF.
ACC with LSF has limited braking capability and may not stop your vehicle in
time to avoid a collision with a vehicle that quickly stops in front of you.
Always be prepared to apply the brake pedal if conditions require.
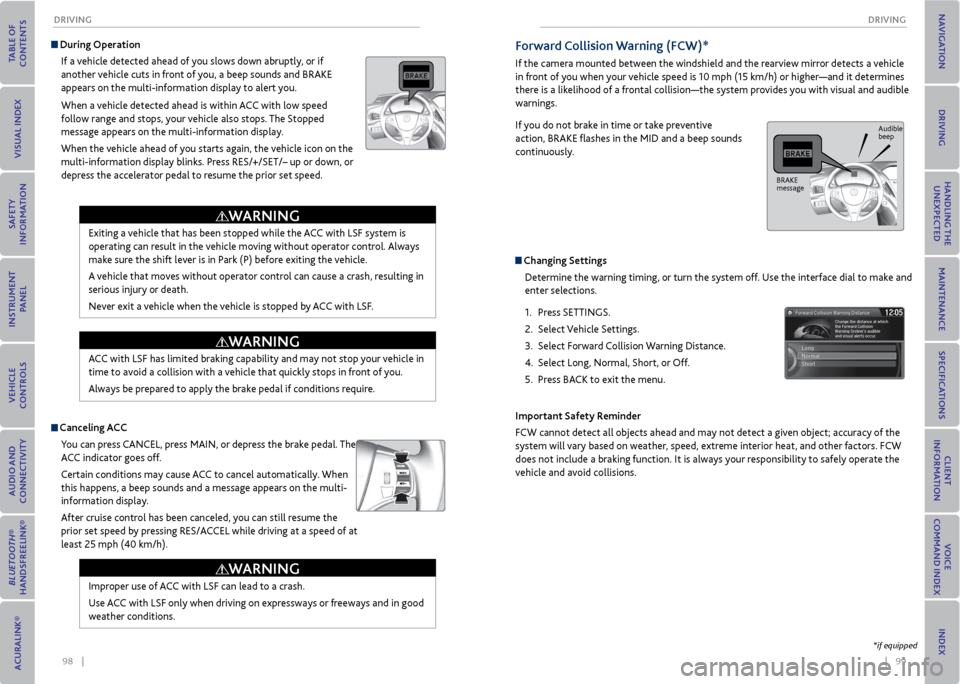
During operation
If a vehicle detected ahead of you slows down abruptly, or if
another vehicle cuts in front of you, a beep sounds and BRAKE
appears on the multi-information display to alert you.
When a vehicle detected ahead is within ACC with low speed
follow range and stops, your vehicle also stops. The Stopped
message appears on the multi-information display.
When the vehicle ahead of you starts again, the vehicle icon on the
multi-information display blinks. Press RES/+/SET/– up or down, or
depress the accelerator pedal to resume the prior set speed.
Canceling ACCYou can press CANCEL, press MAIN, or depress the brake pedal. The
ACC indicator goes off.
Certain conditions may cause ACC to cancel automatically. When
this happens, a beep sounds and a message appears on the multi-
information display.
After cruise control has been canceled, you can still resume the
prior set speed by pressing RES/ACCEL while driving at a speed of at
least 25 mph (40 km/h).
WArNING
WArNING
WArNING
Forward Collision Warning (FCW)*
If the camera mounted between the windshield and the rearview mirror detects a vehicle
in front of you when your vehicle speed is 10 mph (15 km/h) or higher—and it determines
there is a likelihood of a frontal collision—the system provides you with visual and audible
warnings.
If you do not brake in time or take preventive
action, BRAKE flashes in the MID and a beep sounds
continuously.
Changing Settings
Determine the warning timing, or turn the system off. Use the interface dial to make and
enter selections.
1. Press SETTINGS.
2. Select Vehicle Settings.
3. Select Forward Collision Warning Distance.
4. Select Long, Normal, Short, or Off.
5. Press BACK to exit the menu.
Important Safety reminder
FCW cannot detect all objects ahead and may not detect a given object; accuracy of the
system will vary based on weather, speed, extreme interior heat, and other factors. FCW
does not include a braking function. It is always your responsibility to safely operate the
vehicle and avoid collisions.
*if equipped
BRAKE
message Audible
beep
Page 54 of 79
100 || 101
DrIvING
DrIvING
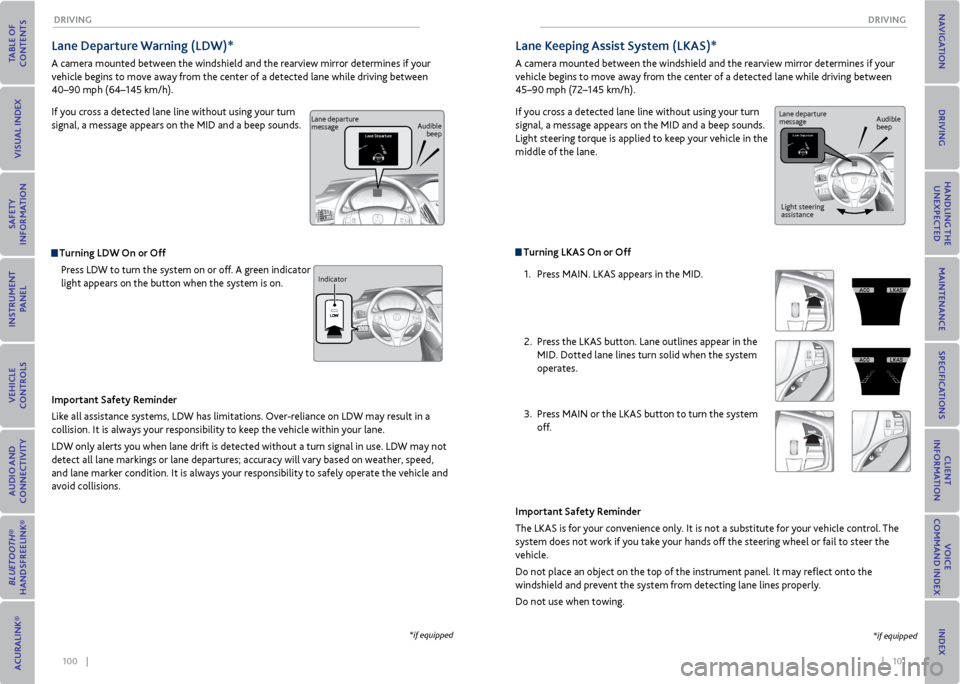
Lane Departure Warning (LDW)*
A camera mounted between the windshield and the rearview mirror determines if your
vehicle begins to move away from the center of a detected lane while driving between
40–90 mph (64–145 km/h).
If you cross a detected lane line without using your turn
signal, a message appears on the MID and a beep sounds.
Turning LDW on or off
Press LDW to turn the system on or off. A green indicator
light appears on the button when the system is on.
Important Safety reminder
Like all assistance systems, LDW has limitations. Over-reliance on LDW may result in a
collision. It is always your responsibility to keep the vehicle within your lane.
LDW only alerts you when lane drift is detected without a turn signal in use. LDW may not
detect all lane markings or lane departures; accuracy will vary based on weather, speed,
and lane marker condition. It is always your responsibility to safely operate the vehicle and
avoid collisions.
*if equipped
Lane departure
message Audible
beep
Indicator
Turning LKAS on or off 1. Press MAIN. LKAS appears in the MID.
2. Press the LKAS button. Lane outlines appear in the
MID. Dotted lane lines turn solid when the system
operates.
3. Press MAIN or the LKAS button to turn the system
off.
Lane Keeping Assist System (LKAS)*
A camera mounted between the windshield and the rearview mirror determines if your
vehicle begins to move away from the center of a detected lane while driving between
45–90 mph (72–145 km/h).
If you cross a detected lane line without using your turn
signal, a message appears on the MID and a beep sounds.
Light steering torque is applied to keep your vehicle in the
middle of the lane.
Important Safety reminder
The LKAS is for your convenience only. It is not a substitute for your vehicle control. The
system does not work if you take your hands off the steering wheel or fail to steer the
vehicle.
Do not place an object on the top of the instrument panel. It may reflect onto the
windshield and prevent the system from detecting lane lines properly.
Do not use when towing.
*if equipped
Lane departure
message Audible
beep
Light steering
assistance
Page 55 of 79
102 || 103
DrIvING
DrIvING
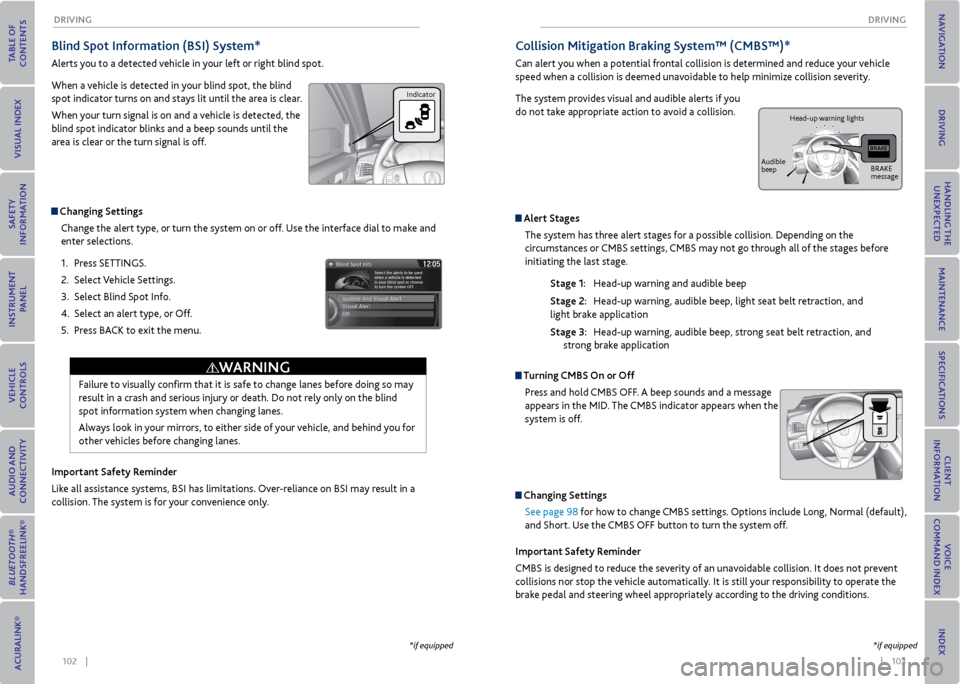
Blind Spot Information (BSI) System*
Alerts you to a detected vehicle in your left or right blind spot.
When a vehicle is detected in your blind spot, the blind
spot indicator turns on and stays lit until the area is clear.
When your turn signal is on and a vehicle is detected, the
blind spot indicator blinks and a beep sounds until the
area is clear or the turn signal is off.
Changing Settings
Change the alert type, or turn the system on or off. Use the interface dial to make and
enter selections.
1. Press SETTINGS.
2. Select Vehicle Settings.
3. Select Blind Spot Info.
4. Select an alert type, or Off.
5. Press BACK to exit the menu.
Important Safety reminder
Like all assistance systems, BSI has limitations. Over-reliance on BSI may result in a
collision. The system is for your convenience only.
Failure to visually confirm that it is safe to change lanes before doing so may
result in a crash and serious injury or death. Do not rely only on the blind
spot information system when changing lanes.
Always look in your mirrors, to either side of your vehicle, and behind you for
other vehicles before changing lanes.
WArNING
*if equipped
Indicator
Collision mitigation Braking System™ (CmBS™)*
Can alert you when a potential frontal collision is determined and reduce your vehicle
speed when a collision is deemed unavoidable to help minimize collision severity.
The system provides visual and audible alerts if you
do not take appropriate action to avoid a collision.
Alert Stages The system has three alert stages for a possible collision. Depending on the
circumstances or CMBS settings, CMBS may not go through all of the stages before
initiating the last stage.
Stage 1: Head-up warning and audible beep
Stage 2: Head-up warning, audible beep, light seat belt retraction, and
light brake application
Stage 3: Head-up warning, audible beep, strong seat belt retraction, and
strong brake application
Turning CmBS on or off
Press and hold CMBS OFF. A beep sounds and a message
appears in the MID. The CMBS indicator appears when the
system is off.
Changing SettingsSee page 98 for how to change CMBS settings. Options include Long, Normal (default),
and Short. Use the CMBS OFF button to turn the system off.
Important Safety reminder
CMBS is designed to reduce the severity of an unavoidable collision. It does not prevent
collisions nor stop the vehicle automatically. It is still your responsibility to operate the
brake pedal and steering wheel appropriately according to the driving conditions.
*if equipped
BRAKE
message
Audible
beep Head-up warning lights
Page 57 of 79
106 || 107
DrIvING
DrIvING
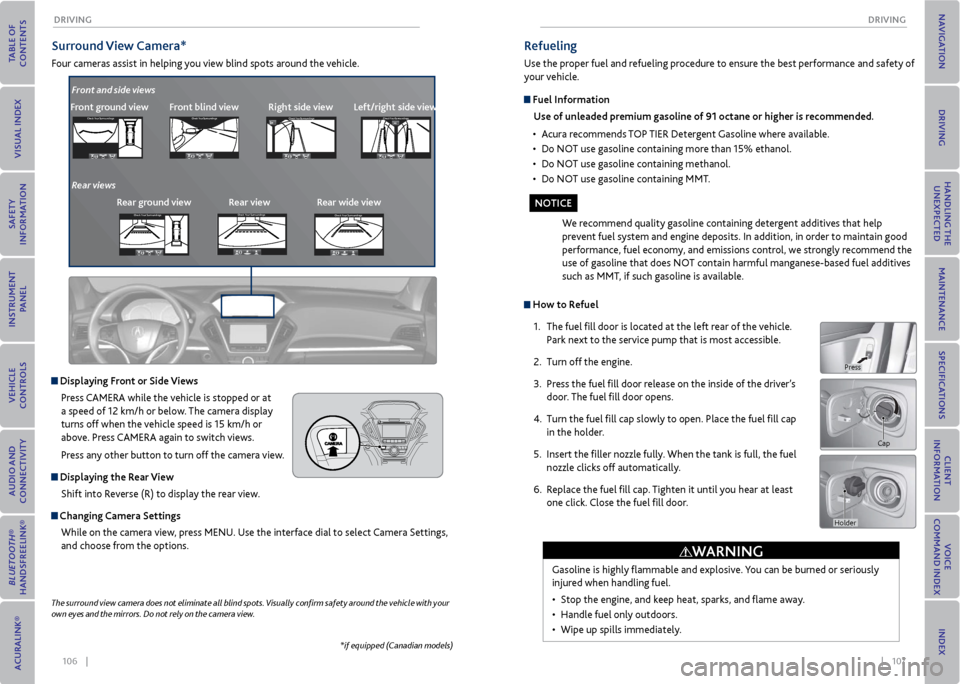
Surround view Camera*
Four cameras assist in helping you view blind spots around the vehicle.
*if equipped (Canadian models)
The surround
view camera does not eliminate all blind spots. Visually confirm safety around the vehicle with your
own eyes and the mirrors. Do not rely on the camera view.
Front ground view Front blind viewright side viewCheck Your Surround ingsCheck Your Surround ings
Check Your Surround ingsCh eck Yo ur Surroundi ngs
Displaying Front or Side views
Press CAMERA while the vehicle is stopped or at
a speed of 12 km/h or below. The camera display
turns off when the vehicle speed is 15 km/h or
above. Press CAMERA again to switch views.
Press any other button to turn off the camera view.
Displaying the r ear view
Shift into Reverse (R) to display the rear view.
Changing Camera Settings While on the camera view, press MENU. Use the interface dial to select Camera Settings,
and choose from the options.
Left/right side views
Front and side views
rear ground view rear view rear wide view
Rear viewsCheck
Your Surround ingsCheck Your Surround ings
Check Your Surround ingsCh eck Yo ur Surroundi ngs
Check Your Surround ingsCheck Your Surround ings
Check Your Surround ingsCh eck Yo ur Surroundi ngs
Check Your Surround ingsCheck Your Surround ings
Check Your Surround ingsCh eck Yo ur Surroundi ngs
Check Your Surroundings
Check Your Surroundings
Check Your Surroundings
Check Your Surroundings
Check Your Surroundings
Check Your Surroundings
Check Your Surroundings
Check Your Surroundings
Check Your Surroundings
How to r efuel
1. The fuel fill door is located at the left rear of the vehicle.
Park next to the service pump that is most accessible.
2. Turn off the engine.
3. Press the fuel fill door release on the inside of the driver’s
door. The fuel fill door opens.
4. Turn the fuel fill cap slowly to open. Place the fuel fill cap
in the holder.
5. Insert the filler nozzle fully. When the tank is full, the fuel
nozzle clicks off automatically.
6. Replace the fuel fill cap. Tighten it until you hear at least
one click. Close the fuel fill door.
refueling
Use the proper fuel and refueling procedure to ensure the best performance and safety of
your vehicle.
Fuel Information
Use of unleaded premium gasoline of 91 octane or higher is recommended.
• Acura recommends TOP TIER Detergent Gasoline where available.
• Do NOT use gasoline containing more than 15% ethanol.
• Do NOT use gasoline containing methanol.
• Do NOT use gasoline containing MMT.
We recommend quality gasoline containing detergent additives that help
prevent fuel system and engine deposits. In addition, in order to maintain good
performance, fuel economy, and emissions control, we strongly recommend the
use of gasoline that does NOT contain harmful manganese-based fuel additives
such as MMT, if such gasoline is available.
Gasoline is highly flammable and explosive. You can be burned or seriously
injured when handling fuel.
• Stop the engine, and keep heat, sparks, and flame away.
• Handle fuel only outdoors.
• Wipe up spills immediately.
Cap
WArNING
No TICe
Holder
Press