remote control Acura MDX 2015 Owner's Guide
[x] Cancel search | Manufacturer: ACURA, Model Year: 2015, Model line: MDX, Model: Acura MDX 2015Pages: 79, PDF Size: 16.44 MB
Page 3 of 79
This Owner’s Guide is intended to help you quickly get acquainted with your 2015 Acura
MDX. It provides basic information and instructions on technology and convenience
features, as well as emergency procedures and how to get assistance.
This guide is for vehicles sold in the United States and Canada. It covers all MDX models, so
you may find descriptions of features and equipment that are not in your vehicle. Images
throughout this guide are from U.S. vehicles and represent features and equipment that are
available on some, but not all, models.
This guide is not intended to be a substitute for the Owner’s Manual. The Owner
Information CD enclosed in your glove box kit includes the Owner’s Manual, Navigation
Manual, and vehicle and tire warranties in electronic format. This information can be viewed
on a computer (PC or Mac platform) and saved or printed for your reference. You can
also visit owners.acura.com (U.S.) or myacura.ca (Canada) to view the complete and most
current information.
If you are the first registered owner of your vehicle, you may request a complimentary
printed copy of the Owner’s Manual, Navigation Manual, or Vehicle Warranty up to six
months after vehicle purchase. To request a copy, visit owners.acura.com (U.S.) or myacura.
ca (Canada) and create or log in to your account. In Canada, please request a copy from
your Acura dealer.
American Honda Motor Company strives to be proactive in protecting our environment and
natural resources. By using electronic delivery for a considerable portion of the information
typically found in a vehicle owner’s manual, we are further reducing our impact on the
environment.
Acura Total Luxury Care r oadside Assistance
Your Acura TLC Roadside Assistance representative is here to help you
24 hours a day, 7 days a week. Under your 4-year/50,000-mile (80,000 km) warranty, the
following benefits are available:
- Towing services — full cost of towing to the closest Acura dealer
- Roadside assistance — jump starting, fuel delivery, lockout, and flat tire
- Trip planning — detailed trip routing, emergency services, and more
Call (800) 594-8500 (U.S.) or (800) 565-7587 (Canada)
Acura Client relations
Your authorized Acura dealer should be able to answer any questions you have about your
vehicle. However, if you are dissatisfied with the information you receive, you can call Acura
Client Relations (see page 140).
Call (800) 382-2238 (U.S.) or (888) 922-8729 (Canada)
INTroDUCTIoN TABLe oF CoNTeNTS
*if equipped
vISUAL INDex ...................................1
Steering Wheel and Nearby Controls
1
Dashboard and Ceiling Controls ..... 2
SAFeTy INFormATIoN .................. 3
Important Safety Information ....... 3
Seat Belts ........................................... 5
Airbags ............................................... 9
Child Safety ..................................... 15
Safety Label Locations ................... 21
r eporting Safety Defects .............. 22
INSTrUmeNT P ANeL .................... 23
malfunction Indicators .................. 23
Condition Indicators ...................... 25
on/off Indicators .......................... 26
multi-Information Display ........... 27
veHICLe CoNTroLS ..................... 28
Using the remote Transmitter ..... 28
Keyless Access System .................. 29
Power Tailgate operation ............. 30
Door operation from Inside the v ehicle
31
Power Window operation ............ 32
Power moonroof operation ........33
Interior and exterior Lights ...........34
one-Touch Turn Signal .................. 36
Wiper operation ............................ 36
Adjusting the Seats ........................ 38
Adjusting the mirrors..................... 41
Adjusting the Steering Wheel ...... 42
Driving Position memory System ... 42
r ear Seats ........................................ 43
HomeLink® Garage opener .......... 45Climate Control System
................46
Seat Heaters and ventilation* ..... 49
Customized Features ..................... 50
AUDIo AND CoNNeCTIvITy ....... 51
Basic Audio operation .................... 51
Fm/Am radio .................................. 54
Siriusxm® radio ............................. 55
Compact Disc .................................. 56
Hard Disc Drive (HDD) Audio* .... 57
iPod® or USB Flash Drive .............. 58
Bluetooth® Audio ........................... 59
Pandora® ......................................... 60
AcuraLink featuring Aha™ ............. 61
r ear entertainment System* ....... 62
Bluetooth® HANDSFreeLINK ®.... 66
Basic HFL operation ...................... 66
Pairing a Phone ............................... 68
making a Call .................................. 69
SmS Text messaging and e-mail .... 72
A CUrALINK
®* ................................. 73
AcuraLink messages ....................... 73
Subscription Features .................... 74
NA vIGATIoN* ............................... 76
Basic Navigation operation ......... 76
entering a Destination .................. 79
r outing ............................................ 81
DrIvING .......................................... 83
Before Driving ................................. 83
maximum Load Limit ..................... 85
Towing a Trailer .............................. 87
r emote engine Start* ..................... 91
Starting to Drive ............................. 92
Integrated Dynamics System ....... 94
Page 16 of 79
24 || 25
INSTrUmeNT P
ANeL
INSTrUmeNT P ANeL
ABS (Anti-lock Brake System)
There is a problem with the anti-lock brake system. Your vehicle still has normal
braking ability, but no anti-lock function.
Supplemental restraint System (SrS)
There is a problem with one of the airbag systems or seat belt tensioners.
electric Power Steering (ePS)
There is a problem with the electric power steering system. Stop in a safe place and
restart the engine.
Tire Pressure monitoring System (TPmS)
(Blinks and stays on) There is a problem with the tire pressure monitoring system,
or a spare tire* is installed.
Keyless Access system
There is a problem with the keyless access system.
v ehicle Stability Assist (vSA®) system
• There is a problem with the VSA system or the hill start assist system.
• (Blinks) VSA is active.
Brake system
There is a problem with one of the braking systems. Avoid high speeds and sudden
braking. Your vehicle still has normal braking ability.
Super-Handling All-Wheel Drive™ (SH-AWD®)*
• There is a problem with the SH-AWD system.
• (Blinks) The differential temperature is too high. Stop in a safe place, shift to Park,
and idle until the indicator goes off.
Collision mitigation Braking System
Tm (CmBSTm)*
There is a problem with the CMBS system.
Blind Spot Information (BSI) system*
There is a problem with the BSI system or the sensor is blocked.
Adaptive Cruise Control (ACC) with Low Speed Follow*
There is a problem with the ACC system.
Lane Keeping Assist System (LKAS)*
There is a problem with the LKAS.
Forward Collision Warning (FCW) system*
There is a problem with the FCW system, the temperature is too high, or the
camera is blocked.
Lane Departure Warning (LDW) system*
There is a problem with the LDW system, the temperature is too high, or the
camera is blocked.
Ca nada
U.S.
SYSTEM
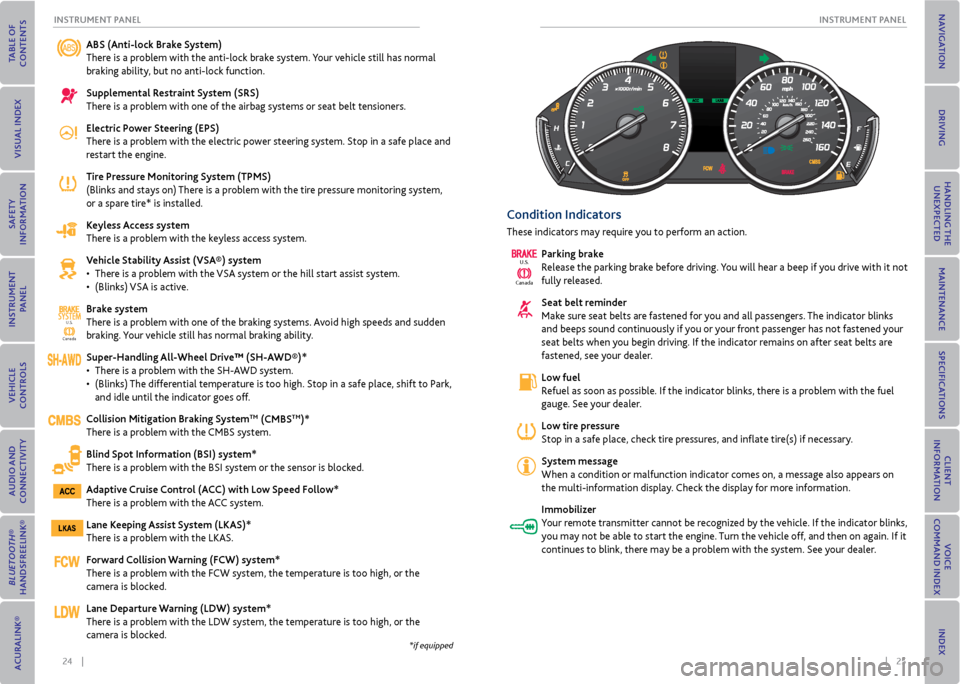
Condition Indicators
These indicators may require you to perform an action.
Parking brake
Release the parking brake before driving. You will hear a beep if you drive with it not
fully released.
Seat belt reminder
Make sure seat belts are fastened for you and all passengers. The indicator blinks
and beeps sound continuously if you or your front passenger has not fastened your
seat belts when you begin driving. If the indicator remains on after seat belts are
fastened, see your dealer.
Low fuel
Refuel as soon as possible. If the indicator blinks, there is a problem with the fuel
gauge. See your dealer.
Low tire pressure
Stop in a safe place, check tire pressures, and inflate tire(s) if necessary.
System message
When a condition or malfunction indicator comes on, a message also appears on
the multi-information display. Check the display for more information.
Immobilizer
Your remote transmitter cannot be recognized by the vehicle. If the indicator blinks,
you may not be able to start the engine. Turn the vehicle off, and then on again. If it
continues to blink, there may be a problem with the system. See your dealer.
Canada
U.S.
*if equipped
Page 18 of 79
28 || 29
veHICLe CoNTroLS
veHICLe CoNTroLS
Learn about the various controls necessary for operating and driving the vehicle.
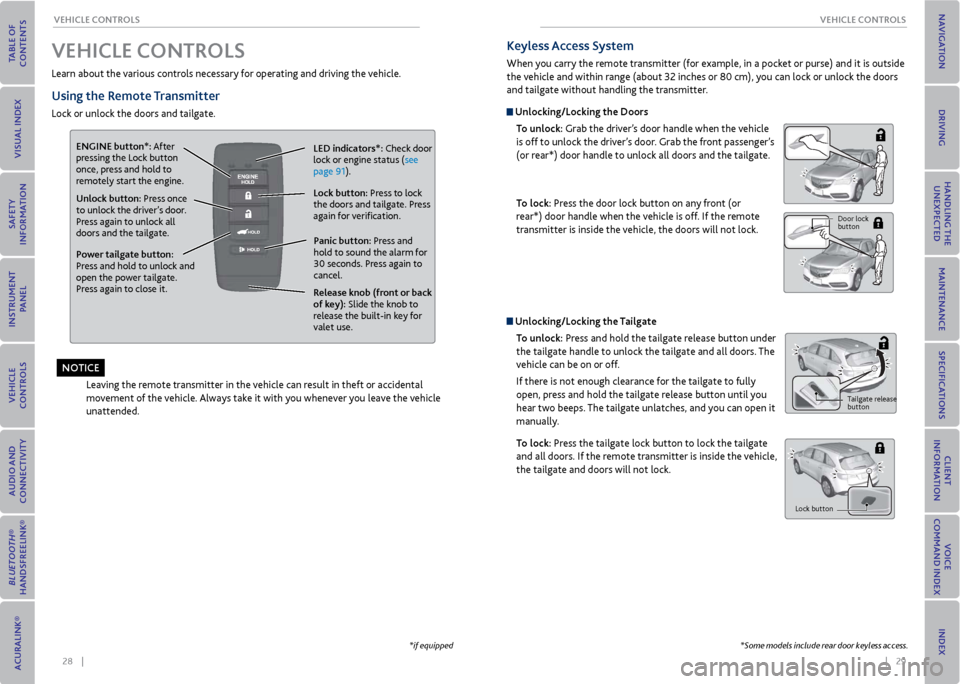
Using the remote Transmitter
Lock or unlock the doors and tailgate.
Unlock button: Press once
to unlock the driver’s door.
Press again to unlock all
doors and the tailgate.
release knob (front or back
of key): Slide the knob to
release the built-in key for
valet use.
Power tailgate button:
Press and hold to unlock and
open the power tailgate.
Press again to close it. Lock button: Press to lock
the doors and tailgate. Press
again for verification. LeD indicators*: Check door
lock or engine status (see
page 91).
Panic button: Press and
hold to sound the alarm for
30 seconds. Press again to
cancel.
veHICLe CoNTroLS
Leaving the remote transmitter in the vehicle can result in theft or accidental
movement of the vehicle. Always take it with you whenever you leave the vehicle
unattended.
eNGINe button*: After
pressing the Lock button
once, press and hold to
remotely start the engine.
*if equipped
Unlocking/Locking the Tailgate
To unlock: Press and hold the tailgate release button under
the tailgate handle to unlock the tailgate and all doors. The
vehicle can be on or off.
If there is not enough clearance for the tailgate to fully
open, press and hold the tailgate release button until you
hear two beeps. The tailgate unlatches, and you can open it
manually.
To lock: Press the tailgate lock button to lock the tailgate
and all doors. If the remote transmitter is inside the vehicle,
the tailgate and doors will not lock.
Tailgate release
button
Lock button
Keyless Access System
When you carry the remote transmitter (for example, in a pocket or purse) and it is outside
the vehicle and within range (about 32 inches or 80 cm), you can lock or unlock the doors
and tailgate without handling the transmitter.
Unlocking/Locking the Doors
To unlock: Grab the driver’s door handle when the vehicle
is off to unlock the driver’s door. Grab the front passenger’s
(or rear*) door handle to unlock all doors and the tailgate.
To lock: Press the door lock button on any front (or
rear*) door handle when the vehicle is off. If the remote
transmitter is inside the vehicle, the doors will not lock.
Door lock
button
*Some models include rear door keyless access.
NoTICe
Page 25 of 79
42 || 43
veHICLe CoNTroLS
veHICLe CoNTroLS
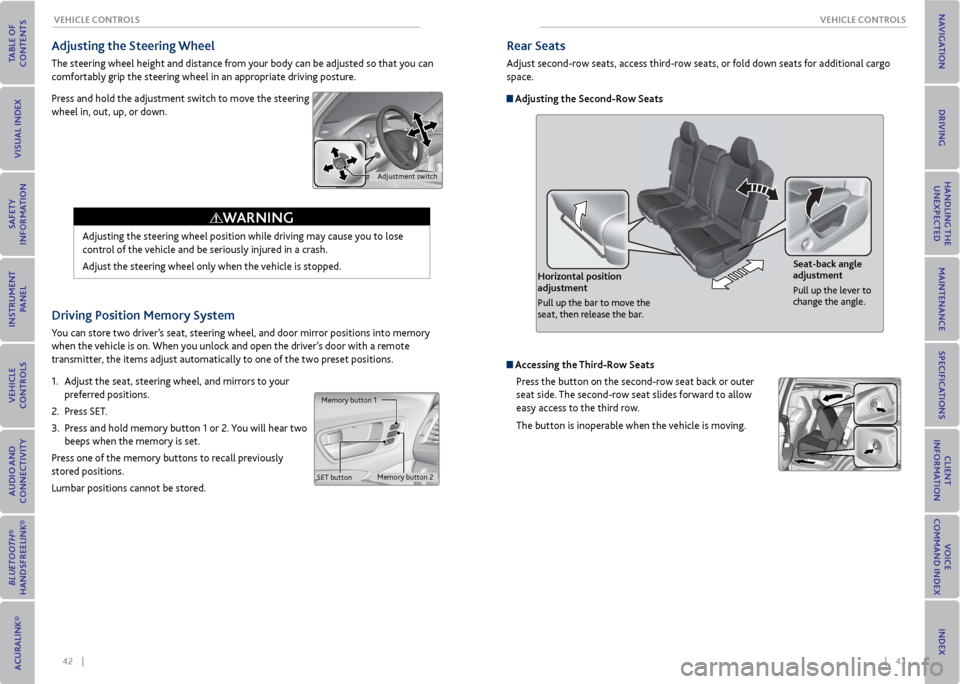
Driving Position memory System
You can store two driver’s seat, steering wheel, and door mirror positions into memory
when the vehicle is on. When you unlock and open the driver’s door with a remote
transmitter, the items adjust automatically to one of the two preset positions.
1. Adjust the seat, steering wheel, and mirrors to your
preferred positions.
2. Press SET.
3. Press and hold memory button 1 or 2. You will hear two
beeps when the memory is set.
Press one of the memory buttons to recall previously
stored positions.
Lumbar positions cannot be stored.
Memory button 1
Memory button 2
SET button
Adjusting the Steering Wheel
The steering wheel height and distance from your body can be adjusted so that you can
comfortably grip the steering wheel in an appropriate driving posture.
Press and hold the adjustment switch to move the steering
wheel in, out, up, or down.
Adjusting the steering wheel position while driving may cause you to lose
control of the vehicle and be seriously injured in a crash.
Adjust the steering wheel only when the vehicle is stopped.
WArNING
Adjustment switch
rear Seats
Adjust second-row seats, access third-row seats, or fold down seats for additional cargo
space.
Adjusting the Second-row Seats
Horizontal position
adjustment
Pull up the bar to move the
seat, then release the bar. Seat-back angle
adjustment
Pull up the lever to
change the angle.
Accessing the
Third-row Seats
Press the button on the second-row seat back or outer
seat side. The second-row seat slides forward to allow
easy access to the third row.
The button is inoperable when the vehicle is moving.
Page 26 of 79
44 || 45
veHICLe CoNTroLS
veHICLe CoNTroLS
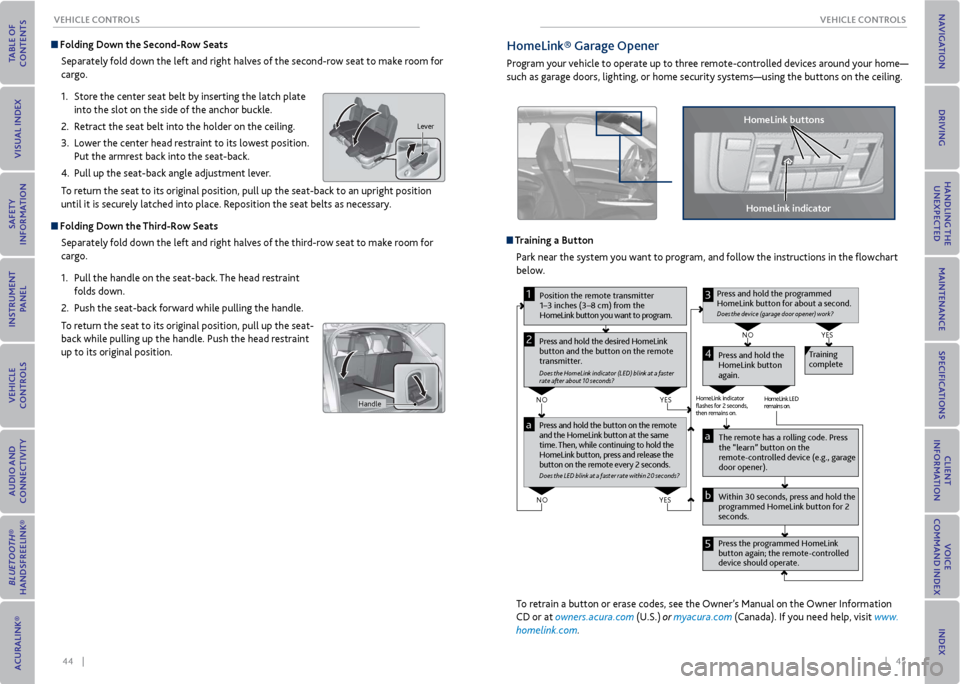
Folding Down the Second-row Seats
Separately fold down the left and right halves of the second-row seat to make room for
cargo.
1. Store the center seat belt by inserting the latch plate
into the slot on the side of the anchor buckle.
2. Retract the seat belt into the holder on the ceiling.
3. Lower the center head restraint to its lowest position.
Put the armrest back into the seat-back.
4. Pull up the seat-back angle adjustment lever.
To return the seat to its original position, pull up the seat-back to an upright position
until it is securely latched into place. Reposition the seat belts as necessary.
Folding Down the Third-row Seats
Separately fold down the left and right halves of the third-row seat to make room for
cargo.
1. Pull the handle on the seat-back. The head restraint
folds down.
2. Push the seat-back forward while pulling the handle.
To return the seat to its original position, pull up the seat-
back while pulling up the handle. Push the head restraint
up to its original position.
Lever
Handle
HomeLink® Garage opener
Program your vehicle to operate up to three remote-controlled devices around your home—
such as garage doors, lighting, or home security systems—using the buttons on the ceiling.
Training a Button Park near the system you want to program, and follow the instructions in the flowchart
below.
Pr ess and hold the button on the r emote
and the HomeLink button at the same
time. Then, while continuing to hold the
HomeLink button, pr ess and release the
button on the r emote every 2 seconds.
Does the LED blink at a fa ster ra te within 20 seconds ?
Press and hold the
HomeLink button
again. T
raining
complete
YES
NO
HomeLink indicator
�ashes for 2 seconds,
then rem ains on. HomeLink LED
r
emains on.YES
NO
YES
NO
P osition the remote transmitter
1–3 inches (3–8 cm) from the
HomeLink button you want to program.1
Press and hold the desir ed HomeLink
button and the button on the r emote
transmitter .
Does the HomeLink indicat or (LED) blink at a f ast er
rate after about 10 seconds ?
2
a
The remote has a ro lling code. Press
the “learn” button on the
r emote-contr olled device (e.g., garage
door opener).
Pr ess the pr ogrammed HomeLink
button again; the remote-contr olled
device should operate.
Within 30 seconds, pr
ess and hold the
pr ogrammed HomeLink button for 2
seconds.a
Pr ess and hold the programmed
HomeLink button for about a second.
Does the devic e (garage door opener) work?
3
b
4
5
To retrain a button or erase codes, see the Owner’s Manual on the Owner Information
CD or at owners.acura.com (U.S.) or myacura.com (Canada). If you need help, visit www.
homelink.com.
HomeLink indicator
HomeLink buttons
Page 29 of 79
50 || 51
AUDIo AND CoNNeCTIvITy
veHICLe CoNTroLS
*if equipped
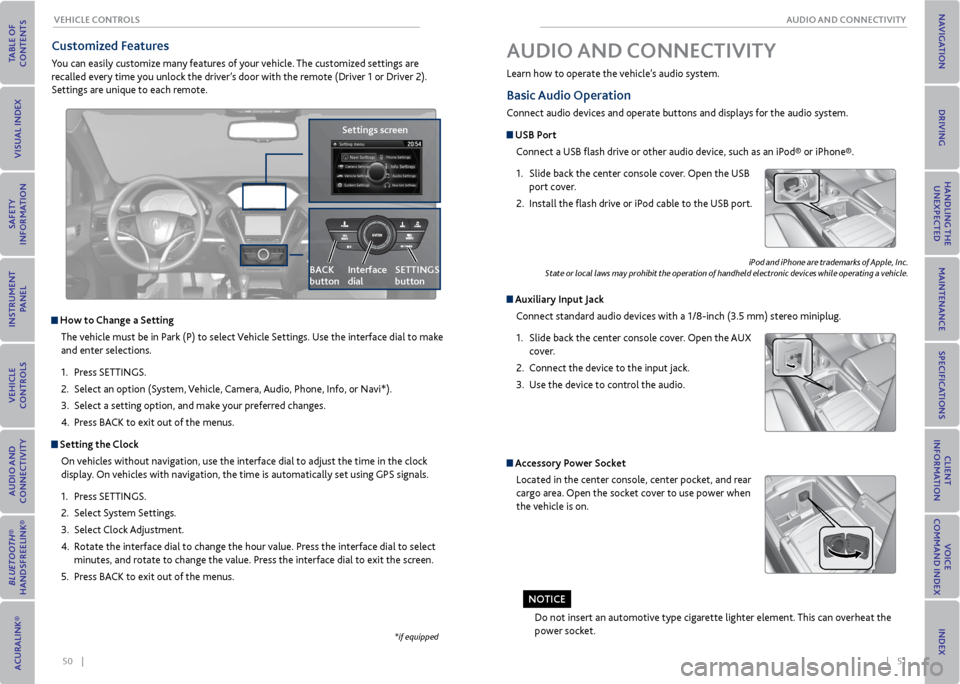
Customized Features
You can easily customize many features of your vehicle. The customized settings are
recalled every time you unlock the driver’s door with the remote (Driver 1 or Driver 2).
Settings are unique to each remote.
How to Change a Setting
The vehicle must be in Park (P) to select Vehicle Settings. Use the interface dial to make
and enter selections.
1. Press SETTINGS.
2. Select an option (System, Vehicle, Camera, Audio, Phone, Info, or Navi*).
3. Select a setting option, and make your preferred changes.
4. Press BACK to exit out of the menus.
Setting the Clock
On vehicles without navigation, use the interface dial to adjust the time in the clock
display. On vehicles with navigation, the time is automatically set using GPS signals.
1. Press SETTINGS.
2. Select System Settings.
3. Select Clock Adjustment.
4. Rotate the interface dial to change the hour value. Press the interface dial to select
minutes, and rotate to change the value. Press the interface dial to exit the screen.
5. Press BACK to exit out of the menus.
Settings screen
BACK
button
Interface
dial SeTTINGS
button
Basic
Audio operation
Connect audio devices and operate buttons and displays for the audio system.
USB Port
Connect a USB flash drive or other audio device, such as an iPod® or iPhone®.
1. Slide back the center console cover. Open the USB
port cover.
2. Install the flash drive or iPod cable to the USB port.
Auxiliary Input Jack
Connect standard audio devices with a 1/8-inch (3.5 mm) stereo miniplug.
1. Slide back the center console cover. Open the AUX
cover.
2. Connect the device to the input jack.
3. Use the device to control the audio.
iPod and iPhone are trademarks of Apple, Inc.
State or local laws may prohibit the operation of handheld electronic devices while operating a vehicle.
AUDIo AND CoNNeCTIvITy
Learn how to operate the vehicle’s audio system.
Accessory Power Socket
Located in the center console, center pocket, and rear
cargo area. Open the socket cover to use power when
the vehicle is on.
Do not insert an automotive type cigarette lighter element. This can overheat the
power socket.
No TICe
Page 33 of 79
58 || 59
AUDIo AND CoNNeCTIvITy
AUDIo AND CoNNeCTIvITy
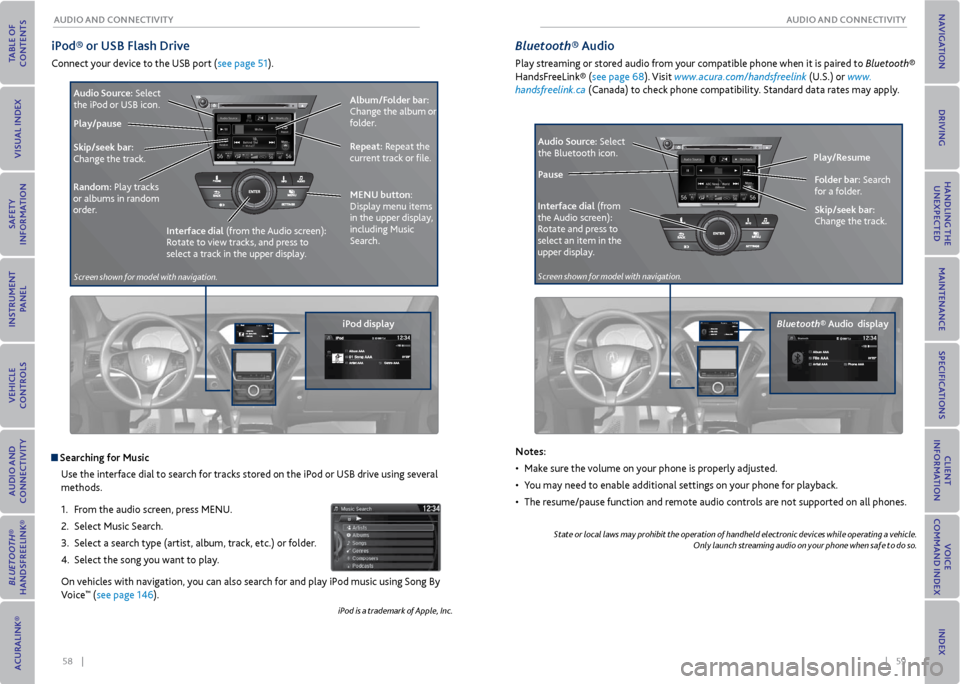
iPod® or USB Flash Drive
Connect your device to the USB port (see page 51).
iPod displayAlbum/Folder bar:
Change the album or
folder.
r
epeat: Repeat the
current track or file.
Skip/seek bar:
Change the track.
random: Play tracks
or albums in random
order. Audio Source:
Select
the iPod or USB icon.
Play/pause
Interface dial (from the Audio screen):
Rotate to view tracks, and press to
select a track in the upper display.
Searching for music
Use the interface dial to search for tracks stored on the iPod or USB drive using several
methods.
1. From the audio screen, press MENU.
2. Select Music Search.
3. Select a search type (artist, album, track, etc.) or folder.
4. Select the song you want to play.
On vehicles with navigation, you can also search for and play iPod music using Song By
Voice
™ (see page 146).
iPod is a trademark of Apple, Inc.
meNU button:
Display menu items
in the upper display,
including Music
Search.
Bluetooth® Audio
Play streaming or stored audio from your compatible phone when it is paired to Bluetooth®
HandsFreeLink® (see page 68). Visit www.acura.com/handsfreelink (U.S.) or www.
handsfreelink.ca (Canada) to check phone compatibility. Standard data rates may apply.
Bluetooth® Audio display Play/r
esume
Interface dial (from
the Audio screen):
Rotate and press to
select an item in the
upper display. Audio Source:
Select
the Bluetooth icon.
Pause
Notes:
• Make sure the volume on your phone is properly adjusted.
• You may need to enable additional settings on your phone for playback.
• The resume/pause function and remote audio controls are not supported on all phones.
State or local laws may prohibit the operation of handheld electronic devices while operating a vehicle.
Only launch streaming audio on your phone when safe to do so.
Folder bar: Search
for a folder.
Skip/seek bar:
Change the track.
Screen shown for model with navigation.Screen shown for model with navigation.
Page 36 of 79
64 || 65
AUDIo AND CoNNeCTIvITy
AUDIo AND CoNNeCTIvITy
1. Make sure REAR POWER is turned on in the front audio controls.
2. From the rear control panel, press the desired audio source button (or the SOURCE
button for Ultrawide RES).
3. Press the arrow/ENTER buttons to highlight options on the screen and select them.
Use the other rear control panel buttons to operate the system.
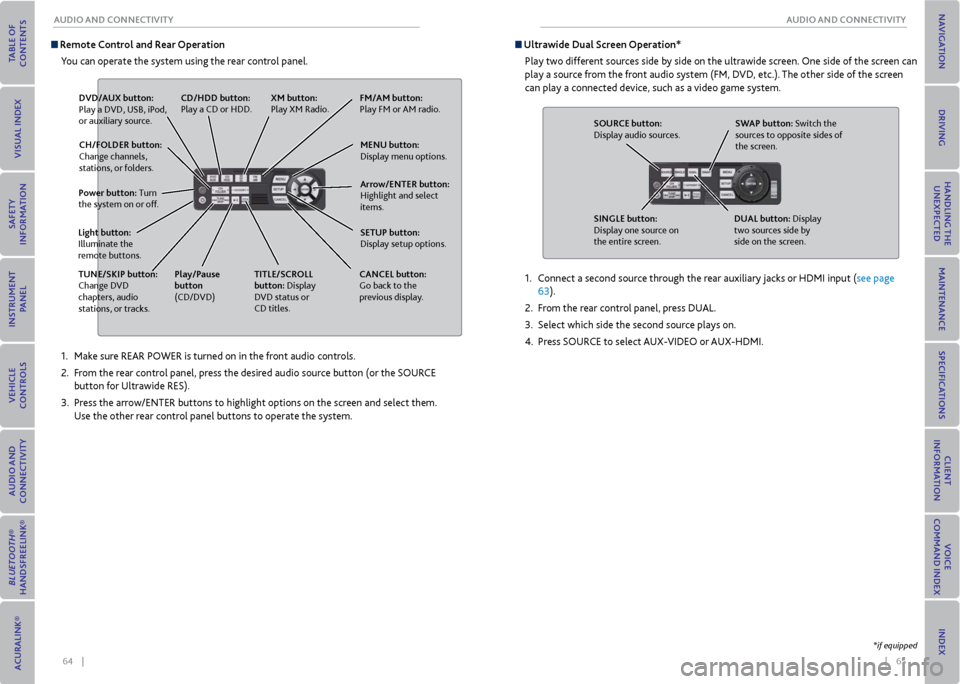
remote Control and rear operation
You can operate the system using the rear control panel.
D vD/AUx button:
Play a DVD, USB, iPod,
or auxiliary source.
TUNe/SKIP button:
Change DVD
chapters, audio
stations, or tracks. TITLe/SCroLL
button: Display
DVD status or
CD titles.
Play/Pause
button
(CD/DVD)
Power button: Turn
the system on or off.
CH/FoLDer button:
Change channels,
stations, or folders.
Light button:
Illuminate the
remote buttons. CANCeL button:
Go back to the
previous display.
CD/HDD button:
Play a CD or HDD.
xm button:
Play XM Radio.Fm/Am button:
Play FM or AM radio.
meNU button:
Display menu options.
SeTUP button:
Display setup options. Arrow/eNTer button:
Highlight and select
items.
Ultrawide Dual Screen operation*
Play two different sources side by side on the ultrawide screen. One side of the screen can
play a source from the front audio system (FM, DVD, etc.). The other side of the screen
can play a connected device, such as a video game system.
SoUr Ce button:
Display audio sources.
SINGLe button:
Display one source on
the entire screen. SWAP button: Switch the
sources to opposite sides of
the screen.
DUAL button: Display
two sources side by
side on the screen.
1. Connect a second source through the rear auxiliary jacks or HDMI input (see page
63).
2. From the rear control panel, press DUAL.
3. Select which side the second source plays on.
4. Press SOURCE to select AUX-VIDEO or AUX-HDMI.
*if equipped
Page 49 of 79
90 || 91
DrIvING
DrIvING
Pre-Tow Checklist
When preparing to tow, and before driving away, be sure to check the following:
• Avoid towing a trailer during your vehicle’s first 600 miles (1,000 km).
• The vehicle and trailer have been properly serviced and are in good condition. Lights
and brakes work properly, and the tires are properly inflated.
• All weights and loads are within limits. Never exceed the gross weight ratings.
• When towing more than 3,500 lbs (1,590 kg), use of gasoline with an octane rating of
91 or higher is recommended.
• Check if all loads are within limits at a public scale (see page 89). If a public scale is
not available, add the estimated weight of your cargo load to the weight of the trailer
(as quoted by the manufacturer) and the tongue load.
• The hitch, safety chains, and any other attachments are secure.
• All items in or on the trailer are properly secured and cannot shift while you drive.
Exceeding any load limit or improperly loading your vehicle and trailer can
cause a crash in which you can be seriously hurt or killed.
Check the loading of your vehicle and trailer carefully before starting to
drive.
WArNING
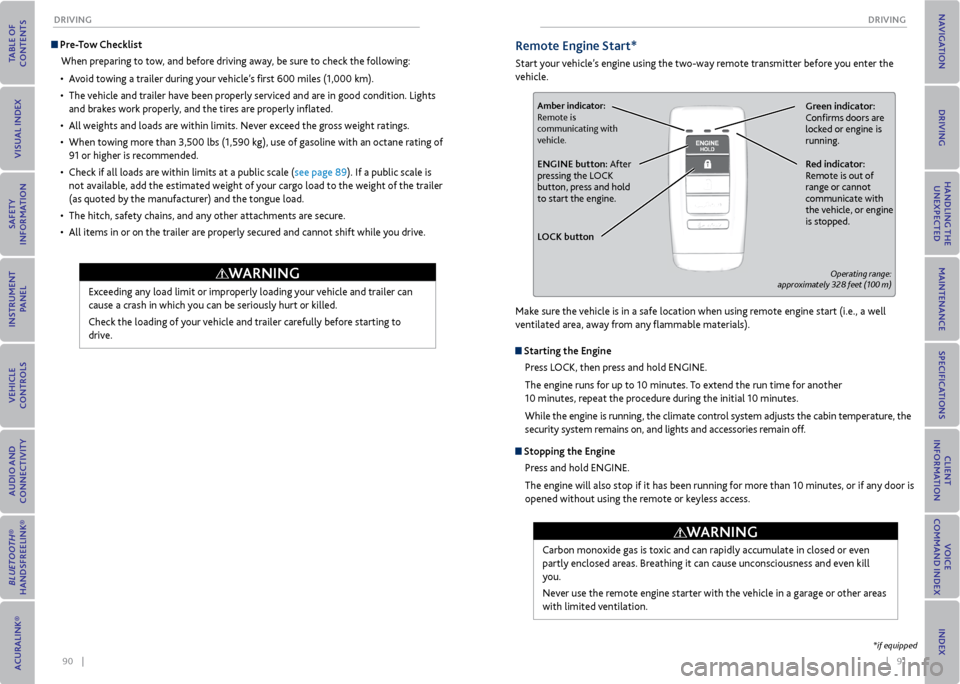
remote engine Start*
Start your vehicle’s engine using the two-way remote transmitter before you enter the
vehicle.
Green indicator:
Confirms doors are
locked or engine is
running.Amber indicator:
Remote is
communicating with
vehicle.
red indicator:
Remote is out of
range or cannot
communicate with
the vehicle, or engine
is stopped.eNGINe button: After
pressing the LOCK
button, press and hold
to start the engine.
L oCK button
Operating range:
approximately 328 feet (100 m)
Make sure the vehicle is in a safe location when using remote engine start (i.e., a well
ventilated area, away from any flammable materials).
Starting the engine
Press LOCK, then press and hold ENGINE.
The engine runs for up to 10 minutes. To extend the run time for another
10 minutes, repeat the procedure during the initial 10 minutes.
While the engine is running, the climate control system adjusts the cabin temperature, the
security system remains on, and lights and accessories remain off.
Stopping the engine
Press and hold ENGINE.
The engine will also stop if it has been running for more than 10 minutes, or if any door is
opened without using the remote or keyless access.
Carbon monoxide gas is toxic and can rapidly accumulate in closed or even
partly enclosed areas. Breathing it can cause unconsciousness and even kill
you.
Never use the remote engine starter with the vehicle in a garage or other areas
with limited ventilation.
WArNING
*if equipped
Page 79 of 79
150 || 151
INDex
INDex
Exterior Lights ............................................ 34
Front Lights .................................................. 35
Interior Lights .............................................. 35
LKAS ................................................... 24, 101
Lock tab ............................................................ 31
Low fuel ............................................................ 25
Low oil pressure .............................................. 23
Low tire pressure ............................................. 25
Maintenance .................................................. 121
Battery ....................................................... 128
Engine Coolant ......................................... 127
Engine Oil .................................................. 125
Opening the Hood ................................... 124
Service Codes ............................................ 122
Under the Hood ....................................... 124
Window Washer Fluid ............................. 128
Wiper Blades ............................................. 129
Maintenance Minder .................................... 122
Making a Call .................................................. 69
Malfunction indicator lamp .......................... 23
Map Legend ...................................................... 81
Master Door Lock Switch .............................. 31
Maximum Load Limit .................................... 85
MENU button .................................... 53, 66, 77
Mirrors ............................................................ 41
Moonroof ........................................................ 33
Multi-Information Display ............................ 27
System message ......................................... 25
Multi-View Rear Camera ............................. 105
Navigation ....................................................... 76
Detour .......................................................... 82
Entering a Destination ............................... 79
Find Nearest Place ..................................... 80
Home Address ............................................. 79
INFO button ................................................ 77
Interface dial ................................................ 77
Map Legend .................................................. 81
MENU button .............................................. 77
NAV button .................................................. 77
Place Category ........................................... 80
Routing ......................................................... 81
SETTINGS button ....................................... 77
Shortcuts ..................................................... 80
Steering Wheel Controls ........................... 76
Street Address ............................................. 79
System Guidance Volume ......................... 78
Talk button ................................................... 76
Traffic ........................................................... 82
Voice Command Tips .................................. 76
Voice Prompt ............................................... 78
Navigation Commands ................................ 142
ODMD ............................................................ 53
On-Demand Multi-Use Display (ODMD) ... 53
One-Touch Turn Signal ................................. 36
Opening the Hood ........................................ 124Overheating ...................................................
110
Paddle shifters ................................................ 93
Pairing a Phone ............................................... 68
Pandora® ......................................................... 60
Parking brake ............................................ 25, 95
Parking Sensor System ................................ 104
Phone ........................................................... 68
Phonebook ....................................................... 70
PHONE button ............................................... 66
Phone Commands ....................................... 146
Pick-Up button ............................................... 66
Place Category ............................................... 80
Power Door Mirrors ........................................ 41
Power Moonroof ............................................ 33
Power Tailgate ................................................ 30
Power Windows .............................................. 32
Rain-Sensing Wipers ..................................... 36
Readiness Codes ............................................ 137
Rear Camera .................................................. 105
Rear Climate Control ..................................... 47
Rear Entertainment System .......................... 62
Headphones ................................................ 63
Remote Control .......................................... 64
Ultrawide Dual Screen ............................... 65
Rear Seats ........................................................ 43
Second-Row Seats .............................. 43, 44
Third-Row Seats .................................. 43, 44
Rearview Mirror ............................................... 41
Rear Wiper ........................................................ 37
Refueling ......................................................... 107
Remote Battery Strength ........................... 108
Remote Control .............................................. 64
Remote Engine Start ...................................... 91
Remote Transmitter ...................................... 28
Reporting Safety Defects .............................. 22
Reverse Tilt Door Mirrors .............................. 41
Roadside Assistance ..................................... 141
Routing ............................................................ 81
Safety Information ........................................... 3
Child Safety .................................................. 15
Reporting Safety Defects .......................... 22
Safety Label Locations ............................... 21
Safety Messages ............................................ 4
Seat Belts ........................................................... 5
Adjusting the Shoulder Anchor .................. 7
Fastening a Seat Belt .................................... 7
Lap/Shoulder Seat Belts .............................. 5
Proper Use of Seat Belts .............................. 5
Seat Belt Inspection ..................................... 6
Seat belt Reminder ..................................... 25
Seat Belt with Detachable Anchor ............ 8
Seat Heaters and Ventilation ...................... 49
Seats ........................................................... 38
Rear Seats .................................................... 43
Second-Row Seats .............................. 43, 44Third-Row Seats ..................................
43, 44
Second-Row Seat Heaters ........................... 49
Second-Row Seats .................................. 43, 44
Selector wheel .................................... 27, 52, 66
Sequential Shift Mode .................................. 93
Service Codes ................................................ 122
Settings ........................................................... 50
SETTINGS button ............................. 53, 66, 77
Setting the Clock ........................................... 50
SH-AWD ........................................................... 24
Shifting ............................................................ 92
Sequential Shift Mode .............................. 93
Shift Lever Does Not Move ........................ 109
Shoulder Anchor ............................................... 7
Side Airbags ..................................................... 10
Side Curtain Airbags ....................................... 10
SiriusXM® Radio ............................................. 55
SMS Text Messaging ....................................... 72
Sound ............................................................ 52
SOURCE button .............................................. 52
Specifications ............................................... 138
Speed Dial .................................................. 70, 71
SRS ............................................................ 24
Steering Wheel
............................................... 42
Heated Steering Wheel ............................. 48
Steering Wheel and Nearby Controls ........... 1
Steering Wheel Controls ........................ 52, 76
Street Address ................................................. 79
Super-Handling All-Wheel Drive ................. 24
Supplemental Restraint System .................. 24
Surround View Camera ............................... 106
System Guidance Volume ............................. 78
System message ............................................. 25
Tailgate ............................................................ 29
Talk button ................................................ 66, 76
Text Messaging ................................................ 72
Third-Row Seats ...................................... 43, 44
Tire Chains ...................................................... 132
Tire Information ........................................... 130
DOT Tire Quality Grading ...................... 134
Tire and Loading Information Label ...... 131
Tire and Wheel Replacement.................. 131
Tire Chains .................................................. 132
Tire Identification Number ..................... 133
Tire Labeling ............................................... 133
Tire Terminology ....................................... 133
Winter Tires ................................................ 132
Tire Pressure Monitoring System ...24, 111, 136
Tire Repair Kit ................................................ 116
Tire Specifications ........................................ 138
Tongue load .................................................... 88
Towing a Trailer ............................................... 87
Load limits .................................................... 87
Tongue load ................................................ 88
Trailer weight ............................................... 87TPMS
.................................................... 24, 111
Traffic ........................................................... 82
TRIP button ...................................................... 27
Troubleshooting ............................................ 139
Turn Signal ...................................................... 36
Ultrawide Dual Screen ................................... 65
Under the Hood ............................................ 124
USB Flash Drive .............................................. 58
USB Port ........................................................... 51
Utility Vehicle ................................................. 84
Vehicle Controls ............................................. 28
Vehicle Specifications ................................. 138
Vehicle Stability Assist ............................ 24, 94
Voice Command Index ................................. 142
Voice Command Tips ................................67, 76
Voice Prompt ................................................... 78
VSA® ..................................................... 24, 94
Warranty Coverages ..................................... 141
Windows ........................................................... 32
Window Washer Fluid .................................. 128
Winter Tires .................................................... 132
Wipers ........................................................... 36
Wiper Blades .................................................. 129
Wireless headphones .................................... 63