service indicator Acura MDX 2015 Owner's Guide
[x] Cancel search | Manufacturer: ACURA, Model Year: 2015, Model line: MDX, Model: Acura MDX 2015Pages: 79, PDF Size: 16.44 MB
Page 3 of 79
This Owner’s Guide is intended to help you quickly get acquainted with your 2015 Acura
MDX. It provides basic information and instructions on technology and convenience
features, as well as emergency procedures and how to get assistance.
This guide is for vehicles sold in the United States and Canada. It covers all MDX models, so
you may find descriptions of features and equipment that are not in your vehicle. Images
throughout this guide are from U.S. vehicles and represent features and equipment that are
available on some, but not all, models.
This guide is not intended to be a substitute for the Owner’s Manual. The Owner
Information CD enclosed in your glove box kit includes the Owner’s Manual, Navigation
Manual, and vehicle and tire warranties in electronic format. This information can be viewed
on a computer (PC or Mac platform) and saved or printed for your reference. You can
also visit owners.acura.com (U.S.) or myacura.ca (Canada) to view the complete and most
current information.
If you are the first registered owner of your vehicle, you may request a complimentary
printed copy of the Owner’s Manual, Navigation Manual, or Vehicle Warranty up to six
months after vehicle purchase. To request a copy, visit owners.acura.com (U.S.) or myacura.
ca (Canada) and create or log in to your account. In Canada, please request a copy from
your Acura dealer.
American Honda Motor Company strives to be proactive in protecting our environment and
natural resources. By using electronic delivery for a considerable portion of the information
typically found in a vehicle owner’s manual, we are further reducing our impact on the
environment.
Acura Total Luxury Care r oadside Assistance
Your Acura TLC Roadside Assistance representative is here to help you
24 hours a day, 7 days a week. Under your 4-year/50,000-mile (80,000 km) warranty, the
following benefits are available:
- Towing services — full cost of towing to the closest Acura dealer
- Roadside assistance — jump starting, fuel delivery, lockout, and flat tire
- Trip planning — detailed trip routing, emergency services, and more
Call (800) 594-8500 (U.S.) or (800) 565-7587 (Canada)
Acura Client relations
Your authorized Acura dealer should be able to answer any questions you have about your
vehicle. However, if you are dissatisfied with the information you receive, you can call Acura
Client Relations (see page 140).
Call (800) 382-2238 (U.S.) or (888) 922-8729 (Canada)
INTroDUCTIoN TABLe oF CoNTeNTS
*if equipped
vISUAL INDex ...................................1
Steering Wheel and Nearby Controls
1
Dashboard and Ceiling Controls ..... 2
SAFeTy INFormATIoN .................. 3
Important Safety Information ....... 3
Seat Belts ........................................... 5
Airbags ............................................... 9
Child Safety ..................................... 15
Safety Label Locations ................... 21
r eporting Safety Defects .............. 22
INSTrUmeNT P ANeL .................... 23
malfunction Indicators .................. 23
Condition Indicators ...................... 25
on/off Indicators .......................... 26
multi-Information Display ........... 27
veHICLe CoNTroLS ..................... 28
Using the remote Transmitter ..... 28
Keyless Access System .................. 29
Power Tailgate operation ............. 30
Door operation from Inside the v ehicle
31
Power Window operation ............ 32
Power moonroof operation ........33
Interior and exterior Lights ...........34
one-Touch Turn Signal .................. 36
Wiper operation ............................ 36
Adjusting the Seats ........................ 38
Adjusting the mirrors..................... 41
Adjusting the Steering Wheel ...... 42
Driving Position memory System ... 42
r ear Seats ........................................ 43
HomeLink® Garage opener .......... 45Climate Control System
................46
Seat Heaters and ventilation* ..... 49
Customized Features ..................... 50
AUDIo AND CoNNeCTIvITy ....... 51
Basic Audio operation .................... 51
Fm/Am radio .................................. 54
Siriusxm® radio ............................. 55
Compact Disc .................................. 56
Hard Disc Drive (HDD) Audio* .... 57
iPod® or USB Flash Drive .............. 58
Bluetooth® Audio ........................... 59
Pandora® ......................................... 60
AcuraLink featuring Aha™ ............. 61
r ear entertainment System* ....... 62
Bluetooth® HANDSFreeLINK ®.... 66
Basic HFL operation ...................... 66
Pairing a Phone ............................... 68
making a Call .................................. 69
SmS Text messaging and e-mail .... 72
A CUrALINK
®* ................................. 73
AcuraLink messages ....................... 73
Subscription Features .................... 74
NA vIGATIoN* ............................... 76
Basic Navigation operation ......... 76
entering a Destination .................. 79
r outing ............................................ 81
DrIvING .......................................... 83
Before Driving ................................. 83
maximum Load Limit ..................... 85
Towing a Trailer .............................. 87
r emote engine Start* ..................... 91
Starting to Drive ............................. 92
Integrated Dynamics System ....... 94
Page 11 of 79
14 || 15
SAFeTy
SAFeTy
9 Impact sensors that can detect a
moderate-to-severe front or side
impact.
10 An indicator on the dashboard that alerts you that the front
passenger’s front airbag has been
turned off.
11 An indicator on the instrument panel that alerts you to a possible
problem with the airbag system or
seat belt tensioners.
12 Safing sensor
13 A rollover sensor that detects whether the vehicle is about to roll
over.
Airbag Care
You do not need to, and should not, perform any maintenance on or replace any airbag
system components yourself. However, you should have your vehicle inspected by a
dealer in the following situations:
When the airbags have deployed
If an airbag has inflated, the control unit and other related parts must be replaced.
Similarly, once an automatic seat belt tensioner has been activated, it must be replaced.
When the vehicle has been in a moderate-to-severe collision
Even if the airbags did not inflate, have your dealer inspect the following: the driver’s seat
position sensor, weight sensors in the passenger’s seat, front seat belt tensioners, and
each seat belt that was worn during the crash.
Do not remove or modify a front seat without first consulting a dealer
This would likely disable the driver’s seat position sensor or the weight sensors in the
passenger’s seat. If it is necessary to remove or modify a front seat to accommodate
a person with disabilities, contact an Acura dealer. For U.S. vehicles, call Acura Client
Relations at (800) 382-2238. For Canadian vehicles, call Acura Client Services at (888)
922-8729.
Child Safety
Each year, many children are injured or killed in vehicle crashes because they are either
unrestrained or not properly restrained. In fact, vehicle collisions are the number one cause
of death of children ages 12 and under.
The National Highway Traffic Safety Administration and Transport Canada recommend
that all children ages 12 and under be properly restrained in a rear seat. Some states or
provinces/territories have laws restricting where children may ride.
To reduce the number of child deaths and injuries, every state, Canadian province, and
territory requires that infants and children be properly restrained when they ride in a
vehicle.
Protecting Child Passengers—Important Considerations • An inflating front or side airbag can injure or kill a child sitting in the front seat.
• A child in the front seat is more likely to interfere with the driver’s ability to safely
control the vehicle.
• Statistics show that children of all sizes and ages are safer when they are properly
restrained in a rear seat.
• Any child who is too small to wear a seat belt correctly must be restrained in an
approved child seat that is properly secured to the vehicle using either the lap belt
portion of the lap/shoulder belt or the lower anchors of the LATCH system.
• Never hold a child on your lap because it is impossible to protect them in the event of a
collision.
• Never put a seat belt over yourself and a child. During a crash, the belt would likely
press deep into the child and cause serious or fatal injuries.
• Never let two children use the same seat belt. Both children could be very seriously
injured in a crash.
• Do not allow children to operate the doors, windows, or seat adjustments.
• Do not leave children in the vehicle unattended, especially in hot weather when the
inside of the vehicle can get hot enough to kill them. They could also activate vehicle
controls, causing it to move unexpectedly.
Children who are unrestrained or improperly restrained can be seriously
injured or killed in a crash.
Any child too small for a seat belt should be properly restrained in a child
seat. A larger child should be properly restrained with a seat belt, using a
booster seat if necessary.
WArNING
Page 49 of 79
90 || 91
DrIvING
DrIvING
Pre-Tow Checklist
When preparing to tow, and before driving away, be sure to check the following:
• Avoid towing a trailer during your vehicle’s first 600 miles (1,000 km).
• The vehicle and trailer have been properly serviced and are in good condition. Lights
and brakes work properly, and the tires are properly inflated.
• All weights and loads are within limits. Never exceed the gross weight ratings.
• When towing more than 3,500 lbs (1,590 kg), use of gasoline with an octane rating of
91 or higher is recommended.
• Check if all loads are within limits at a public scale (see page 89). If a public scale is
not available, add the estimated weight of your cargo load to the weight of the trailer
(as quoted by the manufacturer) and the tongue load.
• The hitch, safety chains, and any other attachments are secure.
• All items in or on the trailer are properly secured and cannot shift while you drive.
Exceeding any load limit or improperly loading your vehicle and trailer can
cause a crash in which you can be seriously hurt or killed.
Check the loading of your vehicle and trailer carefully before starting to
drive.
WArNING
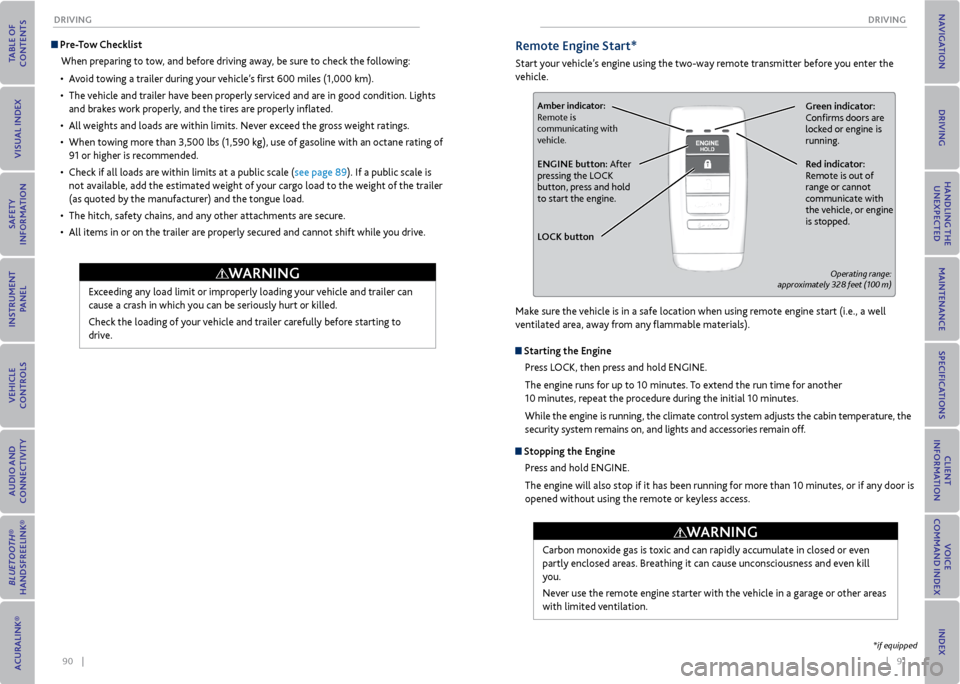
remote engine Start*
Start your vehicle’s engine using the two-way remote transmitter before you enter the
vehicle.
Green indicator:
Confirms doors are
locked or engine is
running.Amber indicator:
Remote is
communicating with
vehicle.
red indicator:
Remote is out of
range or cannot
communicate with
the vehicle, or engine
is stopped.eNGINe button: After
pressing the LOCK
button, press and hold
to start the engine.
L oCK button
Operating range:
approximately 328 feet (100 m)
Make sure the vehicle is in a safe location when using remote engine start (i.e., a well
ventilated area, away from any flammable materials).
Starting the engine
Press LOCK, then press and hold ENGINE.
The engine runs for up to 10 minutes. To extend the run time for another
10 minutes, repeat the procedure during the initial 10 minutes.
While the engine is running, the climate control system adjusts the cabin temperature, the
security system remains on, and lights and accessories remain off.
Stopping the engine
Press and hold ENGINE.
The engine will also stop if it has been running for more than 10 minutes, or if any door is
opened without using the remote or keyless access.
Carbon monoxide gas is toxic and can rapidly accumulate in closed or even
partly enclosed areas. Breathing it can cause unconsciousness and even kill
you.
Never use the remote engine starter with the vehicle in a garage or other areas
with limited ventilation.
WArNING
*if equipped
Page 58 of 79
108 || 109
HANDLING THe UNexPeCTeD
HANDLING THe UNexPeCTeD
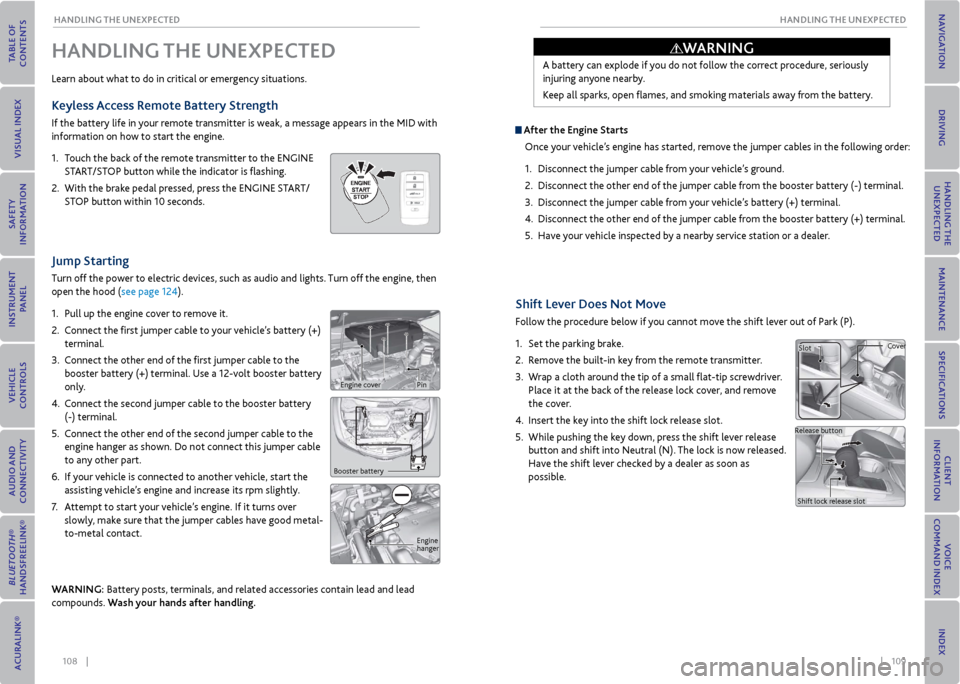
Shift Lever Does Not move
Follow the procedure below if you cannot move the shift lever out of Park (P).
1. Set the parking brake.
2. Remove the built-in key from the remote transmitter.
3. Wrap a cloth around the tip of a small flat-tip screwdriver.
Place it at the back of the release lock cover, and remove
the cover.
4. Insert the key into the shift lock release slot.
5. While pushing the key down, press the shift lever release
button and shift into Neutral (N). The lock is now released.
Have the shift lever checked by a dealer as soon as
possible.
Jump Starting
Turn off the power to electric devices, such as audio and lights. Turn off the engine, then
open the hood (see page 124).
1. Pull up the engine cover to remove it.
2. Connect the first jumper cable to your vehicle’s battery (+)
terminal.
3. Connect the other end of the first jumper cable to the
booster battery (+) terminal. Use a 12-volt booster battery
only.
4. Connect the second jumper cable to the booster battery
(-) terminal.
5. Connect the other end of the second jumper cable to the
engine hanger as shown. Do not connect this jumper cable
to any other part.
6. If your vehicle is connected to another vehicle, start the
assisting vehicle’s engine and increase its rpm slightly.
7. Attempt to start your vehicle’s engine. If it turns over
slowly, make sure that the jumper cables have good metal-
to-metal contact.
WArNING: Battery posts, terminals, and related accessories contain lead and lead
compounds. Wash your hands after handling.
HANDLING THe UNexPeCTeD
Learn about what to do in critical or emergency situations.
Keyless Access remote Battery Strength
If the battery life in your remote transmitter is weak, a message appears in the MID with
information on how to start the engine.
1. Touch the back of the remote transmitter to the ENGINE
START/STOP button while the indicator is flashing.
2. With the brake pedal pressed, press the ENGINE START/
STOP button within 10 seconds.
Booster battery
Engine
hanger
A battery can explode if you do not follow the correct procedure, seriously
injuring anyone nearby.
Keep all sparks, open flames, and smoking materials away from the battery.
After the engine Starts
Once your vehicle’s engine has started, remove the jumper cables in the following order:
1. Disconnect the jumper cable from your vehicle’s ground.
2. Disconnect the other end of the jumper cable from the booster battery (-) terminal.
3. Disconnect the jumper cable from your vehicle’s battery (+) terminal.
4. Disconnect the other end of the jumper cable from the booster battery (+) terminal.
5. Have your vehicle inspected by a nearby service station or a dealer.
Slot Cover
Release button Shift lock release slot
WArNING
Engine coverPin
Page 61 of 79
114 || 115
HANDLING THe UNexPeCTeD
HANDLING THe UNexPeCTeD
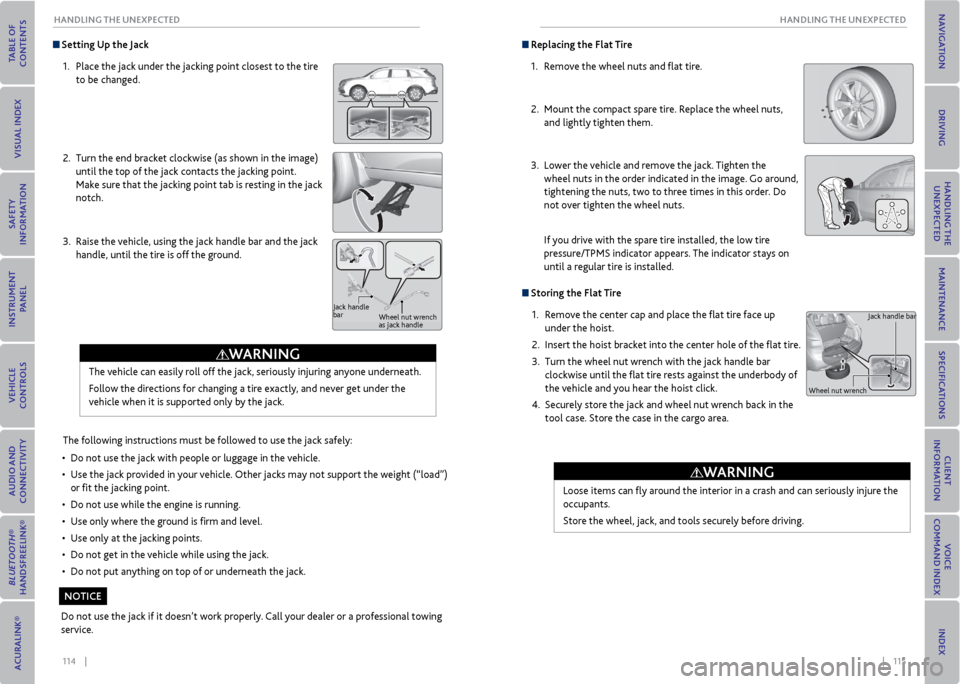
Setting Up the Jack
1. Place the jack under the jacking point closest to the tire
to be changed.
2. Turn the end bracket clockwise (as shown in the image)
until the top of the jack contacts the jacking point.
Make sure that the jacking point tab is resting in the jack
notch.
3. Raise the vehicle, using the jack handle bar and the jack
handle, until the tire is off the ground.
The following instructions must be followed to use the jack safely:
• Do not use the jack with people or luggage in the vehicle.
• Use the jack provided in your vehicle. Other jacks may not support the weight (“load”)
or fit the jacking point.
• Do not use while the engine is running.
• Use only where the ground is firm and level.
• Use only at the jacking points.
• Do not get in the vehicle while using the jack.
• Do not put anything on top of or underneath the jack.
The vehicle can easily roll off the jack, seriously injuring anyone underneath.
Follow the directions for changing a tire exactly, and never get under the
vehicle when it is supported only by the jack.
Jack handle
bar
Wheel nut wrench
as jack handle
Do not use the jack if it doesn’t work properly. Call your dealer or a professional towing
service.
WArNING
NoTICe
replacing the Flat Tire
1. Remove the wheel nuts and flat tire.
2. Mount the compact spare tire. Replace the wheel nuts,
and lightly tighten them.
3. Lower the vehicle and remove the jack. Tighten the
wheel nuts in the order indicated in the image. Go around,
tightening the nuts, two to three times in this order. Do
not over tighten the wheel nuts.
If you drive with the spare tire installed, the low tire
pressure/TPMS indicator appears. The indicator stays on
until a regular tire is installed.
Storing the Flat Tire
1. Remove the center cap and place the flat tire face up
under the hoist.
2. Insert the hoist bracket into the center hole of the flat tire.
3. Turn the wheel nut wrench with the jack handle bar
clockwise until the flat tire rests against the underbody of
the vehicle and you hear the hoist click.
4. Securely store the jack and wheel nut wrench back in the
tool case. Store the case in the cargo area.
Loose items can fly around the interior in a crash and can seriously injure the
occupants.
Store the wheel, jack, and tools securely before driving.
Jack handle bar
Wheel nut wrench
WArNING
Page 65 of 79
122 || 123
mAINTeNANCe
mAINTeNANCe
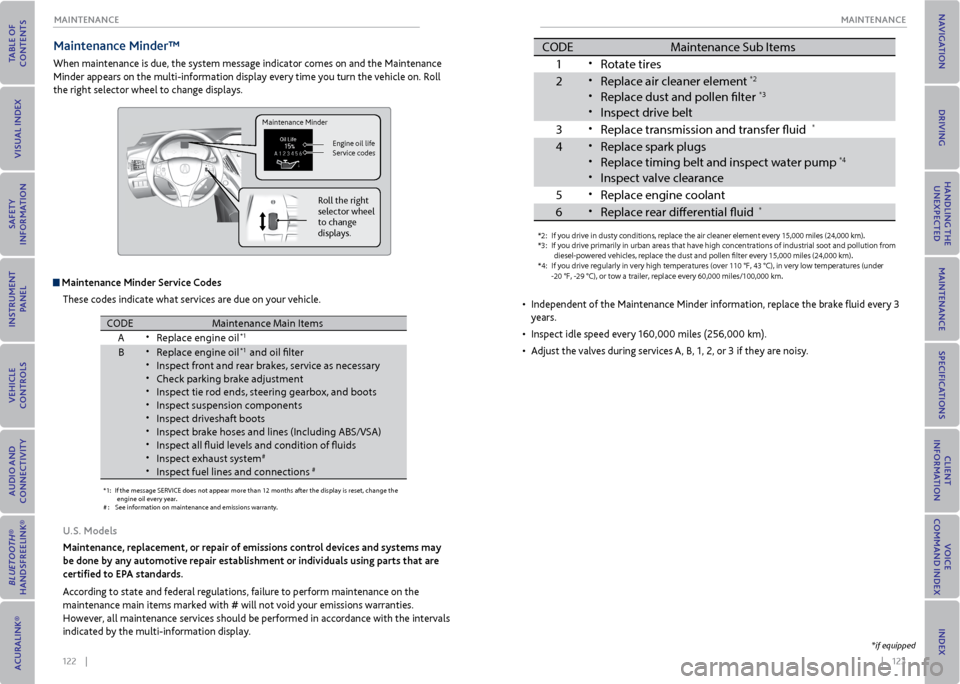
maintenance minder™
When maintenance is due, the system message indicator comes on and the Maintenance
Minder appears on the multi-information display every time you turn the vehicle on. Roll
the right selector wheel to change displays.
maintenance minder Service Codes
These codes indicate what services are due on your vehicle.
*1: If the message SERVICE does not appear more than 12 months after the display is\
reset, change the
engine oil every year .
#: See information on maintenance and emissions warranty.
CODEMaintenance Main Items
A
•Replace engine oi l*1
B•Replace engine oil*1 and oil flter•Inspect front and rear brakes, service as necessar y•Check parking brake adjustment•Inspect tie rod ends, steering gearbox, and boot s•Inspect suspension components•Inspect driveshaft boots•Inspect brake hoses and lines (Including ABS/VSA)•Inspect all fuid levels and condition of fuid s•Inspect exhaust system#
•Inspect fuel lines and connections#
*4:If you drive regularly in very high temperatures (over 110 °F, 43 °\
C), in very low temperatures (unde r
-20 °F, -29 °C), or tow a trai ler, repl ace ever y 60,000 mi les/100,000 km .
CODE Maintenance Sub Items
1
•Rotate tires
2
•Replace air cleaner element*2
•Replace dust and pollen flte r*3
•Inspect drive belt
3
•Replace transmission and transfer fuid*
4•Replace spark plug s•Replace timing belt an d inspect water pump*4
•Inspect valve clearanc
e
5
•Replace engine coolan t
6
•Replace rear diferential fuid*
*2:I f you drive in dusty condi tion s, replac e the air cleaner element every 15,000 miles (24,000 km).
*3: If you drive primarily in urban areas that have high concentrations of i\
ndustrial soot and pollution from
diesel-powered vehicles, replace the dust and pollen flter every 15,000 miles (24,000 km).
U.S. models
maintenance, replacement, or repair of emissions control devices and systems may
be done by any automotive repair establishment or individuals using parts that are
certified to ePA standards.
According to state and federal regulations, failure to perform maintenance on the
maintenance main items marked with # will not void your emissions warranties.
However, all maintenance services should be performed in accordance with the intervals
indicated by the multi-information display.
Maintenance Minder
Engine oil life
Service codes
Roll the right
selector wheel
to change
displays.
*1: If the message SERVICE does not appear more than 12 months after the display is\
reset, change the
engine oil every year .
#: See information on maintenance and emissions warranty.
CODEMaintenance Main Item s
A
•Replace engine oi l*1
B•Replace engine oil*1 and oil flter
•Inspect front and rear brakes, service as necessar y
•Check parking brake adjustment
•Inspect tie rod ends, steering gearbox, and boot s
•Inspect suspension components
•Inspect driveshaft boots
•Inspect brake hoses and lines (Including ABS/VSA)
•Inspect all fuid levels and condition of fuid s
•Inspect exhaust system#
•Inspect fuel lines and connections#
*4:If you drive regularly in very high temperatures (over 110 °F, 43 °\
C), in very low temperatures (unde r
-20 °F, -29 °C), or tow a trai ler, repl ace ever y 60,000 mi les/100,000 km .
CODEMaintenance Sub Item s
1
•Rotate tires
2•Replace air cleaner element*2
•Replace dust and pollen flte r*3
•Inspect drive belt
3
•Replace transmission and transfer fuid*
4•Replace spark plug s
•Replace timing belt an d inspect water pump*4
•Inspect valve clearanc
e
5
•Replace engine coolan t
6•Replace rear diferential fuid*
*2:If you drive in dusty condi tion s, replac e the air cleaner element every 15,000 miles (24,000 km).
*3: If you drive primarily in urban areas that have high concentrations of i\
ndustrial soot and pollution from
diesel-powered vehicles, replace the dust and pollen flter every 15,000 miles (24,000 km).
• Independent of the Maintenance Minder information, replace the brake fluid every 3
years.
• Inspect idle speed every 160,000 miles (256,000 km).
• Adjust the valves during services A, B, 1, 2, or 3 if they are noisy.
*if equipped
Page 70 of 79
132 || 133
mAINTeNANCe
mAINTeNANCe
Tire Service Life
The life of your tires is dependent on many factors, including driving habits, road
conditions, vehicle loading, inflation pressure, maintenance history, speed, and
environmental conditions (even when the tires are not in use).
In addition to regular inspections and inflation pressure maintenance, it is recommended
that you have annual inspections performed once the tires reach five years old. All tires,
including the spare, should be removed from service after 10 years from the date of
manufacture, regardless of their condition or state of wear.
Winter Tires
If driving on snowy or frozen roads, mount all season tires marked “M+S”, snow tires, or
tire chains; reduce speed; and maintain sufficient distance between vehicles when driving.
For winter tires, select the size and load ranges that are the same as the original tires, and
mount them to all four wheels.
Tire Chains
Install tire chains on the front tires only. Because your vehicle has limited tire clearance,
we strongly recommend using the following chains: Cable type: SCC Cable Chain ZT735.
Mount chains as tightly as you can, and make sure that they do not touch the brake lines
or suspension.
Using the wrong chains, or not properly installing chains, can damage the
brake lines and cause a crash in which you can be seriously injured or killed.
Follow all instructions in this guide regarding the selection and use of tire
chains.
Traction devices that are the wrong size or improperly installed can damage your
vehicle’s brake lines, suspension, body, and wheels. Stop driving if they are hitting
any part of the vehicle.
WArNING
NoTICe
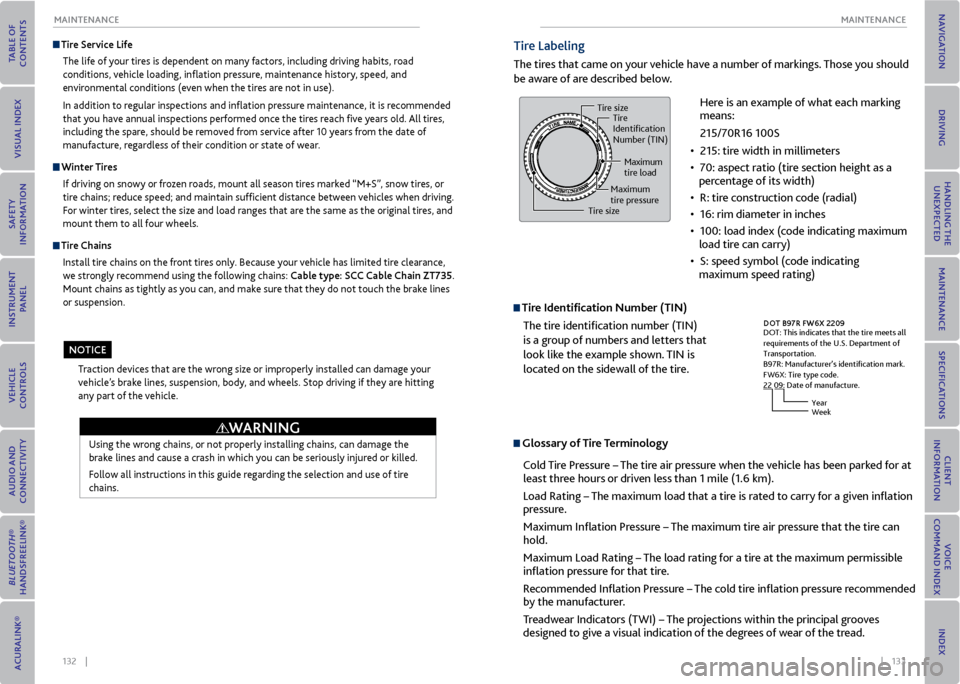
Tire Labeling
The tires that came on your vehicle have a number of markings. Those you should
be aware of are described below.
Tire Identification Number (TIN)
The tire identification number (TIN)
is a group of numbers and letters that
look like the example shown. TIN is
located on the sidewall of the tire.
Glossary of Tire Terminology
Cold Tire Pressure – The tire air pressure when the vehicle has been parked for at
least three hours or driven less than 1 mile (1.6 km).
Load Rating – The maximum load that a tire is rated to carry for a given inflation
pressure.
Maximum Inflation Pressure – The maximum tire air pressure that the tire can
hold.
Maximum Load Rating – The load rating for a tire at the maximum permissible
inflation pressure for that tire.
Recommended Inflation Pressure – The cold tire inflation pressure recommended
by the manufacturer.
Treadwear Indicators (TWI) – The projections within the principal grooves
designed to give a visual indication of the degrees of wear of the tread.
DO T B97R FW6X 2209
DOT: This indicates that the tire meets all
requirements of the
U.S. Department of Transportation.
B97R: Manufacturer’s identi�cation mark.
FW6X: Tire type code.
22 09: Date of manufacture.
YearWeek
Here is an example of what each marking
means:
215/70R16 100S
• 215: tire width in millimeters
• 70: aspect ratio (tire section height as a
percentage of its width)
• R: tire construction code (radial)
• 16: rim diameter in inches
• 100: load index (code indicating maximum
load tire can carry)
• S: speed symbol (code indicating
maximum speed rating)Tire size Tire
Identi�cation
Number (TIN)
Maximum
tire load
Maximum
tire pressure
Tire size
Page 79 of 79
150 || 151
INDex
INDex
Exterior Lights ............................................ 34
Front Lights .................................................. 35
Interior Lights .............................................. 35
LKAS ................................................... 24, 101
Lock tab ............................................................ 31
Low fuel ............................................................ 25
Low oil pressure .............................................. 23
Low tire pressure ............................................. 25
Maintenance .................................................. 121
Battery ....................................................... 128
Engine Coolant ......................................... 127
Engine Oil .................................................. 125
Opening the Hood ................................... 124
Service Codes ............................................ 122
Under the Hood ....................................... 124
Window Washer Fluid ............................. 128
Wiper Blades ............................................. 129
Maintenance Minder .................................... 122
Making a Call .................................................. 69
Malfunction indicator lamp .......................... 23
Map Legend ...................................................... 81
Master Door Lock Switch .............................. 31
Maximum Load Limit .................................... 85
MENU button .................................... 53, 66, 77
Mirrors ............................................................ 41
Moonroof ........................................................ 33
Multi-Information Display ............................ 27
System message ......................................... 25
Multi-View Rear Camera ............................. 105
Navigation ....................................................... 76
Detour .......................................................... 82
Entering a Destination ............................... 79
Find Nearest Place ..................................... 80
Home Address ............................................. 79
INFO button ................................................ 77
Interface dial ................................................ 77
Map Legend .................................................. 81
MENU button .............................................. 77
NAV button .................................................. 77
Place Category ........................................... 80
Routing ......................................................... 81
SETTINGS button ....................................... 77
Shortcuts ..................................................... 80
Steering Wheel Controls ........................... 76
Street Address ............................................. 79
System Guidance Volume ......................... 78
Talk button ................................................... 76
Traffic ........................................................... 82
Voice Command Tips .................................. 76
Voice Prompt ............................................... 78
Navigation Commands ................................ 142
ODMD ............................................................ 53
On-Demand Multi-Use Display (ODMD) ... 53
One-Touch Turn Signal ................................. 36
Opening the Hood ........................................ 124Overheating ...................................................
110
Paddle shifters ................................................ 93
Pairing a Phone ............................................... 68
Pandora® ......................................................... 60
Parking brake ............................................ 25, 95
Parking Sensor System ................................ 104
Phone ........................................................... 68
Phonebook ....................................................... 70
PHONE button ............................................... 66
Phone Commands ....................................... 146
Pick-Up button ............................................... 66
Place Category ............................................... 80
Power Door Mirrors ........................................ 41
Power Moonroof ............................................ 33
Power Tailgate ................................................ 30
Power Windows .............................................. 32
Rain-Sensing Wipers ..................................... 36
Readiness Codes ............................................ 137
Rear Camera .................................................. 105
Rear Climate Control ..................................... 47
Rear Entertainment System .......................... 62
Headphones ................................................ 63
Remote Control .......................................... 64
Ultrawide Dual Screen ............................... 65
Rear Seats ........................................................ 43
Second-Row Seats .............................. 43, 44
Third-Row Seats .................................. 43, 44
Rearview Mirror ............................................... 41
Rear Wiper ........................................................ 37
Refueling ......................................................... 107
Remote Battery Strength ........................... 108
Remote Control .............................................. 64
Remote Engine Start ...................................... 91
Remote Transmitter ...................................... 28
Reporting Safety Defects .............................. 22
Reverse Tilt Door Mirrors .............................. 41
Roadside Assistance ..................................... 141
Routing ............................................................ 81
Safety Information ........................................... 3
Child Safety .................................................. 15
Reporting Safety Defects .......................... 22
Safety Label Locations ............................... 21
Safety Messages ............................................ 4
Seat Belts ........................................................... 5
Adjusting the Shoulder Anchor .................. 7
Fastening a Seat Belt .................................... 7
Lap/Shoulder Seat Belts .............................. 5
Proper Use of Seat Belts .............................. 5
Seat Belt Inspection ..................................... 6
Seat belt Reminder ..................................... 25
Seat Belt with Detachable Anchor ............ 8
Seat Heaters and Ventilation ...................... 49
Seats ........................................................... 38
Rear Seats .................................................... 43
Second-Row Seats .............................. 43, 44Third-Row Seats ..................................
43, 44
Second-Row Seat Heaters ........................... 49
Second-Row Seats .................................. 43, 44
Selector wheel .................................... 27, 52, 66
Sequential Shift Mode .................................. 93
Service Codes ................................................ 122
Settings ........................................................... 50
SETTINGS button ............................. 53, 66, 77
Setting the Clock ........................................... 50
SH-AWD ........................................................... 24
Shifting ............................................................ 92
Sequential Shift Mode .............................. 93
Shift Lever Does Not Move ........................ 109
Shoulder Anchor ............................................... 7
Side Airbags ..................................................... 10
Side Curtain Airbags ....................................... 10
SiriusXM® Radio ............................................. 55
SMS Text Messaging ....................................... 72
Sound ............................................................ 52
SOURCE button .............................................. 52
Specifications ............................................... 138
Speed Dial .................................................. 70, 71
SRS ............................................................ 24
Steering Wheel
............................................... 42
Heated Steering Wheel ............................. 48
Steering Wheel and Nearby Controls ........... 1
Steering Wheel Controls ........................ 52, 76
Street Address ................................................. 79
Super-Handling All-Wheel Drive ................. 24
Supplemental Restraint System .................. 24
Surround View Camera ............................... 106
System Guidance Volume ............................. 78
System message ............................................. 25
Tailgate ............................................................ 29
Talk button ................................................ 66, 76
Text Messaging ................................................ 72
Third-Row Seats ...................................... 43, 44
Tire Chains ...................................................... 132
Tire Information ........................................... 130
DOT Tire Quality Grading ...................... 134
Tire and Loading Information Label ...... 131
Tire and Wheel Replacement.................. 131
Tire Chains .................................................. 132
Tire Identification Number ..................... 133
Tire Labeling ............................................... 133
Tire Terminology ....................................... 133
Winter Tires ................................................ 132
Tire Pressure Monitoring System ...24, 111, 136
Tire Repair Kit ................................................ 116
Tire Specifications ........................................ 138
Tongue load .................................................... 88
Towing a Trailer ............................................... 87
Load limits .................................................... 87
Tongue load ................................................ 88
Trailer weight ............................................... 87TPMS
.................................................... 24, 111
Traffic ........................................................... 82
TRIP button ...................................................... 27
Troubleshooting ............................................ 139
Turn Signal ...................................................... 36
Ultrawide Dual Screen ................................... 65
Under the Hood ............................................ 124
USB Flash Drive .............................................. 58
USB Port ........................................................... 51
Utility Vehicle ................................................. 84
Vehicle Controls ............................................. 28
Vehicle Specifications ................................. 138
Vehicle Stability Assist ............................ 24, 94
Voice Command Index ................................. 142
Voice Command Tips ................................67, 76
Voice Prompt ................................................... 78
VSA® ..................................................... 24, 94
Warranty Coverages ..................................... 141
Windows ........................................................... 32
Window Washer Fluid .................................. 128
Winter Tires .................................................... 132
Wipers ........................................................... 36
Wiper Blades .................................................. 129
Wireless headphones .................................... 63