tow Acura MDX 2015 Owner's Guide
[x] Cancel search | Manufacturer: ACURA, Model Year: 2015, Model line: MDX, Model: Acura MDX 2015Pages: 79, PDF Size: 16.44 MB
Page 3 of 79
This Owner’s Guide is intended to help you quickly get acquainted with your 2015 Acura
MDX. It provides basic information and instructions on technology and convenience
features, as well as emergency procedures and how to get assistance.
This guide is for vehicles sold in the United States and Canada. It covers all MDX models, so
you may find descriptions of features and equipment that are not in your vehicle. Images
throughout this guide are from U.S. vehicles and represent features and equipment that are
available on some, but not all, models.
This guide is not intended to be a substitute for the Owner’s Manual. The Owner
Information CD enclosed in your glove box kit includes the Owner’s Manual, Navigation
Manual, and vehicle and tire warranties in electronic format. This information can be viewed
on a computer (PC or Mac platform) and saved or printed for your reference. You can
also visit owners.acura.com (U.S.) or myacura.ca (Canada) to view the complete and most
current information.
If you are the first registered owner of your vehicle, you may request a complimentary
printed copy of the Owner’s Manual, Navigation Manual, or Vehicle Warranty up to six
months after vehicle purchase. To request a copy, visit owners.acura.com (U.S.) or myacura.
ca (Canada) and create or log in to your account. In Canada, please request a copy from
your Acura dealer.
American Honda Motor Company strives to be proactive in protecting our environment and
natural resources. By using electronic delivery for a considerable portion of the information
typically found in a vehicle owner’s manual, we are further reducing our impact on the
environment.
Acura Total Luxury Care r oadside Assistance
Your Acura TLC Roadside Assistance representative is here to help you
24 hours a day, 7 days a week. Under your 4-year/50,000-mile (80,000 km) warranty, the
following benefits are available:
- Towing services — full cost of towing to the closest Acura dealer
- Roadside assistance — jump starting, fuel delivery, lockout, and flat tire
- Trip planning — detailed trip routing, emergency services, and more
Call (800) 594-8500 (U.S.) or (800) 565-7587 (Canada)
Acura Client relations
Your authorized Acura dealer should be able to answer any questions you have about your
vehicle. However, if you are dissatisfied with the information you receive, you can call Acura
Client Relations (see page 140).
Call (800) 382-2238 (U.S.) or (888) 922-8729 (Canada)
INTroDUCTIoN TABLe oF CoNTeNTS
*if equipped
vISUAL INDex ...................................1
Steering Wheel and Nearby Controls
1
Dashboard and Ceiling Controls ..... 2
SAFeTy INFormATIoN .................. 3
Important Safety Information ....... 3
Seat Belts ........................................... 5
Airbags ............................................... 9
Child Safety ..................................... 15
Safety Label Locations ................... 21
r eporting Safety Defects .............. 22
INSTrUmeNT P ANeL .................... 23
malfunction Indicators .................. 23
Condition Indicators ...................... 25
on/off Indicators .......................... 26
multi-Information Display ........... 27
veHICLe CoNTroLS ..................... 28
Using the remote Transmitter ..... 28
Keyless Access System .................. 29
Power Tailgate operation ............. 30
Door operation from Inside the v ehicle
31
Power Window operation ............ 32
Power moonroof operation ........33
Interior and exterior Lights ...........34
one-Touch Turn Signal .................. 36
Wiper operation ............................ 36
Adjusting the Seats ........................ 38
Adjusting the mirrors..................... 41
Adjusting the Steering Wheel ...... 42
Driving Position memory System ... 42
r ear Seats ........................................ 43
HomeLink® Garage opener .......... 45Climate Control System
................46
Seat Heaters and ventilation* ..... 49
Customized Features ..................... 50
AUDIo AND CoNNeCTIvITy ....... 51
Basic Audio operation .................... 51
Fm/Am radio .................................. 54
Siriusxm® radio ............................. 55
Compact Disc .................................. 56
Hard Disc Drive (HDD) Audio* .... 57
iPod® or USB Flash Drive .............. 58
Bluetooth® Audio ........................... 59
Pandora® ......................................... 60
AcuraLink featuring Aha™ ............. 61
r ear entertainment System* ....... 62
Bluetooth® HANDSFreeLINK ®.... 66
Basic HFL operation ...................... 66
Pairing a Phone ............................... 68
making a Call .................................. 69
SmS Text messaging and e-mail .... 72
A CUrALINK
®* ................................. 73
AcuraLink messages ....................... 73
Subscription Features .................... 74
NA vIGATIoN* ............................... 76
Basic Navigation operation ......... 76
entering a Destination .................. 79
r outing ............................................ 81
DrIvING .......................................... 83
Before Driving ................................. 83
maximum Load Limit ..................... 85
Towing a Trailer .............................. 87
r emote engine Start* ..................... 91
Starting to Drive ............................. 92
Integrated Dynamics System ....... 94
Page 4 of 79
| 1
vISUAL INDex
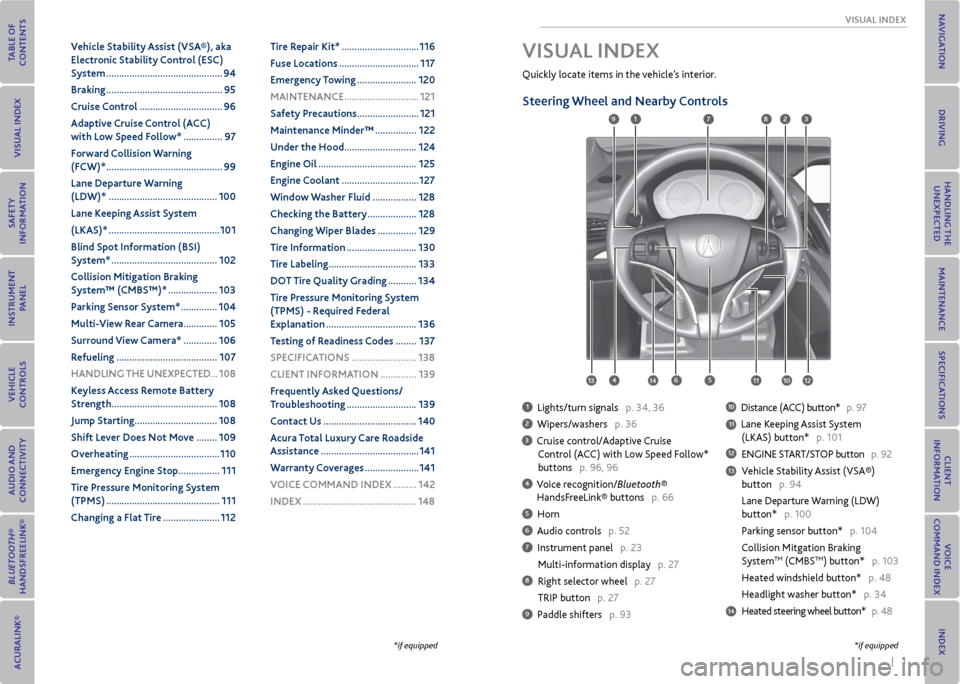
Quickly locate items in the vehicle’s interior.
Steering Wheel and Nearby Controls
1 Lights/turn signals p. 34, 36
2 Wipers/washers p. 36
3 Cruise control/Adaptive Cruise
Control (ACC) with Low Speed Follow*
buttons p. 96, 96
4 Voice recognition/Bluetooth®
HandsFreeLink® buttons p. 66
5 Horn
6 Audio controls p. 52
7 Instrument panel p. 23
Multi-information display p. 27
8 Right selector wheel p. 27
TRIP button p. 27
9 Paddle shifters p. 93
10 Distance (ACC) button* p. 97
11 Lane Keeping Assist System
(LKAS) button* p. 101
12 ENGINE START/STOP button p. 92
13 Vehicle Stability Assist (VSA®)
button p. 94
Lane Departure Warning (LDW)
button* p. 100
Parking sensor button* p. 104
Collision Mitgation Braking
System
TM (CMBSTM) button* p. 103
Heated windshield button* p. 48
Headlight washer button* p. 34
14 Heated steering wheel button* p. 48
vISUAL INDex
1
45
9
61011
7283
131412
*if equipped*if equipped
v ehicle Stability Assist (vSA®), aka
electronic Stability Control (eSC)
System ............................................. 94
Braking ............................................. 95
Cruise Control ................................ 96
Adaptive Cruise Control (ACC)
with Low Speed Follow* ............... 97
Forward Collision Warning
(FCW)* ............................................. 99
Lane Departure Warning
(LDW)* .......................................... 100
Lane Keeping Assist System
(LKAS)* ........................................... 101
Blind Spot Information (BSI)
System* ......................................... 102
Collision mitigation Braking
System™ (CmBS™)* ................... 103
Parking Sensor System* .............. 104
multi- view rear Camera ............. 105
Surround view Camera* ............. 106
r efueling ....................................... 107
HANDLING THe UNexPeCTeD ...108
Keyless Access r emote Battery
Strength ......................................... 108
Jump Starting ................................ 108
Shift Lever Does Not move ........ 109
overheating ................................... 110
emergency engine Stop ................ 111
Tire Pressure monitoring System
(TPmS) ............................................ 111
Changing a Flat Tire ...................... 112Tire r
epair Kit* .............................. 116
Fuse Locations ............................... 117
emergency Towing ....................... 120
mAINTeNANCe ............................. 121
Safety Precautions ........................ 121
maintenance minder™ ................ 122
Under the Hood ............................ 124
engine oil ...................................... 125
engine Coolant .............................. 127
Window Washer Fluid ................. 128
Checking the Battery ................... 128
Changing Wiper Blades ............... 129
Tire Information ........................... 130
Tire Labeling .................................. 133
Do T Tire Quality Grading ........... 134
Tire Pressure monitoring System
(TPmS) - r equired Federal
explanation ................................... 136
Testing of readiness Codes ........ 137
SPeCIFICATIoNS ......................... 138
CLIeNT INFormATIoN .............. 139
Frequently Asked Questions/
Troubleshooting ........................... 139
Contact Us .................................... 140
Acura Total Luxury Care r oadside
Assistance ...................................... 141
Warranty Coverages ..................... 141
v oICe CommAND INDex ......... 142
INDex ............................................ 148
Page 46 of 79
84 || 85
DrIvING
DrIvING
Driving Guidelines for y our Utility v ehicle
Utility vehicles have a significantly higher rollover rate than other types of vehicles. To
prevent rollovers or loss of control:
• Take corners at slower speeds than you would with a passenger vehicle.
• Avoid sharp turns and abrupt maneuvers whenever possible.
• Do not modify your vehicle in any way that raises its center of gravity.
• Never carry more than 165 lbs (75 kg) of cargo on the roof rack (Acura accessory).
In addition:
• During the first 600 miles (1,000 km) of operation, avoid sudden acceleration or full
throttle operation so as not to damage the engine or powertrain.
• Avoid hard braking for the first 200 miles (300 km). You should also follow this when
the brake pads are replaced.
Improperly operating this vehicle on or off pavement can cause crash or
rollover in which you and your passengers can be seriously injured or killed.
Follow all instructions and guidelines in this guide.
Keep your speed low, and don’t drive faster than conditions permit.
WArNING
Improper accessories or modifications can affect your vehicle’s handling,
stability, and performance, and cause a crash in which you can be seriously
hurt or killed.
Follow all instructions in the vehicle owner’s manual regarding accessories
and modifications.
WArNING
maximum Load Limit
Carrying too much cargo or improperly storing it can affect your vehicle’s handling,
stability, stopping distance, and tires, and make it unsafe.
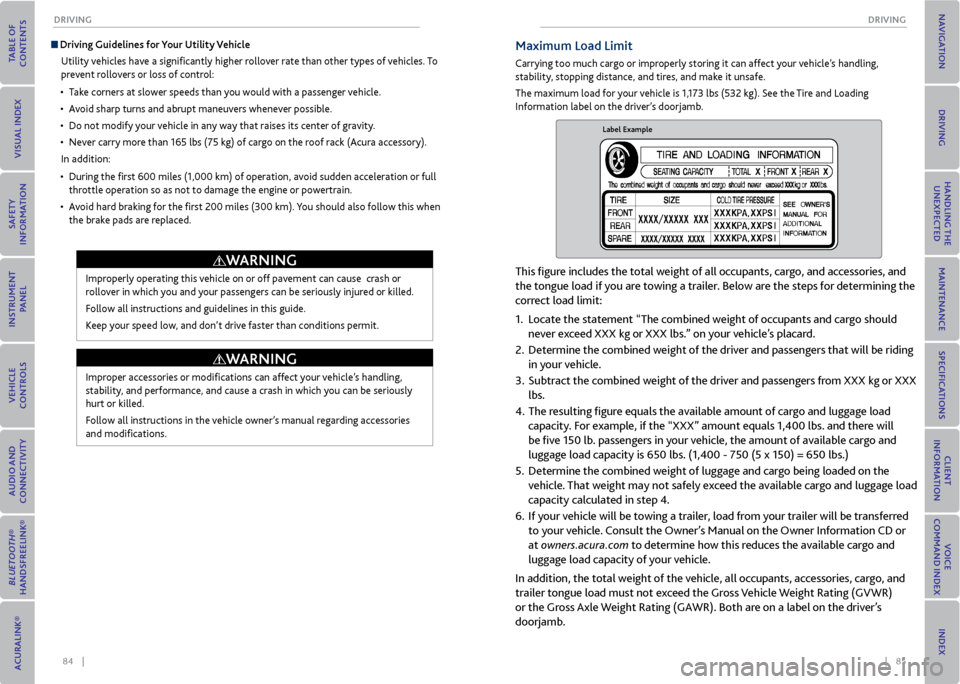
The maximum load for your vehicle is 1,173 lbs (532 kg). See the Tire and Loading
Information label on the driver’s doorjamb.
Label Example
This figure includes the total weight of all occupants, cargo, and accessories, and
the tongue load if you are towing a trailer. Below are the steps for determining the
correct load limit:
1. Locate the statement “The combined weight of occupants and cargo should
never exceed XXX kg or XXX lbs.” on your vehicle’s placard.
2. Determine the combined weight of the driver and passengers that will be riding
in your vehicle.
3. Subtract the combined weight of the driver and passengers from XXX kg or XXX
lbs.
4. The resulting figure equals the available amount of cargo and luggage load
capacity. For example, if the “XXX” amount equals 1,400 lbs. and there will
be five 150 lb. passengers in your vehicle, the amount of available cargo and
luggage load capacity is 650 lbs. (1,400 - 750 (5 x 150) = 650 lbs.)\
5. Determine the combined weight of luggage and cargo being loaded on the
vehicle. That weight may not safely exceed the available cargo and luggage load
capacity calculated in step 4.
6. If your vehicle will be towing a trailer, load from your trailer will be transferred
to your vehicle. Consult the Owner’s Manual on the Owner Information CD or
at owners.acura.com to determine how this reduces the available cargo and
luggage load capacity of your vehicle.
In addition, the total weight of the vehicle, all occupants, accessories, cargo, and
trailer tongue load must not exceed the Gross Vehicle Weight Rating (GVWR)
or the Gross Axle Weight Rating (GAWR). Both are on a label on the driver’s
doorjamb.
Page 47 of 79
86 || 87
DrIvING
DrIvING
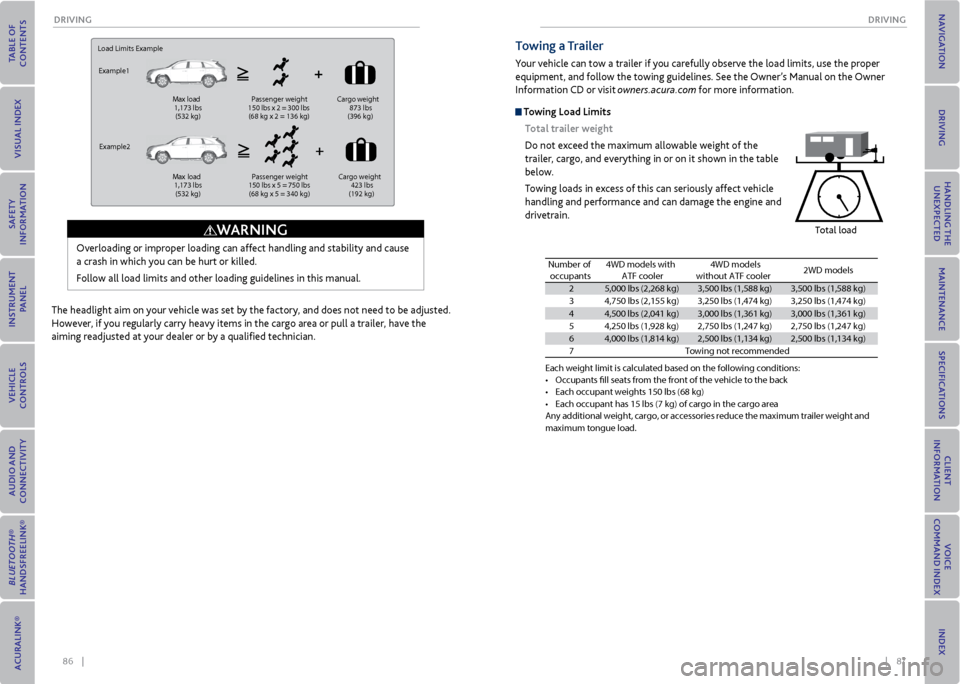
Load Limits Example
Example1
Max load
1,173 lbs
(532 kg ) Passenger weight
150 lbs x 2 = 300 lbs
(68 kg x 2 = 136 kg )Cargo
weight
873 lbs
(396 kg )
Example2 Max load
1,173 lbs
(532 kg ) Passenger weight
150 lbs x 5 = 750 lbs
(68 kg x 5 = 340 kg )Cargo
weight
423 lbs
(192 kg )
Overloading or improper loading can affect handling and stability and cause
a crash in which you can be hurt or killed.
Follow all load limits and other loading guidelines in this manual.
WArNING
The headlight aim on your vehicle was set by the factory, and does not need to be adjusted.
However, if you regularly carry heavy items in the cargo area or pull a trailer, have the
aiming readjusted at your dealer or by a qualified technician.
Towing a Trailer
Your vehicle can tow a trailer if you carefully observe the load limits, use the proper
equipment, and follow the towing guidelines. See the Owner’s Manual on the Owner
Information CD or visit owners.acura.com for more information.
Towing Load Limits
Total trailer weight
Do not exceed the maximum allowable weight of the
trailer, cargo, and everything in or on it shown in the table
below.
Towing loads in excess of this can seriously affect vehicle
handling and performance and can damage the engine and
drivetrain.
Total load
Each weight limit \fis calculated base\fd on the following \fconditions\f•Occupants fll seats\f f\bom the f\bont of th\fe vehicle to the b\fac k•Each occupant weigh\fts 150 lbs (68 kg)•Each occupant has 1\f5 lbs (7 kg) of ca\b\fgo in the ca\bgo a\be\faAny additional weight, ca\bgo, o\b accesso\bies \beduce the maximum t\baile\b weight and maximum tongue loa\fd.
Number of
occupant s4WD models with
ATF cooler4WD models
without ATF cooler2WD models
25,000 lbs (2,268 kg\f)3,500 lbs (1,588 kg)\f3,500 lbs (1,588 kg)\f
34,750 lbs (2,155 k\fg )3,250 lbs (1,474 k\fg)3,250 lbs (1,474 k\fg)
44,500 lbs (2,041 k\fg)3,000 lbs (1,361 k\fg)3,000 lbs (1,361 k\fg)
54,250 lbs (1,928 kg\f)2,750 lbs (1,247 k\fg)2,750 lbs (1,247 k\fg)
64,000 lbs (1,814 kg\f)2,500 lbs (1,134 k\fg)2,500 lbs (1,134 k\fg)
7Towing not \becommen\fded
Page 48 of 79
88 || 89
DrIvING
DrIvING
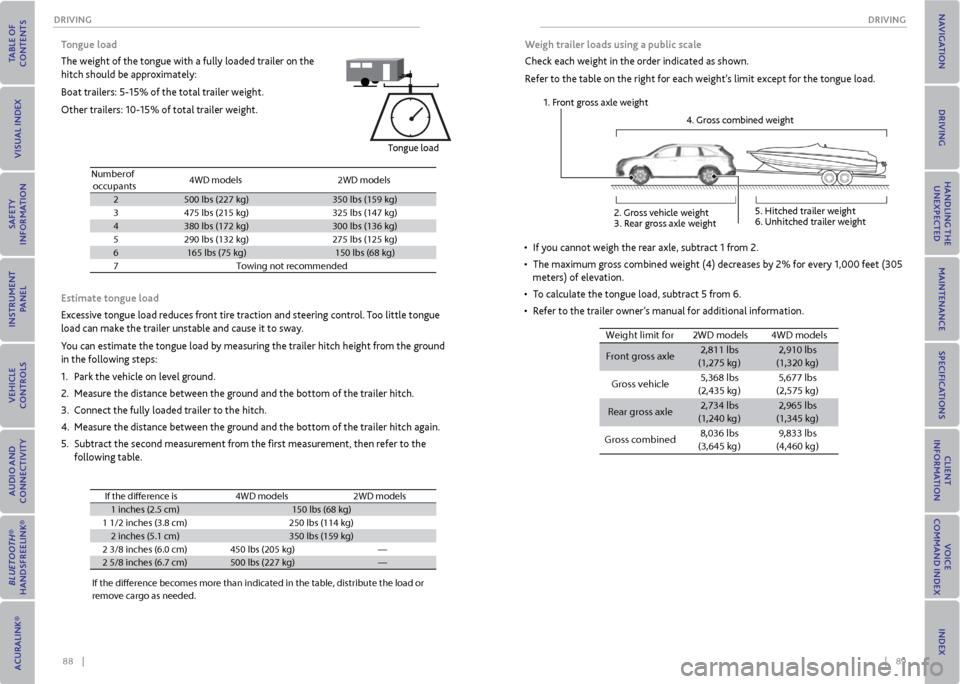
Tongue load
The weight of the tongue with a fully loaded trailer on the
hitch should be approximately:
Boat trailers: 5-15% of the total trailer weight.
Other trailers: 10-15% of total trailer weight.
Number of
occupant s4WD model s2WD models
2500 lbs (227 kg )350 lbs (159 kg )3475 lbs (215 kg)325 lbs (147 kg )4380 lbs (172 kg)300 lbs (136 kg )5290 lbs (132 kg)275 lbs (125 kg )6165 lbs (75 kg)150 lbs (68 kg)7Towing not recommende d
Tongue load
Number of
occupant s4WD model s2WD models
2500 lbs (227 kg )350 lbs (159 kg )
3475 lbs (215 kg)325 lbs (147 kg )
4380 lbs (172 kg)300 lbs (136 kg )
5290 lbs (132 kg)275 lbs (125 kg )
6165 lbs (75 kg)150 lbs (68 kg)
7Towing not recommende d
estimate tongue load
Excessive tongue load reduces front tire traction and steering control. Too little tongue
load can make the trailer unstable and cause it to sway.
You can estimate the tongue load by measuring the trailer hitch height from the ground
in the following steps:
1. Park the vehicle on level ground.
2. Measure the distance between the ground and the bottom of the trailer hitch.
3. Connect the fully loaded trailer to the hitch.
4. Measure the distance between the ground and the bottom of the trailer hitch again.
5. Subtract the second measurement from the first measurement, then refer to the
following table.
If the diference b\,ecomes more than i\,ndicated in the ta\,ble, distrib\fte the\, load or
remove cargo as nee\,ded .
If the diference i\ls4WD models\fWD models
\b inches (2.5 cm)\b50 lbs (68 kg)
\b \b/2 inches (3.8 cm\,)250 lbs (\b\b4 kg)
2 inches (5.\b cm)350 lbs (\b59 kg)
2 3/8 inches (6.0 c\,m)450 lbs (205 kg)—
2 5/8 inches (6.7 c\,m)500 lbs (227 kg)—
Weigh trailer loads using a public scale
Check each weight in the order indicated as shown.
Refer to the table on the right for each weight’s limit except for the tongue load.
Weight limit for
Front gross axle2,811 lbs
(1,275 kg )2,910 lbs
(1,320 kg)
Gross vehicl e5,368 lbs
(2,435 kg ) 5,677 lbs
(2,575 kg)
Rear gross axle2,734 lbs
(1,240 kg )2,965 lbs
(1,345 kg)
Gross combined 8,036 lbs
(3,645 kg ) 9,833 lbs
(4,460 kg)
4WD models
2WD model s
• If you cannot weigh the rear axle, subtract 1 from 2.
• The maximum gross combined weight (4) decreases by 2% for every 1,000 feet (305
meters) of elevation.
• To calculate the tongue load, subtract 5 from 6.
• Refer to the trailer owner’s manual for additional information.
1. Front gross axle weight
2. Gross vehicle weight
3. Rear gross axle weight 4. Gross combined weight
5. Hitched trailer weight
6. Unhitched trailer weight
Page 49 of 79
90 || 91
DrIvING
DrIvING
Pre-Tow Checklist
When preparing to tow, and before driving away, be sure to check the following:
• Avoid towing a trailer during your vehicle’s first 600 miles (1,000 km).
• The vehicle and trailer have been properly serviced and are in good condition. Lights
and brakes work properly, and the tires are properly inflated.
• All weights and loads are within limits. Never exceed the gross weight ratings.
• When towing more than 3,500 lbs (1,590 kg), use of gasoline with an octane rating of
91 or higher is recommended.
• Check if all loads are within limits at a public scale (see page 89). If a public scale is
not available, add the estimated weight of your cargo load to the weight of the trailer
(as quoted by the manufacturer) and the tongue load.
• The hitch, safety chains, and any other attachments are secure.
• All items in or on the trailer are properly secured and cannot shift while you drive.
Exceeding any load limit or improperly loading your vehicle and trailer can
cause a crash in which you can be seriously hurt or killed.
Check the loading of your vehicle and trailer carefully before starting to
drive.
WArNING
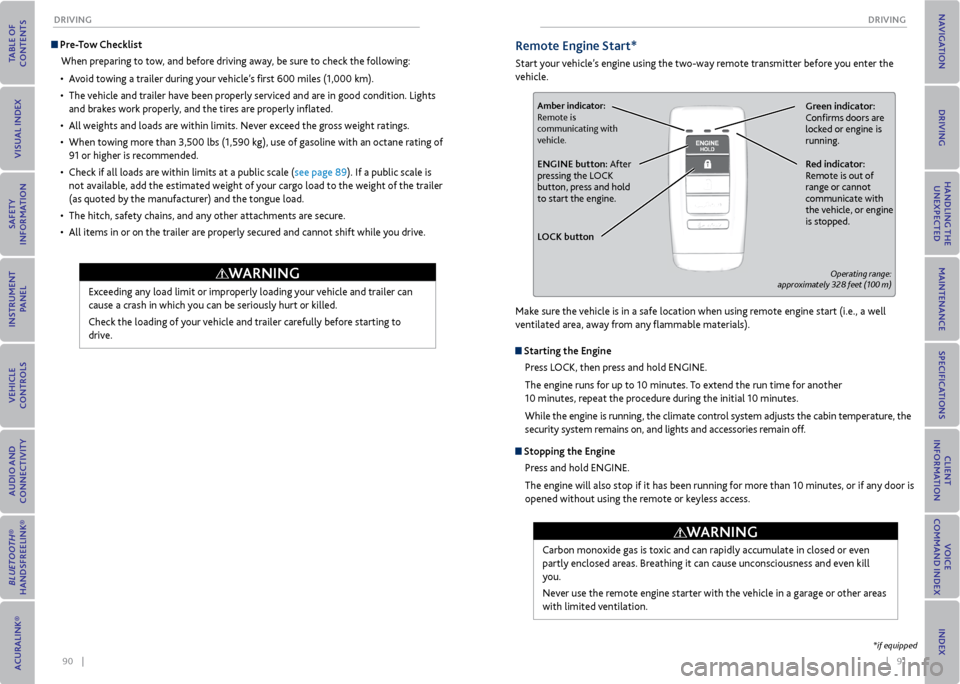
remote engine Start*
Start your vehicle’s engine using the two-way remote transmitter before you enter the
vehicle.
Green indicator:
Confirms doors are
locked or engine is
running.Amber indicator:
Remote is
communicating with
vehicle.
red indicator:
Remote is out of
range or cannot
communicate with
the vehicle, or engine
is stopped.eNGINe button: After
pressing the LOCK
button, press and hold
to start the engine.
L oCK button
Operating range:
approximately 328 feet (100 m)
Make sure the vehicle is in a safe location when using remote engine start (i.e., a well
ventilated area, away from any flammable materials).
Starting the engine
Press LOCK, then press and hold ENGINE.
The engine runs for up to 10 minutes. To extend the run time for another
10 minutes, repeat the procedure during the initial 10 minutes.
While the engine is running, the climate control system adjusts the cabin temperature, the
security system remains on, and lights and accessories remain off.
Stopping the engine
Press and hold ENGINE.
The engine will also stop if it has been running for more than 10 minutes, or if any door is
opened without using the remote or keyless access.
Carbon monoxide gas is toxic and can rapidly accumulate in closed or even
partly enclosed areas. Breathing it can cause unconsciousness and even kill
you.
Never use the remote engine starter with the vehicle in a garage or other areas
with limited ventilation.
WArNING
*if equipped
Page 54 of 79
100 || 101
DrIvING
DrIvING
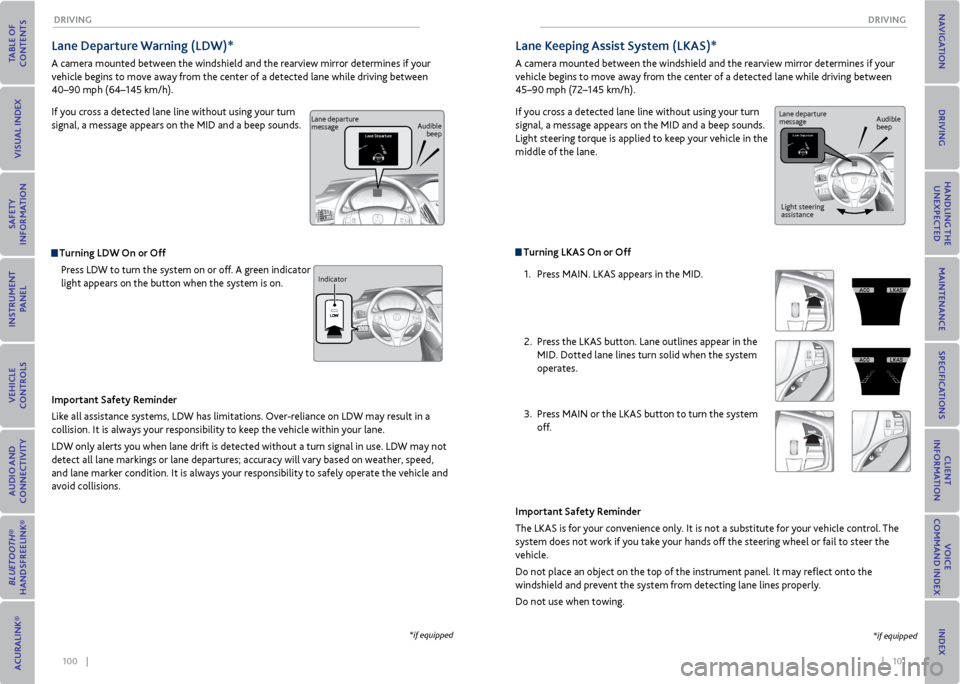
Lane Departure Warning (LDW)*
A camera mounted between the windshield and the rearview mirror determines if your
vehicle begins to move away from the center of a detected lane while driving between
40–90 mph (64–145 km/h).
If you cross a detected lane line without using your turn
signal, a message appears on the MID and a beep sounds.
Turning LDW on or off
Press LDW to turn the system on or off. A green indicator
light appears on the button when the system is on.
Important Safety reminder
Like all assistance systems, LDW has limitations. Over-reliance on LDW may result in a
collision. It is always your responsibility to keep the vehicle within your lane.
LDW only alerts you when lane drift is detected without a turn signal in use. LDW may not
detect all lane markings or lane departures; accuracy will vary based on weather, speed,
and lane marker condition. It is always your responsibility to safely operate the vehicle and
avoid collisions.
*if equipped
Lane departure
message Audible
beep
Indicator
Turning LKAS on or off 1. Press MAIN. LKAS appears in the MID.
2. Press the LKAS button. Lane outlines appear in the
MID. Dotted lane lines turn solid when the system
operates.
3. Press MAIN or the LKAS button to turn the system
off.
Lane Keeping Assist System (LKAS)*
A camera mounted between the windshield and the rearview mirror determines if your
vehicle begins to move away from the center of a detected lane while driving between
45–90 mph (72–145 km/h).
If you cross a detected lane line without using your turn
signal, a message appears on the MID and a beep sounds.
Light steering torque is applied to keep your vehicle in the
middle of the lane.
Important Safety reminder
The LKAS is for your convenience only. It is not a substitute for your vehicle control. The
system does not work if you take your hands off the steering wheel or fail to steer the
vehicle.
Do not place an object on the top of the instrument panel. It may reflect onto the
windshield and prevent the system from detecting lane lines properly.
Do not use when towing.
*if equipped
Lane departure
message Audible
beep
Light steering
assistance
Page 61 of 79
114 || 115
HANDLING THe UNexPeCTeD
HANDLING THe UNexPeCTeD
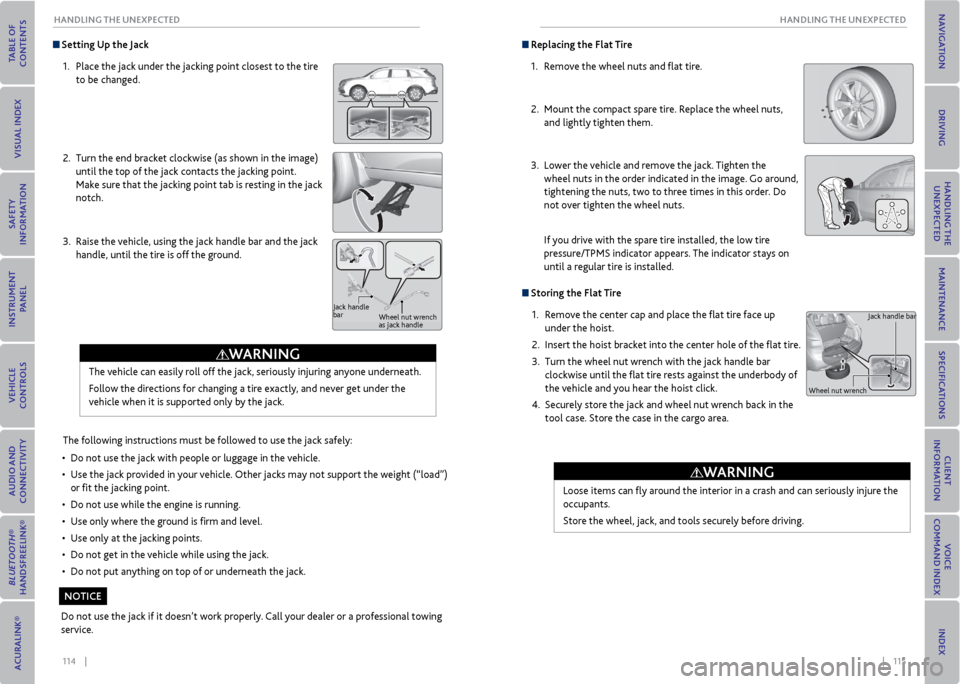
Setting Up the Jack
1. Place the jack under the jacking point closest to the tire
to be changed.
2. Turn the end bracket clockwise (as shown in the image)
until the top of the jack contacts the jacking point.
Make sure that the jacking point tab is resting in the jack
notch.
3. Raise the vehicle, using the jack handle bar and the jack
handle, until the tire is off the ground.
The following instructions must be followed to use the jack safely:
• Do not use the jack with people or luggage in the vehicle.
• Use the jack provided in your vehicle. Other jacks may not support the weight (“load”)
or fit the jacking point.
• Do not use while the engine is running.
• Use only where the ground is firm and level.
• Use only at the jacking points.
• Do not get in the vehicle while using the jack.
• Do not put anything on top of or underneath the jack.
The vehicle can easily roll off the jack, seriously injuring anyone underneath.
Follow the directions for changing a tire exactly, and never get under the
vehicle when it is supported only by the jack.
Jack handle
bar
Wheel nut wrench
as jack handle
Do not use the jack if it doesn’t work properly. Call your dealer or a professional towing
service.
WArNING
NoTICe
replacing the Flat Tire
1. Remove the wheel nuts and flat tire.
2. Mount the compact spare tire. Replace the wheel nuts,
and lightly tighten them.
3. Lower the vehicle and remove the jack. Tighten the
wheel nuts in the order indicated in the image. Go around,
tightening the nuts, two to three times in this order. Do
not over tighten the wheel nuts.
If you drive with the spare tire installed, the low tire
pressure/TPMS indicator appears. The indicator stays on
until a regular tire is installed.
Storing the Flat Tire
1. Remove the center cap and place the flat tire face up
under the hoist.
2. Insert the hoist bracket into the center hole of the flat tire.
3. Turn the wheel nut wrench with the jack handle bar
clockwise until the flat tire rests against the underbody of
the vehicle and you hear the hoist click.
4. Securely store the jack and wheel nut wrench back in the
tool case. Store the case in the cargo area.
Loose items can fly around the interior in a crash and can seriously injure the
occupants.
Store the wheel, jack, and tools securely before driving.
Jack handle bar
Wheel nut wrench
WArNING
Page 64 of 79
120 || 121
mAINTeNANCe
HANDLING THe UNexPeCTeD
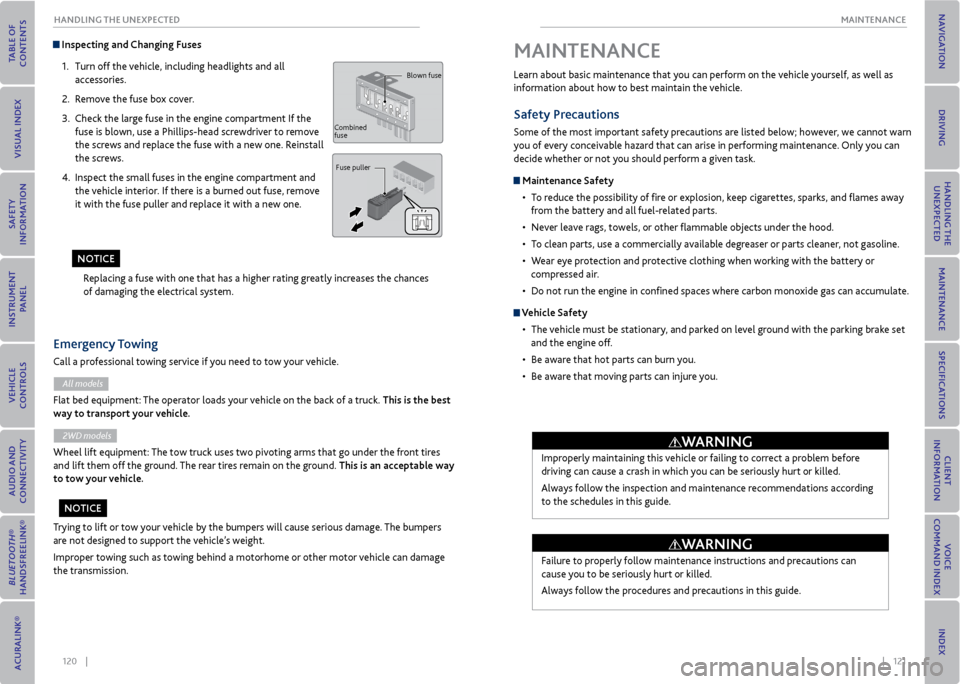
Inspecting and Changing Fuses
1. Turn off the vehicle, including headlights and all
accessories.
2. Remove the fuse box cover.
3. Check the large fuse in the engine compartment If the
fuse is blown, use a Phillips-head screwdriver to remove
the screws and replace the fuse with a new one. Reinstall
the screws.
4. Inspect the small fuses in the engine compartment and
the vehicle interior. If there is a burned out fuse, remove
it with the fuse puller and replace it with a new one.
Replacing a fuse with one that has a higher rating greatly increases the chances
of damaging the electrical system.
Blown fuse
Combined
fuse Fuse puller
Trying to lift or tow your vehicle by the bumpers will cause serious damage. The bumpers
are not designed to support the vehicle’s weight.
Improper towing such as towing behind a motorhome or other motor vehicle can damage
the transmission.
emergency Towing
Call a professional towing service if you need to tow your vehicle.
All models
Flat bed equipment: The operator loads your vehicle on the back of a truck. This is the best
way to transport your vehicle.
2WD models
Wheel lift equipment: The tow truck uses two pivoting arms that go under the front tires
and lift them off the ground. The rear tires remain on the ground. This is an acceptable way
to tow your vehicle.
No TICe
NoTICe Learn about basic maintenance that you can perform on the vehicle yourself, as well as
information about how to best maintain the vehicle.
Safety Precautions
Some of the most important safety precautions are listed below; however, we cannot warn
you of every conceivable hazard that can arise in performing maintenance. Only you can
decide whether or not you should perform a given task.
maintenance Safety
• To reduce the possibility of fire or explosion, keep cigarettes, sparks, and flames away
from the battery and all fuel-related parts.
• Never leave rags, towels, or other flammable objects under the hood.
• To clean parts, use a commercially available degreaser or parts cleaner, not gasoline.
• Wear eye protection and protective clothing when working with the battery or
compressed air.
• Do not run the engine in confined spaces where carbon monoxide gas can accumulate.
vehicle Safety
• The vehicle must be stationary, and parked on level ground with the parking brake set
and the engine off.
• Be aware that hot parts can burn you.
• Be aware that moving parts can injure you.
mAINTeNANCe
Improperly maintaining this vehicle or failing to correct a problem before
driving can cause a crash in which you can be seriously hurt or killed.
Always follow the inspection and maintenance recommendations according
to the schedules in this guide.
Failure to properly follow maintenance instructions and precautions can
cause you to be seriously hurt or killed.
Always follow the procedures and precautions in this guide.
WArNING
WArNING
Page 65 of 79
122 || 123
mAINTeNANCe
mAINTeNANCe
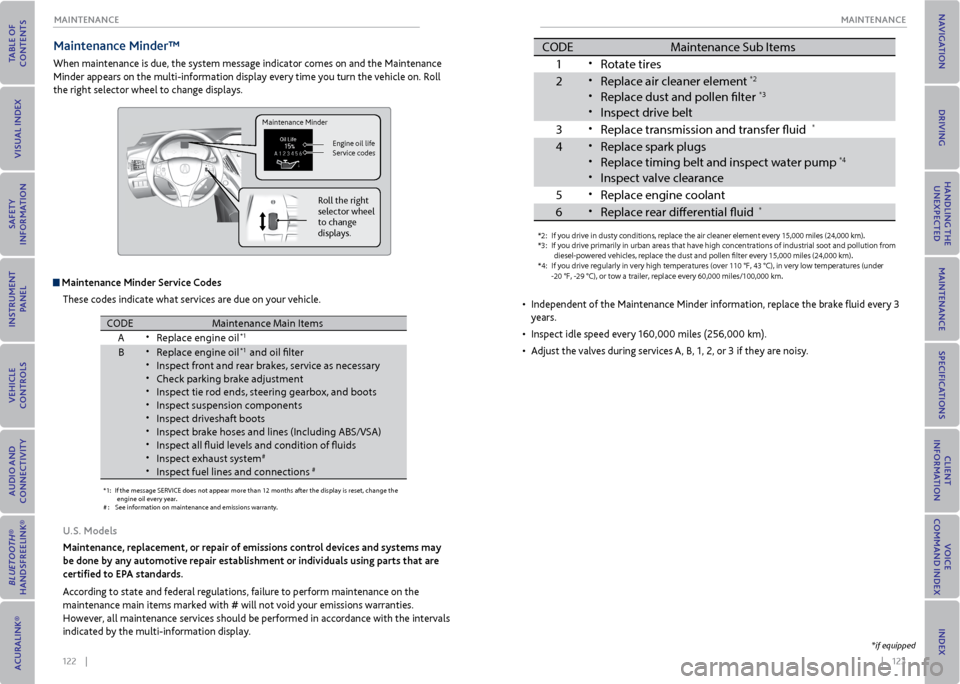
maintenance minder™
When maintenance is due, the system message indicator comes on and the Maintenance
Minder appears on the multi-information display every time you turn the vehicle on. Roll
the right selector wheel to change displays.
maintenance minder Service Codes
These codes indicate what services are due on your vehicle.
*1: If the message SERVICE does not appear more than 12 months after the display is\
reset, change the
engine oil every year .
#: See information on maintenance and emissions warranty.
CODEMaintenance Main Items
A
•Replace engine oi l*1
B•Replace engine oil*1 and oil flter•Inspect front and rear brakes, service as necessar y•Check parking brake adjustment•Inspect tie rod ends, steering gearbox, and boot s•Inspect suspension components•Inspect driveshaft boots•Inspect brake hoses and lines (Including ABS/VSA)•Inspect all fuid levels and condition of fuid s•Inspect exhaust system#
•Inspect fuel lines and connections#
*4:If you drive regularly in very high temperatures (over 110 °F, 43 °\
C), in very low temperatures (unde r
-20 °F, -29 °C), or tow a trai ler, repl ace ever y 60,000 mi les/100,000 km .
CODE Maintenance Sub Items
1
•Rotate tires
2
•Replace air cleaner element*2
•Replace dust and pollen flte r*3
•Inspect drive belt
3
•Replace transmission and transfer fuid*
4•Replace spark plug s•Replace timing belt an d inspect water pump*4
•Inspect valve clearanc
e
5
•Replace engine coolan t
6
•Replace rear diferential fuid*
*2:I f you drive in dusty condi tion s, replac e the air cleaner element every 15,000 miles (24,000 km).
*3: If you drive primarily in urban areas that have high concentrations of i\
ndustrial soot and pollution from
diesel-powered vehicles, replace the dust and pollen flter every 15,000 miles (24,000 km).
U.S. models
maintenance, replacement, or repair of emissions control devices and systems may
be done by any automotive repair establishment or individuals using parts that are
certified to ePA standards.
According to state and federal regulations, failure to perform maintenance on the
maintenance main items marked with # will not void your emissions warranties.
However, all maintenance services should be performed in accordance with the intervals
indicated by the multi-information display.
Maintenance Minder
Engine oil life
Service codes
Roll the right
selector wheel
to change
displays.
*1: If the message SERVICE does not appear more than 12 months after the display is\
reset, change the
engine oil every year .
#: See information on maintenance and emissions warranty.
CODEMaintenance Main Item s
A
•Replace engine oi l*1
B•Replace engine oil*1 and oil flter
•Inspect front and rear brakes, service as necessar y
•Check parking brake adjustment
•Inspect tie rod ends, steering gearbox, and boot s
•Inspect suspension components
•Inspect driveshaft boots
•Inspect brake hoses and lines (Including ABS/VSA)
•Inspect all fuid levels and condition of fuid s
•Inspect exhaust system#
•Inspect fuel lines and connections#
*4:If you drive regularly in very high temperatures (over 110 °F, 43 °\
C), in very low temperatures (unde r
-20 °F, -29 °C), or tow a trai ler, repl ace ever y 60,000 mi les/100,000 km .
CODEMaintenance Sub Item s
1
•Rotate tires
2•Replace air cleaner element*2
•Replace dust and pollen flte r*3
•Inspect drive belt
3
•Replace transmission and transfer fuid*
4•Replace spark plug s
•Replace timing belt an d inspect water pump*4
•Inspect valve clearanc
e
5
•Replace engine coolan t
6•Replace rear diferential fuid*
*2:If you drive in dusty condi tion s, replac e the air cleaner element every 15,000 miles (24,000 km).
*3: If you drive primarily in urban areas that have high concentrations of i\
ndustrial soot and pollution from
diesel-powered vehicles, replace the dust and pollen flter every 15,000 miles (24,000 km).
• Independent of the Maintenance Minder information, replace the brake fluid every 3
years.
• Inspect idle speed every 160,000 miles (256,000 km).
• Adjust the valves during services A, B, 1, 2, or 3 if they are noisy.
*if equipped