Brake Acura MDX 2016 User Guide
[x] Cancel search | Manufacturer: ACURA, Model Year: 2016, Model line: MDX, Model: Acura MDX 2016Pages: 84, PDF Size: 14.98 MB
Page 54 of 84
100 || 101 DRIVING DRIVING
TABLE OF
CONTENTS
INDEX
VISUAL INDEX
VOICE COMMAND
INDEX
SAFETY
INFORMATION
CLIENT
INFORMATION
INSTRUMENT
PANEL
SPECIFICATIONS
VEHICLE
CONTROLS
MAINTENANCE
AUDIO AND
CONNECTIVITY
HANDLING THE
UNEXPECTED
BLUETOOTH®
HANDSFREELINK®
DRIVING
ACURALINK®
NAVIGATION
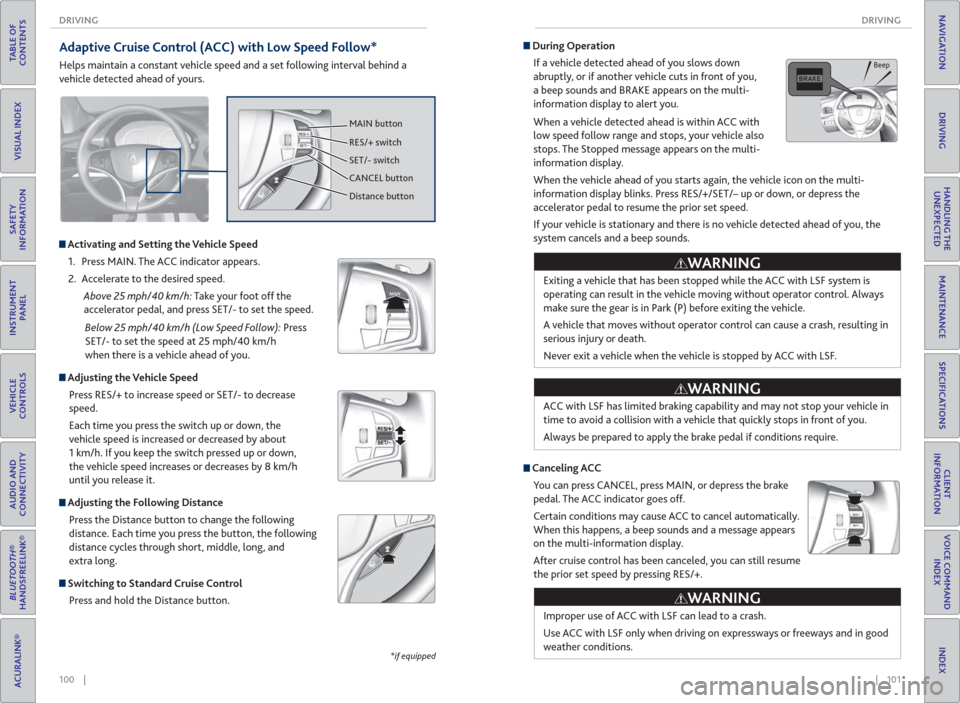
Adaptive Cruise Control ( ACC) with Low Speed Follow*
Helps maintain a constant vehicle speed and a set following interval behind a
vehicle detected ahead of yours.
CANCEL
MAIN button
RES/+ switch
SET/- switch
CANCEL button
Distance button
Activating and Setting the Vehicle Speed
1. Press MAIN. The ACC indicator appears.
2. Accelerate to the desired speed.
Above 25 mph/40 km/h: Take your foot off the
accelerator pedal, and press SET/- to set the speed.
Below 25 mph/40 km/h (Low Speed Follow): Press
SET/- to set the speed at 25 mph/40 km/h
when there is a vehicle ahead of you.
Adjusting the Vehicle Speed
Press RES/+ to increase speed or SET/- to decrease
speed.
Each time you press the switch up or down, the
vehicle speed is increased or decreased by about
1 km/h. If you keep the switch pressed up or down,
the vehicle speed increases or decreases by 8 km/h
until you release it.
Adjusting the Following Distance
Press the Distance button to change the following
distance. Each time you press the button, the following
distance cycles through short, middle, long, and
extra long.
Switching to Standard Cruise Control
Press and hold the Distance button.
*if equipped
Exiting a vehicle that has been stopped while the ACC with LSF system is
operating can result in the vehicle moving without operator control. Always
make sure the gear is in Park (P) before exiting the vehicle.
A vehicle that moves without operator control can cause a crash, resulting in
serious injury or death.
Never exit a vehicle when the vehicle is stopped by ACC with LSF.
ACC with LSF has limited braking capability and may not stop your vehicle in
time to avoid a collision with a vehicle that quickly stops in front of you.
Always be prepared to apply the brake pedal if conditions require.
During Operation
If a vehicle detected ahead of you slows down
abruptly, or if another vehicle cuts in front of you,
a beep sounds and BRAKE appears on the multi-
information display to alert you.
When a vehicle detected ahead is within ACC with
low speed follow range and stops, your vehicle also
stops. The Stopped message appears on the multi-
information display.
When the vehicle ahead of you starts again, the vehicle icon on the multi-
information display blinks. Press RES/+/SET/– up or down, or depress the
accelerator pedal to resume the prior set speed.
If your vehicle is stationary and there is no vehicle detected ahead of you, the
system cancels and a beep sounds.
Canceling ACC
You can press CANCEL, press MAIN, or depress the brake
pedal. The ACC indicator goes off.
Certain conditions may cause ACC to cancel automatically.
When this happens, a beep sounds and a message appears
on the multi-information display.
After cruise control has been canceled, you can still resume
the prior set speed by pressing RES/+.
WARNING
WARNING
Improper use of ACC with LSF can lead to a crash.
Use ACC with LSF only when driving on expressways or freeways and in good
weather conditions.
WARNING
Beep
Page 55 of 84
102 || 103 DRIVING DRIVING
TABLE OF
CONTENTS
INDEX
VISUAL INDEX
VOICE COMMAND
INDEX
SAFETY
INFORMATION
CLIENT
INFORMATION
INSTRUMENT
PANEL
SPECIFICATIONS
VEHICLE
CONTROLS
MAINTENANCE
AUDIO AND
CONNECTIVITY
HANDLING THE
UNEXPECTED
BLUETOOTH®
HANDSFREELINK®
DRIVING
ACURALINK®
NAVIGATION
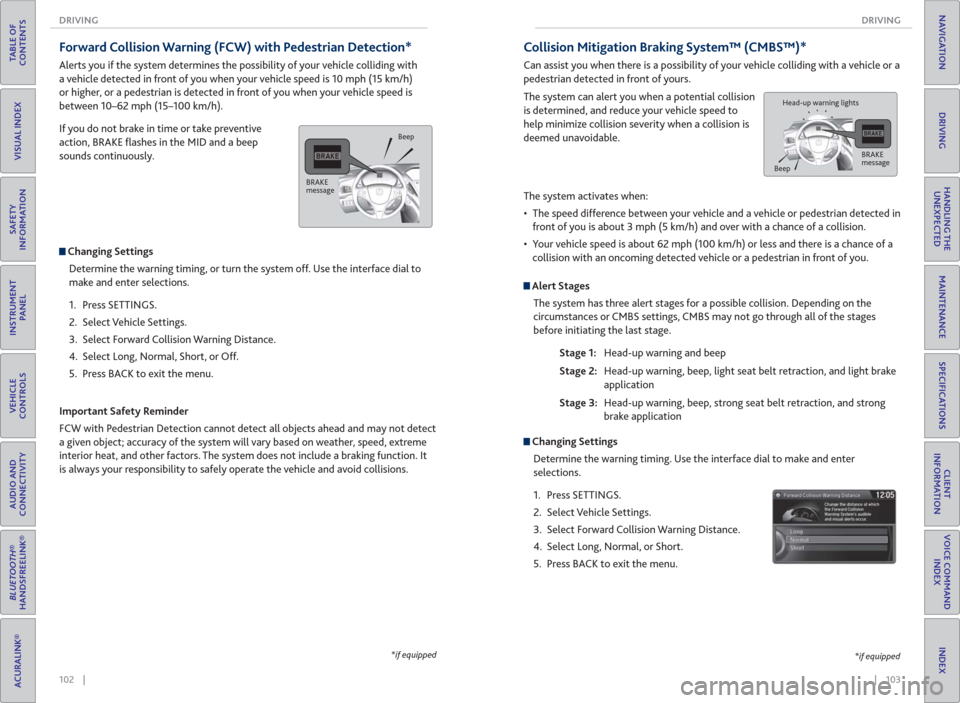
Forward Collision Warning ( FCW) with Pedestrian Detection*
Alerts you if the system determines the possibility of your vehicle colliding with
a vehicle detected in front of you when your vehicle speed is 10 mph (15 km/h)
or higher, or a pedestrian is detected in front of you when your vehicle speed is
between 10–62 mph (15–100 km/h).
If you do not brake in time or take preventive
action, BRAKE fl ashes in the MID and a beep
sounds continuously.
Changing Settings
Determine the warning timing, or turn the system off. Use the interface dial to
make and enter selections.
1. Press SETTINGS.
2. Select Vehicle Settings.
3. Select Forward Collision Warning Distance.
4. Select Long, Normal, Short, or Off.
5. Press BACK to exit the menu.
Important Safety Reminder
FCW with Pedestrian Detection cannot detect all objects ahead and may not detect
a given object; accuracy of the system will vary based on weather, speed, extreme
interior heat, and other factors. The system does not include a braking function. It
is always your responsibility to safely operate the vehicle and avoid collisions.
*if equipped
BRAKE
messageBeep
Collision Mitigation Braking System™ ( CMBS™)*
Can assist you when there is a possibility of your vehicle colliding with a vehicle or a
pedestrian detected in front of yours.
The system can alert you when a potential collision
is determined, and reduce your vehicle speed to
help minimize collision severity when a collision is
deemed unavoidable.
The system activates when:
• The speed difference between your vehicle and a vehicle or pedestrian detected in
front of you is about 3 mph (5 km/h) and over with a chance of a collision.
• Your vehicle speed is about 62 mph (100 km/h) or less and there is a chance of a
collision with an oncoming detected vehicle or a pedestrian in front of you.
Alert Stages
The system has three alert stages for a possible collision. Depending on the
circumstances or CMBS settings, CMBS may not go through all of the stages
before initiating the last stage.
Stage 1: Head-up warning and beep
Stage 2: Head-up warning, beep, light seat belt retraction, and light brake
application
Stage 3: Head-up warning, beep, strong seat belt retraction, and strong
brake application
*if equipped
BRAKE
message
BeepHead-up warning lights
Changing Settings
Determine the warning timing. Use the interface dial to make and enter
selections.
1. Press SETTINGS.
2. Select Vehicle Settings.
3. Select Forward Collision Warning Distance.
4. Select Long, Normal, or Short.
5. Press BACK to exit the menu.
Page 56 of 84
104 || 105 DRIVING DRIVING
TABLE OF
CONTENTS
INDEX
VISUAL INDEX
VOICE COMMAND
INDEX
SAFETY
INFORMATION
CLIENT
INFORMATION
INSTRUMENT
PANEL
SPECIFICATIONS
VEHICLE
CONTROLS
MAINTENANCE
AUDIO AND
CONNECTIVITY
HANDLING THE
UNEXPECTED
BLUETOOTH®
HANDSFREELINK®
DRIVING
ACURALINK®
NAVIGATION
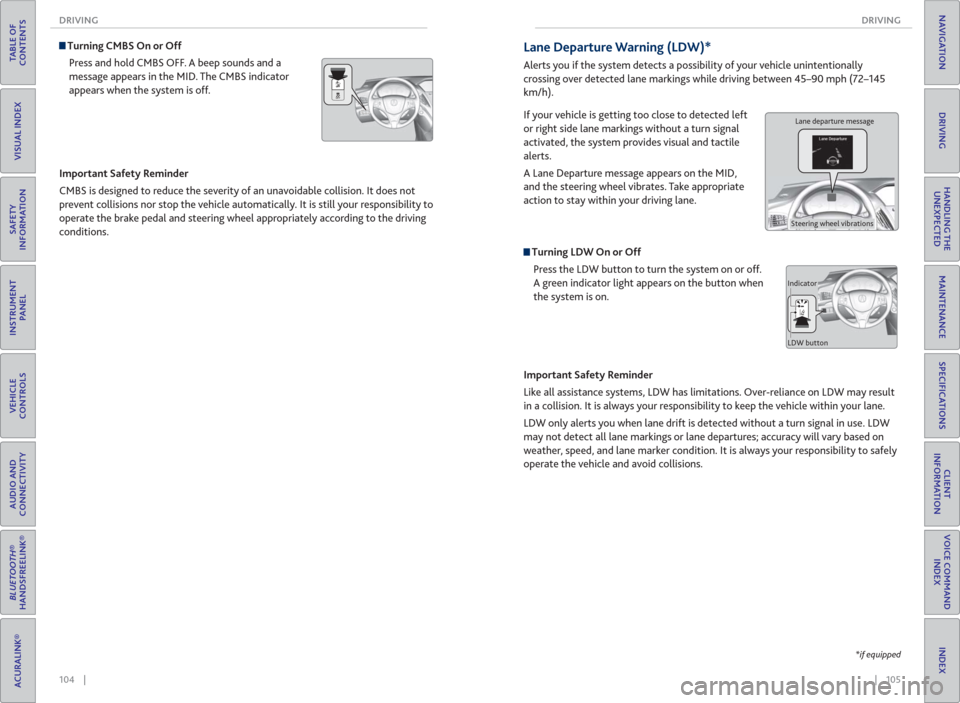
Turning CMBS On or Off
Press and hold CMBS OFF. A beep sounds and a
message appears in the MID. The CMBS indicator
appears when the system is off.
Important Safety Reminder
CMBS is designed to reduce the severity of an unavoidable collision. It does not
prevent collisions nor stop the vehicle automatically. It is still your responsibility to
operate the brake pedal and steering wheel appropriately according to the driving
conditions.
*if equipped
Lane Departure Warning ( LDW)*
Alerts you if the system detects a possibility of your vehicle unintentionally
crossing over detected lane markings while driving between 45–90 mph (72–145
km/h).
If your vehicle is getting too close to detected left
or right side lane markings without a turn signal
activated, the system provides visual and tactile
alerts.
A Lane Departure message appears on the MID,
and the steering wheel vibrates. Take appropriate
action to stay within your driving lane.
Turning LDW On or Off
Press the LDW button to turn the system on or off.
A green indicator light appears on the button when
the system is on.
Important Safety Reminder
Like all assistance systems, LDW has limitations. Over-reliance on LDW may result
in a collision. It is always your responsibility to keep the vehicle within your lane.
LDW only alerts you when lane drift is detected without a turn signal in use. LDW
may not detect all lane markings or lane departures; accuracy will vary based on
weather, speed, and lane marker condition. It is always your responsibility to safely
operate the vehicle and avoid collisions.
Lane departure message
Steering wheel vibrations
Indicator
LDW button
Page 57 of 84
106 || 107 DRIVING DRIVING
TABLE OF
CONTENTS
INDEX
VISUAL INDEX
VOICE COMMAND
INDEX
SAFETY
INFORMATION
CLIENT
INFORMATION
INSTRUMENT
PANEL
SPECIFICATIONS
VEHICLE
CONTROLS
MAINTENANCE
AUDIO AND
CONNECTIVITY
HANDLING THE
UNEXPECTED
BLUETOOTH®
HANDSFREELINK®
DRIVING
ACURALINK®
NAVIGATION
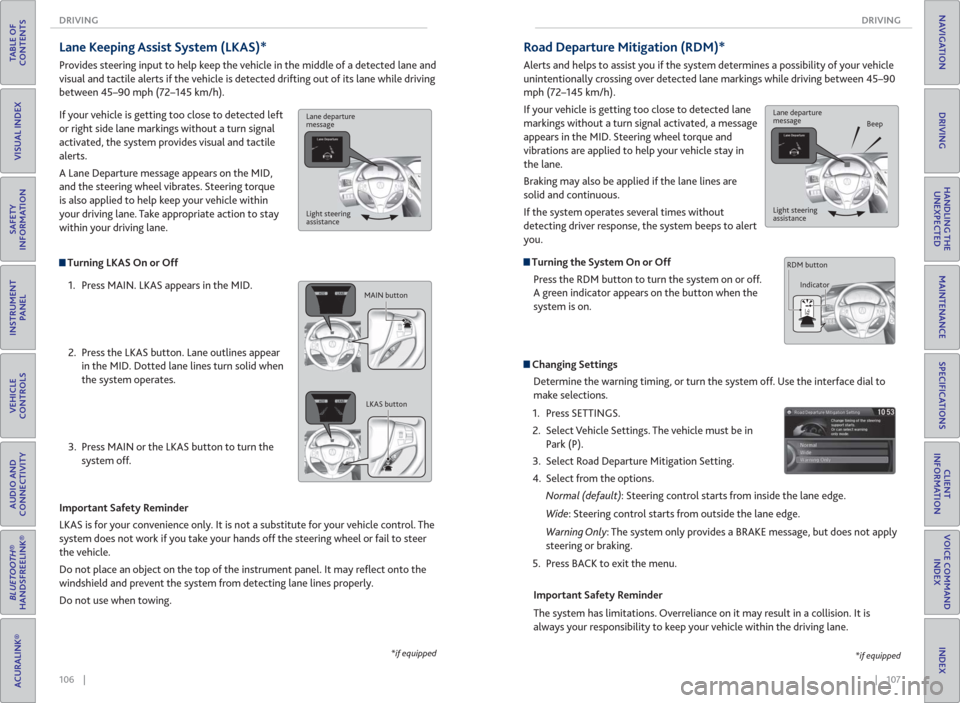
Turning LKAS On or Off
1. Press MAIN. LKAS appears in the MID.
2. Press the LKAS button. Lane outlines appear
in the MID. Dotted lane lines turn solid when
the system operates.
3. Press MAIN or the LKAS button to turn the
system off.
Lane Keeping Assist System ( LKAS)*
Provides steering input to help keep the vehicle in the middle of a detected lane and
visual and tactile alerts if the vehicle is detected drifting out of its lane while driving
between 45–90 mph (72–145 km/h).
If your vehicle is getting too close to detected left
or right side lane markings without a turn signal
activated, the system provides visual and tactile
alerts.
A Lane Departure message appears on the MID,
and the steering wheel vibrates. Steering torque
is also applied to help keep your vehicle within
your driving lane. Take appropriate action to stay
within your driving lane.
Important Safety Reminder
LKAS is for your convenience only. It is not a substitute for your vehicle control. The
system does not work if you take your hands off the steering wheel or fail to steer
the vehicle.
Do not place an object on the top of the instrument panel. It may refl ect onto the
windshield and prevent the system from detecting lane lines properly.
Do not use when towing.
*if equipped
Lane departure
message
Light steering
assistance
MAIN button
LKAS button
Road Departure Mitigation (RDM)*
Alerts and helps to assist you if the system determines a possibility of your vehicle
unintentionally crossing over detected lane markings while driving between 45–90
mph (72–145 km/h).
If your vehicle is getting too close to detected lane
markings without a turn signal activated, a message
appears in the MID. Steering wheel torque and
vibrations are applied to help your vehicle stay in
the lane.
Braking may also be applied if the lane lines are
solid and continuous.
If the system operates several times without
detecting driver response, the system beeps to alert
you.
Turning the System On or Off
Press the RDM button to turn the system on or off.
A green indicator appears on the button when the
system is on.
Steering vibrations
Changing Settings
Determine the warning timing, or turn the system off. Use the interface dial to
make selections.
1. Press SETTINGS.
2. Select Vehicle Settings. The vehicle must be in
Park (P).
3. Select Road Departure Mitigation Setting.
4. Select from the options.
Normal (default): Steering control starts from inside the lane edge.
Wide: Steering control starts from outside the lane edge.
Warning Only: The system only provides a BRAKE message, but does not apply
steering or braking.
5. Press BACK to exit the menu.
Important Safety Reminder
The system has limitations. Overreliance on it may result in a collision. It is
always your responsibility to keep your vehicle within the driving lane.
*if equipped
Lane departure
message
Beep
Light steering
assistance
Indicator RDM button
Page 61 of 84
114 || 115 HANDLING THE UNEXPECTED DRIVING
TABLE OF
CONTENTS
INDEX
VISUAL INDEX
VOICE COMMAND
INDEX
SAFETY
INFORMATION
CLIENT
INFORMATION
INSTRUMENT
PANEL
SPECIFICATIONS
VEHICLE
CONTROLS
MAINTENANCE
AUDIO AND
CONNECTIVITY
HANDLING THE
UNEXPECTED
BLUETOOTH®
HANDSFREELINK®
DRIVING
ACURALINK®
NAVIGATION
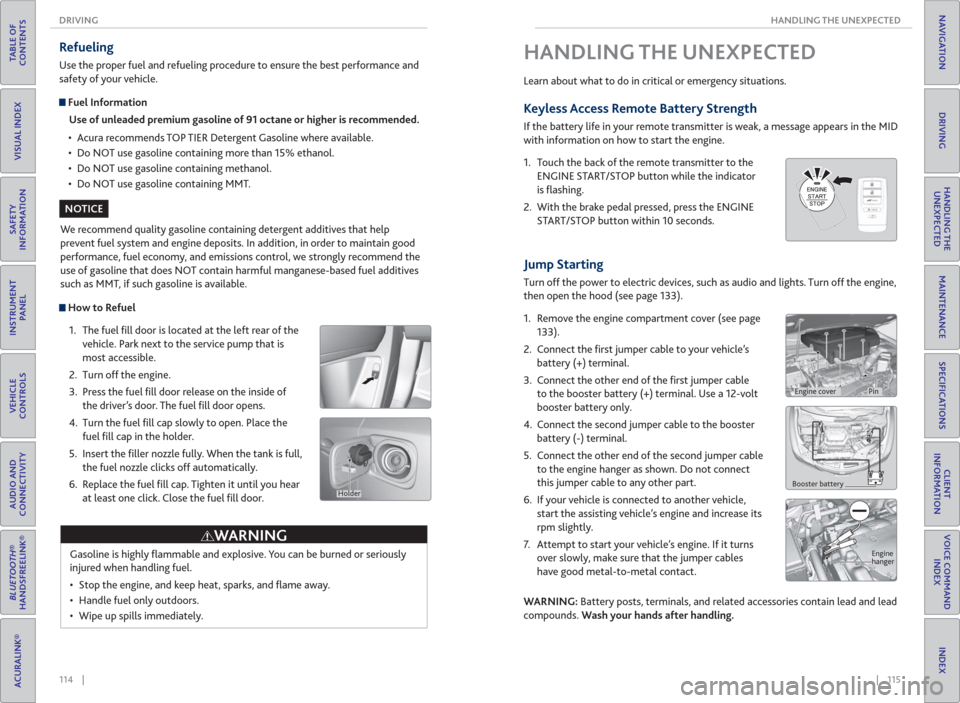
How to Refuel
1. The fuel fi ll door is located at the left rear of the
vehicle. Park next to the service pump that is
most accessible.
2. Turn off the engine.
3. Press the fuel fi ll door release on the inside of
the driver’s door. The fuel fi ll door opens.
4. Turn the fuel fi ll cap slowly to open. Place the
fuel fi ll cap in the holder.
5. Insert the fi ller nozzle fully. When the tank is full,
the fuel nozzle clicks off automatically.
6. Replace the fuel fi ll cap. Tighten it until you hear
at least one click. Close the fuel fi ll door.
Refueling
Use the proper fuel and refueling procedure to ensure the best performance and
safety of your vehicle.
Fuel Information
Use of unleaded premium gasoline of 91 octane or higher is recommended.
• Acura recommends TOP TIER Detergent Gasoline where available.
• Do NOT use gasoline containing more than 15% ethanol.
• Do NOT use gasoline containing methanol.
• Do NOT use gasoline containing MMT.
We recommend quality gasoline containing detergent additives that help
prevent fuel system and engine deposits. In addition, in order to maintain good
performance, fuel economy, and emissions control, we strongly recommend the
use of gasoline that does NOT contain harmful manganese-based fuel additives
such as MMT, if such gasoline is available.
Gasoline is highly fl ammable and explosive. You can be burned or seriously
injured when handling fuel.
• Stop the engine, and keep heat, sparks, and fl ame away.
• Handle fuel only outdoors.
• Wipe up spills immediately.
WARNING
NOTICE
Holder
Jump Starting
Turn off the power to electric devices, such as audio and lights. Turn off the engine,
then open the hood (see page 133).
1. Remove the engine compartment cover (see page
133).
2. Connect the fi rst jumper cable to your vehicle’s
battery (+) terminal.
3. Connect the other end of the fi rst jumper cable
to the booster battery (+) terminal. Use a 12-volt
booster battery only.
4. Connect the second jumper cable to the booster
battery (-) terminal.
5. Connect the other end of the second jumper cable
to the engine hanger as shown. Do not connect
this jumper cable to any other part.
6. If your vehicle is connected to another vehicle,
start the assisting vehicle’s engine and increase its
rpm slightly.
7. Attempt to start your vehicle’s engine. If it turns
over slowly, make sure that the jumper cables
have good metal-to-metal contact.
WARNING: Battery posts, terminals, and related accessories contain lead and lead
compounds. Wash your hands after handling.
HANDLING THE UNEXPECTED
Learn about what to do in critical or emergency situations.
Keyless Access Remote Battery Strength
If the battery life in your remote transmitter is weak, a message appears in the MID
with information on how to start the engine.
1. Touch the back of the remote transmitter to the
ENGINE START/STOP button while the indicator
is fl ashing.
2. With the brake pedal pressed, press the ENGINE
START/STOP button within 10 seconds.
Booster battery
Engine
hanger
Engine coverPin
Page 62 of 84
116 || 117 HANDLING THE UNEXPECTED HANDLING THE UNEXPECTED
TABLE OF
CONTENTS
INDEX
VISUAL INDEX
VOICE COMMAND
INDEX
SAFETY
INFORMATION
CLIENT
INFORMATION
INSTRUMENT
PANEL
SPECIFICATIONS
VEHICLE
CONTROLS
MAINTENANCE
AUDIO AND
CONNECTIVITY
HANDLING THE
UNEXPECTED
BLUETOOTH®
HANDSFREELINK®
DRIVING
ACURALINK®
NAVIGATION
A battery can explode if you do not follow the correct procedure, seriously
injuring anyone nearby.
Keep all sparks, open fl ames, and smoking materials away from the battery.
After the Engine Starts
Once your vehicle’s engine has started, remove the jumper cables in the following
order:
1. Disconnect the jumper cable from your vehicle’s ground.
2. Disconnect the other end of the jumper cable from the booster battery (-)
terminal.
3. Disconnect the jumper cable from your vehicle’s battery (+) terminal.
4. Disconnect the other end of the jumper cable from the booster battery (+)
terminal.
5. Have your vehicle inspected by a nearby service station or a dealer.
WARNING
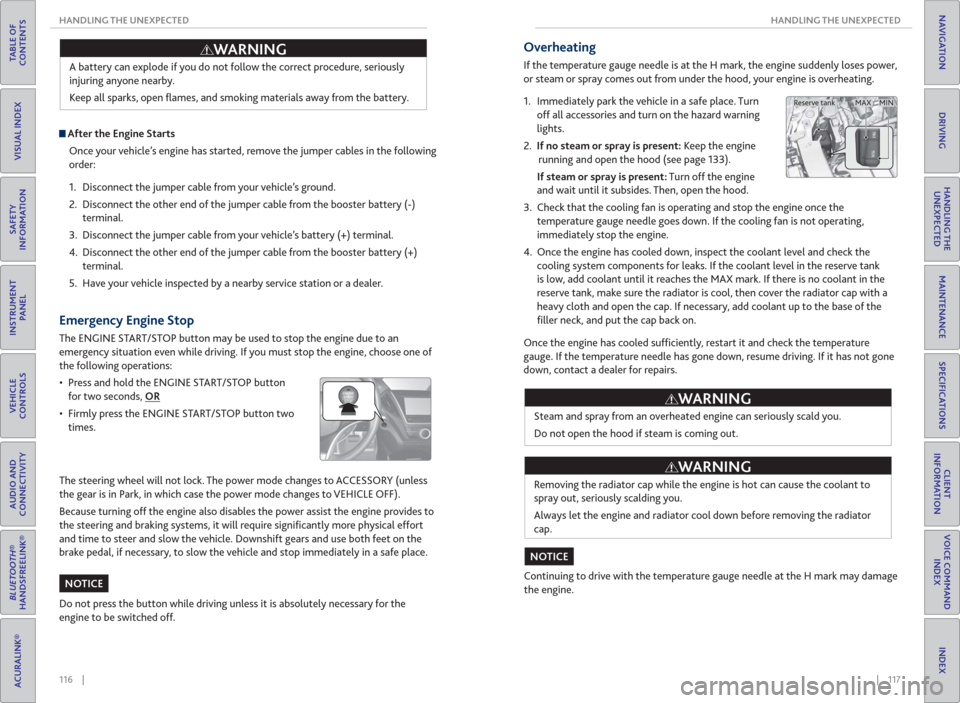
Emergency Engine Stop
The ENGINE START/STOP button may be used to stop the engine due to an
emergency situation even while driving. If you must stop the engine, choose one of
the following operations:
• Press and hold the ENGINE START/STOP button
for two seconds, OR
• Firmly press the ENGINE START/STOP button two
times.
The steering wheel will not lock. The power mode changes to ACCESSORY (unless
the gear is in Park, in which case the power mode changes to VEHICLE OFF).
Because turning off the engine also disables the power assist the engine provides to
the steering and braking systems, it will require signifi cantly more physical effort
and time to steer and slow the vehicle. Downshift gears and use both feet on the
brake pedal, if necessary, to slow the vehicle and stop immediately in a safe place.
Do not press the button while driving unless it is absolutely necessary for the
engine to be switched off.
NOTICE
Overheating
If the temperature gauge needle is at the H mark, the engine suddenly loses power,
or steam or spray comes out from under the hood, your engine is overheating.
1. Immediately park the vehicle in a safe place. Turn
off all accessories and turn on the hazard warning
lights.
2. If no steam or spray is present: Keep the engine
running and open the hood (see page 133).
If steam or spray is present: Turn off the engine
and wait until it subsides. Then, open the hood.
3. Check that the cooling fan is operating and stop the engine once the
temperature gauge needle goes down. If the cooling fan is not operating,
immediately stop the engine.
4. Once the engine has cooled down, inspect the coolant level and check the
cooling system components for leaks. If the coolant level in the reserve tank
is low, add coolant until it reaches the MAX mark. If there is no coolant in the
reserve tank, make sure the radiator is cool, then cover the radiator cap with a
heavy cloth and open the cap. If necessary, add coolant up to the base of the
fi ller neck, and put the cap back on.
Once the engine has cooled suffi ciently, restart it and check the temperature
gauge. If the temperature needle has gone down, resume driving. If it has not gone
down, contact a dealer for repairs.
Steam and spray from an overheated engine can seriously scald you.
Do not open the hood if steam is coming out.
Removing the radiator cap while the engine is hot can cause the coolant to
spray out, seriously scalding you.
Always let the engine and radiator cool down before removing the radiator
cap.
Continuing to drive with the temperature gauge needle at the H mark may damage
the engine.
WARNING
WARNING
NOTICE
MAX MIN Reserve tank
Page 64 of 84
120 || 121 HANDLING THE UNEXPECTED HANDLING THE UNEXPECTED
TABLE OF
CONTENTS
INDEX
VISUAL INDEX
VOICE COMMAND
INDEX
SAFETY
INFORMATION
CLIENT
INFORMATION
INSTRUMENT
PANEL
SPECIFICATIONS
VEHICLE
CONTROLS
MAINTENANCE
AUDIO AND
CONNECTIVITY
HANDLING THE
UNEXPECTED
BLUETOOTH®
HANDSFREELINK®
DRIVING
ACURALINK®
NAVIGATION
Changing a Flat Tire
If a tire goes fl at while driving, grasp the steering wheel fi rmly, and brake gradually
to reduce speed. Stop in a safe place. Replace the fl at tire with a compact spare
tire.* Go to a dealer as soon as possible to have the full-size tire repaired or
replaced.
Before Changing the Tire
1. Park the vehicle on fi rm, level, non-slippery surface.
2. Change the gear to Park (P), and apply the parking brake.
3. Turn on the hazard warning lights and turn the vehicle off.
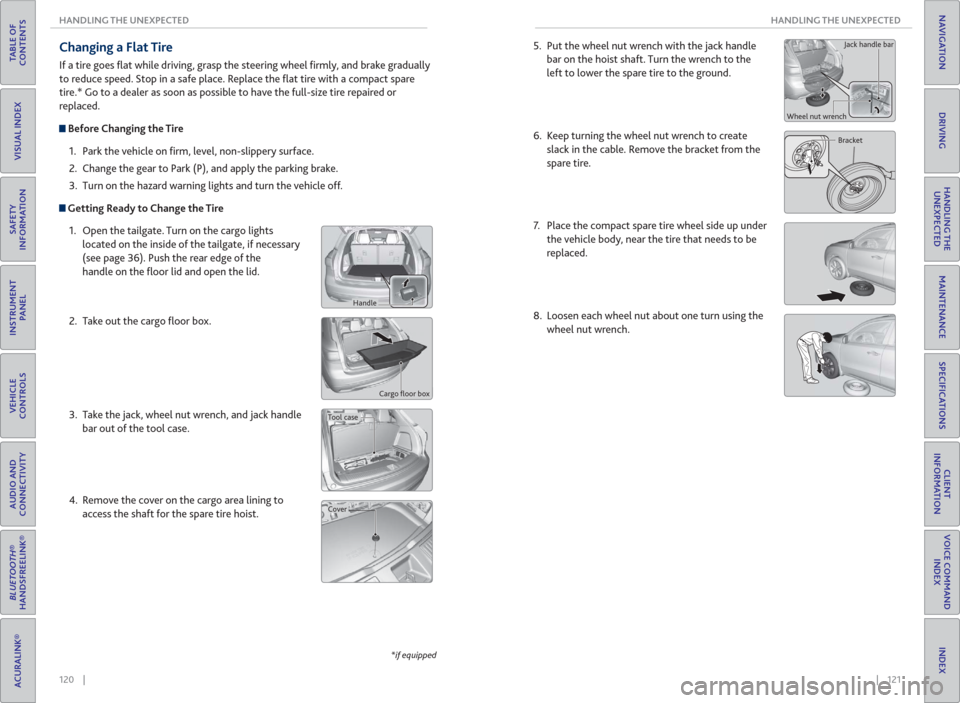
Getting Ready to Change the Tire
1. Open the tailgate. Turn on the cargo lights
located on the inside of the tailgate, if necessary
(see page 36). Push the rear edge of the
handle on the fl oor lid and open the lid.
2. Take out the cargo fl oor box.
3. Take the jack, wheel nut wrench, and jack handle
bar out of the tool case.
4. Remove the cover on the cargo area lining to
access the shaft for the spare tire hoist.
Cargo fl oor box
*if equipped
Handle
Tool case
Cover
5. Put the wheel nut wrench with the jack handle
bar on the hoist shaft. Turn the wrench to the
left to lower the spare tire to the ground.
6. Keep turning the wheel nut wrench to create
slack in the cable. Remove the bracket from the
spare tire.
7. Place the compact spare tire wheel side up under
the vehicle body, near the tire that needs to be
replaced.
8. Loosen each wheel nut about one turn using the
wheel nut wrench.
Bracket Wheel nut wrenchJack handle bar
Page 66 of 84
124 || 125 HANDLING THE UNEXPECTED HANDLING THE UNEXPECTED
TABLE OF
CONTENTS
INDEX
VISUAL INDEX
VOICE COMMAND
INDEX
SAFETY
INFORMATION
CLIENT
INFORMATION
INSTRUMENT
PANEL
SPECIFICATIONS
VEHICLE
CONTROLS
MAINTENANCE
AUDIO AND
CONNECTIVITY
HANDLING THE
UNEXPECTED
BLUETOOTH®
HANDSFREELINK®
DRIVING
ACURALINK®
NAVIGATION
Tire Repair Kit*
If a tire has a small puncture, you can use the tire repair kit to temporarily repair it.
The puncture must be smaller than 3/16-inch (4 mm) and not in the tire sidewall.
Go to a dealer to have the full-size tire permanently repaired or replaced.
Before Repairing the Tire
1. Park the vehicle on fi rm, level, non-slippery surface.
2. Change the gear to Park (P), and apply the parking brake.
3. Turn on the hazard warning lights and turn the vehicle off.
Getting Ready to Repair the Tire
1. Pull the handle on the cargo area fl oor lid and
open the lid.
2. Remove the cargo fl oor box.
3. Remove the kit from the case.
4. Place the kit face up on fl at ground near the
punctured tire and away from traffi c. Do not
place the kit on its side.
5. Follow the instructions in the kit to repair the
tire.
Do not use an unapproved puncture-repairing agent on a fl at tire, as it can damage
the tire pressure sensor.
Tire repair kit
Case
*if equipped
NOTICE
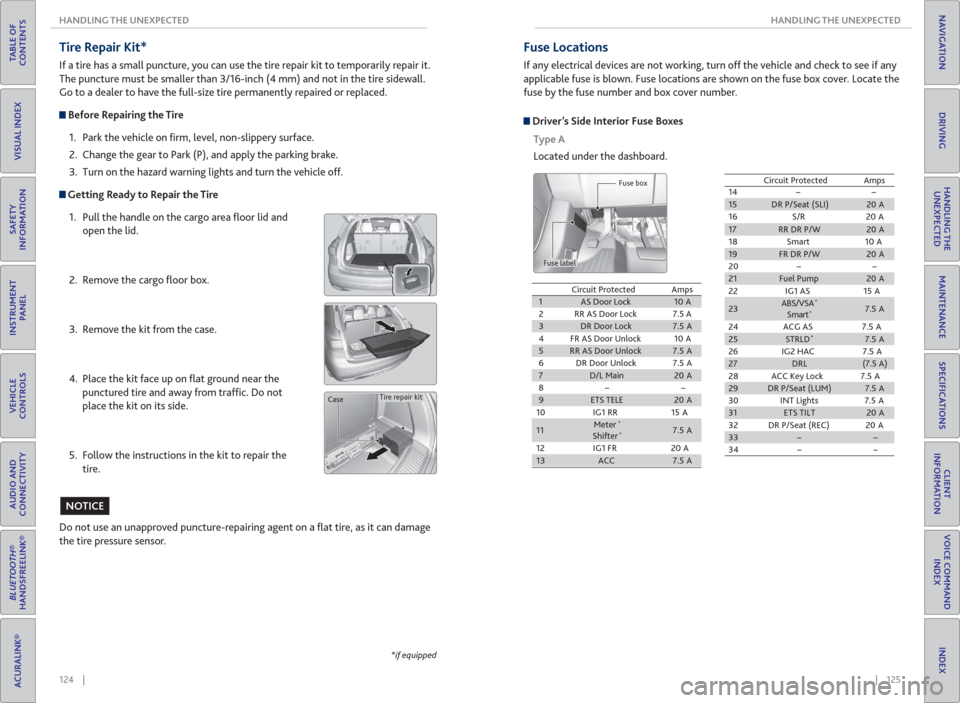
Fuse Locations
If any electrical devices are not working, turn off the vehicle and check to see if any
applicable fuse is blown. Fuse locations are shown on the fuse box cover. Locate the
fuse by the fuse number and box cover number.
Driver’s Side Interior Fuse Boxes
Type A
Located under the dashboard.
Fuse box
Fuse label
Circuit ProtectedAmps1AS Door Lock10 A2RR AS Door Lock7.5 A3DR Door Lock7.5 A4FR AS Door Unlock10 A5RR AS Door Unlock7.5 A6DR Door Unlock7.5 A7D/L Main20 A8−−9ETS TELE20 A
10 IG1 RR 15 A
11Meter*
Shifter*7.5 A
12 IG1 FR 20 A
13ACC7.5 A
14 − −15DR P/Seat (SLI)20 A
16 S/R 20 A
17RR DR P/W20 A
18 Smart 10 A
19FR DR P/W20 A
20 − −
21Fuel Pump20 A
22 IG1 AS 15 A
23ABS/VSA*
Smart*7.5 A
24 ACG AS 7.5 A
25STRLD*7.5 A
26 IG2 HAC 7.5 A
27DRL(7.5 A)
28 ACC Key Lock 7.5 A
29DR P/Seat (LUM)7.5 A
30 INT Lights 7.5 A
31ETS TILT20 A
32 DR P/Seat (REC) 20 A
33−−34−−
Circuit ProtectedAmps
Page 67 of 84
126 || 127 HANDLING THE UNEXPECTED HANDLING THE UNEXPECTED
TABLE OF
CONTENTS
INDEX
VISUAL INDEX
VOICE COMMAND
INDEX
SAFETY
INFORMATION
CLIENT
INFORMATION
INSTRUMENT
PANEL
SPECIFICATIONS
VEHICLE
CONTROLS
MAINTENANCE
AUDIO AND
CONNECTIVITY
HANDLING THE
UNEXPECTED
BLUETOOTH®
HANDSFREELINK®
DRIVING
ACURALINK®
NAVIGATION
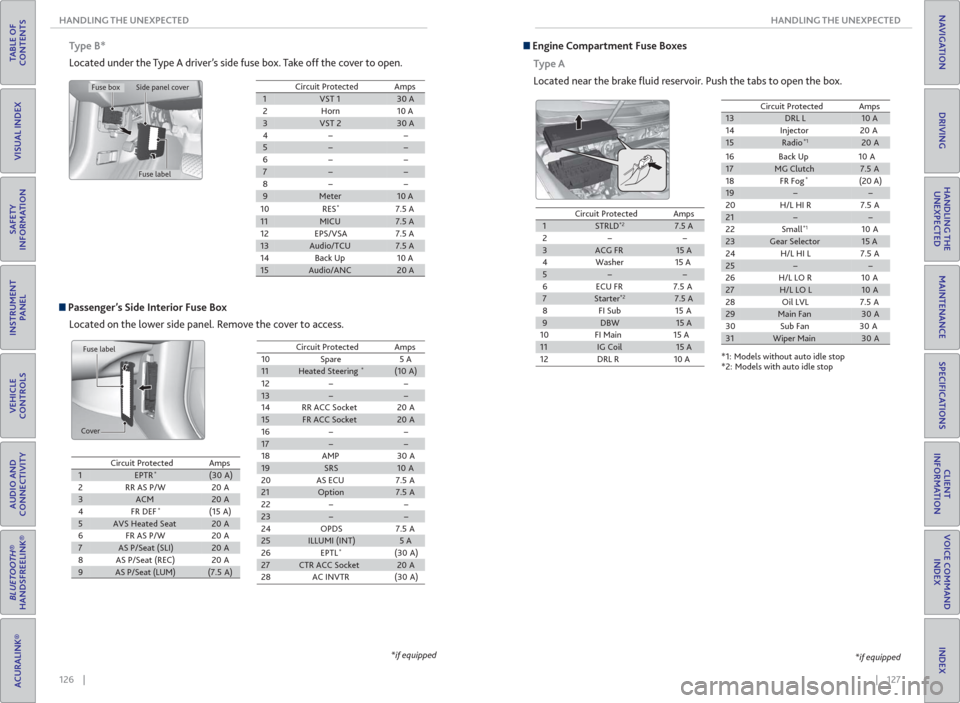
Passenger’s Side Interior Fuse Box
Located on the lower side panel. Remove the cover to access.
Fuse label
Cover
Type B*
Located under the Type A driver’s side fuse box. Take off the cover to open.
Circuit ProtectedAmps1VST 130 A2Horn10 A3VST 230 A4−−5−−6−−7−−8−−9Meter10 A
10RES *7.5 A
11MICU7.5 A12EPS/VSA7.5 A13Audio/TCU7.5 A14Back Up10 A15Audio/ANC20 A
Circuit ProtectedAmps1EPTR*(30 A)2RR AS P/W20 A3ACM20 A4FR DEF*(15 A)5AVS Heated Seat20 A6FR AS P/W20 A7AS P/Seat (SLI)20 A8AS P/Seat (REC)20 A9AS P/Seat (LUM)(7.5 A)
10Spare5 A11Heated Steering*(10 A)12−−13−−14RR ACC Socket20 A15FR ACC Socket20 A16−−17−−18AMP30 A19SRS10 A20AS ECU7.5 A21Option7.5 A22−−23−−24OPDS7.5 A25ILLUMI (INT)5 A26EPTL*(30 A)27CTR ACC Socket20 A28AC INVTR(30 A)
Circuit ProtectedAmps
*if equipped
Fuse box
Fuse label Side panel cover
Engine Compartment Fuse Boxes
Type A
Located near the brake fl uid reservoir. Push the tabs to open the box.
*if equipped
Circuit ProtectedAmps1STRLD*27.5 A2−−3ACG FR15 A
4Washer 15 A
5−−
6 ECU FR 7.5 A
7Starter*27.5 A
8FI Sub 15A
9DBW15 A
10 FI Main 15 A
11IG Coil15 A
12 DRL R 10 A
13DRL L10 A
14 Injector 20 A
15Radio*120 A
*1: Models without auto idle stop
*2: Models with auto idle stop16 Back Up 10 A
17MG Clutch7.5 A
18 FR Fog*(20 A)19−−
20 H/L HI R 7.5 A
21−−
22 Small*110 A23Gear Selector15 A
24 H/L HI L 7.5 A
25−−
26 H/L LO R 10 A
27H/L LO L10 A
28 Oil LVL 7.5 A
29Main Fan30 A
30 Sub Fan 30 A
31Wiper Main30 A
Circuit ProtectedAmps
Page 68 of 84
128 || 129 HANDLING THE UNEXPECTED HANDLING THE UNEXPECTED
TABLE OF
CONTENTS
INDEX
VISUAL INDEX
VOICE COMMAND
INDEX
SAFETY
INFORMATION
CLIENT
INFORMATION
INSTRUMENT
PANEL
SPECIFICATIONS
VEHICLE
CONTROLS
MAINTENANCE
AUDIO AND
CONNECTIVITY
HANDLING THE
UNEXPECTED
BLUETOOTH®
HANDSFREELINK®
DRIVING
ACURALINK®
NAVIGATION
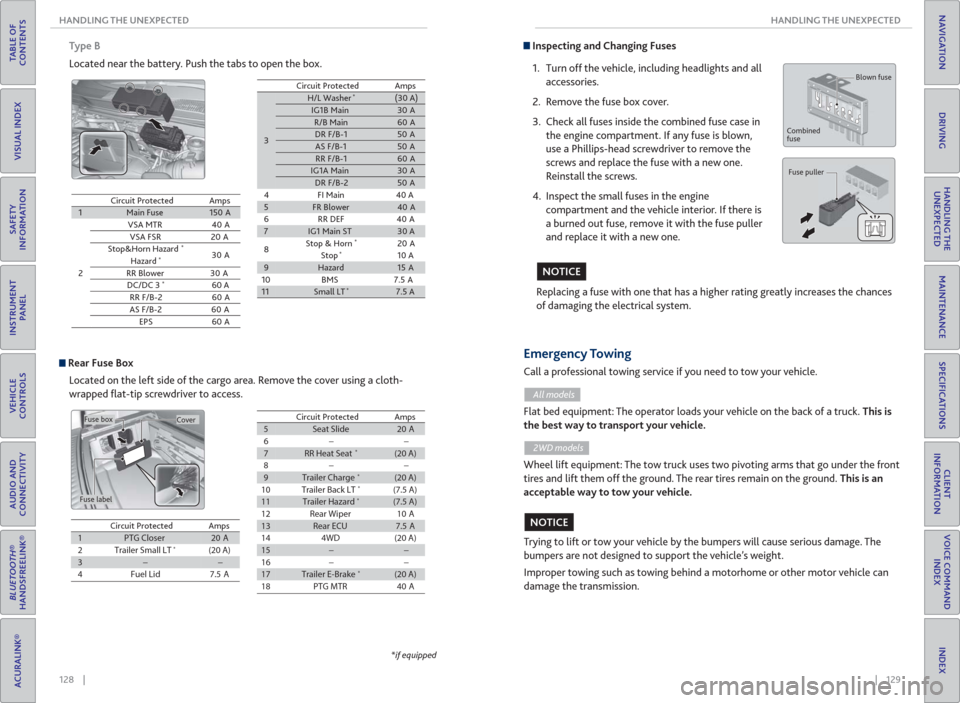
Type B
Located near the battery. Push the tabs to open the box.
Circuit ProtectedAmps1Main Fuse150 A
2
VSA MTR40 A
VSA FSR 20 A
Stop&Horn Hazard
*30 A
Hazard*
RR Blower 30 A
DC/DC 3*60 A
RR F/B-2 60 A
AS F/B-2 60 A
EPS 60 A
3
H/L Washer*(30 A)IG1B Main30 AR/B Main60 ADR F/B-150 AAS F/B-150 ARR F/B-160 AIG1A Main30 ADR F/B-250 A
4 FI Main 40 A
5FR Blower40 A
6RR DEF 40A
7IG1 Main ST30 A
8Stop & Horn*20 A
Stop*10 A9Hazard15 A
10 BMS 7.5 A
11Small LT*7.5 A
Circuit ProtectedAmps
Rear Fuse Box
Located on the left side of the cargo area. Remove the cover using a cloth-
wrapped fl at-tip screwdriver to access.
Cover
Fuse label
Fuse box
Circuit ProtectedAmps1PTG Closer20 A2Trailer Small LT*(20 A)3��4Fuel Lid7.5 A
Circuit ProtectedAmps5Seat Slide20 A6��7RR Heat Seat*(20 A)8��9Trailer Charge*(20 A)10Trailer Back LT*(7.5 A)11Trailer Hazard*(7.5 A)12Rear Wiper10 A13Rear ECU7.5 A144WD(20 A)15��16��17Trailer E-Brake*(20 A)18PTG MTR40 A
*if equipped
Inspecting and Changing Fuses
1. Turn off the vehicle, including headlights and all
accessories.
2. Remove the fuse box cover.
3. Check all fuses inside the combined fuse case in
the engine compartment. If any fuse is blown,
use a Phillips-head screwdriver to remove the
screws and replace the fuse with a new one.
Reinstall the screws.
4. Inspect the small fuses in the engine
compartment and the vehicle interior. If there is
a burned out fuse, remove it with the fuse puller
and replace it with a new one.
Replacing a fuse with one that has a higher rating greatly increases the chances
of damaging the electrical system.
Blown fuse
Combined
fuse
Fuse puller
NOTICE
Trying to lift or tow your vehicle by the bumpers will cause serious damage. The
bumpers are not designed to support the vehicle’s weight.
Improper towing such as towing behind a motorhome or other motor vehicle can
damage the transmission.
Emergency Towing
Call a professional towing service if you need to tow your vehicle.
All models
Flat bed equipment: The operator loads your vehicle on the back of a truck. This is
the best way to transport your vehicle.
2WD models
Wheel lift equipment: The tow truck uses two pivoting arms that go under the front
tires and lift them off the ground. The rear tires remain on the ground. This is an
acceptable way to tow your vehicle.
NOTICE