steering Acura MDX 2016 Owner's Guide
[x] Cancel search | Manufacturer: ACURA, Model Year: 2016, Model line: MDX, Model: Acura MDX 2016Pages: 84, PDF Size: 14.98 MB
Page 3 of 84
TABLE OF
CONTENTS
INDEX
VISUAL INDEX
VOICE COMMAND
INDEX
SAFETY
INFORMATION
CLIENT
INFORMATION
INSTRUMENT
PANEL
SPECIFICATIONS
VEHICLE
CONTROLS
MAINTENANCE
AUDIO AND
CONNECTIVITY
HANDLING THE
UNEXPECTED
BLUETOOTH®
HANDSFREELINK®
DRIVING
ACURALINK®
NAVIGATION
This Owner’s Guide is intended to help you quickly get acquainted with your 2016
Acura MDX. It provides basic information and instructions on technology and
convenience features, as well as emergency procedures and how to get assistance.
This guide is for vehicles sold in the United States and Canada. It covers all MDX
models, so you may fi nd descriptions of features and equipment that are not in
your vehicle. Images throughout this guide are from U.S. vehicles and represent
features and equipment that are available on some, but not all, models.
This guide is not intended to be a substitute for the Owner’s Manual. The Owner
Information CD enclosed in your glove box kit includes the Owner’s Manual,
Navigation Manual, and vehicle and tire warranties in electronic format. This
information can be viewed on a computer (PC or Mac platform) and saved or
printed for your reference. You can also visit owners.acura.com (U.S.) or myacura.ca
(Canada) to view the complete and most current information.
If you are the fi rst registered owner of your vehicle, you may request a
complimentary printed copy of the Owner’s Manual, Navigation Manual, or Vehicle
Warranty up to six months after vehicle purchase. To request a copy, visit owners.
acura.com (U.S.) or myacura.ca (Canada) and create or log in to your account. In
Canada, please request a copy from your Acura dealer.
American Honda Motor Company strives to be proactive in protecting our
environment and natural resources. By using electronic delivery for a considerable
portion of the information typically found in a vehicle owner’s manual, we are
further reducing our impact on the environment.
Acura Total Luxury Care Roadside Assistance
Your Acura TLC Roadside Assistance representative is here to help you
24 hours a day, 7 days a week. Under your 4-year/50,000-mile (80,000 km)
warranty, the following benefi ts are available:
- Towing services — full cost of towing to the closest Acura dealer
- Roadside assistance — jump starting, fuel delivery, lockout, and fl at tire
- Trip planning — detailed trip routing, emergency services, and more
Call (800) 594-8500 (U.S.) or (800) 565-7587 (Canada)
Acura Client Relations
Your authorized Acura dealer should be able to answer any questions you have
about your vehicle. However, if you are dissatisfi ed with the information you
receive, you can call Acura Client Relations (see page 149).
Call (800) 382-2238 (U.S.) or (888) 922-8729 (Canada)
INTRODUCTION TABLE OF CONTENTS
*if equipped
VISUAL INDEX ................................... 1
Steering Wheel and Nearby
Controls .............................................. 1
Dashboard and Ceiling Controls .....2
SAFETY INFORMATION .................. 3
Important Safety Information ....... 3
Seat Belts ...........................................5
Airbags ............................................... 9
Child Safety .....................................15
Safety Label Locations .................. 22
Reporting Safety Defects .............. 23
INSTRUMENT PANEL .................... 24
Malfunction Indicators .................. 24
Condition Indicators ...................... 26
On/Off Indicators .......................... 27
Multi-Information Display ........... 28
VEHICLE CONTROLS ..................... 29
Using the Remote Transmitter ..... 29
Keyless Access System .................. 30
Power Tailgate Operation ..............31
Door Operation from Inside the
Vehicle ............................................. 32
Power Window Operation ............ 33
Power Moonroof Operation ........ 34
Interior and Exterior Lights........... 35
One-Touch Turn Signal .................. 36
Wiper Operation ............................ 37
Adjusting the Seats ........................ 39
Adjusting the Mirrors..................... 42
Adjusting the Steering Wheel ...... 43
Driving Position Memory System ... 43
Rear Seats ........................................ 44
HomeLink® Garage Opener .......... 46
Climate Control System................ 47Seat Heaters and Ventilation* ..... 50
Customized Features ......................51
AUDIO AND CONNECTIVITY ...... 52
Basic Audio Operation ................... 52
On-Demand Multi-Use Display
(ODMD) ........................................... 54
FM/AM Radio .................................. 55
SiriusXM® Radio ............................. 56
Compact Disc (CD) or USB Flash
Drive ................................................. 57
Hard Disc Drive (HDD) Audio* .... 58
iPod® ................................................ 59
Bluetooth® Audio ........................... 60
Pandora® ..........................................61
AcuraLink featuring Aha™ ............ 62
Rear Entertainment System
(RES)* .............................................. 63
BLUETOOTH® HANDSFREELINK® ...67
Basic HFL Operation ...................... 67
Pairing a Phone ............................... 69
Making a Call .................................. 70
SMS Text Messaging and E-Mail ... 73
Siri™ Eyes Free ............................... 74
ACURALINK
®* ................................. 75
AcuraLink Messages ....................... 75
Subscription Features .................... 76
NAVIGATION* ................................77
Basic Navigation Operation ..........77
Entering a Destination .................. 80
Routing ............................................ 82
DRIVING .......................................... 84
Before Driving ................................. 84
Maximum Load Limit ..................... 86
Towing a Trailer .............................. 88
Page 4 of 84
| 1 VISUAL INDEX
INDEX
VOICE COMMAND
INDEX
CLIENT
INFORMATION
SPECIFICATIONS
MAINTENANCE
HANDLING THE
UNEXPECTED
DRIVING
NAVIGATION
TABLE OF
CONTENTS
VISUAL INDEX
SAFETY
INFORMATION
INSTRUMENT
PANEL
VEHICLE
CONTROLS
AUDIO AND
CONNECTIVITY
BLUETOOTH®
HANDSFREELINK®
ACURALINK®
*if equipped
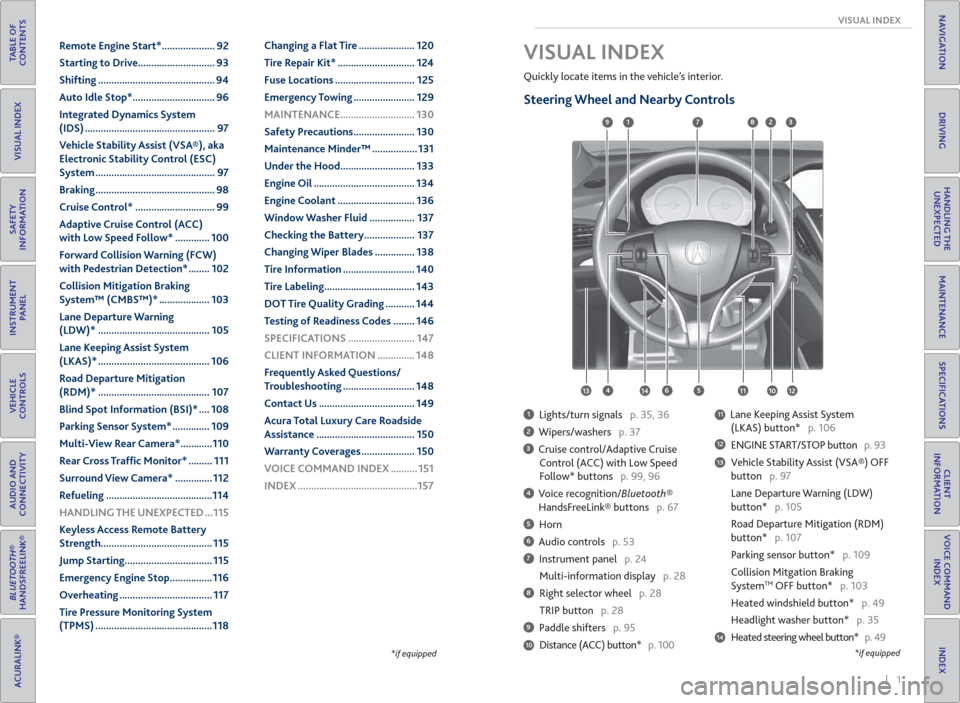
Quickly locate items in the vehicle’s interior.
Steering Wheel and Nearby Controls
1 Lights/turn signals p. 35, 36
2 Wipers/washers p. 37
3 Cruise control/Adaptive Cruise
Control (ACC) with Low Speed
Follow* buttons p. 99, 96
4 Voice recognition/Bluetooth®
HandsFreeLink® buttons p. 67
5 Horn
6 Audio controls p. 53
7 Instrument panel p. 24
Multi-information display p. 28
8 Right selector wheel p. 28
TRIP button p. 28
9 Paddle shifters p. 95
Distance (ACC) button* p. 100
11 Lane Keeping Assist System
(LKAS) button* p. 106
12 ENGINE START/STOP button p. 93
13 Vehicle Stability Assist (VSA®) OFF
button p. 97
Lane Departure Warning (LDW)
button* p. 105
Road Departure Mitigation (RDM)
button* p. 107
Parking sensor button* p. 109
Collision Mitgation Braking
System
TM OFF button* p. 103
Heated windshield button* p. 49
Headlight washer button* p. 35
14 Heated steering wheel button* p. 49
VISUAL INDEX
1
45
9
61011
7283
131412
*if equipped10
Remote Engine Start* .................... 92
Starting to Drive ............................. 93
Shifting ............................................ 94
Auto Idle Stop* ............................... 96
Integrated Dynamics System
(IDS) ................................................. 97
Vehicle Stability Assist (VSA®), aka
Electronic Stability Control (ESC)
System ............................................. 97
Braking ............................................. 98
Cruise Control* .............................. 99
Adaptive Cruise Control (ACC)
with Low Speed Follow* ............. 100
Forward Collision Warning (FCW)
with Pedestrian Detection* ........ 102
Collision Mitigation Braking
System™ (CMBS™)* ................... 103
Lane Departure Warning
(LDW)* .......................................... 105
Lane Keeping Assist System
(LKAS)* .......................................... 106
Road Departure Mitigation
(RDM)* .......................................... 107
Blind Spot Information (BSI)* .... 108
Parking Sensor System* .............. 109
Multi-View Rear Camera* ............110
Rear Cross Traf� c Monitor* ......... 111
Surround View Camera* .............. 112
Refueling ........................................114
HANDLING THE UNEXPECTED ...115
Keyless Access Remote Battery
Strength.......................................... 115
Jump Starting ................................. 115
Emergency Engine Stop ................116
Overheating ................................... 117
Tire Pressure Monitoring System
(TPMS) ............................................118Changing a Flat Tire ..................... 120
Tire Repair Kit* ............................. 124
Fuse Locations .............................. 125
Emergency Towing ....................... 129
MAINTENANCE ............................ 130
Safety Precautions ....................... 130
Maintenance Minder™ ................. 131
Under the Hood ............................ 133
Engine Oil ...................................... 134
Engine Coolant ............................. 136
Window Washer Fluid ................. 137
Checking the Battery ................... 137
Changing Wiper Blades ............... 138
Tire Information ........................... 140
Tire Labeling .................................. 143
DOT Tire Quality Grading ........... 144
Testing of Readiness Codes ........ 146
SPECIFICATIONS ......................... 147
CLIENT INFORMATION .............. 148
Frequently Asked Questions/
Troubleshooting ........................... 148
Contact Us .................................... 149
Acura Total Luxury Care Roadside
Assistance ..................................... 150
Warranty Coverages .................... 150
VOICE COMMAND INDEX .......... 151
INDEX .............................................157
Page 8 of 84
8 || 9 SAFETY SAFETY
TABLE OF
CONTENTS
INDEX
VISUAL INDEX
VOICE COMMAND
INDEX
SAFETY
INFORMATION
CLIENT
INFORMATION
INSTRUMENT
PANEL
SPECIFICATIONS
VEHICLE
CONTROLS
MAINTENANCE
AUDIO AND
CONNECTIVITY
HANDLING THE
UNEXPECTED
BLUETOOTH®
HANDSFREELINK®
DRIVING
ACURALINK®
NAVIGATION
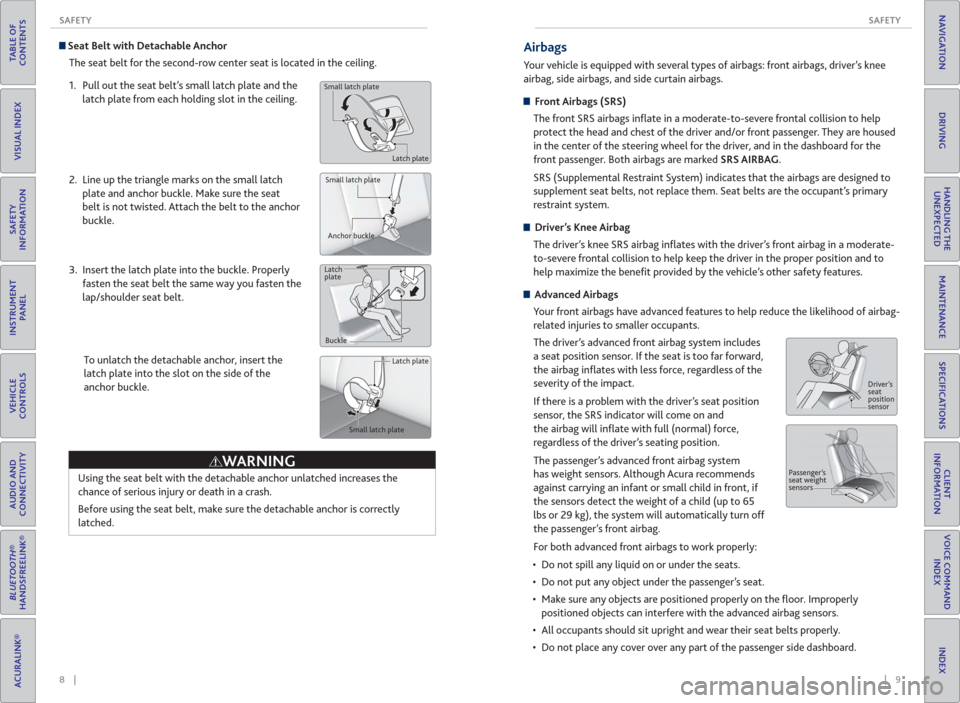
Seat Belt with Detachable Anchor
The seat belt for the second-row center seat is located in the ceiling.
1. Pull out the seat belt’s small latch plate and the
latch plate from each holding slot in the ceiling.
2. Line up the triangle marks on the small latch
plate and anchor buckle. Make sure the seat
belt is not twisted. Attach the belt to the anchor
buckle.
3. Insert the latch plate into the buckle. Properly
fasten the seat belt the same way you fasten the
lap/shoulder seat belt.
To unlatch the detachable anchor, insert the
latch plate into the slot on the side of the
anchor buckle.
Using the seat belt with the detachable anchor unlatched increases the
chance of serious injury or death in a crash.
Before using the seat belt, make sure the detachable anchor is correctly
latched.
Small latch plate
Latch plate
Small latch plate
Anchor buckle
Latch
plate
Buckle
Latch plate
Small latch plate
WARNING
Airbags
Your vehicle is equipped with several types of airbags: front airbags, driver’s knee
airbag, side airbags, and side curtain airbags.
Front Airbags (SRS)
The front SRS airbags infl ate in a moderate-to-severe frontal collision to help
protect the head and chest of the driver and/or front passenger. They are housed
in the center of the steering wheel for the driver, and in the dashboard for the
front passenger. Both airbags are marked SRS AIRBAG.
SRS (Supplemental Restraint System) indicates that the airbags are designed to
supplement seat belts, not replace them. Seat belts are the occupant’s primary
restraint system.
Driver’s Knee Airbag
The driver’s knee SRS airbag infl ates with the driver’s front airbag in a moderate-
to-severe frontal collision to help keep the driver in the proper position and to
help maximize the benefi t provided by the vehicle’s other safety features.
Advanced Airbags
Your front airbags have advanced features to help reduce the likelihood of airbag-
related injuries to smaller occupants.
The driver’s advanced front airbag system includes
a seat position sensor. If the seat is too far forward,
the airbag infl ates with less force, regardless of the
severity of the impact.
If there is a problem with the driver’s seat position
sensor, the SRS indicator will come on and
the airbag will infl ate with full (normal) force,
regardless of the driver’s seating position.
The passenger’s advanced front airbag system
has weight sensors. Although Acura recommends
against carrying an infant or small child in front, if
the sensors detect the weight of a child (up to 65
lbs or 29 kg), the system will automatically turn off
the passenger’s front airbag.
For both advanced front airbags to work properly:
• Do not spill any liquid on or under the seats.
• Do not put any object under the passenger’s seat.
• Make sure any objects are positioned properly on the fl oor. Improperly
positioned objects can interfere with the advanced airbag sensors.
• All occupants should sit upright and wear their seat belts properly.
• Do not place any cover over any part of the passenger side dashboard.
Driver’s
seat
position
sensor
Passenger’s
seat weight
sensors
Page 9 of 84
10 || 11 SAFETY SAFETY
TABLE OF
CONTENTS
INDEX
VISUAL INDEX
VOICE COMMAND
INDEX
SAFETY
INFORMATION
CLIENT
INFORMATION
INSTRUMENT
PANEL
SPECIFICATIONS
VEHICLE
CONTROLS
MAINTENANCE
AUDIO AND
CONNECTIVITY
HANDLING THE
UNEXPECTED
BLUETOOTH®
HANDSFREELINK®
DRIVING
ACURALINK®
NAVIGATION
Side Airbags
The side airbags help protect the upper torso and pelvis of the driver or a front
passenger during a moderate-to-severe side impact. They are housed in the
outside edge of the driver’s and front passenger’s seat-backs. Both are marked
SIDE AIRBAG.
Side Curtain Airbags
Side curtain airbags help protect the head and torso of the driver and passengers in
outer seating positions during a moderate-to-severe side impact. The side curtain
airbags equipped in this vehicle are also designed to help reduce the likelihood
of partial and complete ejection of vehicle occupants through side windows in
crashes, particularly rollover crashes.
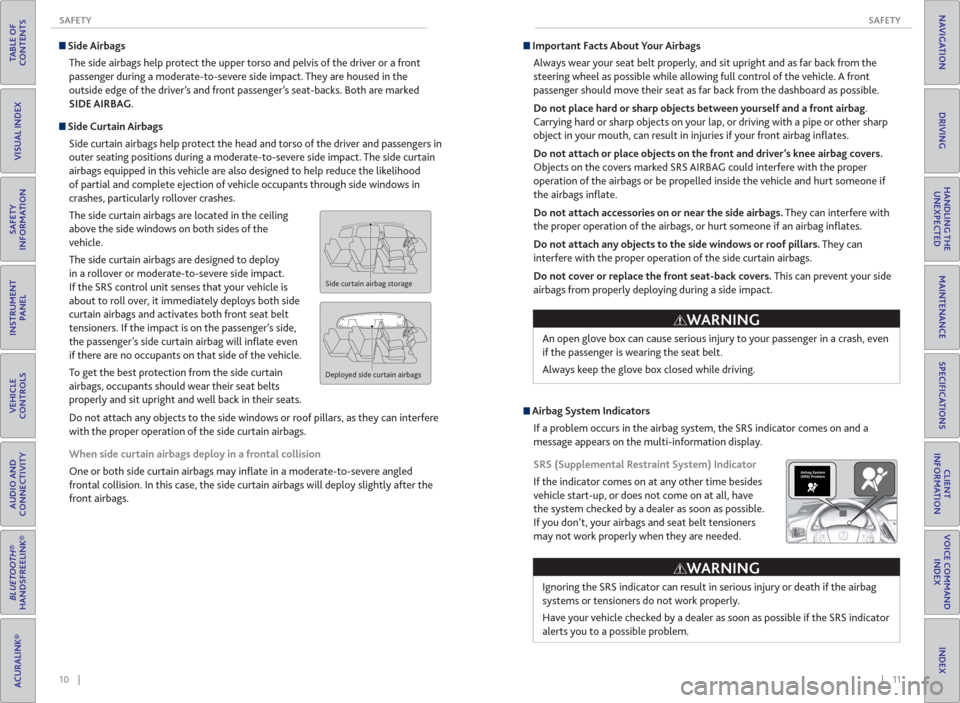
The side curtain airbags are located in the ceiling
above the side windows on both sides of the
vehicle.
The side curtain airbags are designed to deploy
in a rollover or moderate-to-severe side impact.
If the SRS control unit senses that your vehicle is
about to roll over, it immediately deploys both side
curtain airbags and activates both front seat belt
tensioners. If the impact is on the passenger’s side,
the passenger’s side curtain airbag will infl ate even
if there are no occupants on that side of the vehicle.
To get the best protection from the side curtain
airbags, occupants should wear their seat belts
properly and sit upright and well back in their seats.
Do not attach any objects to the side windows or roof pillars, as they can interfere
with the proper operation of the side curtain airbags.
When side curtain airbags deploy in a frontal collision
One or both side curtain airbags may infl ate in a moderate-to-severe angled
frontal collision. In this case, the side curtain airbags will deploy slightly after the
front airbags.
Side curtain airbag storage
Deployed side curtain airbags
Important Facts About Your Airbags
Always wear your seat belt properly, and sit upright and as far back from the
steering wheel as possible while allowing full control of the vehicle. A front
passenger should move their seat as far back from the dashboard as possible.
Do not place hard or sharp objects between yourself and a front airbag.
Carrying hard or sharp objects on your lap, or driving with a pipe or other sharp
object in your mouth, can result in injuries if your front airbag infl ates.
Do not attach or place objects on the front and driver’s knee airbag covers.
Objects on the covers marked SRS AIRBAG could interfere with the proper
operation of the airbags or be propelled inside the vehicle and hurt someone if
the airbags infl ate.
Do not attach accessories on or near the side airbags. They can interfere with
the proper operation of the airbags, or hurt someone if an airbag infl ates.
Do not attach any objects to the side windows or roof pillars. They can
interfere with the proper operation of the side curtain airbags.
Do not cover or replace the front seat-back covers. This can prevent your side
airbags from properly deploying during a side impact.
Ignoring the SRS indicator can result in serious injury or death if the airbag
systems or tensioners do not work properly.
Have your vehicle checked by a dealer as soon as possible if the SRS indicator
alerts you to a possible problem.
WARNING
Airbag System Indicators
If a problem occurs in the airbag system, the SRS indicator comes on and a
message appears on the multi-information display.
SRS (Supplemental Restraint System) Indicator
If the indicator comes on at any other time besides
vehicle start-up, or does not come on at all, have
the system checked by a dealer as soon as possible.
If you don’t, your airbags and seat belt tensioners
may not work properly when they are needed.An open glove box can cause serious injury to your passenger in a crash, even
if the passenger is wearing the seat belt.
Always keep the glove box closed while driving.
WARNING
Airbag System
(SRS) Problem
Page 10 of 84
12 || 13 SAFETY SAFETY
TABLE OF
CONTENTS
INDEX
VISUAL INDEX
VOICE COMMAND
INDEX
SAFETY
INFORMATION
CLIENT
INFORMATION
INSTRUMENT
PANEL
SPECIFICATIONS
VEHICLE
CONTROLS
MAINTENANCE
AUDIO AND
CONNECTIVITY
HANDLING THE
UNEXPECTED
BLUETOOTH®
HANDSFREELINK®
DRIVING
ACURALINK®
NAVIGATION
Passenger Airbag Off Indicator
The indicator comes on to alert you that the front
passenger’s front airbag has been turned off. This
occurs when the front passenger’s weight sensors
detect 65 lbs (29 kg) or less, the weight of an infant
or small child, on the seat.
Infants and small children should always ride
properly restrained in a back seat.
Objects placed on the front passenger’s seat can also cause the indicator to come
on.
If the front passenger’s seat is empty, the passenger’s front airbag will not deploy
and the indicator will not come on.
If the indicator comes on with no occupant or objects in the front passenger’s
seat, something may be interfering with the weight sensors, such as:
• An object hanging on the seat or in the seat-back pocket.
• A child seat or other object pressing against the rear of the seat-back.
• A rear passenger pushing or pulling on the back of the front passenger’s seat.
• The front seat or seat-back is forced against an object on the seat or fl oor
behind it.
• An object placed under the front passenger’s seat.
If none of these conditions exist, have your vehicle checked by a dealer as soon as
possible.
The passenger airbag off indicator may go on and off repeatedly if the total
weight on the seat is near the airbag cutoff threshold.
U.S. Canada
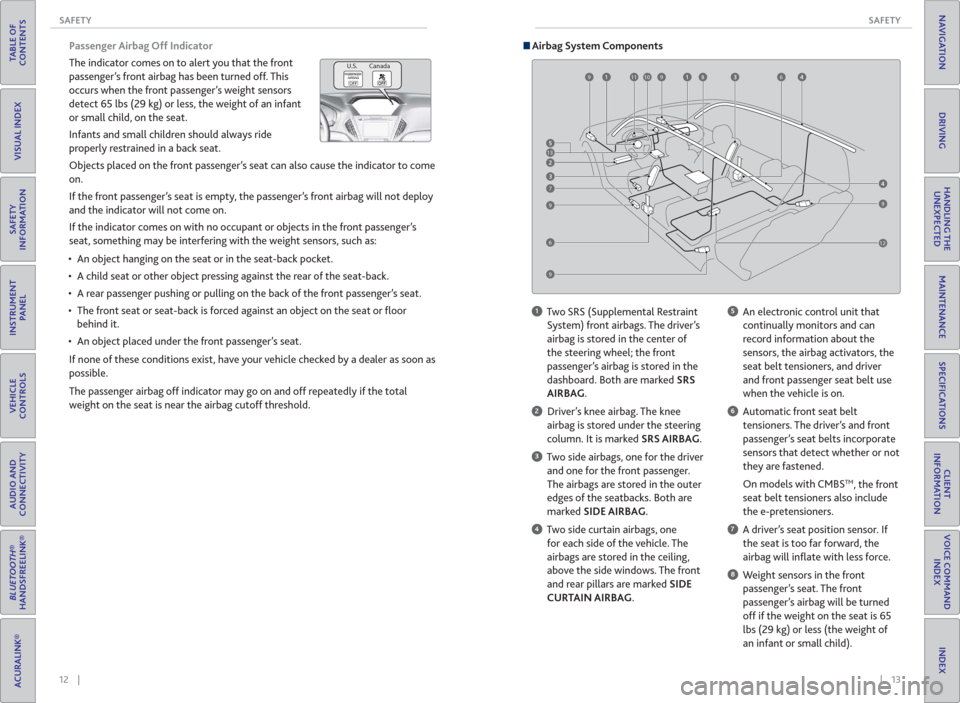
Airbag System Components
13
6
7
810119
99
9
612
9
1 Two SRS (Supplemental Restraint
System) front airbags. The driver’s
airbag is stored in the center of
the steering wheel; the front
passenger’s airbag is stored in the
dashboard. Both are marked SRS
AIRBAG.
2 Driver’s knee airbag. The knee
airbag is stored under the steering
column. It is marked SRS AIRBAG.
3 Two side airbags, one for the driver
and one for the front passenger.
The airbags are stored in the outer
edges of the seatbacks. Both are
marked SIDE AIRBAG.
4 Two side curtain airbags, one
for each side of the vehicle. The
airbags are stored in the ceiling,
above the side windows. The front
and rear pillars are marked SIDE
CURTAIN AIRBAG.
5 An electronic control unit that
continually monitors and can
record information about the
sensors, the airbag activators, the
seat belt tensioners, and driver
and front passenger seat belt use
when the vehicle is on.
6 Automatic front seat belt
tensioners. The driver’s and front
passenger’s seat belts incorporate
sensors that detect whether or not
they are fastened.
On models with CMBS
TM, the front
seat belt tensioners also include
the e-pretensioners.
7 A driver’s seat position sensor. If
the seat is too far forward, the
airbag will infl ate with less force.
8 Weight sensors in the front
passenger’s seat. The front
passenger’s airbag will be turned
off if the weight on the seat is 65
lbs (29 kg) or less (the weight of
an infant or small child).
Page 16 of 84
24 || 25 INSTRUMENT PANEL INSTRUMENT PANEL
TABLE OF
CONTENTS
INDEX
VISUAL INDEX
VOICE COMMAND
INDEX
SAFETY
INFORMATION
CLIENT
INFORMATION
INSTRUMENT
PANEL
SPECIFICATIONS
VEHICLE
CONTROLS
MAINTENANCE
AUDIO AND
CONNECTIVITY
HANDLING THE
UNEXPECTED
BLUETOOTH®
HANDSFREELINK®
DRIVING
ACURALINK®
NAVIGATION
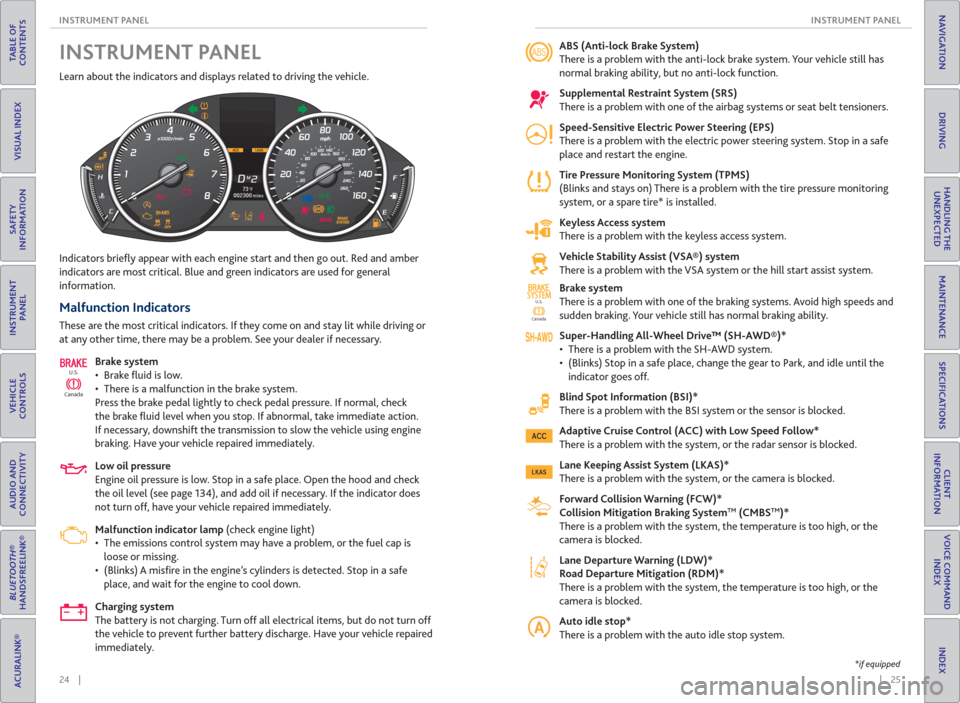
Learn about the indicators and displays related to driving the vehicle.
Indicators briefl y appear with each engine start and then go out. Red and amber
indicators are most critical. Blue and green indicators are used for general
information.
Malfunction Indicators
These are the most critical indicators. If they come on and stay lit while driving or
at any other time, there may be a problem. See your dealer if necessary.
Brake system
• Brake fl uid is low.
• There is a malfunction in the brake system.
Press the brake pedal lightly to check pedal pressure. If normal, check
the brake fl uid level when you stop. If abnormal, take immediate action.
If necessary, downshift the transmission to slow the vehicle using engine
braking. Have your vehicle repaired immediately.
Low oil pressure
Engine oil pressure is low. Stop in a safe place. Open the hood and check
the oil level (see page 134), and add oil if necessary. If the indicator does
not turn off, have your vehicle repaired immediately.
Malfunction indicator lamp (check engine light)
• The emissions control system may have a problem, or the fuel cap is
loose or missing.
• (Blinks) A misfi re in the engine’s cylinders is detected. Stop in a safe
place, and wait for the engine to cool down.
Charging system
The battery is not charging. Turn off all electrical items, but do not turn off
the vehicle to prevent further battery discharge. Have your vehicle repaired
immediately.
CanadaU.S.
INSTRUMENT PANEL ABS ( Anti-lock Brake System)
There is a problem with the anti-lock brake system. Your vehicle still has
normal braking ability, but no anti-lock function.
Supplemental Restraint System ( SRS)
There is a problem with one of the airbag systems or seat belt tensioners.
Speed-Sensitive Electric Power Steering ( EPS)
There is a problem with the electric power steering system. Stop in a safe
place and restart the engine.
Tire Pressure Monitoring System ( TPMS)
(Blinks and stays on) There is a problem with the tire pressure monitoring
system, or a spare tire* is installed.
Keyless Access system
There is a problem with the keyless access system.
Vehicle Stability Assist ( VSA®) system
There is a problem with the VSA system or the hill start assist system.
Brake system
There is a problem with one of the braking systems. Avoid high speeds and
sudden braking. Your vehicle still has normal braking ability.
Super-Handling All-Wheel Drive™ ( SH-AWD®)*
• There is a problem with the SH-AWD system.
• (Blinks) Stop in a safe place, change the gear to Park, and idle until the
indicator goes off.
Blind Spot Information ( BSI)*
There is a problem with the BSI system or the sensor is blocked.
Adaptive Cruise Control ( ACC) with Low Speed Follow*
There is a problem with the system, or the radar sensor is blocked.
Lane Keeping Assist System ( LKAS)*
There is a problem with the system, or the camera is blocked.
Forward Collision Warning ( FCW)*
Collision Mitigation Braking System
TM ( CMBSTM)*
There is a problem with the system, the temperature is too high, or the
camera is blocked.
Lane Departure Warning ( LDW)*
Road Departure Mitigation (RDM)*
There is a problem with the system, the temperature is too high, or the
camera is blocked.
Auto idle stop*
There is a problem with the auto idle stop system.
CanadaU.S.
SYSTEMSYSTEM
*if equipped
Page 23 of 84
38 || 39 VEHICLE CONTROLS VEHICLE CONTROLS
TABLE OF
CONTENTS
INDEX
VISUAL INDEX
VOICE COMMAND
INDEX
SAFETY
INFORMATION
CLIENT
INFORMATION
INSTRUMENT
PANEL
SPECIFICATIONS
VEHICLE
CONTROLS
MAINTENANCE
AUDIO AND
CONNECTIVITY
HANDLING THE
UNEXPECTED
BLUETOOTH®
HANDSFREELINK®
DRIVING
ACURALINK®
NAVIGATION
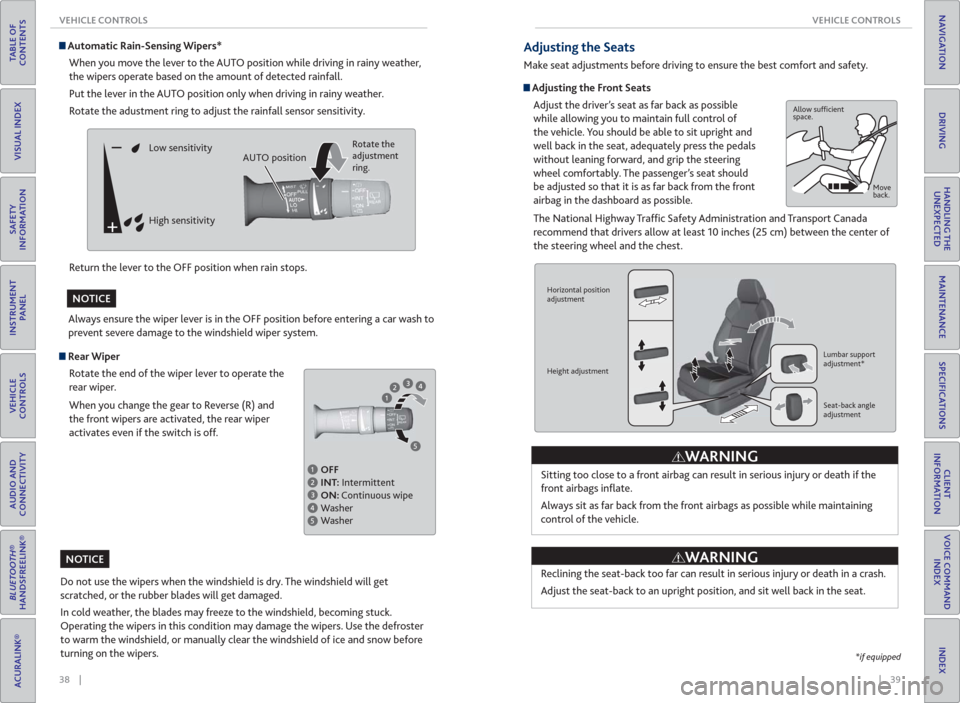
Rear Wiper
Rotate the end of the wiper lever to operate the
rear wiper.
When you change the gear to Reverse (R) and
the front wipers are activated, the rear wiper
activates even if the switch is off.
Automatic Rain-Sensing Wipers*
When you move the lever to the AUTO position while driving in rainy weather,
the wipers operate based on the amount of detected rainfall.
Put the lever in the AUTO position only when driving in rainy weather.
Rotate the adustment ring to adjust the rainfall sensor sensitivity.
Return the lever to the OFF position when rain stops.
Do not use the wipers when the windshield is dry. The windshield will get
scratched, or the rubber blades will get damaged.
In cold weather, the blades may freeze to the windshield, becoming stuck.
Operating the wipers in this condition may damage the wipers. Use the defroster
to warm the windshield, or manually clear the windshield of ice and snow before
turning on the wipers.
NOTICE
OFF
INT: Intermittent
ON: Continuous wipe
Washer
Washer
Always ensure the wiper lever is in the OFF position before entering a car wash to
prevent severe damage to the windshield wiper system.
NOTICE
Low sensitivity
High sensitivityRotate the
adjustment
ring.
AUTO position
*if equipped
Adjusting the Seats
Make seat adjustments before driving to ensure the best comfort and safety.
Adjusting the Front Seats
Adjust the driver’s seat as far back as possible
while allowing you to maintain full control of
the vehicle. You should be able to sit upright and
well back in the seat, adequately press the pedals
without leaning forward, and grip the steering
wheel comfortably. The passenger’s seat should
be adjusted so that it is as far back from the front
airbag in the dashboard as possible.
The National Highway Traffi c Safety Administration and Transport Canada
recommend that drivers allow at least 10 inches (25 cm) between the center of
the steering wheel and the chest.
Sitting too close to a front airbag can result in serious injury or death if the
front airbags infl ate.
Always sit as far back from the front airbags as possible while maintaining
control of the vehicle.Allow suffi cient
space.
Move
back.
Horizontal position
adjustment
Height adjustmentLumbar support
adjustment*
Seat-back angle
adjustment
WARNING
Reclining the seat-back too far can result in serious injury or death in a crash.
Adjust the seat-back to an upright position, and sit well back in the seat.
WARNING
Page 25 of 84
42 || 43 VEHICLE CONTROLS VEHICLE CONTROLS
TABLE OF
CONTENTS
INDEX
VISUAL INDEX
VOICE COMMAND
INDEX
SAFETY
INFORMATION
CLIENT
INFORMATION
INSTRUMENT
PANEL
SPECIFICATIONS
VEHICLE
CONTROLS
MAINTENANCE
AUDIO AND
CONNECTIVITY
HANDLING THE
UNEXPECTED
BLUETOOTH®
HANDSFREELINK®
DRIVING
ACURALINK®
NAVIGATION
*if equipped
Adjusting the Mirrors
Adjust the angle of the mirrors for the best visibility when you are sitting in the
correct driving position.
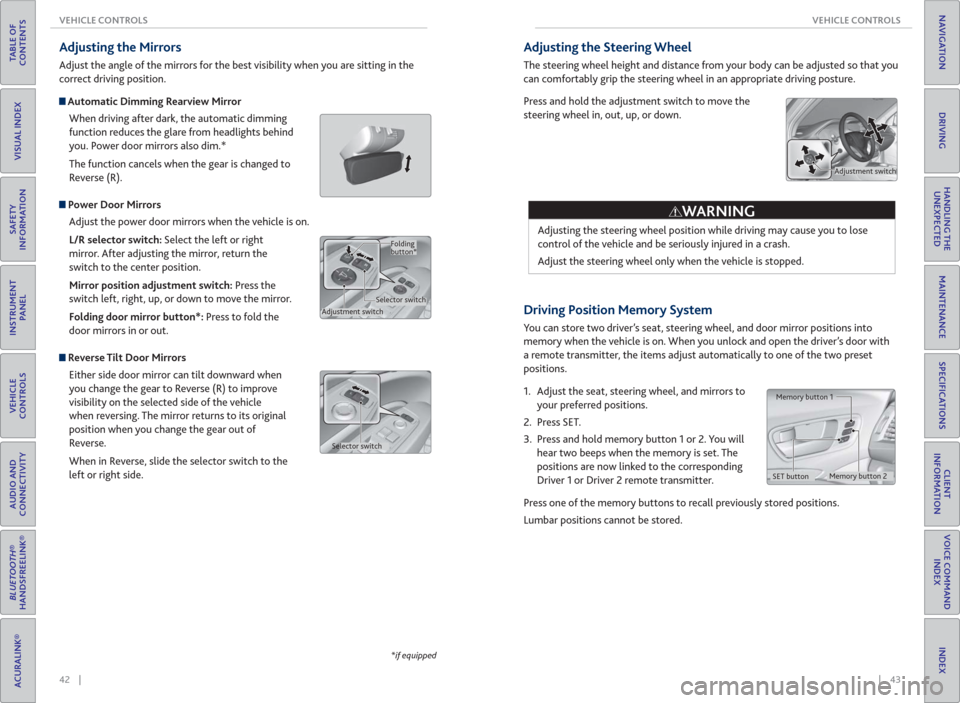
Automatic Dimming Rearview Mirror
When driving after dark, the automatic dimming
function reduces the glare from headlights behind
you. Power door mirrors also dim.*
The function cancels when the gear is changed to
Reverse (R).
Power Door Mirrors
Adjust the power door mirrors when the vehicle is on.
L/R selector switch: Select the left or right
mirror. After adjusting the mirror, return the
switch to the center position.
Mirror position adjustment switch: Press the
switch left, right, up, or down to move the mirror.
Folding door mirror button*: Press to fold the
door mirrors in or out.
Reverse Tilt Door Mirrors
Either side door mirror can tilt downward when
you change the gear to Reverse (R) to improve
visibility on the selected side of the vehicle
when reversing. The mirror returns to its original
position when you change the gear out of
Reverse.
When in Reverse, slide the selector switch to the
left or right side.
Adjustment switchSelector switchFolding
button*
Selector switch
Driving Position Memory System
You can store two driver’s seat, steering wheel, and door mirror positions into
memory when the vehicle is on. When you unlock and open the driver’s door with
a remote transmitter, the items adjust automatically to one of the two preset
positions.
1. Adjust the seat, steering wheel, and mirrors to
your preferred positions.
2. Press SET.
3. Press and hold memory button 1 or 2. You will
hear two beeps when the memory is set. The
positions are now linked to the corresponding
Driver 1 or Driver 2 remote transmitter.
Press one of the memory buttons to recall previously stored positions.
Lumbar positions cannot be stored.
Memory button 1
Memory button 2
SET button
Adjusting the Steering Wheel
The steering wheel height and distance from your body can be adjusted so that you
can comfortably grip the steering wheel in an appropriate driving posture.
Press and hold the adjustment switch to move the
steering wheel in, out, up, or down.
Adjusting the steering wheel position while driving may cause you to lose
control of the vehicle and be seriously injured in a crash.
Adjust the steering wheel only when the vehicle is stopped.
WARNING
Adjustment switch
Page 28 of 84
48 || 49 VEHICLE CONTROLS VEHICLE CONTROLS
TABLE OF
CONTENTS
INDEX
VISUAL INDEX
VOICE COMMAND
INDEX
SAFETY
INFORMATION
CLIENT
INFORMATION
INSTRUMENT
PANEL
SPECIFICATIONS
VEHICLE
CONTROLS
MAINTENANCE
AUDIO AND
CONNECTIVITY
HANDLING THE
UNEXPECTED
BLUETOOTH®
HANDSFREELINK®
DRIVING
ACURALINK®
NAVIGATION
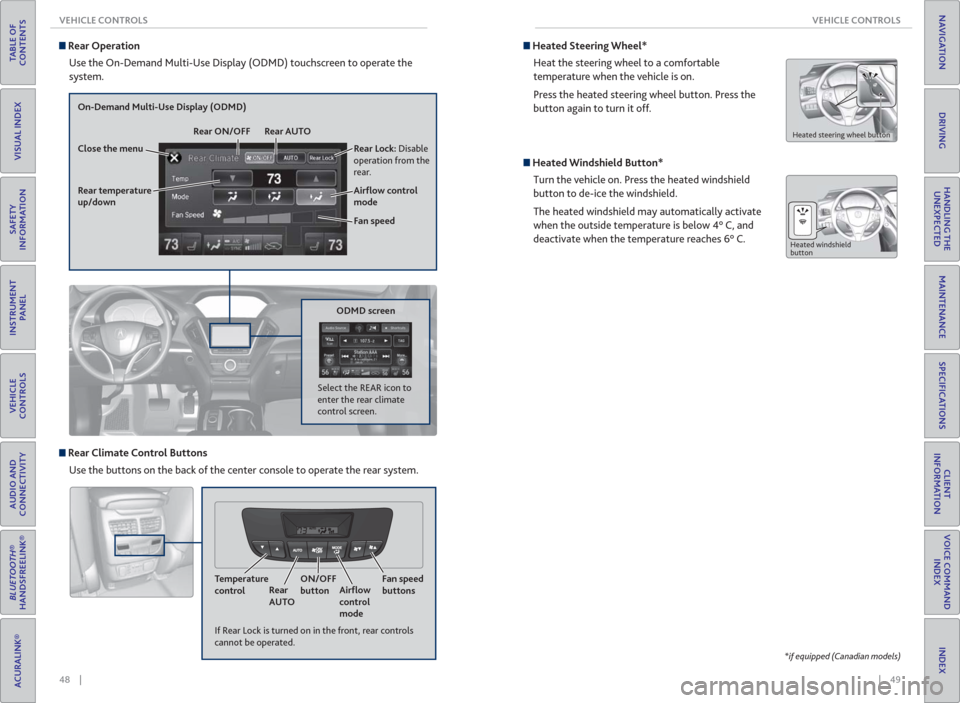
Rear Operation
Use the On-Demand Multi-Use Display (ODMD) touchscreen to operate the
system.
Rear Lock: Disable
operation from the
rear.
Rear temperature
up/down
On-Demand Multi-Use Display (ODMD)
Close the menuRear ON/OFF Rear AUTO
Fan speed Air� ow control
mode
If Rear Lock is turned on in the front, rear controls
cannot be operated.
ODMD screen
Select the REAR icon to
enter the rear climate
control screen.
Rear Climate Control Buttons
Use the buttons on the back of the center console to operate the rear system.
Temperature
controlRear
AUTOON/OFF
buttonAir� ow
control
modeFan speed
buttons
Heated Steering Wheel*
Heat the steering wheel to a comfortable
temperature when the vehicle is on.
Press the heated steering wheel button. Press the
button again to turn it off.
Heated steering wheel button
Heated Windshield Button*
Turn the vehicle on. Press the heated windshield
button to de-ice the windshield.
The heated windshield may automatically activate
when the outside temperature is below 4° C, and
deactivate when the temperature reaches 6° C.
Heated windshield
button
*if equipped (Canadian models)
Page 30 of 84
52 || 53 AUDIO AND CONNECTIVITY AUDIO AND CONNECTIVITY
TABLE OF
CONTENTS
INDEX
VISUAL INDEX
VOICE COMMAND
INDEX
SAFETY
INFORMATION
CLIENT
INFORMATION
INSTRUMENT
PANEL
SPECIFICATIONS
VEHICLE
CONTROLS
MAINTENANCE
AUDIO AND
CONNECTIVITY
HANDLING THE
UNEXPECTED
BLUETOOTH®
HANDSFREELINK®
DRIVING
ACURALINK®
NAVIGATION
Basic Audio Operation
Connect audio devices and operate buttons and displays for the audio system.
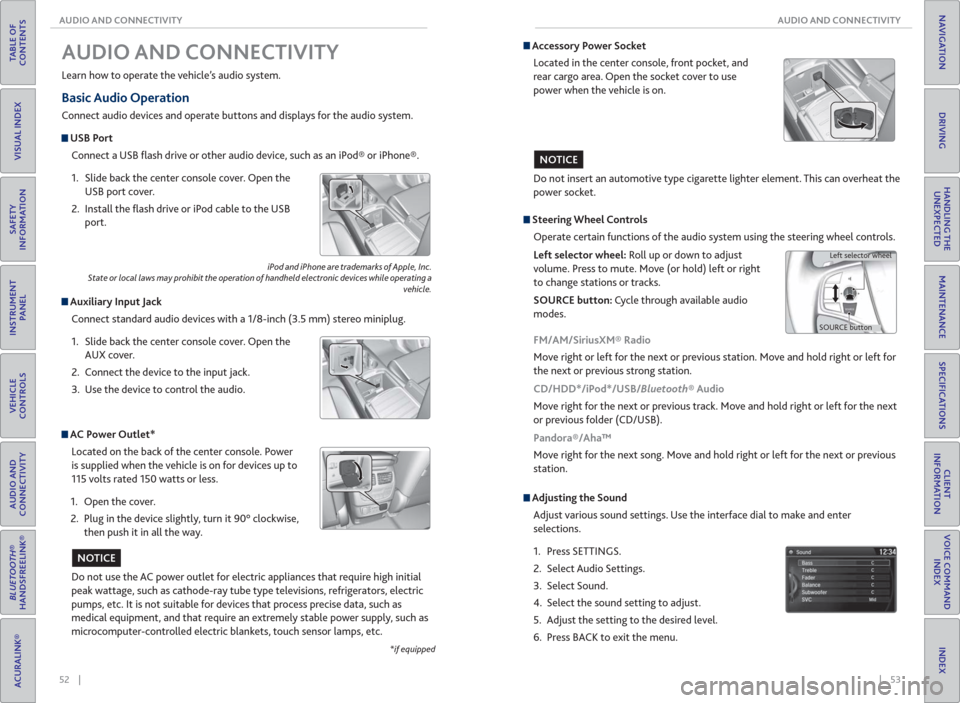
USB Port
Connect a USB fl ash drive or other audio device, such as an iPod® or iPhone®.
1. Slide back the center console cover. Open the
USB port cover.
2. Install the fl ash drive or iPod cable to the USB
port.
Auxiliary Input Jack
Connect standard audio devices with a 1/8-inch (3.5 mm) stereo miniplug.
1. Slide back the center console cover. Open the
AUX cover.
2. Connect the device to the input jack.
3. Use the device to control the audio.
iPod and iPhone are trademarks of Apple, Inc.
State or local laws may prohibit the operation of handheld electronic devices while operating a
vehicle.
AUDIO AND CONNECTIVITY
Learn how to operate the vehicle’s audio system.
AC Power Outlet*
Located on the back of the center console. Power
is supplied when the vehicle is on for devices up to
115 volts rated 150 watts or less.
1. Open the cover.
2. Plug in the device slightly, turn it 90° clockwise,
then push it in all the way.
Do not use the AC power outlet for electric appliances that require high initial
peak wattage, such as cathode-ray tube type televisions, refrigerators, electric
pumps, etc. It is not suitable for devices that process precise data, such as
medical equipment, and that require an extremely stable power supply, such as
microcomputer-controlled electric blankets, touch sensor lamps, etc.
NOTICE
*if equipped
Accessory Power Socket
Located in the center console, front pocket, and
rear cargo area. Open the socket cover to use
power when the vehicle is on.
Do not insert an automotive type cigarette lighter element. This can overheat the
power socket.
NOTICE
Adjusting the Sound
Adjust various sound settings. Use the interface dial to make and enter
selections.
1. Press SETTINGS.
2. Select Audio Settings.
3. Select Sound.
4. Select the sound setting to adjust.
5. Adjust the setting to the desired level.
6. Press BACK to exit the menu.
Steering Wheel Controls
Operate certain functions of the audio system using the steering wheel controls.
Left selector wheel: Roll up or down to adjust
volume. Press to mute. Move (or hold) left or right
to change stations or tracks.
SOURCE button: Cycle through available audio
modes.
SOURCE buttonLeft selector wheel
FM/AM/SiriusXM® Radio
Move right or left for the next or previous station. Move and hold right or left for
the next or previous strong station.
CD/HDD*/iPod*/USB/Bluetooth® Audio
Move right for the next or previous track. Move and hold right or left for the next
or previous folder (CD/USB).
Pandora®/Aha™
Move right for the next song. Move and hold right or left for the next or previous
station.