USB Acura MDX 2017 Navigation Manual
[x] Cancel search | Manufacturer: ACURA, Model Year: 2017, Model line: MDX, Model: Acura MDX 2017Pages: 369, PDF Size: 29.59 MB
Page 145 of 369
144
Audio SystemUSB Ports
Audio
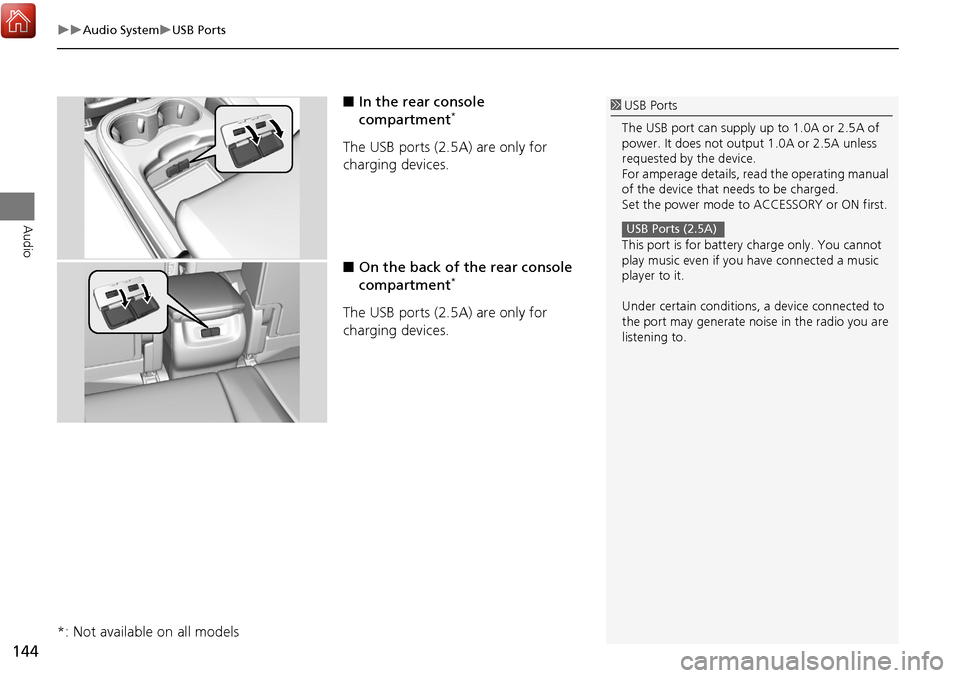
■In the rear console
compartment*
The USB ports (2.5A) are only for
charging devices.
■On the back of the rear console
compartment
*
The USB ports (2.5A) are only for
charging devices.
*: Not available on all models
1 USB Ports
The USB port can supply up to 1.0A or 2.5A of
power. It does not output 1.0A or 2.5A unless
requested by the device.
For amperage details, read the operating manual
of the device that needs to be charged.
Set the power mode to ACCESSORY or ON first.
This port is for battery charge only. You cannot
play music even if you have connected a music
player to it.
Under certain c onditions, a device connected to
the port may generate noise in the radio you are
listening to.
USB Ports (2.5A)
Page 150 of 369
149
Audio
Audio Remote Controls
Steering Wheel Controls
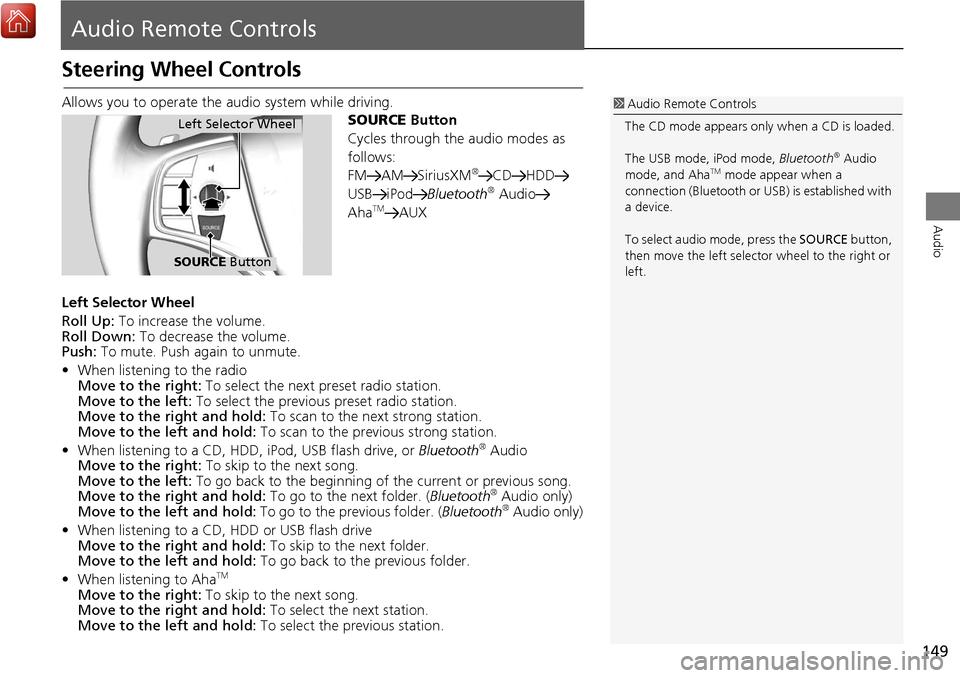
Allows you to operate the audio system while driving.
SOURCE Button
Cycles through the audio modes as
follows:
FM AM SiriusXM
®CD HDD
USB iPod Bluetooth® Audio
AhaTMAUX
Left Selector Wheel
Roll Up: To increase the volume.
Roll Down: To decrease the volume.
Push: To mute. Push again to unmute.
• When listening to the radio
Move to the right: To select the next preset radio station.
Move to the left: To select the previous preset radio station.
Move to the ri ght and hold: To scan to the next strong station.
Move to the left and hold: To scan to the previous strong station.
• When listening to a CD, HDD, iPod, USB flash drive, or Bluetooth
® Audio
Move to the right: To skip to the next song.
Move to the left: To go back to the beginning of the current or previous song.
Move to the ri ght and hold: To go to the next folder. ( Bluetooth
® Audio only)
Move to the left and hold: To go to the previous folder. (Bluetooth® Audio only)
• When listening to a CD, HDD or USB flash drive
Move to the ri ght and hold: To skip to the next folder.
Move to the left and hold: To go back to the previous folder.
• When listening to Aha
TM
Move to the right: To skip to the next song.
Move to the ri ght and hold: To select the next station.
Move to the left and hold: To select the previous station.
1Audio Remote Controls
The CD mode appears only when a CD is loaded.
The USB mode, iPod mode, Bluetooth
® Audio
mode, and AhaTM mode appear when a
connection (Bluetooth or US B) is established with
a device.
To select audio mode, press the SOURCE button,
then move the left selector wheel to the right or
left.
Left Selector Wheel
SOURCE Button
Page 152 of 369
151
Audio Settings
Audio
•Update Gracenote Album Info (CD or HDD mode): Updates the Gracenote®
Album Info (Gracenote® Media Database) from CD or from USB.
2
Updating Gracenote® Album Info P. 194
• Delete All HDD Data (HDD mode): Resets all the menu and customized settings,
and delete all music data on the HDD.
• Bluetooth Device List: Displays the Bluetooth
® device list.
• Connect Bluetooth Audio Device (Bluetooth
® Audio or Aha™ mode):
Connects, disconnects or pairs a Bluetooth® Audio device to HFL.
• DVD Auto Play (DVD mode): Turns the auto play feature on or off.
• Audio Language (DVD mode): Selects a language for the audio that is available
on the DVD.
• Subtitle Language (DVD mode): Selects a language for the subtitle that is
available on the DVD.
• Menu Language (DVD mode): Selects a language for the DVD menu that is
available on the DVD.
• Dynamic Range (DVD mode): Sets whether to control the range of the loud and
low sounds.
• Source Select Popup: Selects whether the list of selectable audio sources comes
on when the AUDIO button is pressed.
• Cover Art (CD (MP3/WMA/AAC), iPod , USB or Aha™ mode): Turns on and off
the cover art display.
• Default: Cancels/Resets all customized it ems in the Audio Settings group as
default.
Page 195 of 369
194
Playing Hard Disc Drive (HDD) AudioAudio Menu
Audio
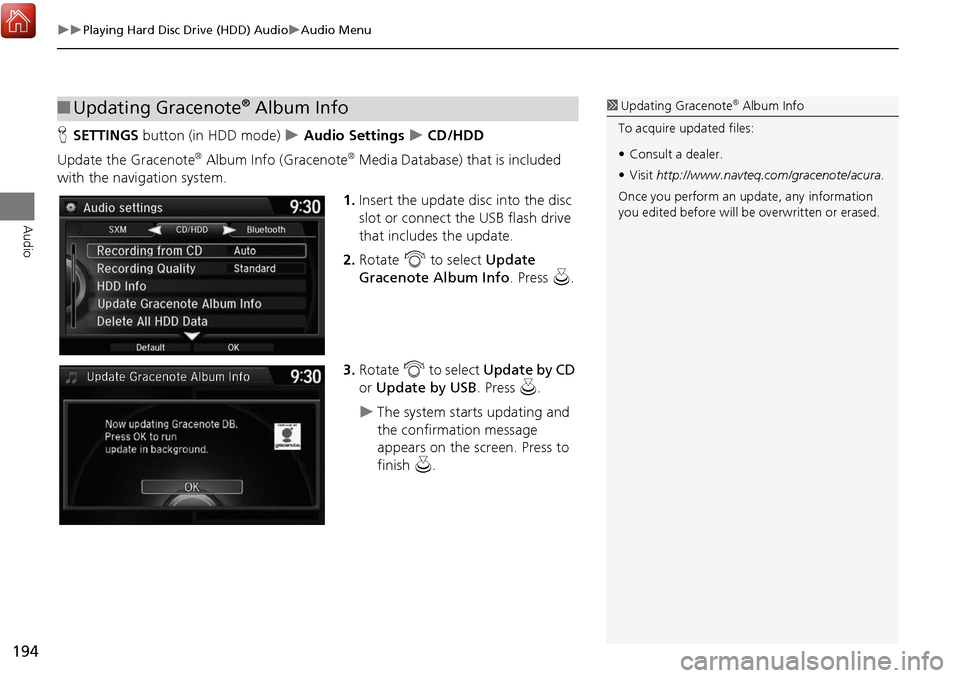
HSETTINGS button (in HDD mode) Audio Settings CD/HDD
Update the Gracenote
® Album Info (Gracenote® Media Database) that is included
with the navigation system.
1.Insert the update disc into the disc
slot or connect the USB flash drive
that includes the update.
2. Rotate i to select Update
Gracenote Album Info . Press u.
3. Rotate i to select Update by CD
or Update by USB . Press u.
The system starts updating and
the confirmation message
appears on the screen. Press to
finish u.
■Updating Gracenote® Album Info1 Updating Gracenote® Album Info
To acquire updated files:
• Consult a dealer.
• Visit http://www.navteq.com/gracenote/acura .
Once you perform an update, any information
you edited before will be overwritten or erased.
Page 197 of 369
196
Audio
Playing an iPod
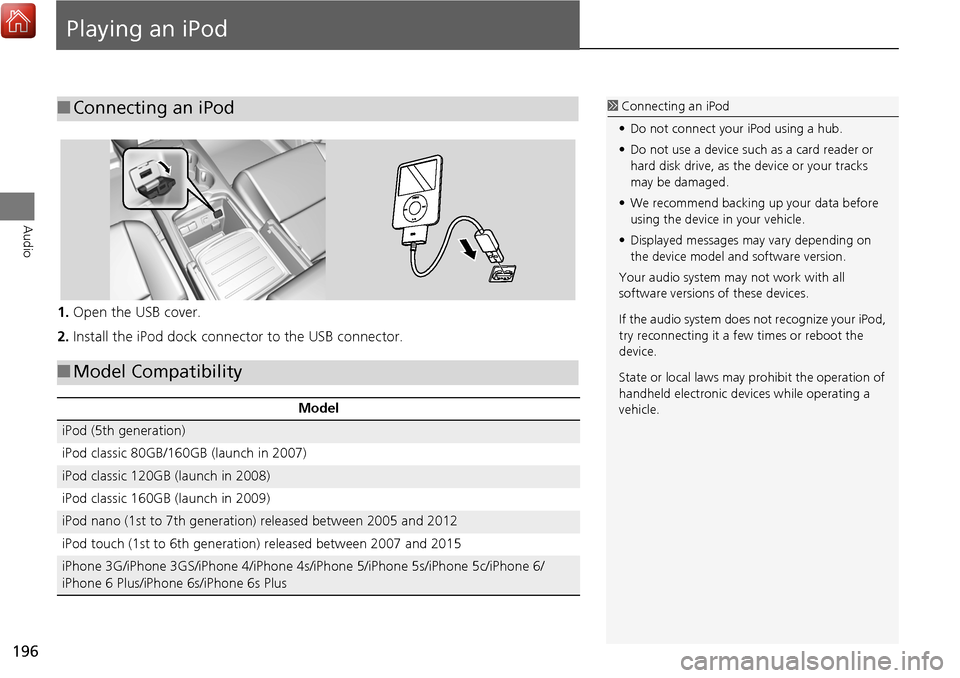
1.Open the USB cover.
2. Install the iPod dock connector to the USB connector.
■Connecting an iPod1 Connecting an iPod
• Do not connect your iPod using a hub.
• Do not use a device such as a card reader or
hard disk drive, as the device or your tracks
may be damaged.
• We recommend backing up your data before
using the device in your vehicle.
• Displayed messages ma y vary depending on
the device model a nd software version.
Your audio system ma y not work with all
software versions of these devices.
If the audio system does not recognize your iPod,
try reconnecting it a few times or reboot the
device.
State or local laws may prohibit the operation of
handheld electronic devi ces while operating a
vehicle.
■ Model Compatibility
Model
iPod (5th generation)
iPod classic 80GB/160GB (launch in 2007)
iPod classic 120GB (launch in 2008)
iPod classic 160GB (launch in 2009)
iPod nano (1st to 7th generation) released between 2005 and 2012
iPod touch (1st to 6th generation) released between 2007 and 2015
iPhone 3G/iPhone 3GS/iPhone 4/iPhone 4s/iPhone 5/iPhone 5s/iPhone 5c/iPhone 6/
iPhone 6 Plus/iPhone 6s/iPhone 6s Plus
Page 198 of 369

197
Playing an iPodSelecting iPod Mode
Audio
Selecting iPod Mode
1.Connect the iPod to the USB adapter cable in the console compartment.
2. Press the MENU button. (in AUDIO mode)
3. Rotate i, select Change Source . Press u.
4. Rotate i, select iPod. Press u.
2. Select Source .
3. Select the iPod icon.1Playing an iPod
You can control an iPod using voice commands.
2 Voice Control Operation P. 6
2 Song By Voice
TM (SBV) P. 203
Available opera ting functions vary on models or
versions. Some functions may not be available on
the vehicle’s audio system.
If there is a problem, you may see an error
message on the audio/information screen.
2 iPod/USB Flash Drive P. 339
Interface Dial
On Demand Multi-Use DisplayTM
Page 209 of 369
208
Audio
Playing Internet Radio
Selecting Internet Radio Mode
1.Connect a compatible phone through Bluetooth®.
2. Press the MENU button. (in AUDIO mode)
3. Rotate i to select Change Source . Press u.
4. Rotate i to select Aha. Press u.
2. Select Source .
3. Select the Aha icon.
You can also connect the phone using your dock connector to the USB port.1 Playing internet Radio
To find out if your phone is compatible with this
feature, visit handsfreelink.ca , or call 1-888-528-
7876.
Interface Dial
On Demand Multi-Use DisplayTM
iPhone
Page 212 of 369
211
Audio
Playing a USB Flash Drive
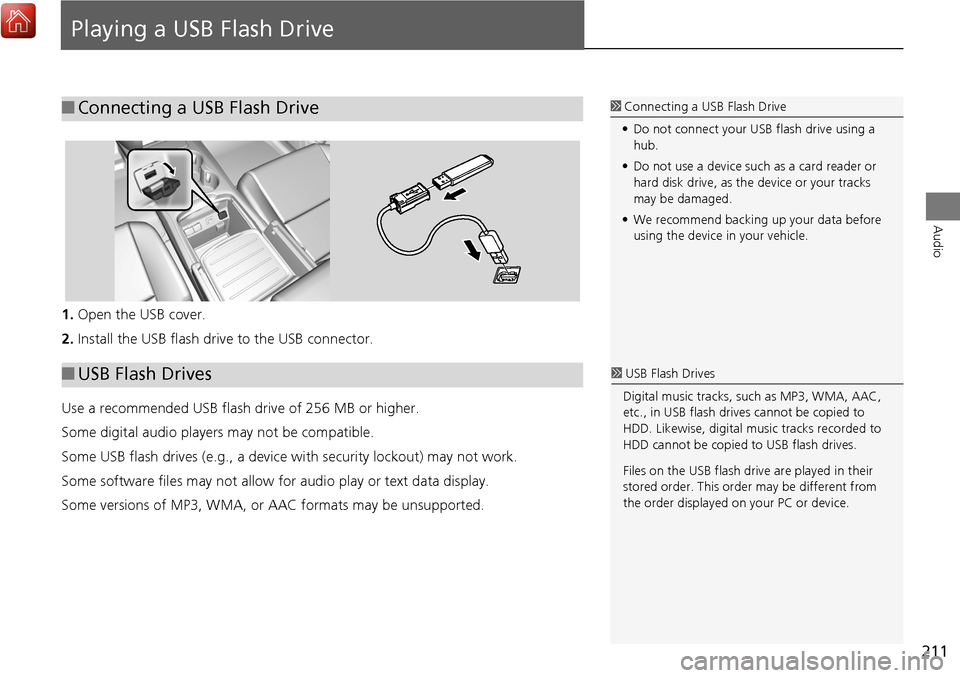
1.Open the USB cover.
2. Install the USB flash drive to the USB connector.
Use a recommended USB flash drive of 256 MB or higher.
Some digital audio players may not be compatible.
Some USB flash drives (e.g., a device with security lockout) may not work.
Some software files may not allow for audio play or text data display.
Some versions of MP3, WMA, or AAC formats may be unsupported.
■Connecting a USB Flash Drive1 Connecting a USB Flash Drive
• Do not connect your US B flash drive using a
hub.
• Do not use a device such as a card reader or
hard disk drive, as th e device or your tracks
may be damaged.
• We recommend backing up your data before
using the device in your vehicle.
■ USB Flash Drives1 USB Flash Drives
Digital music tracks, such as MP3, WMA, AAC,
etc., in USB flash drives cannot be copied to
HDD. Likewise, digital music tracks recorded to
HDD cannot be copied to USB flash drives.
Files on the USB flash drive are played in their
stored order. This orde r may be different from
the order displayed on your PC or device.
Page 213 of 369
212
Playing a USB Flash DriveSelecting USB Mode
Audio
Selecting USB Mode
1.Connect the USB flash drive to the USB port in the console compartment.
2. Press the MENU button. (in AUDIO mode)
3. Rotate i to select Change Source . Press u.
4. Rotate i to select USB. Press u .
2. Select Source .
3. Select the USB icon.1Playing a USB Flash Drive
You can control a USB flash drive using voice
commands.
2 Voice Control Operation P. 6
Files in WMA/AAC format protected by digital
rights management (DRM) cannot be played.
The audio system displays Unplayable File, and
then skips to the next file.
If there is a problem, you may see an error
message on the audio/information screen.
2 iPod/USB Flash Drive P. 339
Interface Dial
On Demand Multi-Use DisplayTM
Page 214 of 369
213
Playing a USB Flash DriveAudio Screen Control
Audio
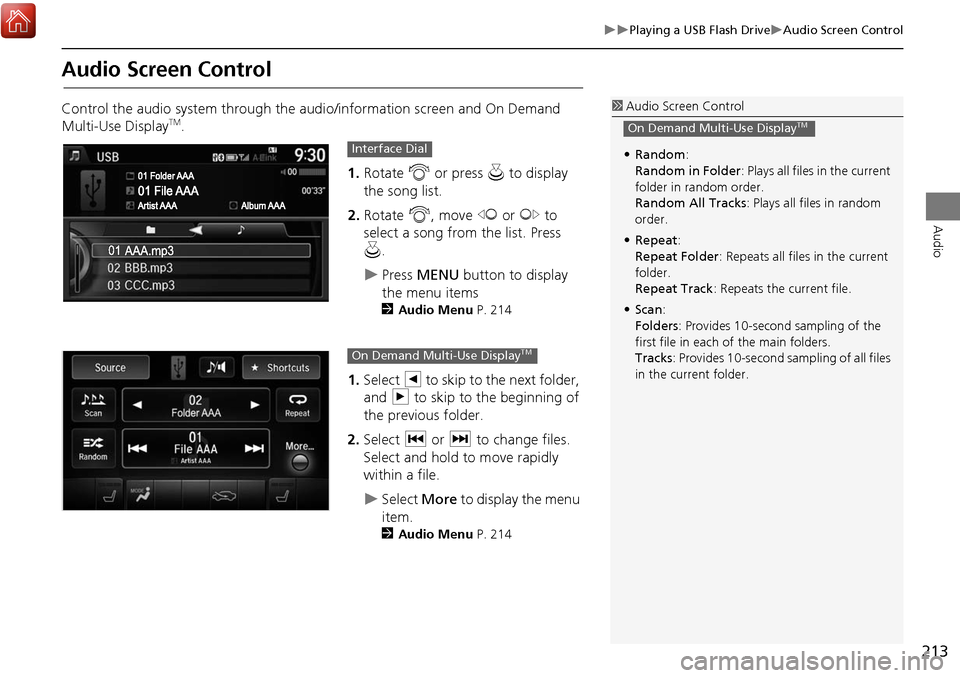
Audio Screen Control
Control the audio system through the audio/information screen and On Demand
Multi-Use DisplayTM.1.Rotate i or press u to display
the song list.
2. Rotate i, move w or y to
select a song from the list. Press
u .
Press MENU button to display
the menu items
2 Audio Menu P. 214
1.Select b to skip to the next folder,
and n to skip to the beginning of
the previous folder.
2. Select c or x to change files.
Select and hold to move rapidly
within a file.
Select More to display the menu
item.
2 Audio Menu P. 214
1Audio Screen Control
• Random :
Random in Folder : Plays all files in the current
folder in random order.
Random All Tracks : Plays all files in random
order.
• Repeat :
Repeat Folder : Repeats all files in the current
folder.
Repeat Track: Repeats the current file.
• Scan:
Folders : Provides 10-second sampling of the
first file in each of the main folders.
Tracks : Provides 10-second sampling of all files
in the current folder.
On Demand Multi-Use DisplayTM
Interface Dial
On Demand Multi-Use DisplayTM