reset Acura MDX 2017 Navigation Manual
[x] Cancel search | Manufacturer: ACURA, Model Year: 2017, Model line: MDX, Model: Acura MDX 2017Pages: 369, PDF Size: 29.59 MB
Page 163 of 369
162
Playing SiriusXM® RadioAudio Screen Control
Audio
■Multi-channel preset (for music channels only)
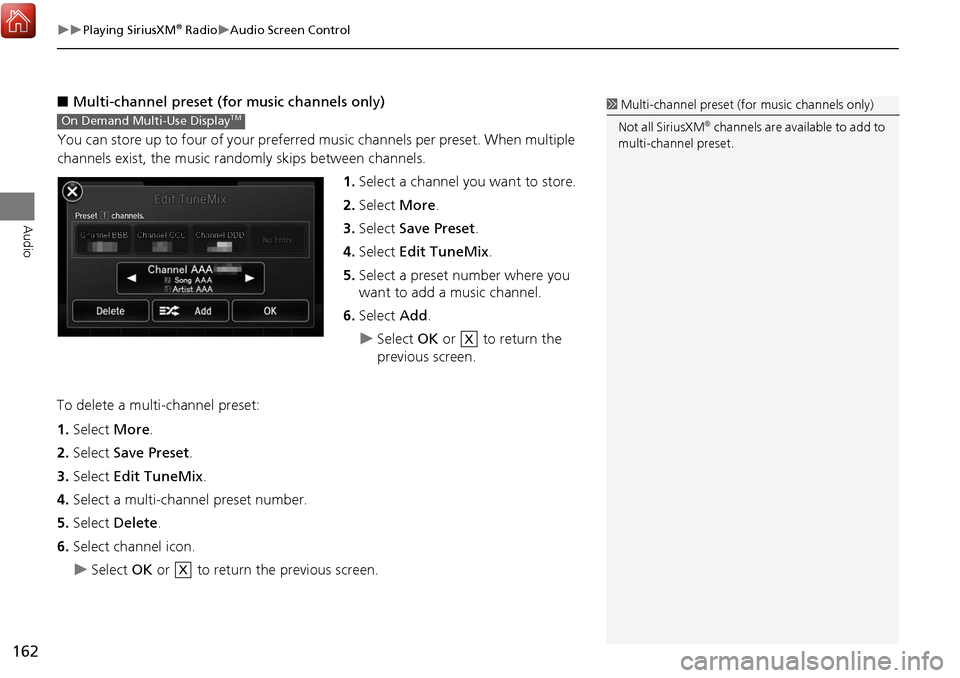
You can store up to four of your preferre d music channels per preset. When multiple
channels exist, the music rand omly skips between channels.
1.Select a channel you want to store.
2. Select More.
3. Select Save Preset .
4. Select Edit TuneMix .
5. Select a preset number where you
want to add a music channel.
6. Select Add.
Select OK or to return the
previous screen.
To delete a multi-channel preset:
1. Select More.
2. Select Save Preset .
3. Select Edit TuneMix .
4. Select a multi-channel preset number.
5. Select Delete .
6. Select channel icon.
Select OK or to return the previous screen.
1Multi-channel preset (f or music channels only)
Not all SiriusXM
® channels are available to add to
multi-channel preset.On Demand Multi-Use DisplayTM
X
X
Page 164 of 369
163
Playing SiriusXM® RadioAudio Screen Control
Audio
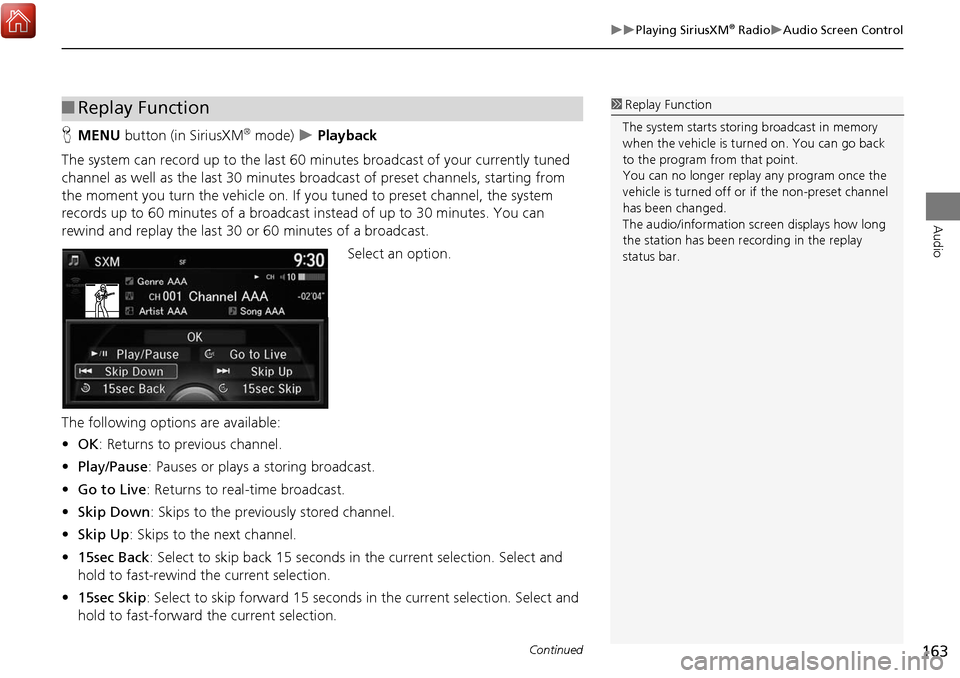
HMENU button (in SiriusXM® mode) Playback
The system can record up to the last 60 minutes broadcast of your currently tuned
channel as well as the last 30 minutes broa dcast of preset channels, starting from
the moment you turn the vehicle on. If y ou tuned to preset channel, the system
records up to 60 minutes of a broadcast instead of up to 30 minutes. You can
rewind and replay the last 30 or 60 minutes of a broadcast.
Select an option.
The following options are available:
• OK : Returns to previous channel.
• Play/Pause: Pauses or plays a storing broadcast.
• Go to Live : Returns to real-time broadcast.
• Skip Down : Skips to the previously stored channel.
• Skip Up: Skips to the next channel.
• 15sec Back : Select to skip back 15 seconds in the current selection. Select and
hold to fast-rewind the current selection.
• 15sec Skip : Select to skip forward 15 seconds in the current selection. Select and
hold to fast-forward the current selection.
■ Replay Function1 Replay Function
The system starts stori ng broadcast in memory
when the vehicle is turned on. You can go back
to the program from that point.
You can no longer repl ay any program once the
vehicle is turned off or if the non-preset channel
has been changed.
The audio/information scre en displays how long
the station has been re cording in the replay
status bar.
Continued
Page 174 of 369
173
Playing SiriusXM® RadioAudio Menu
Audio
Audio Menu
HMENU button (in SiriusXM® mode)
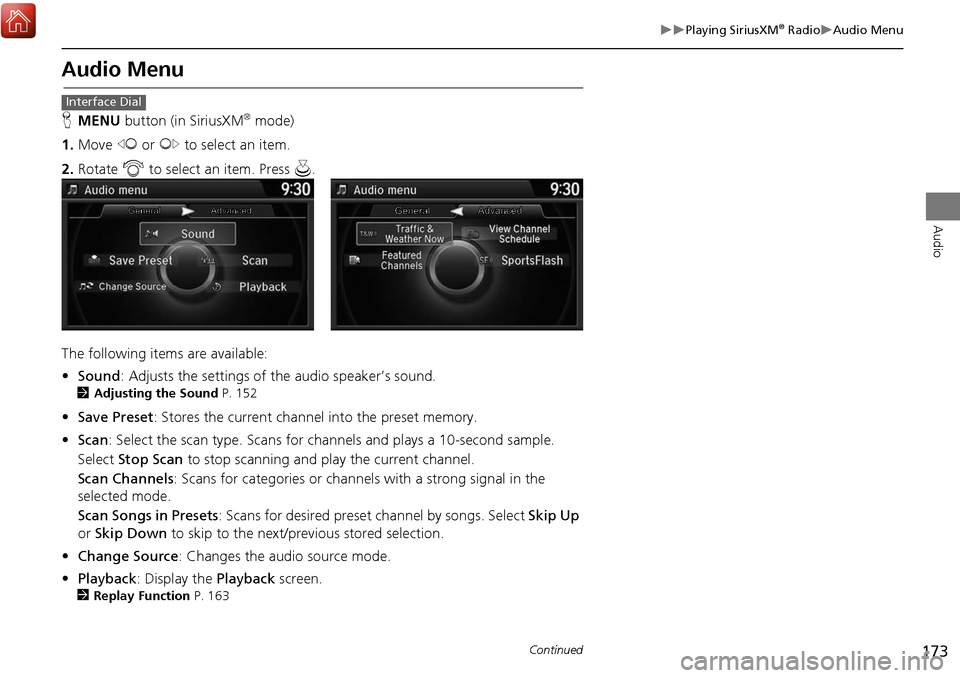
1. Move w or y to select an item.
2. Rotate i to select an item. Press u.
The following items are available:
• Sound : Adjusts the settings of the audio speaker’s sound.
2Adjusting the Sound P. 152
•Save Preset : Stores the current channel into the preset memory.
• Scan : Select the scan type. Scans for cha nnels and plays a 10-second sample.
Select Stop Scan to stop scanning and play the current channel.
Scan Channels : Scans for categories or channels with a strong signal in the
selected mode.
Scan Songs in Presets: Scans for desired preset channel by songs. Select Skip Up
or Skip Down to skip to the next/previous stored selection.
• Change Source : Changes the audio source mode.
• Playback : Display the Playback screen.
2Replay Function P. 163
Interface Dial
Continued
Page 176 of 369
175
Playing SiriusXM® RadioAudio Menu
Audio
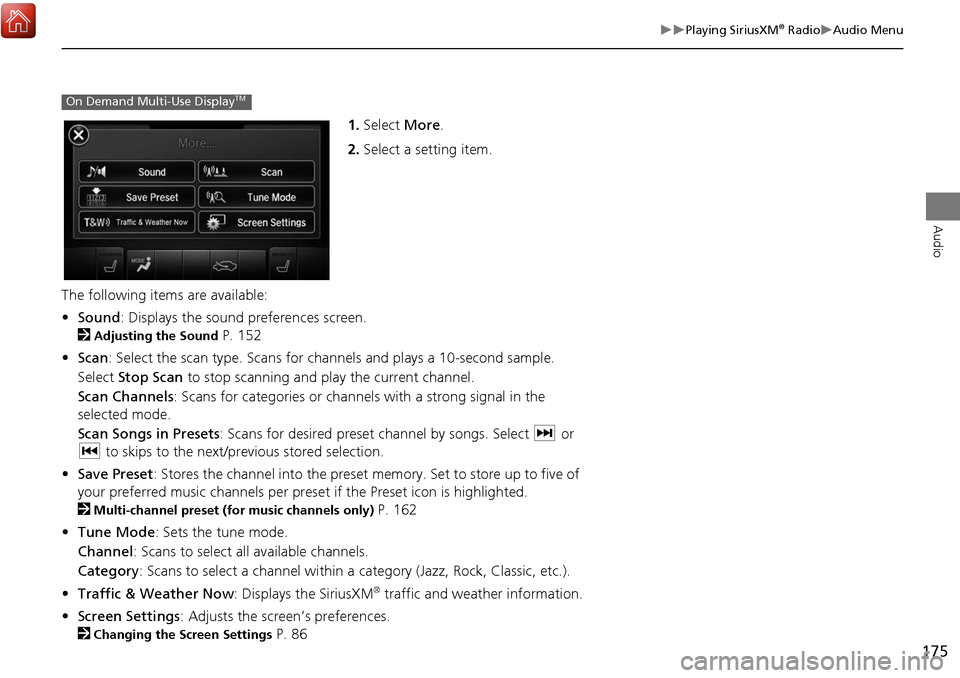
1.Select More.
2. Select a setting item.
The following items are available:
• Sound : Displays the sound preferences screen.
2
Adjusting the Sound P. 152
• Scan : Select the scan type. Scans for cha nnels and plays a 10-second sample.
Select Stop Scan to stop scanning and play the current channel.
Scan Channels : Scans for categories or channels with a strong signal in the
selected mode.
Scan Songs in Presets : Scans for desired preset channel by songs. Select x or
c to skips to the next/previous stored selection.
• Save Preset : Stores the channel into the preset memory. Set to store up to five of
your preferred music channels per preset if the Preset icon is highlighted.
2
Multi-channel preset (for music channels only) P. 162
• Tune Mode : Sets the tune mode.
Channel: Scans to select all available channels.
Category : Scans to select a channel within a category (Jazz, Rock, Classic, etc.).
• Traffic & Weather Now : Displays the SiriusXM
® traffic and weather information.
• Screen Settings : Adjusts the screen’s preferences.
2
Changing the Screen Settings P. 86
On Demand Multi-Use DisplayTM
Page 235 of 369
234
Bluetooth® HandsFreeLink®Setting Up Speed Dialing
Bluetooth
® HandsFreeLink
®
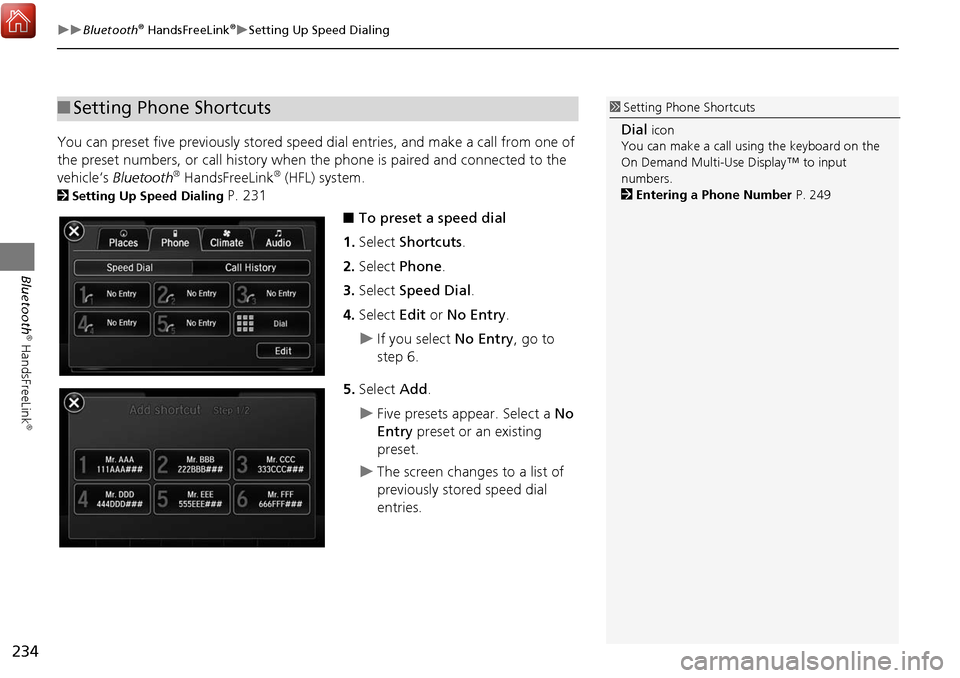
You can preset five previously stored speed dial entries, and make a call from one of
the preset numbers, or call history when the phone is paired and connected to the
vehicle‘s Bluetooth
® HandsFreeLink® (HFL) system.
2Setting Up Speed Dialing P. 231
■To preset a speed dial
1. Select Shortcuts .
2. Select Phone .
3. Select Speed Dial .
4. Select Edit or No Entry .
If you select No Entry, go to
step 6.
5. Select Add.
Five presets appear. Select a No
Entry preset or an existing
preset.
The screen changes to a list of
previously stored speed dial
entries.
■ Setting Phone Shortcuts1 Setting Phone Shortcuts
Dial icon
You can make a call using the keyboard on the
On Demand Multi-Use Display™ to input
numbers.
2 Entering a Phone Number P. 249
Page 236 of 369
235
Bluetooth® HandsFreeLink®Setting Up Speed Dialing
Bluetooth
® HandsFreeLink
®
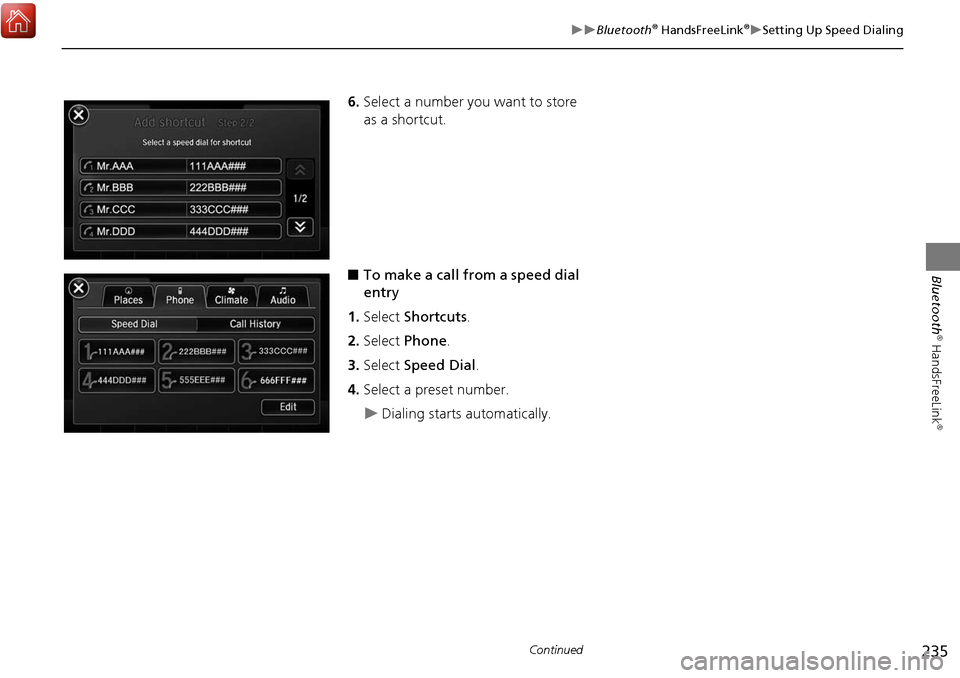
6.Select a number you want to store
as a shortcut.
■ To make a call from a speed dial
entry
1. Select Shortcuts .
2. Select Phone .
3. Select Speed Dial .
4. Select a preset number.
Dialing starts automatically.
Continued
Page 237 of 369
236
Bluetooth® HandsFreeLink®Setting Up Speed Dialing
Bluetooth
® HandsFreeLink
®
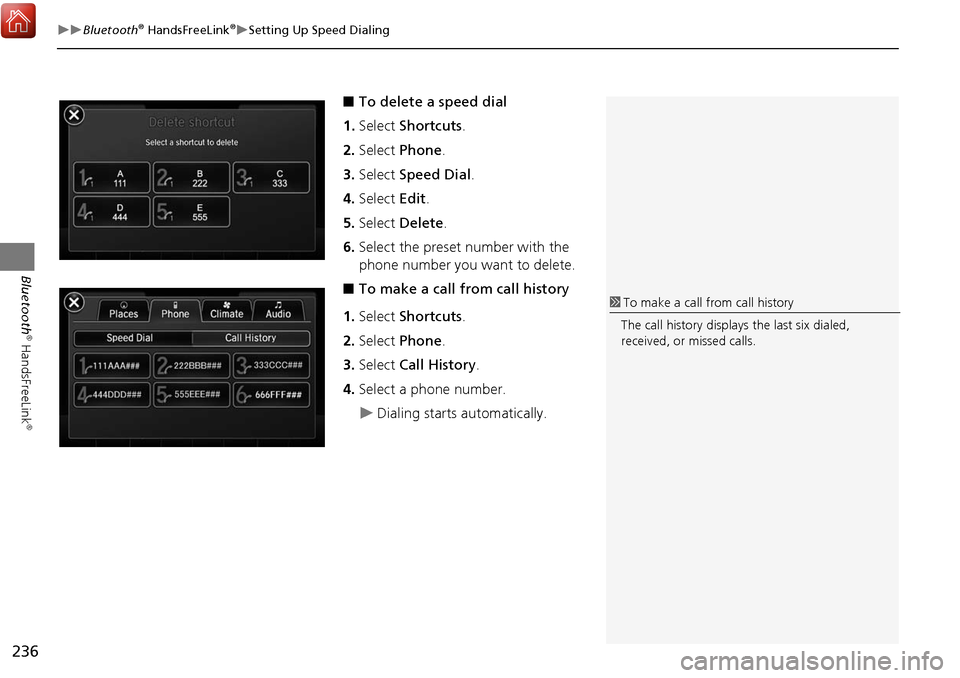
■To delete a speed dial
1. Select Shortcuts .
2. Select Phone .
3. Select Speed Dial .
4. Select Edit.
5. Select Delete .
6. Select the preset number with the
phone number you want to delete.
■ To make a call from call history
1. Select Shortcuts .
2. Select Phone .
3. Select Call History .
4. Select a phone number.
Dialing starts automatically.
1To make a call from call history
The call history displays the last six dialed,
received, or missed calls.
Page 264 of 369
263
Text/E-mail MessageHFL Menus
Bluetooth
® HandsFreeLink
®
Text/
Email*1
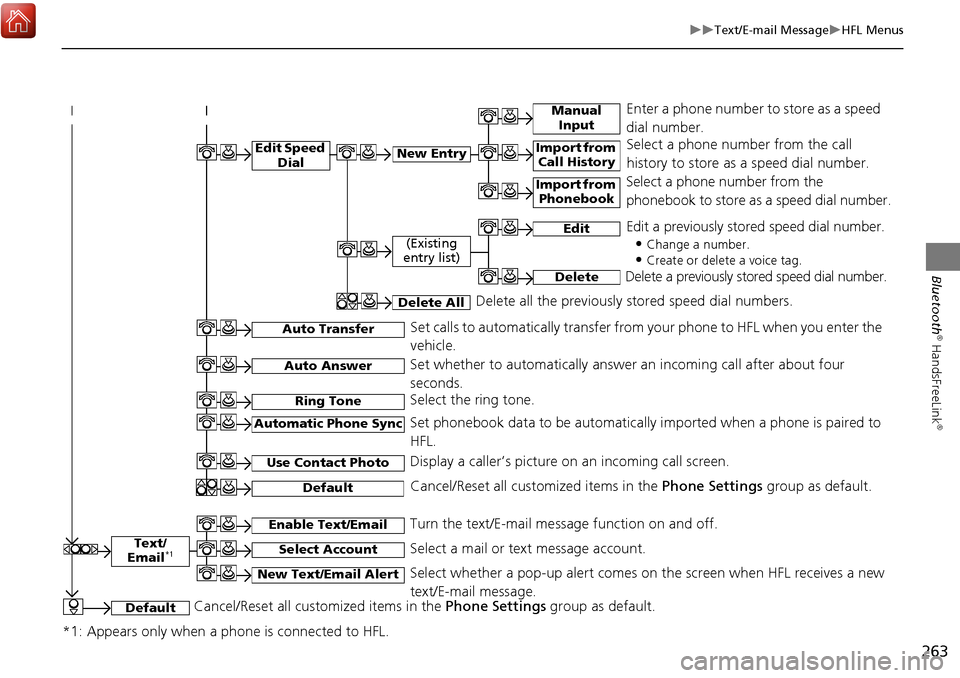
Manual Input
Edit Speed DialNew Entry
Import from Call History
*1: Appears only when a phone is connected to HFL.
Import from Phonebook
Select a phone number from the call
history to store as a speed dial number.
Select a phone number from the
phonebook to store as a speed dial number.
Enter a phone number to store as a speed
dial number.
Edit
Delete
(Existing
entry list)
Edit a previously stored speed dial number.
•
Change a number.
•Create or delete a voice tag.
Delete a previously st ored speed dial number.
Set calls to automatically transfer from your phone to HFL when you enter the
vehicle.Auto Transfer
Auto Answer
Ring Tone
Set whether to automatically answer an incoming call after about four
seconds.
Select the ring tone.
Use Contact Photo
Set phonebook data to be automatically imported when a phone is paired to
HFL.
Display a caller’s picture on an incoming call screen.Automatic Phone Sync
Select AccountSelect a mail or text message account.
Enable Text/EmailTurn the text/E-mail message function on and off.
New Text/Email AlertSelect whether a pop-up alert comes on the screen when HFL receives a new
text/E-mail message.
Cancel/Reset all customized items in the Phone Settings group as default.Default
Delete AllDelete all the previously stored speed dial numbers.
DefaultCancel/Reset all customized items in the Phone Settings group as default.
Page 287 of 369
286
Rear Control Panel OperationScreen and Surround Settings
Rear Entertainment System
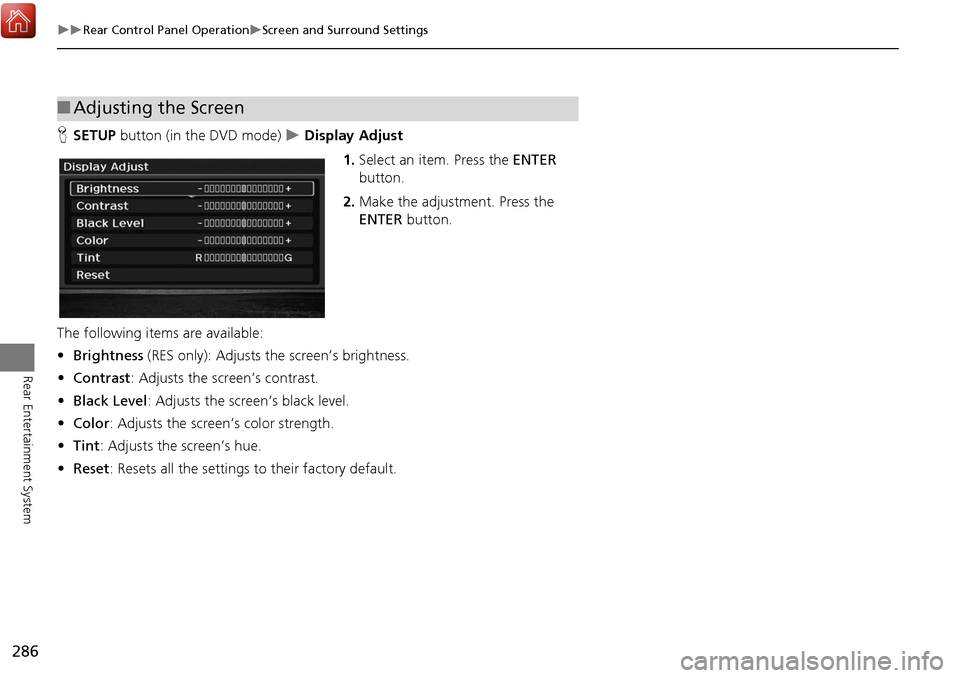
HSETUP button (in the DVD mode) Display Adjust
1.Select an item. Press the ENTER
button.
2. Make the adjustment. Press the
ENTER button.
The following item s are available:
• Brightness (RES only): Adjusts the screen’s brightness.
• Contrast : Adjusts the screen’s contrast.
• Black Level : Adjusts the screen’s black level.
• Color : Adjusts the screen’s color strength.
• Tint : Adjusts the screen’s hue.
• Reset: Resets all the settings to their factory default.
■Adjusting the Screen
Page 301 of 369
300
Other Features
Trip Computer
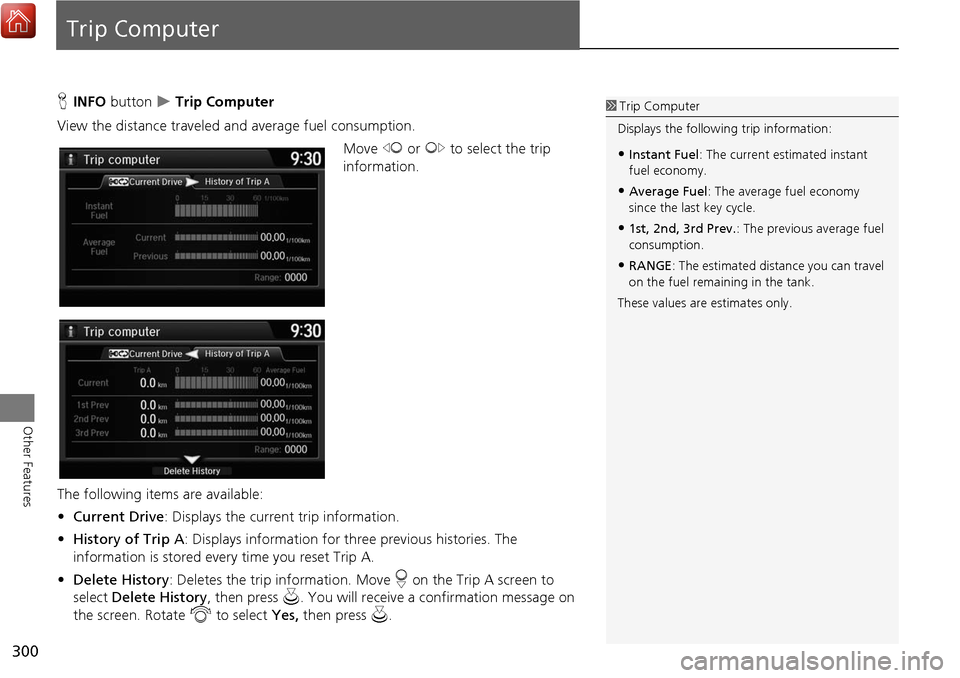
HINFO button Trip Computer
View the distance traveled and average fuel consumption. Move w or y to select the trip
information.
The following item s are available:
• Current Drive : Displays the current trip information.
• History of Trip A : Displays information for three previous histories. The
information is stored ever y time you reset Trip A.
• Delete History : Deletes the trip information. Move r on the Trip A screen to
select Delete History , then press u. You will receive a confirmation message on
the screen. Rotate i to select Yes, then press u.1Trip Computer
Displays the following trip information:
•Instant Fuel : The current estimated instant
fuel economy.
•Average Fuel : The average fuel economy
since the last key cycle.
•1st, 2nd, 3rd Prev. : The previous average fuel
consumption.
•RANGE : The estimated distance you can travel
on the fuel remaining in the tank.
These values are estimates only.