Acura MDX 2017 Owner's Guide
Manufacturer: ACURA, Model Year: 2017, Model line: MDX, Model: Acura MDX 2017Pages: 170, PDF Size: 12.43 MB
Page 101 of 170
94 |
DRIVING
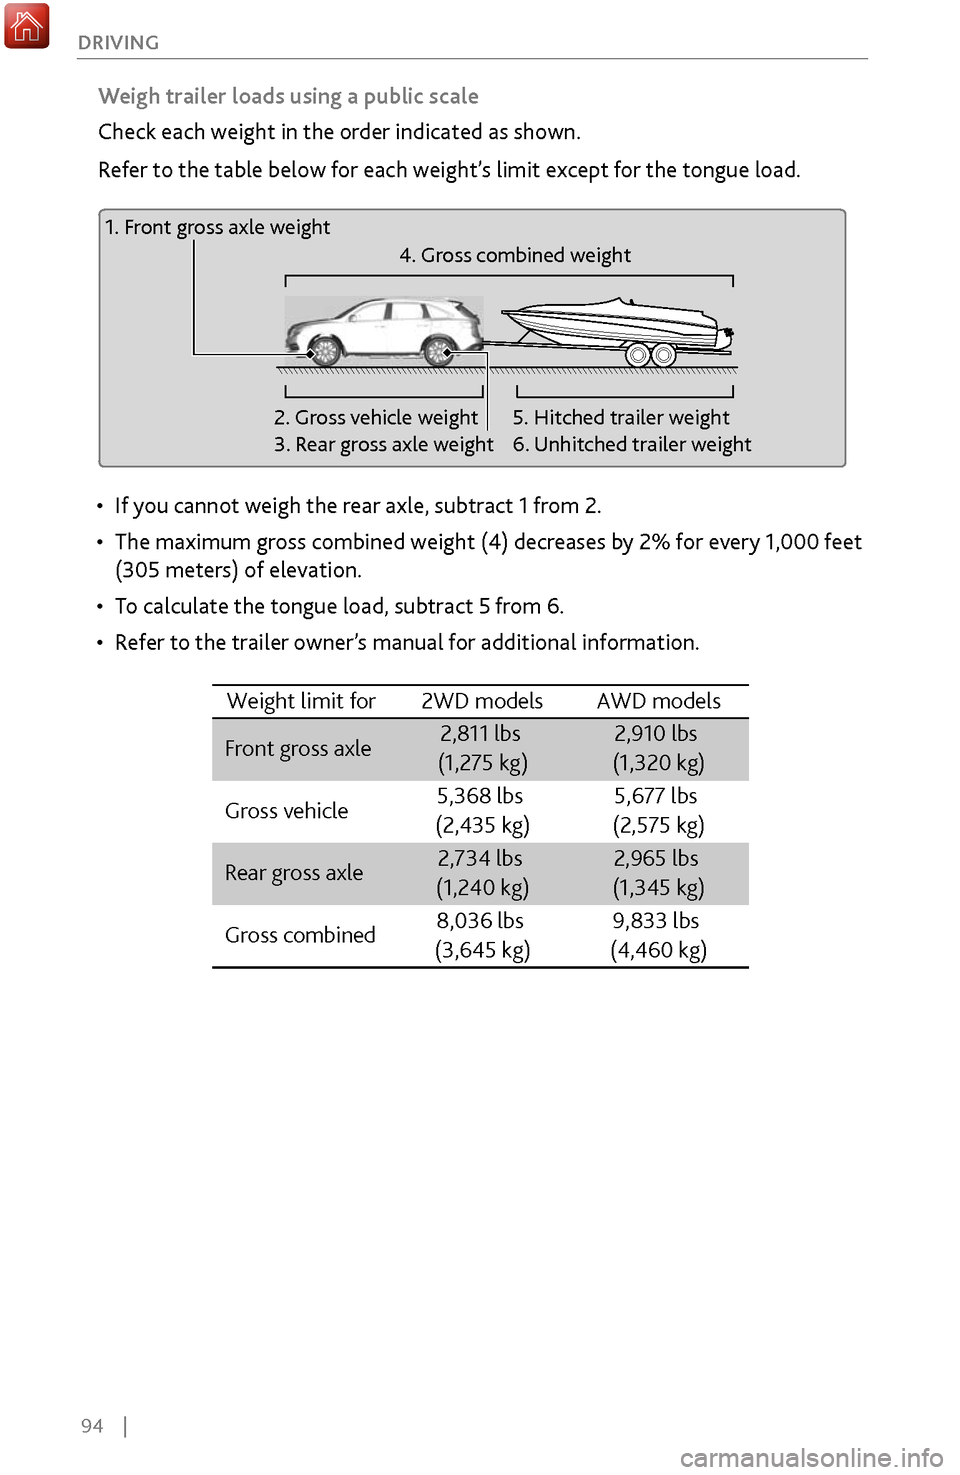
Weigh trailer loads using a public scale
Check each weight in the order indicated as shown.
Refer to the table below for each weight’s limit except for the tongue load.
Weight limit fo
r
Front gross axle2,811 lbs
(1,275 kg)2,910 lbs
(1,320 kg)
Gross vehicle 5,368 lbs
(2,435 kg ) 5,677 lbs
(2,575 kg)
Rear gross axle2,734 lbs
(1,240 kg)2,965 lbs
(1,345 kg)
Gross combine d8,036 lbs
(3,645 kg )9,833 lbs
(4,460 kg)
AWD models
2WD model s
• If you cannot weigh the rear axle, subtract 1 from 2.
•
The maximum gross combined weight (4)
decreases by 2% for every 1,000 feet
(305 meters) of elevation.
•
To calculate the
tongue load, subtract 5 from 6.
•
Refer to the trailer owner’
s manual for additional information.
1. Front gross axle weight
2. Gross vehicle weight
3. Rear gross axle weight4. Gross combined weight
5. Hitched trailer weight
6. Unhitched trailer weight
Page 102 of 170
| 95
DRIVING
Pre-Tow Checklist
When preparing to tow, and before driving away, be sure to check the following:
•
Avoid
towing a trailer during your vehicle’s first 600 miles (1,000 km).
•
The vehicle and
trailer have been properly serviced and are in good condition.
Lights and brakes work properly, and the tires are properly inflated.
•
All weights and loads are
within limits. Never exceed the gross weight ratings.
•
When towing more
than 3,500 lbs (1,590 kg), use of gasoline with an octane
rating of 91 or higher is recommended.
•
Check if all loads are within limits at a public scale (see page 94). If a pu
blic
scale is not available, add the estimated weight of your cargo load to the
weight of the trailer (as quoted by the manufacturer) and the tongue load.
•
The hitch, safety chains, and any other attachments ar
e secure.
•
All items in or on
the trailer are properly secured and cannot shift while you
drive.
Exceeding any load limit or improperly loading your vehicle and trailer can
cause a crash in which you can be seriously hurt or killed.
Check the loading of your vehicle and trailer carefully before starting to
drive.
WARNING
Page 103 of 170
96 |
DRIVING
Remote Engine Start*
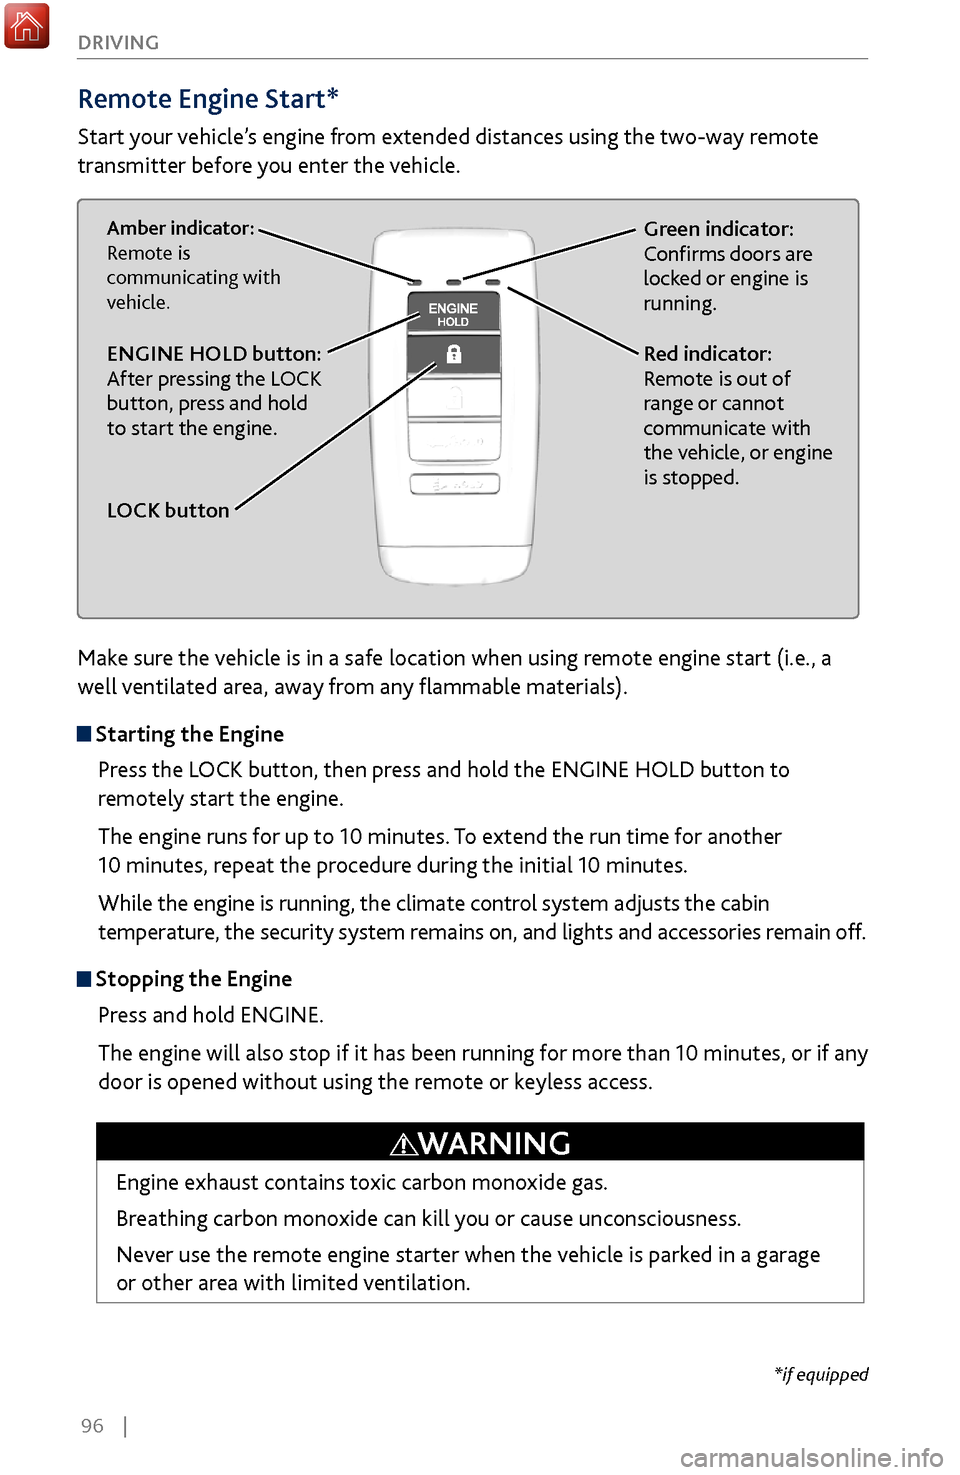
Start your vehicle’s engine from extended distances using the two-way remote
transmitter before you enter the vehicle.
Green indicator:
Confirms doors are
locked or engine is
running.Amber indicator:
Remote is
communicating with
vehicle.
Red indicator:
Remote is out of
range or cannot
communicate with
the vehicle, or engine
is stopped.ENGINE HOLD button:
After pressing the LOCK
button, press and hold
to start the engine.
LOCK button
Make sure the vehicle is in a safe location when using remote engine start (i.e., a
well ventilated area, away from any flammable materials).
Starting the Engine
Press the LOCK button, then press and hold the ENGINE HOLD button to
remotely start the engine.
The engine runs for up to 10 minutes. To extend the run time for another
10 minutes, repeat the procedure during the initial 10 minutes.
While the engine is running, the climate control system adjusts the cabin
temperature, the security system remains on, and lights and accessories remain off.
Stopping the Engine Press and hold ENGINE.
The engine will also stop if it has been running for more than 10 minutes, or if any
door is opened without using the remote or keyless access.
Engine exhaust contains toxic carbon monoxide gas.
Breathing carbon monoxide can kill you or cause unconsciousness.
Never use the remote engine starter when the vehicle is parked in a garage
or other area with limited ventilation.
WARNING
*if equipped
Page 104 of 170
| 97
DRIVING
Starting to Drive
The keyless access system allows simple push-button start.
Before
Starting the Engine
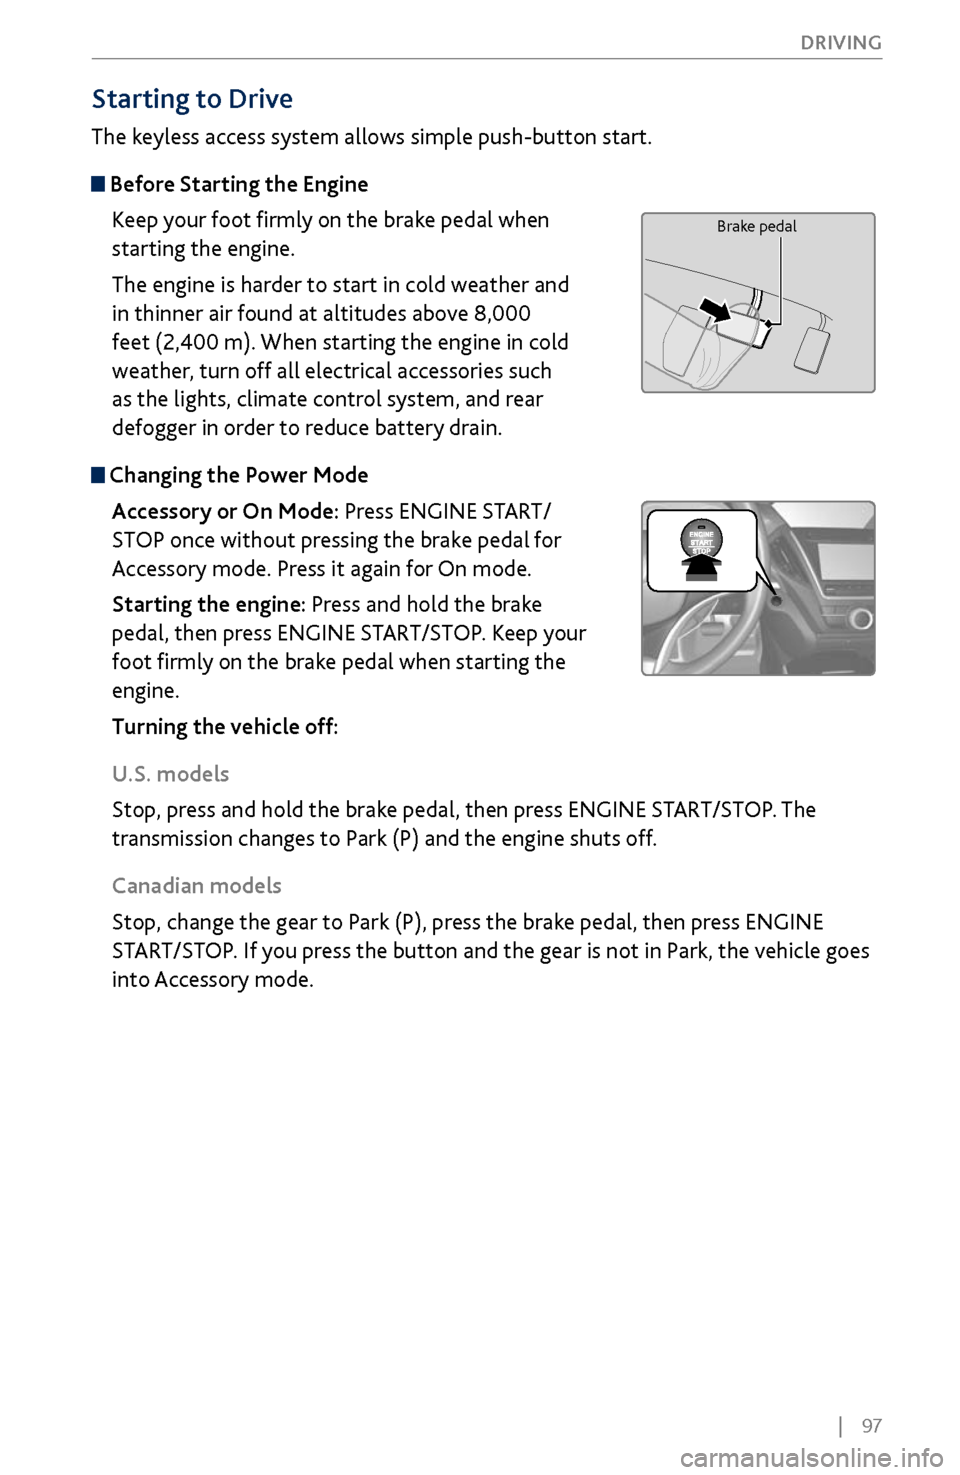
Keep your foot firmly on the brake pedal when
starting the engine.
The engine is harder to start in cold weather and
in thinner air found at altitudes above 8,000
feet (2,400 m). When starting the engine in cold
weather, turn off all electrical accessories such
as the lights, climate control system, and rear
defogger in order to reduce battery drain.
Changing the Power Mode
Accessory or On Mode: Press ENGINE START/
STOP once without pressing the brake pedal for
Accessory mode. Press it again for On mode.
Starting the engine: Press and hold the brake
pedal, then press ENGINE START/STOP. Keep your
foot firmly on the brake pedal when starting the
engine.
Turning the vehicle off:
U.S. models
Stop, press and hold the brake pedal, then press ENGINE START/STOP. The
transmission changes to Park (P) and the engine shuts off.
Canadian models
Stop, change the gear to Park (P), press the brake pedal, then press ENGINE
START/STOP. If you press the button and the gear is not in Park, the vehicle goes
into Accessory mode.
Brake pedal
Page 105 of 170
98 |
DRIVING
When you change from D to R and vice versa, press the brake pedal and come
to a complete stop, then select the intended gear position while maintaining
brake pressure.
NOTICE
Shifting
Change your vehicle’s gears to begin driving.
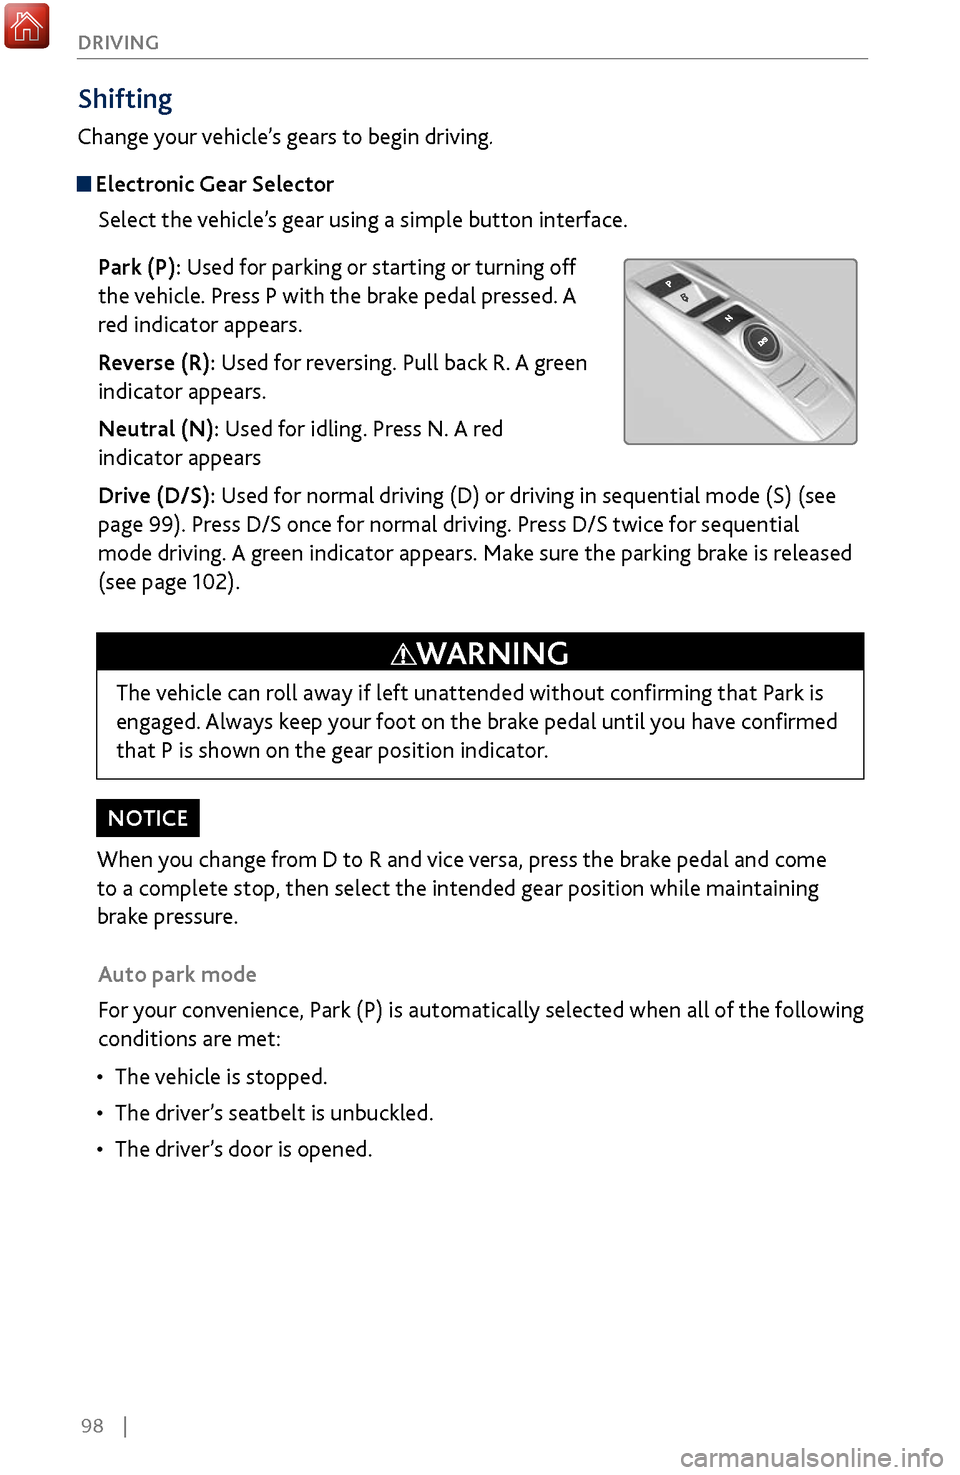
Electronic Gear Selector
Select the vehicle’s gear using a simple button interface.
Park (P): Used for parking or starting or turning off
the vehicle. Press P with the brake pedal pressed. A
red indicator appears.
Reverse (R): Used for reversing. Pull back R. A green
indicator appears.
Neutral (N): Used for idling. Press N. A red
indicator appears
Drive (D/S): Used for normal driving (D) or driving in sequential mode (S) (see
page 99). Press D/S once for normal driving. Press D/S twice for sequential
mode driving. A green indicator appears. Make sure the parking brake is released
(see page 102).
Auto park mode
For your convenience, Park (P) is automatically selected when all of the following
conditions are met:
•
The vehicle is stopped.
•
The driver
’s seatbelt is unbuckled.
•
The driver’
s door is opened.
The vehicle can roll away if left unattended without confirming that Park is
engaged. Always keep your foot on the brake pedal until you have confirmed
that P is shown on the gear position indicator.
WARNING
Page 106 of 170
| 99
DRIVING
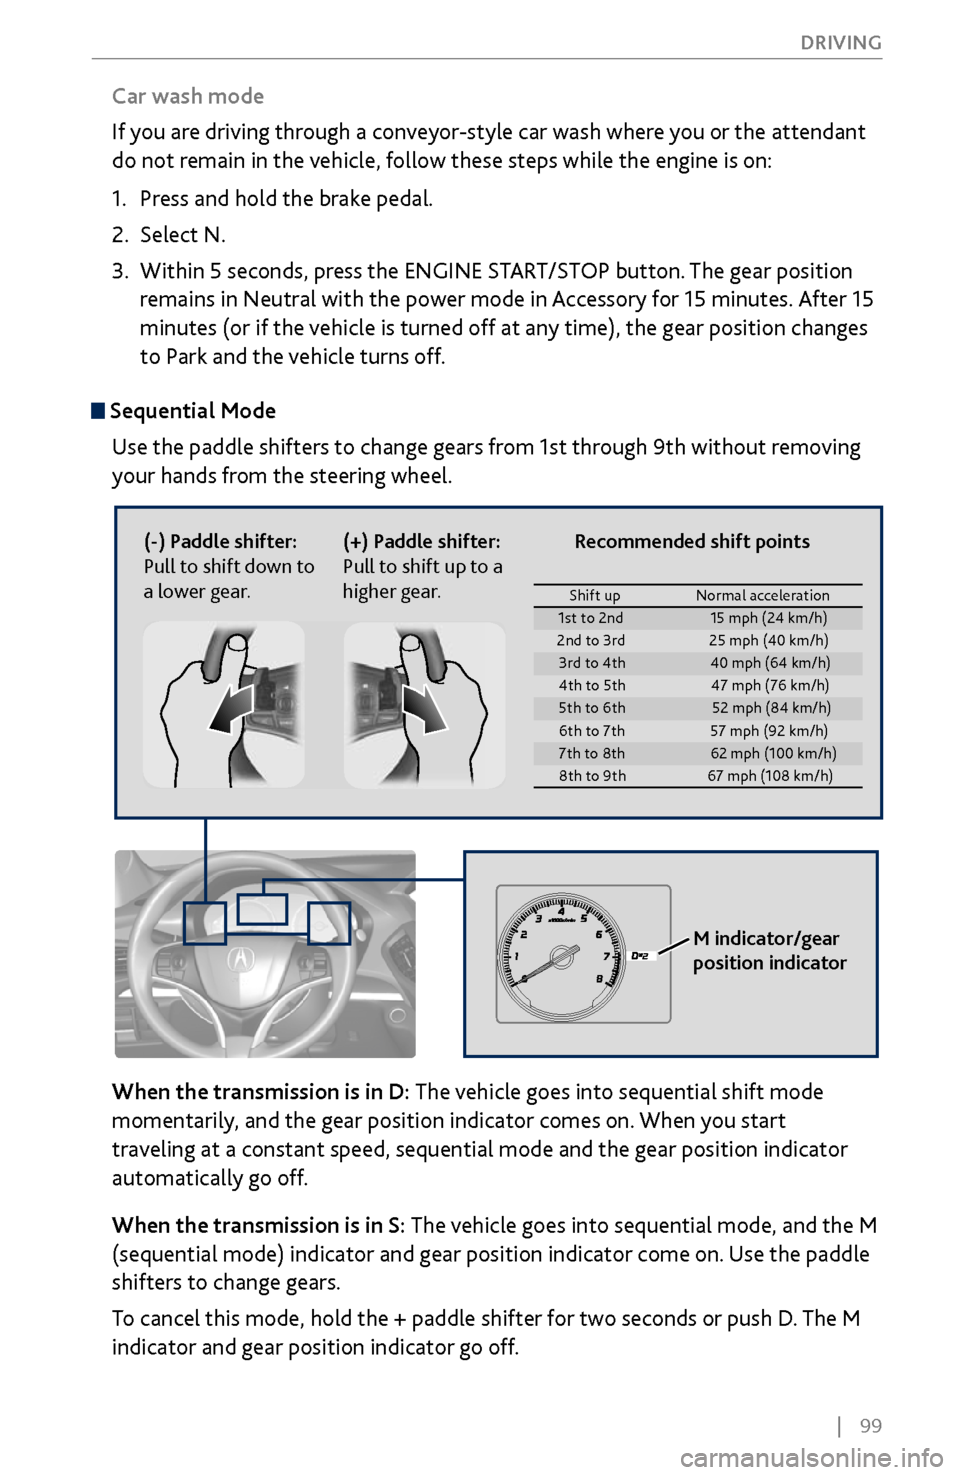
Sequential Mode
Use the paddle shifters to change gears from 1st through 9th without removing
your hands from the steering wheel.
When the transmission is in D: The vehicle goes into sequential shift mode
momentarily, and the gear position indicator comes on. When you start
traveling at a constant speed, sequential mode and the gear position indicator
automatically go off.
When the transmission is in S: The vehicle goes into sequential mode, and the M
(sequential mode) indicator and gear position indicator come on. Use the paddle
shifters to change gears.
To cancel this mode, hold the + paddle shifter for two seconds or push D. The M
indicator and gear position indicator go off.
(-) Paddle shifter:
Pull to shift down to
a lower gear. (+) Paddle shifter:
Pull to shift up to a
higher gear.
M indicator/gear
position indicator
Car wash mode
If you are driving through a conveyor-style car wash where you or the attendant
do not remain in the vehicle, follow these steps while the engine is on:
1.
Press and hold the brak
e pedal.
2.
Select N.
3.
Within 5 seconds, press the ENGINE
START/STOP button. The gear position
remains in Neutral with the power mode in Accessory for 15 minutes. After 15
minutes (or if the vehicle is turned off at any time), the gear position changes
to Park and the vehicle turns off.
Shift up Normal acceleration1st to 2n d15 mph (24 km/h)
2nd to 3rd 25 mph (40 km/h)
3rd to 4th40 mph (64 km/h)
4th to 5t h4 7 mph (76 km/h )
5th to 6th52 mph (84 km/h)
6th to 7t h5 7 mph (92 km/h )
7th to 8th62 mph (100 km/h)
8th to 9th 67 mph (108 km/h)
Recommended shift points
Page 107 of 170
100 |
DRIVING
Auto Idle Stop*
Automatically stops and restarts the engine to help maximize your fuel economy,
depending on environmental and vehicle conditions.
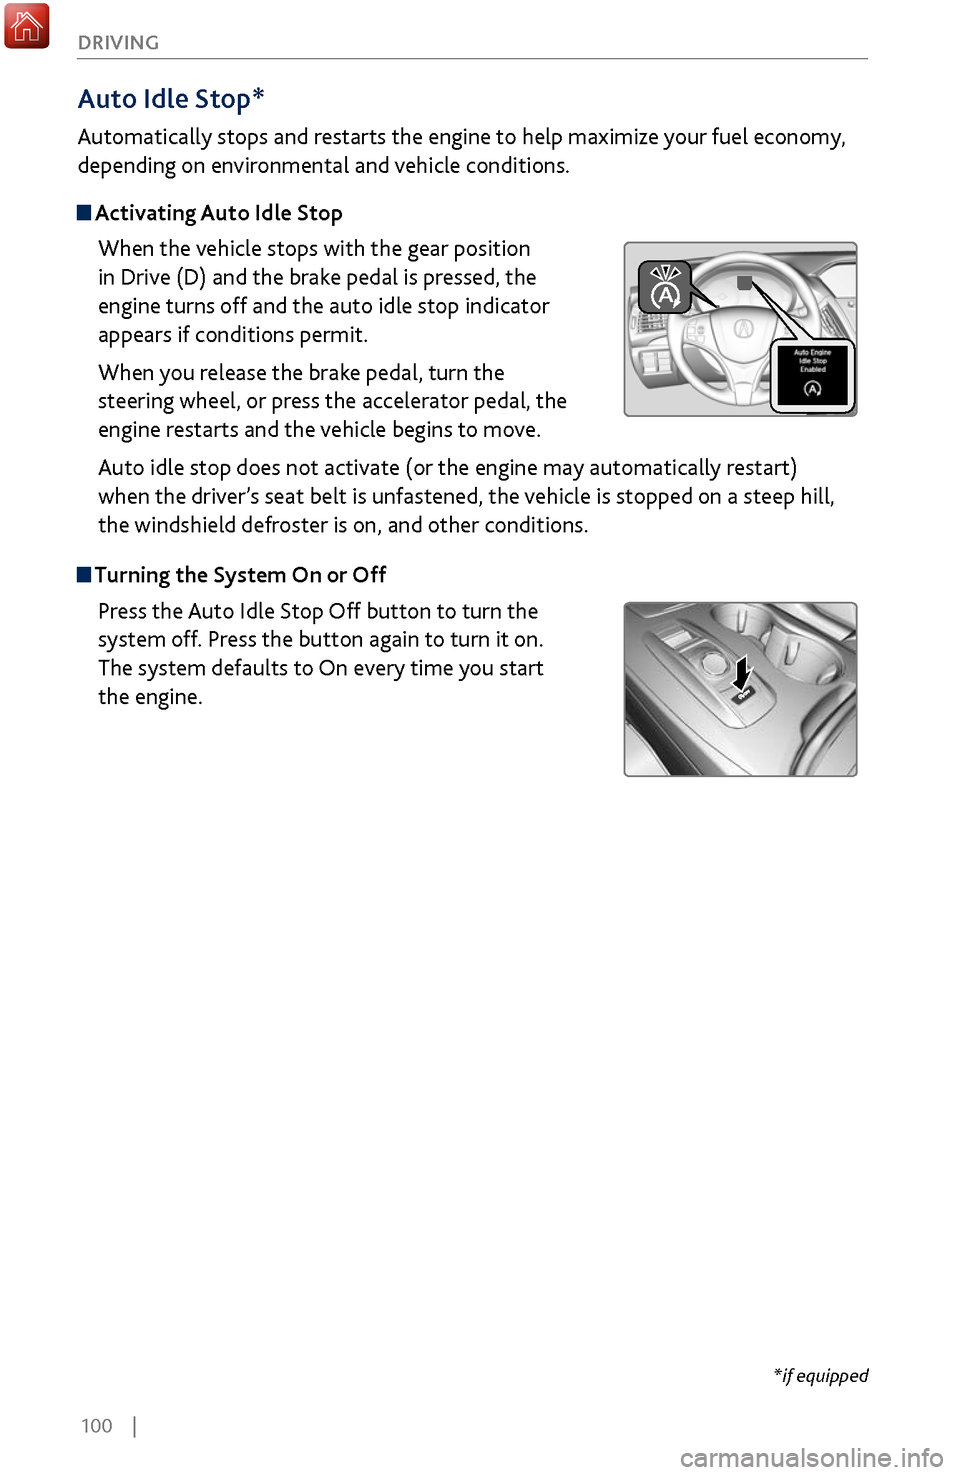
Activating Auto Idle Stop
When the vehicle stops with the gear position
in Drive (D) and the brake pedal is pressed, the
engine turns off and the auto idle stop indicator
appears if conditions permit.
When you release the brake pedal, turn the
steering wheel, or press the accelerator pedal, the
engine restarts and the vehicle begins to move.
Auto idle stop does not activate (or the engine may automatically restart)
when the driver’s seat belt is unfastened, the vehicle is stopped on a steep hill,
the windshield defroster is on, and other conditions.
Turning the System On or Off
Press the Auto Idle Stop Off button to turn the
system off. Press the button again to turn it on.
The system defaults to On every time you start
the engine.
*if equipped
Page 108 of 170
| 101
DRIVING
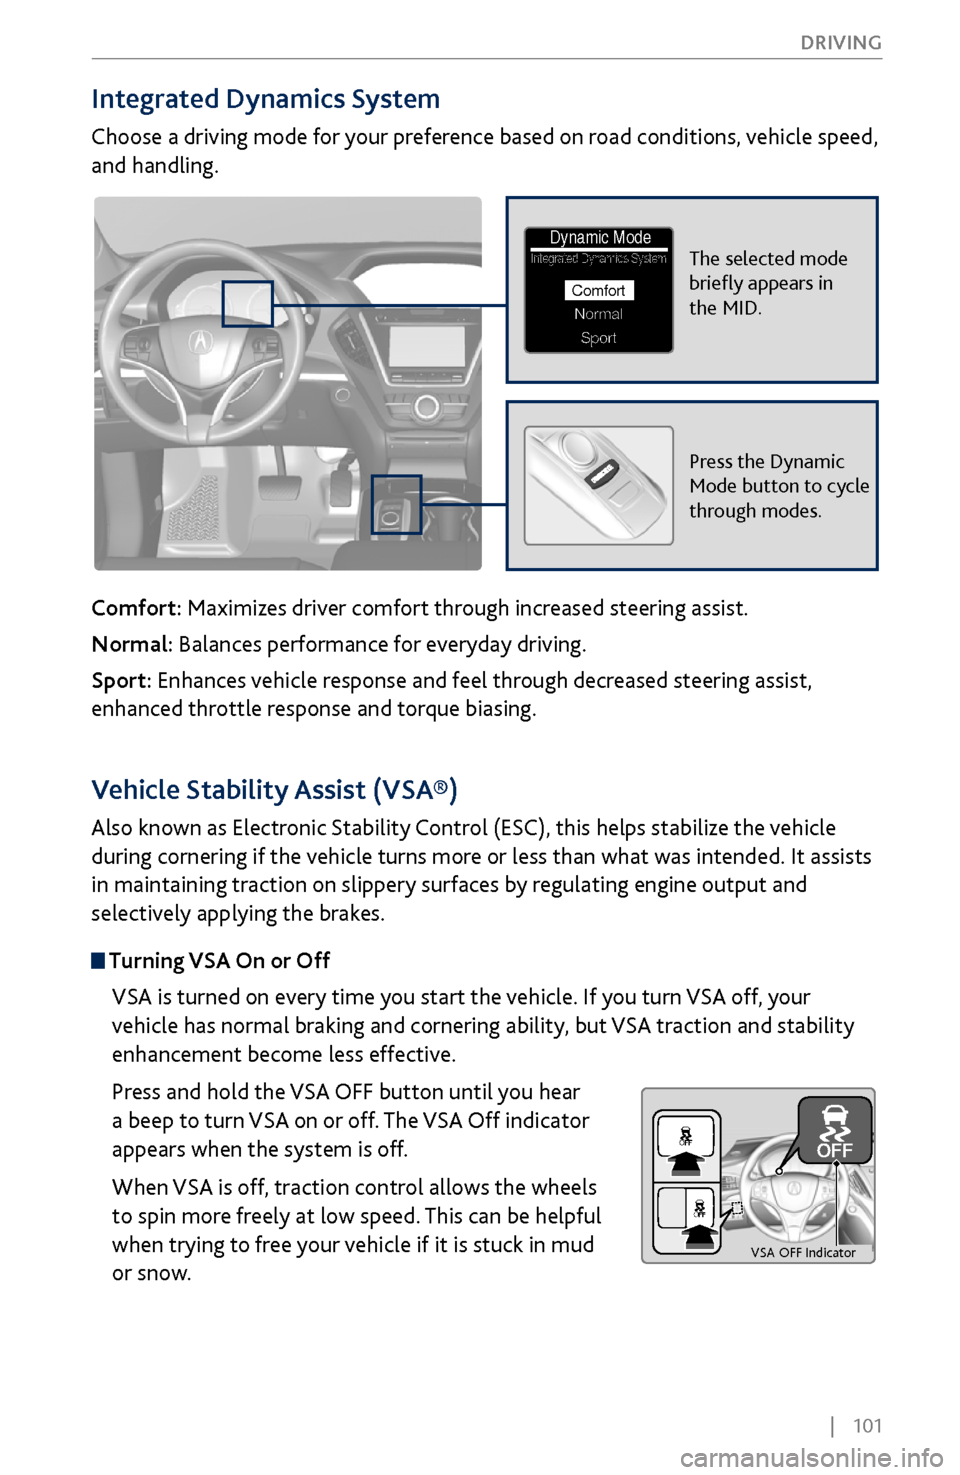
Integrated Dynamics System
Choose a driving mode for your preference based on road conditions, vehicle speed,
and handling.
Comfort: Maximizes driver comfort through increased steering assist.
Normal: Balances performance for everyday driving.
Sport: Enhances vehicle response and feel through decreased steering assist,
enhanced throttle response and torque biasing.
The selected mode
briefly appears in
the MID.Integrated Dynamics System
NormalSport
Comfort
Dynamic Mode
Press the Dynamic
Mode button to cycle
through modes.
Vehicle Stability Assist (VSA®)
Also known as Electronic Stability Control (ESC), this helps stabilize the vehicle
during cornering if the vehicle turns more or less than what was intended. It assists
in maintaining traction on slippery surfaces by regulating engine output and
selectively applying the brakes.
Turning VSA On or Off
VSA is turned on every time you start the vehicle. If you turn VSA off, your
vehicle has normal braking and cornering ability, but VSA traction and stability
enhancement become less effective.
Press and hold the VSA OFF button until you hear
a beep to turn VSA on or off. The VSA Off indicator
appears when the system is off.
When VSA is off, traction control allows the wheels
to spin more freely at low speed. This can be helpful
when trying to free your vehicle if it is stuck in mud
or snow.
VS A OFF Indicator
Page 109 of 170
102 |
DRIVING
Braking
Slow down or stop your vehicle, and keep it from moving when parked.
Foot Brake
Press the brake pedal to slow down or stop your vehicle from moving.
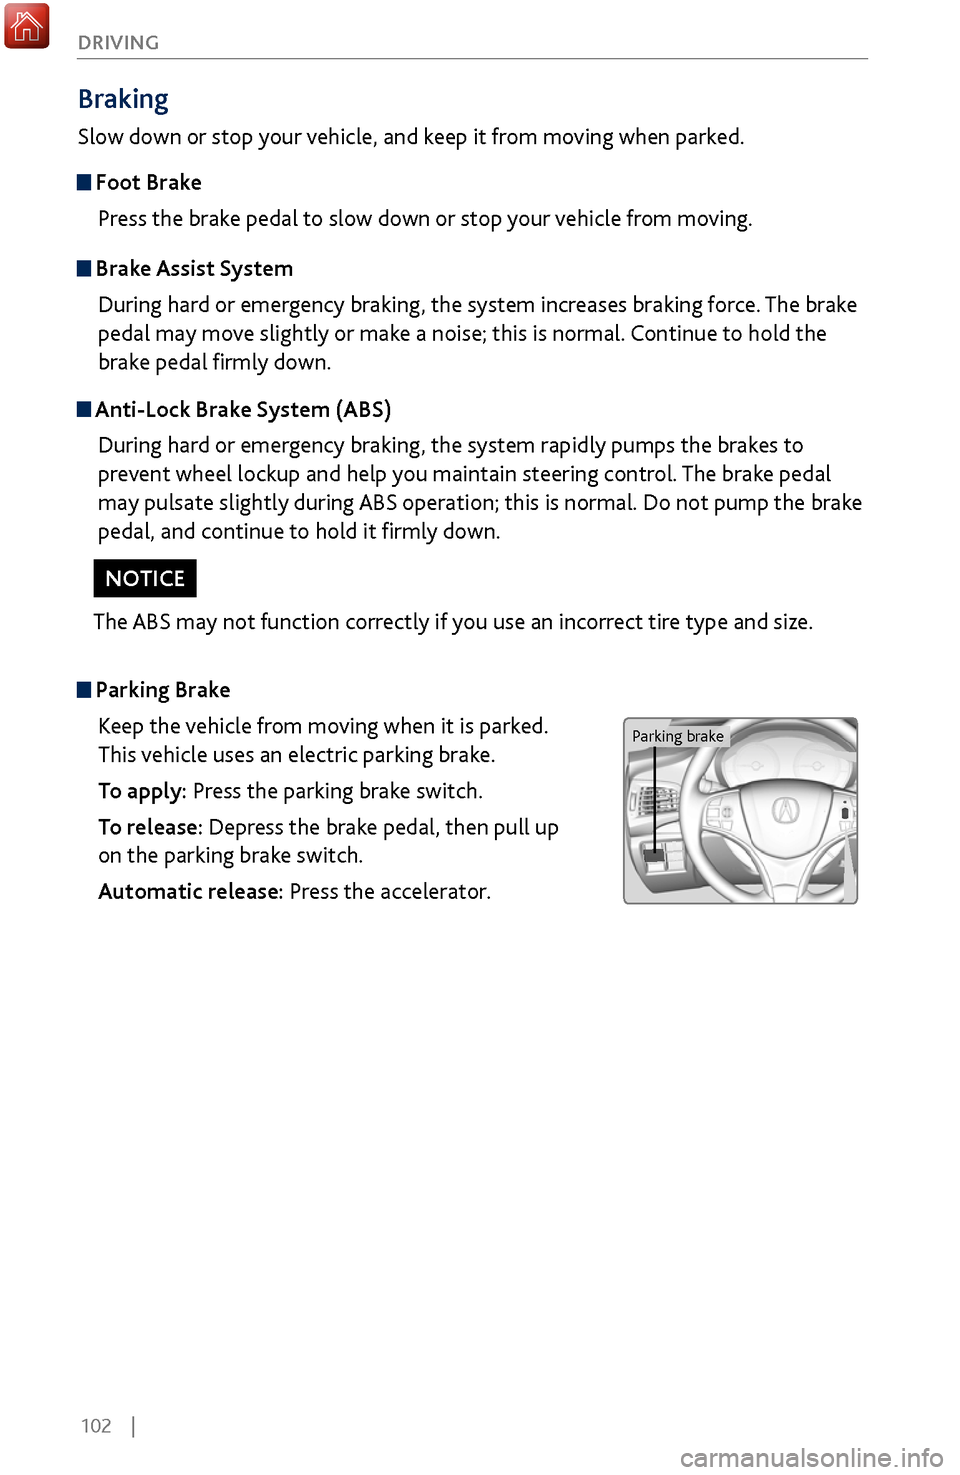
Parking BrakeKeep the vehicle from moving when it is parked.
This vehicle uses an electric parking brake.
To apply: Press the parking brake switch.
To release: Depress the brake pedal, then pull up
on the parking brake switch.
Automatic release: Press the accelerator.
Brake Assist SystemDuring hard or emergency braking, the system increases braking force. The brake
pedal may move slightly or make a noise; this is normal. Continue to hold the
brake pedal firmly down.
Anti-Lock Brake System (ABS)During hard or emergency braking, the system rapidly pumps the brakes to
prevent wheel lockup and help you maintain steering control. The brake pedal
may pulsate slightly during ABS operation; this is normal. Do not pump the brake
pedal, and continue to hold it firmly down.
The ABS may not function correctly if you use an incorrect tire type and size.
NOTICE
Parking brake
Page 110 of 170

| 103
DRIVING
Automatic Brake Hold
Keeps the brake applied until you press the
accelerator.
To turn the system on or off: Press the automatic
brake hold button.
To activate: Brake to a full stop. Once the brake-
hold indicator lamp comes on, release the brake
pedal.
To release: Press the accelerator.
Brake hold
Activating the automatic brake hold system on steep hills or slippery roads
may still allow the vehicle to move if you remove your foot from the brake
pedal.
If a vehicle unexpectedly moves, it may cause a crash resulting in serious
injury or death.
Never activate the automatic brake hold system or rely on it to keep a
vehicle from moving when stopped on a steep hill or slippery roads.
WARNING
Using the automatic brake hold system to park the vehicle may result in the
vehicle unexpectedly moving.
If a vehicle moves unexpectedly, it may cause a crash, resulting in serious
injury or death.
Never leave the vehicle when braking is temporarily kept by automatic brake
hold and always park the vehicle by putting the transmission in (P) and
applying the parking brake.
WARNING