Acura MDX 2017 Owner's Guide
Manufacturer: ACURA, Model Year: 2017, Model line: MDX, Model: Acura MDX 2017Pages: 170, PDF Size: 12.43 MB
Page 131 of 170
124 |
HANDLING THE UNEXPECTED
Tire Pressure Monitoring System (TPMS) - Required Federal Explanation
Each tire, including the spare (if provided), should be checked monthly
when cold and inflated to the inflation pressure recommended by the
vehicle manufacturer on the vehicle placard or tire inflation pressure
label.
(If your vehicle has tires of a different size than the size indicated on the
vehicle placard or tire inflation pressure label, you should determine the
proper tire inflation pressure for those tires.)
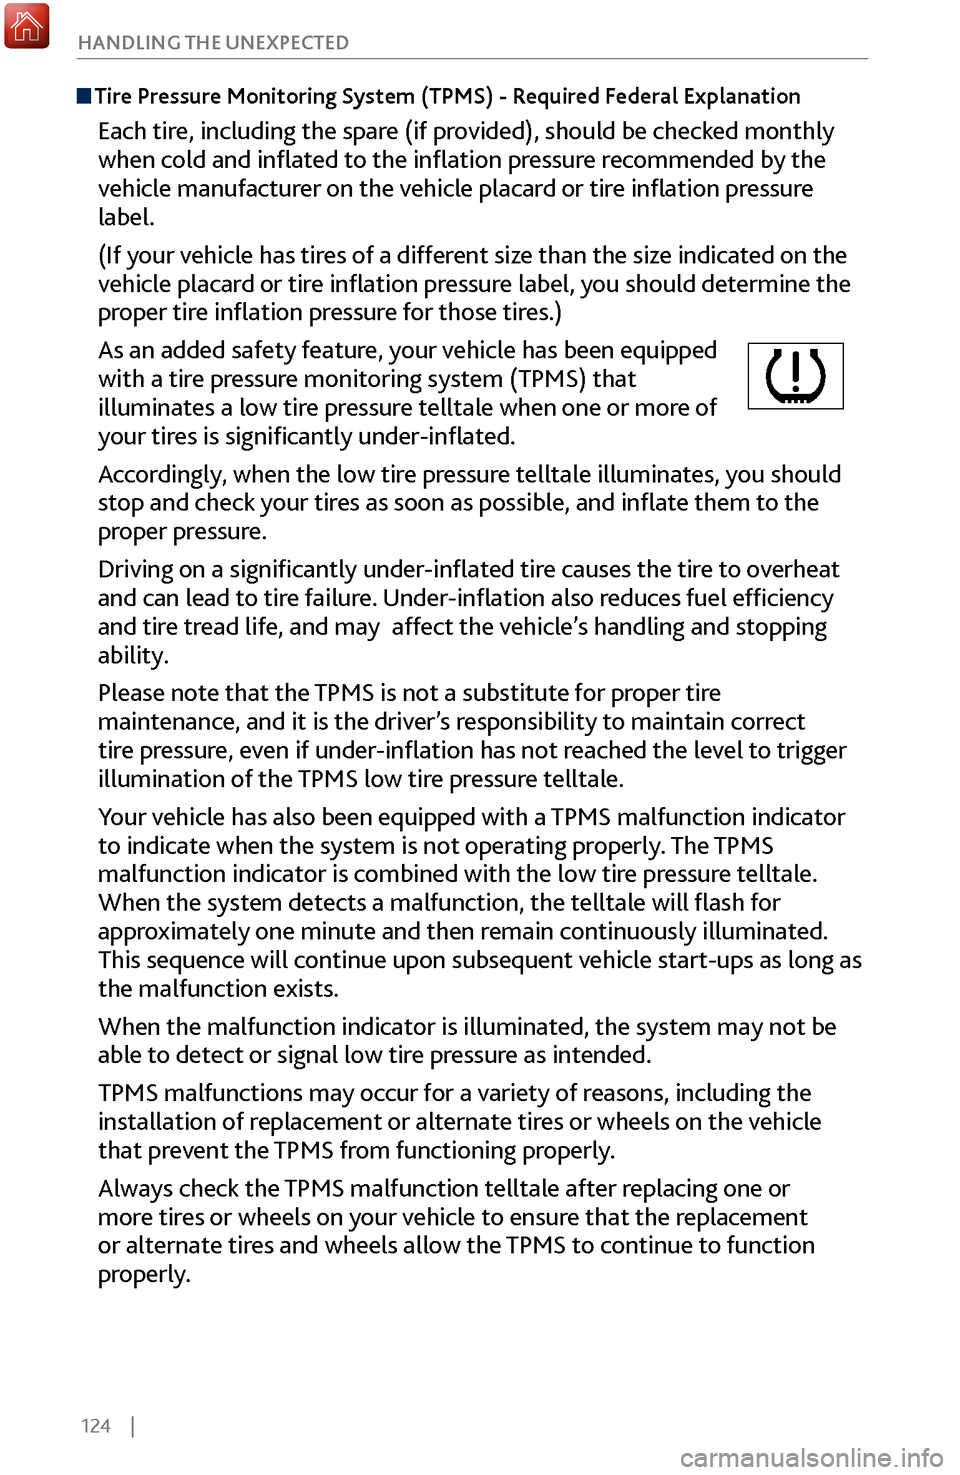
As an added safety feature, your vehicle has been equipped
with a tire pressure monitoring system (TPMS) that
illuminates a low tire pressure telltale when one or more of
your tires is significantly under-inflated.
Accordingly, when the low tire pressure telltale illuminates, you should
stop and check your tires as soon as possible, and inflate them to the
proper pressure.
Driving on a significantly under-inflated tire causes the tire to overheat
and can lead to tire failure. Under-inflation also reduces fuel efficiency
and tire tread life, and may affect the vehicle’s handling and stopping
ability.
Please note that the TPMS is not a substitute for proper tire
maintenance, and it is the driver’s responsibility to maintain correct
tire pressure, even if under-inflation has not reached the level to trigger
illumination of the TPMS low tire pressure telltale.
Your vehicle has also been equipped with a TPMS malfunction indicator
to indicate when the system is not operating properly. The TPMS
malfunction indicator is combined with the low tire pressure telltale.
When the system detects a malfunction, the telltale will flash for
approximately one minute and then remain continuously illuminated.
This sequence will continue upon subsequent vehicle start-ups as long as
the malfunction exists.
When the malfunction indicator is illuminated, the system may not be
able to detect or signal low tire pressure as intended.
TPMS malfunctions may occur for a variety of reasons, including the
installation of replacement or alternate tires or wheels on the vehicle
that prevent the TPMS from functioning properly.
Always check the TPMS malfunction telltale after replacing one or
more tires or wheels on your vehicle to ensure that the replacement
or alternate tires and wheels allow the TPMS to continue to function
properly.
Page 132 of 170

| 125
HANDLING THE UNEXPECTED
Refueling from a Portable Fuel Container
When you refuel from a portable fuel container, use the funnel provided with your
vehicle. 1.
Turn off the engine.
2.
Press the fuel fill
door release button. The fuel
fill door opens.
3.
Take
the funnel out of its clip in the cargo area
(see page 126).
4.
Remov
e the funnel from the case.
5.
Place the end of the funnel on the
lower part
of filler opening, then insert it slowly and
completely. Make sure that the end of the funnel
goes down along with the filler pipe.
6.
Fill the tank
with fuel from the portable fuel
container. Pour fuel carefully so you do not spill
any.
7.
Remov
e the funnel from the filler neck. Wipe up
any fuel from the funnel before storing it.
8.
Shut the fuel fill door
by hand.
Do not insert the nozzle of a portable fuel container or any funnel other than the
one provided with your vehicle. Doing so can damage the fuel system.
Do not try to pry open or push open the sealed fuel tank with foreign objects.
This can damage the fuel system and its seal.
NOTICE
Funnel
Page 133 of 170
126 |
HANDLING THE UNEXPECTED
Handling a Flat Tire
If a tire goes flat while driving, grasp the steering wheel firmly, and brake gradually
to reduce speed. Stop in a safe place. Replace the flat tire with a compact spare tire.
Go to a dealer as soon as possible to have the full-size tire repaired or replaced.
Changing a Flat Tire*
Before Changing the Tire
1.
Park the
vehicle on firm, level, and non-slippery surface.
2.
Change the gear to P
ark (P), and apply the parking brake.
3.
Turn on the hazard
warning lights and turn the vehicle off.
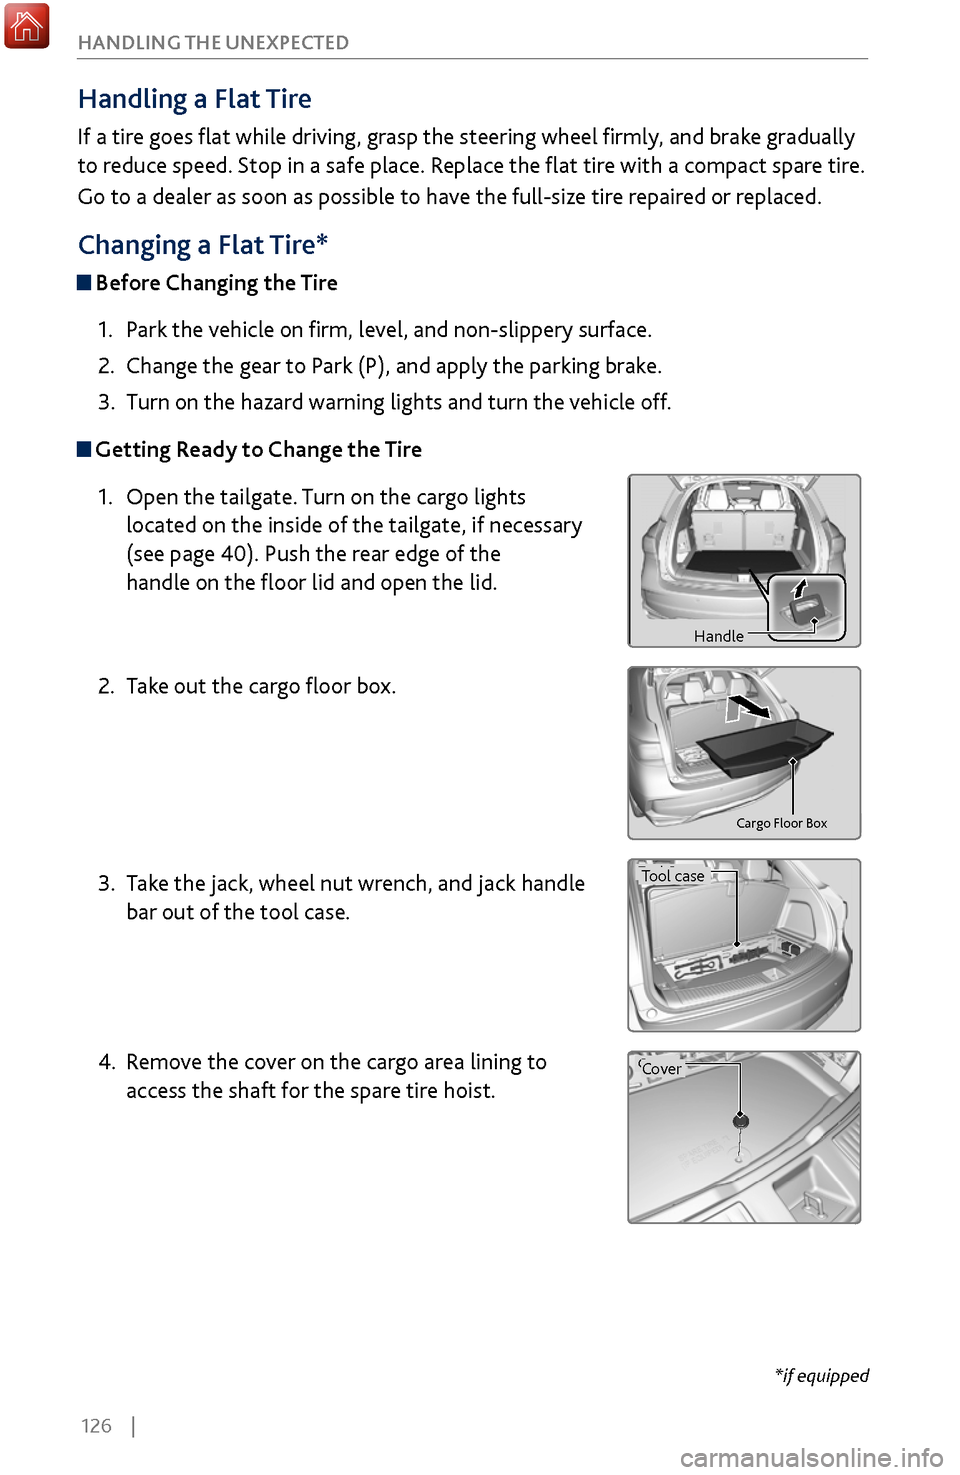
Getting Ready to Change the Tire1.
Open the tailgate. Turn on the car
go lights
located on the inside of the tailgate, if necessary
(see page 40). Push the rear edge of the
handle on the floor lid and open the lid.
2.
Take out the
cargo floor box.
3.
Take
the jack, wheel nut wrench, and jack handle
bar out of the tool case.
4.
Remov
e the cover on the cargo area lining to
access the shaft for the spare tire hoist.
Handl e
Cargo Floor Box
Tool Case
Cove r
Wheel Nut Wrench
Jack Handle Bar
Bracket
Handl e
Cargo Floor Box
Tool Case
Cove r
Wheel Nut Wrench
Jack Handle Bar
Bracket
*if equipped
HandleHandl e
Cargo Floor Box
Tool Case
Cove r
Wheel Nut Wrench
Jack Handle Bar
Bracket
Tool case
Handl e
Cargo Floor Box
Tool Case
Cove r
Wheel Nut Wrench
Jack Handle Bar
Bracket
Cover
Page 134 of 170
| 127
HANDLING THE UNEXPECTED
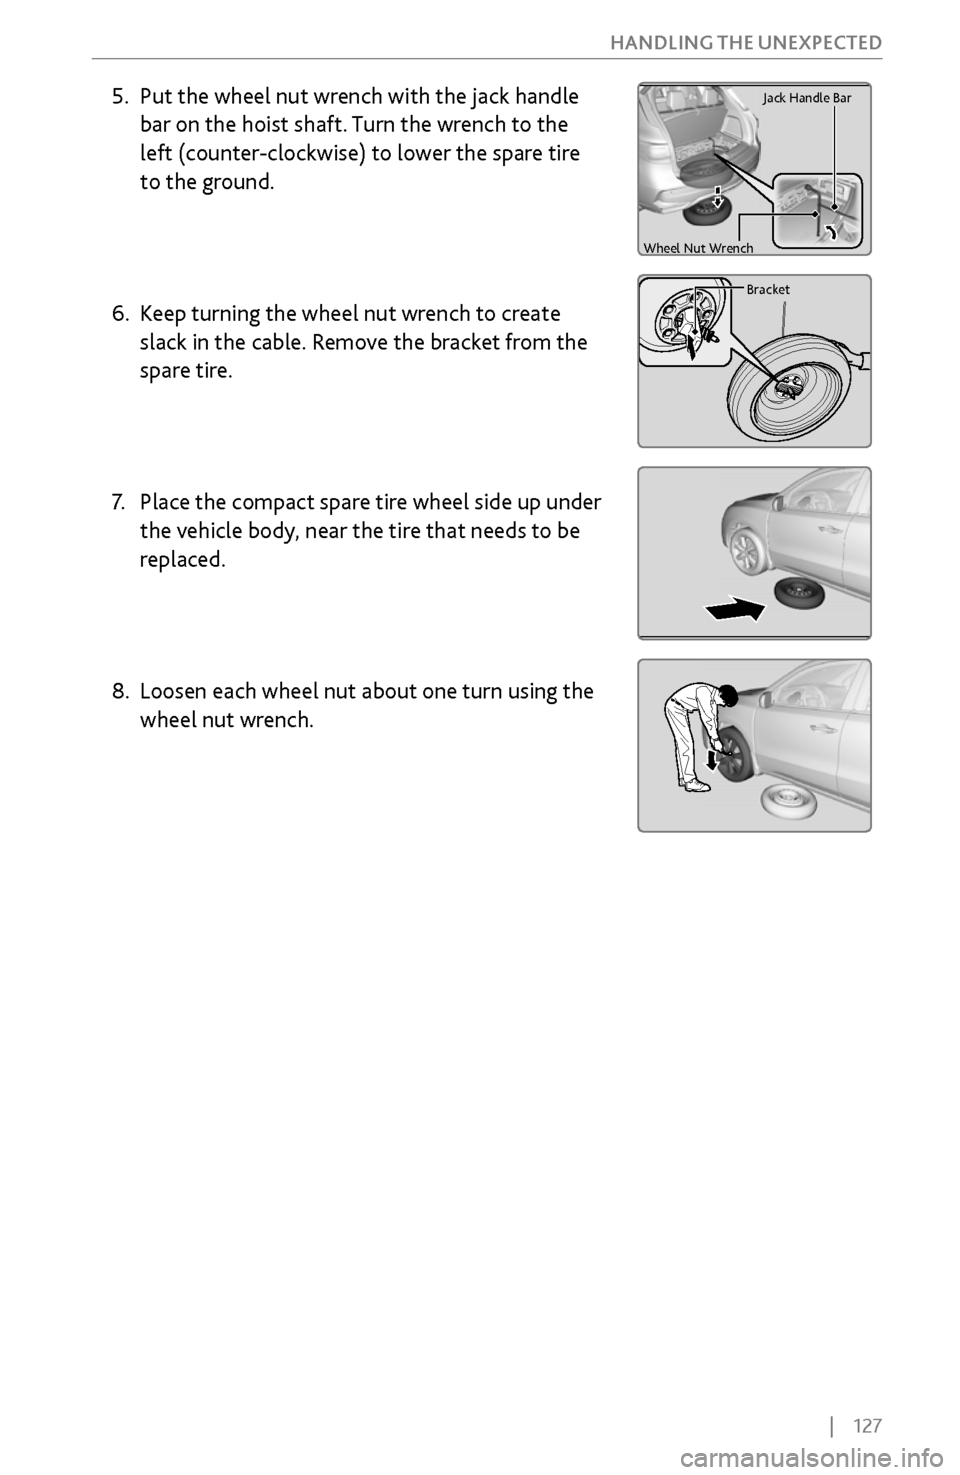
5. Put the wheel nut wrench with the jack handle
bar on the hoist
shaft. Turn the wrench to the
left (counter-clockwise) to lower the spare tire
to the ground.
6.
Keep turning the wheel
nut wrench to create
slack in the cable. Remove the bracket from the
spare tire.
7.
Place the compact
spare tire wheel side up under
the vehicle body, near the tire that needs to be
replaced.
8.
Loosen each wheel nut about one
turn using the
wheel nut wrench.
Handl e
Cargo Floor Box
Tool Case
Cove r
Wheel Nut Wrench
Jack Handle Bar
Bracket
Handl e
Cargo Floor Box
Tool Case
Cove r
Wheel Nut Wrench
Jack Handle Bar
Bracket
Handl e
Cargo Floor Box
Tool Case
Cove r
Wheel Nut Wrench
Jack Handle Bar
Bracket
Handl e
Cargo Floor Box
Tool Case
Cove r
Wheel Nut Wrench
Jack Handle Bar
Bracket
Page 135 of 170
128 |
HANDLING THE UNEXPECTED
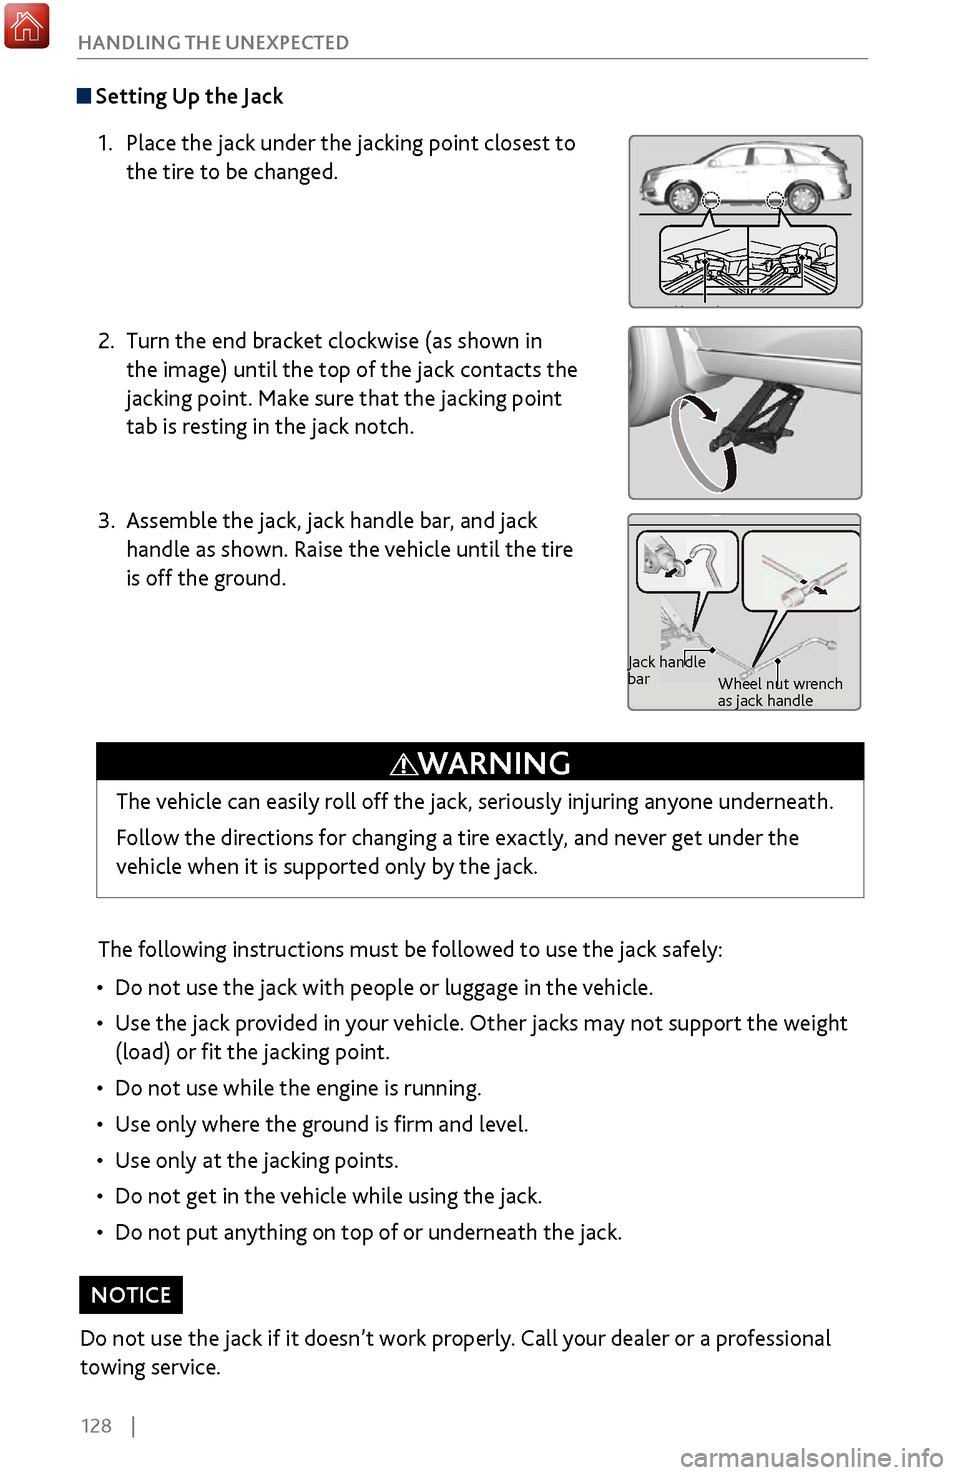
Setting Up the Jack
1.
Place the jack under the jacking point closest
to
the tire to be changed.
2.
Turn the end bracket clockwise (as shown in
the
image) until the top of the jack contacts the
jacking point. Make sure that the jacking point
tab is resting in the jack notch.
3.
Assemble the jack, jack handle bar, and jack
handle as shown. Raise
the vehicle until the tire
is off the ground.
The following instructions must be followed to use the jack safely:
•
Do not use the jack with people
or luggage in the vehicle.
•
Use the jack pro
vided in your vehicle. Other jacks may not support the weight
(load) or fit the jacking point.
•
Do not use while the engine is running.
•
Use only
where the ground is firm and level.
•
Use only at
the jacking points.
•
Do not get in the v
ehicle while using the jack.
•
Do not put
anything on top of or underneath the jack.
Jacking PointsJacking PointsJacking Points
Jack handle
barWheel nut wrench
as jack handle
The vehicle can easily roll off the jack, seriously injuring anyone underneath.
Follow the directions for changing a tire exactly, and never get under the
vehicle when it is supported only by the jack.
WARNING
Do not use the jack if it doesn’t work properly. Call your dealer or a professional
towing service.
NOTICE
Page 136 of 170
| 129
HANDLING THE UNEXPECTED
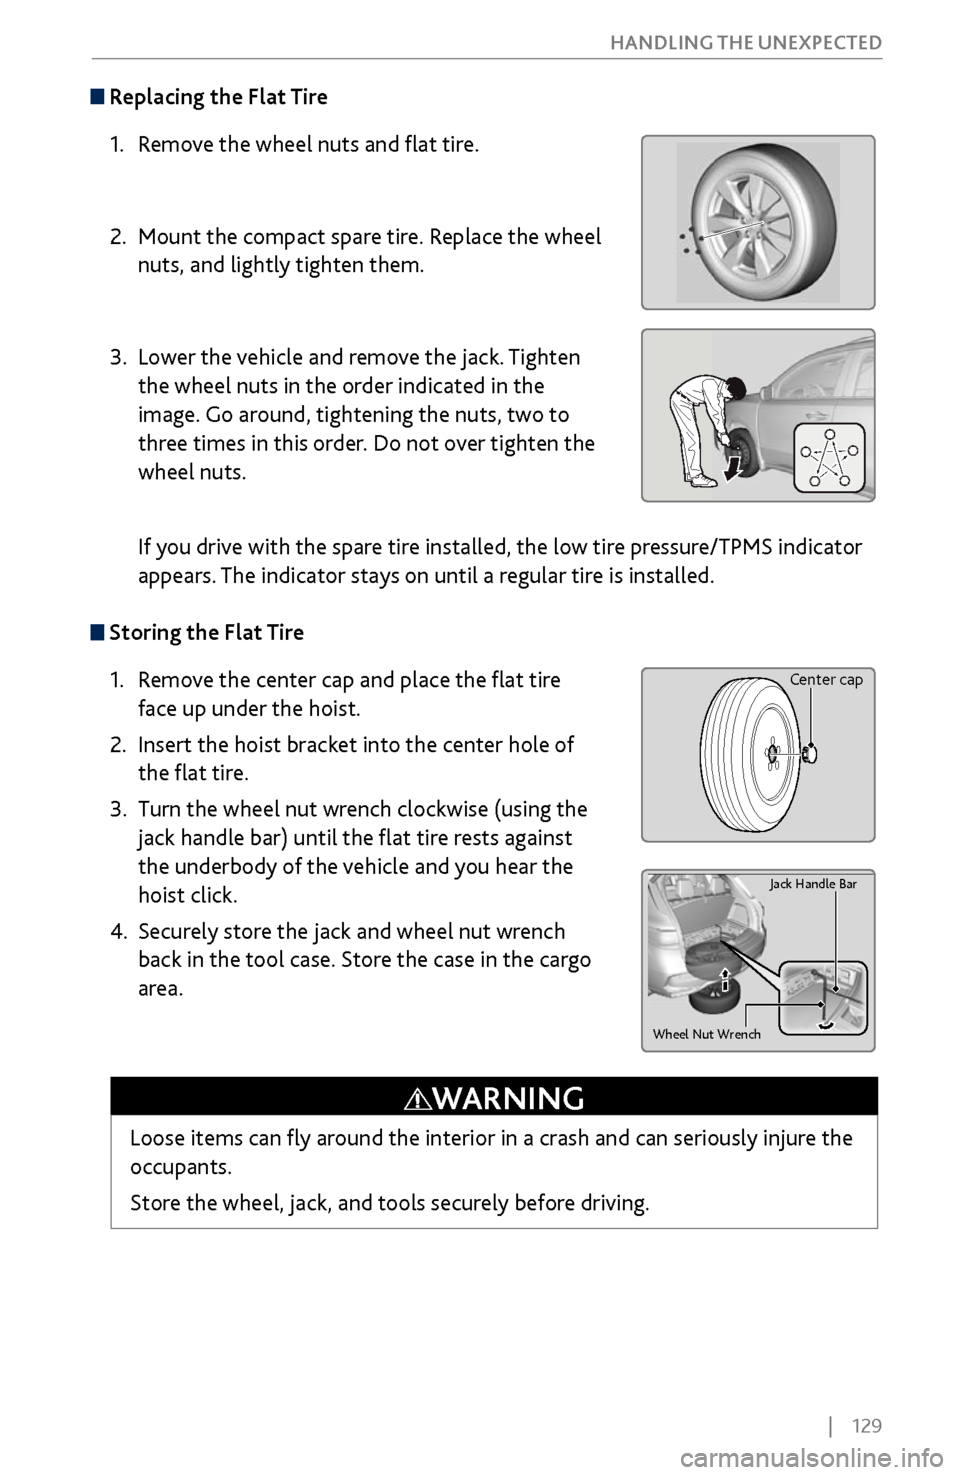
Replacing the Flat Tire
1.
Remov
e the wheel nuts and flat tire.
2.
Mount the compact spar
e tire. Replace the wheel
nuts, and lightly tighten them.
3.
Lower the v
ehicle and remove the jack. Tighten
the wheel nuts in the order indicated in the
image. Go around, tightening the nuts, two to
three times in this order. Do not over tighten the
wheel nuts.
If you drive with the spare tire installed, the low tire pressure/TPMS indicator
appears. The indicator stays on until a regular tire is installed.
Storing the Flat Tire
1.
Remov
e the center cap and place the flat tire
face up under the hoist.
2.
Insert the hoist bracket into
the center hole of
the flat tire.
3.
Turn the wheel nut
wrench clockwise (using the
jack handle bar) until the flat tire rests against
the underbody of the vehicle and you hear the
hoist click.
4.
Securely stor
e the jack and wheel nut wrench
back in the tool case. Store the case in the cargo
area.
Wheel Nut Wrench
Ja ck Handle Bar
Loose items can fly around the interior in a crash and can seriously injure the
occupants.
Store the wheel, jack, and tools securely before driving.
WARNING
Center cap
Page 137 of 170
130 |
HANDLING THE UNEXPECTED
Handle
Cargo
Floor Box
Tire Repair Kit*
If a tire has a small puncture, you can use the tire repair kit to temporarily repair it.
The puncture must be smaller than 3/16-inch (4 mm) and not in the tire sidewall.
Go to a dealer to have the full-size tire permanently repaired or replaced.
Before Repairing the Tire
1.
Park the
vehicle on firm, level, and non-slippery surface.
2.
Change the gear to P
ark (P), and apply the parking brake.
3.
Turn on the hazard
warning lights and turn the vehicle off.
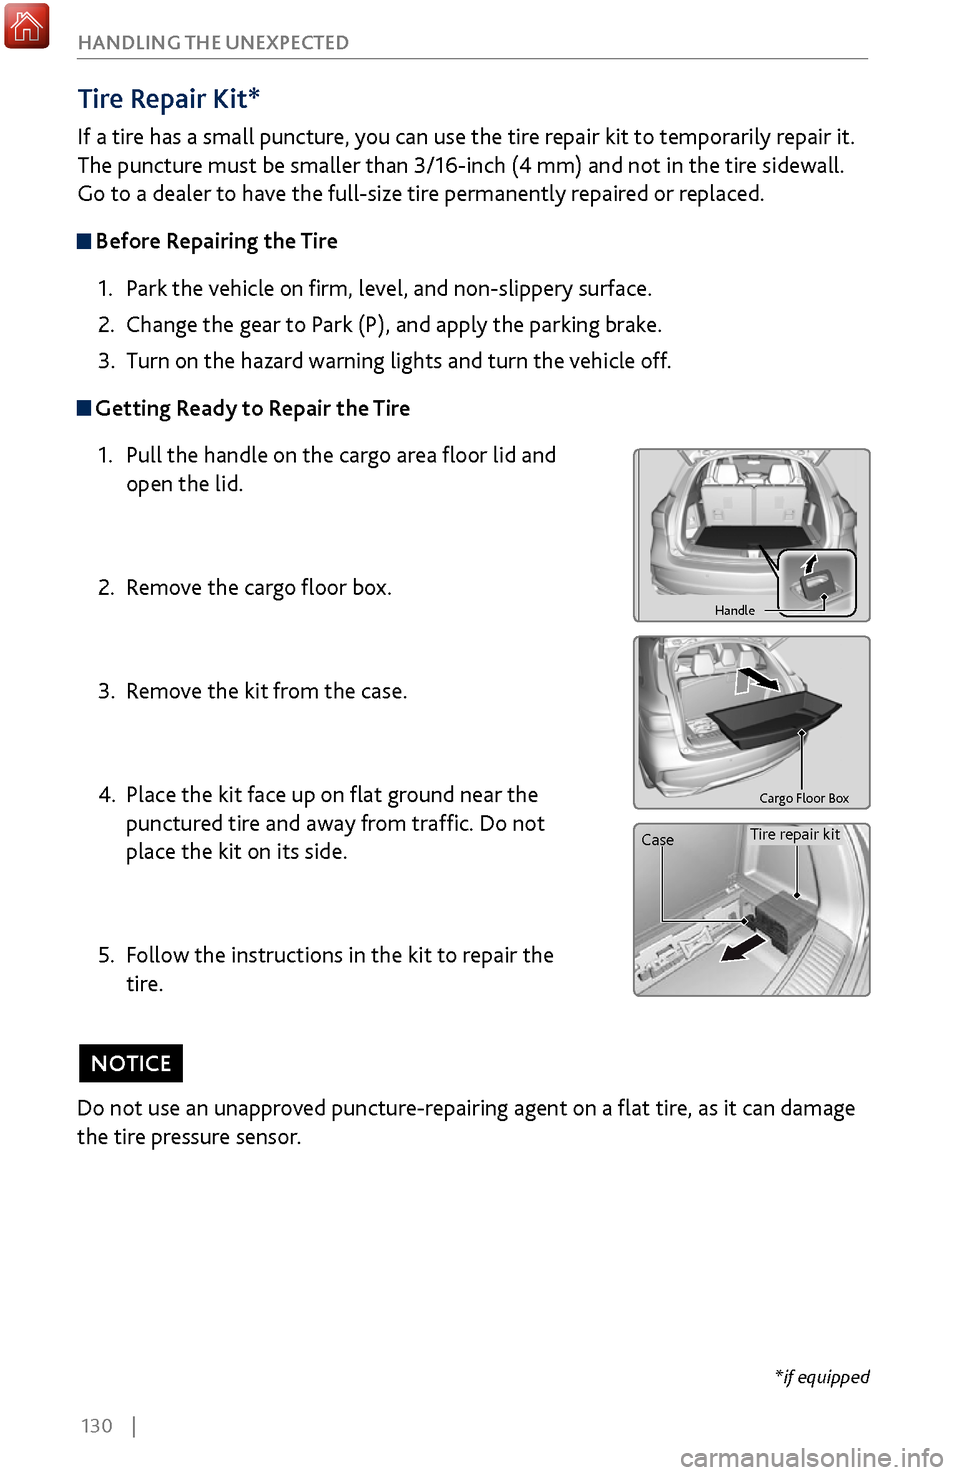
Getting Ready to Repair the Tire1.
Pull the handle on
the cargo area floor lid and
open the lid.
2.
Remov
e the cargo floor box.
3.
Remov
e the kit from the case.
4.
Place the kit face up
on flat ground near the
punctured tire and away from traffic. Do not
place the kit on its side.
5.
Follow the instructions
in the kit to repair the
tire.
Handle
Cargo Floor Box
Handle
Cargo Floor Box
Tire repair kit
Case
*if equipped
Do not use an unapproved puncture-repairing agent on a flat tire, as it can damage
the tire pressure sensor.
NOTICE
Page 138 of 170
| 131
HANDLING THE UNEXPECTED
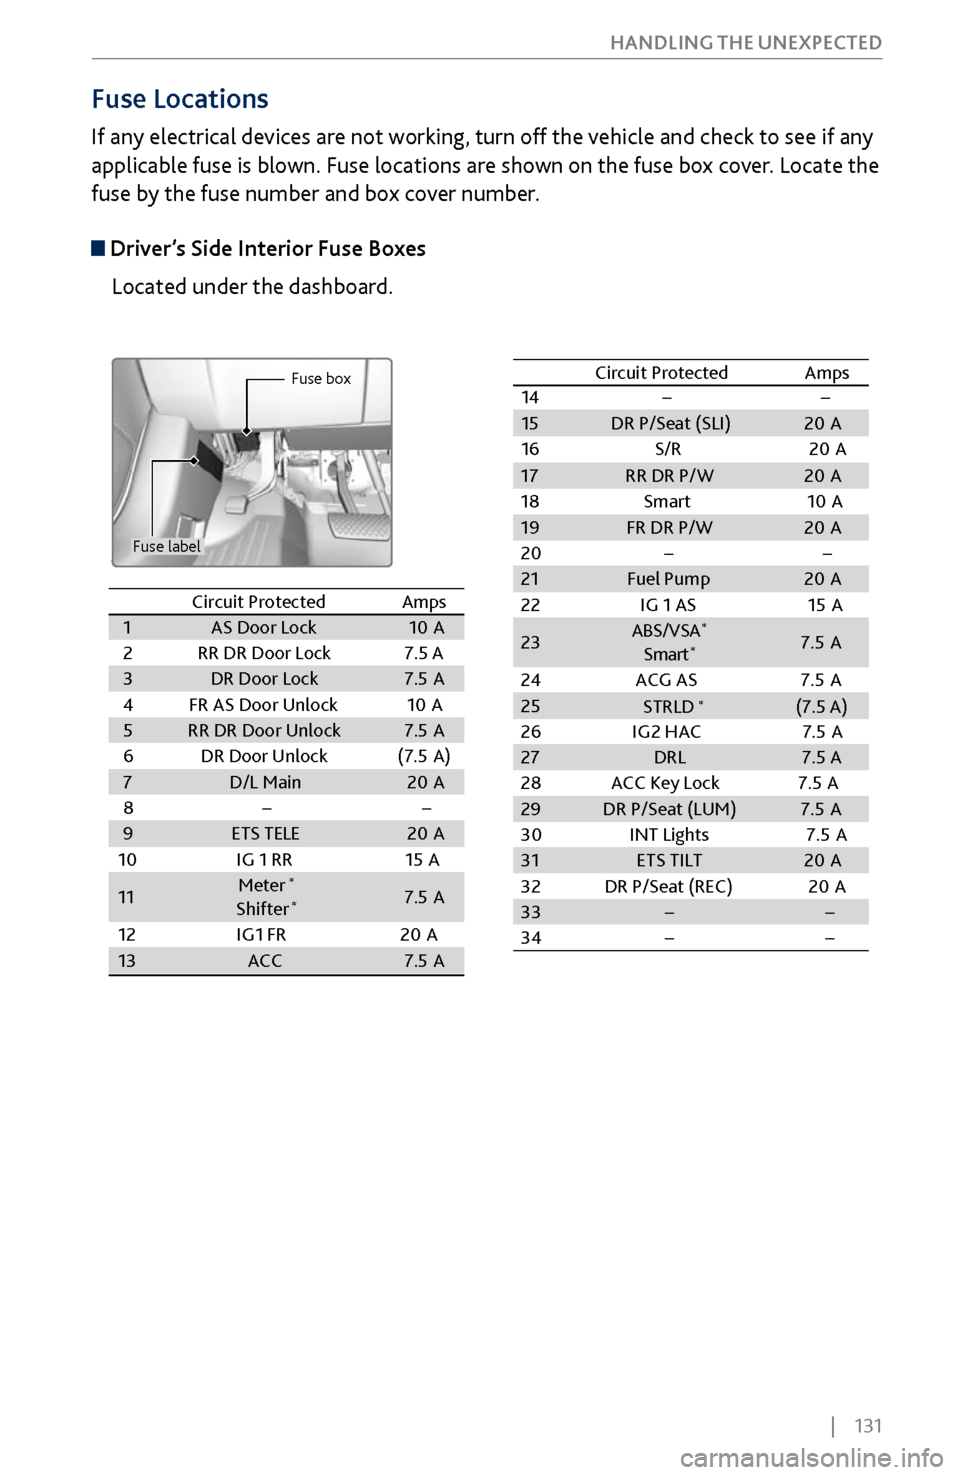
Fuse Locations
If any electrical devices are not working, turn off the vehicle and check to see if any
applicable fuse is blown. Fuse locations are shown on the fuse box cover. Locate the
fuse by the fuse number and box cover number.
Driver’s Side Interior Fuse Boxes
Located under the dashboard.
Fuse box
Fuse label
Circuit ProtectedAmps1AS Door Lock10 A2RR DR Door Lock7.5 A3DR Door Lock7.5A4FR AS Door Unlock10 A5RR DR Door Unlock7.5A6DR Door Unloc k(7.5A )7D/L Main20A8��9ETS TELE20A
10 IG 1 RR 15A
11Meter*
Shifter*7.5A
12 IG1 FR 20A
13ACC7.5A
14 ��
15 DR P/Seat (SLI) 20A
16 S/R2 0A
17RR DR P/W 20A
18 Smart1 0A
19 FR DR P/W 20A
20 ��
21 Fuel Pump 20A
22 IG 1 AS 15A
23 ABS/VS
A
*
Smar t*7.5 A
24 ACG AS 7.5 A
25
26 IG2 HAC 7.5 A
27 DRL 7.5 A
28 ACC Key Lock 7.5A
29 DR P/Seat (LUM) 7.5 A
30 INT Lights 7.5A
31 ETS TILT 20A
32 DR P/Seat (REC) 20A
33 � �
34 � �
Circuit Protected
Amps
STRLD (7.5 A)
*
Circuit Protected Amps
1 AS Door Lock 10A
2 RR DR Door Lock 7.5 A
3 DR Door Lock 7.5A
4 FR AS Door Unlock 10A
5 RR DR Door Unlock 7.5A
6 DR Door Unloc k(7.5A )
7 D/L Main 20A
8 � �
9 ETS TELE 20A
10 IG 1 RR 15A
11 Meter
*
Shifter*7.
5A
12 IG1 FR 20A
13 ACC 7.5A
14��15DR P/Seat (SLI)20 A
16 S/R20A
17RR DR P/W20A
18 Smart10A19FR DR P/W20A
20��21Fuel Pump20 A
22 IG 1 AS 15A
23ABS/VS A*
Smar t*7.5 A
24 ACG AS 7.5 A
2526 IG2 HAC 7.5 A27DRL7.5 A
28 ACC Key Lock 7.5A
29DR P/Seat (LUM)7.5 A
30 INT Lights 7.5A
31ETS TILT20A
32 DR P/Seat (REC) 20A
33��34��
Circuit ProtectedAmps
STRLD (7.5 A)*
Page 139 of 170
132 |
HANDLING THE UNEXPECTED
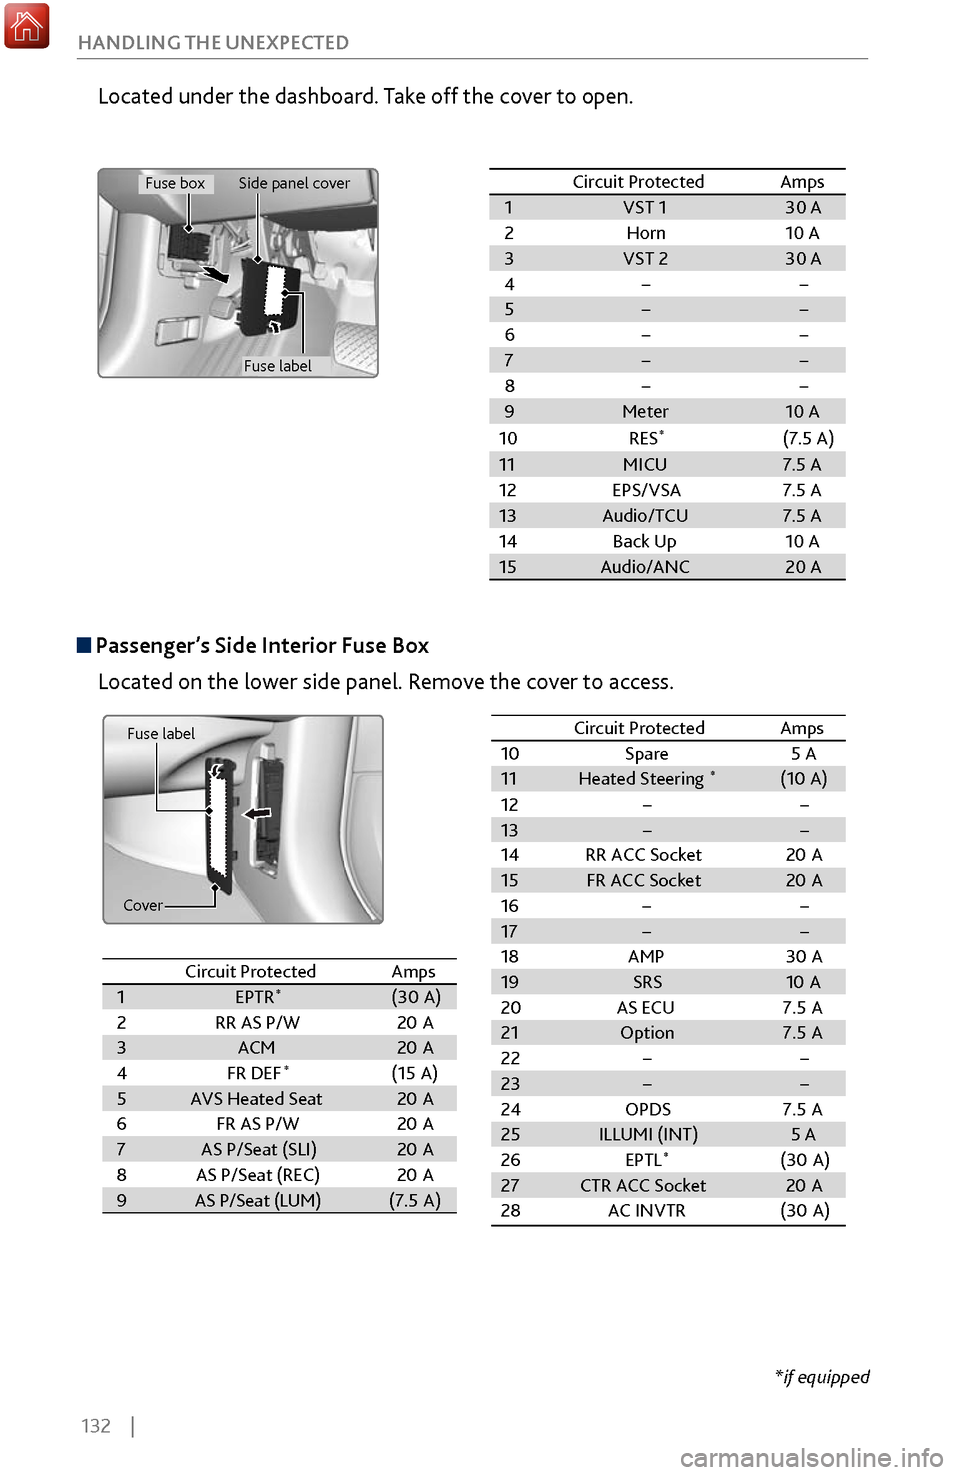
Passenger’s Side Interior Fuse Box
Located on the lower side panel. Remove the cover to access.
Fuse label
Cover
Located under the dashboard. Take off the cover to open.
Circuit ProtectedAmps1VST 130 A2Horn10 A3VST 230 A4��5��6��7��8��9Meter10 A
10RES *(7.5 A)
11MICU7.5 A12EPS/VSA7.5 A13Audio/TCU7.5 A14Back Up10 A15Audio/ANC20 A
Circuit ProtectedAmps1EPTR*(30A )2RR AS P/ W20A3ACM20A4FR DE F*(15A )5AVS Heated Seat20A6FR AS P/W20A7AS P/Seat (SLI )20A8AS P/Seat (REC)20A9AS P/Seat (LUM )(7.5 A)
10 Spare 5 A
11 Heated Steering*(10A )
12 � �
13 � �
14RR ACC Socket 20A
15 FR ACC Socket 20A
16 � �
17 � �
18 AMP 30A
19 SRS 10A
20 AS ECU 7.5A
21 Option 7.5A
22 � �
23 � �
24 OPDS 7.5A
25 ILLUMI (INT) 5 A
26 EPTL
*(30A)
27 CTR ACC Socket 20A
28 AC INVTR (30A )
Circuit Protecte
dAmps
Circuit Protected Amps
1 EPTR*(30A )
2 RR AS P/W 20A
3 ACM 20A
4 FR DEF
*(15A )
5 AVS Heated Seat 20A
6 FR AS P/W 20A
7 AS P/Seat (SLI )20A
8 AS P/Seat (REC) 20A
9 AS P/Seat (LUM )(7.5 A)
10Spare5 A11Heated Steering*(1 0A )12��13��14RR ACC Socket20A15FR ACC Socket20A16��17��18AMP30 A19SRS10A20AS EC U7.5A21Option7.5A22��23��24OPDS7.5A25ILLUMI (INT )5 A26EPTL*(30A )27CTR ACC Socket20A28AC INVTR(30A )
Circuit Protecte dAmps
*if equipped
Fuse box
Fuse label
Side panel cover
Page 140 of 170
| 133
HANDLING THE UNEXPECTED
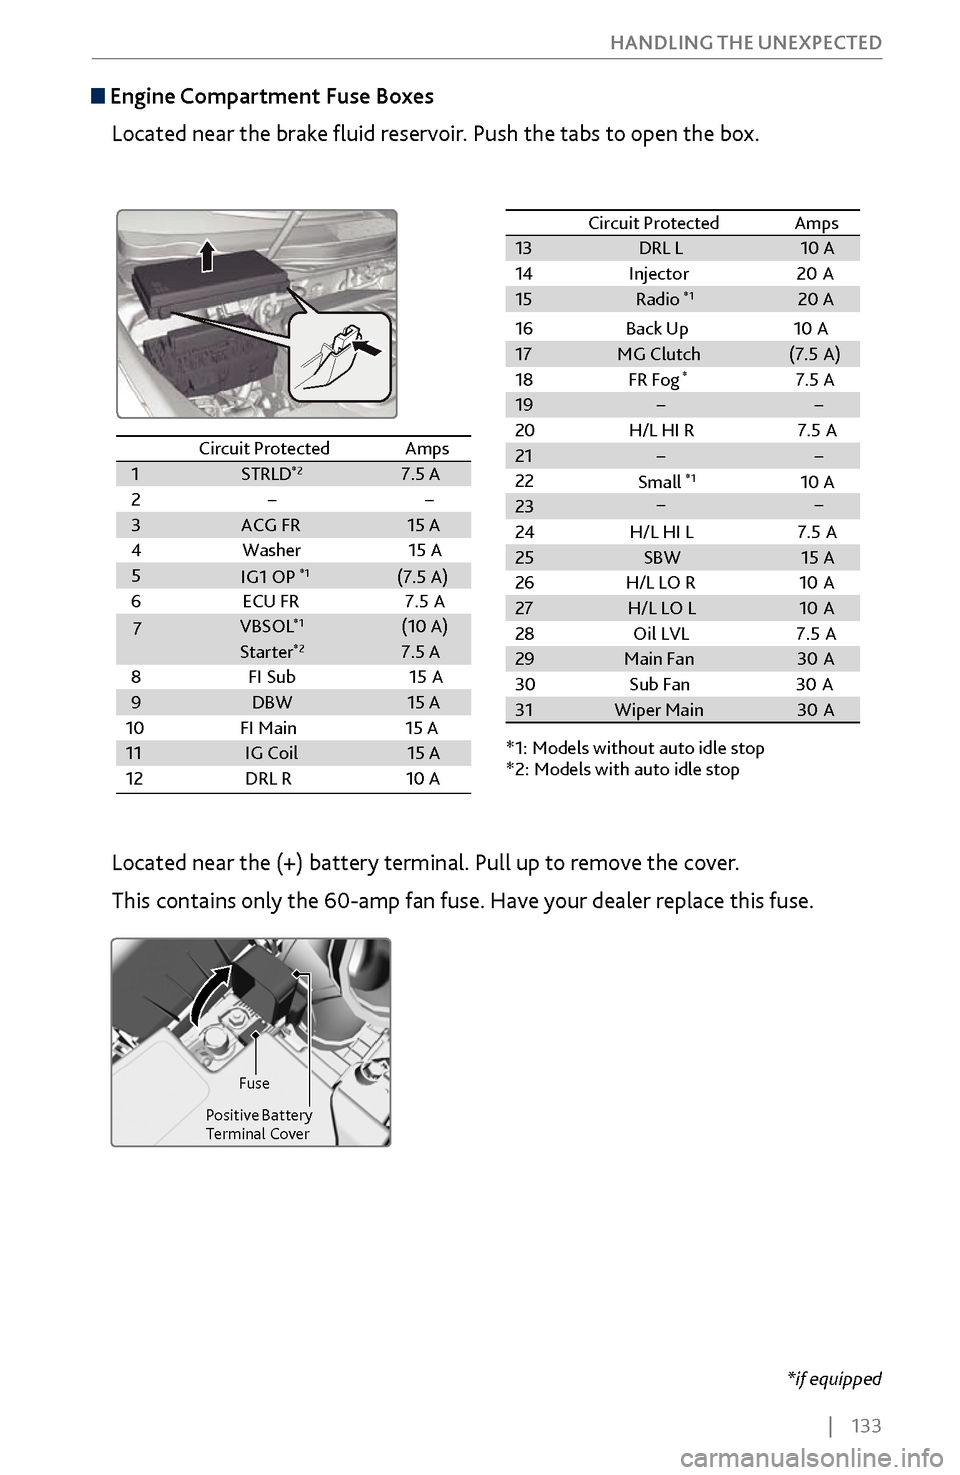
Engine Compartment Fuse Boxes
Located near the brake fluid reservoir. Push the tabs to open the box.
*if equipped
Circuit ProtectedAmps1STRLD*27.5 A2��3ACG FR15 A
4W asher15 A56E CU FR 7.5A
7VBSOL*1(10 A)
8F I Su
b15A9DBW15 A
10 FI Main 15 A
11IG Coil15 A
12 DRL R10 A
13 DRL L 10 A
14 Injector2 0A
15
*1: Models without auto idle stop
*2: Models with auto idle stop
16
Back Up 10A
17 MG Clutch (7.5A )
18 FR Fog
*7.5 A
19 � �
20 H/L HI R7.5 A
21 � �
22
23 Gear Selector 15 A
24 H/L HI L7.5 A
25 SBW 15 A
26 H/L LO R1 0A
27 H/L LO L 10A
28 Oil LVL 7.5A
29 Main Fan 30A
30 Sub Fan3 0A
31 Wiper Main 30A
Circuit Protecte
d Amps
Starter*27.5 A
��
IG1 OP*1(7.5 A)
Radio*120 A
Small
*110 A
Circuit Protected Amps
1 STRLD*27.5 A
2 � �
3 ACG FR 15 A
4W asher1 5 A
5
6E CU FR 7.5A
7 VBSOL
*1(10 A)
8F I Sub1 5A
9 DBW 15 A
10 FI Main 15 A
11 IG Coil 15 A
12 DRL R1 0 A
13DRL L10 A
14 Injector20A15
*1: Models without auto idle stop
*2: Models with auto idle stop
16
Back Up 10A
17MG Clutch(7.5A )
18 FR Fog*7.5 A19��
20 H/L HI R7.5 A21��
22
23 Gear Selector 15 A
24 H/L HI L7.5 A25SBW15 A
26 H/L LO R10A27H/L LO L10A
28 Oil LVL 7.5A
29Main Fa n30A
30 Sub Fan30A31Wiper Main30A
Circuit Protecte dAmps
Starter*27.5 A
��
IG1 OP
*1(7.5 A)
Radio*120
A
Small
*110 A
Located near the (+) battery terminal. Pull up to remove the cover.
This contains only the 60-amp fan fuse. Have your dealer replace this fuse.
Fuse
Positive Battery
Terminal Cover