lock Acura MDX 2017 User Guide
[x] Cancel search | Manufacturer: ACURA, Model Year: 2017, Model line: MDX, Model: Acura MDX 2017Pages: 170, PDF Size: 12.43 MB
Page 41 of 170
34 |
V
EHICLE CONTROLS
Door Operation from Inside the Vehicle
Use these methods to lock or unlock and open or close the doors.
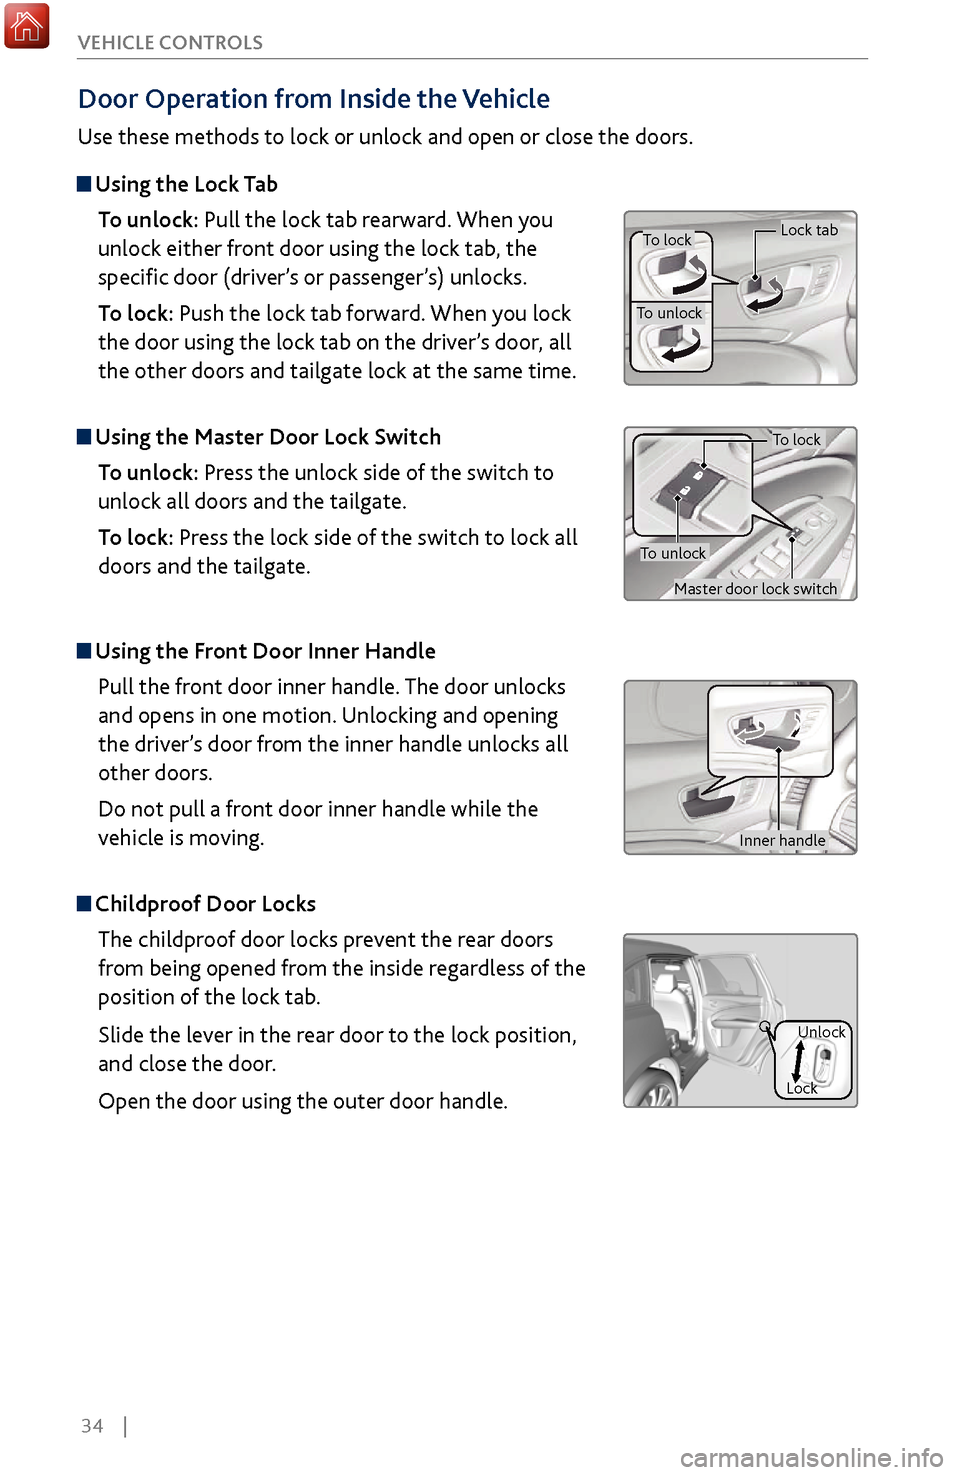
Using the
Lock Tab
To unlock: Pull the lock tab rearward. When you
unlock either front door using the lock tab, the
specific door (driver’s or passenger’s) unlocks.
To lock: Push the lock tab forward. When you lock
the door using the lock tab on the driver’s door, all
the other doors and tailgate lock at the same time.
Using the Master Door Lock Switch
To unlock: Press the unlock side of the switch to
unlock all doors and the tailgate.
To lock: Press the lock side of the switch to lock all
doors and the tailgate.
Using the Front Door Inner Handle
Pull the front door inner handle. The door unlocks
and opens in one motion. Unlocking and opening
the driver’s door from the inner handle unlocks all
other doors.
Do not pull a front door inner handle while the
vehicle is moving.
Childproof Door Locks The childproof door locks prevent the rear doors
from being opened from the inside regardless of the
position of the lock tab.
Slide the lever in the rear door to the lock position,
and close the door.
Open the door using the outer door handle.
Unlock
Lock
Inner handle
To lock
To unlock
Lock tab
To lock
To unlock
Master door lock switch
Page 42 of 170
| 35
V
EHICLE CONTROLS
Power
Window Operation
The power windows can be opened and closed by using the switches on the doors
when the vehicle is on. The switches on the driver’s side can be used to open and
close all the windows.
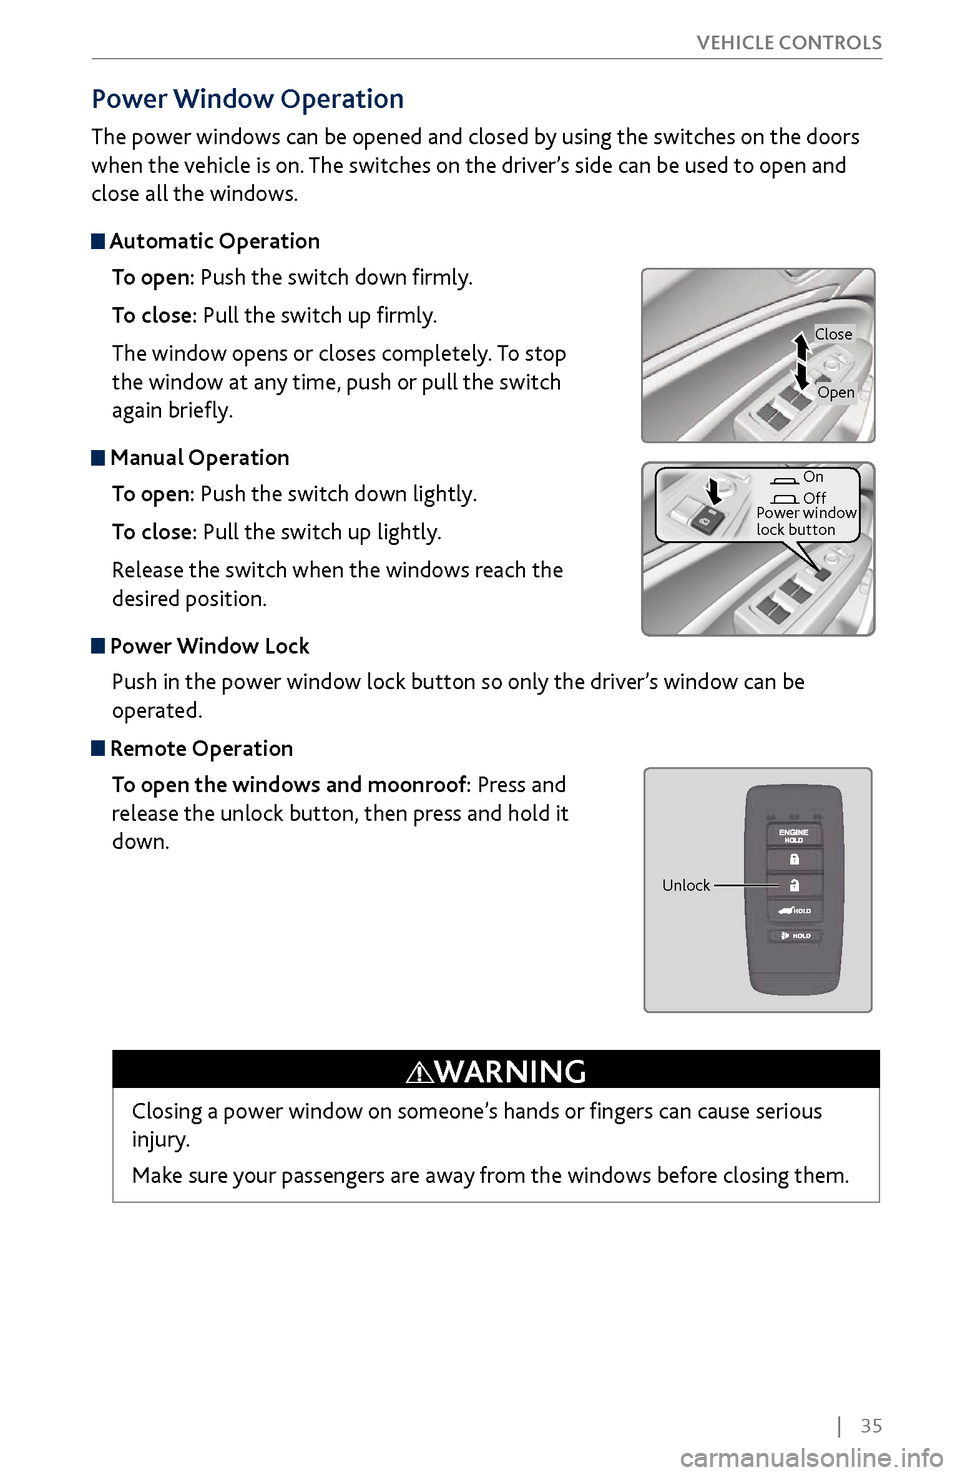
Automatic Operation
To open: Push the switch down firmly.
To close: Pull the switch up firmly.
The window opens or closes completely. To stop
the window at any time, push or pull the switch
again briefly.
Manual OperationTo open: Push the switch down lightly.
To close: Pull the switch up lightly.
Release the switch when the windows reach the
desired position.
Power Window LockPush in the power window lock button so only the driver’s window can be
operated.
Remote OperationTo open the windows and moonroof: Press and
release the unlock button, then press and hold it
down.
Closing a power window on someone’s hands or fingers can cause serious
injury.
Make sure your passengers are away from the windows before closing them.
WARNING
Close
On
Off
Power window
lock button
Open
Unlock
Page 46 of 170
| 39
V
EHICLE CONTROLS
If you find the timing of beam changes inconvenient for driving, change the
beams manually.
For the system to work properly:
•
Do not place
an object that reflects light on the dashboard.
•
Keep the
windshield around the camera clean. When cleaning the windshield,
be careful not to apply windshield cleanser to the camera lens.
•
Do not attach an object, stick
er or film in the area around the camera.
•
Do not touch the camera lens.
If
the camera receives a strong impact or requires repair, consult a dealer.
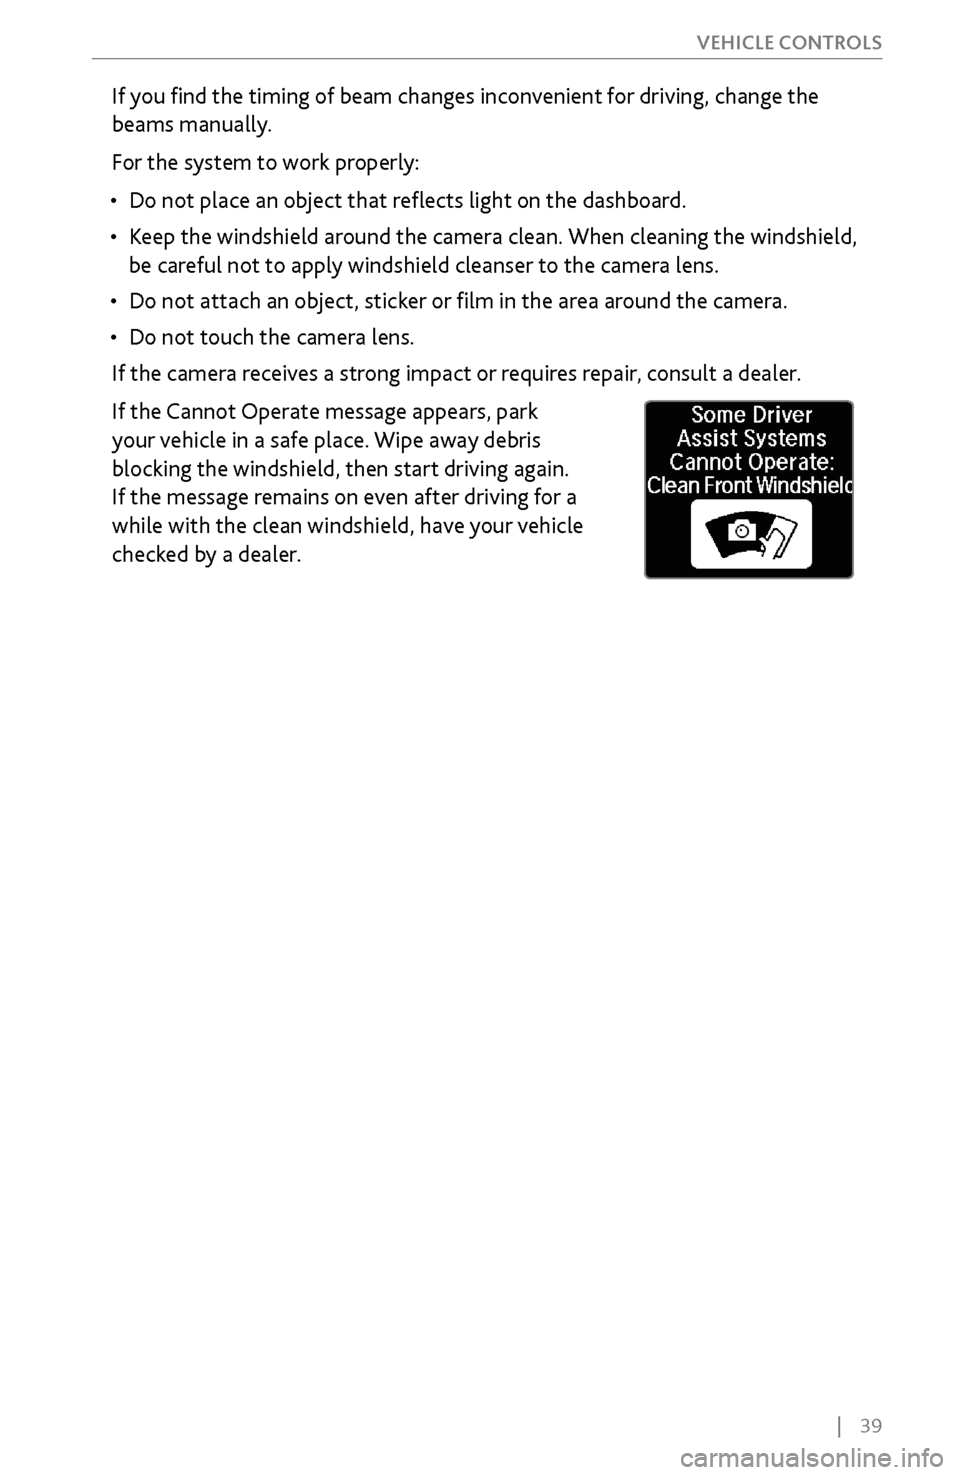
If the Cannot Operate message appears, park
your vehicle in a safe place. Wipe away debris
blocking the windshield, then start driving again.
If the message remains on even after driving for a
while with the clean windshield, have your vehicle
checked by a dealer.
Page 47 of 170
40 |
V
EHICLE CONTROLS
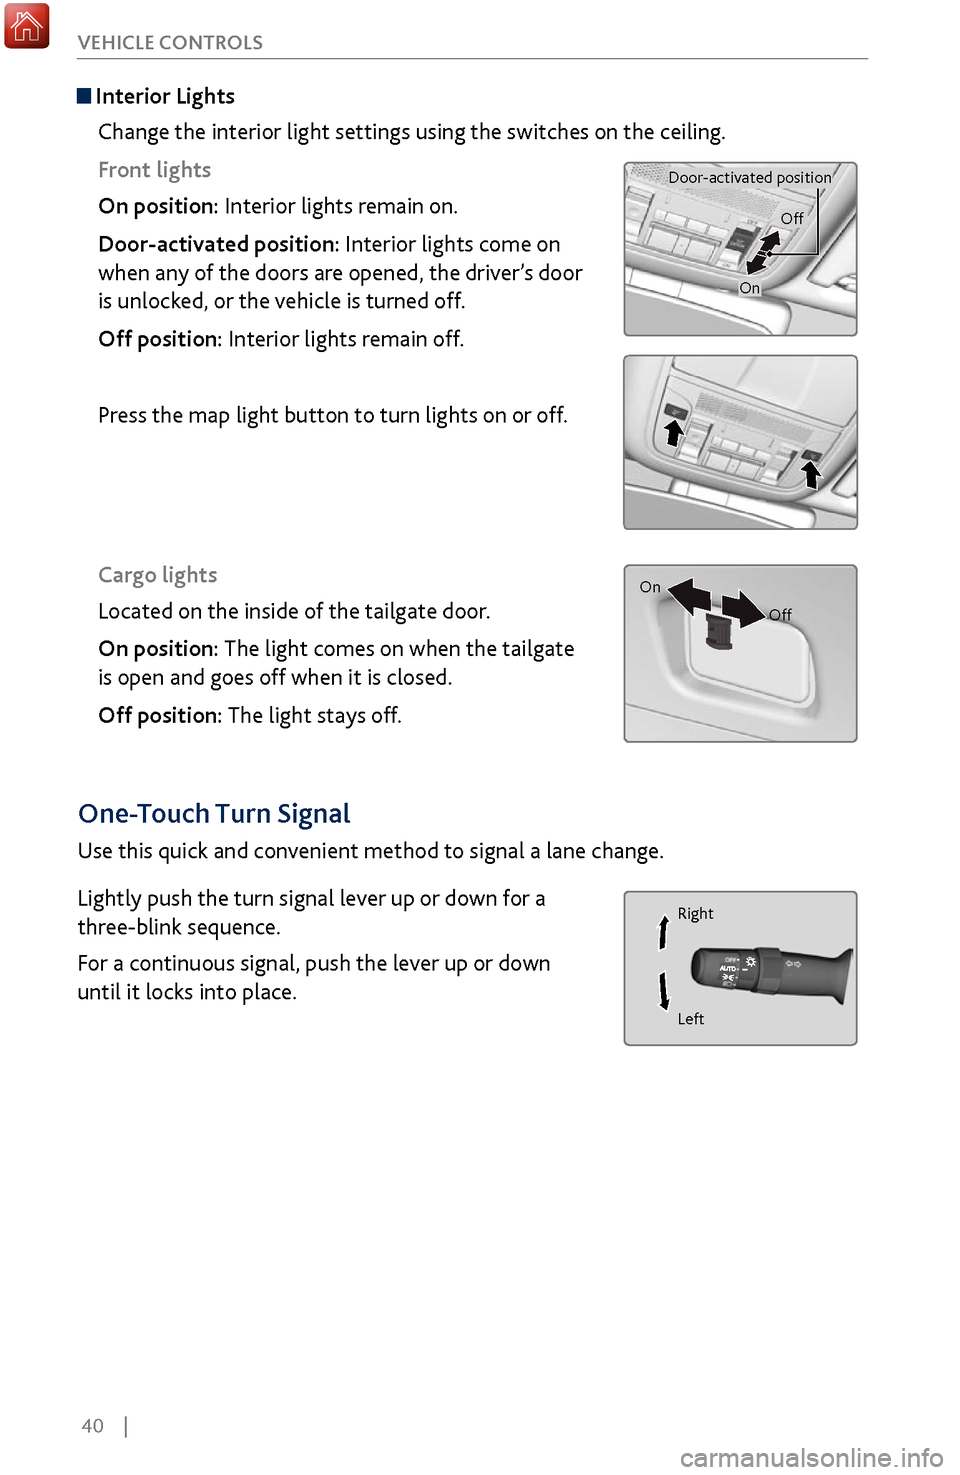
Interior Lights
Change the interior light settings using the switches on the ceiling.
Front lights
On position: Interior lights remain on.
Door-activated position: Interior lights come on
when any of the doors are opened, the driver’s door
is unlocked, or the vehicle is turned off.
Off position: Interior lights remain off.
Press the map light button to turn lights on or off.
Cargo lights
Located on the inside of the tailgate door.
On position: The light comes on when the tailgate
is open and goes off when it is closed.
Off position: The light stays off.
Door-activated position
On
Off
On Off
One-Touch Turn Signal
Use this quick and convenient method to signal a lane change.
Lightly push the turn signal lever up or down for a
three-blink sequence.
For a continuous signal, push the lever up or down
until it locks into place.
Right
Left
Page 51 of 170
44 |
V
EHICLE CONTROLS
Adjusting the
Head Restraints
Your vehicle is equipped with head restraints in all seating positions. Head
restraints are most effective for protection against whiplash and other rear-
impact crash injuries.
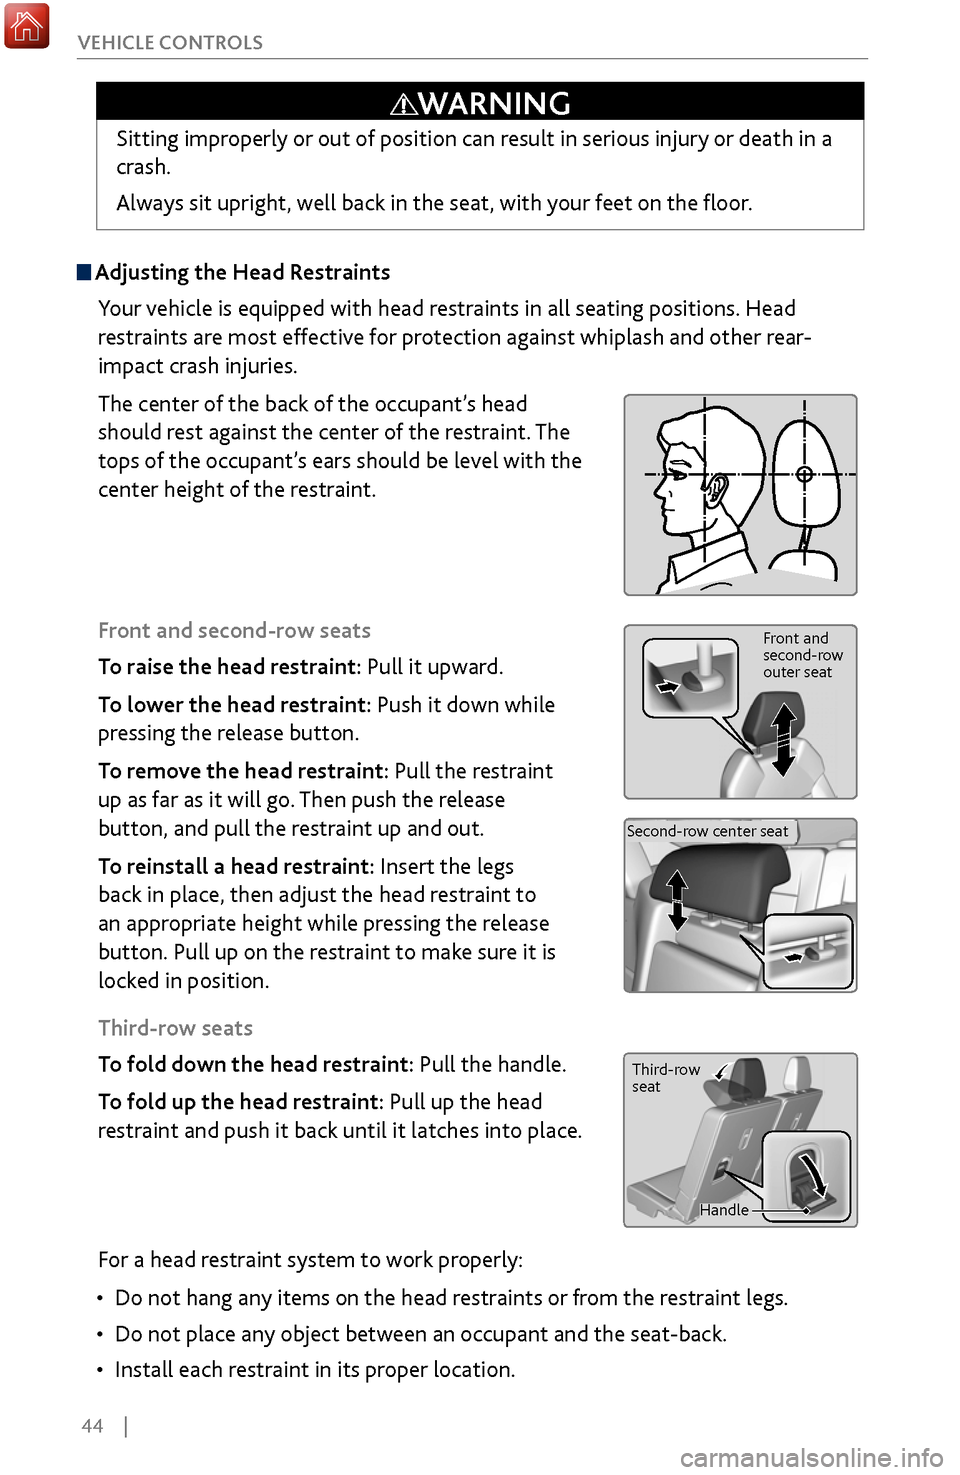
The center of the back of the occupant’s head
should rest against the center of the restraint. The
tops of the occupant’s ears should be level with the
center height of the restraint.
Front and second-row seats
To raise the head restraint: Pull it upward.
To lower the head restraint: Push it down while
pressing the release button.
To remove the head restraint: Pull the restraint
up as far as it will go. Then push the release
button, and pull the restraint up and out.
To reinstall a head restraint: Insert the legs
back in place, then adjust the head restraint to
an appropriate height while pressing the release
button. Pull up on the restraint to make sure it is
locked in position.
Third-row seats
To fold down the head restraint: Pull the handle.
To fold up the head restraint: Pull up the head
restraint and push it back until it latches into place.
Front and
second-row
outer seat
Second-row center seat
Sitting improperly or out of position can result in serious injury or death in a
crash.
Always sit upright, well back in the seat, with your feet on the floor.
WARNING
Third-row
seat
Handle
For a head restraint system to work properly:
•
Do not hang any items on
the head restraints or from the restraint legs.
•
Do not place any object between an
occupant and the seat-back.
•
Install each restraint in its proper location.
Page 52 of 170
| 45
V
EHICLE CONTROLS
Failure to reinstall, or correctly reinstall, the head restraints can result in
severe injury during a crash.
Always replace the head restraints before driving.
WARNING
Improperly positioning head restraints reduces their effectiveness and
increases the likelihood of serious injury in a crash.
Make sure head restraints are in place and positioned properly before driving.
WARNING
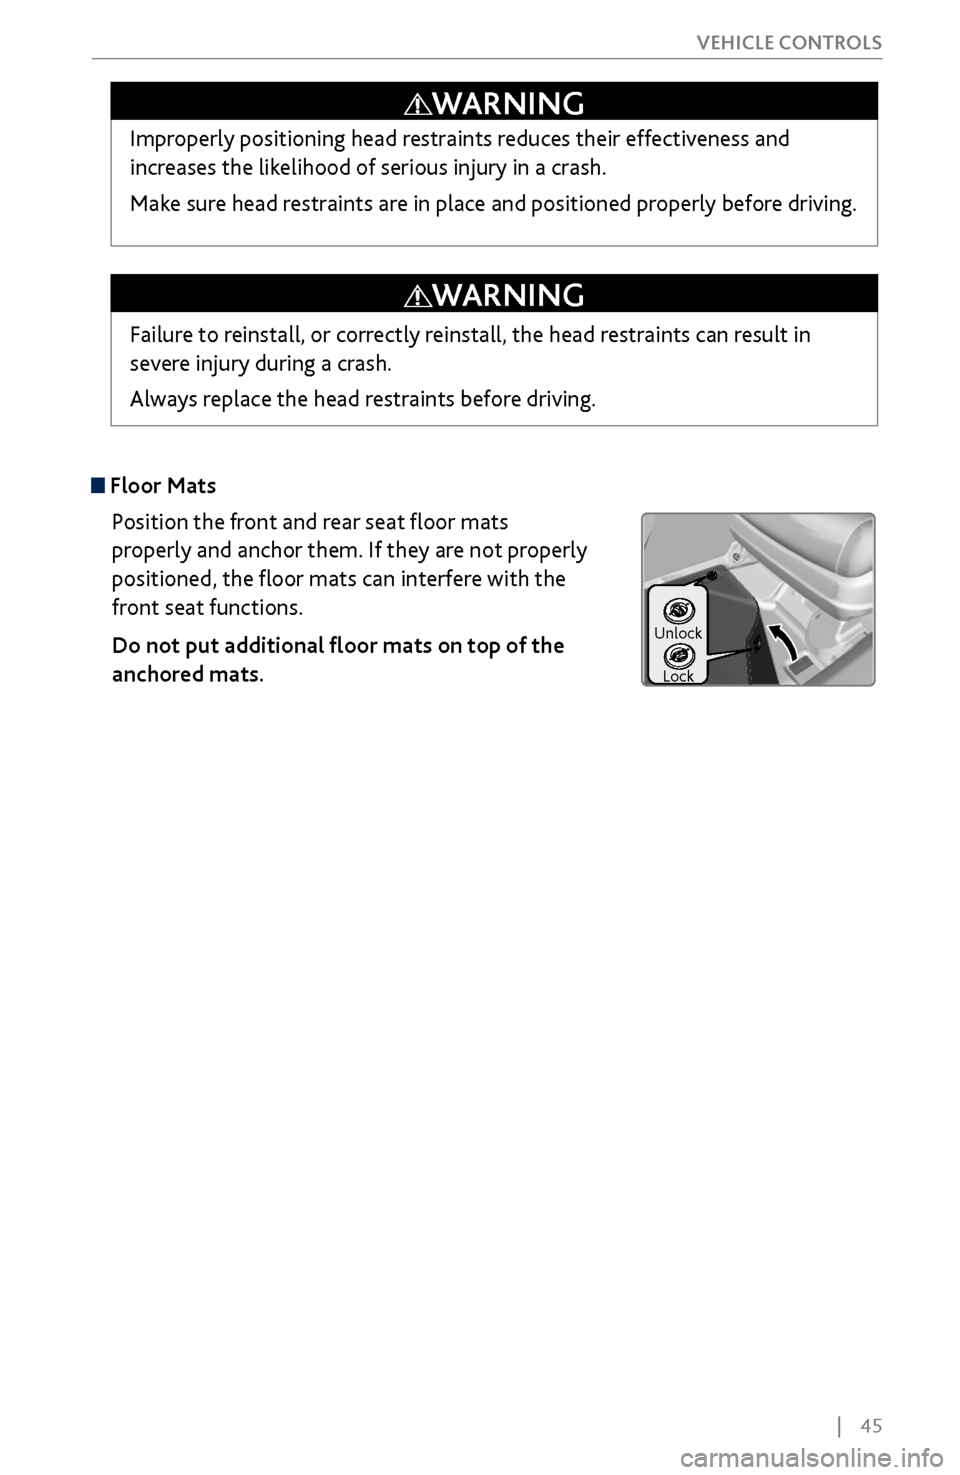
Floor Mats
Position the front and rear seat floor mats
properly and anchor them. If they are not properly
positioned, the floor mats can interfere with the
front seat functions.
Do not put additional floor mats on top of the
anchored mats.
Unlock
Lock
Page 54 of 170
| 47
V
EHICLE CONTROLS
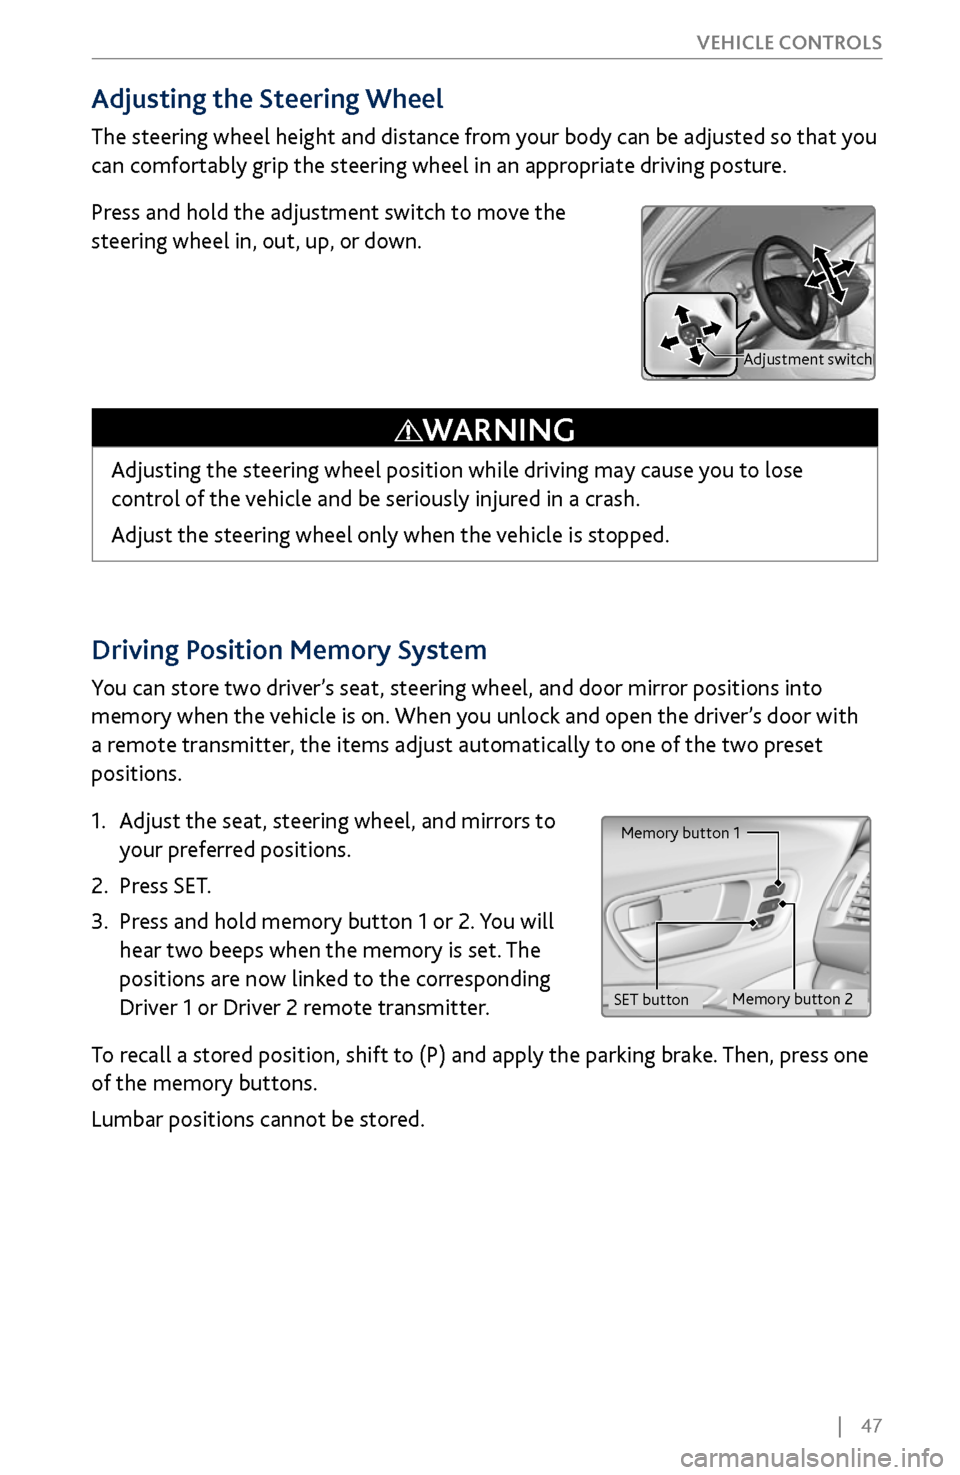
Driving Position Memory System
You can store two driver’s seat, steering wheel, and door mirror positions into
memory when the vehicle is on. When you unlock and open the driver’s door with
a remote transmitter, the items adjust automatically to one of the two preset
positions.
1.
Adjust the seat
, steering wheel, and mirrors to
your preferred positions.
2.
Press SET.
3.
Press and hold memory button 1 or 2.
You will
hear two beeps when the memory is set. The
positions are now linked to the corresponding
Driver 1 or Driver 2 remote transmitter.
To recall a stored position, shift to (P) and apply the parking brake. Then, press one
of the memory buttons.
Lumbar positions cannot be stored.
Memory button 1
Memory button 2
SET button
Adjusting the Steering Wheel
The steering wheel height and distance from your body can be adjusted so that you
can comfortably grip the steering wheel in an appropriate driving posture.
Press and hold the adjustment switch to move the
steering wheel in, out, up, or down.
Adjusting the steering wheel position while driving may cause you to lose
control of the vehicle and be seriously injured in a crash.
Adjust the steering wheel only when the vehicle is stopped.
WARNING
Adjustment switch
Page 59 of 170
52 |
V
EHICLE CONTROLS
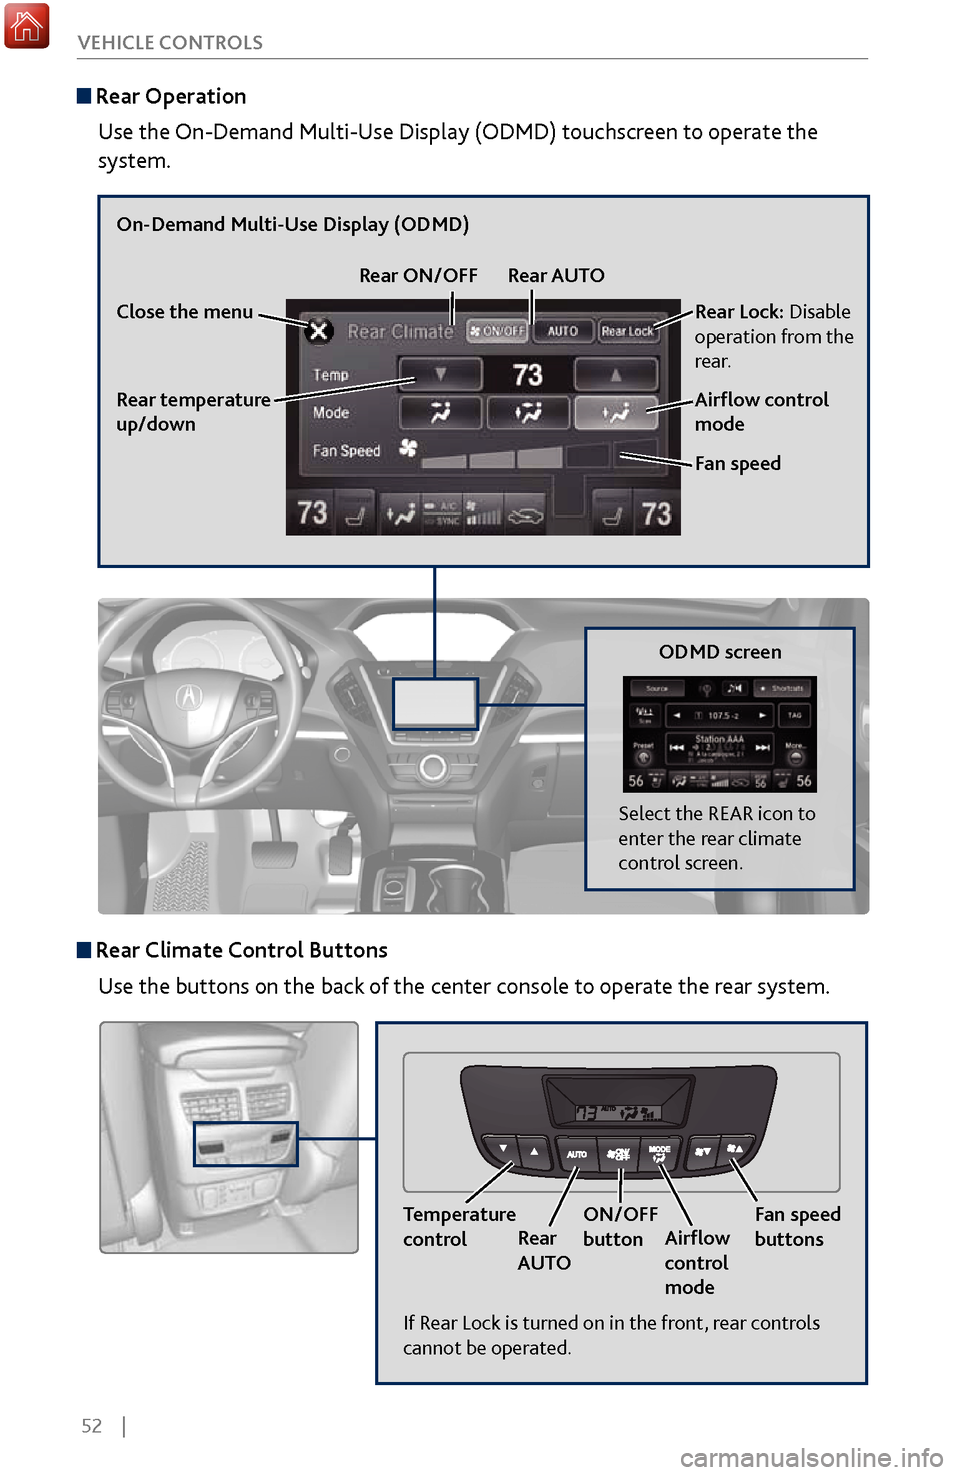
Rear Operation
Use the On-Demand Multi-Use Display (ODMD) touchscreen to operate the
system.
Rear Lock: Disable
operation from the
rear.
Rear temperature
up/down
On-Demand Multi-Use Display (ODMD)
Close the menu Rear ON/OFF
Rear AUTO
Fan speed Airflow control
mode
If Rear Lock is turned on in the front, rear controls
cannot be operated.
ODMD screen
Select the REAR icon to
enter the rear climate
control screen.
Rear Climate Control ButtonsUse the buttons on the back of the center console to operate the rear system.
Temperature
controlRear
AUTO ON/OFF
button
Airflow
control
mode Fan speed
buttons
Page 62 of 170
| 55
V
EHICLE CONTROLS
*if equipped
Customized Features
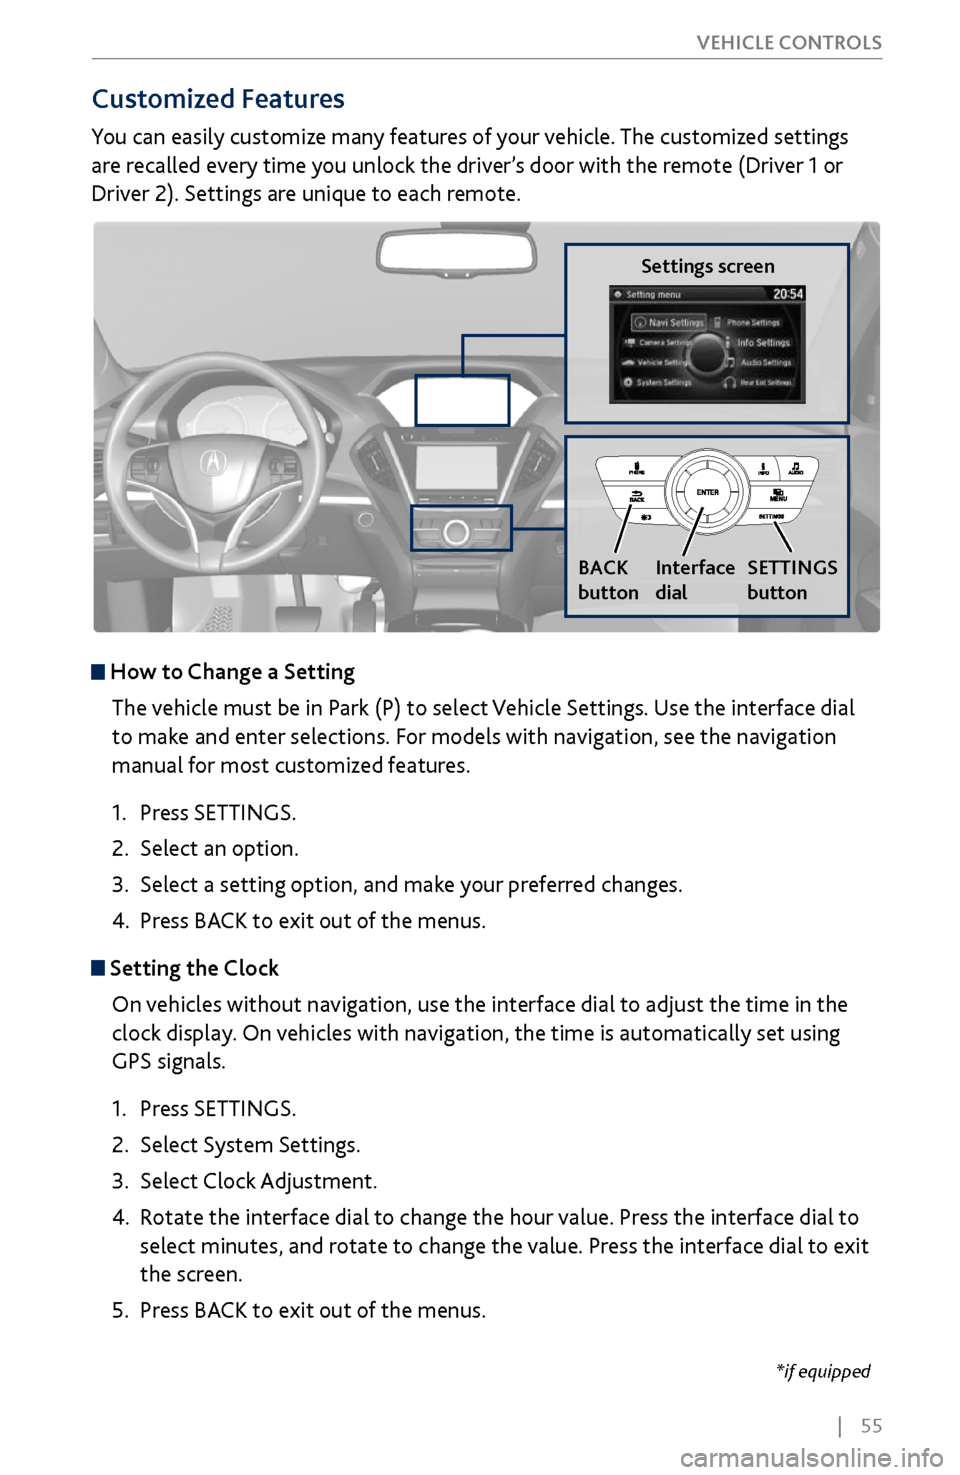
You can easily customize many features of your vehicle. The customized settings
are recalled every time you unlock the driver’s door with the remote (Driver 1 or
Driver 2). Settings are unique to each remote.
How to
Change a Setting
The vehicle must be in Park (P) to select Vehicle Settings. Use the interface dial
to make and enter selections. For models with navigation, see the navigation
manual for most customized features.
1.
Press SETTINGS.
2.
Select an option.
3.
Select a setting option, and make
your preferred changes.
4.
Press BA
CK to exit out of the menus.
Setting the Clock
On vehicles without navigation, use the interface dial to adjust the time in the
clock display. On vehicles with navigation, the time is automatically set using
GPS signals.
1.
Press SETTINGS.
2.
Select System Settings.
3.
Select Clock Adjustment
.
4.
Rotate the interface dial to
change the hour value. Press the interface dial to
select minutes, and rotate to change the value. Press the interface dial to exit
the screen.
5.
Press BA
CK to exit out of the menus.
Settings screen
BACK
button
Interface
dial SETTINGS
button
Page 75 of 170
68 |
AUDIO AND CONNECTIVITY
*if equipped
System Components
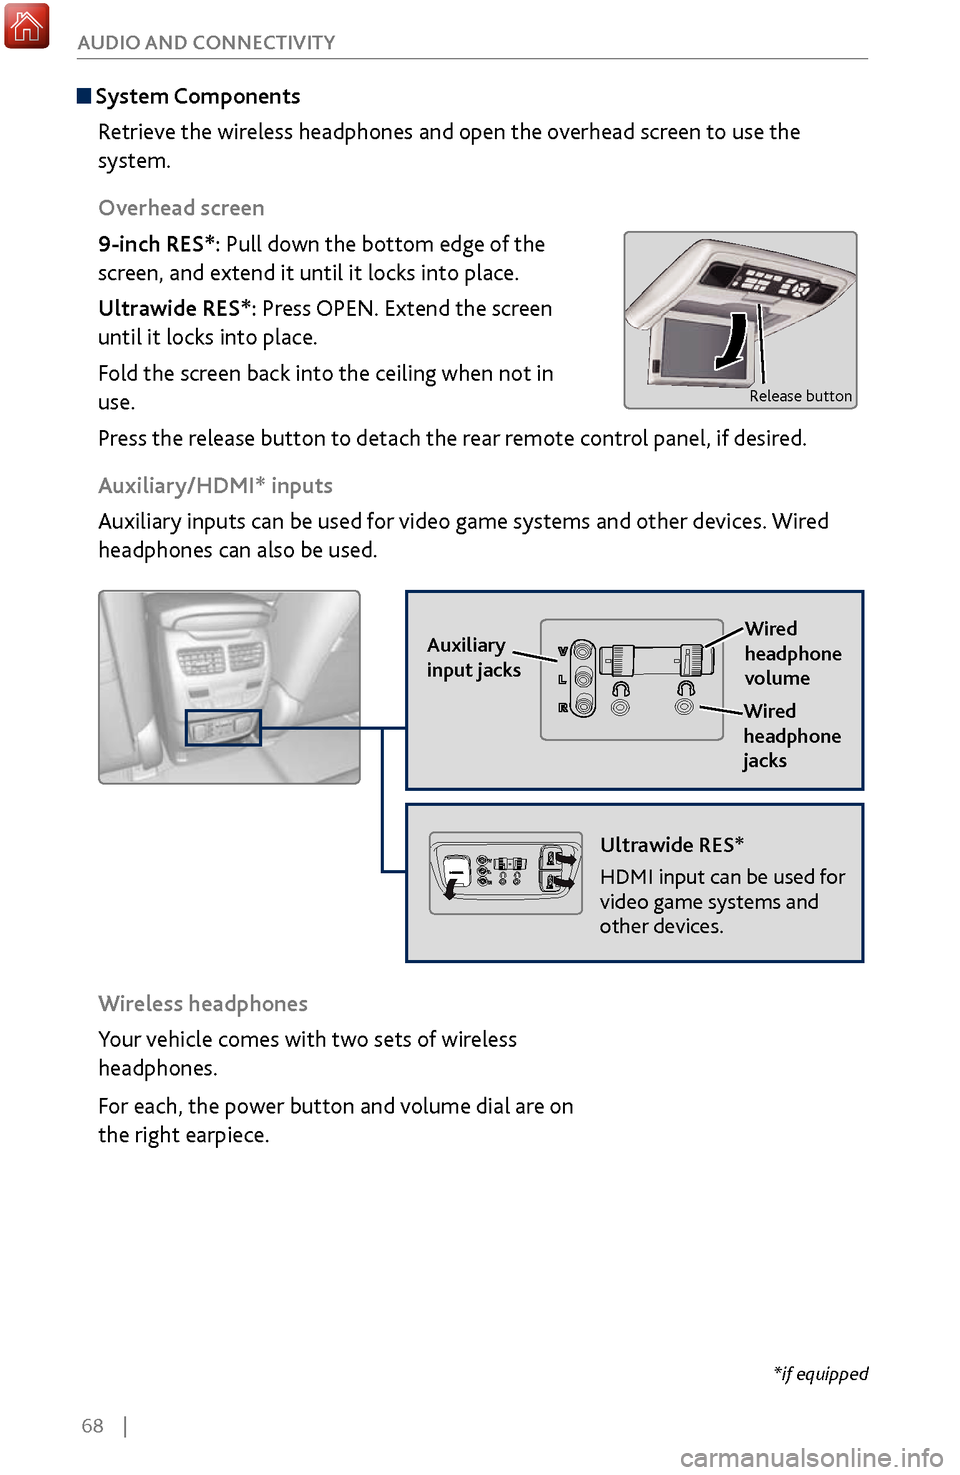
Retrieve the wireless headphones and open the overhead screen to use the
system.
Overhead screen
9-inch RES*: Pull down the bottom edge of the
screen, and extend it until it locks into place.
Ultrawide RES*: Press OPEN. Extend the screen
until it locks into place.
Fold the screen back into the ceiling when not in
use.
Press the release button to detach the rear remote control panel, if desired.
Auxiliary/HDMI* inputs
Auxiliary inputs can be used for video game systems and other devices. Wired
headphones can also be used.
Wireless headphones
Your vehicle comes with two sets of wireless
headphones.
For each, the power button and volume dial are on
the right earpiece.
Auxiliary
input jacks
Release button
Ultrawide RES*
HDMI input can be used for
video game systems and
other devices.
Wired
headphone
volume
Wired
headphone
jacks