steering wheel Acura MDX 2017 User Guide
[x] Cancel search | Manufacturer: ACURA, Model Year: 2017, Model line: MDX, Model: Acura MDX 2017Pages: 170, PDF Size: 12.43 MB
Page 88 of 170
| 81
NAVIGATION
Learn how to enter a destination and operate the navigation system.
Basic Navigation Operation
A real-time navigation system uses GPS and a map database to show your current
location and help guide you to a desired destination. You can operate the system
using voice commands or the system controls.
To reduce the potential for driver distraction, certain manual functions may
be inoperable or grayed out while the vehicle is moving. Voice commands are
always available.
Steering Wheel Controls
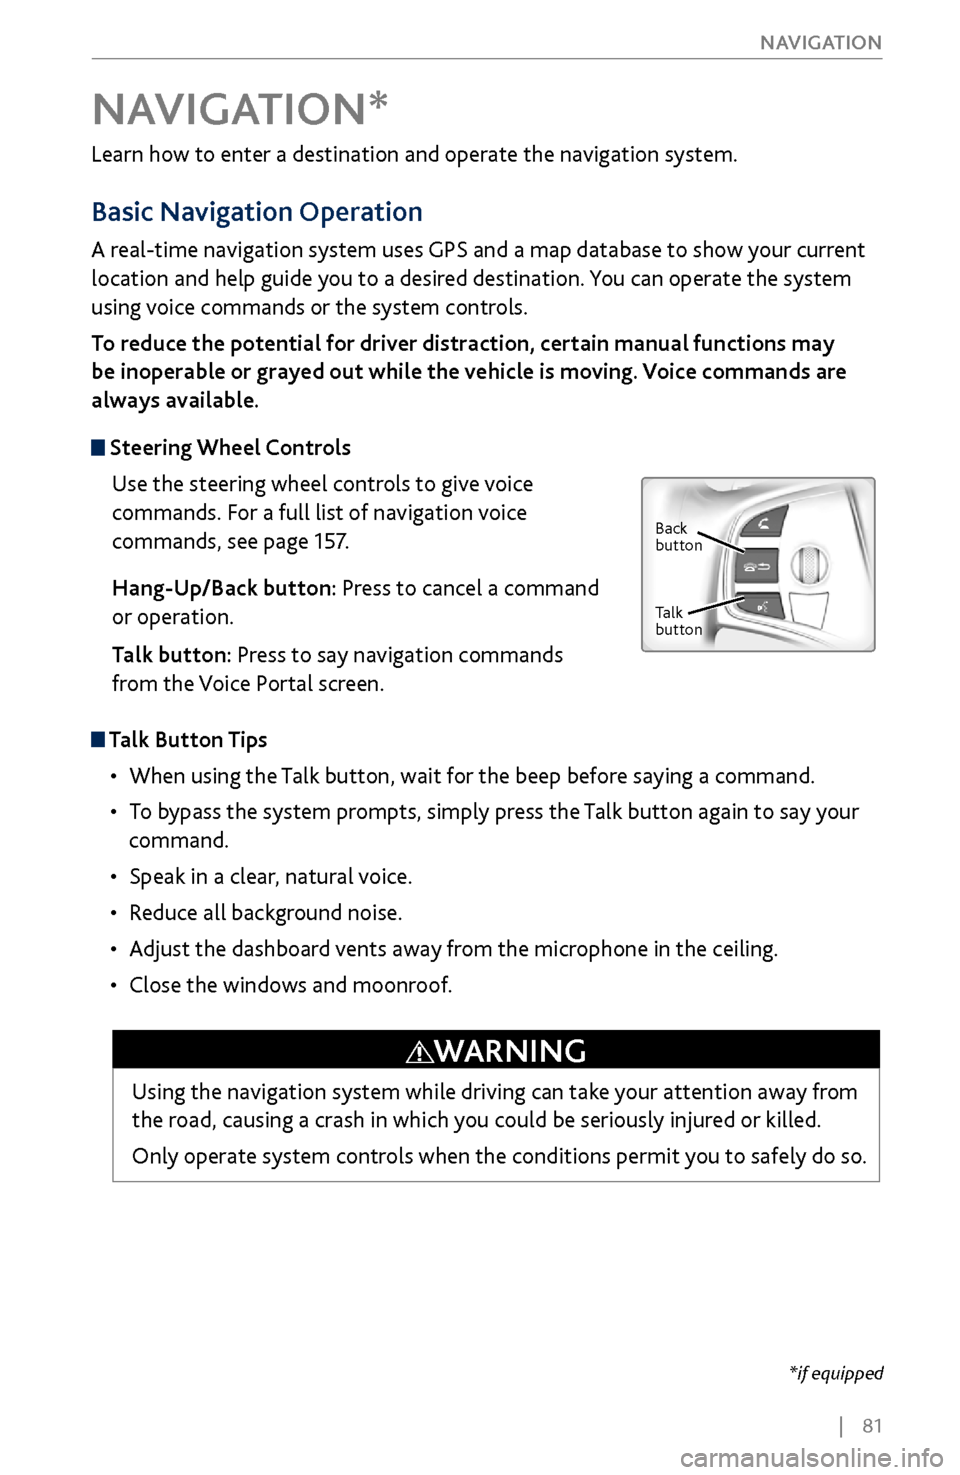
Use the steering wheel controls to give voice
commands. For a full list of navigation voice
commands, see page 157.
Hang-Up/Back button: Press to cancel a command
or operation.
Talk button: Press to say navigation commands
from the Voice Portal screen.
Talk Button Tips
•
When using the T
alk button, wait for the beep before saying a command.
•
To bypass
the system prompts, simply press the Talk button again to say your
command.
•
Speak in a clear, natural v
oice.
•
Reduce all background noise.
•
Adjust the dashboard
vents away from the microphone in the ceiling.
•
Close the windows and moonr
oof.
NAVIGATION*
Using the navigation system while driving can take your attention away from
the road, causing a crash in which you could be seriously injured or killed.
Only operate system controls when the conditions permit you to safely do so.
WARNING
*if equipped
Back
button
Talk
button
Page 93 of 170
86 |
NAVIGATION
Routing
After a destination is set, you can alter or cancel your route.
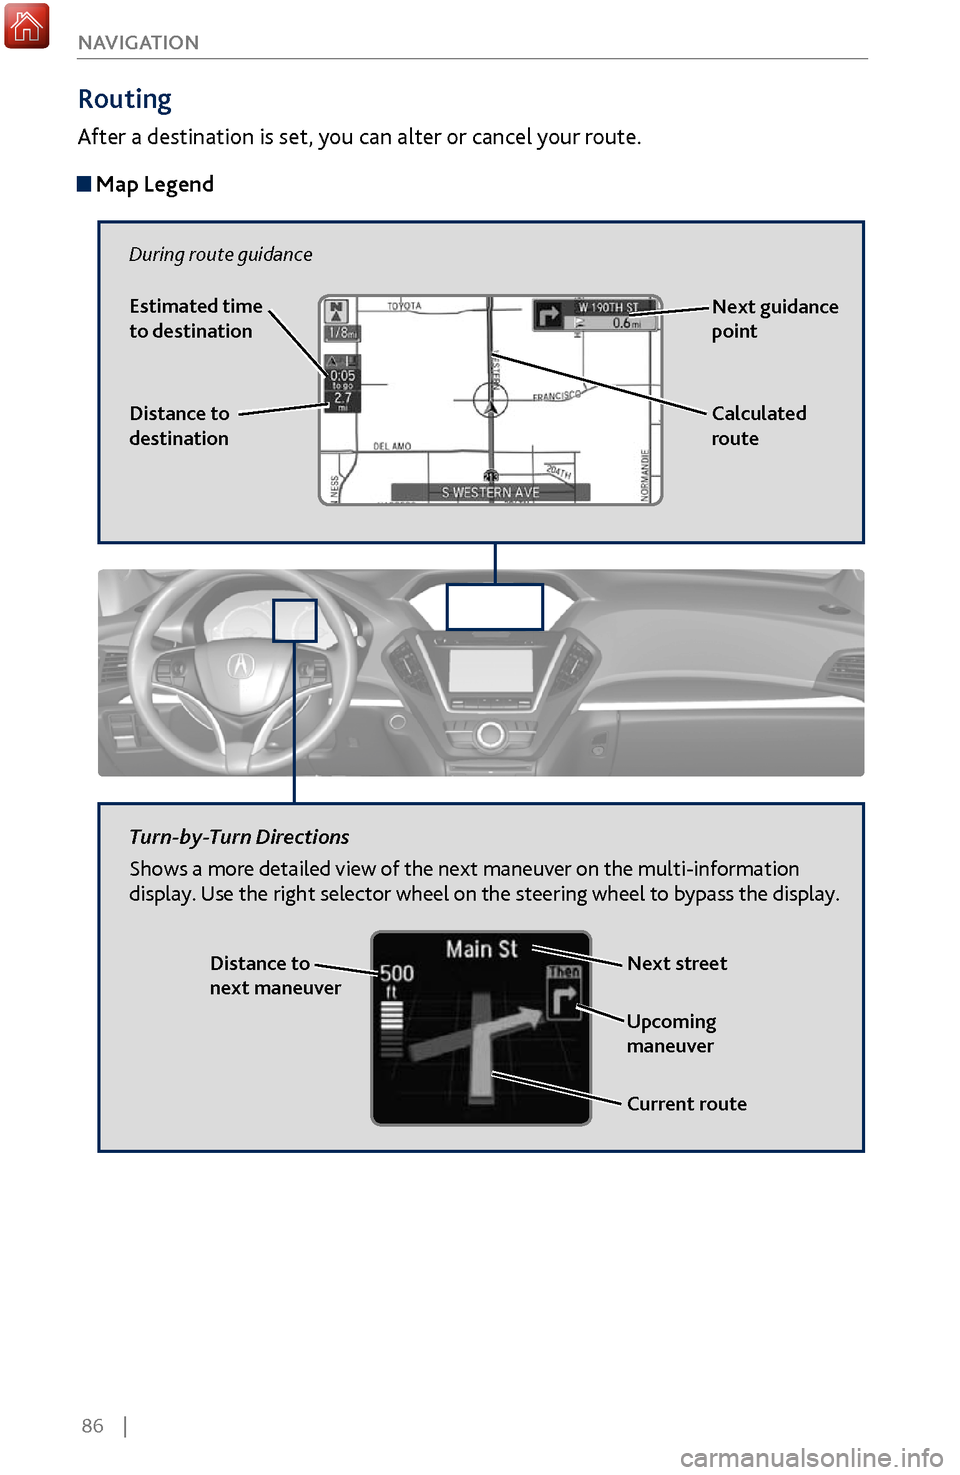
Map Legend
During route guidance
Next guidance
point
Distance to
destination Calculated
route
Estimated time
to destination
Distance to
next maneuver
Turn-by-Turn Directions
Shows a more detailed view of the next maneuver on the multi-information
display. Use the right selector wheel on the steering wheel to bypass the display.
Upcoming
maneuver
Current route
Next street
Page 95 of 170
88 |
DRIVING
Learn about preparation for driving, as well as other features.
Before Driving
Check the following items before you begin driving.
Exterior Checks
•
Make sur
e there are no obstructions on the windows, door mirrors, exterior
lights, or other parts of the vehicle.
•
Remov
e any frost, snow, or ice.
•
Make sure
the hood is securely closed.
•
Heat from
the engine and exhaust can ignite flammable materials left under
the hood, causing a fire. If you’ve parked your vehicle for an extended period,
inspect and remove any debris that may have collected, such as dried grass
and leaves that have fallen or have been carried in for use as a nest by a small
animal. Also check under the hood for leftover flammable materials after you
or someone else has performed maintenance on your vehicle.
•
Make sure
the tires are in good condition.
•
Make sure
there are no people or objects behind or around the vehicle.
DRIVING
Interior Checks•
Store or secur
e all items on board properly.
•
Do not pile items higher than the seat height
.
•
Do not place anything in the
front seat footwells. Make sure to secure the floor
mats.
•
If you hav
e any animals on board, do not let them move freely in the vehicle.
•
Securely close and lock all
doors and the tailgate.
•
Adjust y
our seating position, mirrors, and steering wheel properly.
•
Make sure items placed
on the floor behind the front seats cannot roll under
the seats.
•
Everyone in
the vehicle must fasten their seat belt.
•
Make sure
that the indicators in the instrument panel come on when you start
the vehicle, and go off soon after.
If the doors are frozen shut, use warm water around the door edges to melt any
ice. Do not try to force them open, as this can damage the rubber trim around the
doors. When done, wipe dry to avoid further freezing.
NOTICE
Page 106 of 170
| 99
DRIVING
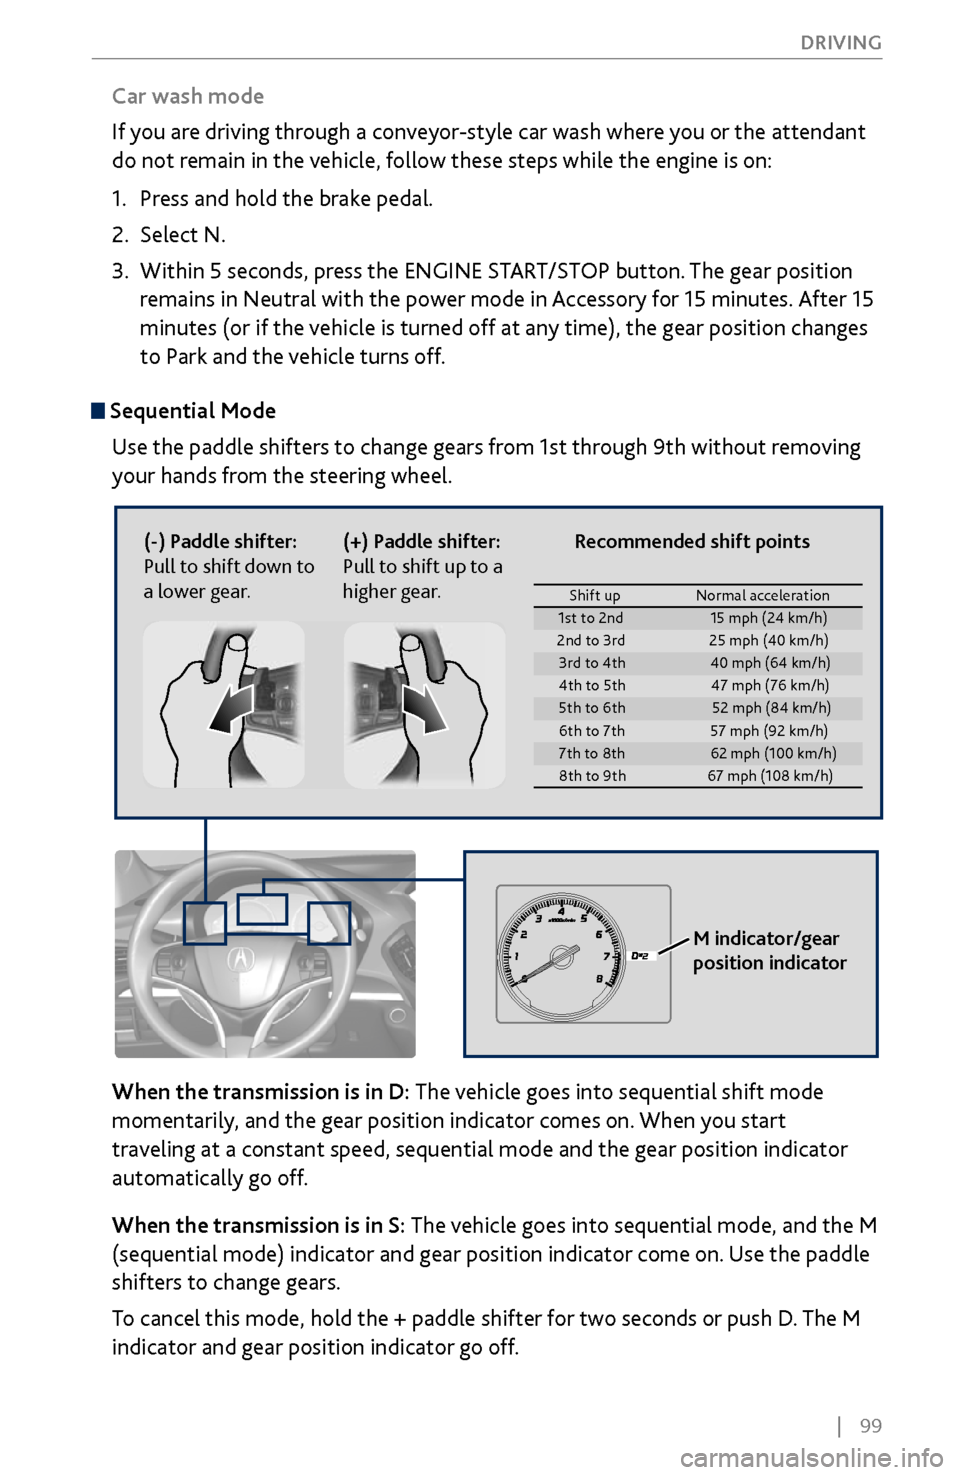
Sequential Mode
Use the paddle shifters to change gears from 1st through 9th without removing
your hands from the steering wheel.
When the transmission is in D: The vehicle goes into sequential shift mode
momentarily, and the gear position indicator comes on. When you start
traveling at a constant speed, sequential mode and the gear position indicator
automatically go off.
When the transmission is in S: The vehicle goes into sequential mode, and the M
(sequential mode) indicator and gear position indicator come on. Use the paddle
shifters to change gears.
To cancel this mode, hold the + paddle shifter for two seconds or push D. The M
indicator and gear position indicator go off.
(-) Paddle shifter:
Pull to shift down to
a lower gear. (+) Paddle shifter:
Pull to shift up to a
higher gear.
M indicator/gear
position indicator
Car wash mode
If you are driving through a conveyor-style car wash where you or the attendant
do not remain in the vehicle, follow these steps while the engine is on:
1.
Press and hold the brak
e pedal.
2.
Select N.
3.
Within 5 seconds, press the ENGINE
START/STOP button. The gear position
remains in Neutral with the power mode in Accessory for 15 minutes. After 15
minutes (or if the vehicle is turned off at any time), the gear position changes
to Park and the vehicle turns off.
Shift up Normal acceleration1st to 2n d15 mph (24 km/h)
2nd to 3rd 25 mph (40 km/h)
3rd to 4th40 mph (64 km/h)
4th to 5t h4 7 mph (76 km/h )
5th to 6th52 mph (84 km/h)
6th to 7t h5 7 mph (92 km/h )
7th to 8th62 mph (100 km/h)
8th to 9th 67 mph (108 km/h)
Recommended shift points
Page 107 of 170
100 |
DRIVING
Auto Idle Stop*
Automatically stops and restarts the engine to help maximize your fuel economy,
depending on environmental and vehicle conditions.
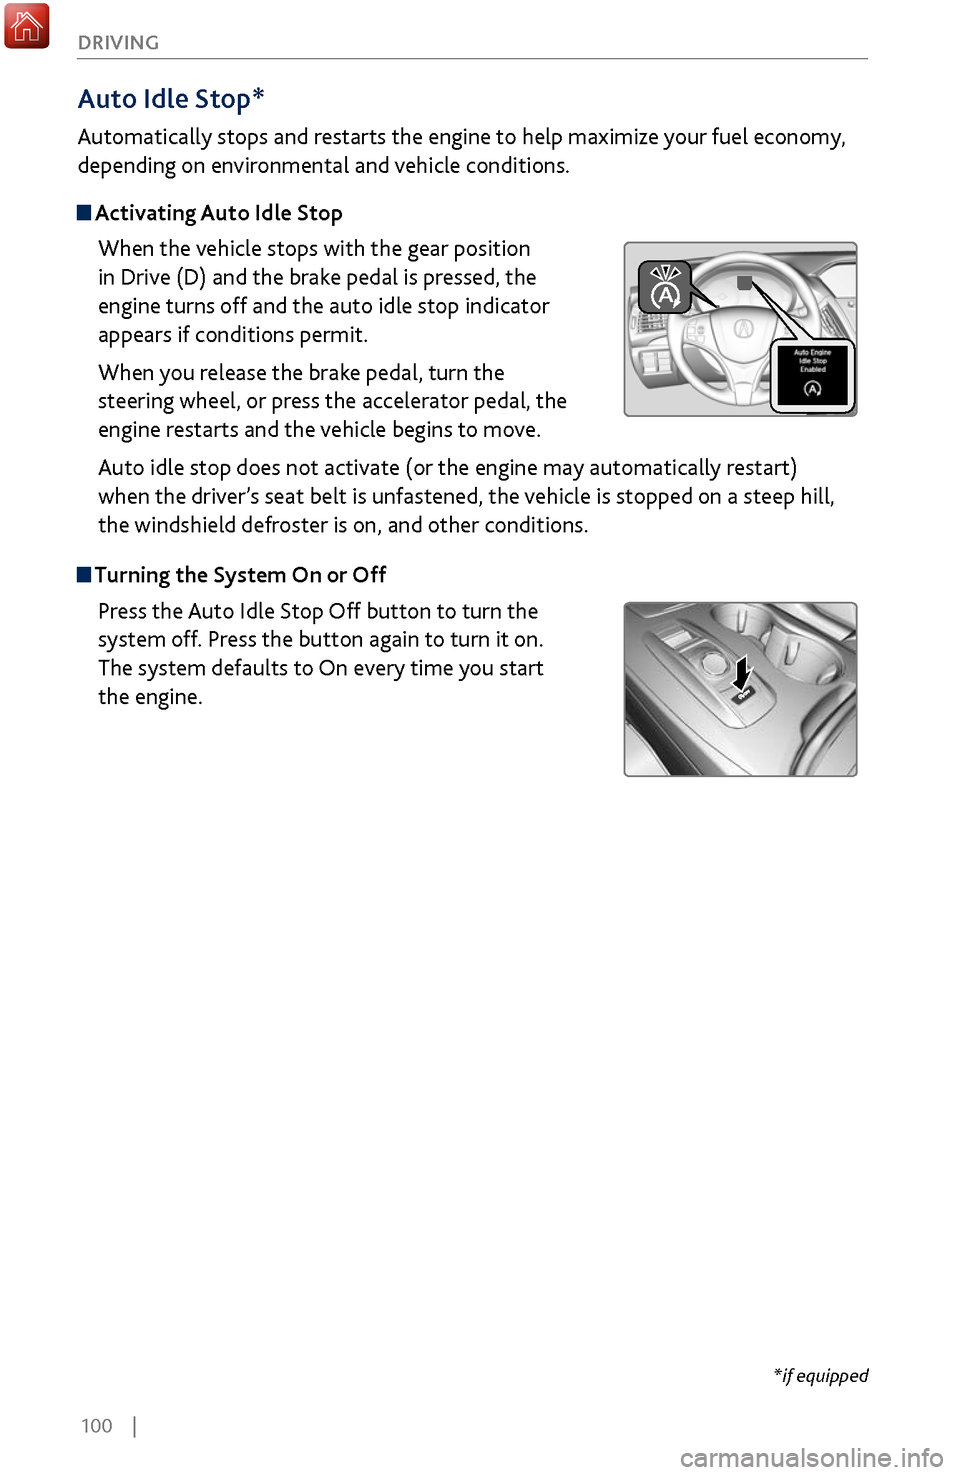
Activating Auto Idle Stop
When the vehicle stops with the gear position
in Drive (D) and the brake pedal is pressed, the
engine turns off and the auto idle stop indicator
appears if conditions permit.
When you release the brake pedal, turn the
steering wheel, or press the accelerator pedal, the
engine restarts and the vehicle begins to move.
Auto idle stop does not activate (or the engine may automatically restart)
when the driver’s seat belt is unfastened, the vehicle is stopped on a steep hill,
the windshield defroster is on, and other conditions.
Turning the System On or Off
Press the Auto Idle Stop Off button to turn the
system off. Press the button again to turn it on.
The system defaults to On every time you start
the engine.
*if equipped
Page 108 of 170
| 101
DRIVING
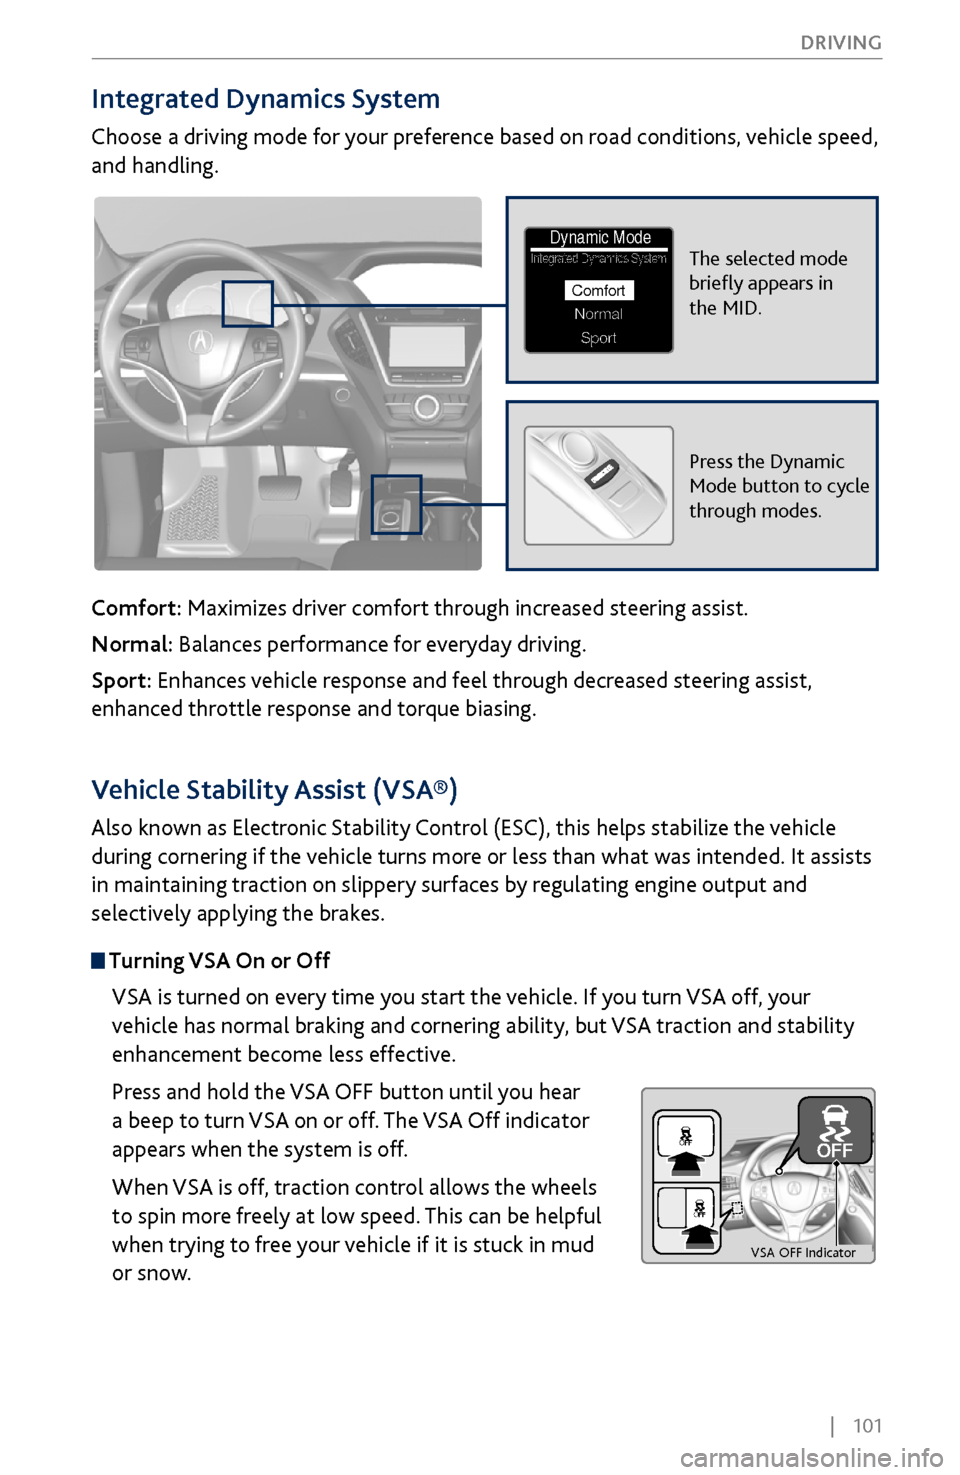
Integrated Dynamics System
Choose a driving mode for your preference based on road conditions, vehicle speed,
and handling.
Comfort: Maximizes driver comfort through increased steering assist.
Normal: Balances performance for everyday driving.
Sport: Enhances vehicle response and feel through decreased steering assist,
enhanced throttle response and torque biasing.
The selected mode
briefly appears in
the MID.Integrated Dynamics System
NormalSport
Comfort
Dynamic Mode
Press the Dynamic
Mode button to cycle
through modes.
Vehicle Stability Assist (VSA®)
Also known as Electronic Stability Control (ESC), this helps stabilize the vehicle
during cornering if the vehicle turns more or less than what was intended. It assists
in maintaining traction on slippery surfaces by regulating engine output and
selectively applying the brakes.
Turning VSA On or Off
VSA is turned on every time you start the vehicle. If you turn VSA off, your
vehicle has normal braking and cornering ability, but VSA traction and stability
enhancement become less effective.
Press and hold the VSA OFF button until you hear
a beep to turn VSA on or off. The VSA Off indicator
appears when the system is off.
When VSA is off, traction control allows the wheels
to spin more freely at low speed. This can be helpful
when trying to free your vehicle if it is stuck in mud
or snow.
VS A OFF Indicator
Page 109 of 170
102 |
DRIVING
Braking
Slow down or stop your vehicle, and keep it from moving when parked.
Foot Brake
Press the brake pedal to slow down or stop your vehicle from moving.
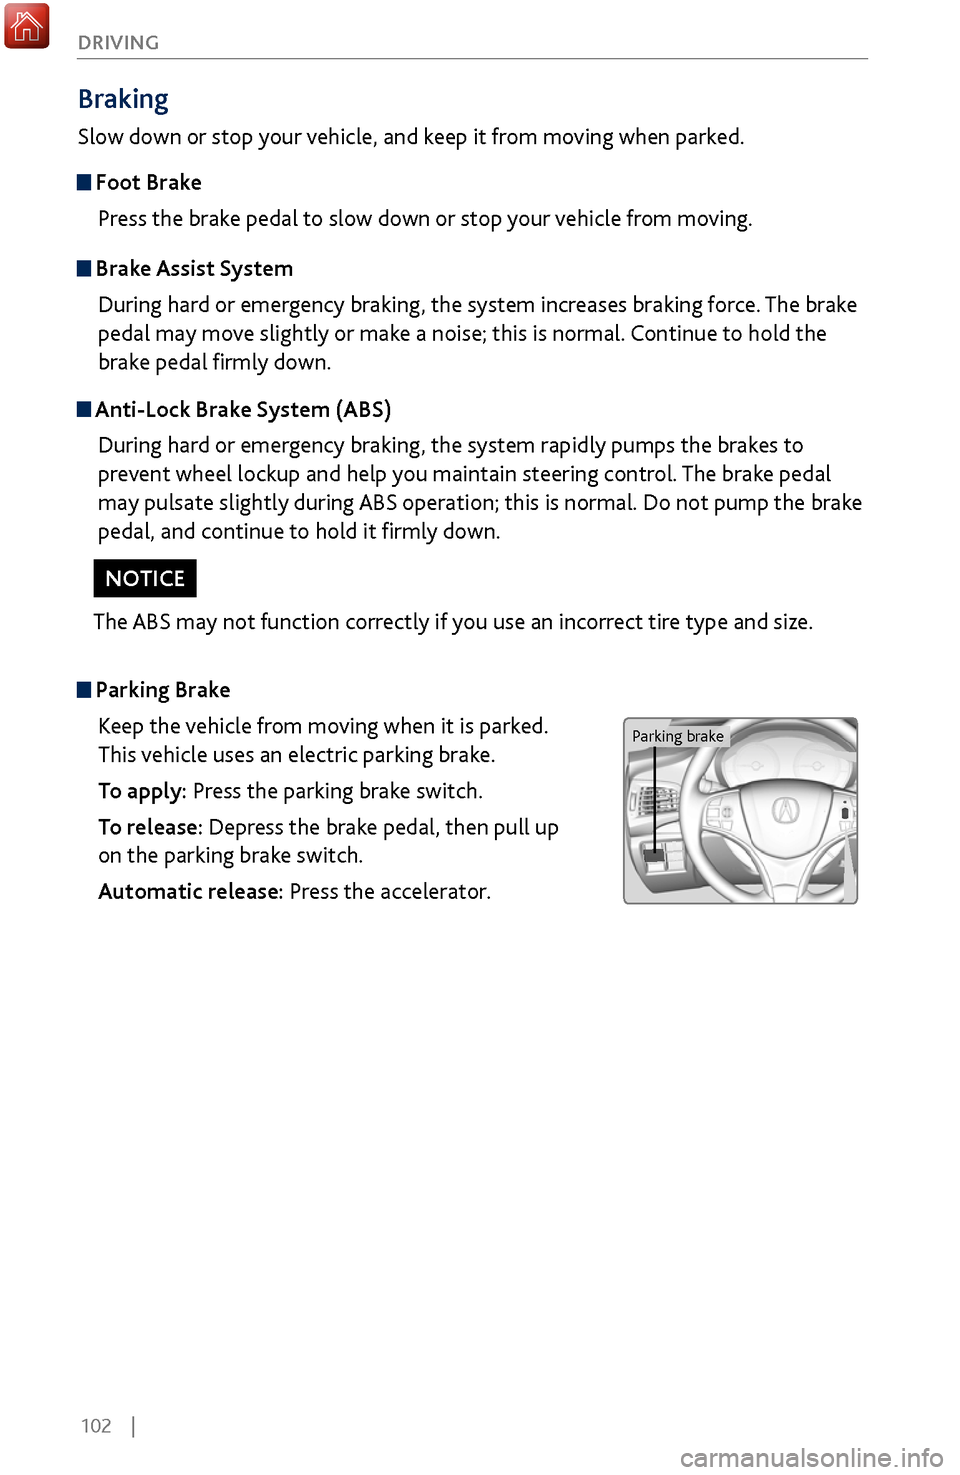
Parking BrakeKeep the vehicle from moving when it is parked.
This vehicle uses an electric parking brake.
To apply: Press the parking brake switch.
To release: Depress the brake pedal, then pull up
on the parking brake switch.
Automatic release: Press the accelerator.
Brake Assist SystemDuring hard or emergency braking, the system increases braking force. The brake
pedal may move slightly or make a noise; this is normal. Continue to hold the
brake pedal firmly down.
Anti-Lock Brake System (ABS)During hard or emergency braking, the system rapidly pumps the brakes to
prevent wheel lockup and help you maintain steering control. The brake pedal
may pulsate slightly during ABS operation; this is normal. Do not pump the brake
pedal, and continue to hold it firmly down.
The ABS may not function correctly if you use an incorrect tire type and size.
NOTICE
Parking brake
Page 115 of 170
108 |
DRIVING
Collision Mitigation Braking System™ (CMBS™)
Can assist you when there is a possibility of your vehicle colliding with a vehicle or a
pedestrian detected in front of yours.
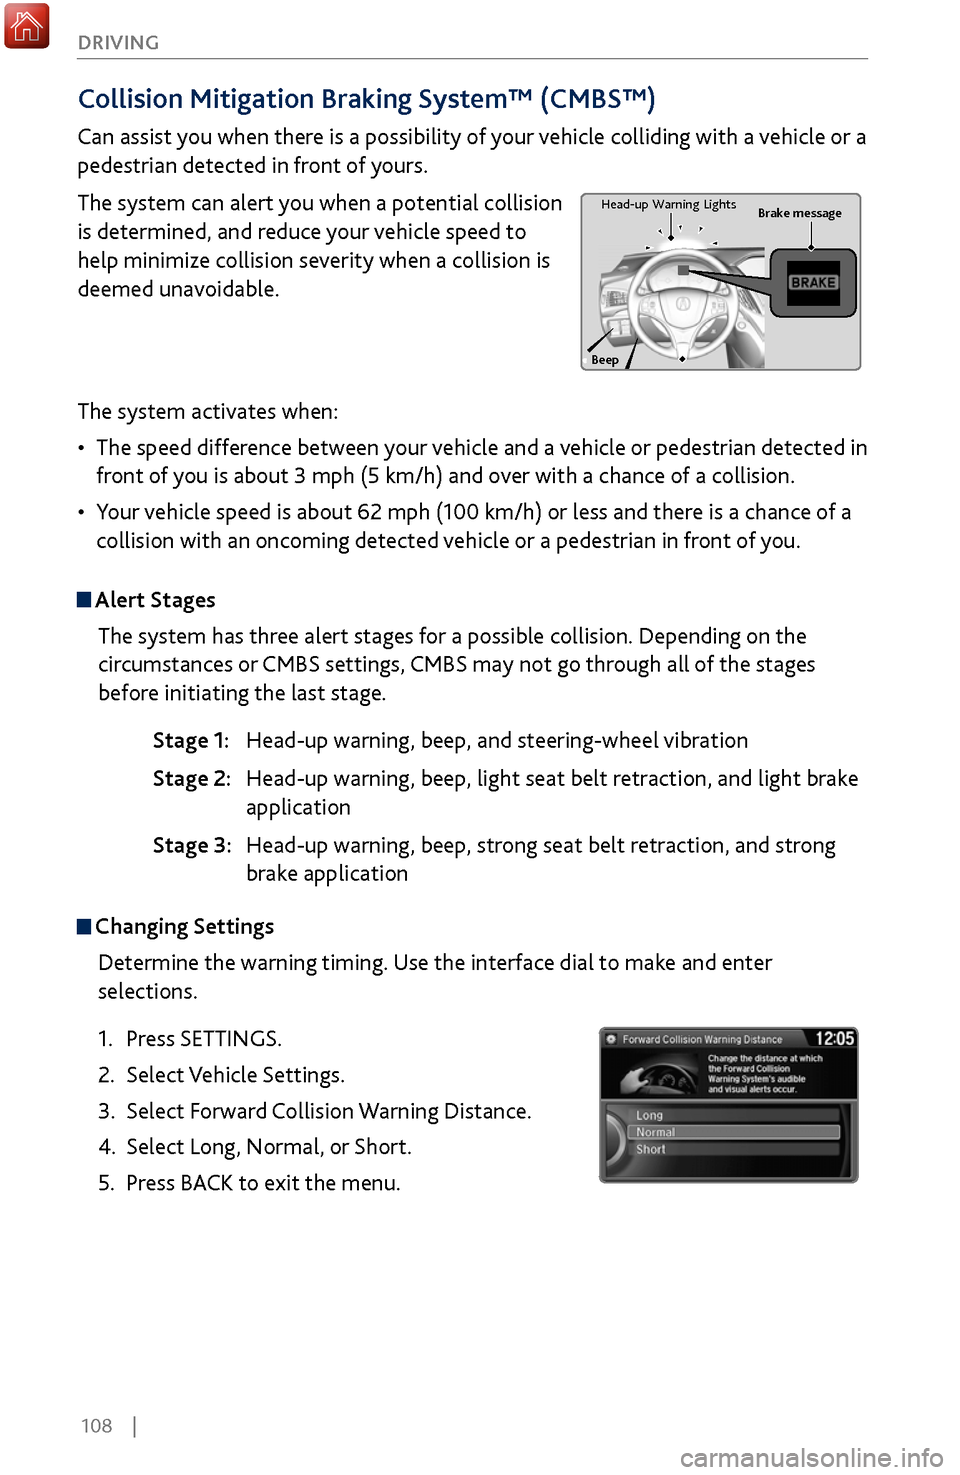
The system can alert you when a potential collision
is determined, and reduce your vehicle speed to
help minimize collision severity when a collision is
deemed unavoidable.
The system activates when:
•
The speed difference between
your vehicle and a vehicle or pedestrian detected in
front of you is about 3 mph (5 km/h) and over with a chance of a collision.
•
Your v
ehicle speed is about 62 mph (100 km/h) or less and there is a chance of a
collision with an oncoming detected vehicle or a pedestrian in front of you.
Alert Stages
The system has three alert stages for a possible collision. Depending on the
circumstances or CMBS settings, CMBS may not go through all of the stages
before initiating the last stage.
Stage 1: Head-up warning, beep
, and steering-wheel vibration
Stage 2: Head-up warning, beep
, light seat belt retraction, and light brake
application
Stage 3:
Head-up warning, beep
, strong seat belt retraction, and strong
brake application
Beep Brake message
Head-up
Warning Lights
Changing Settings
Determine the warning timing. Use the interface dial to make and enter
selections.
1.
Press SETTINGS.
2.
Select Vehicle Settings.
3.
Select Forward
Collision Warning Distance.
4.
Select Long, Normal, or
Short.
5.
Press BACK
to exit the menu.
Page 116 of 170
| 109
DRIVING
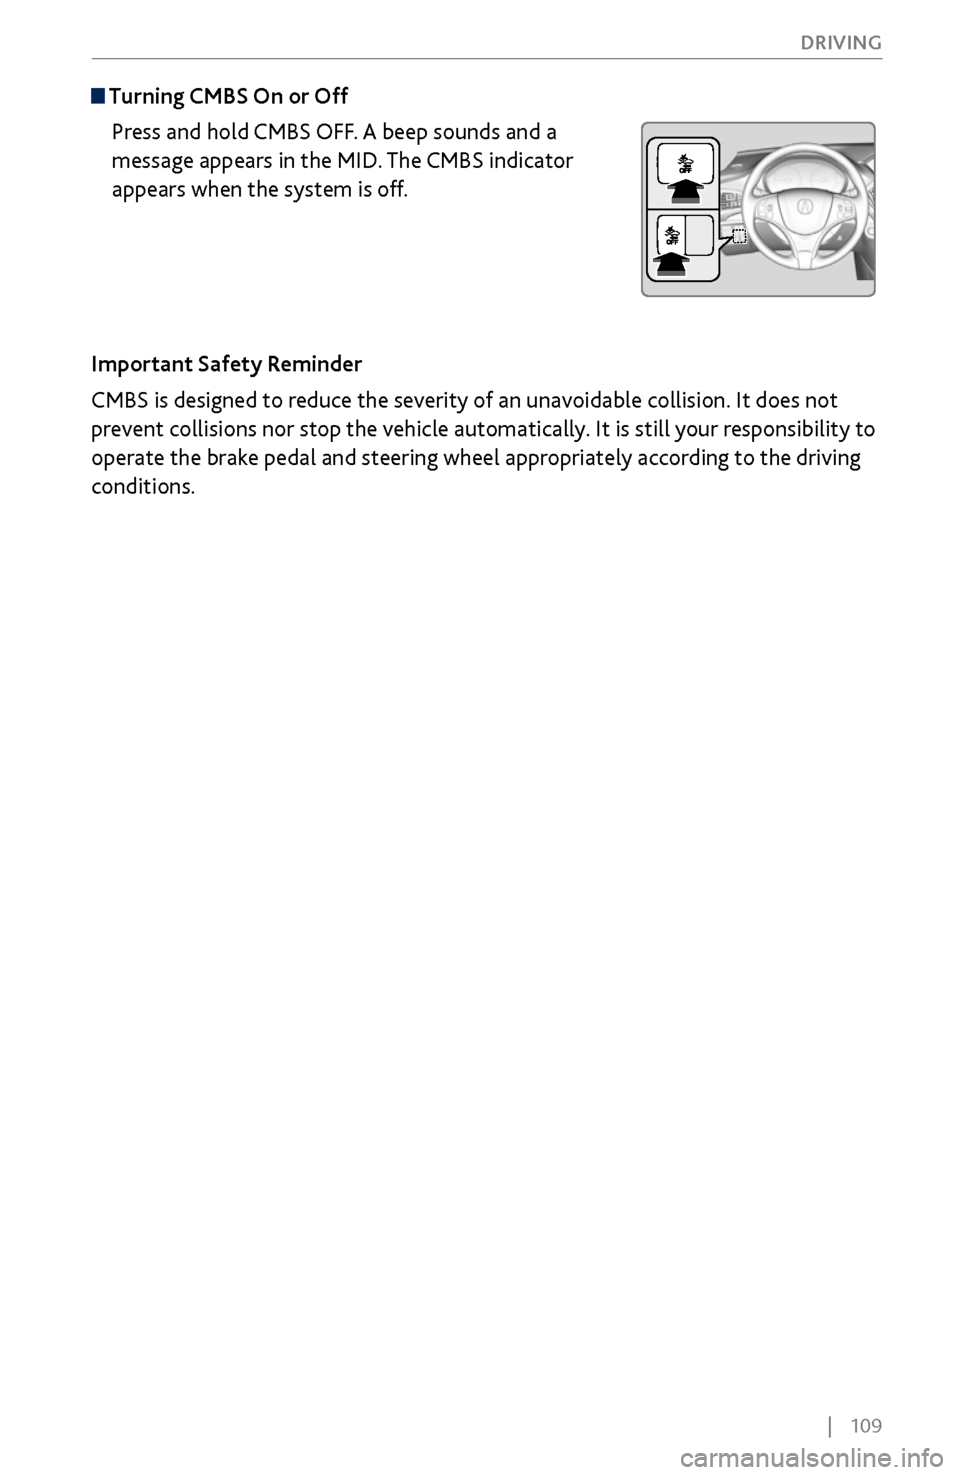
Turning CMBS On or Off
Press and hold CMBS OFF. A beep sounds and a
message appears in the MID. The CMBS indicator
appears when the system is off.
Important Safety Reminder
CMBS is designed to reduce the severity of an unavoidable collision. It does not
prevent collisions nor stop the vehicle automatically. It is still your responsibility to
operate the brake pedal and steering wheel appropriately according to the driving
conditions.
Page 117 of 170
110 |
DRIVING
Lane Departure Warning (LDW)
Alerts you if the system detects a possibility of your vehicle unintentionally
crossing over detected lane markings while driving between 45–90 mph (72–145
km/h).
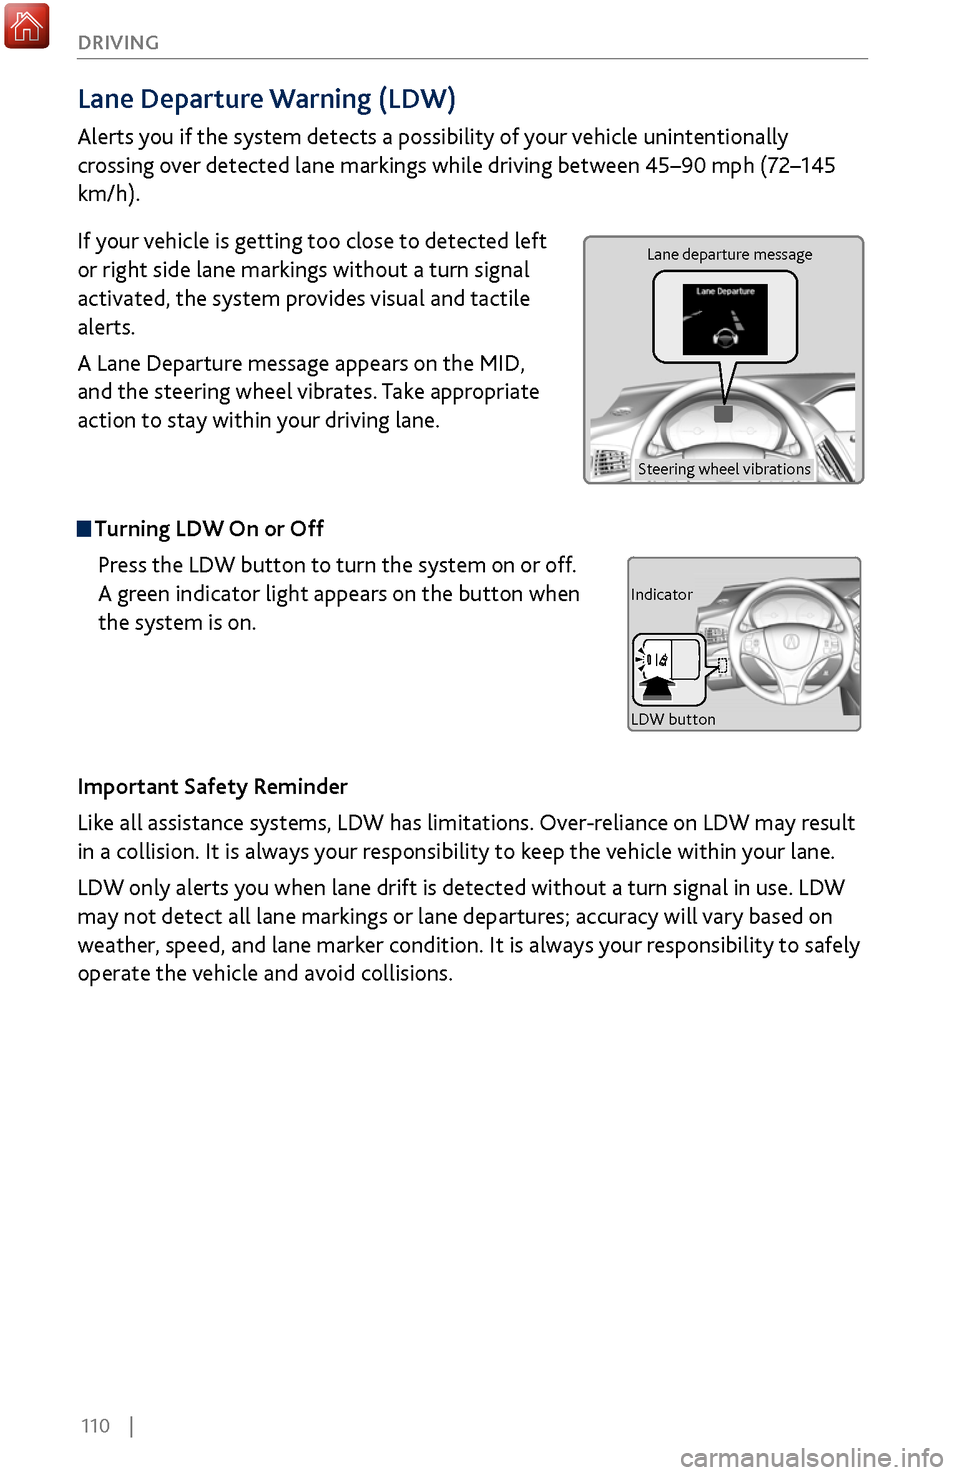
If your vehicle is getting too close to detected left
or right side lane markings without a turn signal
activated, the system provides visual and tactile
alerts.
A Lane Departure message appears on the MID,
and the steering wheel vibrates. Take appropriate
action to stay within your driving lane.
Turning LDW On or Off
Press the LDW button to turn the system on or off.
A green indicator light appears on the button when
the system is on.
Important Safety Reminder
Like all assistance systems, LDW has limitations. Over-reliance on LDW may result
in a collision. It is always your responsibility to keep the vehicle within your lane.
LDW only alerts you when lane drift is detected without a turn signal in use. LDW
may not detect all lane markings or lane departures; accuracy will vary based on
weather, speed, and lane marker condition. It is always your responsibility to safely
operate the vehicle and avoid collisions.
Lane departure message
Steering wheel vibrations
Indicator
LDW button