display Acura MDX 2017 Service Manual
[x] Cancel search | Manufacturer: ACURA, Model Year: 2017, Model line: MDX, Model: Acura MDX 2017Pages: 170, PDF Size: 12.43 MB
Page 90 of 170
| 83
NAVIGATION
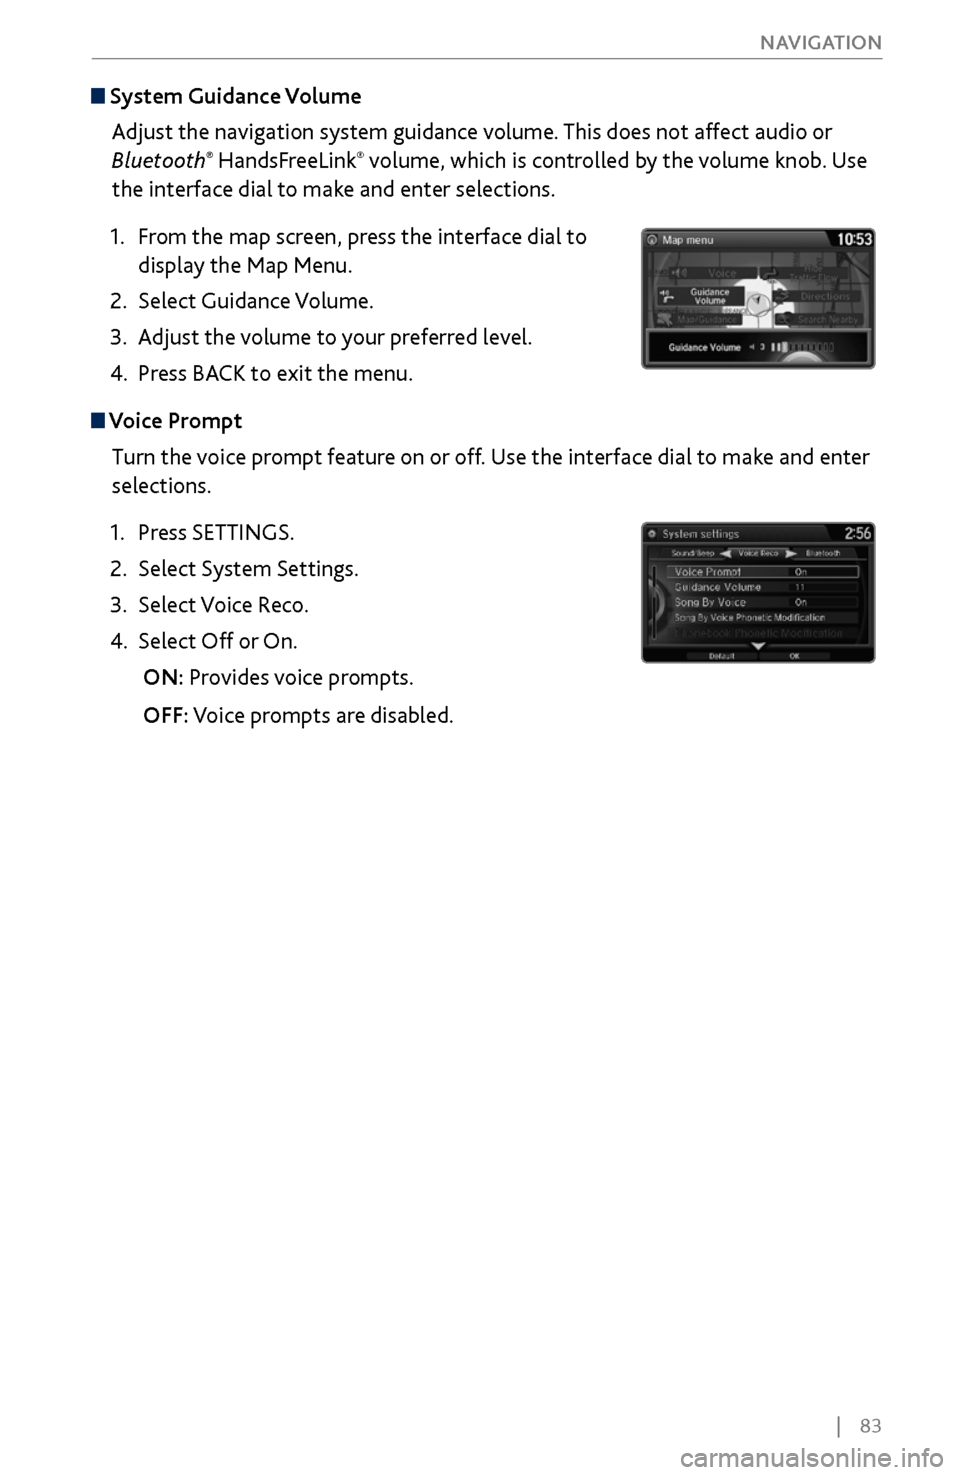
System Guidance Volume
Adjust the navigation system guidance volume. This does not affect audio or
Bluetooth
® HandsFreeLink® volume, which is controlled by the volume knob. Use
the interface dial to make and enter selections.
1.
From the
map screen, press the interface dial to
display the Map Menu.
2.
Select Guidance Volume.
3.
Adjust the v
olume to your preferred level.
4.
Press BACK
to exit the menu.
Voice Prompt Turn the voice prompt feature on or off. Use the interface dial to make and enter
selections.
1.
Press SETTINGS.
2.
Select System Settings.
3.
Select Voice R
eco.
4.
Select Off or On.
ON: Pr
ovides voice prompts.
OFF:
Voice prompts are disabled.
Page 92 of 170
| 85
NAVIGATION
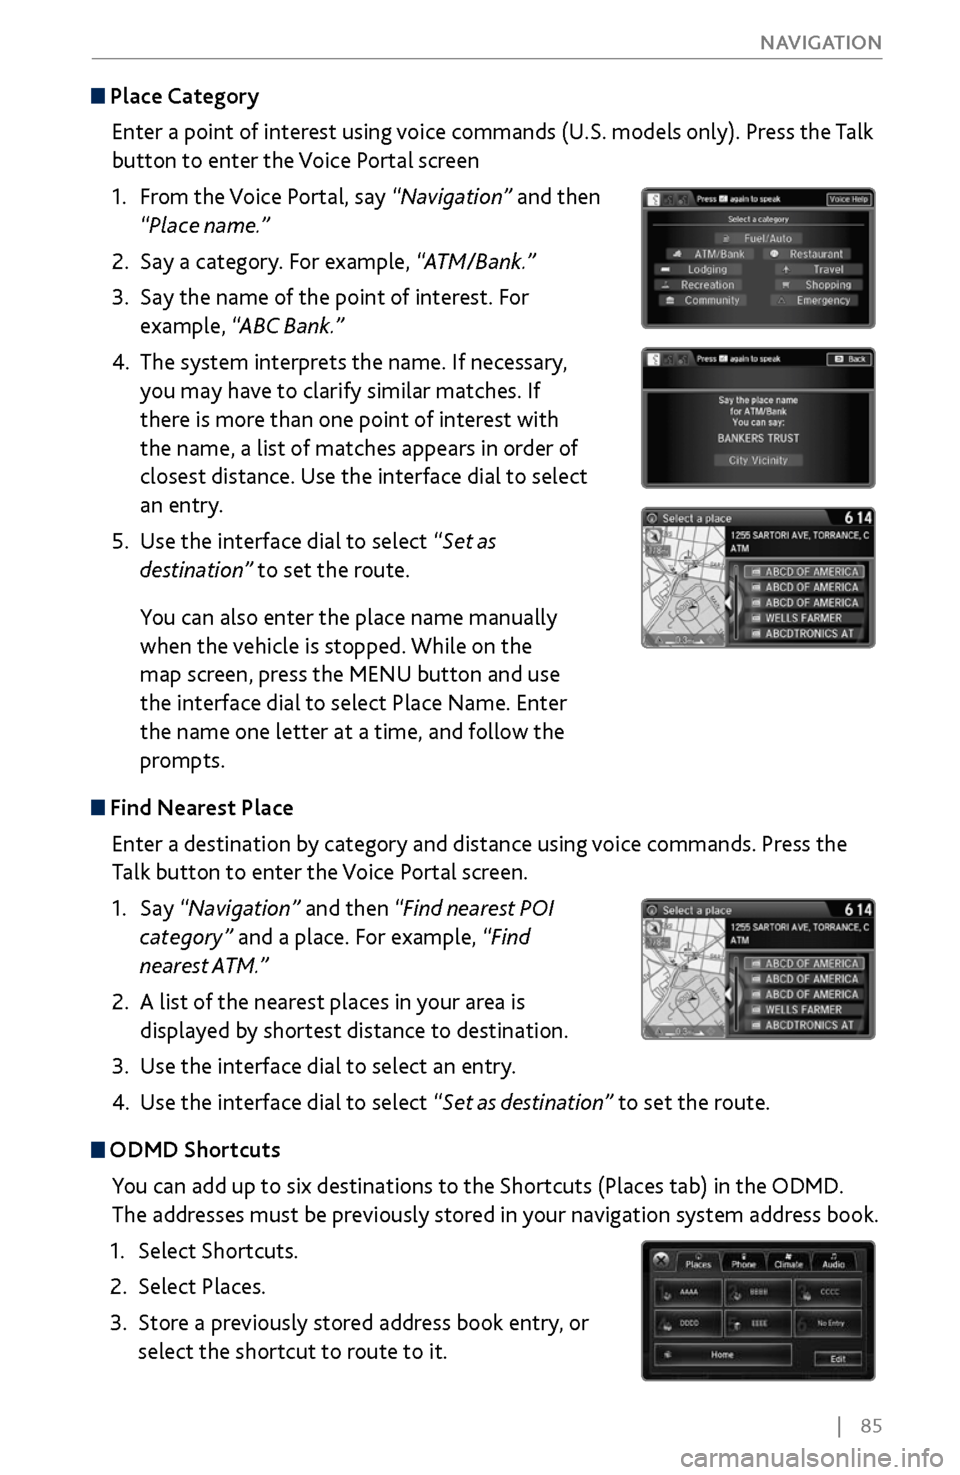
Place Category
Enter a point of interest using voice commands (U.S. models only). Press the Talk
button to enter the Voice Portal screen
1.
From
the Voice Portal, say “Navigation” and then
“Place name.”
2.
Say a category. For example,
“ATM/Bank.”
3.
Say the name of the point of
interest. For
example, “ABC Bank.”
4.
The system interprets the name. If necessary
,
you may have to clarify similar matches. If
there is more than one point of interest with
the name, a list of matches appears in order of
closest distance. Use the interface dial to select
an entry.
5.
Use the interface dial to select “
Set as
destination” to set the route.
You can also enter the place name manually
when the vehicle is stopped. While on the
map screen, press the MENU button and use
the interface dial to select Place Name. Enter
the name one letter at a time, and follow the
prompts.
Find Nearest Place
Enter a destination by category and distance using voice commands. Press the
Talk button to enter the Voice Portal screen.
1.
Say “Navigation
” and then “Find nearest POI
category” and a place. For example, “Find
nearest ATM.”
2.
A list of the near
est places in your area is
displayed by shortest distance to destination.
3.
Use the interface dial
to select an entry.
4.
Use the interface dial to select “
Set as destination” to set the route.
ODMD Shortcuts
You can add up to six destinations to the Shortcuts (Places tab) in the ODMD.
The addresses must be previously stored in your navigation system address book.
1.
Select Shortcuts.
2.
Select Places.
3.
Store a previousl
y stored address book entry, or
select the shortcut to route to it.
Page 93 of 170
86 |
NAVIGATION
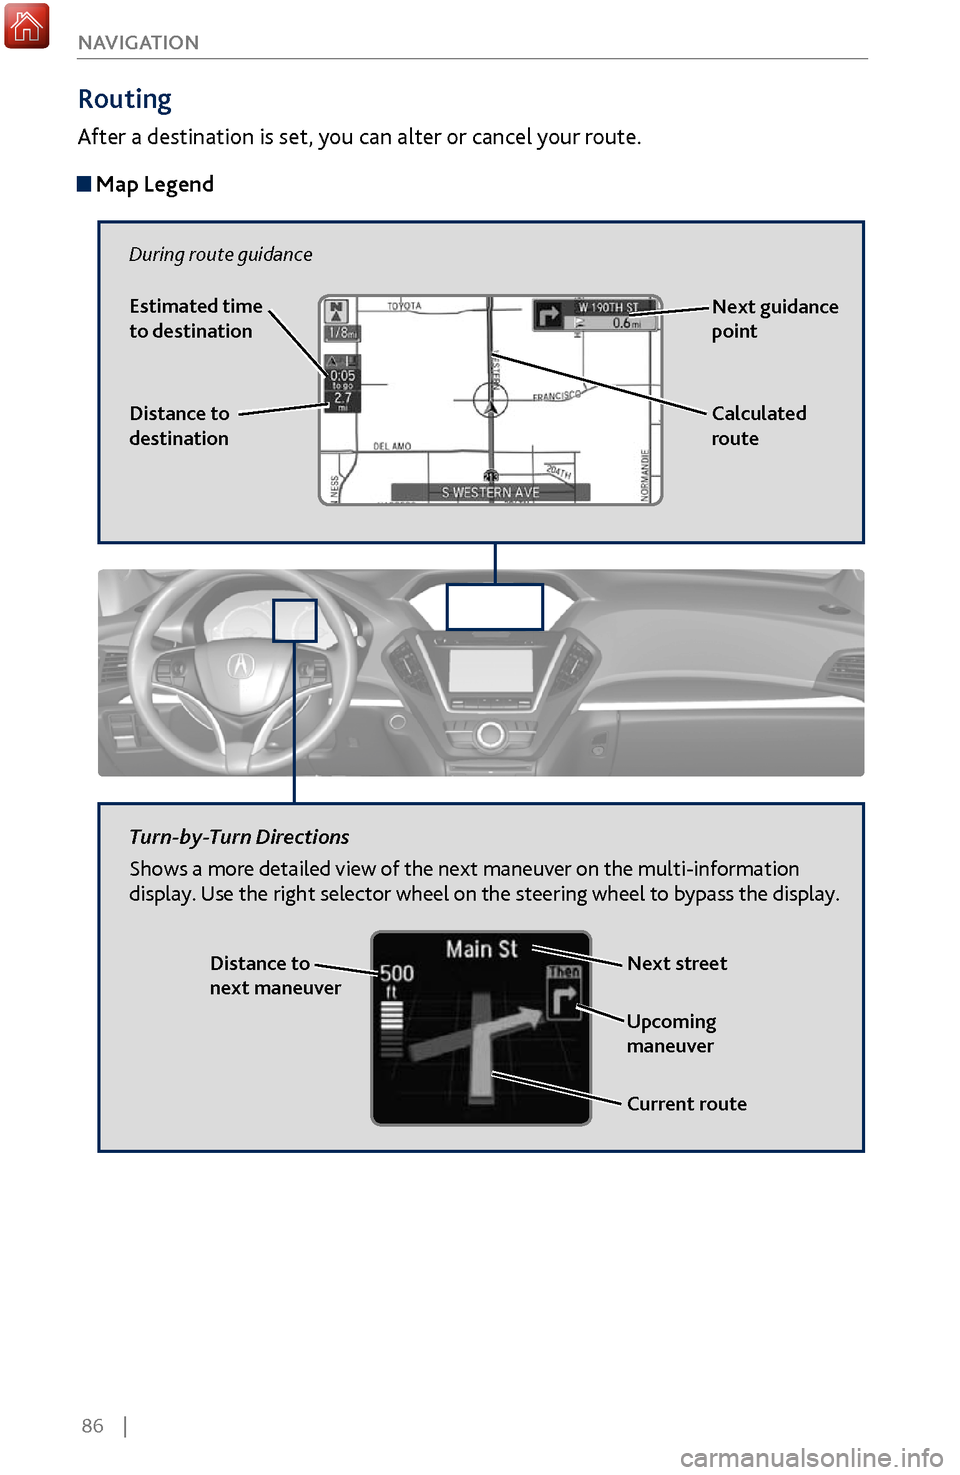
Routing
After a destination is set, you can alter or cancel your route.
Map Legend
During route guidance
Next guidance
point
Distance to
destination Calculated
route
Estimated time
to destination
Distance to
next maneuver
Turn-by-Turn Directions
Shows a more detailed view of the next maneuver on the multi-information
display. Use the right selector wheel on the steering wheel to bypass the display.
Upcoming
maneuver
Current route
Next street
Page 113 of 170
106 |
DRIVING
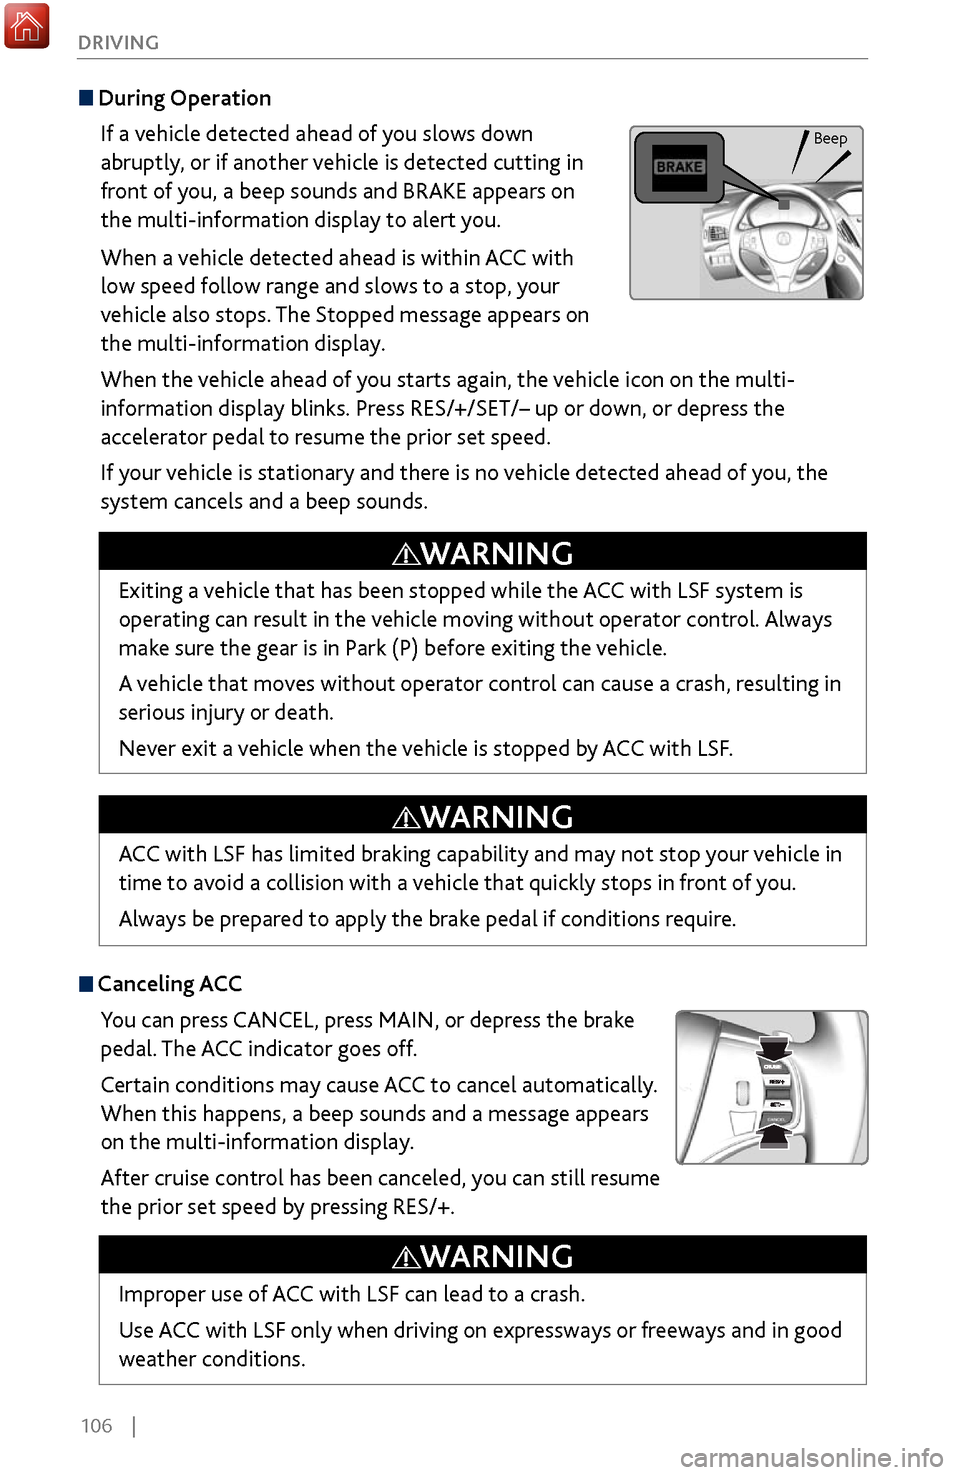
During Operation
If a vehicle detected ahead of you slows down
abruptly, or if another vehicle is detected cutting in
front of you, a beep sounds and BRAKE appears on
the multi-information display to alert you.
When a vehicle detected ahead is within ACC with
low speed follow range and slows to a stop, your
vehicle also stops. The Stopped message appears on
the multi-information display.
When the vehicle ahead of you starts again, the vehicle icon on the multi-
information display blinks. Press RES/+/SET/– up or down, or depress the
accelerator pedal to resume the prior set speed.
If your vehicle is stationary and there is no vehicle detected ahead of you, the
system cancels and a beep sounds.
Canceling ACCYou can press CANCEL, press MAIN, or depress the brake
pedal. The ACC indicator goes off.
Certain conditions may cause ACC
to cancel automatically.
When
this happens, a beep sounds and a message appears
on the multi-information display.
After cruise control has been canceled, you can still resume
the prior set speed by pressing RES/+.
Exiting a vehicle that has been stopped while the ACC with LSF system is
operating can result in the vehicle moving without operator control. Always
make sure the gear is in Park (P) before exiting the vehicle.
A vehicle that moves without operator control can cause a crash, resulting in
serious injury or death.
Never exit a vehicle when the vehicle is stopped by ACC with LSF.
WARNING
ACC with LSF has limited braking capability and may not stop your vehicle in
time to avoid a collision with a vehicle that quickly stops in front of you.
Always be prepared to apply the brake pedal if conditions require.
WARNING
Improper use of ACC with LSF can lead to a crash.
Use ACC with LSF only when driving on expressways or freeways and in good
weather conditions.
WARNING
Beep
Page 121 of 170
114 |
DRIVING
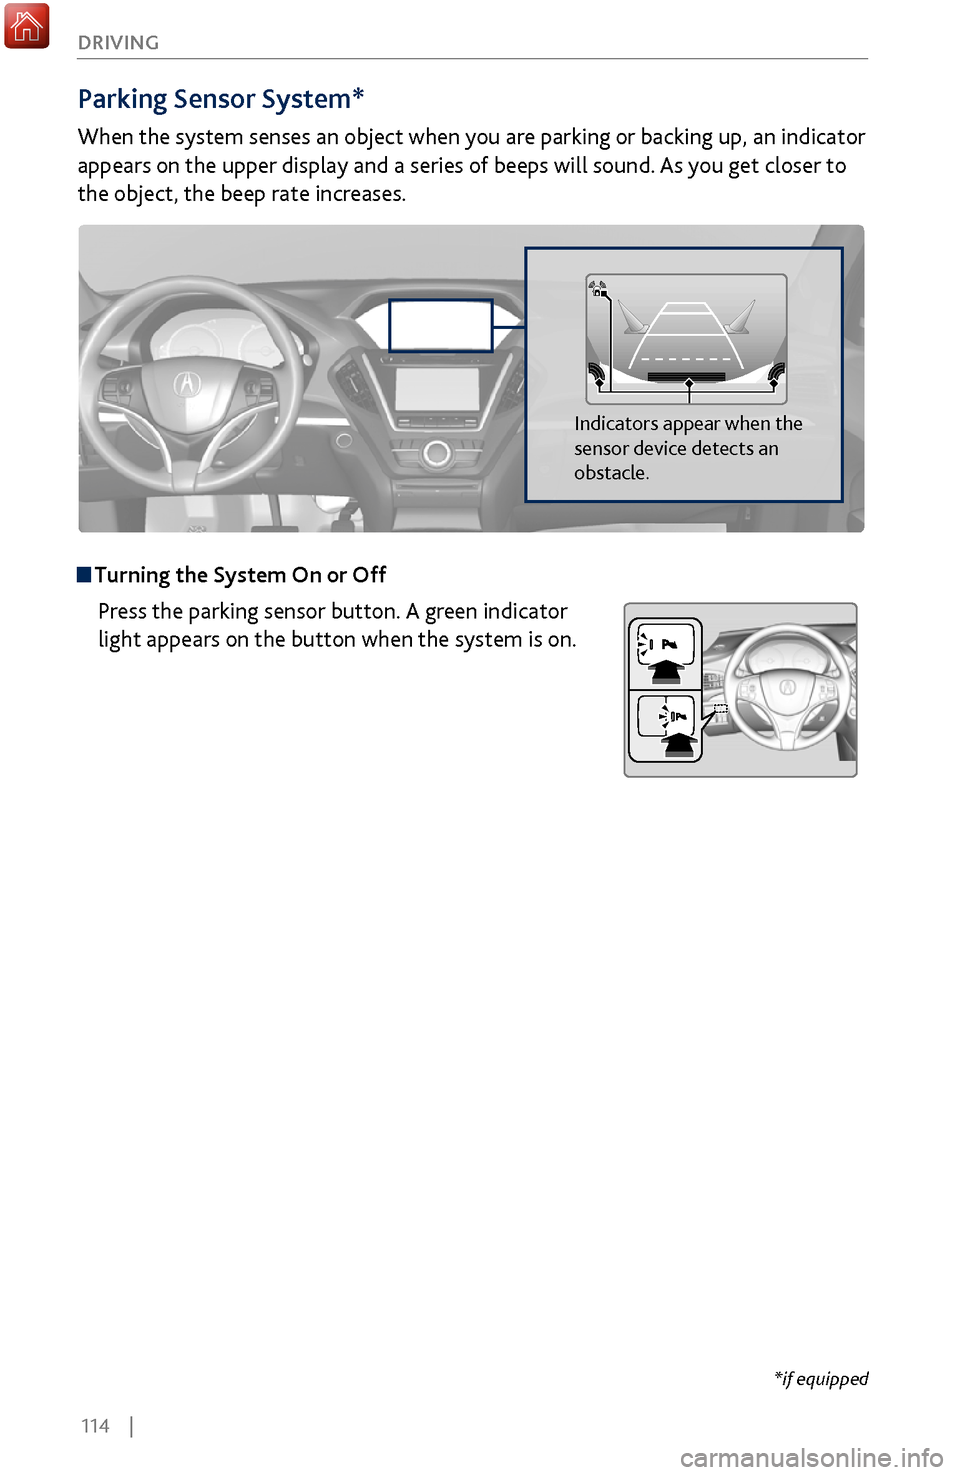
Parking Sensor System*
When the system senses an object when you are parking or backing up, an indicator
appears on the upper display and a series of beeps will sound. As you get closer to
the object, the beep rate increases.
Turning the System On or Off
Press the parking sensor button. A green indicator
light appears on the button when the system is on.
Indicators appear when the
sensor device detects an
obstacle.
*if equipped
Page 122 of 170
| 115
DRIVING
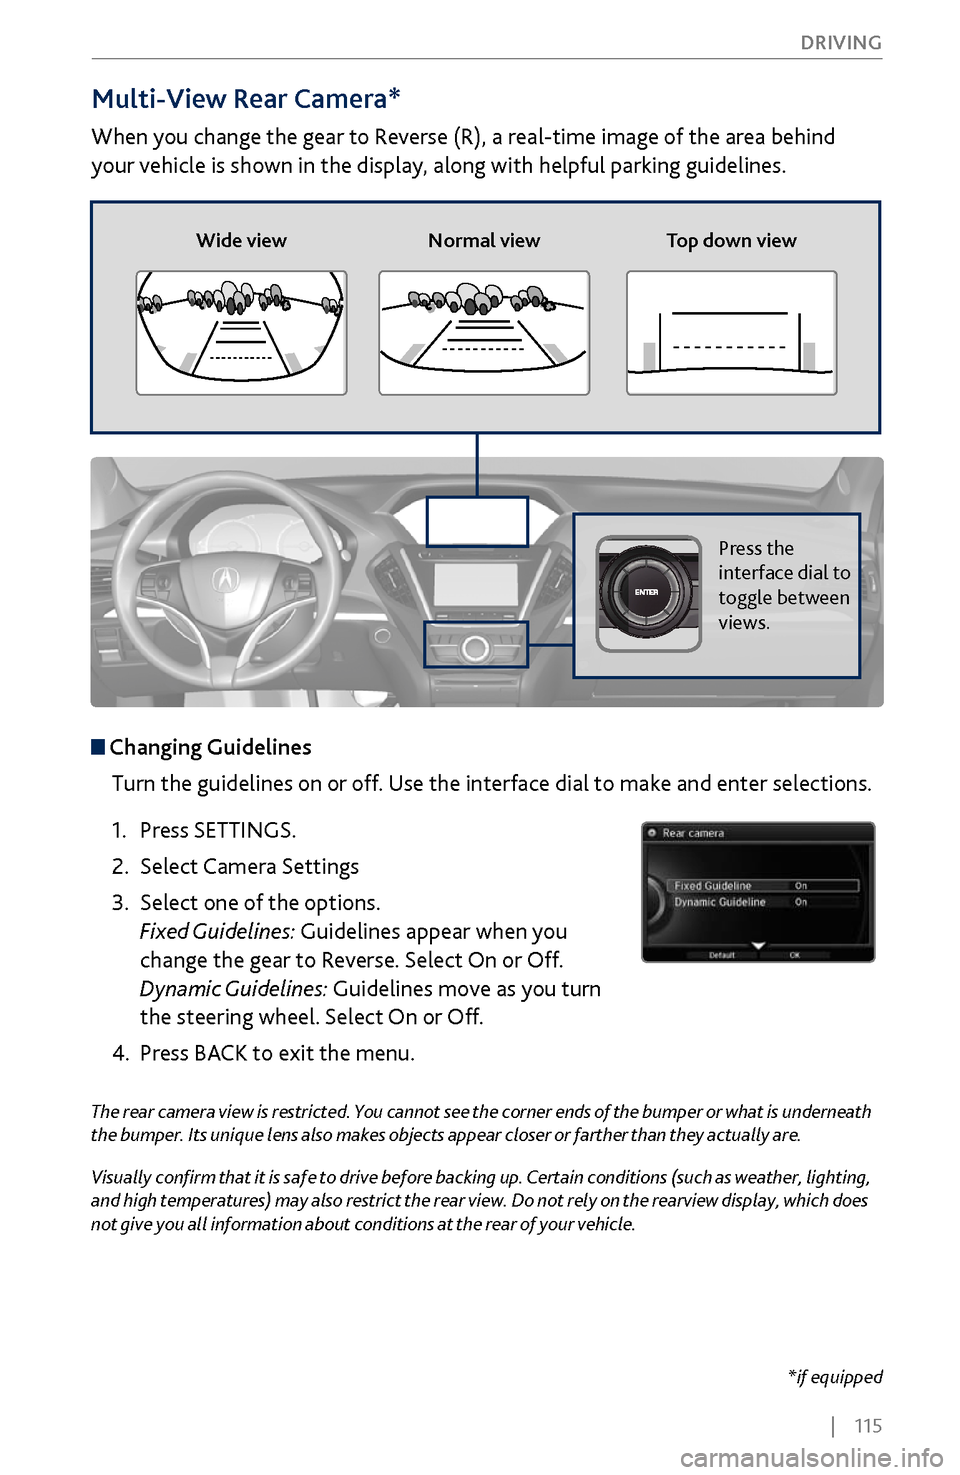
Multi-View Rear Camera*
When you change the gear to Reverse (R), a real-time image of the area behind
your vehicle is shown in the display, along with helpful parking guidelines.
The rear camera view is restricted. You cannot see the corner ends of the bumper or what is underneath
the bumper. Its unique lens also makes objects appear closer or farther than they actually are.
Visually confirm that it is safe to drive before backing up. Certain conditions (such as weather, lighting,
and high temperatures) may also restrict the rear view. Do not rely on the rearview display, which does
not give you all information about conditions at the rear of your vehicle.
Wide view
Normal view Top down view
Press the
interface dial to
toggle between
views.
Changing Guidelines
Turn the guidelines on or off. Use the interface dial to make and enter selections.
1.
Press SETTINGS.
2.
Select Camera Settings
3.
Select one of the options.
Fixed Guidelines:
Guidelines appear when you
change the gear to Reverse. Select On or Off.
Dynamic Guidelines: Guidelines move as you turn
the steering wheel. Select On or Off.
4.
Press BACK
to exit the menu.
*if equipped
Page 124 of 170
| 117
DRIVING
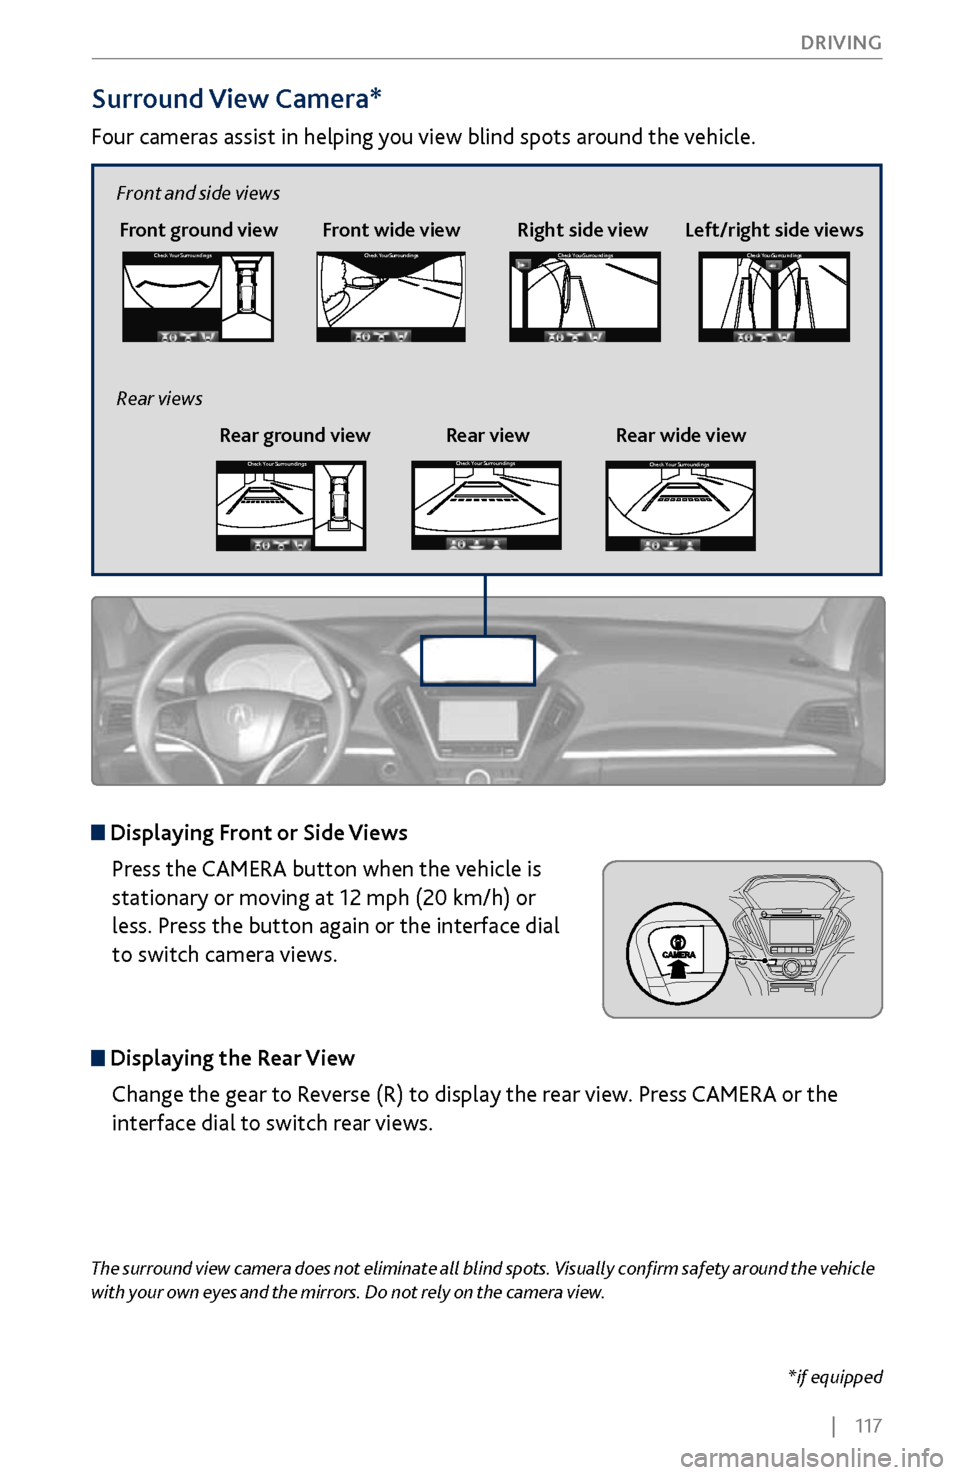
Surround View Camera*
Four cameras assist in helping you view blind spots around the vehicle.
*if equipped
The surround view camera does not eliminate all blind spots. Visually confirm safety around the vehicle
with your own eyes and the mirrors. Do not rely on the camera view.
Front ground view Front wide view Right side viewCheck
Your Surr oundingsCheck Your Surr oundings
Check Your Surr oundingsCh eck Yo ur Surroundi ngs
Displaying Front or Side Views
Press the CAMERA button when the vehicle is
stationary or moving at 12 mph (20 km/h) or
less. Press the button again or the interface dial
to switch camera views.
Displaying the Rear ViewChange the gear to Reverse (R) to display the rear view. Press CAMERA or the
interface dial to switch rear views.
Left/right side views
Front and side views
Rear ground view Rear view Rear wide view
Rear viewsCheck
Your Surr oundingsCheck Your Surr oundings
Check Your Surr oundingsCh eck Yo ur Surroundi ngs
Check Your Surr oundingsCheck Your Surr oundings
Check Your Surr oundingsCh eck Yo ur Surroundi ngs
Check Your Surr oundingsCheck Your Surr oundings
Check Your Surr oundingsCh eck Yo ur Surroundi ngs
Check Your Surroundings
Check Your Surroundings
Check Your Surroundings
Check Your Surroundings
Check Your Surroundings
Check Your Surroundings
Check Your Surroundings
Check Your Surroundings
Check Your Surroundings
Page 125 of 170
118 |
DRIVING
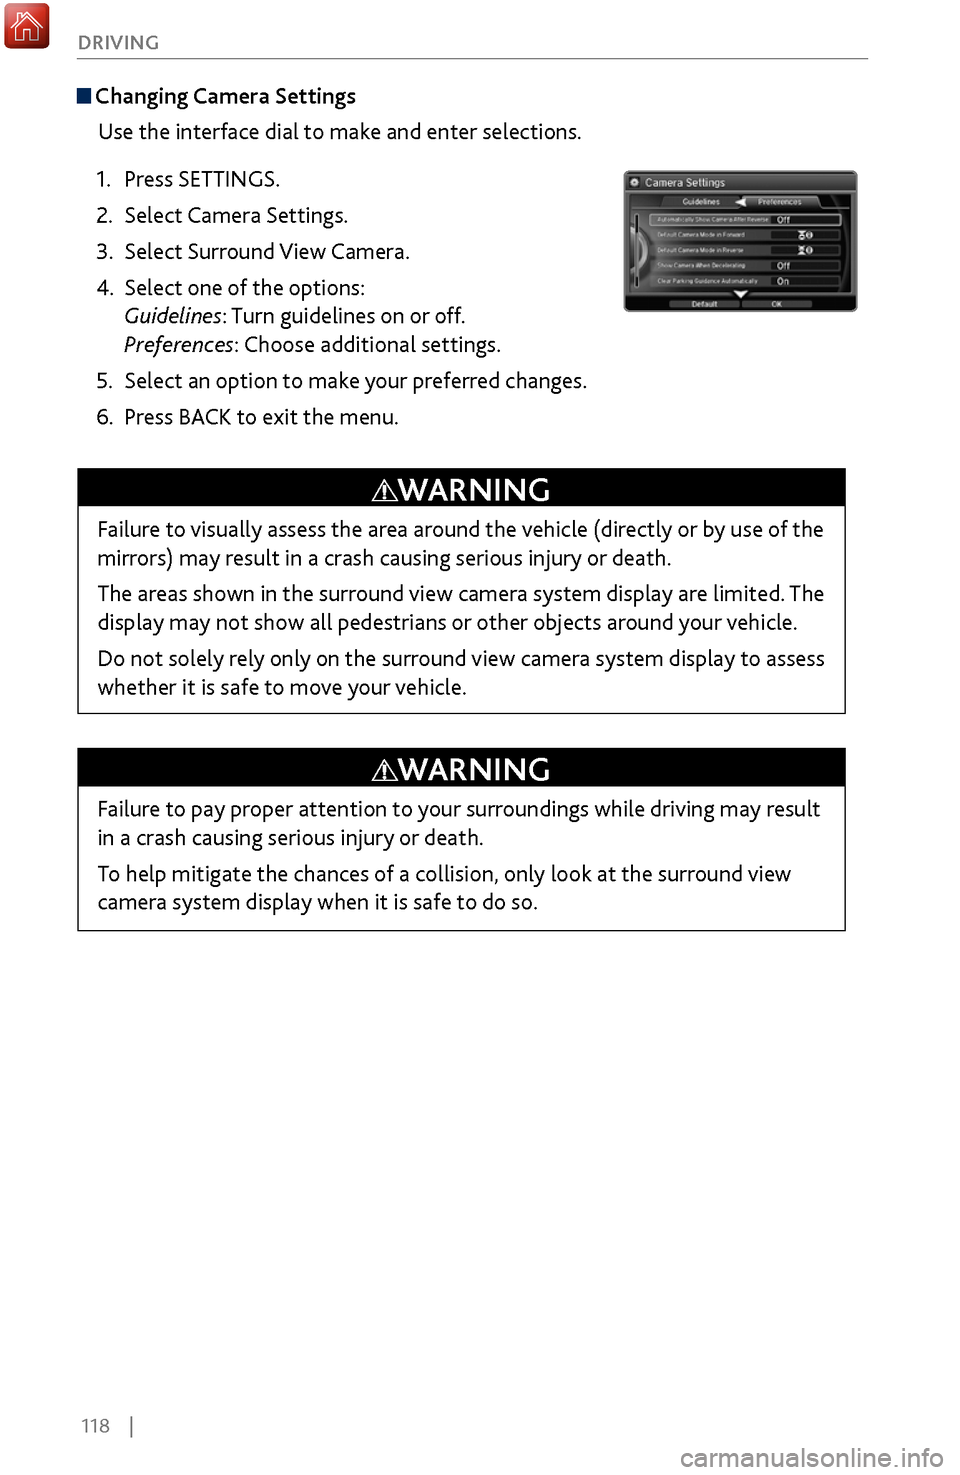
Changing Camera Settings
Use the interface dial to make and enter selections.
1.
Press SETTINGS.
2.
Select Camera Settings.
3.
Select Surround View
Camera.
4.
Select one of the options:
Guidelines:
Turn guidelines on or off.
Preferences: Choose additional settings.
5.
Select an option to mak
e your preferred changes.
6.
Press BACK
to exit the menu.
Failure to visually assess the area around the vehicle (directly or by use of the
mirrors) may result in a crash causing serious injury or death.
The areas shown in the surround view camera system display are limited. The
display may not show all pedestrians or other objects around your vehicle.
Do not solely rely only on the surround view camera system display to assess
whether it is safe to move your vehicle.
WARNING
Failure to pay proper attention to your surroundings while driving may result
in a crash causing serious injury or death.
To help mitigate the chances of a collision, only look at the surround view
camera system display when it is safe to do so.
WARNING
Page 129 of 170
122 |
HANDLING THE UNEXPECTED
Overheating
If you see the multi-information display (MID) message “Stop Driving When Safe.
Engine Temperature Too Hot,” your engine is overheating. You may also notice the
temperature gauge is at the H mark, the engine suddenly loses power, or steam or
spray comes out from under the hood.
1.
Immediately park the
vehicle in a safe place. Turn
off all accessories and turn on the hazard warning
lights.
2. If no steam or spray is present: Keep the engine
running and open the hood (see page 139).
If steam or spray is present
: Turn off the engine
and wait until it subsides. Then, open the hood.
3.
Check that the cooling
fan is operating. If it is not, immediately stop the engine.
Otherwise, idle the engine until the MID message goes off.
4. Once the engine has cooled down, inspect
the coolant level and check the
cooling system components for leaks. If the coolant level in the reserve tank
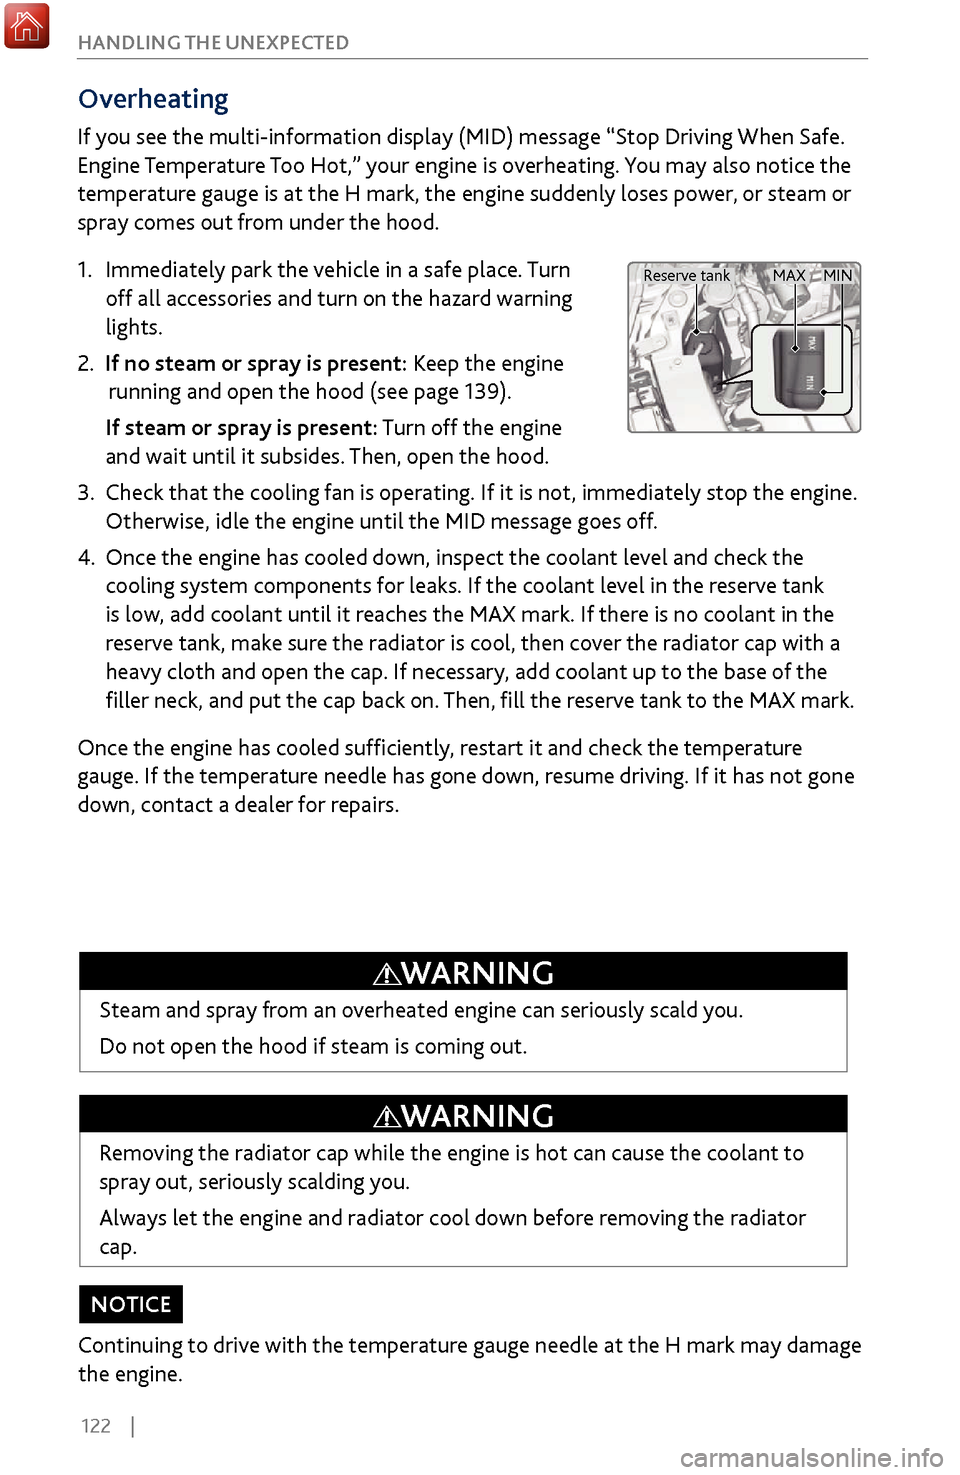
is low, add coolant until it reaches the MAX mark. If there is no coolant in the
reserve tank, make sure the radiator is cool, then cover the radiator cap with a
heavy cloth and open the cap. If necessary, add coolant up to the base of the
filler neck, and put the cap back on. Then, fill the reserve tank to the MAX mark.
Once the engine has cooled sufficiently, restart it and check the temperature
gauge. If the temperature needle has gone down, resume driving. If it has not gone
down, contact a dealer for repairs.
Removing the radiator cap while the engine is hot can cause the coolant to
spray out, seriously scalding you.
Always let the engine and radiator cool down before removing the radiator
cap.
WARNING
Steam and spray from an overheated engine can seriously scald you.
Do not open the hood if steam is coming out.
WARNING
Continuing to drive with the temperature gauge needle at the H mark may damage
the engine.
NOTICE
MAX MIN
Reserve tank
Page 130 of 170
| 123
HANDLING THE UNEXPECTED
Tire Pressure Monitoring System (TPMS)
Monitors the tire pressure while you are driving.
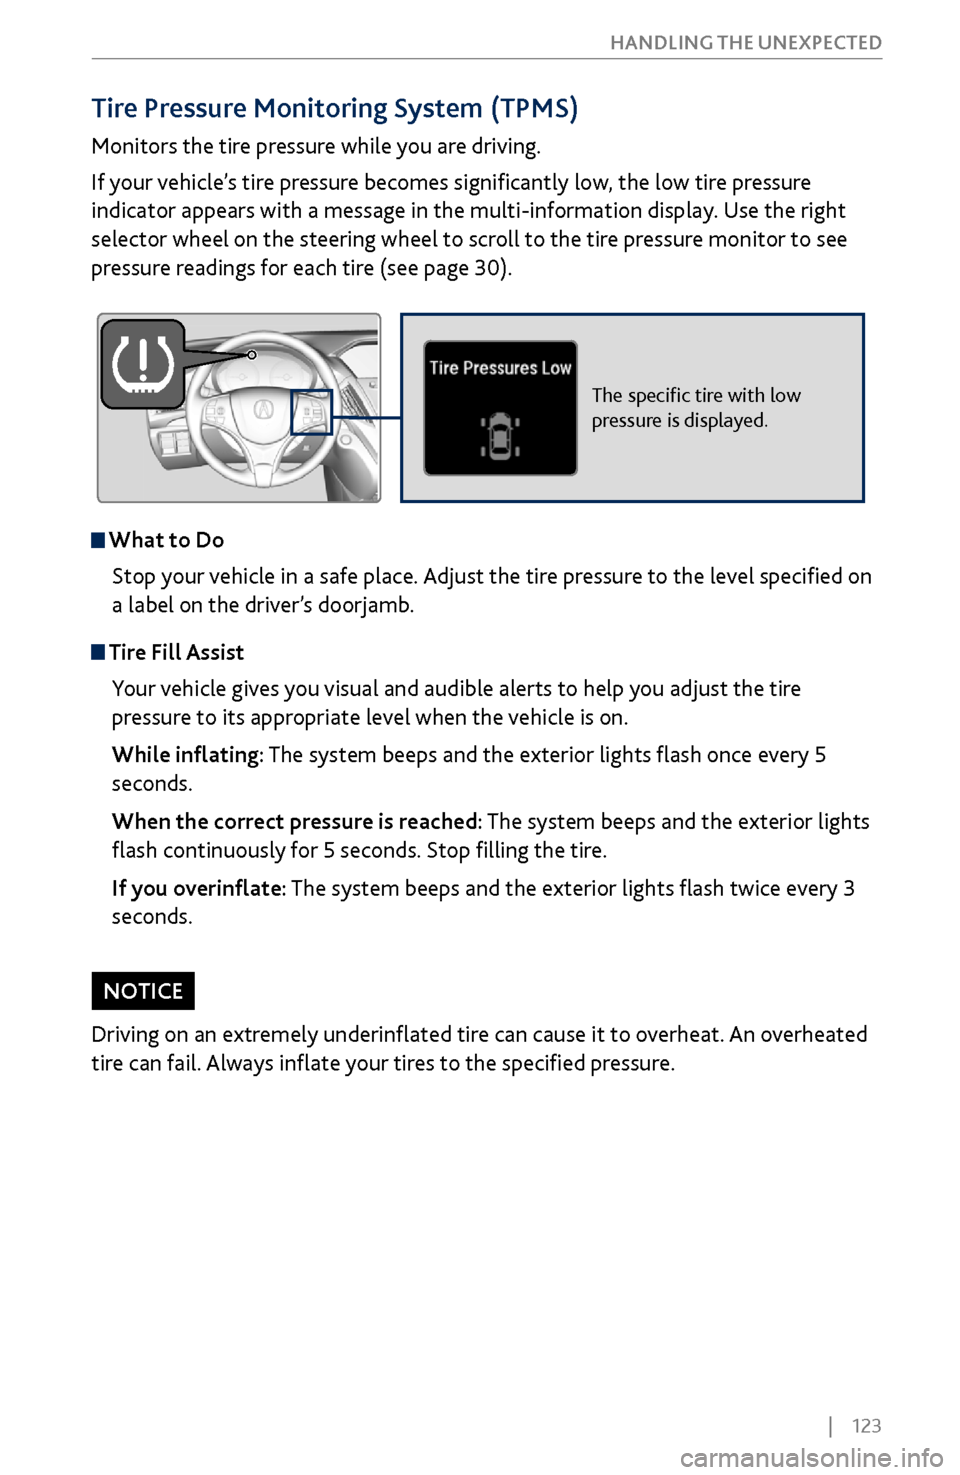
If your vehicle’s tire pressure becomes significantly low, the low tire pressure
indicator appears with a message in the multi-information display. Use the right
selector wheel on the steering wheel to scroll to the tire pressure monitor to see
pressure readings for each tire (see page 30).
The specific tire with low
pressure is displayed.
What to Do
Stop your vehicle in a safe place. Adjust the tire pressure to the level specified on
a label on the driver’s doorjamb.
Tire Fill AssistYour vehicle gives you visual and audible alerts to help you adjust the tire
pressure to its appropriate level when the vehicle is on.
While inflating: The system beeps and the exterior lights flash once every 5
seconds.
When the correct pressure is reached: The system beeps and the exterior lights
flash continuously for 5 seconds. Stop filling the tire.
If you overinflate: The system beeps and the exterior lights flash twice every 3
seconds.
Driving on an extremely underinflated tire can cause it to overheat. An overheated
tire can fail. Always inflate your tires to the specified pressure.
NOTICE