light Acura MDX 2017 Owner's Guide
[x] Cancel search | Manufacturer: ACURA, Model Year: 2017, Model line: MDX, Model: Acura MDX 2017Pages: 170, PDF Size: 12.43 MB
Page 6 of 170
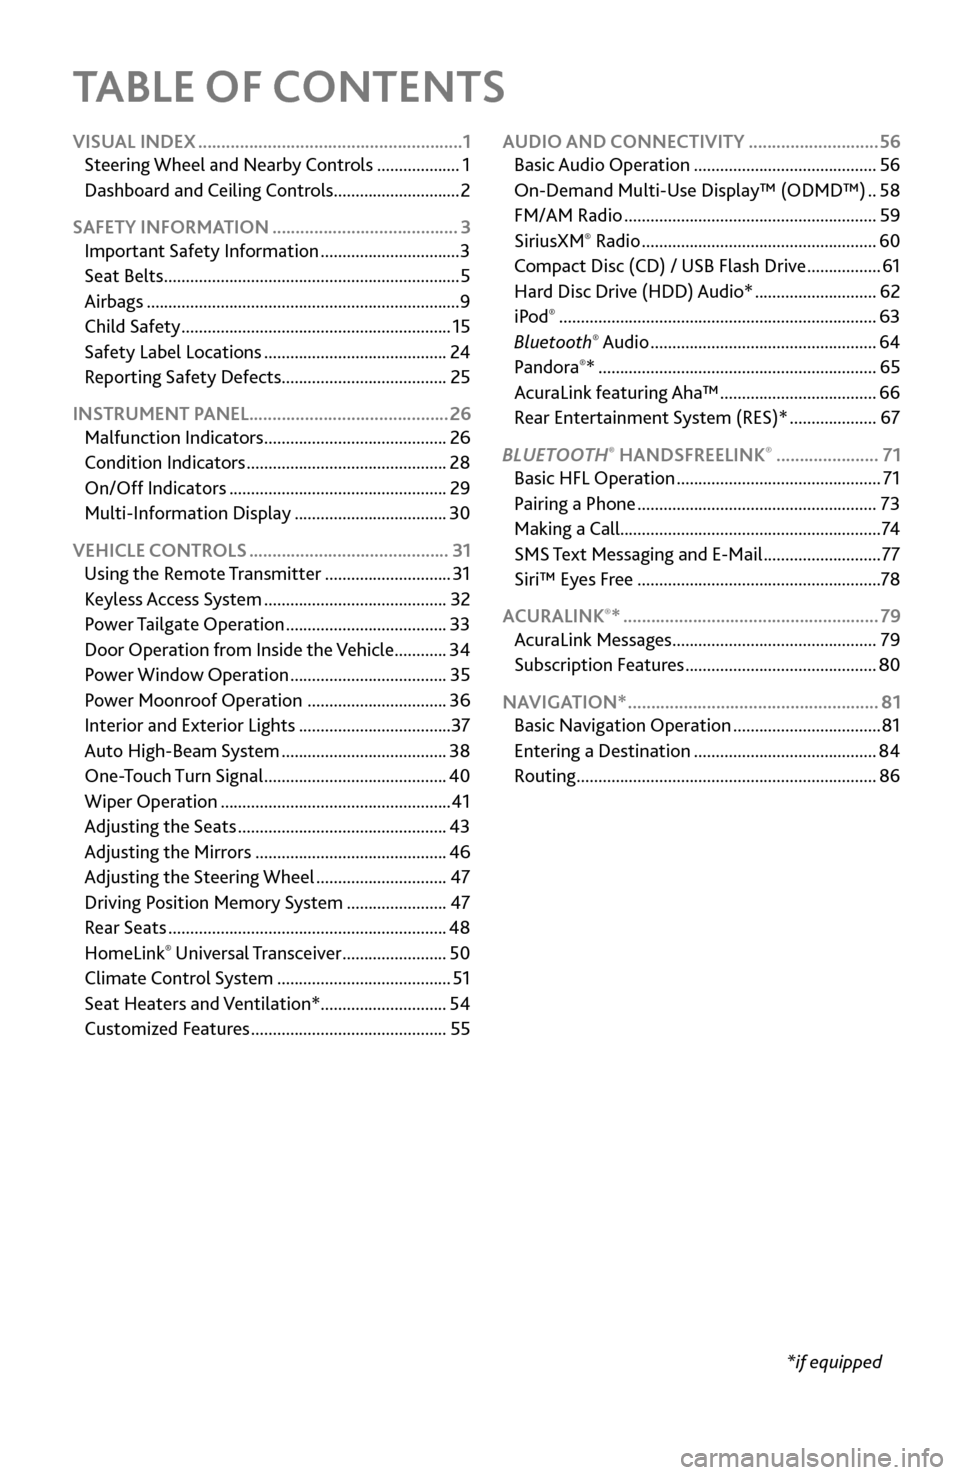
TABLE OF CONTENTS
*if equipped
VISUAL INDEX
.........................................................
1
Steering Wheel and Nearb
y Controls
...................
1
Dashboard
and Ceiling Controls
.............................
2
SAFETY INFORMATION
........................................ 3
Important Safety Information ................................ 3
Seat Belts .................................................................... 5
Airbags ........................................................................\
9
Child Safety .............................................................. 15
Safety Label Locations .......................................... 24
Reporting Safety
Defects...................................... 25
INSTRUMENT PANEL........................................... 26 Malfunction Indicators
.......................................... 26
Condition Indicators .............................................. 28
On/Off Indicators .................................................. 29
Multi-Information Display ................................... 30
VEHICLE CONTROLS
........................................... 31
Using the
Remote Transmitter
.............................
31
Keyless A
ccess System
..........................................
32
Power T
ailgate Operation
.....................................
33
Door Operation
from Inside the Vehicle
............
34
Power Window
Operation
....................................
35
Power
Moonroof Operation
................................
36
Interior and Exterior Lights ................................... 37
Auto High-Beam S
ystem
......................................
38
One-T
ouch Turn Signal
..........................................
40
Wiper Operation ..................................................... 41
Adjusting
the Seats
................................................
43
Adjusting the
Mirrors
............................................
46
Adjusting
the Steering Wheel
..............................
47
Driving Position Memory
System
.......................
47
Rear Seats ................................................................ 48
HomeLink® Universal Transceiver ........................ 50
Climate Control System ........................................ 51
Seat Heaters and V
entilation*............................. 54
Customized Features
............................................. 55AUDIO AND CONNECTIVITY
............................
56
Basic Audio Operation .......................................... 56
On-Demand Multi-Use Display™ (ODMD™) .. 58
FM/AM Radio .......................................................... 59
SiriusXM® Radio ...................................................... 60
Compact Disc (CD) / USB Flash Driv e .................61
Hard Disc Driv
e (HDD) Audio*
............................ 62
iPod® ........................................................................\
. 63
Bluetooth® Audio .................................................... 64
Pandora®* ................................................................ 65
AcuraLink featuring Aha™ .................................... 66
Rear Entertainment
System (RES)*
.................... 67
BLUET
OOTH
® HANDSFREELINK® ...................... 71
Basic HFL Operation ............................................... 71
Pairing a Phone ....................................................... 73
Making a Call ............................................................ 74
SMS
Text Messaging and E-Mail
........................... 77
Siri™ Eyes F
ree
........................................................ 78
ACURALINK
®* ....................................................... 79
AcuraLink Messages ............................................... 79
Subscription Featur
es
............................................ 80
NAVIGA
TION*
...................................................... 81
Basic Navigation Operation .................................. 81
Entering a Destination .......................................... 84
Routing ..................................................................... 86
Page 8 of 170
| 1
V
ISUAL INDEX
Quickly locate items in the vehicle’s interior.
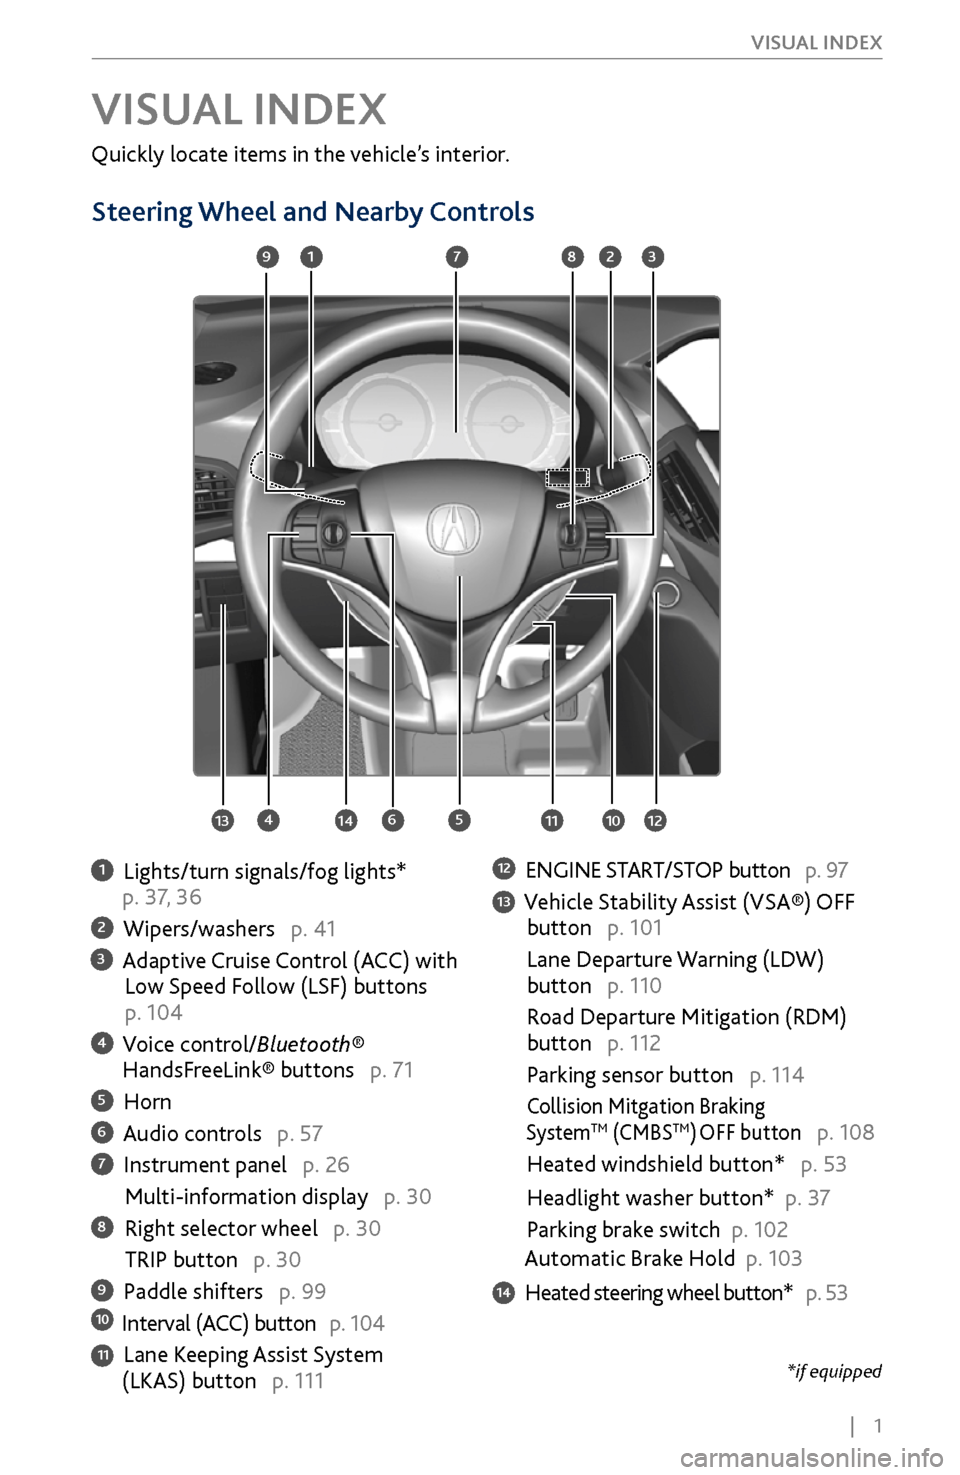
Steering Wheel and Nearby Controls
1 Lights/turn signals/fog lights*
p. 37, 36
2 Wipers/washers p. 41
3 Adaptive Cruise Control (ACC) with Low Speed Follow (LSF) buttons
p. 104
4 Voice control/Bluetooth® HandsFreeLink® buttons p. 71
5 Horn
6 Audio controls p. 57
7 Instrument panel p. 26
Multi-information display p. 30
8 Right selector wheel p. 30
TRIP button p. 30
9 Paddle shifters p. 9910 Interval (ACC) button p. 104
11 Lane Keeping Assist System (LKAS) button p. 111
12 ENGINE START/STOP button p. 97
13 Vehicle Stability Assist (VSA®) OFF
button p. 101
Lane Departure W
arning (LDW)
button p. 110
Road Departure Mitigation (RDM)
button p. 112
Parking sensor button p. 114
Collision Mitgation Braking SystemTM (CMBSTM) OFF button p. 108
Heated windshield button* p. 53
Headlight washer button* p. 3
7
Parking brake switch
p. 102
Automatic Brake Hold p. 103
14 Heated steering wheel button* p. 53
VISUAL INDEX
1
45
9
61011
7283
131412
*if equipped
Page 9 of 170
2 |
V
ISUAL INDEX
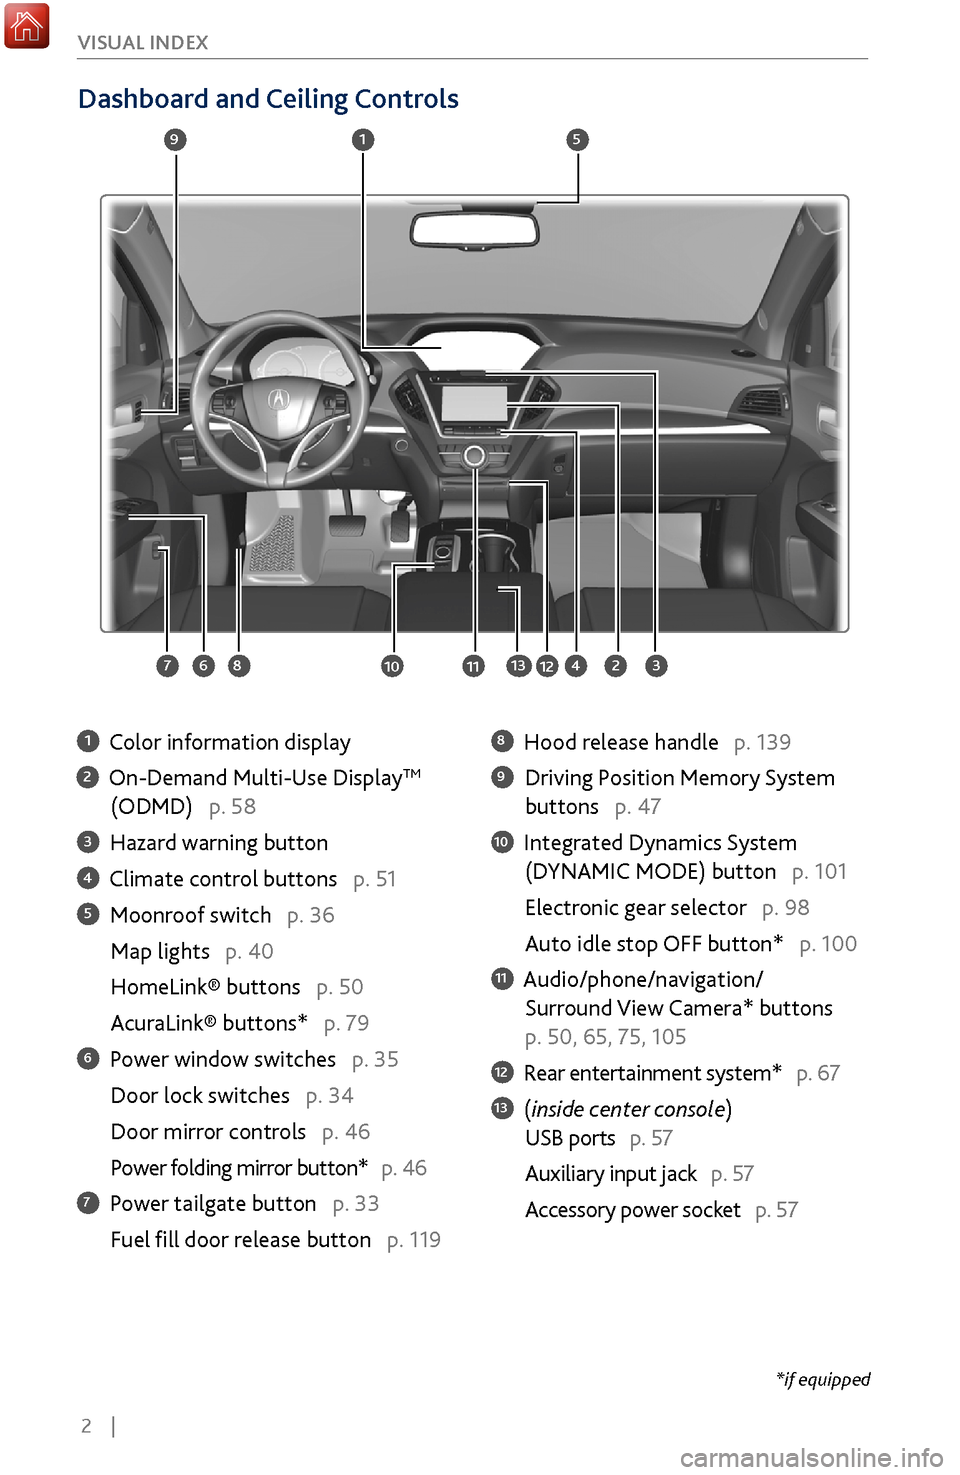
Dashboard and Ceiling Controls
1 Color information display
2 On-Demand Multi-Use DisplayTM
(ODMD) p. 58
3 Hazard warning button
4 Climate control buttons p. 51
5 Moonroof switch p. 36
Map lights p. 40
HomeLink® buttons p. 50
AcuraLink® buttons* p. 79
6 Power window switches p. 35
Door lock switches p. 34
Door mirror controls
p. 46
Power folding mirr
or button* p. 46
7 Power tailgate button p. 33
Fuel fill door r
elease button p. 119
8 Hood release handle p. 139
9 Driving Position Memory System
buttons p. 47
10 Integrated Dynamics System
(D
YNAMIC MODE) button p. 101
Electronic gear selector p. 98
Auto idle stop OFF button* p. 100
11 Audio/phone/navigation/
Surround View Camera*
buttons
p. 50, 65, 75, 105
12 Rear entertainment system* p. 67
13 (inside center console)
USB ports p. 57
Auxiliary input jack p. 57
Accessory power socket
p. 57
1
2834
5
67
9
101112
*if equipped
13
Page 17 of 170
10 |
S
AFETY
Side Airbags
The side airbags help protect the upper torso and pelvis of the driver or a front
passenger during a moderate-to-severe side impact. They are housed in the
outside edge of the driver’s and front passenger’s seat-backs. Both are marked
SIDE AIRBAG.
Side Curtain Airbags
The side curtain airbags help protect the heads of the driver and passengers in
outer seating positions during a moderate-to-severe side impact or angeled-
frontal impact. The side curtain airbags equipped in this vehicle are also designed
to help reduce the likelihood of partial and complete ejection of vehicle occupants
through side windows in crashes, particularly rollover crashes.
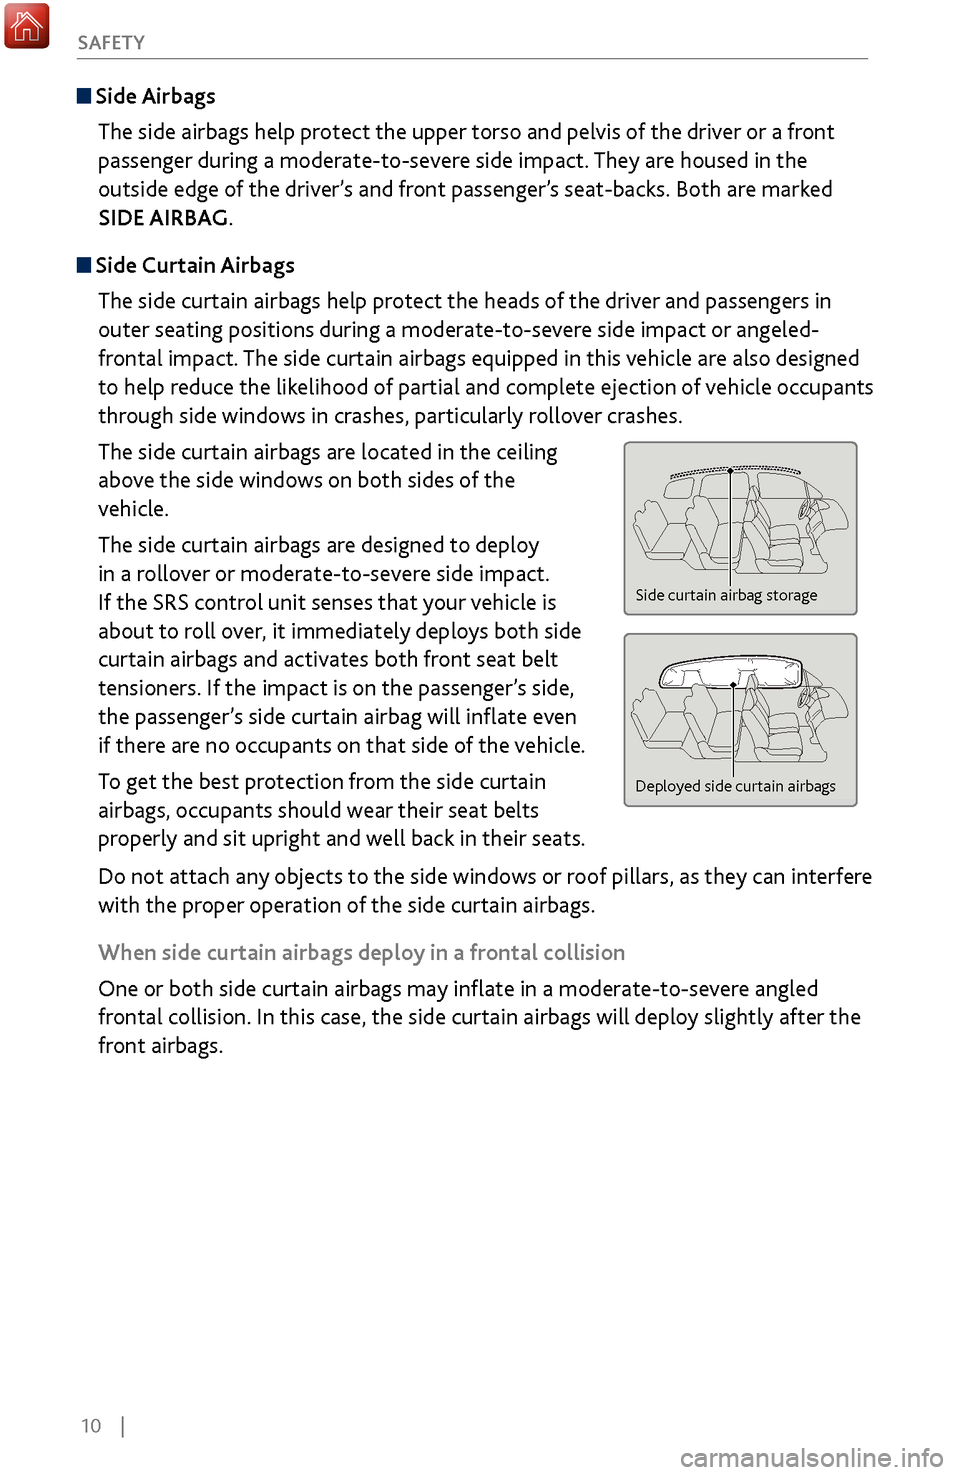
The side curtain airbags are located in the ceiling
above the side windows on both sides of the
vehicle.
The side curtain airbags are designed to deploy
in a rollover or moderate-to-severe side impact.
If the SRS control unit senses that your vehicle is
about to roll over, it immediately deploys both side
curtain airbags and activates both front seat belt
tensioners. If the impact is on the passenger’s side,
the passenger’s side curtain airbag will inflate even
if there are no occupants on that side of the vehicle.
To get the best protection from the side curtain
airbags, occupants should wear their seat belts
properly and sit upright and well back in their seats.
Do not attach any objects to the side windows or roof pillars, as they can interfere
with the proper operation of the side curtain airbags.
When side curtain airbags deploy in a frontal collision
One or both side curtain airbags may inflate in a moderate-to-severe angled
frontal collision. In this case, the side curtain airbags will deploy slightly after the
front airbags.
Side curtain airbag storage
Deployed side curtain airbags
Page 33 of 170
26 |
I
NSTRUMENT PANEL
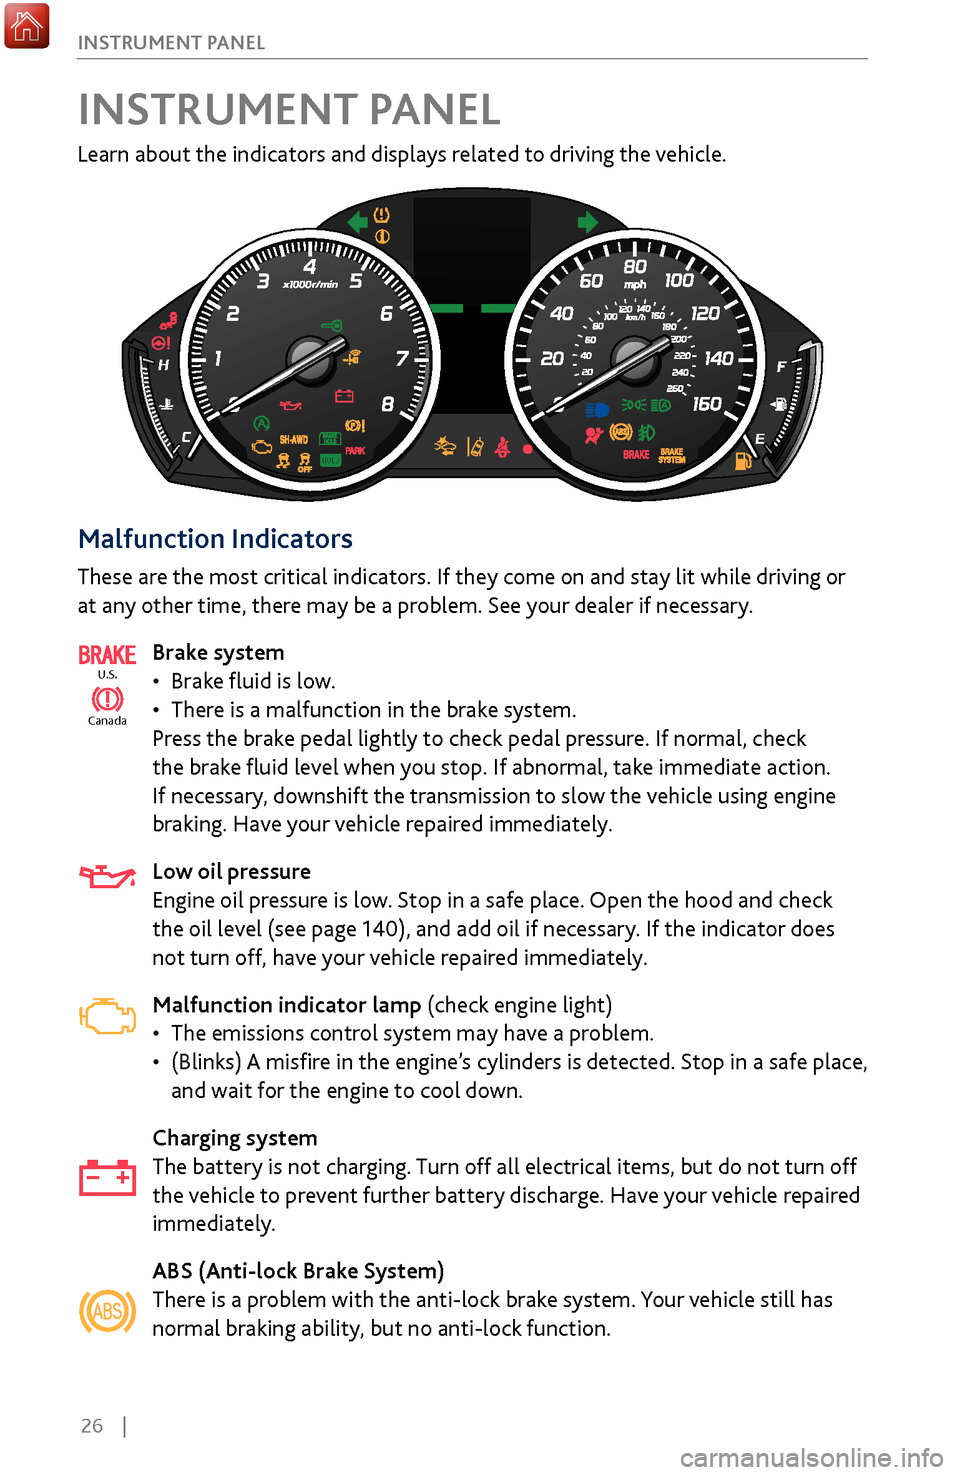
Learn about the indicators and displays related to driving the vehicle.
Malfunction Indicators
These are the most critical indicators. If they come on and stay lit while driving or
at any other time, there may be a problem. See your dealer if necessary.
Brake system
•
Brake fluid is low
.
•
There is a malfunction in the brak
e system.
Press the brake pedal lightly to check pedal pressure. If normal, check
the brake fluid level when you stop. If abnormal, take immediate action.
If necessary, downshift the transmission to slow the vehicle using engine
braking. Have your vehicle repaired immediately.
Low oil pressure
Engine oil pressure is low. Stop in a safe place. Open the hood and check
the oil level (see page 140), and add oil if necessary. If the indicator does
not turn off, have your vehicle repaired immediately.
Malfunction indicator lamp (check engine light)
•
The emissions control system may have a pr
oblem.
•
(Blinks) A misfire in
the engine’s cylinders is detected. Stop in a safe place,
and wait for the engine to cool down.
Charging system
The battery is not charging. Turn off all electrical items, but do not turn off
the vehicle to prevent further battery discharge. Have your vehicle repaired
immediately.
ABS (Anti-lock Brake System)
There is a problem with the anti-lock brake system. Your vehicle still has
normal braking ability, but no anti-lock function.
Ca nada
U.S.
INSTRUMENT PANEL
Page 36 of 170
| 29
I
NSTRUMENT PANEL
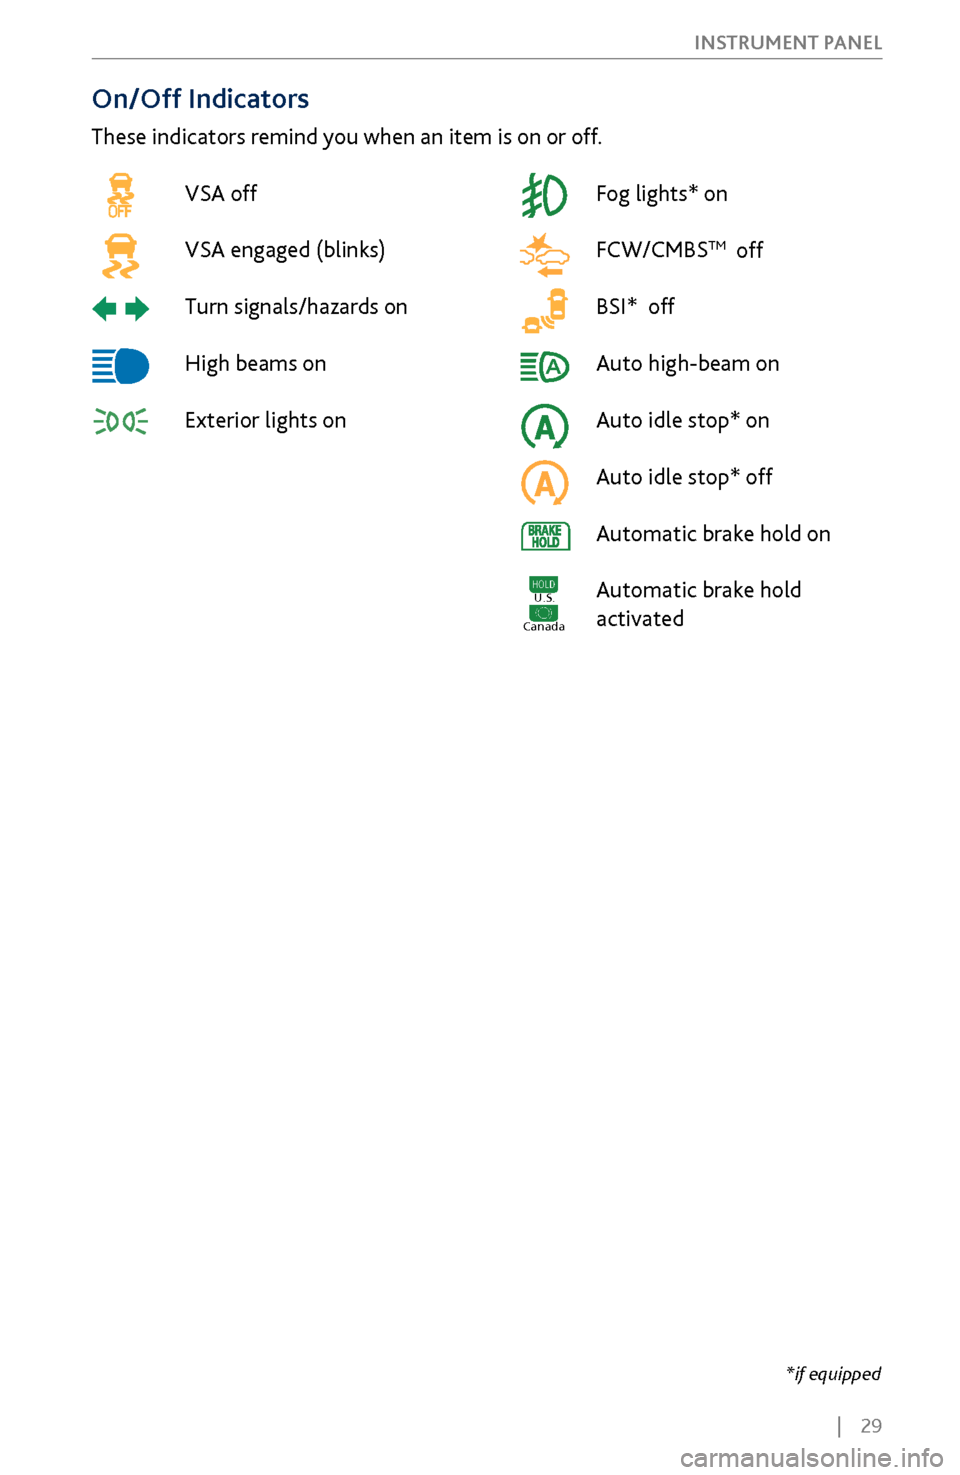
On/Off Indicators
These indicators remind you when an item is on or off.
VSA off
VSA engaged (blinks)
Turn signals/hazards on
High beams on
Exterior lights on Fog lights* on
FCW/CMBS
TM off
BSI* off
Auto high-beam on
Auto idle stop* on
Auto idle stop* off
Automatic brake hold on
Automatic brake hold
activated
*if equipped
U.S.
Canada
Page 39 of 170
32 |
V
EHICLE CONTROLS
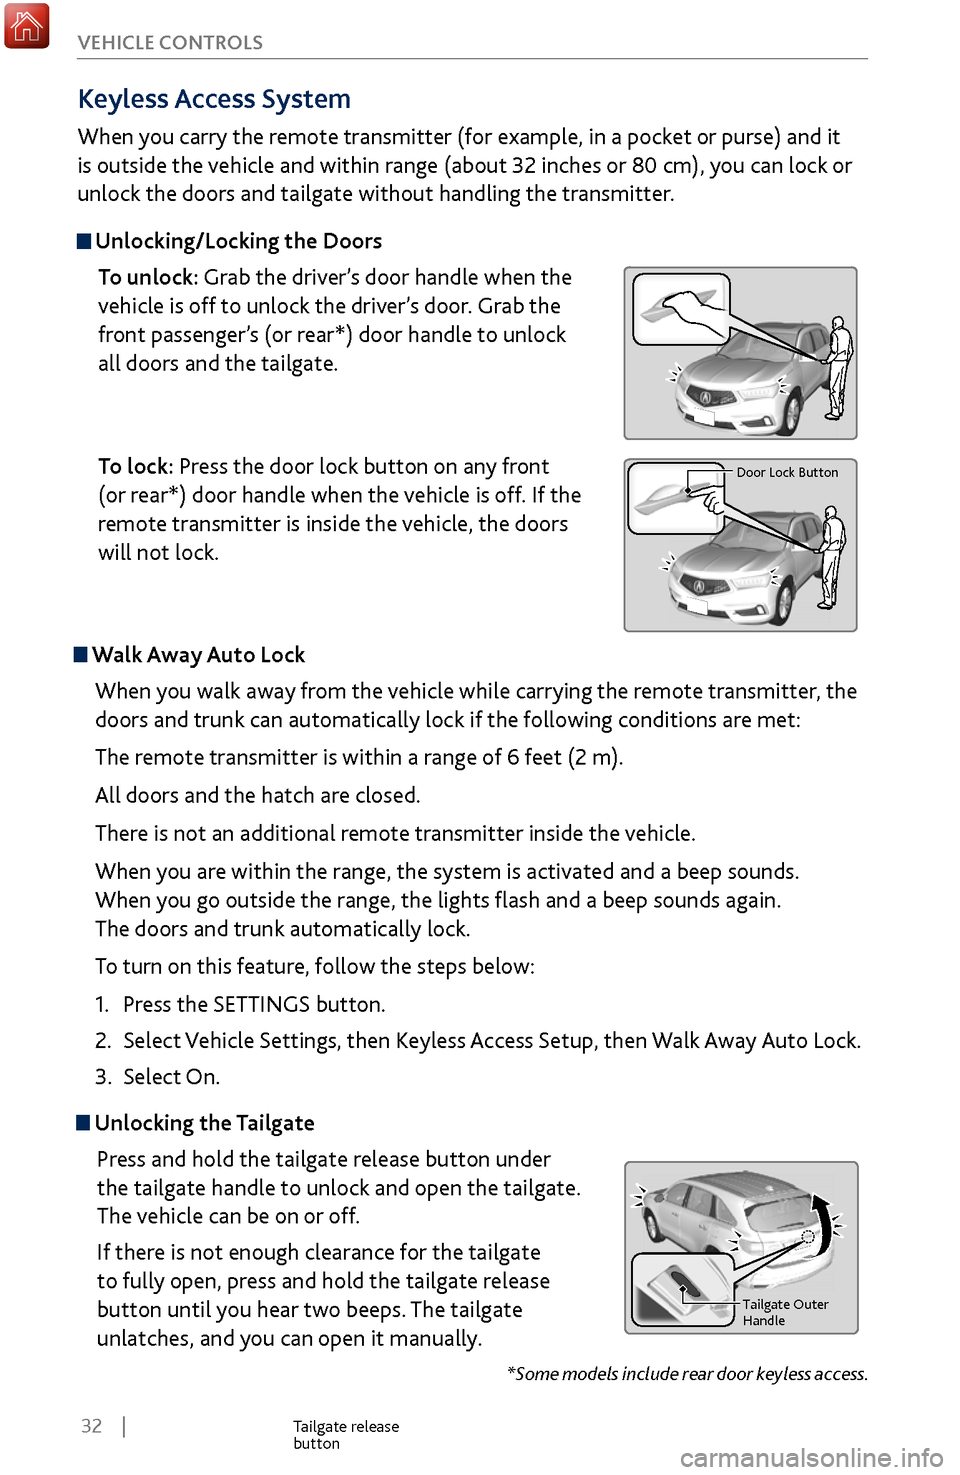
Unlocking the
Tailgate
Press and hold the tailgate release button under
the tailgate handle to unlock and open the tailgate.
The vehicle can be on or off.
If there is not enough clearance for the tailgate
to fully open, press and hold the tailgate release
button until you hear two beeps. The tailgate
unlatches, and you can open it manually.
Tailgate Outer Handl e
Tailgate release
button
Keyless Access System
When you carry the remote transmitter (for example, in a pocket or purse) and it
is outside the vehicle and within range (about 32 inches or 80 cm), you can lock or
unlock the doors and tailgate without handling the transmitter.
Unlocking/Locking the Doors
To unlock: Grab the driver’s door handle when the
vehicle is off to unlock the driver’s door. Grab the
front passenger’s (or rear*) door handle to unlock
all doors and the tailgate.
To lock: Press the door lock button on any front
(or rear*) door handle when the vehicle is off. If the
remote transmitter is inside the vehicle, the doors
will not lock.
Tailgate Outer Handl e
Door Lock Button
*Some models include rear door keyless access.
Walk Away Auto Lock
When you walk away from the vehicle while carrying the remote transmitter, the
doors and trunk can automatically lock if the following conditions are met:
The remote transmitter is within a range of 6 feet (2 m).
All doors and the hatch are closed.
There is not an additional remote transmitter inside the vehicle.
When you are within the range, the system is activated and a beep sounds.
When you go outside the range, the lights flash and a beep sounds again.
The doors and trunk automatically lock.
To turn on this feature, follow the steps below:
1.
Press the SETTINGS
button.
2.
Select Vehicle
Settings, then Keyless Access Setup, then Walk Away Auto Lock.
3.
Select On.
Page 42 of 170
| 35
V
EHICLE CONTROLS
Power
Window Operation
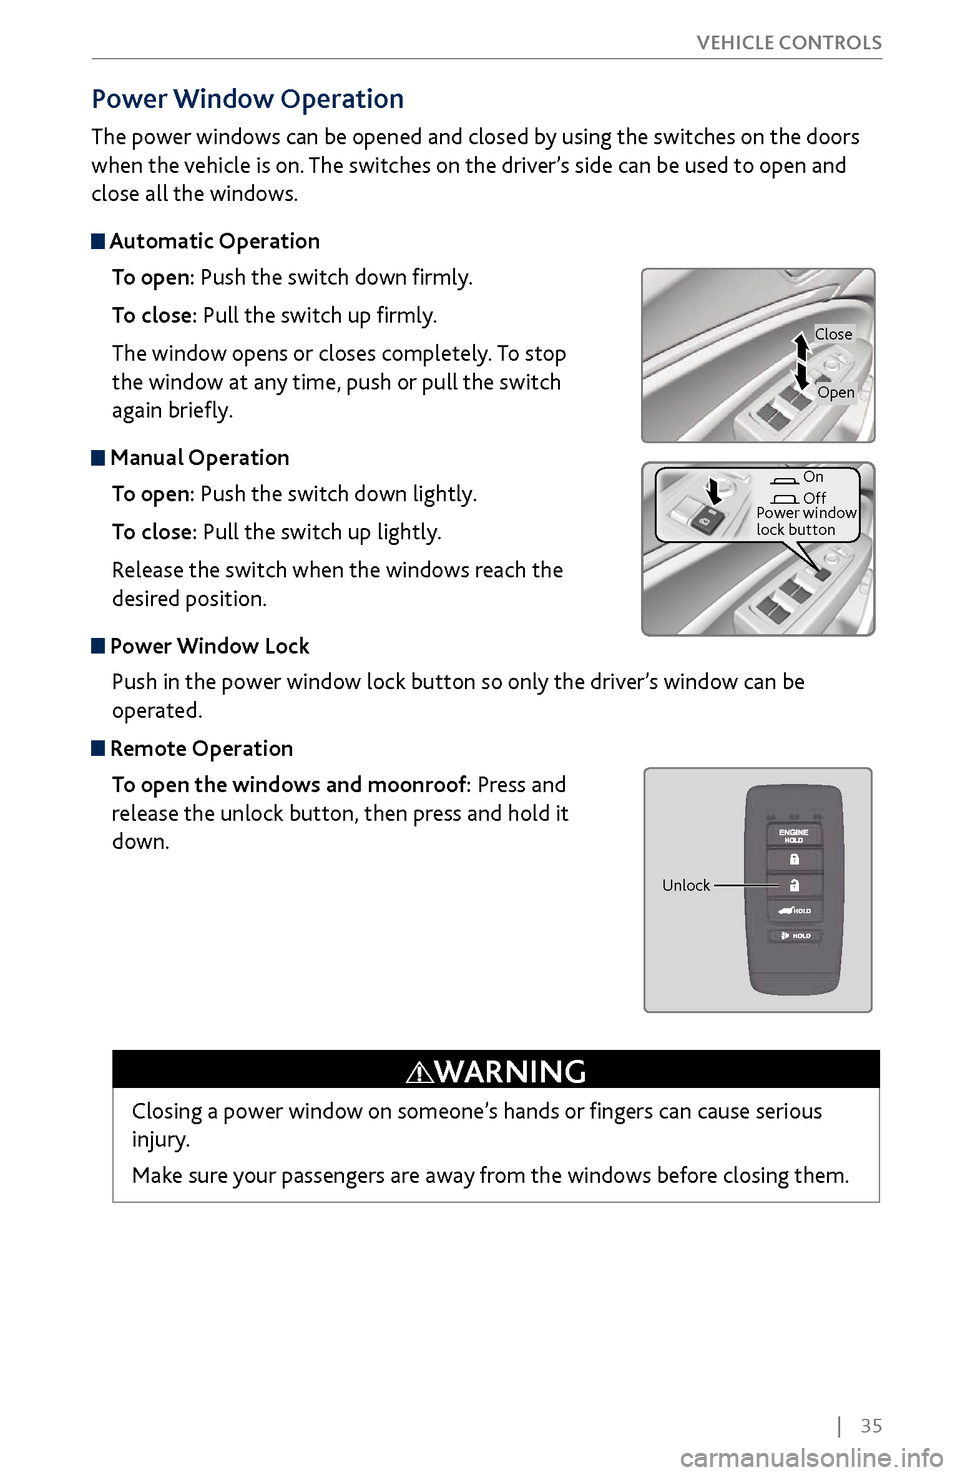
The power windows can be opened and closed by using the switches on the doors
when the vehicle is on. The switches on the driver’s side can be used to open and
close all the windows.
Automatic Operation
To open: Push the switch down firmly.
To close: Pull the switch up firmly.
The window opens or closes completely. To stop
the window at any time, push or pull the switch
again briefly.
Manual OperationTo open: Push the switch down lightly.
To close: Pull the switch up lightly.
Release the switch when the windows reach the
desired position.
Power Window LockPush in the power window lock button so only the driver’s window can be
operated.
Remote OperationTo open the windows and moonroof: Press and
release the unlock button, then press and hold it
down.
Closing a power window on someone’s hands or fingers can cause serious
injury.
Make sure your passengers are away from the windows before closing them.
WARNING
Close
On
Off
Power window
lock button
Open
Unlock
Page 44 of 170
| 37
V
EHICLE CONTROLS
Interior and Exterior Lights
Operate interior and exterior lights when the vehicle is on or off.
Exterior Lights
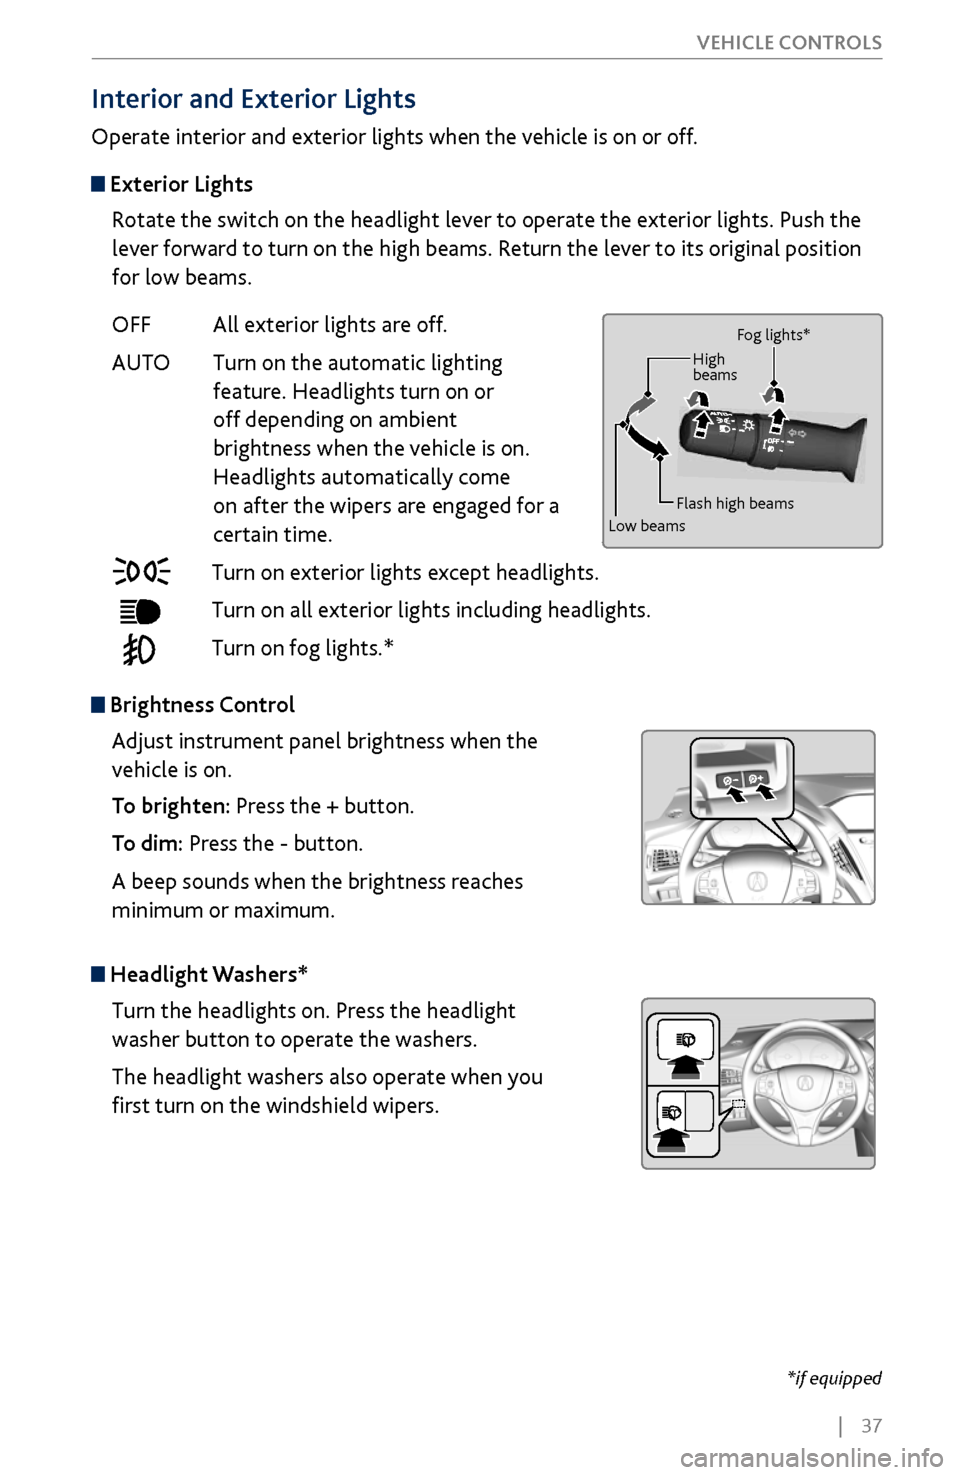
Rotate the switch on the headlight lever to operate the exterior lights. Push the
lever forward to turn on the high beams. Return the lever to its original position
for low beams.
OFF
All exterior lights are off
.
AUTO
Turn on the automatic lighting
feature. Headlights turn on or
off depending on ambient
brightness when the v
ehicle is on.
Headlights automatically come
on after the wipers ar
e engaged for a
certain time.
Turn on exterior lights except headlights.
Turn on all exterior lights including headlights.
Turn on fog lights.*
Brightness Control Adjust instrument panel brightness when the
vehicle is on.
To brighten: Press the + button.
To dim: Press the - button.
A beep sounds when the brightness reaches
minimum or maximum.
Headlight Washers* Turn the headlights on. Press the headlight
washer button to operate the washers.
The headlight washers also operate when you
first turn on the windshield wipers.
High
beams
Low beams Flash high beams
*if equipped
Fog lights*
Page 45 of 170
38 |
V
EHICLE CONTROLS
Auto High-Beam System
Automatically changes the low beam headlights to high beam headlights when
necessary.
How It Works
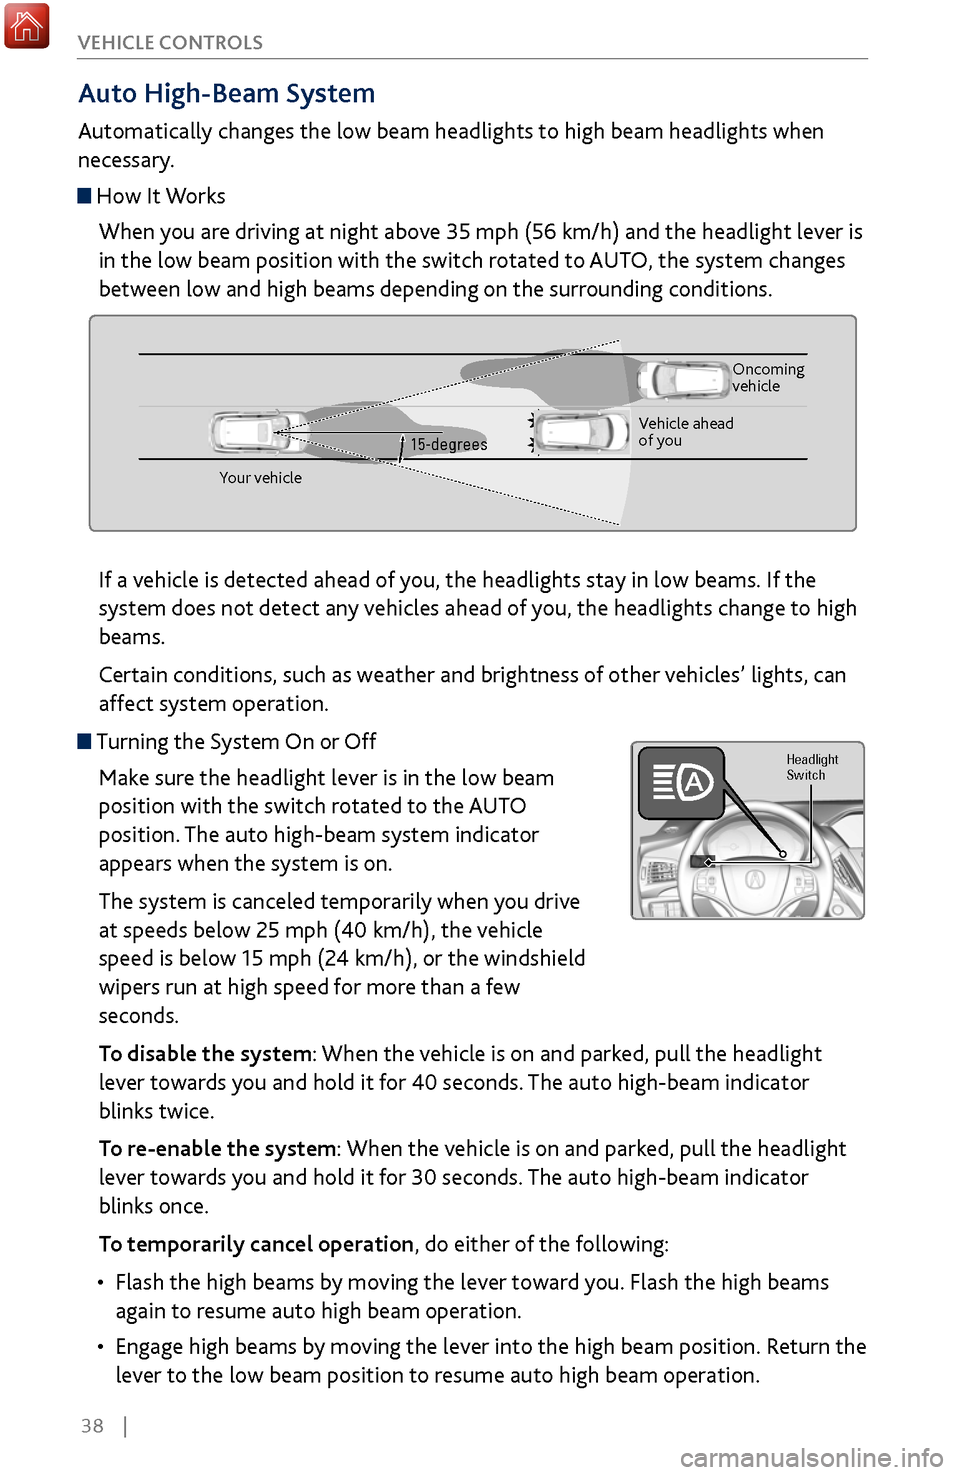
When you are driving at night above 35 mph (56 km/h) and the headlight lever is
in the low beam position with the switch rotated to AUTO, the system changes
between low and high beams depending on the surrounding conditions.
15-degrees
Your vehicle Oncoming
vehicle
Vehicle ahead
of you
If a vehicle is detected ahead of you, the headlights stay in low beams. If the
system does not detect any vehicles ahead of you, the headlights change to high
beams.
Certain conditions, such as weather and brightness of other vehicles’ lights, can
affect system operation.
Turning the System On or Off Make sure the headlight lever is in the low beam
position with the switch rotated to the AUTO
position. The auto high-beam system indicator
appears when the system is on.
The system is canceled temporarily when you drive
at speeds below 25 mph (40 km/h), the vehicle
speed is below 15 mph (24 km/h), or the windshield
wipers run at high speed for more than a few
seconds.
To disable the system: When the vehicle is on and parked, pull the headlight
lever towards you and hold it for 40 seconds. The auto high-beam indicator
blinks twice.
To re-enable the system: When the vehicle is on and parked, pull the headlight
lever towards you and hold it for 30 seconds. The auto high-beam indicator
blinks once.
To temporarily cancel operation, do either of the following:
•
Flash the high beams by mo
ving the lever toward you. Flash the high beams
again to resume auto high beam operation.
•
Engage high beams by moving
the lever into the high beam position. Return the
lever to the low beam position to resume auto high beam operation.
SwitchHeadlight