light Acura MDX 2017 User Guide
[x] Cancel search | Manufacturer: ACURA, Model Year: 2017, Model line: MDX, Model: Acura MDX 2017Pages: 170, PDF Size: 12.43 MB
Page 46 of 170
| 39
V
EHICLE CONTROLS
If you find the timing of beam changes inconvenient for driving, change the
beams manually.
For the system to work properly:
•
Do not place
an object that reflects light on the dashboard.
•
Keep the
windshield around the camera clean. When cleaning the windshield,
be careful not to apply windshield cleanser to the camera lens.
•
Do not attach an object, stick
er or film in the area around the camera.
•
Do not touch the camera lens.
If
the camera receives a strong impact or requires repair, consult a dealer.
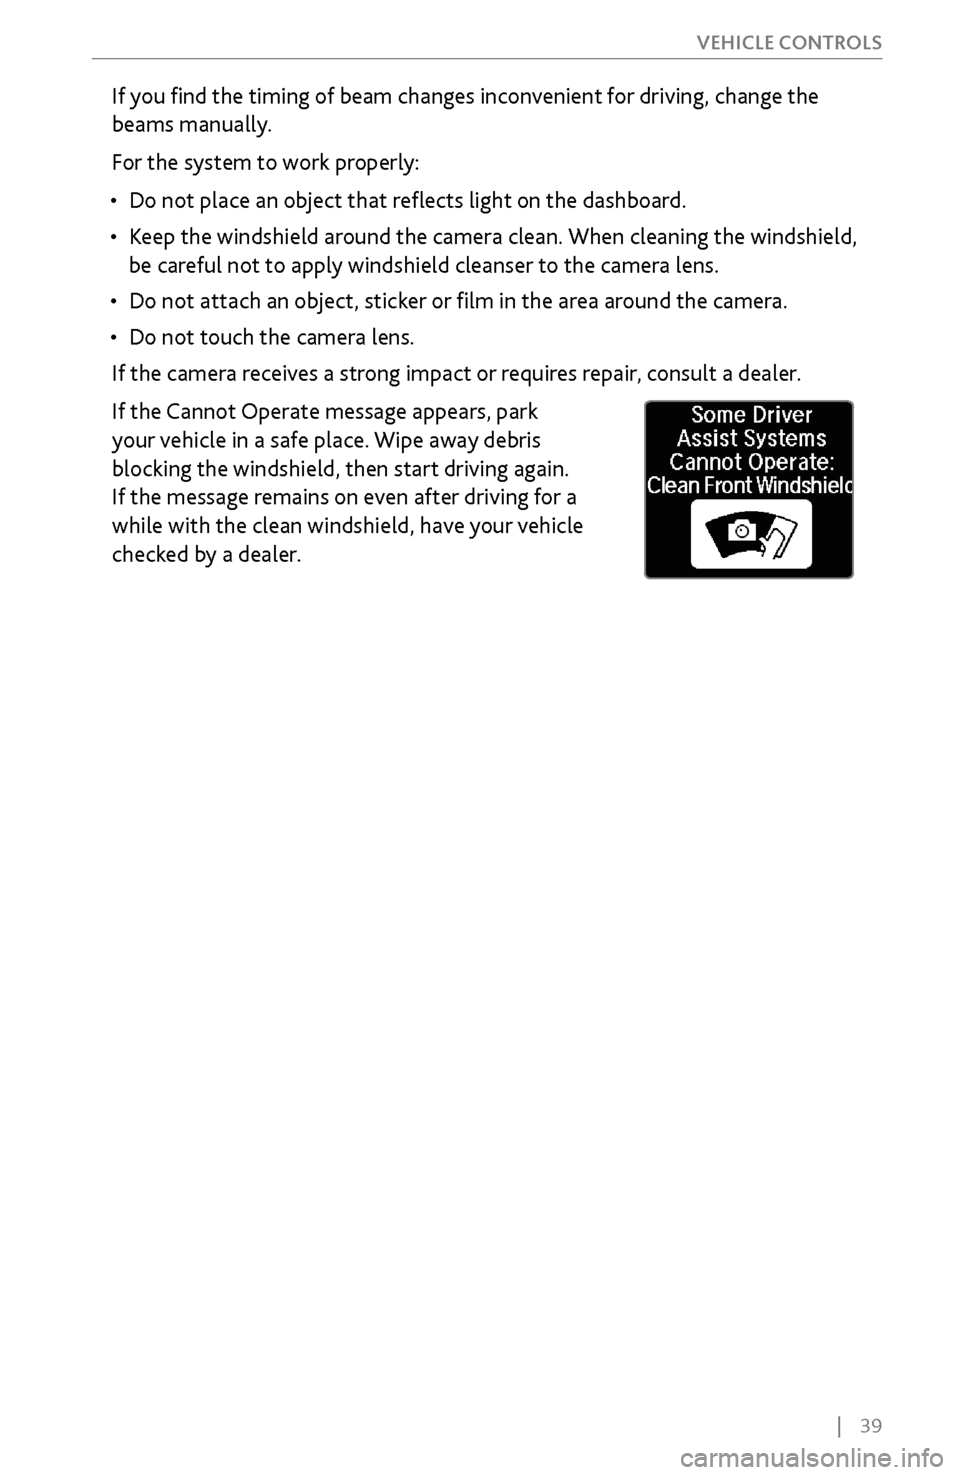
If the Cannot Operate message appears, park
your vehicle in a safe place. Wipe away debris
blocking the windshield, then start driving again.
If the message remains on even after driving for a
while with the clean windshield, have your vehicle
checked by a dealer.
Page 47 of 170
40 |
V
EHICLE CONTROLS
Interior Lights
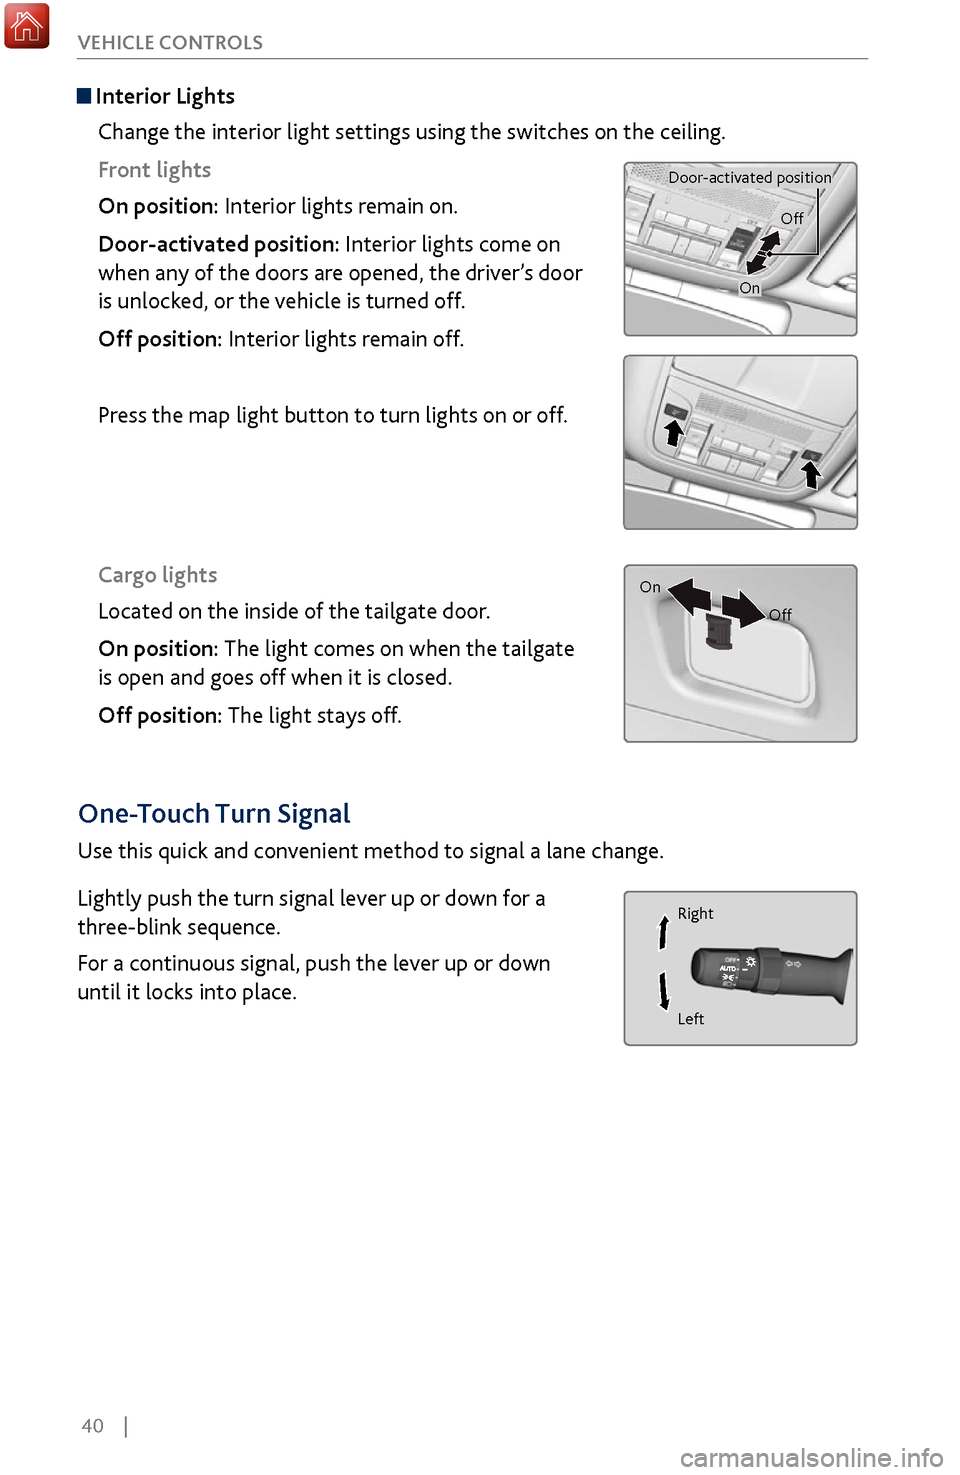
Change the interior light settings using the switches on the ceiling.
Front lights
On position: Interior lights remain on.
Door-activated position: Interior lights come on
when any of the doors are opened, the driver’s door
is unlocked, or the vehicle is turned off.
Off position: Interior lights remain off.
Press the map light button to turn lights on or off.
Cargo lights
Located on the inside of the tailgate door.
On position: The light comes on when the tailgate
is open and goes off when it is closed.
Off position: The light stays off.
Door-activated position
On
Off
On Off
One-Touch Turn Signal
Use this quick and convenient method to signal a lane change.
Lightly push the turn signal lever up or down for a
three-blink sequence.
For a continuous signal, push the lever up or down
until it locks into place.
Right
Left
Page 48 of 170
| 41
V
EHICLE CONTROLS
Wiper Operation
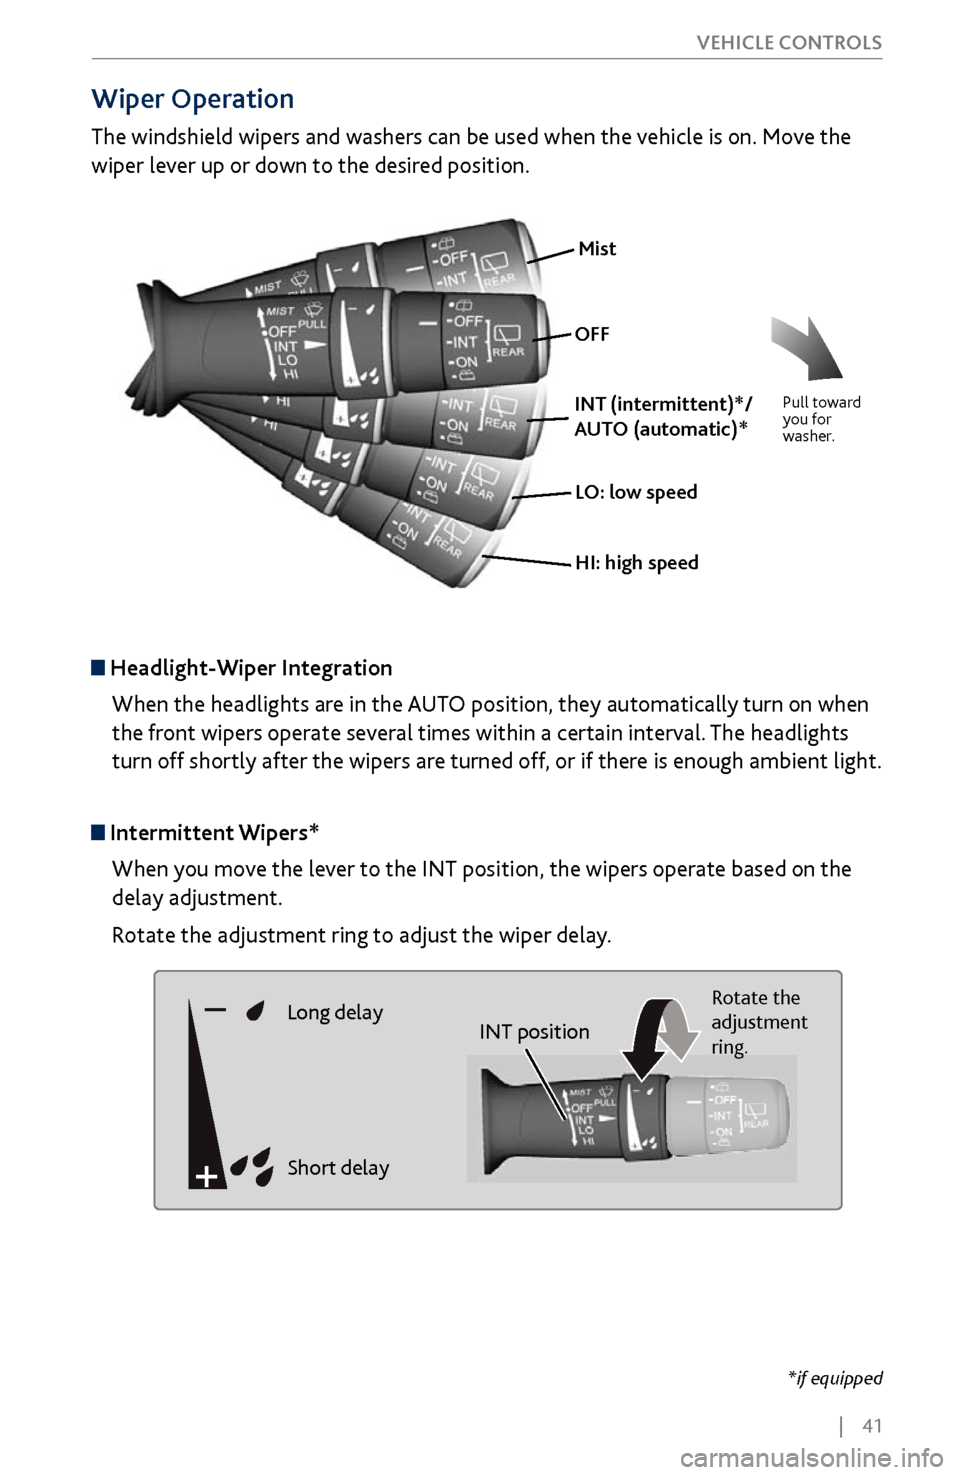
The windshield wipers and washers can be used when the vehicle is on. Move the
wiper lever up or down to the desired position.
*if equipped
Headlight-Wiper Integration
When the headlights are in the AUTO position, they automatically turn on when
the front wipers operate several times within a certain interval. The headlights
turn off shortly after the wipers are turned off, or if there is enough ambient light.
Mist
Pull toward
you for
washer.
OFF
INT (intermittent)*/
AUTO (automatic)*
LO: low speed
HI: high speed
Intermittent Wipers* When you move the lever to the INT position, the wipers operate based on the
delay adjustment.
Rotate the adjustment ring to adjust the wiper delay.
Long delayRotate the
adjustment
ring.
Short delay
INT position
Page 53 of 170
46 |
V
EHICLE CONTROLS
Adjusting the
Mirrors
Adjust the angle of the mirrors for the best visibility when you are sitting in the
correct driving position.
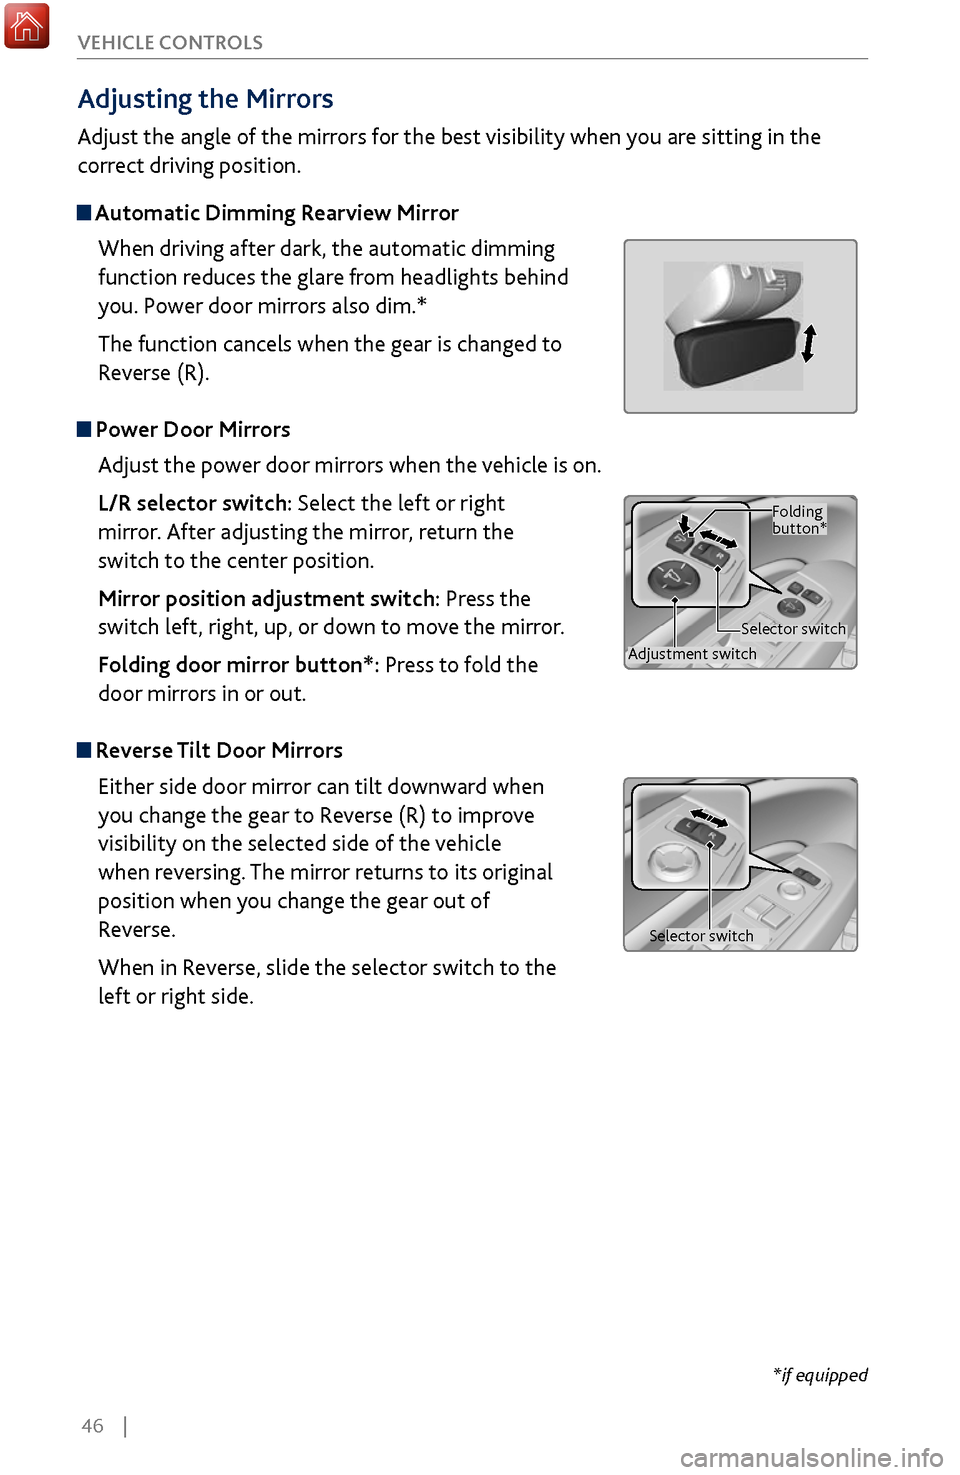
Automatic Dimming Rearview Mirror
When driving after dark, the automatic dimming
function reduces the glare from headlights behind
you. Power door mirrors also dim.*
The function cancels when the gear is changed to
Reverse (R).
Power Door MirrorsAdjust the power door mirrors when the vehicle is on.
L/R selector switch: Select the left or right
mirror. After adjusting the mirror, return the
switch to the center position.
Mirror position adjustment switch: Press the
switch left, right, up, or down to move the mirror.
Folding door mirror button*: Press to fold the
door mirrors in or out.
Reverse Tilt Door MirrorsEither side door mirror can tilt downward when
you change the gear to Reverse (R) to improve
visibility on the selected side of the vehicle
when reversing. The mirror returns to its original
position when you change the gear out of
Reverse.
When in Reverse, slide the selector switch to the
left or right side.
*if equipped
Adjustment switch Selector switchFolding
button*
Selector switch
Page 57 of 170
50 |
V
EHICLE CONTROLS
HomeLink®
Universal Transceiver
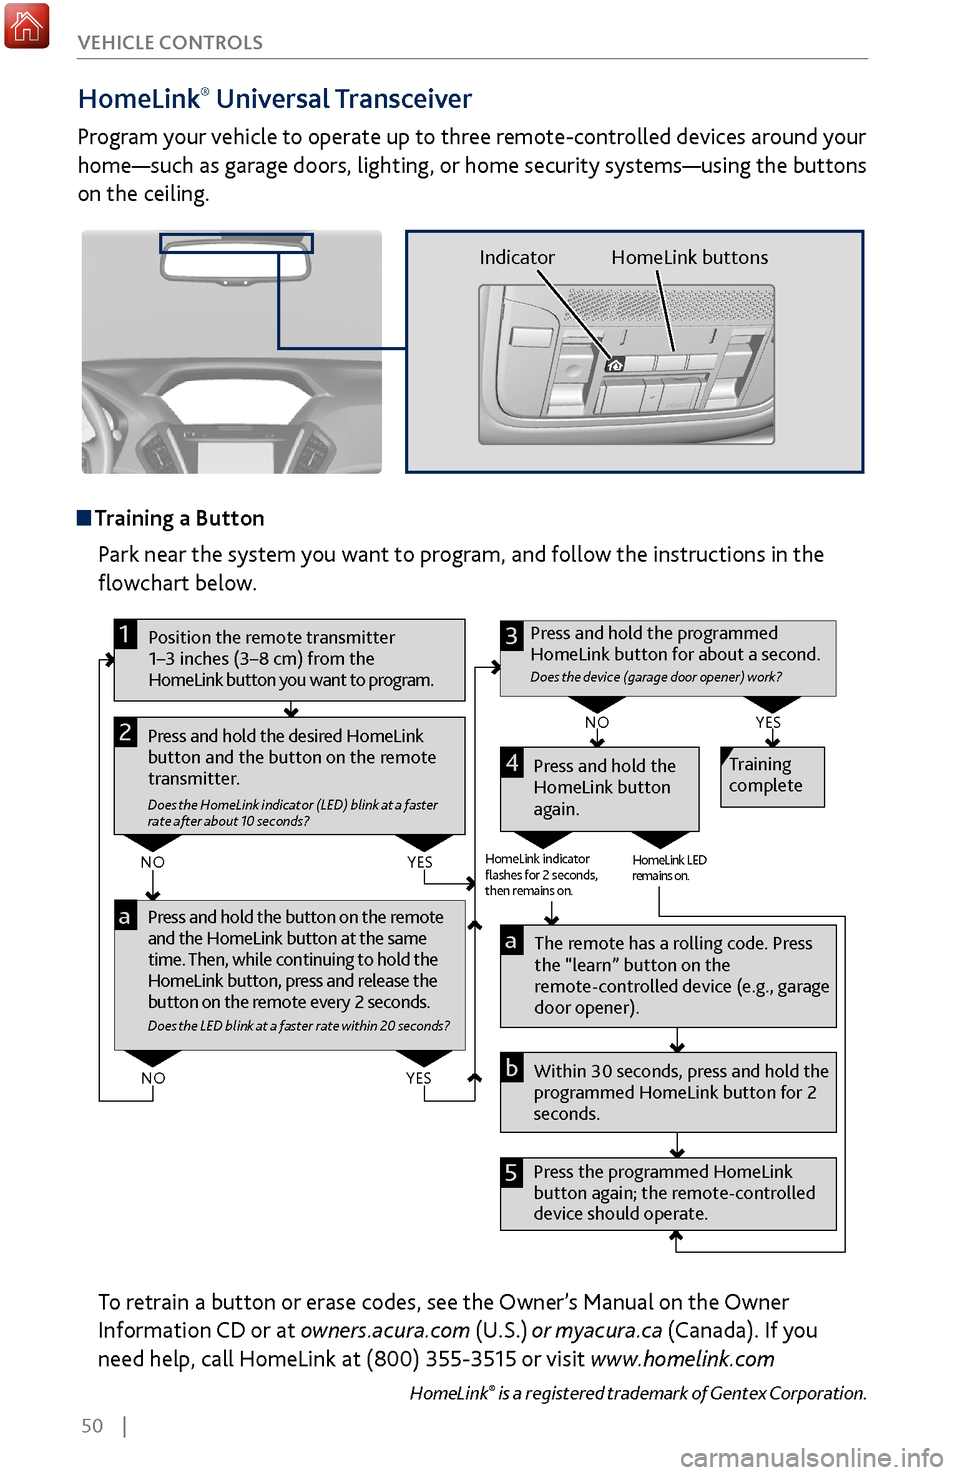
Program your vehicle to operate up to three remote-controlled devices around your
home—such as garage doors, lighting, or home security systems—using the buttons
on the ceiling.
Training a Button
Park near the system you want to program, and follow the instructions in the
flowchart below.
Pr ess and hold the button on the r emote
and the HomeLink button at the same
time. Then, while continuing to hold the
HomeLink button, press and r elease the
button on the remote every 2 seconds.
Does the LED blink at a faster ra te within 20 seconds ?
Press and hold the
HomeLink button
again. Training
complete
YES
NO
HomeLink indicator
�ashes for 2 seconds,
then rem ains on. HomeLink LED
r
emains on.YES
NO
YES
NO
Position the remote transmitter
1–3 inches (3–8 cm) from the
HomeLink button you want to program.1
Press and hold the desired HomeLink
button and the button on the remote
transmitter.
Does the HomeLink indicator (LED) blink at a f aster
rate after about 10 seconds ?
2
a
The remote has a ro lling code. Press
the “learn” button on the
remote-controlled device (e.g., garage
door opener).
Press the programmed HomeLink
button again; the re mote-controlled
device should operate. Within 30 seconds, press and hold the
programmed HomeLink button for 2
seconds.a
Press and hold the programmed
HomeLink button for about a second.
Does the devic e (garage door opener) work ?
3
b
4
5
To retrain a button or erase codes, see the Owner’s Manual on the Owner
Information CD or at owners.acura.com (U.S.) or myacura.ca (Canada). If you
need help, call HomeLink at (800) 355-3515 or visit www.homelink.com
HomeLink® is a registered trademark of Gentex Corporation.
Indicator HomeLink buttons
Page 64 of 170
| 57
AUDIO AND CONNECTIVITY
Do not insert an automotive type cigarette lighter element. This can overheat the
power socket.
NOTICE
Adjusting the
Sound
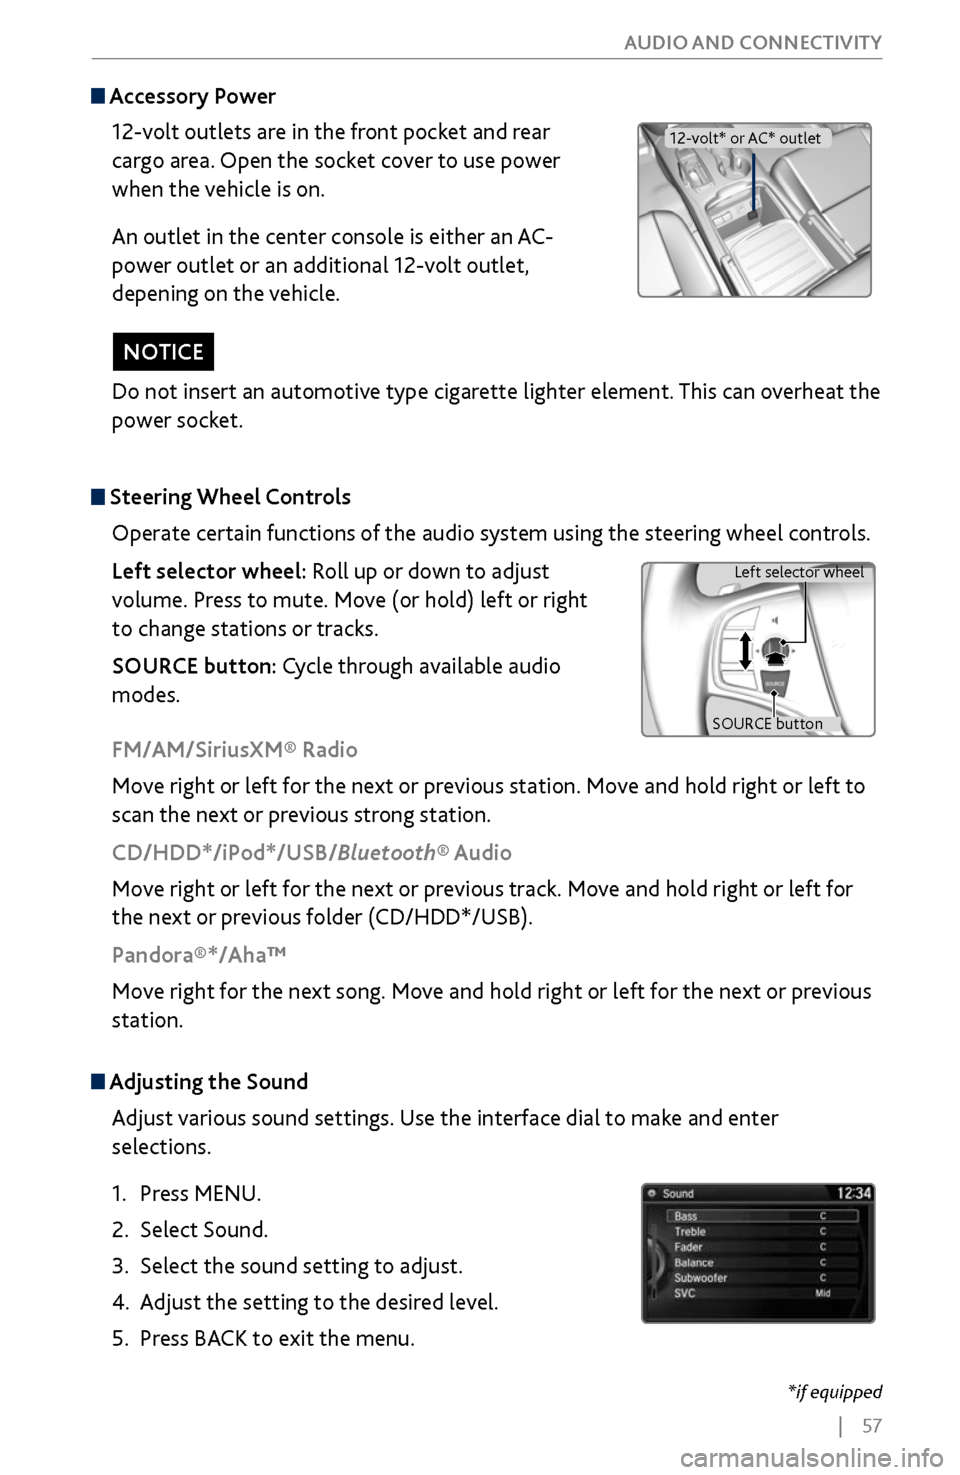
Adjust various sound settings. Use the interface dial to make and enter
selections.
1.
Press MENU.
2.
Select Sound.
3.
Select the sound setting to adjust
.
4.
Adjust the setting to the desir
ed level.
5.
Press BACK
to exit the menu.
Steering Wheel Controls
Operate certain functions of the audio system using the steering wheel controls.
Left selector wheel: Roll up or down to adjust
volume. Press to mute. Move (or hold) left or right
to change stations or tracks.
SOURCE button: Cycle through available audio
modes.
SOURCE button Left selector wheel
FM/AM/SiriusXM® Radio
Move right or left for the next or previous station. Move and hold right or left to
scan the next or previous strong station.
CD/HDD*/iPod*/USB/Bluetooth® Audio
Move right or left for the next or previous track. Move and hold right or left for
the next or previous folder (CD/HDD*/USB).
Pandora®*/Aha™
Move right for the next song. Move and hold right or left for the next or previous
station.
Accessory Power
12-volt outlets are in the front pocket and rear
cargo area. Open the socket cover to use power
when the vehicle is on.
An outlet in the center console is either an AC-
power outlet or an additional 12-volt outlet,
depening on the vehicle.
12-volt* or AC* outlet
*if equipped
Page 76 of 170
| 69
AUDIO AND CONNECTIVITY
1. Make sure REAR POWER is turned on in the front audio controls.
2.
From
the rear control panel, press the desired audio source button (or the
SOURCE button for Ultrawide RES).
3.
Press the arr
ow/ENTER buttons to highlight options on the screen and select
them. Use the other rear control panel buttons to operate the system.
Remote Control and Rear Operation
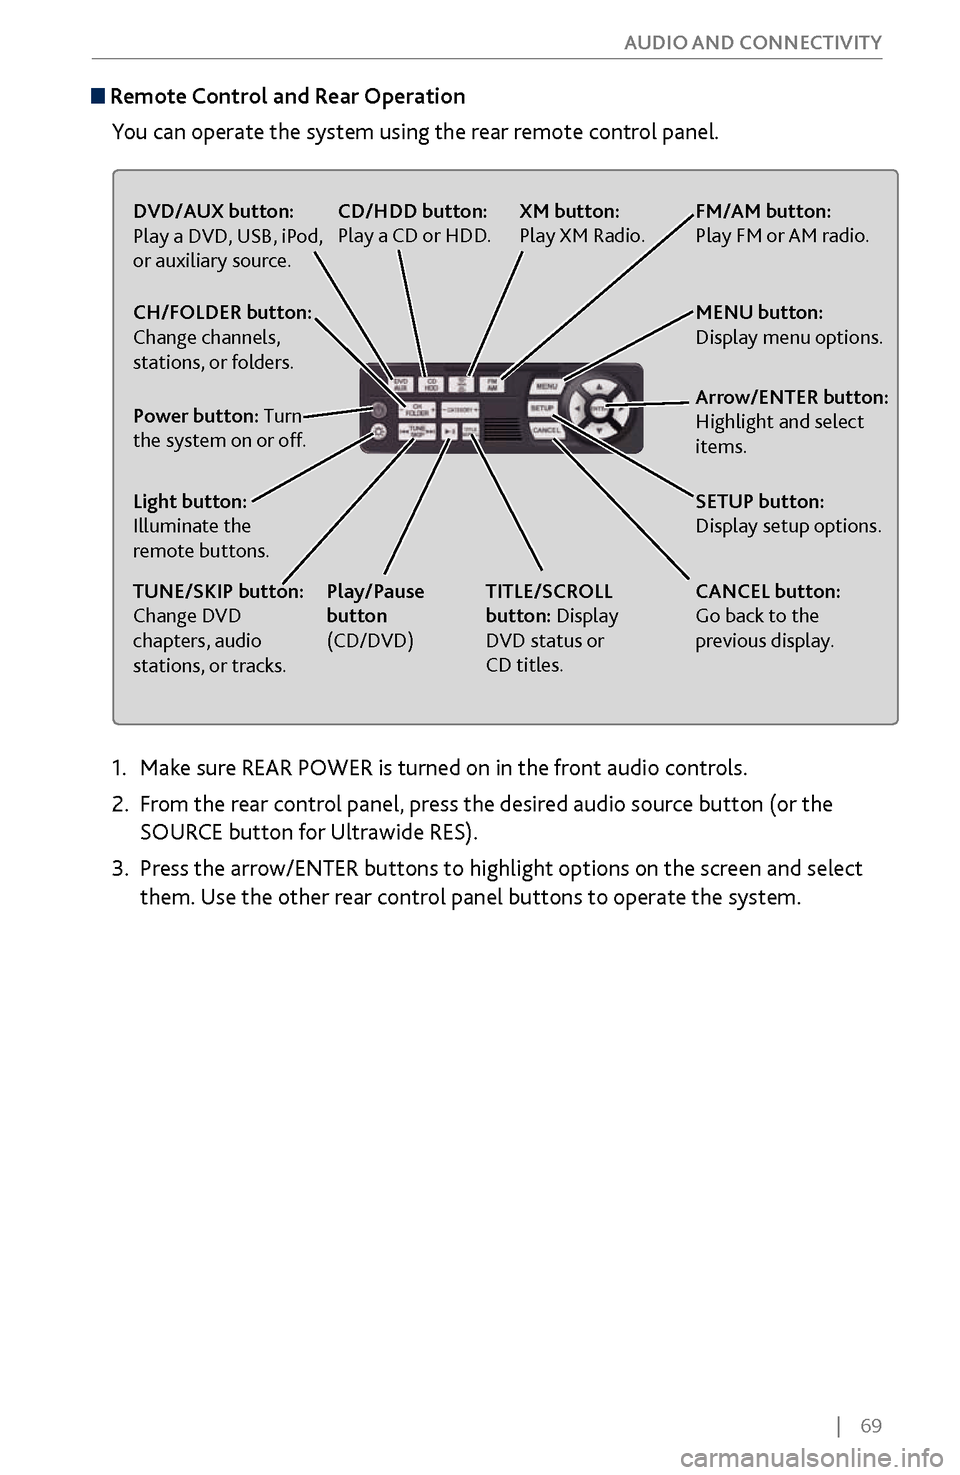
You can operate the system using the rear remote control panel.
DVD/AUX button:
Play a DVD, USB, iPod,
or auxiliary source.
TUNE/SKIP button:
Change DVD
chapters, audio
stations, or tracks. TITLE/SCROLL
button: Display
DVD status or
CD titles.
Play/Pause
button
(CD/DVD)
Power button: Turn
the system on or off. CH/FOLDER button:
Change channels,
stations, or folders.
Light button:
Illuminate the
remote buttons.
CANCEL button:
Go back to the
previous display.
CD/HDD button:
Play a CD or HDD.
XM button:
Play XM Radio.FM/AM button:
Play FM or AM radio.
MENU button:
Display menu options.
SETUP button:
Display setup options. Arrow/ENTER button:
Highlight and select
items.
Page 95 of 170
88 |
DRIVING
Learn about preparation for driving, as well as other features.
Before Driving
Check the following items before you begin driving.
Exterior Checks
•
Make sur
e there are no obstructions on the windows, door mirrors, exterior
lights, or other parts of the vehicle.
•
Remov
e any frost, snow, or ice.
•
Make sure
the hood is securely closed.
•
Heat from
the engine and exhaust can ignite flammable materials left under
the hood, causing a fire. If you’ve parked your vehicle for an extended period,
inspect and remove any debris that may have collected, such as dried grass
and leaves that have fallen or have been carried in for use as a nest by a small
animal. Also check under the hood for leftover flammable materials after you
or someone else has performed maintenance on your vehicle.
•
Make sure
the tires are in good condition.
•
Make sure
there are no people or objects behind or around the vehicle.
DRIVING
Interior Checks•
Store or secur
e all items on board properly.
•
Do not pile items higher than the seat height
.
•
Do not place anything in the
front seat footwells. Make sure to secure the floor
mats.
•
If you hav
e any animals on board, do not let them move freely in the vehicle.
•
Securely close and lock all
doors and the tailgate.
•
Adjust y
our seating position, mirrors, and steering wheel properly.
•
Make sure items placed
on the floor behind the front seats cannot roll under
the seats.
•
Everyone in
the vehicle must fasten their seat belt.
•
Make sure
that the indicators in the instrument panel come on when you start
the vehicle, and go off soon after.
If the doors are frozen shut, use warm water around the door edges to melt any
ice. Do not try to force them open, as this can damage the rubber trim around the
doors. When done, wipe dry to avoid further freezing.
NOTICE
Page 98 of 170

| 91
DRIVING
Load Limits Example
Example1
Max load
1,173 lbs
(532 kg) Passenger weight
150 lbs x 2 = 300 lbs
(68 kg x 2 = 136 kg )Cargo weight
873 lbs
(396 kg)
Example2 Max load
1,173 lbs
(532 kg) Passenger weight
150 lbs x 5 = 750 lbs
(68 kg x 5 = 340 kg) Cargo weight
423 lbs
(192 kg)
Overloading or improper loading can affect handling and stability and cause
a crash in which you can be hurt or killed.
Follow all load limits and other loading guidelines in this manual.
WARNING
The headlight aim on your vehicle was set by the factory, and does not need to be
adjusted. However, if you regularly carry heavy items in the cargo area or pull a
trailer, have the aiming readjusted at your dealer or by a qualified technician.
Page 102 of 170
| 95
DRIVING
Pre-Tow Checklist
When preparing to tow, and before driving away, be sure to check the following:
•
Avoid
towing a trailer during your vehicle’s first 600 miles (1,000 km).
•
The vehicle and
trailer have been properly serviced and are in good condition.
Lights and brakes work properly, and the tires are properly inflated.
•
All weights and loads are
within limits. Never exceed the gross weight ratings.
•
When towing more
than 3,500 lbs (1,590 kg), use of gasoline with an octane
rating of 91 or higher is recommended.
•
Check if all loads are within limits at a public scale (see page 94). If a pu
blic
scale is not available, add the estimated weight of your cargo load to the
weight of the trailer (as quoted by the manufacturer) and the tongue load.
•
The hitch, safety chains, and any other attachments ar
e secure.
•
All items in or on
the trailer are properly secured and cannot shift while you
drive.
Exceeding any load limit or improperly loading your vehicle and trailer can
cause a crash in which you can be seriously hurt or killed.
Check the loading of your vehicle and trailer carefully before starting to
drive.
WARNING