navigation system Acura MDX 2017 Owner's Guide
[x] Cancel search | Manufacturer: ACURA, Model Year: 2017, Model line: MDX, Model: Acura MDX 2017Pages: 170, PDF Size: 12.43 MB
Page 6 of 170
TABLE OF CONTENTS
*if equipped
VISUAL INDEX
.........................................................
1
Steering Wheel and Nearb
y Controls
...................
1
Dashboard
and Ceiling Controls
.............................
2
SAFETY INFORMATION
........................................ 3
Important Safety Information ................................ 3
Seat Belts .................................................................... 5
Airbags ........................................................................\
9
Child Safety .............................................................. 15
Safety Label Locations .......................................... 24
Reporting Safety
Defects...................................... 25
INSTRUMENT PANEL........................................... 26 Malfunction Indicators
.......................................... 26
Condition Indicators .............................................. 28
On/Off Indicators .................................................. 29
Multi-Information Display ................................... 30
VEHICLE CONTROLS
........................................... 31
Using the
Remote Transmitter
.............................
31
Keyless A
ccess System
..........................................
32
Power T
ailgate Operation
.....................................
33
Door Operation
from Inside the Vehicle
............
34
Power Window
Operation
....................................
35
Power
Moonroof Operation
................................
36
Interior and Exterior Lights ................................... 37
Auto High-Beam S
ystem
......................................
38
One-T
ouch Turn Signal
..........................................
40
Wiper Operation ..................................................... 41
Adjusting
the Seats
................................................
43
Adjusting the
Mirrors
............................................
46
Adjusting
the Steering Wheel
..............................
47
Driving Position Memory
System
.......................
47
Rear Seats ................................................................ 48
HomeLink® Universal Transceiver ........................ 50
Climate Control System ........................................ 51
Seat Heaters and V
entilation*............................. 54
Customized Features
............................................. 55AUDIO AND CONNECTIVITY
............................
56
Basic Audio Operation .......................................... 56
On-Demand Multi-Use Display™ (ODMD™) .. 58
FM/AM Radio .......................................................... 59
SiriusXM® Radio ...................................................... 60
Compact Disc (CD) / USB Flash Driv e .................61
Hard Disc Driv
e (HDD) Audio*
............................ 62
iPod® ........................................................................\
. 63
Bluetooth® Audio .................................................... 64
Pandora®* ................................................................ 65
AcuraLink featuring Aha™ .................................... 66
Rear Entertainment
System (RES)*
.................... 67
BLUET
OOTH
® HANDSFREELINK® ...................... 71
Basic HFL Operation ............................................... 71
Pairing a Phone ....................................................... 73
Making a Call ............................................................ 74
SMS
Text Messaging and E-Mail
........................... 77
Siri™ Eyes F
ree
........................................................ 78
ACURALINK
®* ....................................................... 79
AcuraLink Messages ............................................... 79
Subscription Featur
es
............................................ 80
NAVIGA
TION*
...................................................... 81
Basic Navigation Operation .................................. 81
Entering a Destination .......................................... 84
Routing ..................................................................... 86
Page 9 of 170
2 |
V
ISUAL INDEX
Dashboard and Ceiling Controls
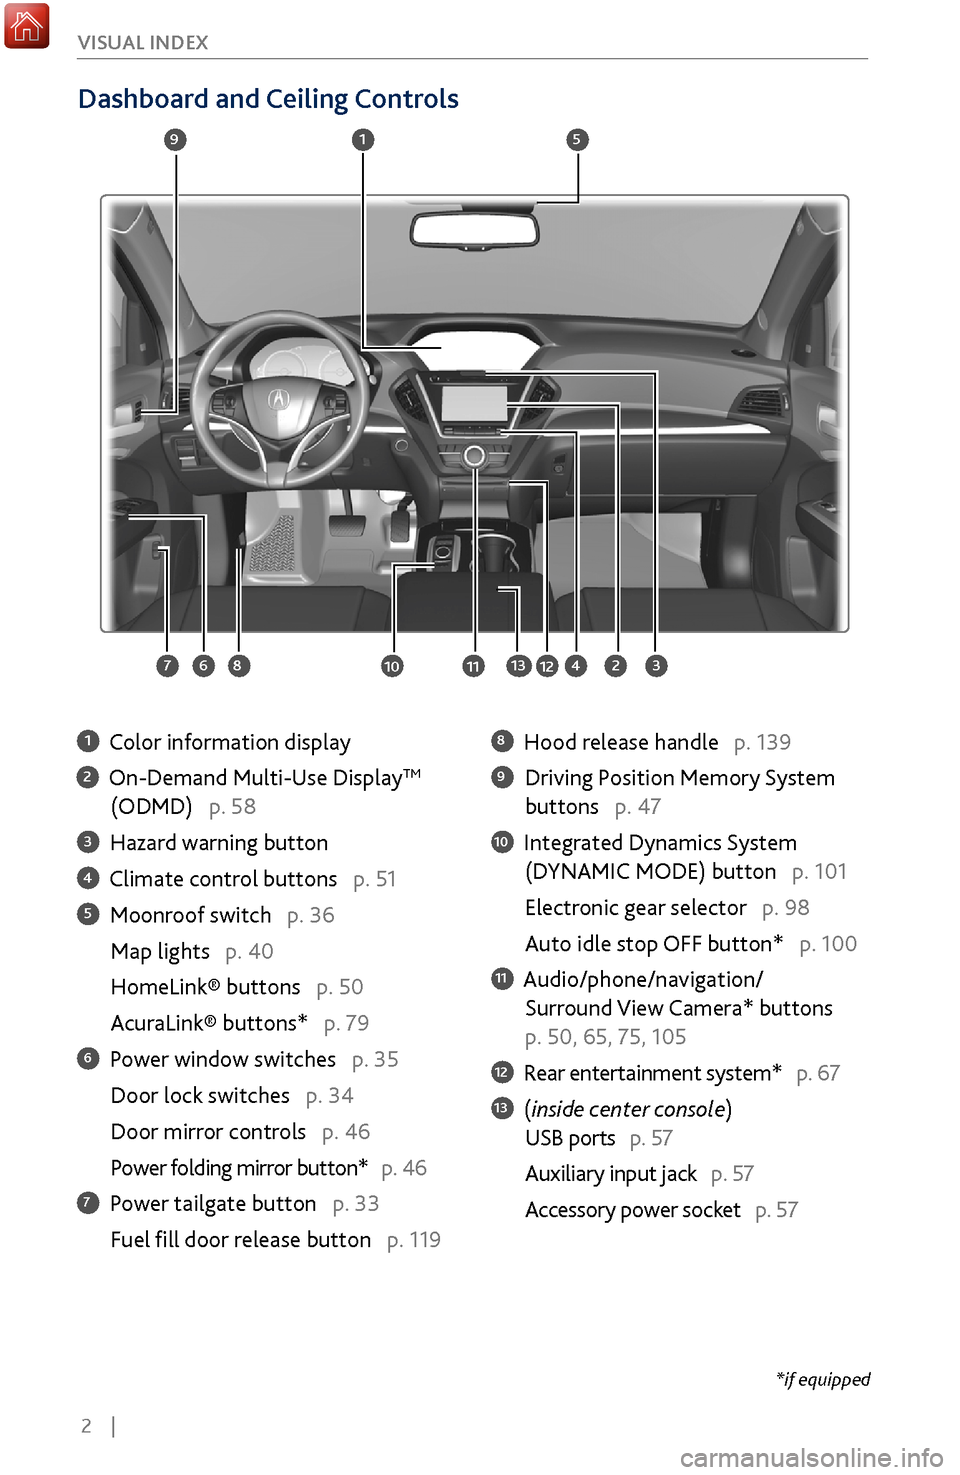
1 Color information display
2 On-Demand Multi-Use DisplayTM
(ODMD) p. 58
3 Hazard warning button
4 Climate control buttons p. 51
5 Moonroof switch p. 36
Map lights p. 40
HomeLink® buttons p. 50
AcuraLink® buttons* p. 79
6 Power window switches p. 35
Door lock switches p. 34
Door mirror controls
p. 46
Power folding mirr
or button* p. 46
7 Power tailgate button p. 33
Fuel fill door r
elease button p. 119
8 Hood release handle p. 139
9 Driving Position Memory System
buttons p. 47
10 Integrated Dynamics System
(D
YNAMIC MODE) button p. 101
Electronic gear selector p. 98
Auto idle stop OFF button* p. 100
11 Audio/phone/navigation/
Surround View Camera*
buttons
p. 50, 65, 75, 105
12 Rear entertainment system* p. 67
13 (inside center console)
USB ports p. 57
Auxiliary input jack p. 57
Accessory power socket
p. 57
1
2834
5
67
9
101112
*if equipped
13
Page 62 of 170
| 55
V
EHICLE CONTROLS
*if equipped
Customized Features
You can easily customize many features of your vehicle. The customized settings
are recalled every time you unlock the driver’s door with the remote (Driver 1 or
Driver 2). Settings are unique to each remote.
How to
Change a Setting
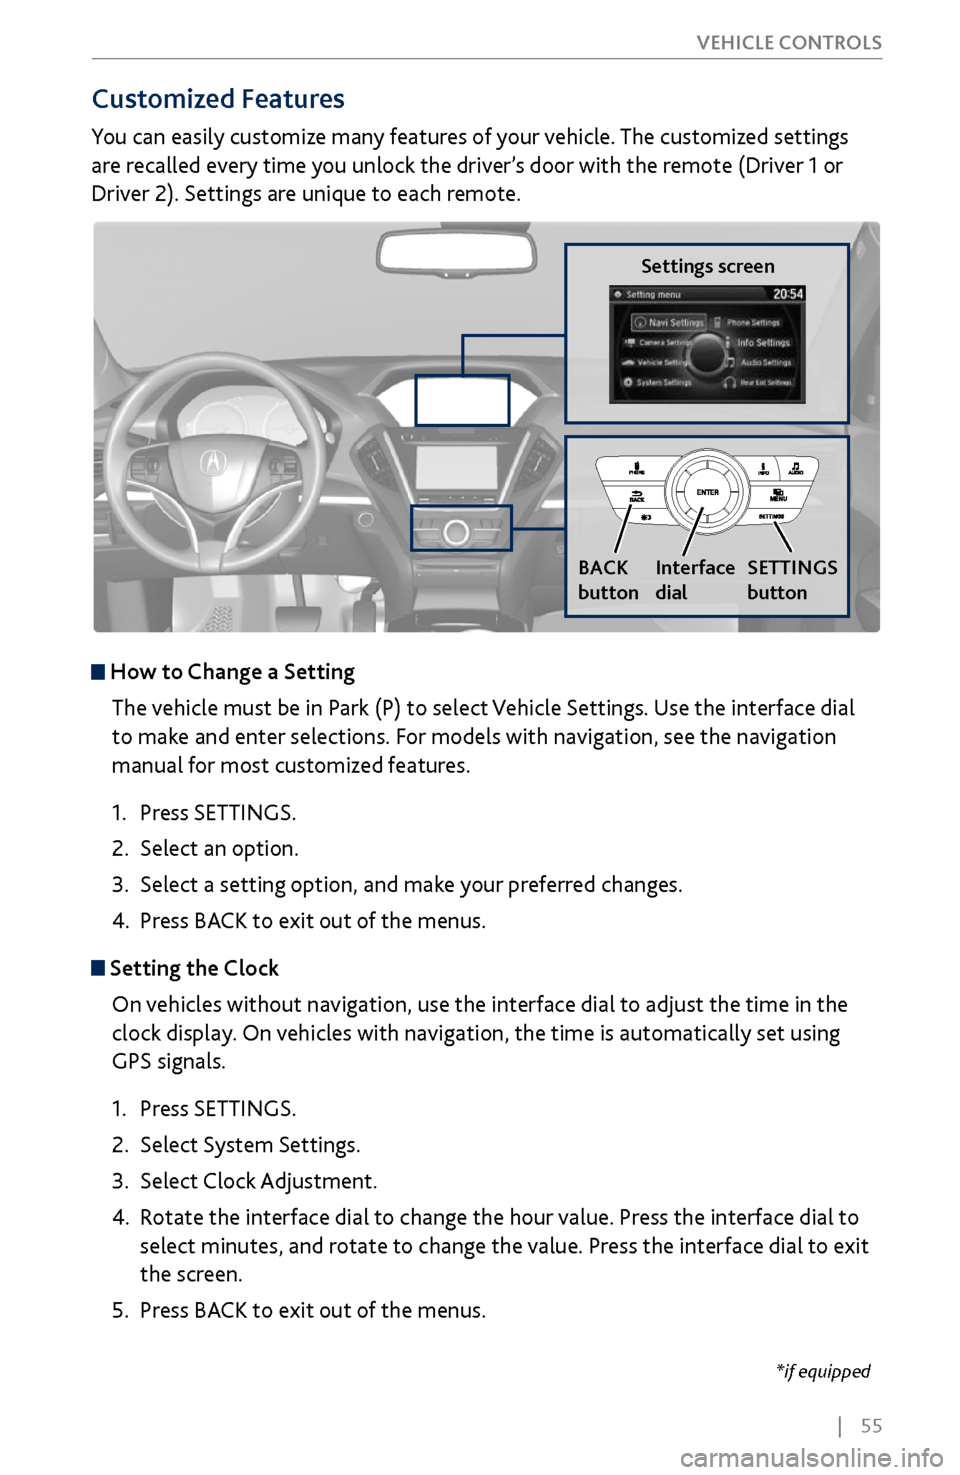
The vehicle must be in Park (P) to select Vehicle Settings. Use the interface dial
to make and enter selections. For models with navigation, see the navigation
manual for most customized features.
1.
Press SETTINGS.
2.
Select an option.
3.
Select a setting option, and make
your preferred changes.
4.
Press BA
CK to exit out of the menus.
Setting the Clock
On vehicles without navigation, use the interface dial to adjust the time in the
clock display. On vehicles with navigation, the time is automatically set using
GPS signals.
1.
Press SETTINGS.
2.
Select System Settings.
3.
Select Clock Adjustment
.
4.
Rotate the interface dial to
change the hour value. Press the interface dial to
select minutes, and rotate to change the value. Press the interface dial to exit
the screen.
5.
Press BA
CK to exit out of the menus.
Settings screen
BACK
button
Interface
dial SETTINGS
button
Page 79 of 170
72 |
Talk Button Tips
On vehicles with navigation, you can say voice commands to operate system
functions. For a list of available voice commands, see page 157. Below are some
helpful tips:
•
When using the T
alk button, wait for the beep before saying a command.
•
To bypass
the system prompts, simply press the Talk button again to say your
command.
•
Speak in a clear, natural v
oice.
•
Reduce all background noise.
•
Adjust the dashboard
vents away from the microphone in the ceiling.
•
Close the windows and moonr
oof.
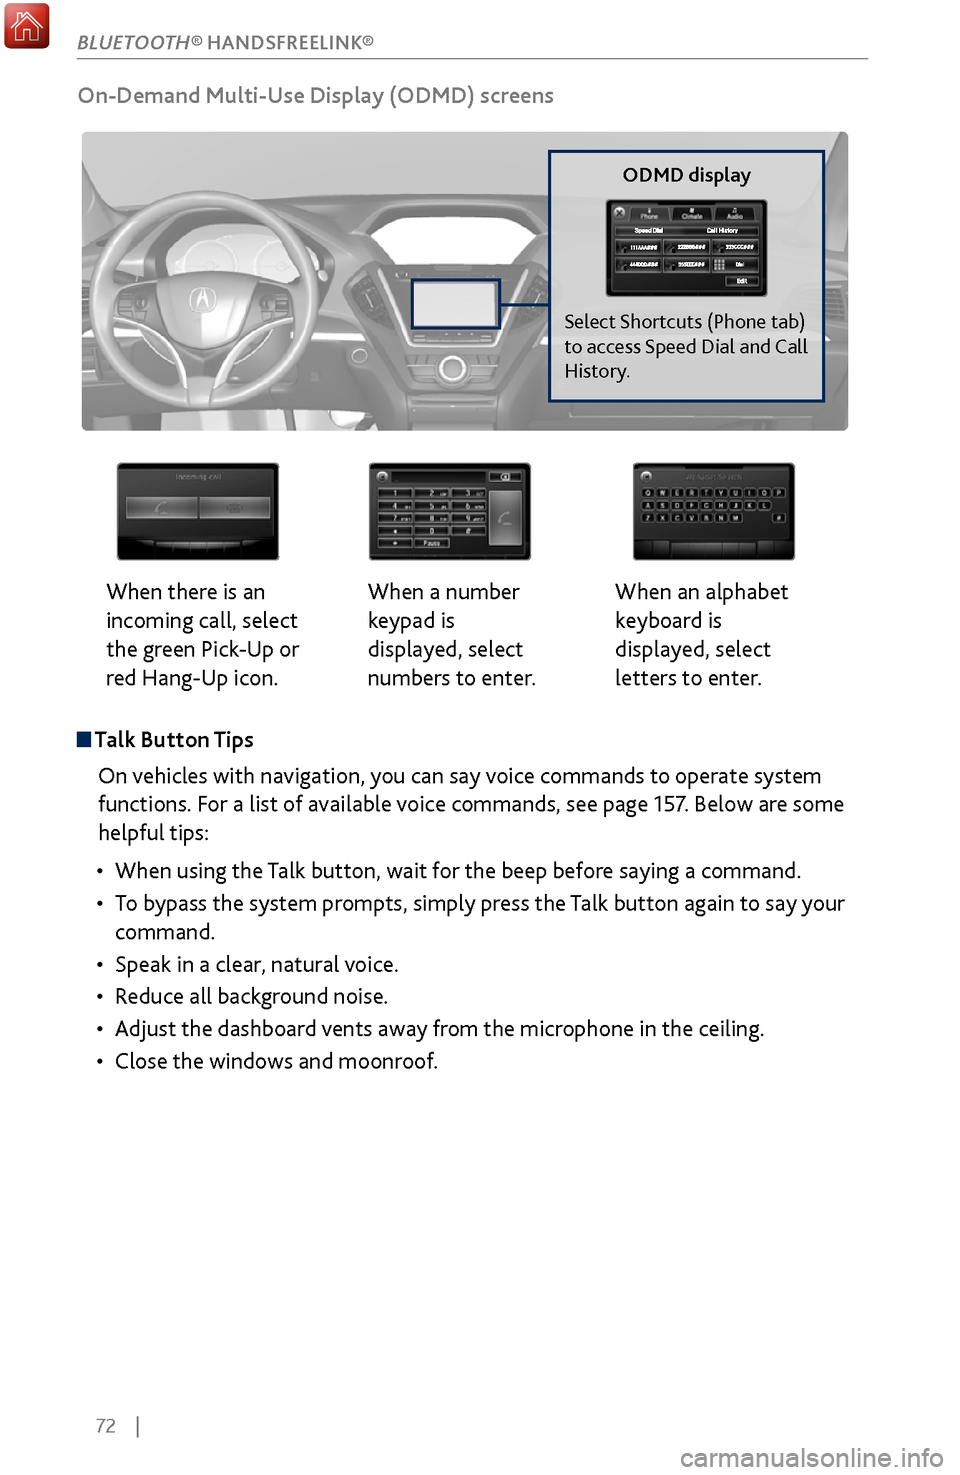
On-Demand Multi-Use Display (ODMD) screens
When there is an
incoming call, select
the green Pick-Up or
red Hang-Up icon. When a number
keypad is
displayed, select
numbers to enter.When an alphabet
keyboard is
displayed, select
letters to enter.
ODMD display
Select Shortcuts (Phone tab)
to access Speed Dial and Call
History.
BLUETOOTH® HANDSFREELINK®
Page 81 of 170
74 |
Making a Call
You can make calls using several methods.
Dialing a NumberEnter a 10-digit phone number to call.
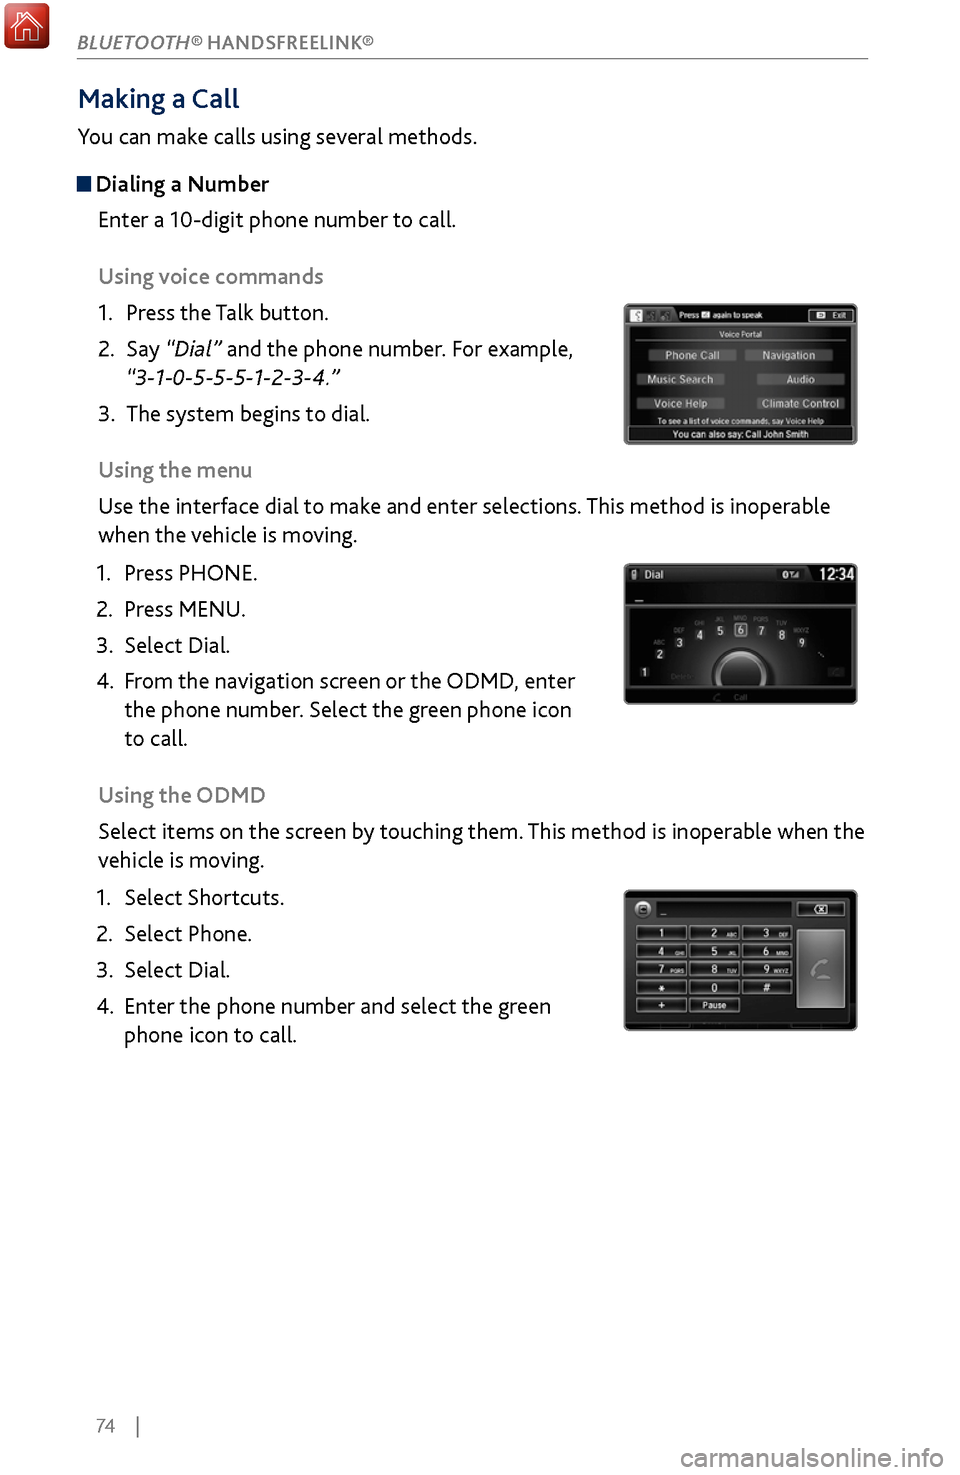
Using voice commands
1.
Press the T
alk button.
2.
Say “Dial” and
the phone number. For example,
“3-1-0-5-5-5-1-2-3-4.”
3.
The system begins to dial.
Using the
menu
Use the interface dial to make and enter selections. This method is inoperable
when the vehicle is moving.
1.
Press PHONE.
2.
Press MENU.
3.
Select Dial.
4.
From the
navigation screen or the ODMD, enter
the phone number. Select the green phone icon
to call.
Using the ODMD
Select items on the screen by touching them. This method is inoperable when the
vehicle is moving.
1.
Select Shortcuts.
2.
Select Phone.
3.
Select Dial.
4.
Enter the phone number and select the gr
een
phone icon to call.
BLUETOOTH® HANDSFREELINK®
Page 87 of 170
80 |
Subscription Features
In addition to standard service, receive benefits such as collision notification,
emergency assistance, online security, enhanced navigation searches, and
important messages about your vehicle. Requires enrollment and privacy
agreement. To subscribe or get more information, visit owners.acura.com (U.S.) or
myacura.ca (Canada) or contact a dealer.
Emergency AssistanceIf your vehicle’s airbags deploy or if the unit detects that the vehicle is severely
impacted, your vehicle automatically attempts to connect to the AcuraLink
operator if your phone is paired to the system and there is sufficient cellular
coverage.
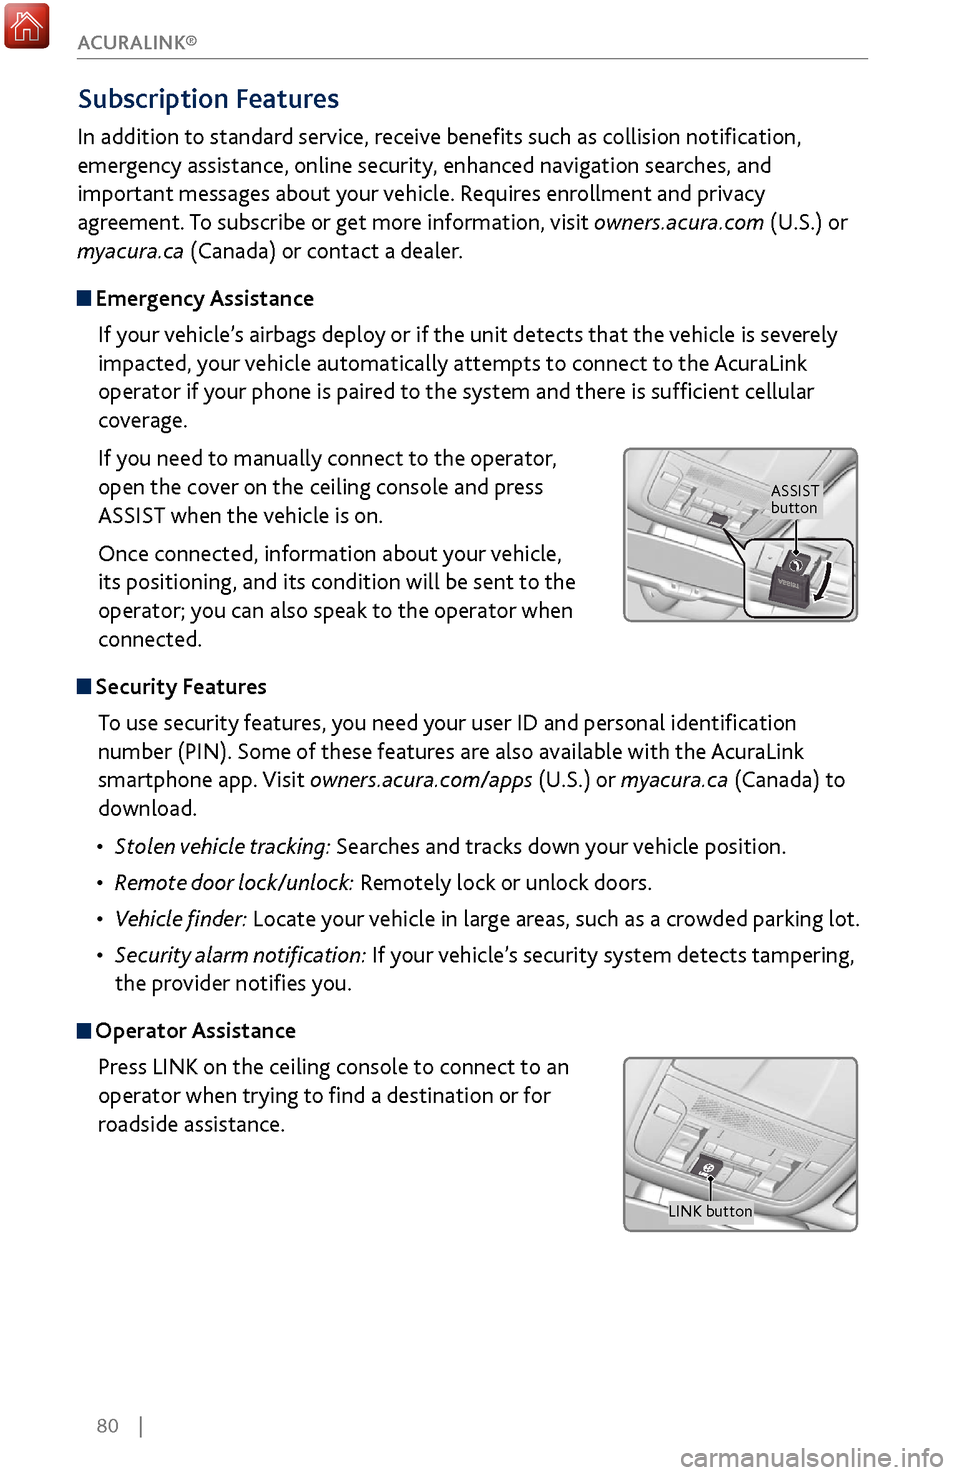
If you need to manually connect to the operator,
open the cover on the ceiling console and press
ASSIST when the vehicle is on.
Once connected, information about your vehicle,
its positioning, and its condition will be sent to the
operator; you can also speak to the operator when
connected.
Security FeaturesTo use security features, you need your user ID and personal identification
number (PIN). Some of these features are also available with the AcuraLink
smartphone app. Visit owners.acura.com/apps (U.S.) or myacura.ca (Canada) to
download.
•
Stolen
vehicle tracking: Searches and tracks down your vehicle position.
•
Remote door
lock/unlock: Remotely lock or unlock doors.
•
Vehicle finder: Locate
your vehicle in large areas, such as a crowded parking lot.
•
Security alarm
notification: If your vehicle’s security system detects tampering,
the provider notifies you.
Operator Assistance
Press LINK on the ceiling console to connect to an
operator when trying to find a destination or for
roadside assistance.
ASSIST
button
LINK button
ACURALINK®
Page 88 of 170
| 81
NAVIGATION
Learn how to enter a destination and operate the navigation system.
Basic Navigation Operation
A real-time navigation system uses GPS and a map database to show your current
location and help guide you to a desired destination. You can operate the system
using voice commands or the system controls.
To reduce the potential for driver distraction, certain manual functions may
be inoperable or grayed out while the vehicle is moving. Voice commands are
always available.
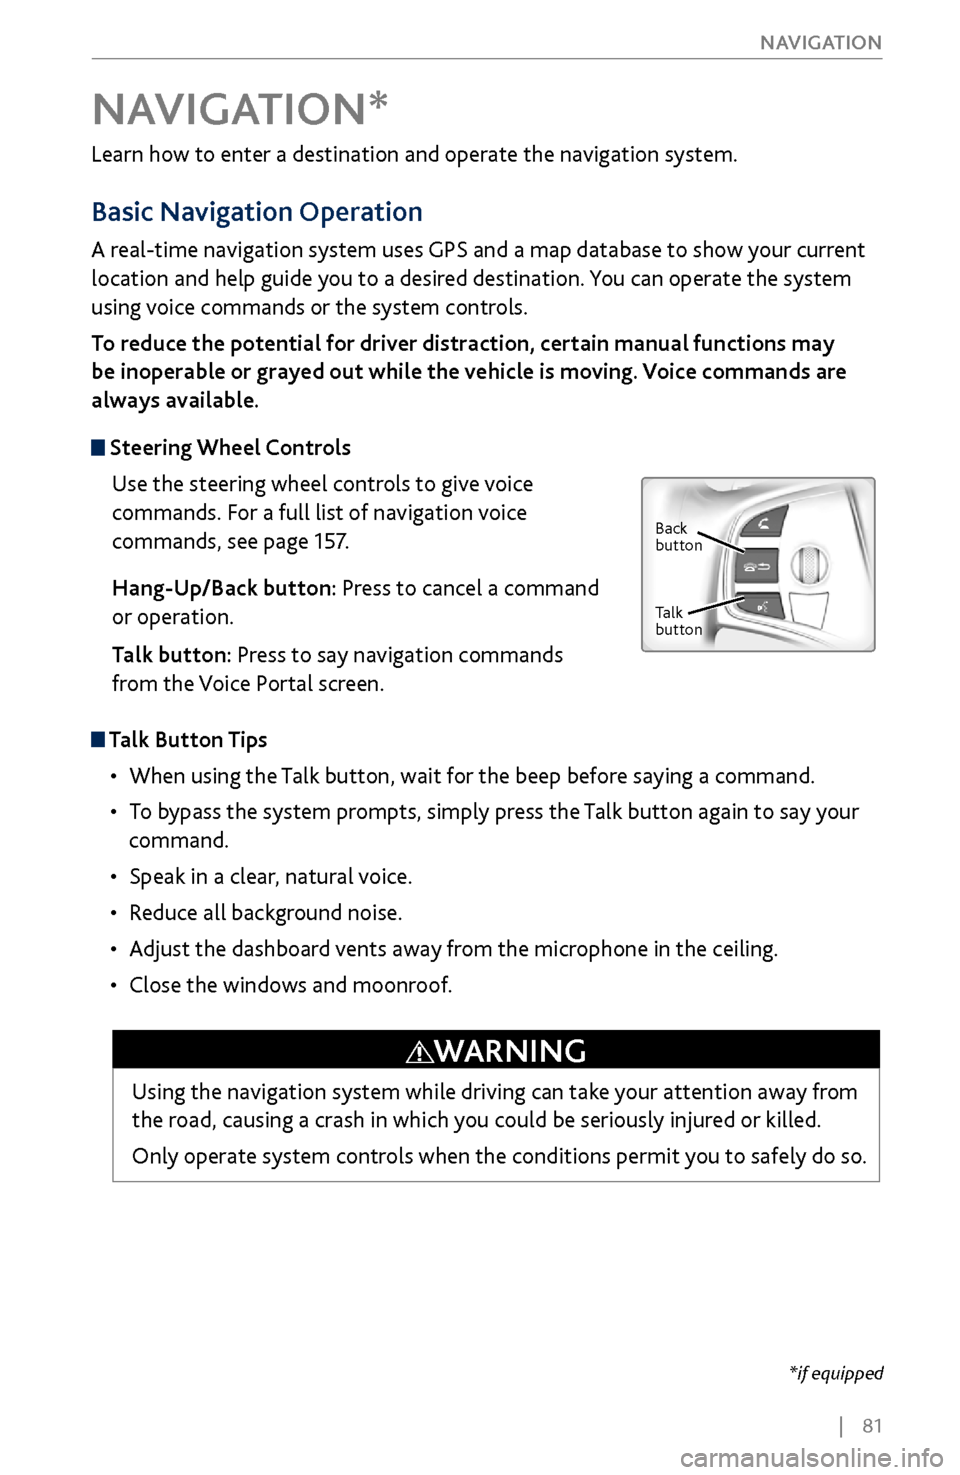
Steering Wheel Controls
Use the steering wheel controls to give voice
commands. For a full list of navigation voice
commands, see page 157.
Hang-Up/Back button: Press to cancel a command
or operation.
Talk button: Press to say navigation commands
from the Voice Portal screen.
Talk Button Tips
•
When using the T
alk button, wait for the beep before saying a command.
•
To bypass
the system prompts, simply press the Talk button again to say your
command.
•
Speak in a clear, natural v
oice.
•
Reduce all background noise.
•
Adjust the dashboard
vents away from the microphone in the ceiling.
•
Close the windows and moonr
oof.
NAVIGATION*
Using the navigation system while driving can take your attention away from
the road, causing a crash in which you could be seriously injured or killed.
Only operate system controls when the conditions permit you to safely do so.
WARNING
*if equipped
Back
button
Talk
button
Page 90 of 170
| 83
NAVIGATION
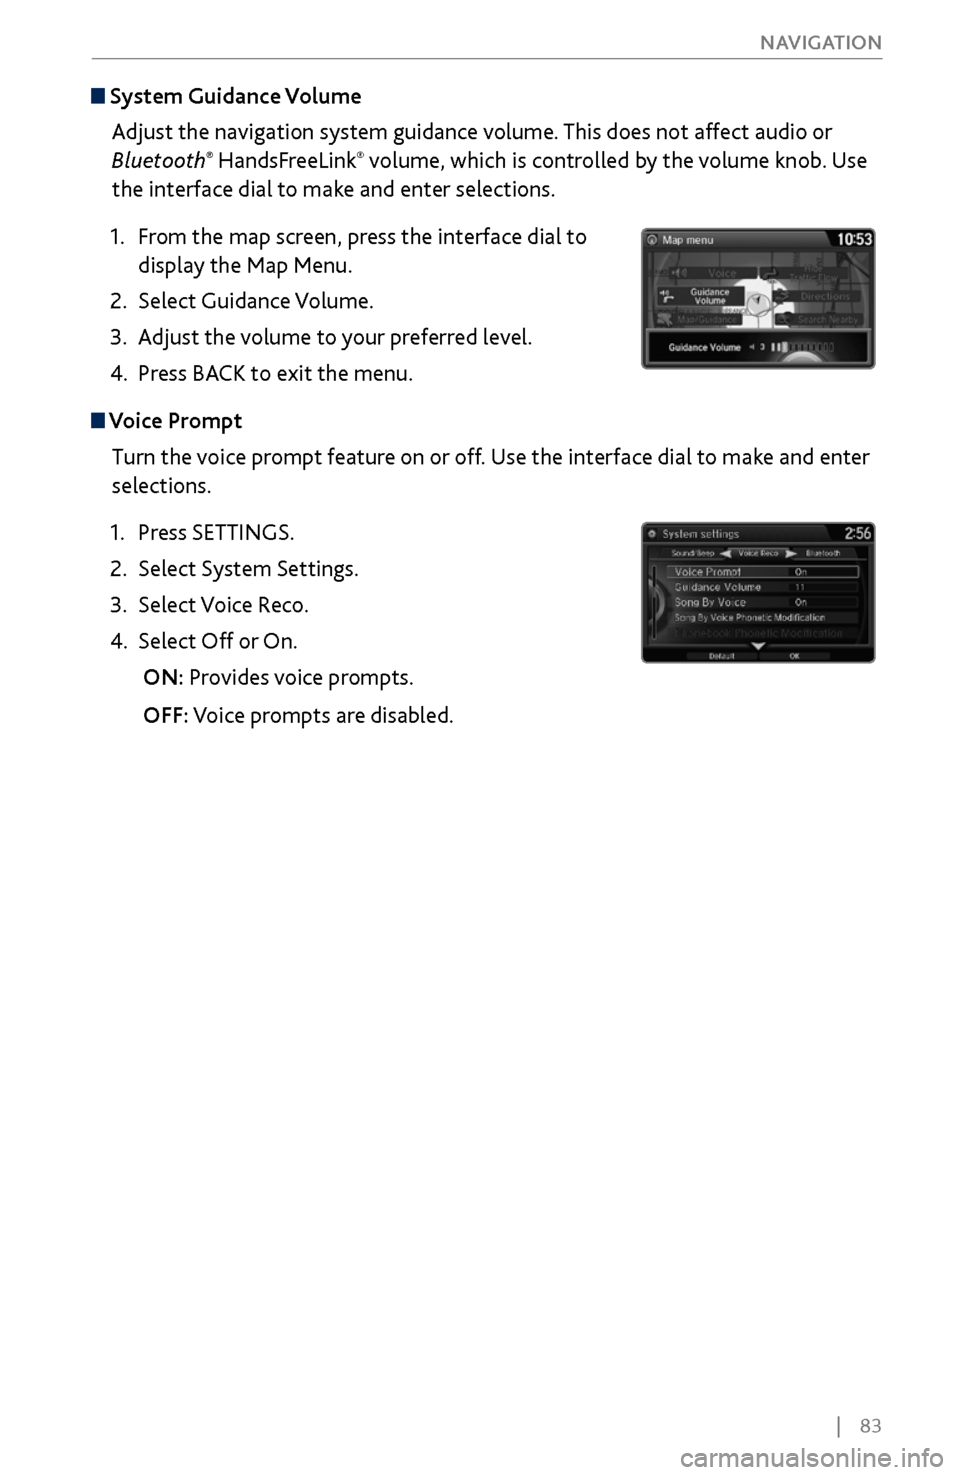
System Guidance Volume
Adjust the navigation system guidance volume. This does not affect audio or
Bluetooth
® HandsFreeLink® volume, which is controlled by the volume knob. Use
the interface dial to make and enter selections.
1.
From the
map screen, press the interface dial to
display the Map Menu.
2.
Select Guidance Volume.
3.
Adjust the v
olume to your preferred level.
4.
Press BACK
to exit the menu.
Voice Prompt Turn the voice prompt feature on or off. Use the interface dial to make and enter
selections.
1.
Press SETTINGS.
2.
Select System Settings.
3.
Select Voice R
eco.
4.
Select Off or On.
ON: Pr
ovides voice prompts.
OFF:
Voice prompts are disabled.
Page 91 of 170
84 |
NAVIGATION
Entering a Destination
Use several methods to enter a destination.
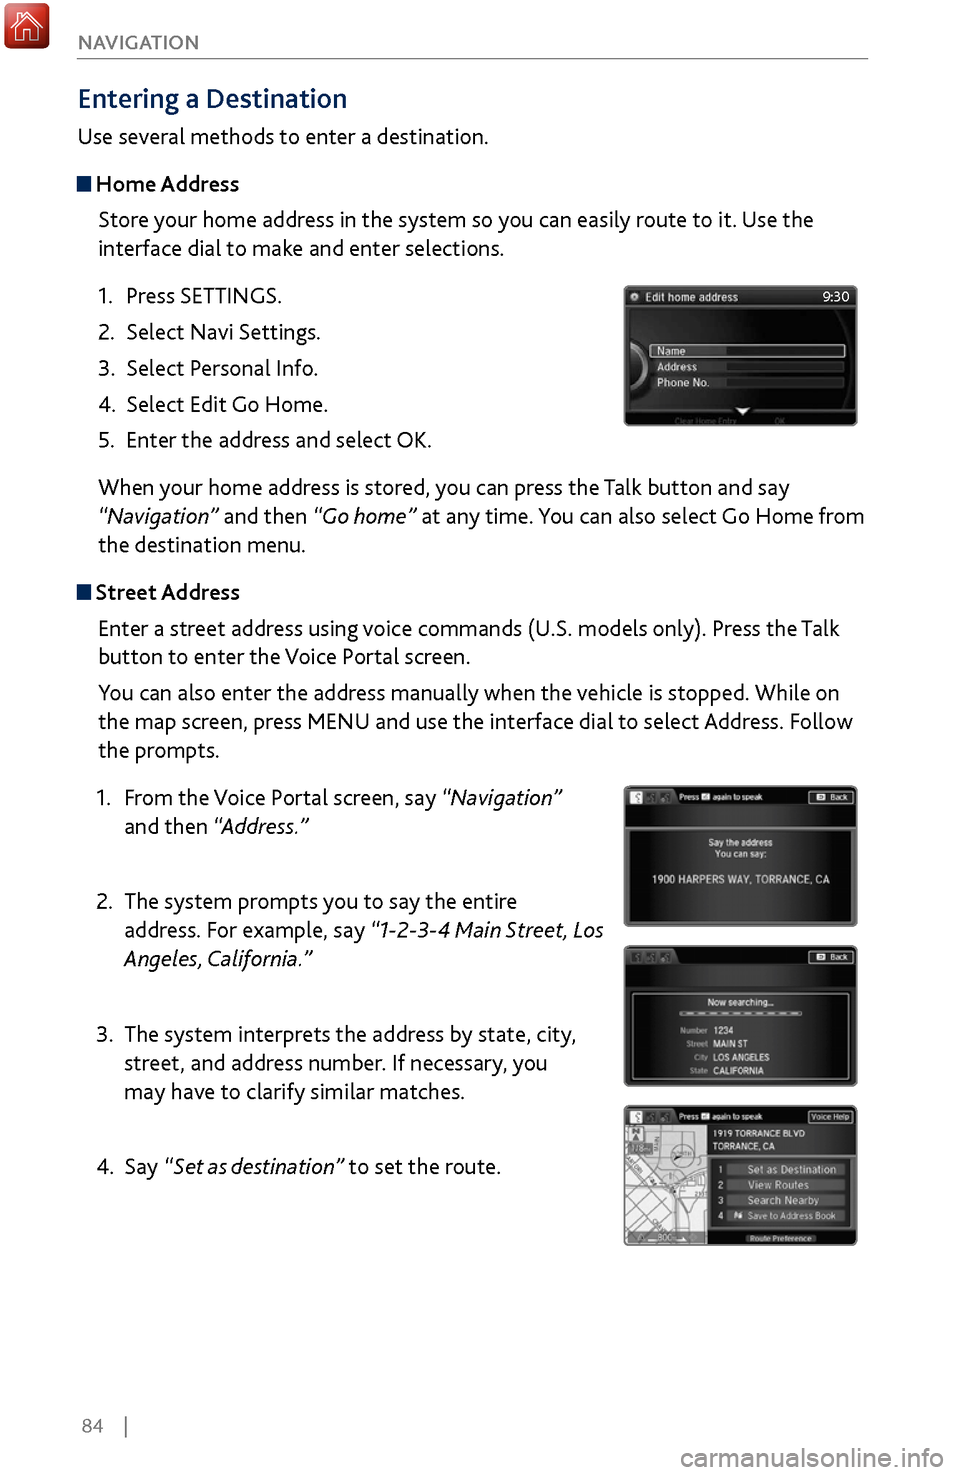
Home Address
Store your home address in the system so you can easily route to it. Use the
interface dial to make and enter selections.
1.
Press SETTINGS.
2.
Select Navi Settings.
3.
Select Personal Info.
4.
Select Edit Go Home.
5.
Enter the address and select
OK.
When your home address is stored, you can press the Talk
button and say
“Navigation
” and then “Go home” at any time. You can also select Go Home from
the destination menu.
Street Address
Enter a street address using voice commands (U.S. models only). Press the Talk
button to enter the Voice Portal screen.
You can also enter the address manually when the vehicle is stopped. While on
the map screen, press MENU and use the interface dial to select Address. Follow
the prompts.
1.
From
the Voice Portal screen, say “Navigation”
and then “Address.”
2.
The system prompts y
ou to say the entire
address. For example, say “1-2-3-4 Main Street, Los
Angeles, California.”
3.
The system interprets the addr
ess by state, city,
street, and address number. If necessary, you
may have to clarify similar matches.
4.
Say “S
et as destination” to set the route.
9:30
Page 92 of 170
| 85
NAVIGATION
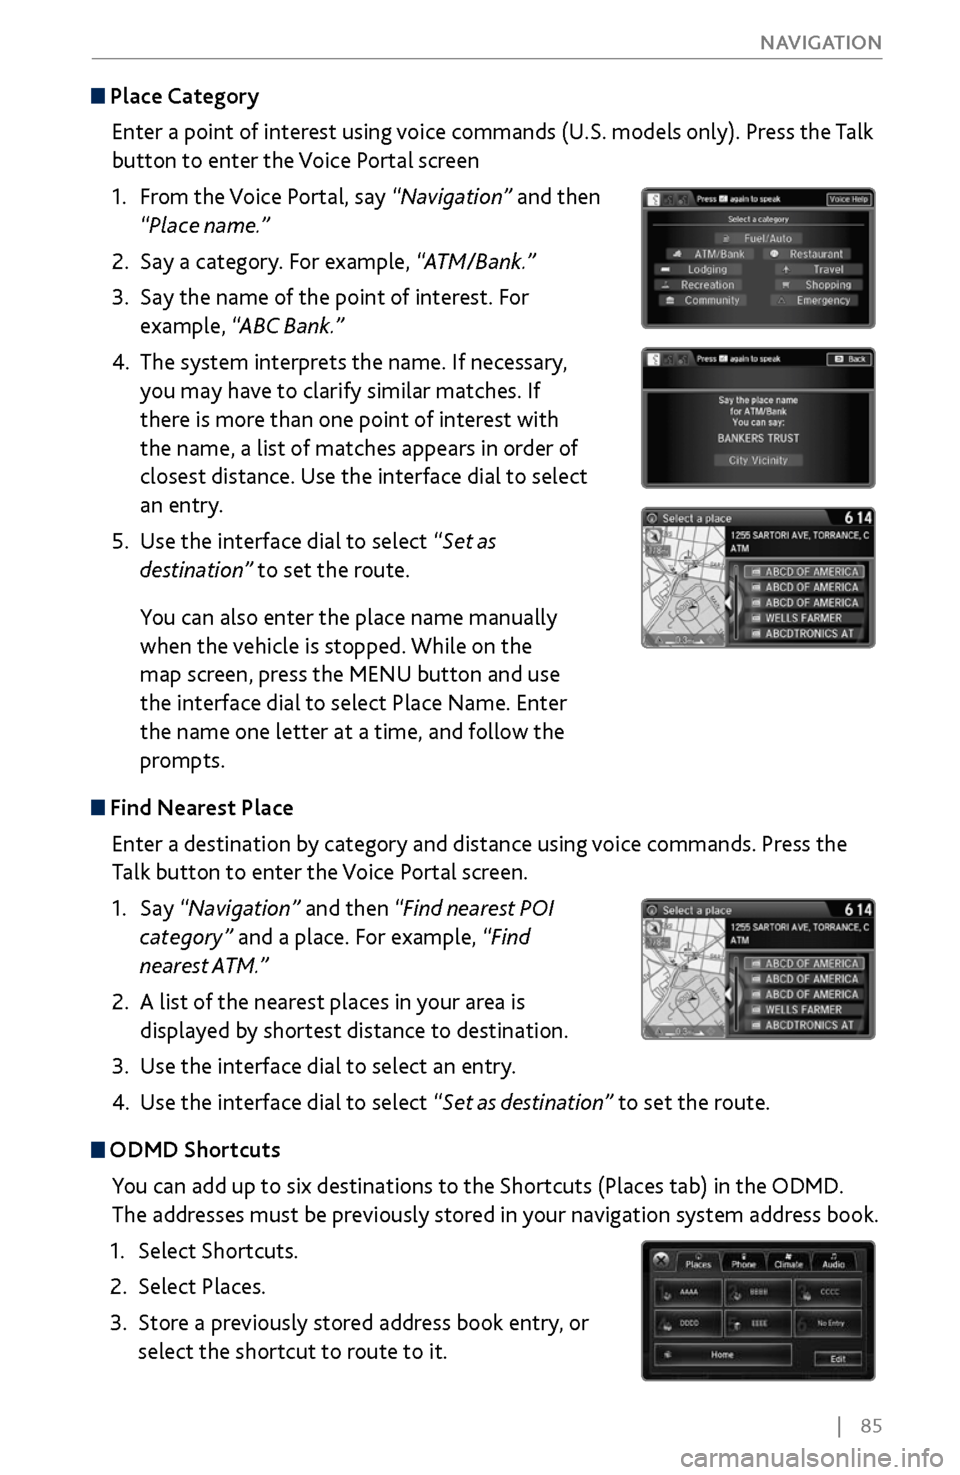
Place Category
Enter a point of interest using voice commands (U.S. models only). Press the Talk
button to enter the Voice Portal screen
1.
From
the Voice Portal, say “Navigation” and then
“Place name.”
2.
Say a category. For example,
“ATM/Bank.”
3.
Say the name of the point of
interest. For
example, “ABC Bank.”
4.
The system interprets the name. If necessary
,
you may have to clarify similar matches. If
there is more than one point of interest with
the name, a list of matches appears in order of
closest distance. Use the interface dial to select
an entry.
5.
Use the interface dial to select “
Set as
destination” to set the route.
You can also enter the place name manually
when the vehicle is stopped. While on the
map screen, press the MENU button and use
the interface dial to select Place Name. Enter
the name one letter at a time, and follow the
prompts.
Find Nearest Place
Enter a destination by category and distance using voice commands. Press the
Talk button to enter the Voice Portal screen.
1.
Say “Navigation
” and then “Find nearest POI
category” and a place. For example, “Find
nearest ATM.”
2.
A list of the near
est places in your area is
displayed by shortest distance to destination.
3.
Use the interface dial
to select an entry.
4.
Use the interface dial to select “
Set as destination” to set the route.
ODMD Shortcuts
You can add up to six destinations to the Shortcuts (Places tab) in the ODMD.
The addresses must be previously stored in your navigation system address book.
1.
Select Shortcuts.
2.
Select Places.
3.
Store a previousl
y stored address book entry, or
select the shortcut to route to it.