towing Acura MDX 2017 Owner's Guide
[x] Cancel search | Manufacturer: ACURA, Model Year: 2017, Model line: MDX, Model: Acura MDX 2017Pages: 170, PDF Size: 12.43 MB
Page 5 of 170
This Owner’s Guide is intended to help you quickly get acquainted with your
2017 Acura MDX. It provides basic information and instructions on technology and
convenience features, as well as emergency procedures and how to get assistance.
This guide is for vehicles sold in the United States and Canada. It covers all MDX
models, so you may find descriptions of features and equipment that are not in
your vehicle. Images throughout this guide are from U.S. vehicles and represent
features and equipment that are available on some, but not all, models.
This guide is not intended to be a substitute for the Owner’s Manual. The Owner
Information CD enclosed in your glove box kit includes the Owner’s Manual,
Navigation Manual, and vehicle and tire warranties in electronic format. This
information can be viewed on a computer (PC
or Mac platform) and saved or
printed
for your reference. You can also visit owners.acura.com (U.S.) or myacura.ca
(Canada) to view the complete and most current information.
If you are the first registered owner of your vehicle, you may request a
complimentary printed copy of the Owner’s Manual, Navigation Manual, or Vehicle
Warranty up to six months after vehicle purchase. To request a copy, visit owners.
acura.com (U.S.) or myacura.ca (Canada) and create or log in to your account. In
Canada, please request a copy from your Acura dealer.
American Honda Motor Co., Inc., strives to be proactive in protecting our
environment and natural resources. By using electronic delivery for a considerable
portion of the information typically found in a vehicle owner’s manual, we are
further reducing our impact on the environment.
Acura Total Luxury Care Roadside Assistance
Your Acura TLC Roadside Assistance representative is here to help you
24 hours a day, 7 days a week. Under your 4-year/50,000-mile (80,000-km)
warranty, the following benefits are available:
- Towing services — full cost of towing to the closest Acura dealer
- Roadside assistance — jump starting, fuel delivery, lockout, and flat tire
- Trip planning — detailed trip routing, emergency services, and more
Call (800) 594-8500 (U.S.) or (800) 565-7587 (Canada)
Acura Client Relations
Your authorized Acura dealer should be able to answer any questions you have
about your vehicle. However, if you are dissatisfied with the information you
receive, you can call Acura Client Relations (see page 155).Call (800) 382-2238 (U.S.) or (888) 922-8729 (Canada)
INTRODUCTION
Page 7 of 170
*if equipped
DRIVING
................................................................
88
Before Driving ......................................................... 88
Maximum Load Limit ............................................ 90
Towing
a Trailer
......................................................
92
Remote
Engine Start*
...........................................
96
Starting to Driv
e
......................................................
97
Shifting ..................................................................... 98
Auto Idle Stop* ..................................................... 100
Integrated Dynamics S
ystem
..............................101
Vehicle Stability Assist (VSA®)
........................... 101
Braking ................................................................... 102
Adaptiv
e Cruise Control (ACC)
with Low Speed
F
ollow
.............................................................
104
Forwar
d Collision Warning (FCW) with
Pedestrian Detection
.................................... 107
Collision Mitigation Braking
System™
(CMBS™)
....................................................... 108
Lane Departure
Warning (LDW)
.........................
110
Lane Keeping
Assist System (LKAS)
...................
111
Road Departur
e Mitigation (RDM)
....................
112
Blind Spot Information (BSI)*
............................. 113
Parking Sensor System*
....................................... 114
Multi-View
Rear Camera*
...................................
115
Cross T
raffic Monitor*
..........................................
116
Surround View
Camera*
......................................
117
Refueling ................................................................. 119
HANDLING THE UNEXPECTED ........................
120
Keyless Access Remote Battery Strength
........ 120
Jump Starting ........................................................ 120
Emergency
Engine Stop
.......................................
121
Overheating ........................................................... 122
Tire Pr
essure Monitoring System (TPMS)
........
123
Handling a Flat Tir
e
..............................................
126
Changing a Flat Tir
e*
...........................................
126
Tire R
epair Kit*
.....................................................
130
Fuse Locations ....................................................... 131
Emer
gency Towing
...............................................
135MAINTENANCE
..................................................
136
Safety Precautions ............................................... 136
Maintenance Minder™ ......................................... 137
Under the
Hood
.................................................... 139
Engine Oil
.............................................................. 140
Engine Coolant ..................................................... 142
Window Washer
Fluid
.........................................
143
Checking the Battery ........................................... 143
Changing Wiper Blades ....................................... 144
Tire Information ................................................... 146
Tire Labeling .......................................................... 149
DOT
Tire Quality Grading
...................................
150
Testing
of Readiness Codes
.................................
152
SPECIFICATIONS
................................................ 153
CLIENT INFORMATION
..................................... 154
Fr
equently Asked Questions/Troubleshooting
154
Contact Us .............................................................. 155
Acura
Total Luxury Care Roadside Assistance
156
Warranty Co
verages
............................................
156
EPA C
ontact Information
....................................
156
INDEX...................................................................
159
Page 97 of 170
90 |
DRIVING
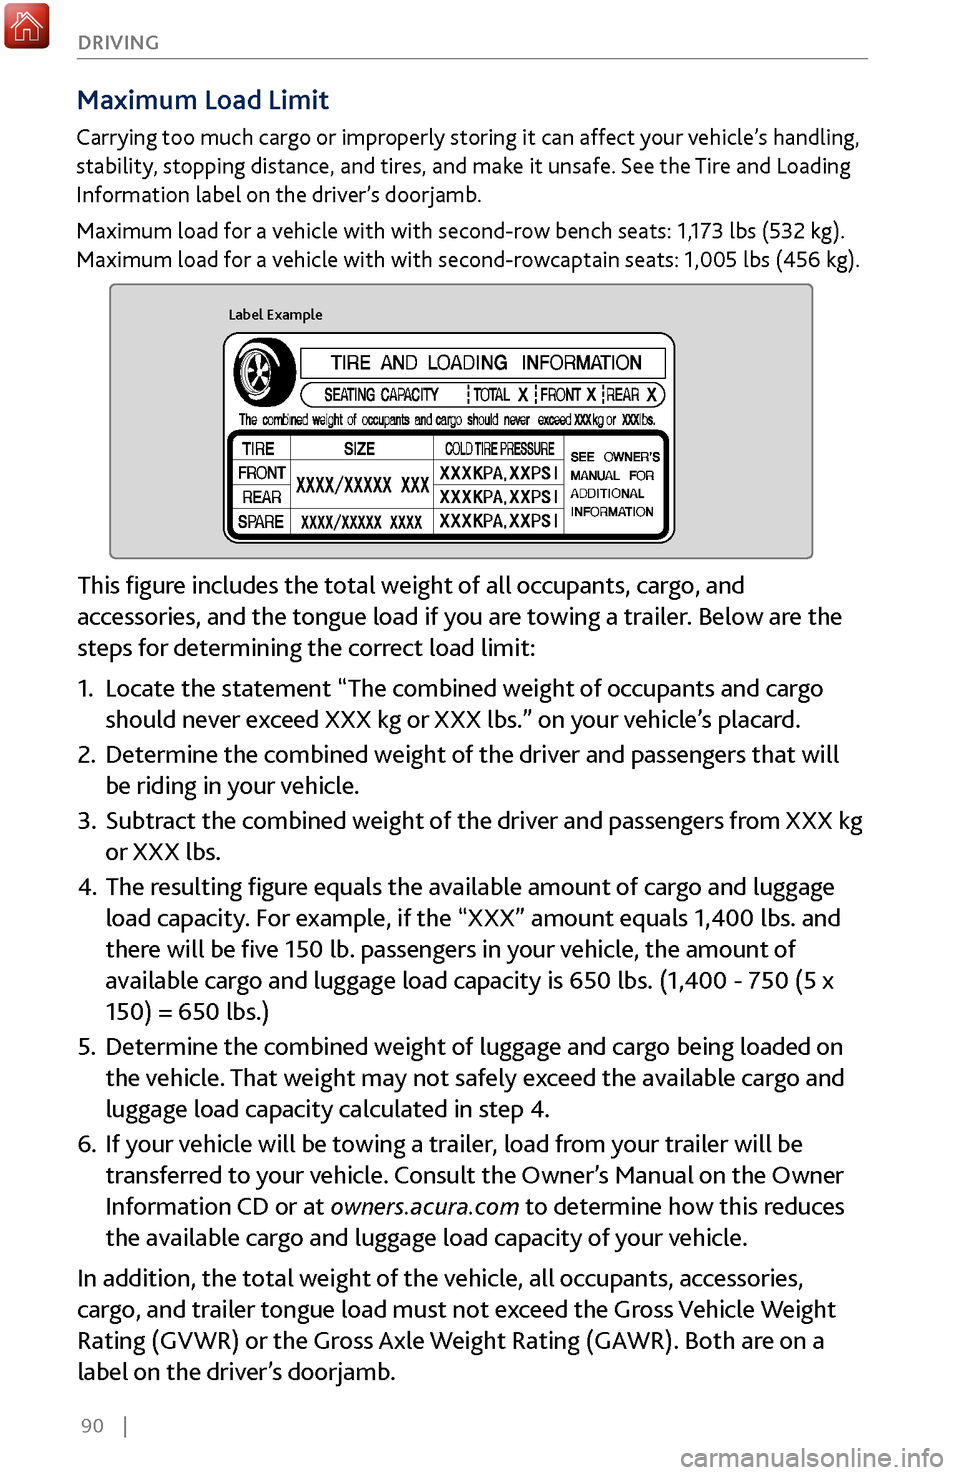
Maximum Load Limit
Carrying too much cargo or improperly storing it can affect your vehicle’s handling,
stability, stopping distance, and tires, and make it unsafe. See the Tire and Loading
Information label on the driver’s doorjamb.
Maximum load for a vehicle with with second-row bench seats: 1,173 lbs (532 kg).
Maximum load for a vehicle with with second-rowcaptain seats: 1,005 lbs (456 kg).
Label Example
This figure includes the total weight of all occupants, cargo, and
accessories, and the tongue load if you are towing a trailer. Below are the
steps for determining the correct load limit:
1.
Locate the statement “The combined
weight of occupants and cargo
should never exceed XXX kg or XXX lbs.” on your vehicle’s placard.
2.
Determine the combined weight of the driv
er and passengers that will
be riding in your vehicle.
3.
Subtract the combined weight of the driv
er and passengers from XXX kg
or XXX lbs.
4.
The resulting figur
e equals the available amount of cargo and luggage
load capacity. For example, if the “XXX” amount equals 1,400 lbs. and
there will be five 150 lb. passengers in your vehicle, the amount of
available cargo and luggage load capacity is 650 lbs. (1,400 - 750 (5 x
150) = 650 lbs.)
5.
Determine the combined weight
of luggage and cargo being loaded on
the vehicle. That weight may not safely exceed the available cargo and
luggage load capacity calculated in step 4.
6.
If your v
ehicle will be towing a trailer, load from your trailer will be
transferred to your vehicle. Consult the Owner’s Manual on the Owner
Information CD or at owners.acura.com to determine how this reduces
the available cargo and luggage load capacity of your vehicle.
In addition, the total weight of the vehicle, all occupants, accessories,
cargo, and trailer tongue load must not exceed the Gross Vehicle Weight
Rating (GVWR) or the Gross Axle Weight Rating (GAWR). Both are on a
label on the driver’s doorjamb.
Page 99 of 170

92 |
DRIVING
Towing a Trailer
Your vehicle can tow a trailer if you carefully observe the load limits, use the proper
equipment, and follow the towing guidelines. An accessory front towing grille is
required whenever a trailer is towed. You can get the accessory grille at a dealer.
See the Owner’s Manual on the Owner Information CD or visit owners.acura.com
for more information.
Towing
Load Limits
Total trailer weight
Do not exceed the maximum allowable weight of
the trailer, cargo, and everything in or on it shown
in the table below.
Towing loads in excess of this can seriously affect
vehicle handling and performance and can damage
the engine and drivetrain.
Total load
Number of
occupants
AWD models with
ATF cooler
AWD models
without ATF cooler2WD model s
25,000 lbs (2,268 kg )3,500 lbs (1,588 kg)3,500 lbs (1,588 kg)
34,750 lbs (2,155 kg)3,250 lbs (1,474 kg)3,250 lbs (1,474 kg)
44,500 lbs (2,041 kg )3,000 lbs (1,361 kg)3,000 lbs (1,361 kg)
54,250 lbs (1,928 kg)2,750 lbs (1,247 kg)2,750 lbs (1,247 kg)
64,000 lbs (1,814 kg )2,500 lbs (1,134 kg)2,500 lbs (1,134 kg)
7Towing not recommended
Each weight limit is calculated based on the following conditions:
•
Occupants fill seats
from the front of the vehicle to the back.
•
Each occupant weights 150 lbs (68 kg).
•
Each occupant has 15 lbs (7 kg) of car
go in the cargo area.
Any additional weight, cargo or accessories reduce the maximum trailer weight
and maximum tongue load.
Exceeding any load limit or improperly loading your vehicle and trailer can
cause a crash in which you can be seriously hurt or killed.
Check the loading of your vehicle and trailer carefully before starting to
drive.
WARNING
Page 100 of 170
| 93
DRIVING
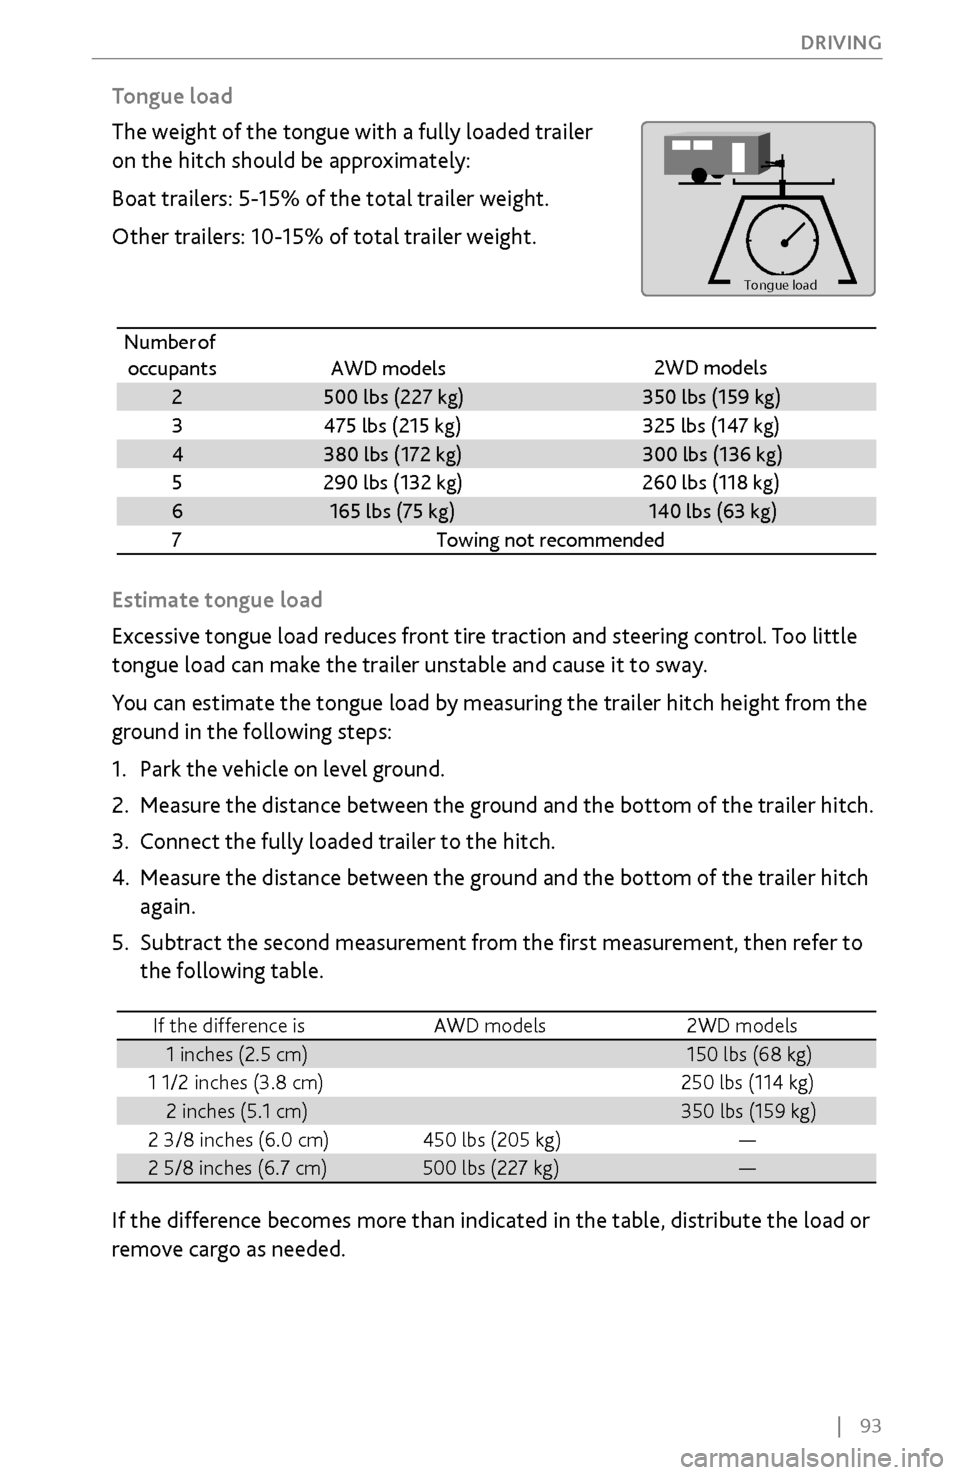
Tongue load
The weight of the tongue with a fully loaded trailer
on the hitch should be approximately:
Boat trailers: 5-15% of the total trailer weight.
Other trailers: 10-15% of total trailer weight.
To
ng ue Loa dTongue load
Number of
occupant s
AWD models 2WD model s
2500 lbs (227 kg)350 lbs (159 kg )
3475 lbs (215 kg)325 lbs (147 kg)
4380 lbs (172 kg)300 lbs (136 kg)
5290 lbs (132 kg)260 lbs (118 kg)
6165 lbs (75 kg)140 lbs (63 kg)
7Towing not recommended
Estimate tongue load
Excessive tongue load reduces front tire traction and steering control. Too little
tongue load can make the trailer unstable and cause it to sway.
You can estimate the tongue load by measuring the trailer hitch height from the
ground in the following steps:
1.
Park the v
ehicle on level ground.
2.
Measure the distance between the
ground and the bottom of the trailer hitch.
3.
Connect the full
y loaded trailer to the hitch.
4.
Measure the distance between the
ground and the bottom of the trailer hitch
again.
5.
Subtract the second measur
ement from the first measurement, then refer to
the following table.
If the difference isAWD model s2WD models
1 inches (2.5 cm)150 lbs (68 kg)
1 1/2 inches (3.8 cm )250 lbs (114 kg)
2 inches (5.1 cm)350 lbs (159 kg)
2 3/8 inches (6.0 cm )450 lbs (205 kg)—
2 5/8 inches (6.7 cm )500 lbs (227 kg)—
If the difference becomes more than indicated in the table, distribute the load or
remove cargo as needed.
Page 102 of 170
| 95
DRIVING
Pre-Tow Checklist
When preparing to tow, and before driving away, be sure to check the following:
•
Avoid
towing a trailer during your vehicle’s first 600 miles (1,000 km).
•
The vehicle and
trailer have been properly serviced and are in good condition.
Lights and brakes work properly, and the tires are properly inflated.
•
All weights and loads are
within limits. Never exceed the gross weight ratings.
•
When towing more
than 3,500 lbs (1,590 kg), use of gasoline with an octane
rating of 91 or higher is recommended.
•
Check if all loads are within limits at a public scale (see page 94). If a pu
blic
scale is not available, add the estimated weight of your cargo load to the
weight of the trailer (as quoted by the manufacturer) and the tongue load.
•
The hitch, safety chains, and any other attachments ar
e secure.
•
All items in or on
the trailer are properly secured and cannot shift while you
drive.
Exceeding any load limit or improperly loading your vehicle and trailer can
cause a crash in which you can be seriously hurt or killed.
Check the loading of your vehicle and trailer carefully before starting to
drive.
WARNING
Page 118 of 170
| 111
DRIVING
Lane Keeping Assist System (LKAS)
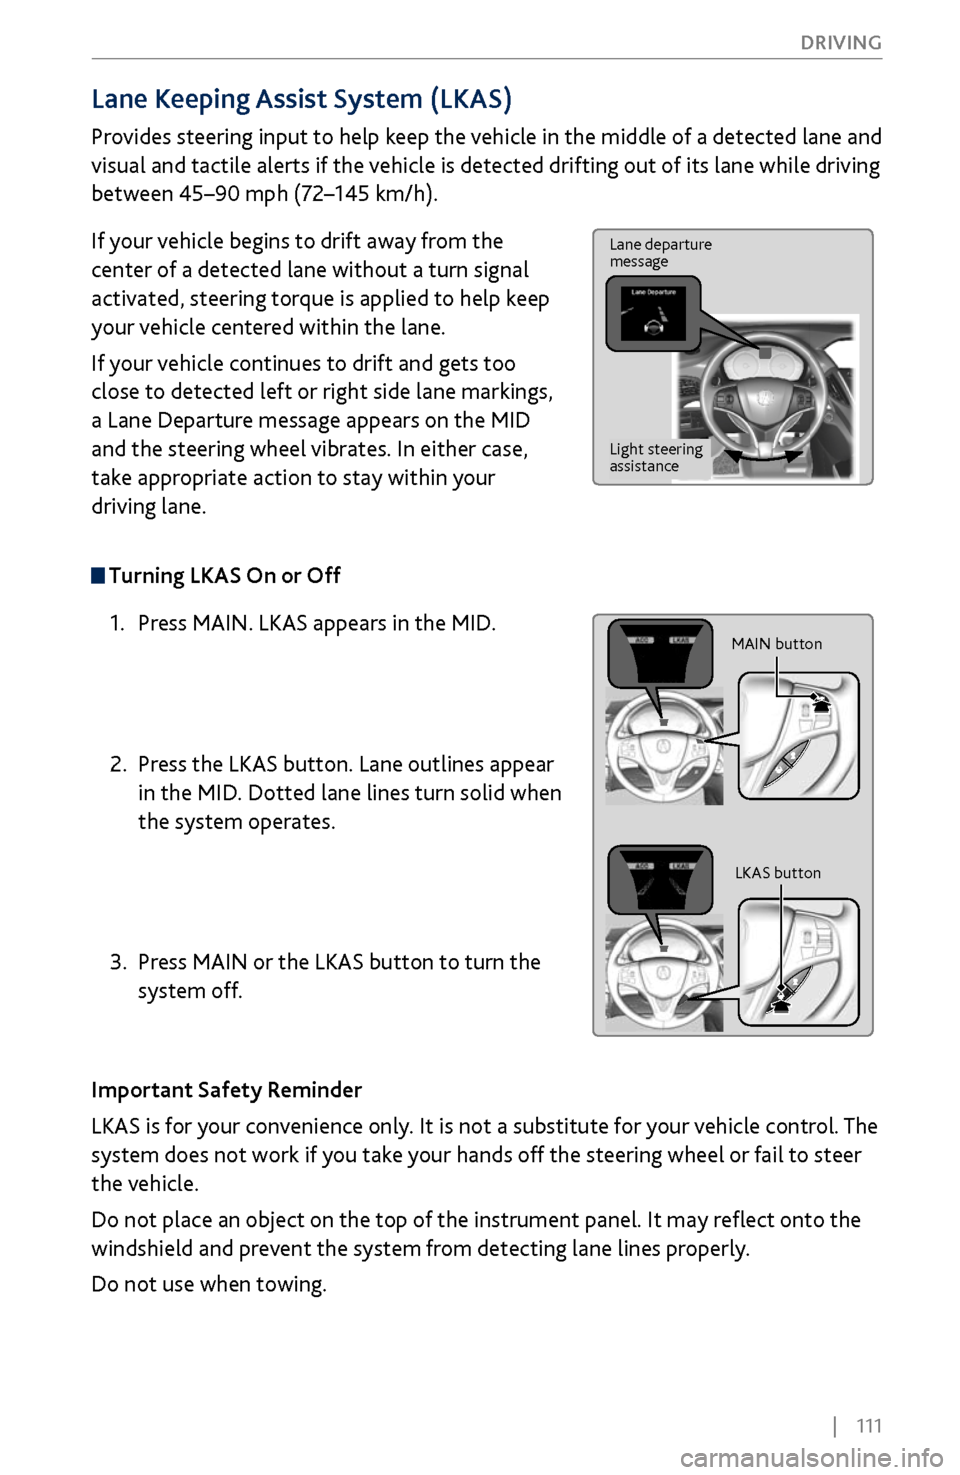
Provides steering input to help keep the vehicle in the middle of a detected lane and
visual and tactile alerts if the vehicle is detected drifting out of its lane while driving
between 45–90 mph (72–145 km/h).
If your vehicle begins to drift away from the
center of a detected lane without a turn signal
activated, steering torque is applied to help keep
your vehicle centered within the lane.
If your vehicle continues to drift and gets too
close to detected left or right side lane markings,
a Lane Departure message appears on the MID
and the steering wheel vibrates. In either case,
take appropriate action to stay within your
driving lane.
Turning LKAS On or Off
1.
Press MAIN. LKAS appears in the MID
.
2.
Press the LKAS button. Lane
outlines appear
in the MID. Dotted lane lines turn solid when
the system operates.
3.
Press MAIN or the
LKAS button to turn the
system off.
Important Safety Reminder
LKAS is for your convenience only. It is not a substitute for your vehicle control. The
system does not work if you take your hands off the steering wheel or fail to steer
the vehicle.
Do not place an object on the top of the instrument panel. It may reflect onto the
windshield and prevent the system from detecting lane lines properly.
Do not use when towing.
Lane departure
message
Light steering
assistance
MAIN button
LKAS button
Page 135 of 170
128 |
HANDLING THE UNEXPECTED
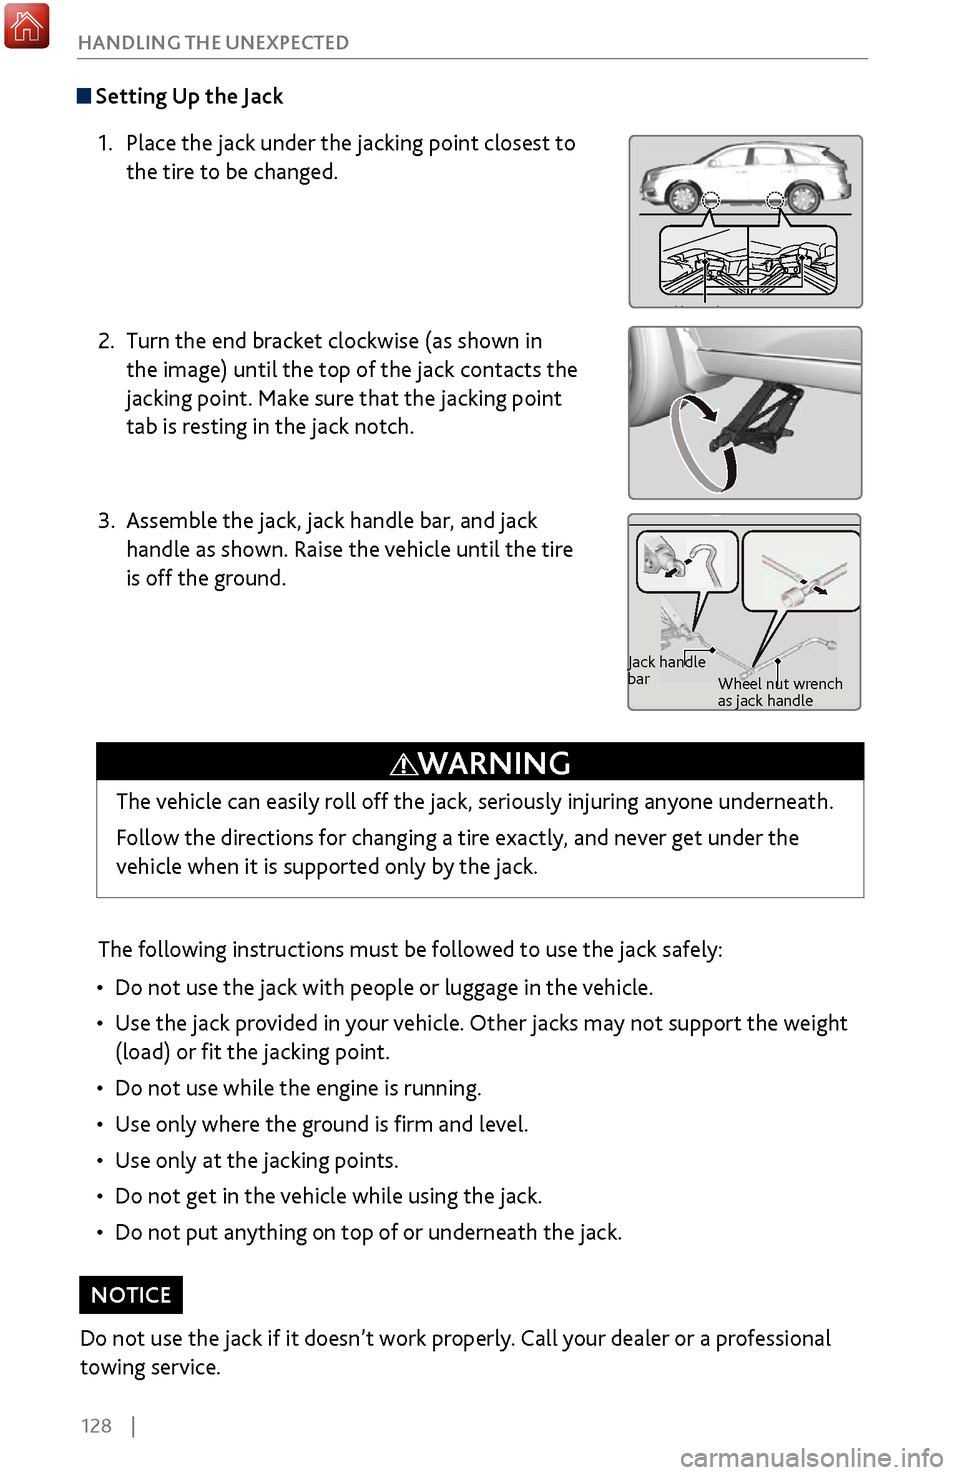
Setting Up the Jack
1.
Place the jack under the jacking point closest
to
the tire to be changed.
2.
Turn the end bracket clockwise (as shown in
the
image) until the top of the jack contacts the
jacking point. Make sure that the jacking point
tab is resting in the jack notch.
3.
Assemble the jack, jack handle bar, and jack
handle as shown. Raise
the vehicle until the tire
is off the ground.
The following instructions must be followed to use the jack safely:
•
Do not use the jack with people
or luggage in the vehicle.
•
Use the jack pro
vided in your vehicle. Other jacks may not support the weight
(load) or fit the jacking point.
•
Do not use while the engine is running.
•
Use only
where the ground is firm and level.
•
Use only at
the jacking points.
•
Do not get in the v
ehicle while using the jack.
•
Do not put
anything on top of or underneath the jack.
Jacking PointsJacking PointsJacking Points
Jack handle
barWheel nut wrench
as jack handle
The vehicle can easily roll off the jack, seriously injuring anyone underneath.
Follow the directions for changing a tire exactly, and never get under the
vehicle when it is supported only by the jack.
WARNING
Do not use the jack if it doesn’t work properly. Call your dealer or a professional
towing service.
NOTICE
Page 142 of 170
| 135
HANDLING THE UNEXPECTED
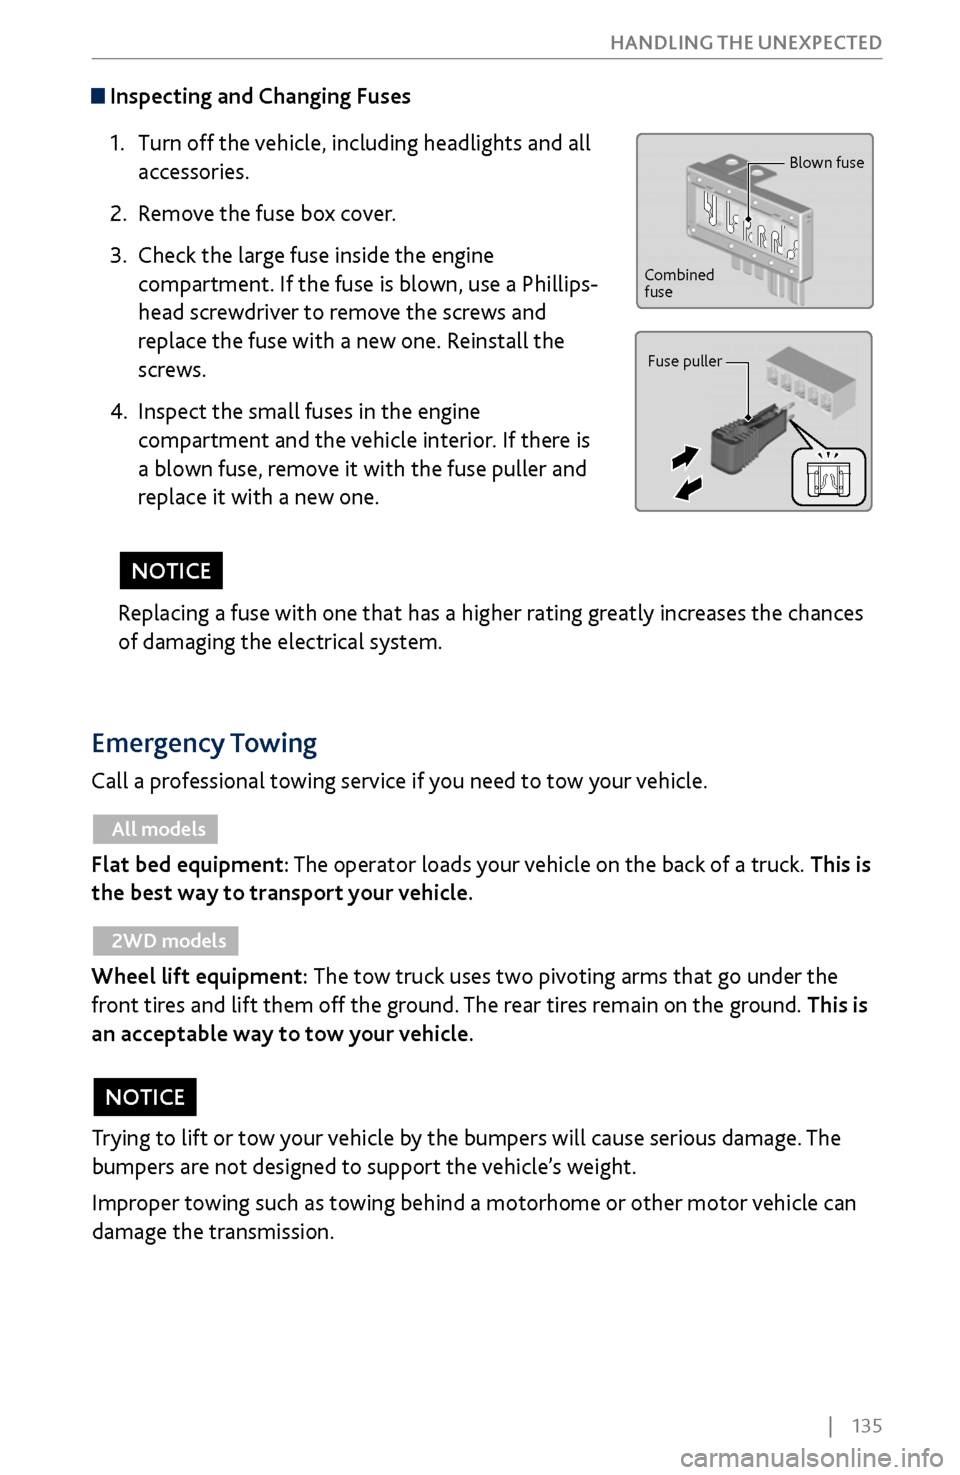
Inspecting and Changing Fuses
1.
Turn off the
vehicle, including headlights and all
accessories.
2.
Remov
e the fuse box cover.
3.
Check the large
fuse inside the engine
compartment. If the fuse is blown, use a Phillips-
head screwdriver to remove the screws and
replace the fuse with a new one. Reinstall the
screws.
4.
Inspect the small fuses in
the engine
compartment and the vehicle interior. If there is
a blown fuse, remove it with the fuse puller and
replace it with a new one.
Blown fuse
Combined
fuse Fuse puller
Replacing a fuse with one that has a higher rating greatly increases the chances
of damaging the electrical system.
NOTICE
Emergency Towing
Call a professional towing service if you need to tow your vehicle.
All models
Flat bed equipment: The operator loads your vehicle on the back of a truck. This is
the best way to transport your vehicle.
2WD models
Wheel lift equipment: The tow truck uses two pivoting arms that go under the
front tires and lift them off the ground. The rear tires remain on the ground. This is
an acceptable way to tow your vehicle.
Trying to lift or tow your vehicle by the bumpers will cause serious damage. The
bumpers are not designed to support the vehicle’s weight.
Improper towing such as towing behind a motorhome or other motor vehicle can
damage the transmission.
NOTICE
Page 145 of 170
138 |
MAINTENANCE
*if equipped
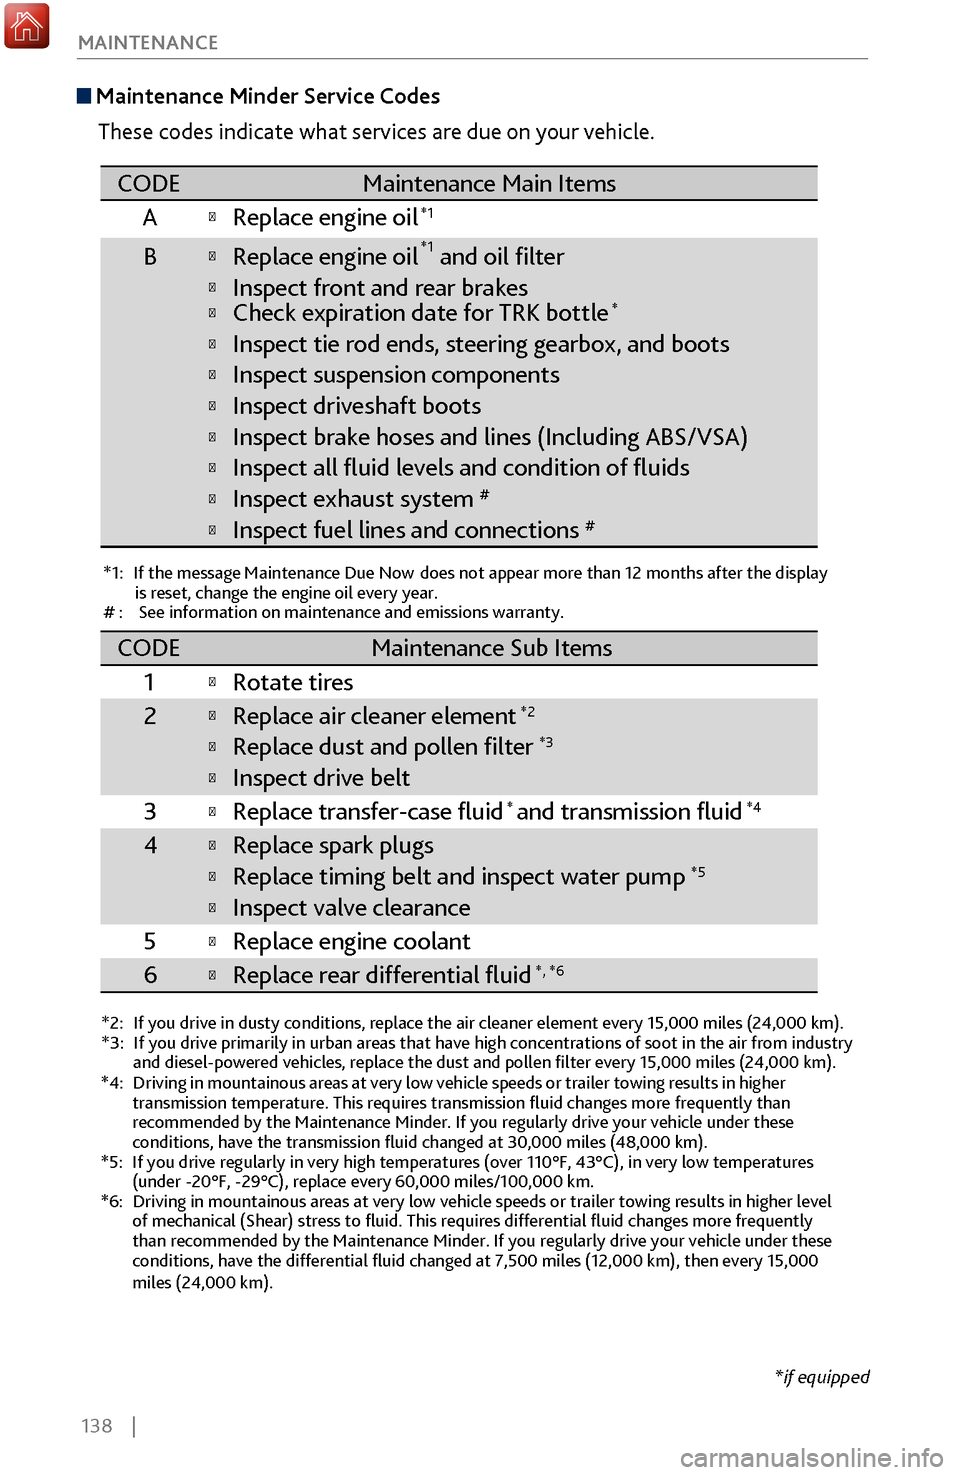
Maintenance Minder
Service Codes
These codes indicate what services are due on your vehicle.
*1: If the message Maintenance Due Now does not appear more than 12 months after the display is reset, change the engine oil every year.
#: See information on maintenance and emissions warranty.
*2:If you drive in dusty conditions, replace the air cleaner element every \
15,000 miles (24,000 km).*3:If you drive primarily in urban areas that have high concentrations of s\
oot in the air from industry and diesel-powered vehicles, replace the dust and pollen �lter every \
15,000 miles (24,000 km).
CODEMaintenance Main Items
A
�Replace engine oi l*1
B�Replace engine oil*1 and oil �lter
�Inspect front and rear brakes�Check expiration date for TRK bottle*
�Inspect tie rod ends, steering gearbox, and boots
�Inspect suspension component s
�Inspect driveshaft boots
�Inspect brake hoses and lines (Including ABS/VSA)
�Inspect all �uid levels and condition of �uids
�Inspect exhaust system#
�Inspect fuel lines and connections#
*4:Driving in mountainous areas at very low vehicle speeds or trailer towing results in higher
transmission temperature. This requires transmission �uid changes mor\
e frequently than
recommended by the Maintenance Minder. If you regularly drive your vehic\
le under these
conditions, have the transmission �uid changed at 30,000 miles (48,0\
00 km).
*5:If you drive regularly in very high temperatures (over 110°F, 43°\
C), in very low temperatures
(under -20°F, -29°C), replace every 60,000 miles/100,000 km.
*6:Driving in mountainous areas at very low vehicle speeds or trailer towin\
g results in higher level
of mechanical (Shear) stress to �uid. This requires differential �\
uid changes more frequently
than recommended by the Maintenance Minder. If you regularly drive your \
vehicle under these
conditions, have the differential �uid changed at 7,500 miles (12,00\
0 km), then every 15,000
miles (24,000 km).
CODEMaintenance Sub Items
1
�Rotate tires
2�Replace air cleaner element*2
�Replace dust and pollen �lter*3
�Inspect drive belt
3
�Replace transfer-case �uid and transmission �ui d*4
4�Replace spark plugs
�Replace timing belt and inspect water pum p*5
�Inspect valve clearance
5
�Replace engine coolant
6�Replace rear differential �uid*, *6
*