replace Acura MDX 2018 Workshop Manual
[x] Cancel search | Manufacturer: ACURA, Model Year: 2018, Model line: MDX, Model: Acura MDX 2018Pages: 697, PDF Size: 38.45 MB
Page 617 of 697

616
uuRemote Control and Wireless Headphone Care*uReplacing the Battery
Maintenance
If there is no sound coming from th e wireless headphone, replace the battery.
1. Remove the screw.
2. Open the cover.
3. Make sure to replace the battery with the
correct polarity.
■Wireless Headphone
Battery type: AAA
Cover
Battery
18 ACURA MDX-31TZ56400.book 616 ページ 2017年8月23日 水曜日 午後4時1分
Page 618 of 697

617
Maintenance
Climate Control System Maintenance
Dust and Pollen Filter
The climate control system is equipped with a dust and pollen filter that collects
pollen, dust, and other debris in the air. The Maintenance MinderTM messages will let
you know when to replace the filter.
We recommend that you replace the dust an d pollen filter sooner when using your
vehicle in areas with high concentrations of dust.
1 Dust and Pollen Filter
If the airflow from the climate control system
deteriorates noticeably, and the windows fog up
easily, the filter may need to be replaced. Please
contact a dealer for replacement.
18 ACURA MDX-31TZ56400.book 617 ページ 2017年8月23日 水曜日 午後4時1分
Page 628 of 697

627Continued
Handling the Unexpected
If a Tire Goes Flat
Changing a Flat Tire*
If a tire goes flat while driving, grasp the steering wheel firmly, and brake gradually
to reduce speed. Then, stop in a safe plac e. Replace the flat tire with a compact
spare tire. Go to a dealer as soon as possib le to have the full-size tire repaired or
replaced.
1. Park the vehicle on firm, level, non-slip pery surface and apply the parking brake.
2. Change the gear position to
(P.
3. Turn on the hazard warning lights an d set the power mode to VEHICLE OFF
(LOCK).
1 Changing a Flat Tire*
Periodically check the tire pressure of the compact
spare. It should be set to the specified pressure.
Specified Pressure: 60 psi (420 kPa, 4.2 kgf/cm
2)
When driving with the compact spare tire, keep the
vehicle speed under 50 mph (80 km/h). Replace with
a full-size tire as soon as possible.
The compact spare tire and wheel in your vehicle are
specifically for this model. Do not use them with
another vehicle. Do not us e another type of compact
spare tire or wheel with your vehicle.
Do not mount tire chains on a compact spare tire.
If a chain-mounted front tire goes flat, remove one of
the full-size rear tires and replace it with the compact
spare tire. Remove the flat front tire and replace it
with the full-size tire that was removed from the rear.
Mount the tire chains on the front tire.
Do not use a puncture-repairing agent other than the
one provided in the kit that came with your vehicle (if
equipped). If a different agent is used, you may
permanently damage the tire pressure sensor.
* Not available on all models
18 ACURA MDX-31TZ56400.book 627 ページ 2017年8月23日 水曜日 午後4時1分
Page 629 of 697

uuIf a Tire Goes Flat uChanging a Flat Tire*
628
Handling the Unexpected
1. Push the rear edge of the handle on the
floor lid and open the lid.
2. Take out the cargo floor box.
3. Take the jack, wheel nut wrench, and jack
handle bar out of the tool case.
■Getting Ready to Replace the Flat Tire1Changing a Flat Tire*
NOTICE
Do not use the jack if it doesn’t work properly. Call
your dealer or a prof essional towing service.
The wheel nut wrench supplied with your vehicle is
specially adapted to fit th e holder shaft. Do not use
any other tool.
The subwoofer is located on the rear right side. Do
not store anything in th is area. Doing so may
compromise vehicle audio performance.
Handle
Cargo Floor Box
Tool Case
* Not available on all models
18 ACURA MDX-31TZ56400.book 628 ページ 2017年8月23日 水曜日 午後4時1分
Page 631 of 697

630
uuIf a Tire Goes Flat uChanging a Flat Tire*
Handling the Unexpected
8. Place a wheel block or rock in front and
rear of the wheel diagonal to the flat tire.
9. Place the compact spare tire (wheel side
up) under the vehicle body, near the tire
that needs to be replaced.
10. Loosen each wheel nut about one turn
using the wheel nut wrench.
Wheel
Blocks
The tire to be replaced.
18 ACURA MDX-31TZ56400.book 630 ページ 2017年8月23日 水曜日 午後4時1分
Page 634 of 697

633
uuIf a Tire Goes Flat uChanging a Flat Tire*
Handling the Unexpected
1. Remove the center cap.
2. Place the flat tire face up under the hoist.
3. Insert the hoist bracke t into the center hole
of the flat tire.
4. Turn the wheel nut wrench with the jack
handle bar clockwise until the flat tire rests
against the underbody of the vehicle and
you hear the hoist click.
5. Securely store the jack and wheel nut
wrench and jack handle bar back in the tool
case. Store the case in the cargo area.
If you replace a flat tire wi th the spare tire, the low tire pressure/TPMS indicator comes
on while you are driving. After driving for a few miles (kilometers), the indicator will
start blinking for a short time and then stay on. Tire Pressure Monitor Problem
appears on the multi-information display (MID), but this is normal.
If you replace the tire with a specified regular tire, the warning message on the MID
and the low tire pressure/TPMS indicator will go off after a few miles (kilometers).
■Storing the Flat Tire1Storing the Flat Tire
3WARNING
Loose items can fly around the interior in a
crash and can seriously injure the
occupants.
Store the jack and tools securely before
driving.
Center Cap
Wheel Nut Wrench Jack Handle Bar
■TPMS and the Spare Tire1
TPMS and the Spare Tire
The system cannot monitor th e pressure of the spare
tire. Manually check the spare tire pressure to be sure
that it is correct.
Use the TPMS specific wheels. Each is equipped with
a tire pressure sensor mount ed inside the tire behind
the valve stem.
18 ACURA MDX-31TZ56400.book 633 ページ 2017年8月23日 水曜日 午後4時1分
Page 640 of 697

Continued639
uuIf a Tire Goes Flat uTemporarily Repairing a Flat Tire*
Handling the Unexpected
7. Press the inflator switch to turn on the
compressor.
u The compressor starts injecting sealant
and air into the tire.
u When the sealant injection is complete,
continue to add air.
8. After the air pressure reaches 35 psi (240
kPa), turn off the kit.
u To check the pressure, occasionally turn
off the compressor and read the gauge.
9. Unplug the power plug from the accessory
power socket.
10. Unscrew the sealant/ai r hose from the tire
valve stem. Reinstall the valve cap.
11. Press the pressure relief button until the
gauge returns to 0 psi (0 kPa).Pressure Gauge
ON
OFF
1Injecting Sealant and Air
If the required air pressure is not reached within 10
minutes, the tire may be too severely damaged for
the kit to provide the necessa ry seal, and your vehicle
will need to be towed.
See an Acura dealer for a replacement sealant bottle
and proper disposal of an empty bottle.
Sealant/Air Hose
Valve Stem
Pressure Relief Button
18 ACURA MDX-31TZ56400.book 639 ページ 2017年8月23日 水曜日 午後4時1分
Page 661 of 697

660
uuFuses uFuse Locations
Handling the Unexpected
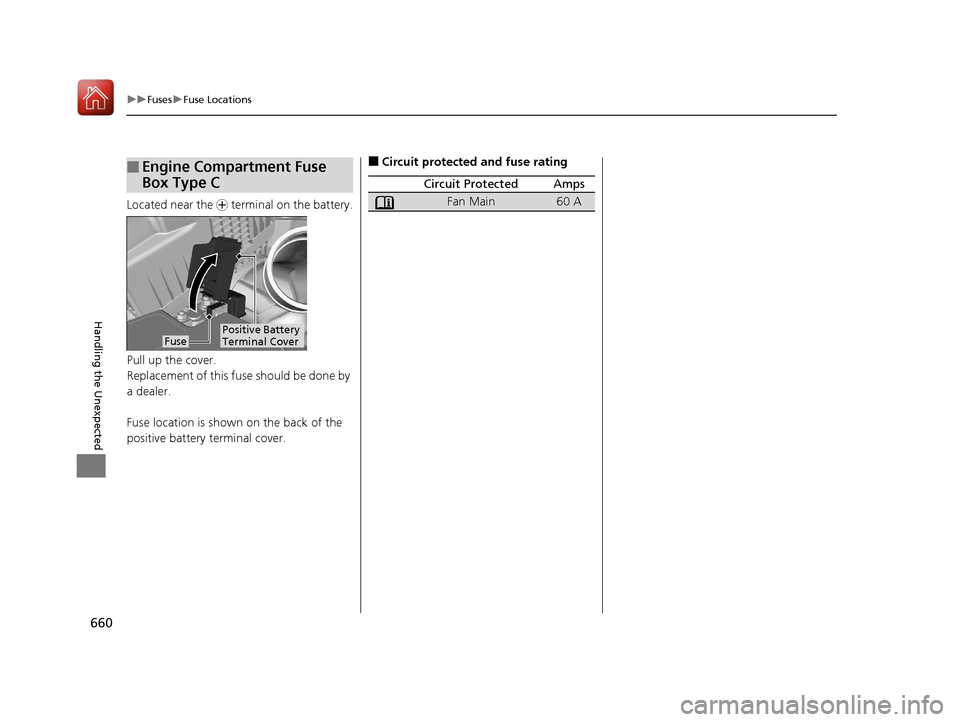
Located near the + terminal on the battery.
Pull up the cover.
Replacement of this fuse should be done by
a dealer.
Fuse location is shown on the back of the
positive battery terminal cover.
■Engine Compartment Fuse
Box Type C
FusePositive Battery
Terminal Cover
■Circuit protected and fuse rating
Circuit ProtectedAmps
Fan Main60 A
18 ACURA MDX-31TZ56400.book 660 ページ 2017年8月23日 水曜日 午後4時1分
Page 666 of 697

665
uuFuses uInspecting and Changing Fuses
Handling the Unexpected
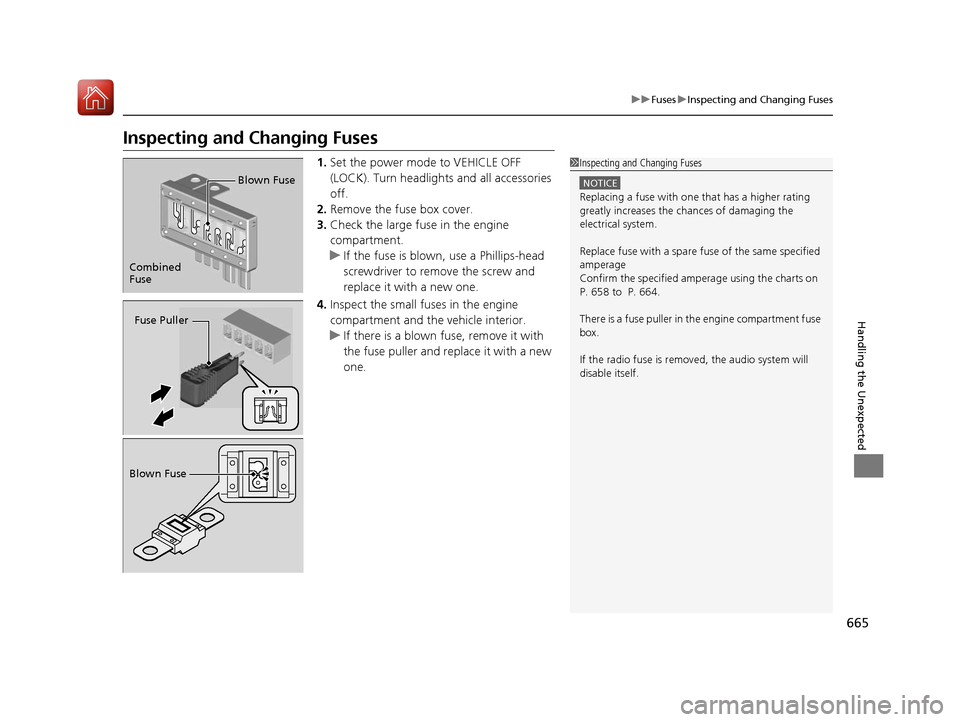
Inspecting and Changing Fuses
1. Set the power mode to VEHICLE OFF
(LOCK). Turn headlights and all accessories
off.
2. Remove the fuse box cover.
3. Check the large fuse in the engine
compartment.
u If the fuse is blown, use a Phillips-head
screwdriver to remove the screw and
replace it with a new one.
4. Inspect the small fu ses in the engine
compartment and the vehicle interior.
u If there is a blown fuse, remove it with
the fuse puller and replace it with a new
one.1Inspecting and Changing Fuses
NOTICE
Replacing a fuse with on e that has a higher rating
greatly increases the chances of damaging the
electrical system.
Replace fuse with a spare fuse of the same specified
amperage
Confirm the specified amperage using the charts on
P. 658 to P. 664.
There is a fuse puller in the engine compartment fuse
box.
If the radio fuse is remove d, the audio system will
disable itself.
Combined
Fuse Blown Fuse
Fuse Puller
Blown Fuse
18 ACURA MDX-31TZ56400.book 665 ページ 2017年8月23日 水曜日 午後4時1分
Page 681 of 697

680
Information
Warranty Coverages
■U.S. Owners
Your new vehicle is covered by these warranties:
New Vehicle Limited Warranty – covers your new vehicle, except for the
emissions control systems and accessori es, against defects in materials and
workmanship.
Emissions Control Systems Defects Warranty and Emissions Performance
Warranty – these two warranties cover your ve hicle’s emissions control systems.
Time, mileage, and coverage are conditiona l. Please read your warranty booklet for
exact information.
Seat Belt Limited Warranty – a seat belt that fails to function properly is covered
by a limited warranty. Please read your warranty booklet for details.
Rust Perforation Limited Warranty – all exterior body panels are covered against
rusting from the inside out for the specified time period, regardless of mileage.
Accessory Limited Warranty – Acura accessories are covered under this warranty.
Time and mileage limits depend on the type of accessory and other factors. Please
read your warranty booklet for details.
Replacement Parts Limited Warranty – covers all Acura replacement parts
against defects in materials and workmanship.
18 ACURA MDX-31TZ56400.book 680 ページ 2017年8月23日 水曜日 午後4時1分