ACURA NSX 1991 Service Repair Manual
Manufacturer: ACURA, Model Year: 1991, Model line: NSX, Model: ACURA NSX 1991Pages: 1640, PDF Size: 60.48 MB
Page 661 of 1640
Front Pilla r Seal/Retaine r
Replacement
22. Le t th e sealan t dr y fo r a t leas t thre e hour s afte r
installin g th e fron t pilla r seal .
23 . Instal l th e roo f o n th e body , the n chec k tha t th e
seal s fi t flus h (se e pag e 20-107 ).
NOTE : I f necessary , alig n th e roo f sid e sea l b y
adjustin g th e roo f sid e loc k uni t (se e pag e 20-106 ).
24 . Chec k tha t eac h doo r glas s contac t th e seal s evenl y
(se e pag e 20-109 ).
25 . Chec k fo r wate r leak s (se e pag e 20-110 ).
26 . Remov e th e roof , the n reinstal l al l remainin g remove d
parts.
ProCarManuals.com
Page 662 of 1640
Rear Pilla r Seal/Retaine r
Replacement
NOTE:
• Whe n th e rea r pilla r sea l ha s bee n removed , and/o r i t
i s damaged , replac e it wit h ne w one .
• Hav e a n assistan t hel p replac e th e rea r pilla r seal .
1 . Remov e th e roof .
2 . Remov e th e rea r roo f rai l tri m (se e pag e 20-80 ).
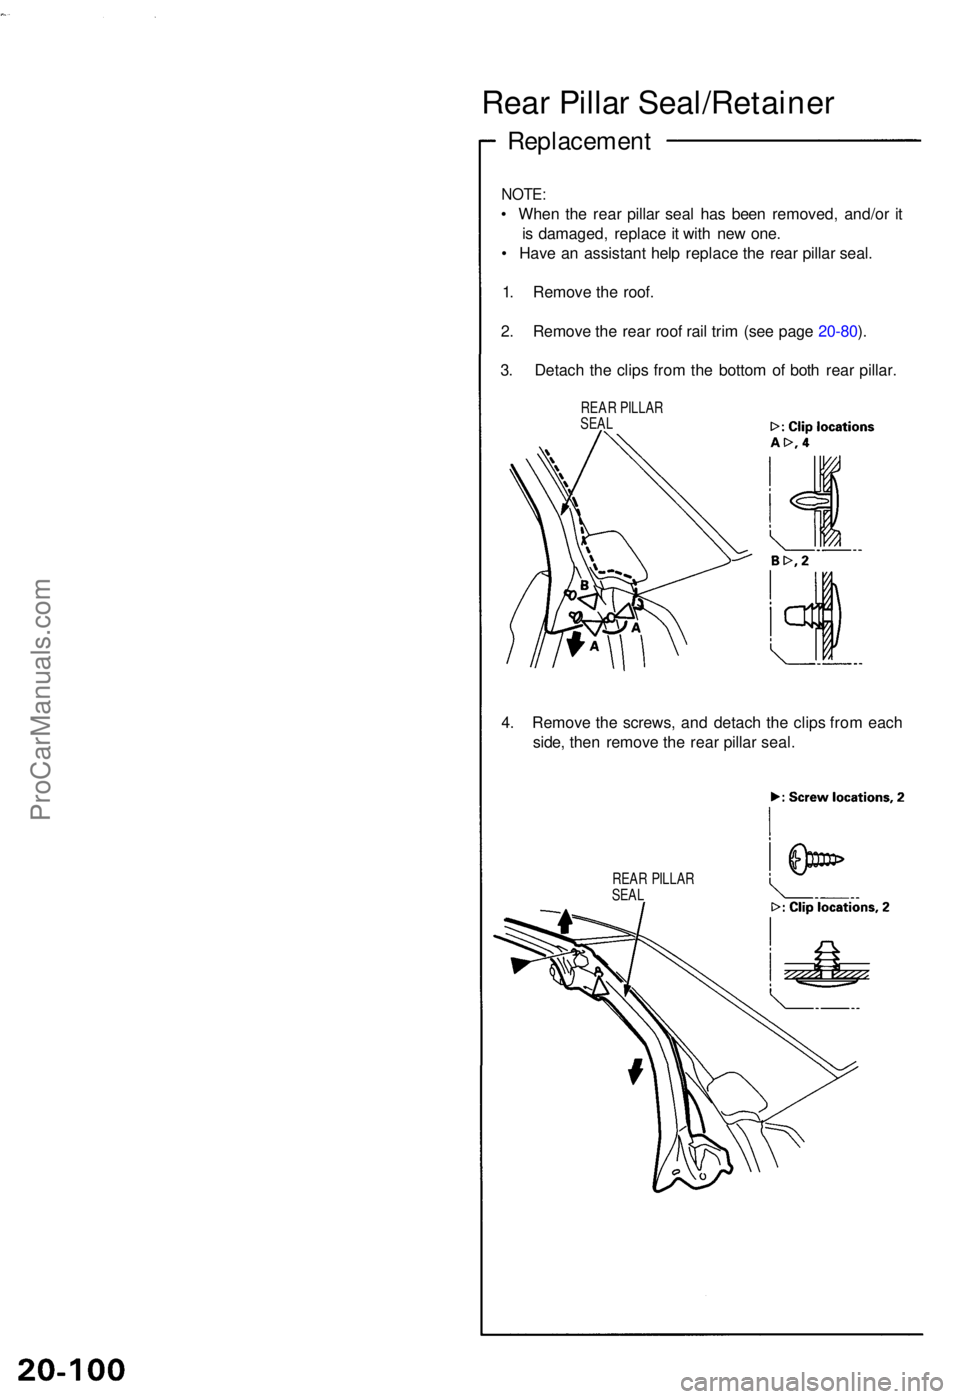
3 . Detac h th e clip s fro m th e botto m o f bot h rea r pillar .
REAR PILLA R
SEA L
4. Remov e th e screws , an d detac h th e clip s fro m eac h
side , the n remov e th e rea r pilla r seal .
REAR PILLA R
SEA L
ProCarManuals.com
Page 663 of 1640
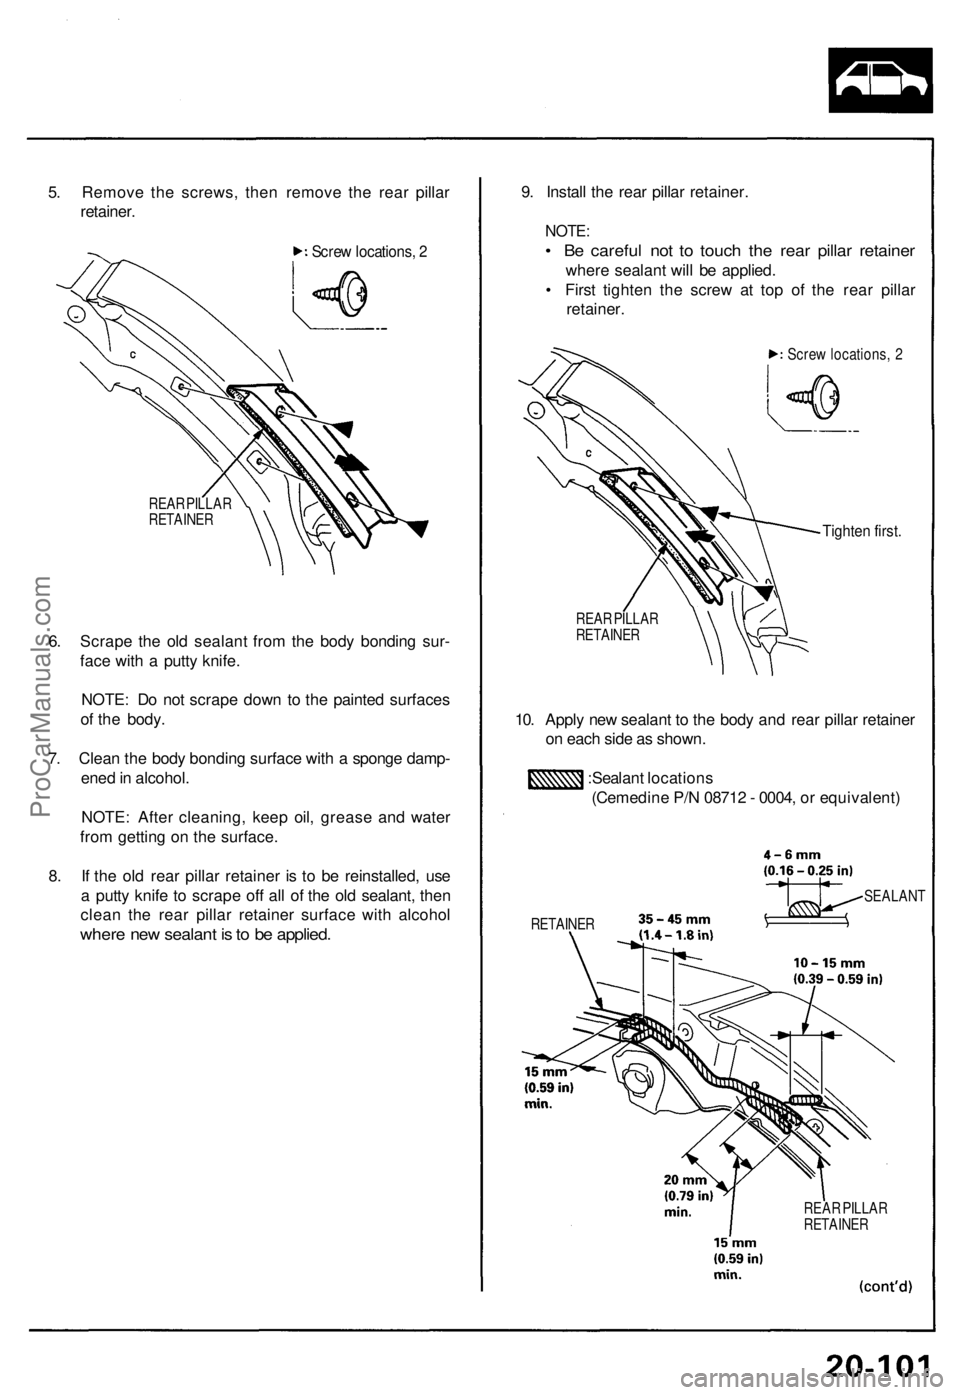
5. Remove the screws, then remove the rear pillar
retainer.
Screw locations, 2
REAR PILLAR
RETAINER
6. Scrape the old sealant from the body bonding sur-
face with a putty knife.
NOTE: Do not scrape down to the painted surfaces
of the body.
7. Clean the body bonding surface with a sponge damp-
ened in alcohol.
NOTE: After cleaning, keep oil, grease and water
from getting on the surface.
8. If the old rear pillar retainer is to be reinstalled, use
a putty knife to scrape off all of the old sealant, then
clean the rear pillar retainer surface with alcohol
where new sealant is to be applied.
9. Install the rear pillar retainer.
NOTE:
• Be careful not to touch the rear pillar retainer
where sealant will be applied.
• First tighten the screw at top of the rear pillar
retainer.
Screw locations, 2
Tighten first.
REAR PILLAR
RETAINER
10. Apply new sealant to the body and rear pillar retainer
on each side as shown.
:Sealant locations
(Cemedine P/N 08712 - 0004, or equivalent)
RETAINER
SEALANT
REAR PILLAR
RETAINERProCarManuals.com
Page 664 of 1640

Rear Pillar Seal/Retainer
Replacement
11. Peel the separator off from the butyl tape on the new
rear pillar seal.
NOTE: Fold the separator of butyl tape at the roof
portion of the rear pillar seal.
SEPARATOR
Fold it.
12. Align the hole and clip on the rear pillar seal with the
grommet and hole on the body, and engage the lips
of the rear pillar seal with the groove of the retainers,
then gently set each corner of the rear pillar seal
down on the sealant as shown.
NOTE: Do not press on the seal yet to make the adhe-
sive stick.
GROMMET
CLIP
REAR PILLAR
RETAINER
LIP
REAR PILLAR
SEAL
About 70°
SEALANT
REAR PILLAR
SEAL
LIP
RETAINER
REAR PILLAR
SEAL
SEPARATOR
Peel off.
BUTYL
TAPEProCarManuals.com
Page 665 of 1640

NOTE: Install the screw, attach the clip on each side,
and install the pillar and roof portions of the rear pillar
seal into the retainers about 50 mm (2 in).
Screw locations, 2
REAR PILLAR
SEAL
REAR PILLAR
SEAL
REAR PILLAR
PANEL
13. Install each pillar portion of the rear pillar seal into
the rear pillar retainer as shown, then attach the clips.
NOTE:
• Do not press on the seal yet to make the adhe-
sive stick.
• After setting the lip at location install the rear
pillar seal while pushing the lip in the rear pillar
retainer with a rounded plastic spatula at location
LIP.
REAR PILLAR
SEAL
(Pillar portion)
REAR PILLAR
RETAINER
REAR PILLAR
SEAL
LIP
REAR PILLAR
RETAINER
REAR PILLAR
RETAINER
PLASTIC
SPATULA
CLIP
RETAINERProCarManuals.com
Page 666 of 1640
Rear Pilla r Seal/Retaine r
Replacement
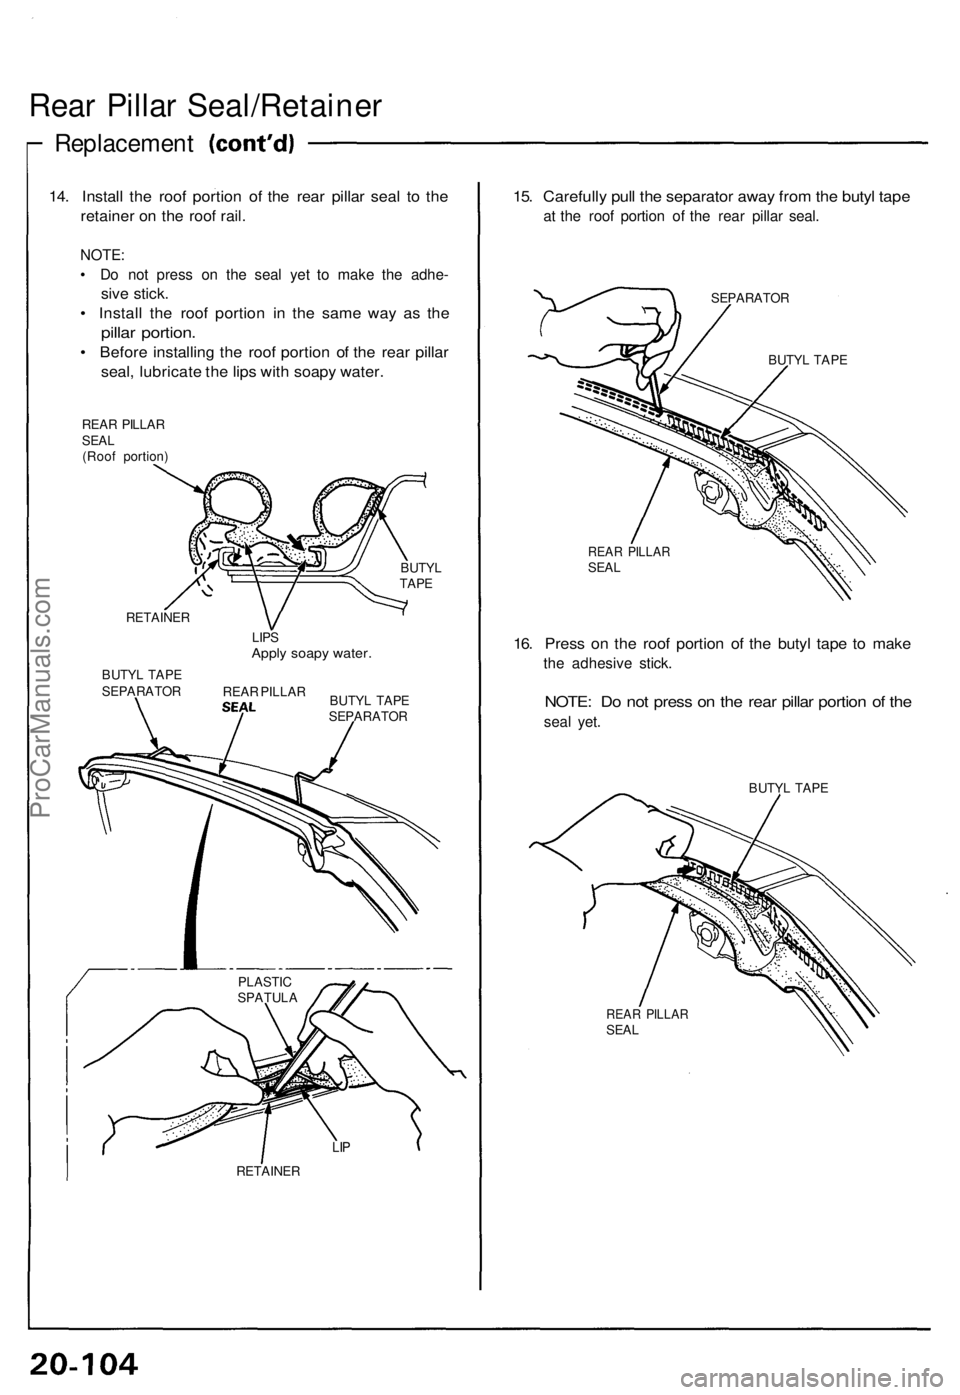
14. Instal l th e roo f portio n o f th e rea r pilla r sea l t o th e
retaine r o n th e roo f rail .
NOTE :
• D o no t press on th e sea l ye t t o mak e th e adhe -
sive stick .
• Instal l th e roo f portio n i n th e sam e wa y a s th e
pilla r portion .
• Befor e installin g th e roo f portio n o f th e rea r pilla r
seal, lubricat e th e lip s wit h soap y water .
REAR PILLA RSEAL(Roo f portion )
RETAINE R
BUTY L TAP E
SEPARATO R
BUTYL
TAP E
LIP S
Appl y soap y water .
REAR PILLA R
BUTY L TAP E
SEPARATO R
RETAINE R
15. Carefull y pul l th e separato r awa y fro m th e buty l tap e
at th e roo f portio n o f th e rea r pilla r seal .
SEPARATO R
BUTYL TAP E
REAR PILLA RSEAL
16. Pres s o n th e roo f portio n o f th e buty l tap e t o mak e
the adhesiv e stick .
NOTE : D o no t pres s o n th e rea r pilla r portio n o f th e
sea l yet .
BUTY L TAP E
REAR PILLA RSEAL
PLASTI C
SPATUL A
LIP
ProCarManuals.com
Page 667 of 1640

17. Scra p o r wip e th e exces s sealan t of f wit h a putt y knif e
or towel .
NOTE : T o remov e sealan t fro m a painte d surfac e o r
th e rea r pilla r seal , wip e wit h a sof t sho p towe l damp -
ened wit h alcohol .
18. Le t th e sealan t dr y fo r a t leas t thre e hour s afte r rea r
pilla r sea l installation .
19. Instal l th e roo f o n th e body , the n chec k tha t th e
seal s fi t flus h (se e pag e 20-107 ).
I f necessary , alig n th e roo f sid e sea l b y adjustin g
th e roo f sid e loc k uni t (se e pag e 20-106 ).
Whe n yo u ar e satisfie d tha t th e sea l fit s properly ,
press o n th e rea r pilla r portio n t o mak e th e adhe -
siv e stick .
20 . Chec k tha t eac h doo r glas s contact s th e seal s evenl y
(se e pag e 20-109 ).
21 . Chec k fo r wate r leak s (se e pag e 20-110 ).
22 . Remov e th e roof , the n reinstal l al l remainin g remove d
parts .
ProCarManuals.com
Page 668 of 1640
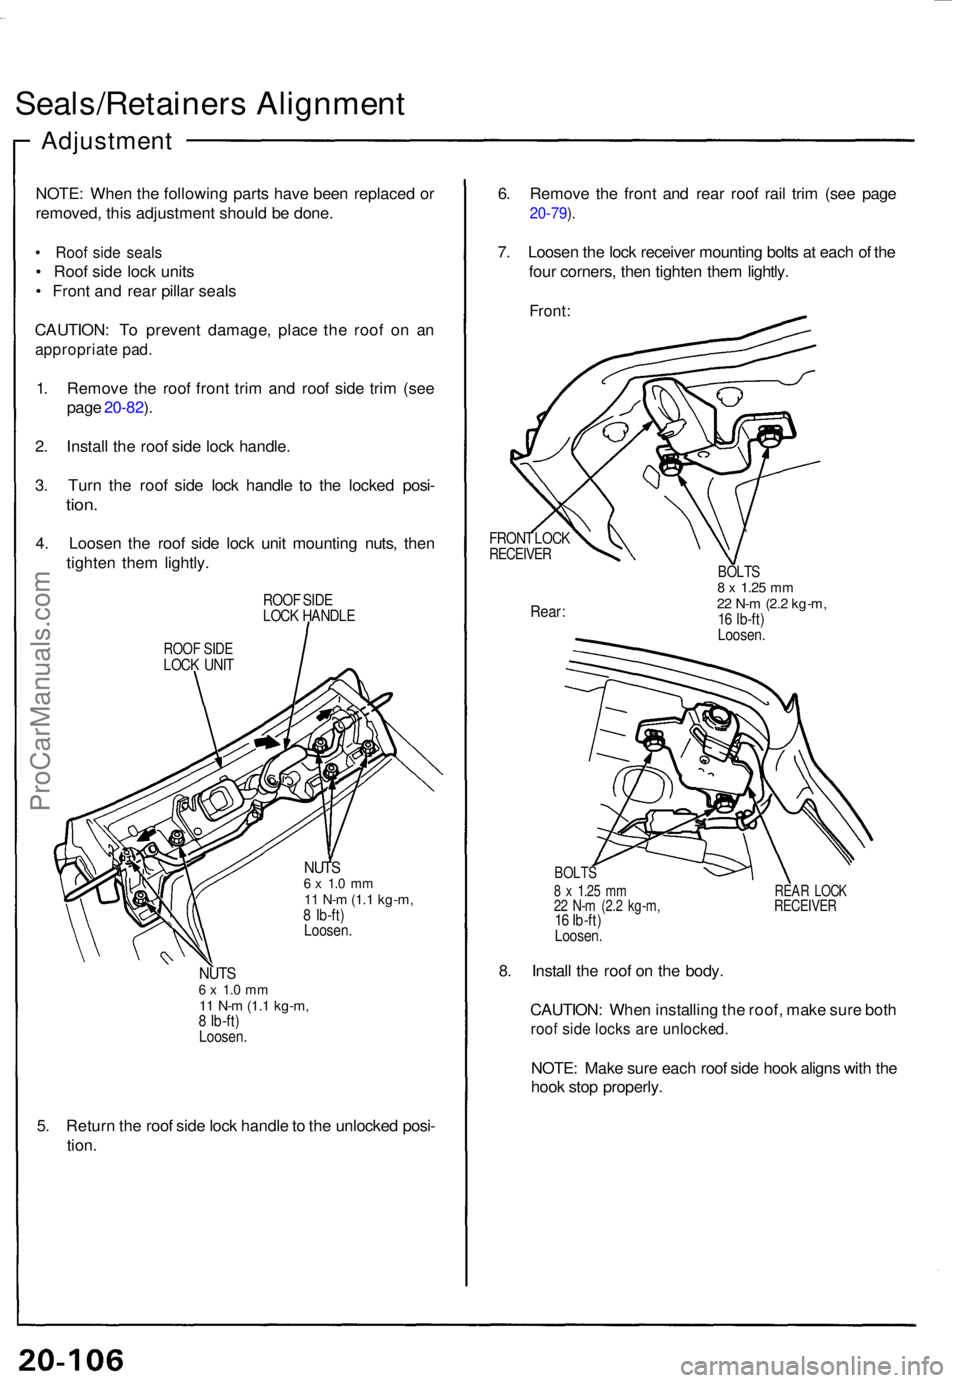
Seals/Retainers Alignmen t
Adjustmen t
NOTE: Whe n th e followin g part s hav e bee n replace d o r
removed , thi s adjustmen t shoul d b e done .
• Roo f sid e seal s
• Roo f sid e loc k unit s
• Fron t an d rea r pilla r seal s
CAUTION : T o preven t damage , plac e th e roo f o n a n
appropriat e pad .
1. Remov e th e roo f fron t tri m an d roo f sid e tri m (se e
pag e 20-82 ).
2 . Instal l th e roo f sid e loc k handle .
3 . Tur n th e roo f sid e loc k handl e t o th e locke d posi -
tion.
4. Loose n th e roo f sid e loc k uni t mountin g nuts , the n
tighte n the m lightly .
ROOF SID E
LOC K HANDL E
ROOF SID ELOC K UNI T
NUT S6 x 1. 0 m m11 N- m (1. 1 kg-m ,8 Ib-ft )
Loosen .
NUTS6 x 1. 0 m m11 N- m (1. 1 kg-m ,8 Ib-ft )
Loosen .
5. Retur n th e roo f sid e loc k handl e to th e unlocke d posi -
tion . 6
. Remov e th e fron t an d rea r roo f rai l tri m (se e pag e
20-79 ).
7 . Loose n th e loc k receive r mountin g bolt s a t eac h o f th e
fou r corners , the n tighte n the m lightly .
Front:
FRON T LOC KRECEIVE R
Rear:
BOLT S8 x 1.2 5 mm22 N- m (2. 2 kg-m ,16 Ib-ft )
Loosen .
BOLTS
8 x 1.2 5 m m REA R LOC K22 N- m (2. 2 kg-m , RECEIVE R16 Ib-ft )
Loosen .
8. Instal l th e roo f o n th e body .
CAUTION : Whe n installin g th e roof , mak e sur e bot h
roof sid e lock s ar e unlocked .
NOTE: Mak e sur e eac h roo f sid e hoo k align s wit h th e
hoo k sto p properly .
ProCarManuals.com
Page 669 of 1640
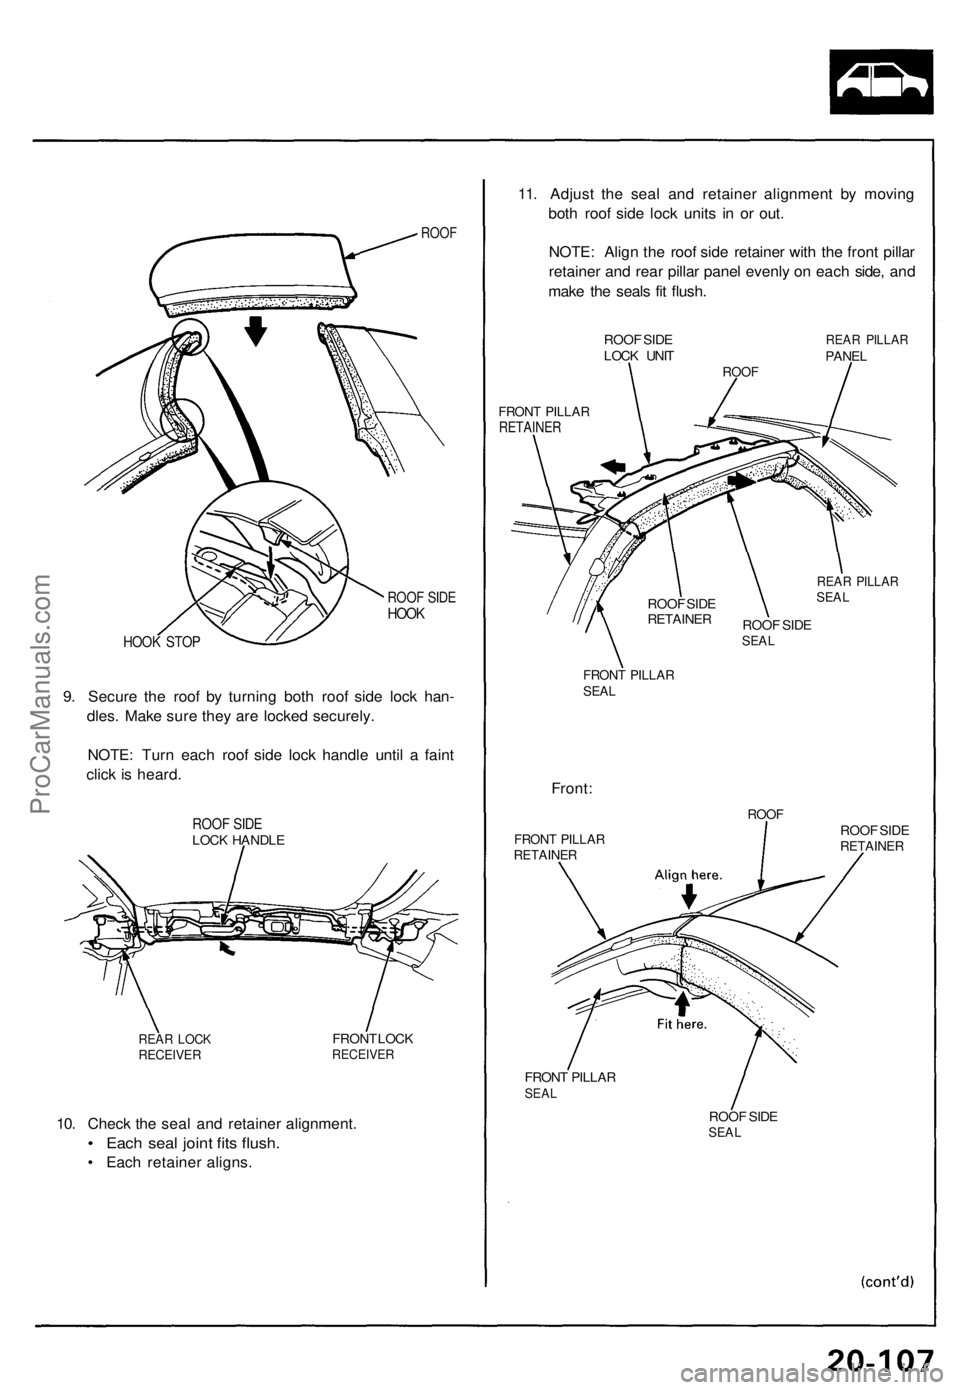
ROOF
ROOF SIDE
HOOK
HOOK STOP
9. Secure the roof by turning both roof side lock han-
dles. Make sure they are locked securely.
NOTE: Turn each roof side lock handle until a faint
click is heard.
ROOF SIDE
LOCK HANDLE
REAR LOCK
RECEIVER
FRONT LOCK
RECEIVER
10. Check the seal and retainer alignment.
• Each seal joint fits flush.
• Each retainer aligns.
11. Adjust the seal and retainer alignment by moving
both roof side lock units in or out.
NOTE: Align the roof side retainer with the front pillar
retainer and rear pillar panel evenly on each side, and
make the seals fit flush.
ROOF SIDE
LOCK UNIT
REAR PILLAR
PANEL
ROOF
FRONT PILLAR
RETAINER
REAR PILLAR
SEAL
ROOF SIDE
SEAL
FRONT PILLAR
SEAL
Front:
FRONT PILLAR
RETAINER
ROOF
ROOF SIDE
RETAINER
FRONT PILLAR
SEAL
ROOF SIDE
SEAL
ROOF SIDE
RETAINERProCarManuals.com
Page 670 of 1640
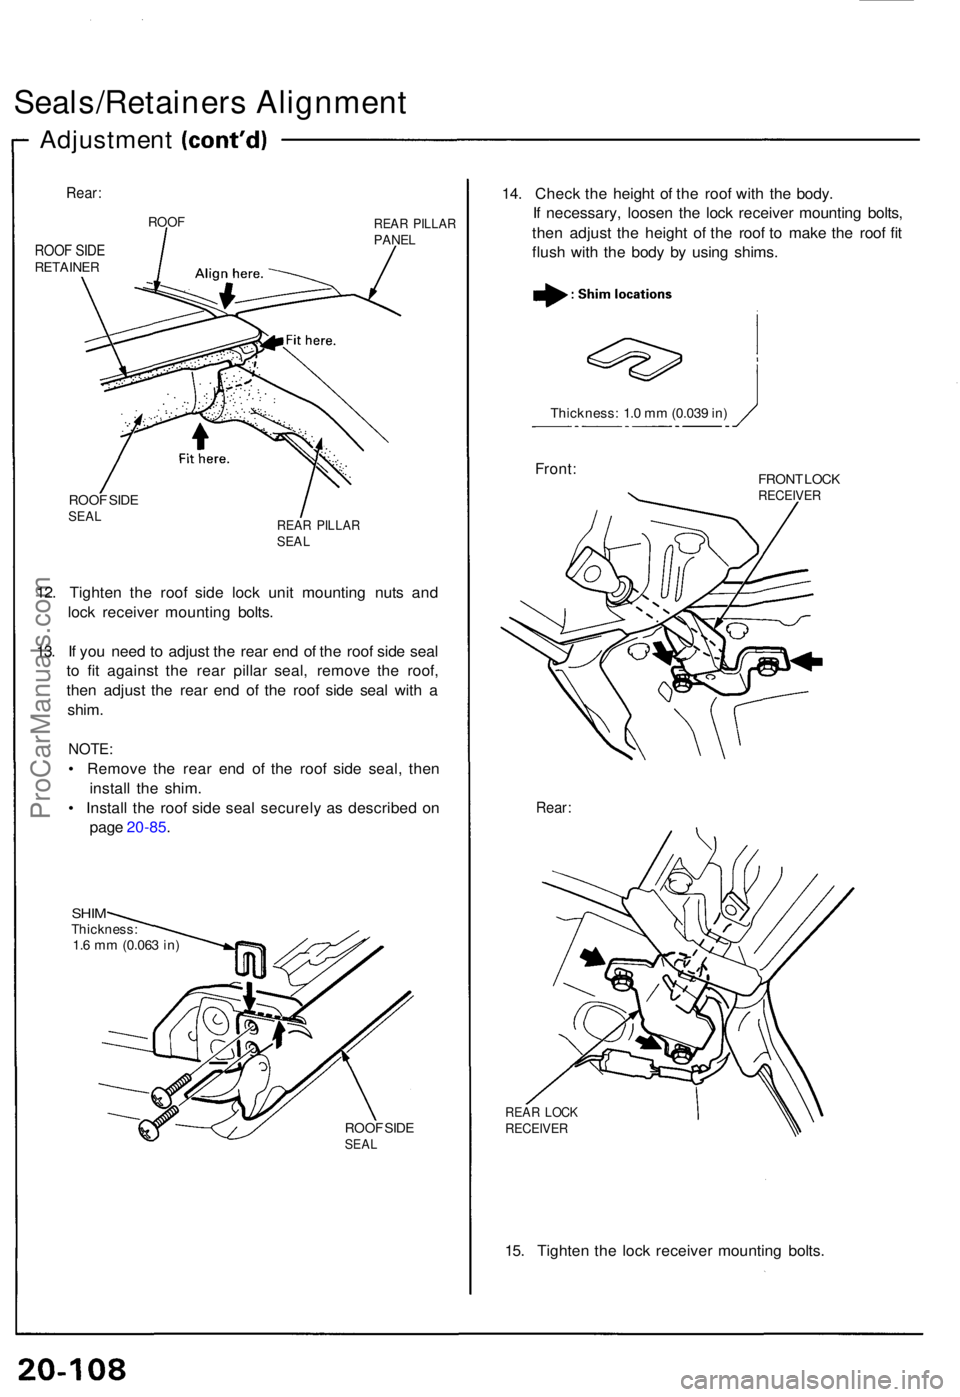
Seals/Retainers Alignmen t
Adjustmen t
Rear:
ROOF SID ERETAINE R
ROOFREAR PILLA RPANEL
ROOF SID ESEA LREA R PILLA RSEAL
12. Tighte n th e roo f sid e loc k uni t mountin g nut s an d
loc k receive r mountin g bolts .
13 . I f yo u nee d t o adjus t th e rea r en d o f th e roo f sid e sea l
t o fi t agains t th e rea r pilla r seal , remov e th e roof ,
the n adjus t th e rea r en d o f th e roo f sid e sea l wit h a
shim .
NOTE :
• Remov e th e rea r en d o f th e roo f sid e seal , the n
instal l th e shim .
• Instal l th e roo f sid e sea l securel y a s describe d o n
pag e 20-85 .
SHIMThickness :1.6 m m (0.06 3 in )
ROOF SID E
SEA L
14. Chec k th e heigh t o f th e roo f wit h th e body .
I f necessary , loose n th e loc k receive r mountin g bolts ,
the n adjus t th e heigh t o f th e roo f t o mak e th e roo f fi t
flus h wit h th e bod y b y usin g shims .
Thickness : 1. 0 m m (0.03 9 in )
Front :FRON T LOC KRECEIVE R
Rear:
REAR LOC KRECEIVE R
15. Tighte n th e loc k receive r mountin g bolts .
ProCarManuals.com