fuses ACURA NSX 1991 Service Repair Manual
[x] Cancel search | Manufacturer: ACURA, Model Year: 1991, Model line: NSX, Model: ACURA NSX 1991Pages: 1640, PDF Size: 60.48 MB
Page 729 of 1640
Troubleshooting
Tips and Precautions
Before Troubleshooting
• Check applicable fuses in the appropriate fuse box.
• Check the battery for damage, state of charge, and
clean and tight connections.
• Check the alternator belt tension.
CAUTION:
• Do not quick-charge a battery unless the battery
ground cable has been disconnected.
Otherwise you will damage the alternator
diodes.
• Do not attempt to crank the engine with the bat-
tery ground cable loosely connected or you will
severely damage the wiring.
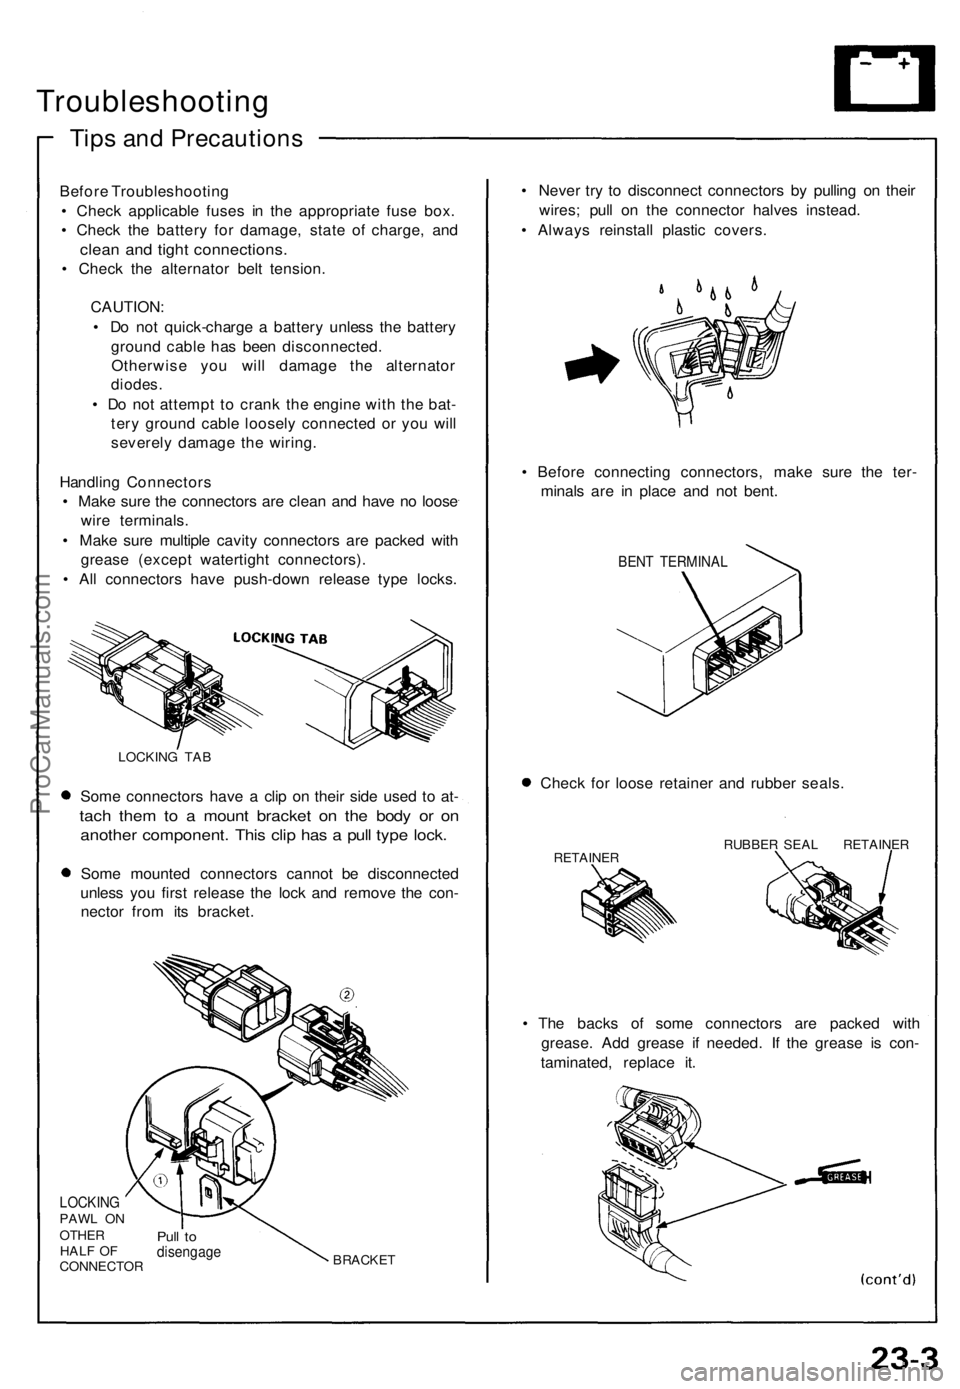
Handling Connectors
• Make sure the connectors are clean and have no loose
wire terminals.
• Make sure multiple cavity connectors are packed with
grease (except watertight connectors).
• All connectors have push-down release type locks.
LOCKING TAB
Some connectors have a clip on their side used to at-
tach them to a mount bracket on the body or on
another component. This clip has a pull type lock.
Some mounted connectors cannot be disconnected
unless you first release the lock and remove the con-
nector from its bracket.
LOCKING
PAWL ON
OTHER
HALF OF
CONNECTOR
Pull to
disengage
BRACKET
• Never try to disconnect connectors by pulling on their
wires; pull on the connector halves instead.
• Always reinstall plastic covers.
• Before connecting connectors, make sure the ter-
minals are in place and not bent.
BENT TERMINAL
Check for loose retainer and rubber seals.
RETAINER
RUBBER SEAL RETAINER
• The backs of some connectors are packed with
grease. Add grease if needed. If the grease is con-
taminated, replace it.ProCarManuals.com
Page 836 of 1640
Lighting System
Retractor Motor Replacement
CAUTION:
• Halogen headlights can become very hot in use; do
not touch them or the attaching hardware immediately
after they have been turned off.
• Do not try to replace or clean headlights with the lights
on.
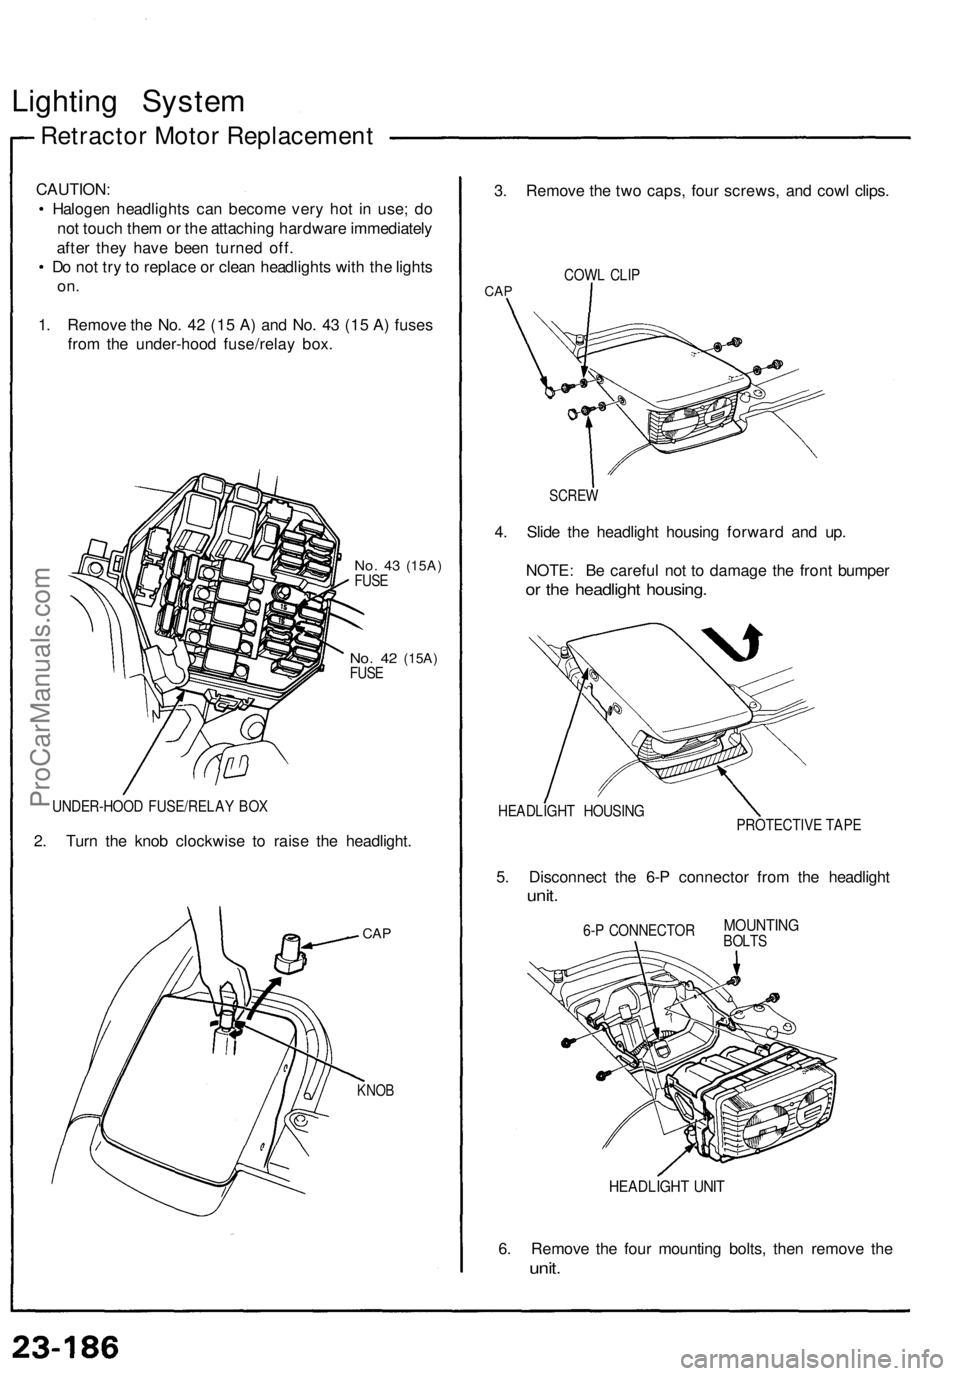
1. Remove the No. 42 (15 A) and No. 43 (15 A) fuses
from the under-hood fuse/relay box.
No. 43
(15A)
FUSE
No. 42
(15A)
FUSE
UNDER-HOOD FUSE/RELAY BOX
2. Turn the knob clockwise to raise the headlight.
CAP
KNOB
3. Remove the two caps, four screws, and cowl clips.
COWL CLIP
CAP
SCREW
4. Slide the headlight housing forward and up.
NOTE: Be careful not to damage the front bumper
or the headlight housing.
HEADLIGHT HOUSING
PROTECTIVE TAPE
5. Disconnect the 6-P connector from the headlight
unit.
6-P CONNECTOR
HEADLIGHT UNIT
6. Remove the four mounting bolts, then remove the
unit.
MOUNTING
BOLTSProCarManuals.com
Page 845 of 1640
Headlight Replacement
CAUTION:
• Halogen headlights can become very hot in use; do
not touch them or the attaching hardware immediately
after they have been turned off.
• Do not try to replace or clean the headlights with the
lights on.
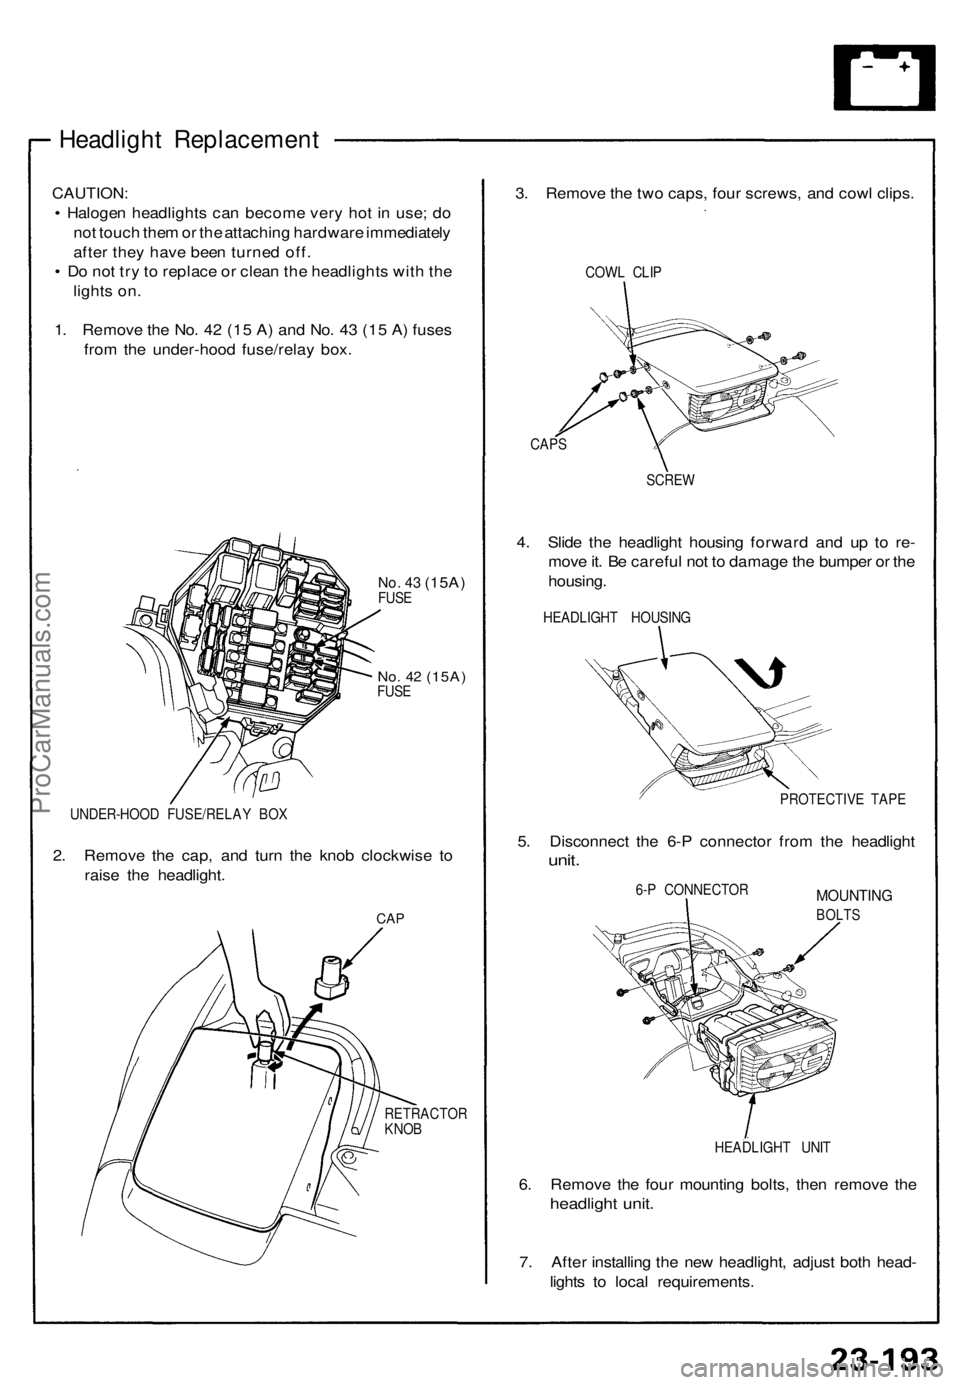
1. Remove the No. 42 (15 A) and No. 43 (15 A) fuses
from the under-hood fuse/relay box.
No. 43
(15A)
FUSE
No. 42
(15A)
FUSE
UNDER-HOOD FUSE/RELAY BOX
2. Remove the cap, and turn the knob clockwise to
raise the headlight.
CAP
RETRACTOR
KNOB
3. Remove the two caps, four screws, and cowl clips.
COWL CLIP
CAPS
SCREW
4. Slide the headlight housing forward and up to re-
move it. Be careful not to damage the bumper or the
housing.
HEADLIGHT HOUSING
PROTECTIVE TAPE
5. Disconnect the 6-P connector from the headlight
unit.
6-P CONNECTOR
MOUNTING
BOLTS
HEADLIGHT UNIT
6. Remove the four mounting bolts, then remove the
headlight unit.
7. After installing the new headlight, adjust both head-
lights to local requirements.ProCarManuals.com
Page 936 of 1640
Troubleshooting
Cruise Control
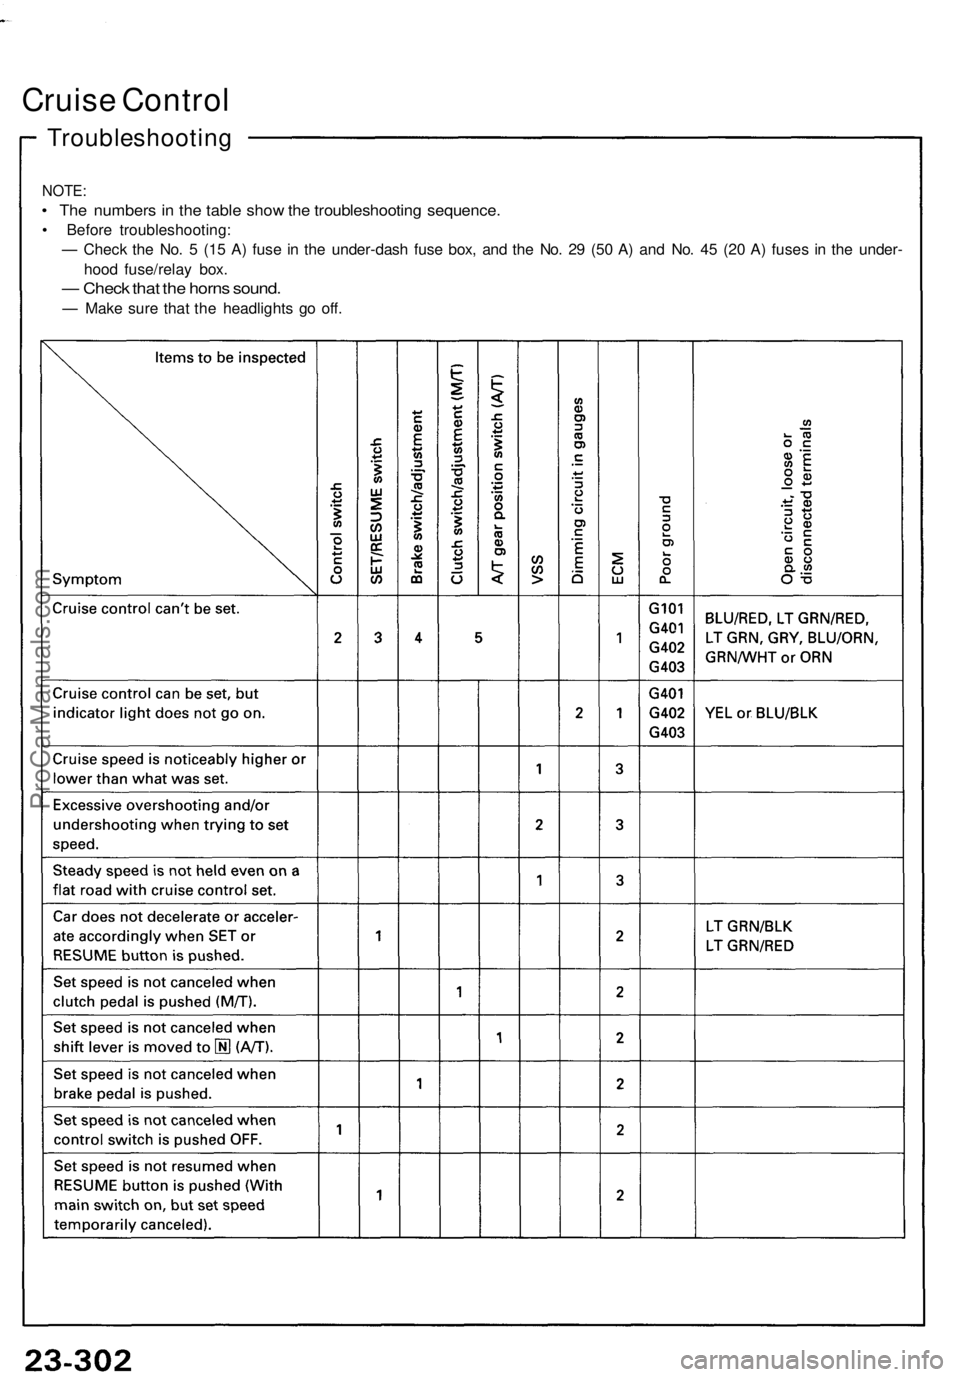
NOTE:
• The numbers in the table show the troubleshooting sequence.
• Before troubleshooting:
— Check the No. 5 (15 A) fuse in the under-dash fuse box, and the No. 29 (50 A) and No. 45 (20 A) fuses in the under-
hood fuse/relay box.
— Check that the horns sound.
— Make sure that the headlights go off.ProCarManuals.com
Page 1055 of 1640
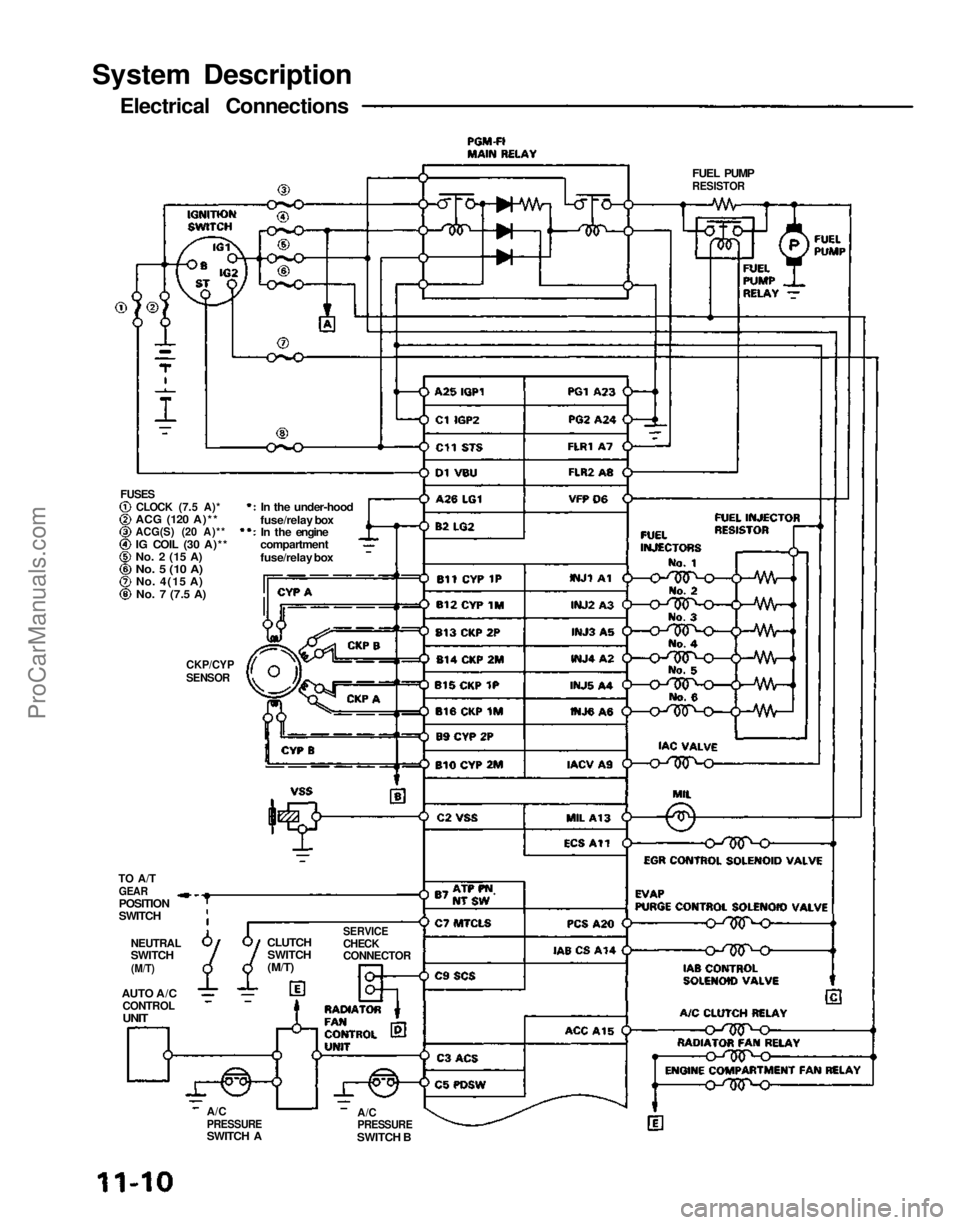
System Description
Electrical Connections
FUSES
CLOCK (7.5 A)*
ACG
(120 A)**
ACG(S) (20 A)**
IG COIL (30 A)**
No. 2 (15 A)
No. 5 (10 A)
No.
4(15
A)
No. 7
(7.5
A)
In the under-hood
fuse/relay box In the engine
compartment
fuse/relay box
CKP/CYP
SENSOR
TO A/T
GEAR
POSITION
SWITCH
NEUTRAL
SWITCH
(M/T)
AUTO A/C
CONTROL
UNIT
CLUTCH
SWITCH
(M/T)
SERVICE
CHECK
CONNECTOR
A/C
PRESSURE
SWITCH A
A/C
PRESSURE
SWITCH B FUEL PUMP
RESISTORProCarManuals.com
Page 1211 of 1640
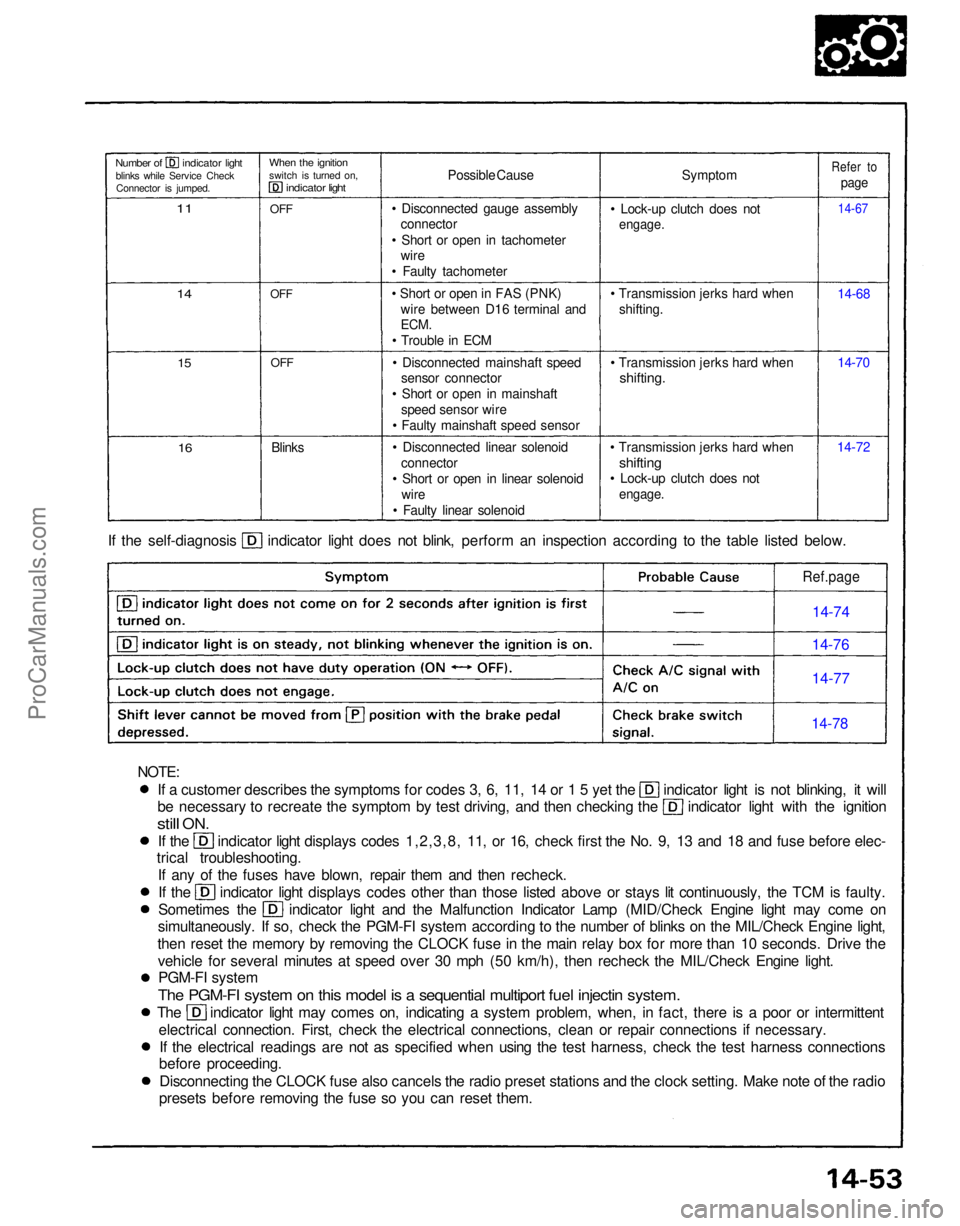
If a customer describes the symptoms for codes 3, 6, 11, 14 or 1 5 yet the indicator light is not blinking, it will
be necessary to recreate the symptom by test driving, and then checking the indicator light with the ignition
still
ON.
If the indicator light displays codes 1,2,3,8, 11, or 16, check first the No. 9, 13 and 18 and fuse before elec-
trical troubleshooting.
If any of the fuses have blown, repair them and then recheck. If the indicator light displays codes other than those listed above or stays lit continuously, the TCM is faulty.
Sometimes the indicator light and the Malfunction Indicator Lamp (MID/Check Engine light may come on
simultaneously. If so, check the PGM-FI system according to the number of blinks on the MIL/Check Engine light,
then reset the memory by removing the CLOCK fuse in the main relay box for more than 10 seconds. Drive the vehicle for several minutes at speed over 30 mph (50 km/h), then recheck the MIL/Check Engine light.PGM-FI system
The PGM-FI system on this model is a sequential multiport fuel injectin system.
The indicator light may comes on, indicating a system problem, when, in fact, there is a poor or intermittent
electrical connection. First, check the electrical connections, clean or repair connections if necessary.If the electrical readings are not as specified when using the test harness, check the test harness connections
before proceeding.
Disconnecting the CLOCK fuse also cancels the radio preset stations and the clock setting. Make note of the radio
presets before removing the fuse so you can reset them. If the self-diagnosis indicator light does not blink, perform an inspection according to the table listed below.
Symptom
• Lock-up clutch does not
engage.
• Transmission jerks hard when shifting.
• Transmission jerks hard when
shifting.
• Transmission jerks hard when
shifting
• Lock-up clutch does not
engage.
14-7214-70 14-68
14-67
Refer to
page
Possible Cause
• Disconnected gauge assembly connector
• Short or open in tachometer wire
• Faulty tachometer
• Short or open in FAS (PNK) wire between D16 terminal and
ECM.
• Trouble in ECM
• Disconnected mainshaft speed sensor connector
• Short or open in mainshaft speed sensor wire
• Faulty mainshaft speed sensor
• Disconnected linear solenoid connector
• Short or open in linear solenoid wire
• Faulty linear solenoid
Blinks
OFF
OFF
OFF
When the ignition
switch is turned on,
indicator light
Number of indicator light
blinks while Service CheckConnector is jumped.
11
14
15
16
Ref.page
14-74
14-76
14-77
14-78
NOTE:ProCarManuals.com
Page 1441 of 1640
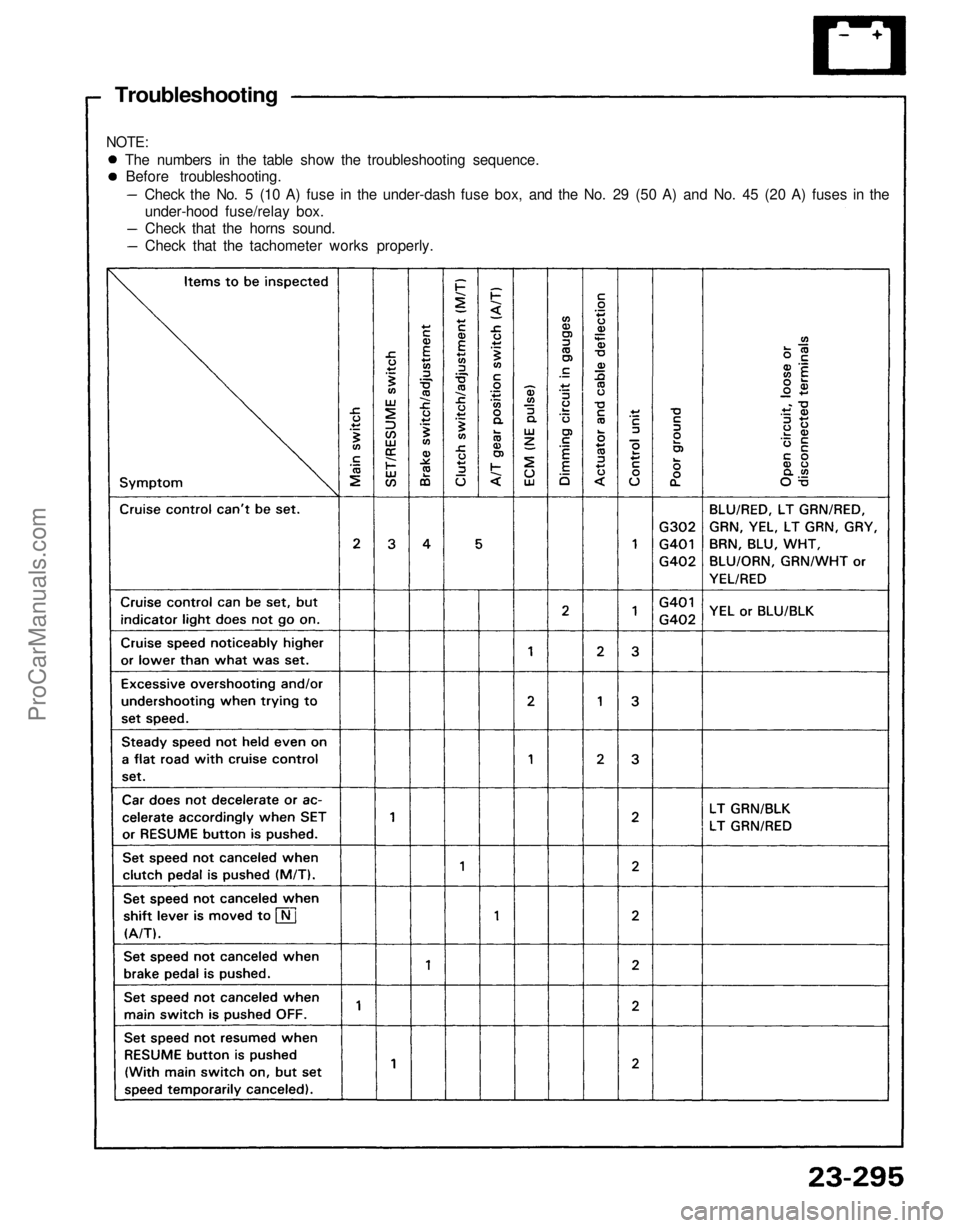
Troubleshooting
NOTE:
The numbers in the table show the troubleshooting sequence.
Before troubleshooting.
Check the No. 5 (10 A) fuse in the under-dash fuse box, and the No. 29 (50 A) and No. 45 (20 A) fuses in the
under-hood fuse/relay box.
Check that the horns sound.
Check that the tachometer works properly.ProCarManuals.com
Page 1626 of 1640
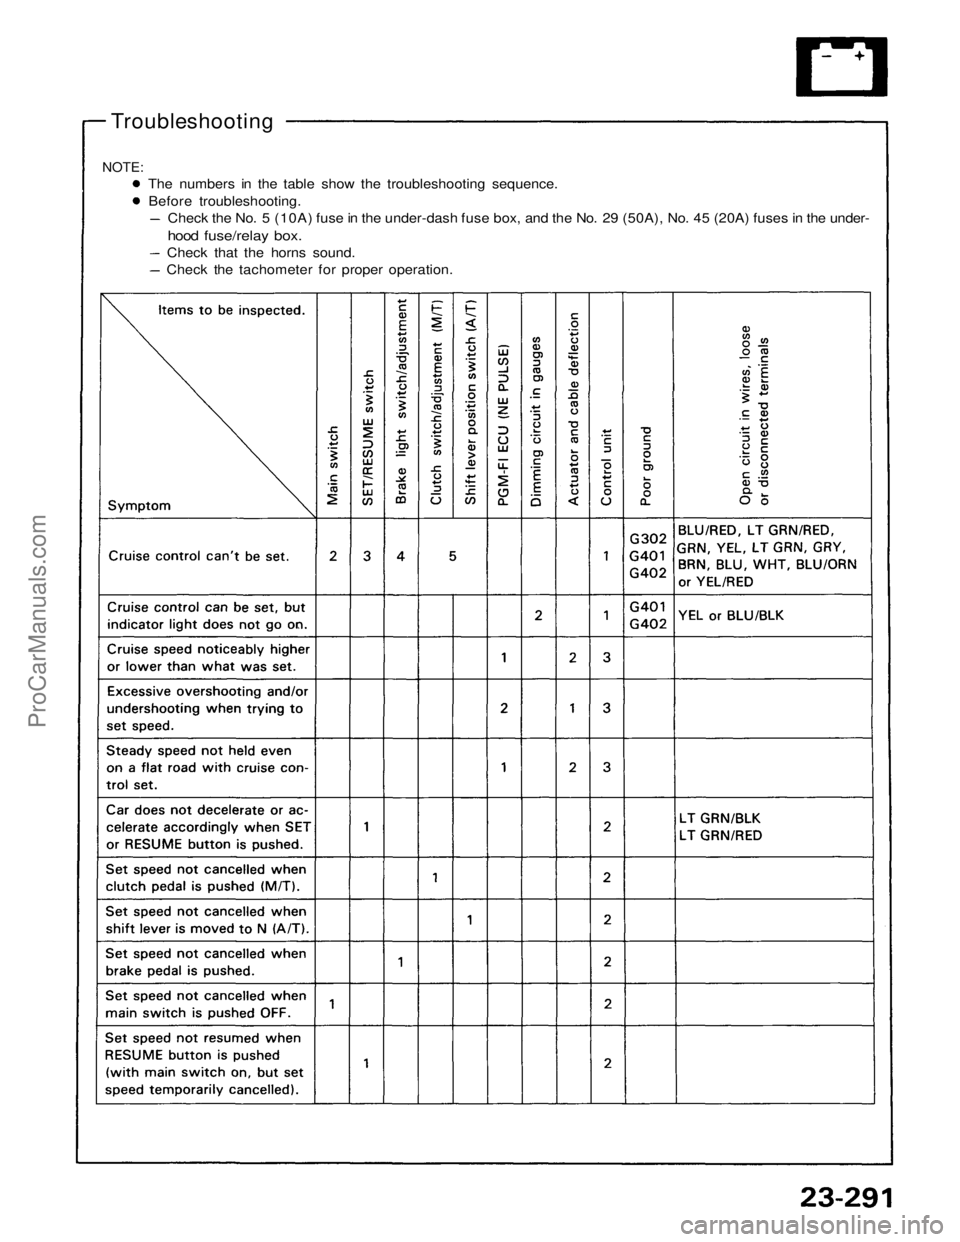
Troubleshooting
NOTE:
The numbers in the table show the troubleshooting sequence.
Before troubleshooting.
Check the No. 5 (10A) fuse in the under-dash fuse box, and the No. 29 (50A), No. 45 (20A) fuses in the under-
hood fuse/relay box.
Check that the horns sound.
Check the tachometer for proper operation.ProCarManuals.com