fuel Acura NSX 2017 Owner's Guide
[x] Cancel search | Manufacturer: ACURA, Model Year: 2017, Model line: NSX, Model: Acura NSX 2017Pages: 116, PDF Size: 7.19 MB
Page 3 of 116
*if equipped
Acura Total Luxury Care Roadside Assistance
Your Acura TLC Roadside Assistance representative is here to help you 24 hours a day, 7 days
a week. Under your 4-year/50,000-mile (80,000 km) warranty, the following benefits are
available:
Towing services—full cost of towing to the closest authorized Acura NSX dealer
Roadside assistance—jump starting, fuel delivery, lockout, and flat tire
Trip planning—detailed trip routing, emergency services, and more
U.S. customers
(800) 594-8500
Canadian customers
(800) 565-7587 (Canada)
Acura Client Relations
Your authorized Acura NSX dealer should be able to answer any questions you have about your
vehicle. However, if you are dissatisfied with the information you receive, you can call Acura
Client Relations (see page 213):
U.S. customers
Main line: (800) 382-2238
NSX specialists: (844) 68-ACURA [682-2872]
Canadian customers
Main line: (888) 922-8729
NSX specialists: (844) 9MYNSX9 [969-6799]
ACURALINK®* .............................................................110
AcuraLink Messages ........................................................ 110
Subscription Features ..................................................... 112
NAVIGATION*
............................................................ 114
Basic Navigation Operation .......................................... 114
Entering a Destination .................................................... 118
Routing ........................................................................\
...... 122
DRIVING
...................................................................... 125
Before Driving ................................................................... 125
High Voltage Battery Maintenance ............................. 127
Maximum Load Limit ...................................................... 127
Starting to Drive .............................................................. 130
Shifting........................................................................\
....... 132
Car Wash Mode
................................................................ 135
Integrated Dynamics System (IDS) .............................. 136
Braking ........................................................................\
....... 139
Automatic Brake Hold .................................................... 141
Cruise Control .................................................................. 143
Vehicle Stability Assist® (VSA®) ..................................... 145
Parking Sensor System* ................................................. 146
Multi-View Rear Camera ................................................ 147
Refueling ........................................................................\
....148
High-Performance Driving ............................................. 150
Cold or Rainy Weather Driving ..................................... 155
HANDLING THE UNEXPECTED ................................156
Keyless Access Remote Battery Strength
................... 156
Emergency Power System Off ...................................... 157
Jump Starting ................................................................... 158
Overheating ...................................................................... 160
Emergency Towing ........................................................... 162
Tire Pressure Monitoring System (TPMS)
................... 163Tire Repair Kit
...................................................................
166
Fuse Locations .................................................................. 168
MAINTENANCE
.......................................................... 175
Safety Precautions........................................................... 175
Maintenance Minder
™ .................................................... 177
Under the Hood ............................................................... 182
Under the Hatch ..............................................................184
Engine Oil ........................................................................\
.. 185
Engine Coolant ................................................................. 189
Inverter Coolant ............................................................... 191
Window Washer Fluid ..................................................... 191
Brake Fluid ........................................................................\
. 192
Checking the 12-Volt Battery ........................................ 193
Changing Wiper Blades .................................................. 195
Tire Information ............................................................... 197
Tire Labeling..................................................................... 202
DOT Tire Quality Grading
............................................. 204
Testing of Readiness Codes ........................................... 206
Long-Term Storage
......................................................... 207
Paint Care ........................................................................\
. 208
SPECIFICATIONS
....................................................... 209
CLIENT INFORMATION
............................................. 211
Frequently Asked Questions/Troubleshooting .......... 211
Contact Us ........................................................................\
213
Acura Total Luxury Care Roadside Assistance ............ 214
EPA Contact Information ............................................... 214
Warranty Coverages ........................................................ 215
Disclosures ....................................................................... 216
VOICE COMMAND INDEX ........................................219
INDEX........................................................................\
.. 223 In the event of a collision, call Acura Roadside Assistance
Page 6 of 116
6 || 7
VISUAL INDEXVISUAL INDEX
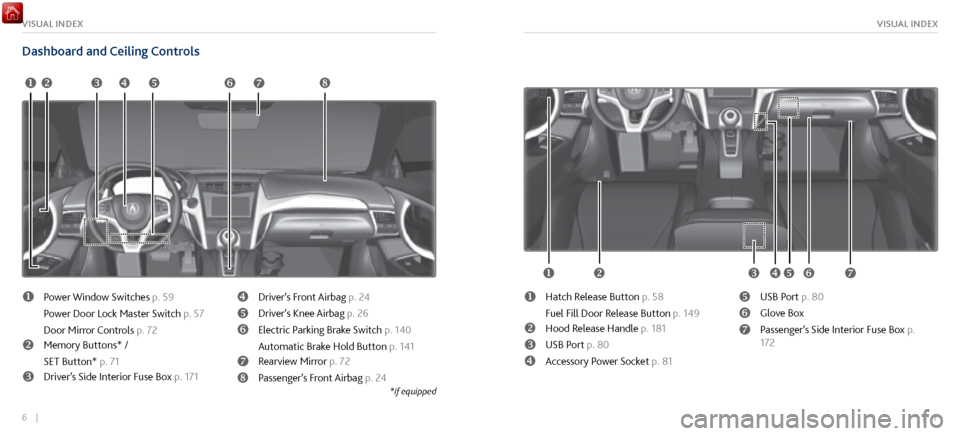
Dashboard and Ceiling Controls
u v w x y z { |
u
Power Window Switches p. 59
Power Door Lock Master Switch p. 57
Door Mirror Controls p. 72
vMemory Buttons* /
SET Button* p. 71
wDriver’s Side Interior Fuse Box p. 171
xDriver’s Front Airbag p. 24
yDriver’s Knee Airbag p. 26
zElectric Parking Brake Switch p. 140
Automatic Brake Hold Button p. 141
{Rearview Mirror p. 72
|Passenger’s Front Airbag p. 24
*if equipped
u v w x y z {
uHatch Release Button p. 58
Fuel Fill Door Release Button p. 149
vHood Release Handle p. 181
wUSB Port p. 80
xAccessory Power Socket p. 81
yUSB Port p. 80
zGlove Box
{Passenger’s Side Interior Fuse Box p.
172
Page 9 of 116
12 || 13
QUICK STARTQUICK START
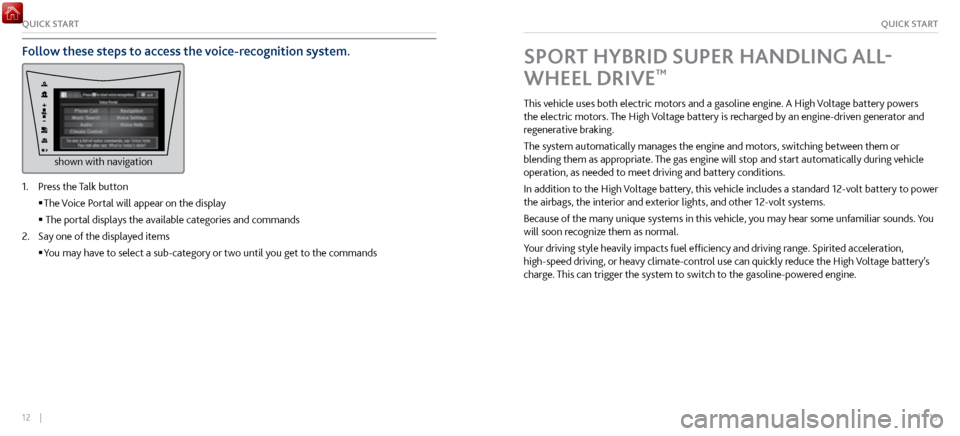
Follow these steps to access the voice-recognition system.
shown with navigation
1. Press the Talk button
The Voice P
ortal will appear on the display
The portal displays the available categories and commands
2.
Say one of the displayed items
You may have to select a sub-category
or two until you get to the commands
SPORT HYBRID SUPER HANDLING ALL-
WHEEL DRIVE
™
This vehicle uses both electric motors and a gasoline engine. A High Voltage battery powers
the electric motors. The High Voltage battery is recharged by an engine-driven generator and
regenerative braking.
The system automatically manages the engine and motors, switching between them or
blending them as appropriate. The gas engine will stop and start automatically during vehicle
operation, as needed to meet driving and battery conditions.
In addition to the High Voltage battery, this vehicle includes a standard 12-volt battery to power
the airbags, the interior and exterior lights, and other 12-volt systems.
Because of the many unique systems in this vehicle, you may hear some unfamiliar sounds. You
will soon recognize them as normal.
Your driving style heavily impacts fuel efficiency and driving range. Spirited acceleration,
high-speed driving, or heavy climate-control use can quickly reduce the High Voltage battery’s
charge. This can trigger the system to switch to the gasoline-powered engine.
Page 27 of 116
48 || 49
INSTRUMENT PANELINSTRUMENT PANEL
Condition Indicators
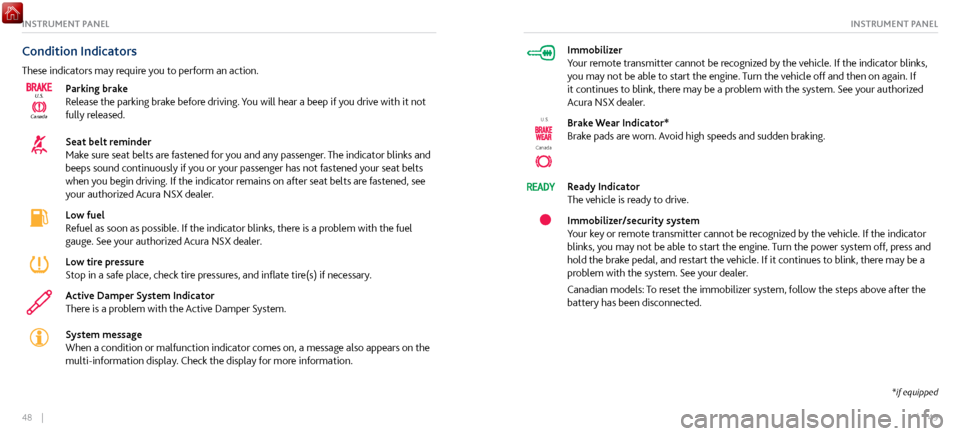
These indicators may require you to perform an action.
CanadaU.S.
Parking brake
Release the parking brake before driving. You will hear a beep if you drive with it not
fully released.
Seat belt reminder
Make sure seat belts are fastened for you and any passenger. The indicator blinks and
beeps sound continuously if you or your passenger has not fastened your seat belts
when you begin driving. If the indicator remains on after seat belts are fastened, see
your authorized Acura NSX dealer.
Low fuel
Refuel as soon as possible. If the indicator blinks, there is a problem with the fuel
gauge. See your authorized Acura NSX dealer.
Low tire pressure
Stop in a safe place, check tire pressures, and inflate tire(s) if necessary.
Active Damper System Indicator
There is a problem with the Active Damper System.
System message
When a condition or malfunction indicator comes on, a message also appears on the
multi-information display. Check the display for more information.
Immobilizer
Your remote transmitter cannot be recognized by the vehicle. If the indicator blinks,
you may not be able to start the engine. Turn the vehicle off and then on again. If
it continues to blink, there may be a problem with the system. See your authorized
Acura NSX dealer.
Canada
U.S.Brake Wear Indicator*
Brake pads are worn. Avoid high speeds and sudden braking.
Ready Indicator
The vehicle is ready to drive.
Immobilizer/security system
Your key or remote transmitter cannot be recognized by the vehicle. If the indicator
blinks, you may not be able to start the engine. Turn the power system off, press and
hold the brake pedal, and restart the vehicle. If it continues to blink, there may be a
problem with the system. See your dealer.
Canadian models: To reset the immobilizer system, follow the steps above after the
battery has been disconnected.
*if equipped
Page 29 of 116
52 || 53
INSTRUMENT PANELINSTRUMENT PANEL
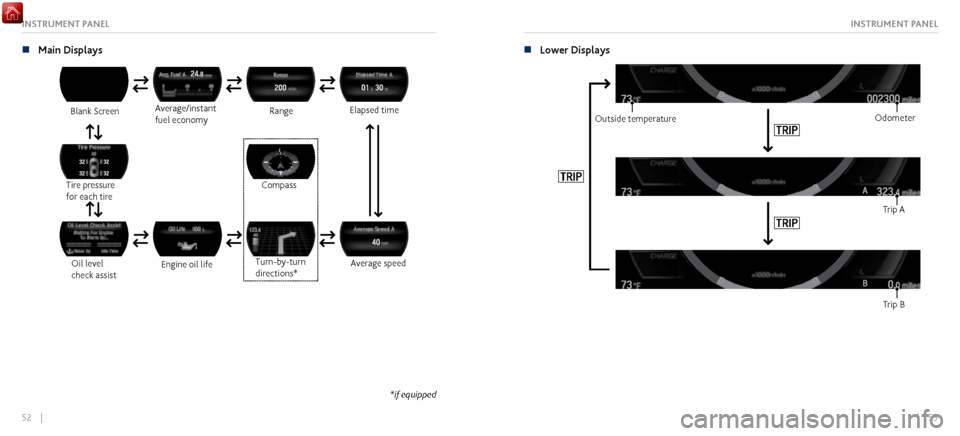
n Main Displays
Blank Screen
Oil level
check assist Average/instant
fuel economy
Tire pressure
for each tire Range
Engine oil life Elapsed time
Turn-by-turn
directions*
Average speed
Compass
*if equipped
n Lower Displays
Odometer
Outside temperature
Trip B Trip A
Page 77 of 116

148 || 149
DRIVINGDRIVING
Refueling
Use the proper fuel and refueling procedure to ensure the best performance and safety of your
vehicle.
n
Fuel Information
Unleaded premium gasoline of 93 octane maximiz
es the engine’s performance.
Unleaded premium gasoline of 91 octane or higher is recommended.
Use of gasoline with octane less than 91 can lead to engine damage.
Acura recommends TOP TIER Detergent Gasoline where available.
Do NOT use gasoline containing more than 15% ethanol.
Do NOT use gasoline containing methanol.
Do NOT use gasoline containing MMT.
We recommend quality gasoline containing detergent additives that help prevent fuel
system and engine deposits. In addition, in order to maintain good performance, fuel
economy, and emissions control, we strongly recommend the use of gasoline that does NOT
contain harmful manganese-based fuel additives such as MMT, if such gasoline is available.
NOTICE n
How to Refuel
The fuel
fill door is located at the left rear of the vehicle. Park next to the service pump that
is most accessible. This vehicle does not use a fuel-fill cap.
Turn off the power system.
Press the fuel fill door release button.
Insert the filler nozzle fully. When the tank is full, the fuel
nozzle clicks off automatically.
Wait about five seconds. Remove the filler nozzle and close
the fuel fill door.
Press
Gasoline is highly flammable and explosive. You can be burned or seriously
injured when handling fuel.
Stop the engine, and keep heat, sparks, and flame away.
Handle fuel only outdoors.
Wipe up spills immediately.
WARNING
Fuel Fill Door Release Button
Page 85 of 116

164 || 165
HANDLING THE UNEXPECTEDHANDLING THE UNEXPECTED
n Tire Pressure Monitoring System (TPMS) - Required Federal Explanation
Each tire, including
the spare (if provided), should be checked monthly when cold
and inflated to the inflation pressure recommended by the vehicle manufacturer
on the vehicle placard or tire inflation pressure label.
(If your vehicle has tires of a different size than the size indicated on the vehicle
placard or tire inflation pressure label, you should determine the proper tire
inflation pressure for those tires.)
As an added safety feature, your vehicle has been equipped with a tire
pressure monitoring system (TPMS) that illuminates a low tire pressure
telltale when one or more of your tires is significantly under-inflated.
Accordingly, when the low tire pressure telltale illuminates, you should stop and
check your tires as soon as possible, and inflate them to the proper pressure.
Driving on a significantly under-inflated tire causes the tire to overheat and can
lead to tire failure. Under-inflation also reduces fuel efficiency and tire tread life,
and may affect the vehicle’s handling and stopping ability.
Please note that the TPMS is not a substitute for proper tire maintenance, and it is
the driver’s responsibility to maintain correct tire pressure, even if under-inflation
has not reached the level to trigger illumination of the TPMS low tire pressure
telltale. Your vehicle has also been equipped with a TPMS malfunction indicator to indicate
when the system is not operating properly. The TPMS malfunction indicator
is combined with the low tire pressure telltale. When the system detects a
malfunction, the telltale will flash for approximately one minute and then remain
continuously illuminated. This sequence will continue upon subsequent vehicle
start-ups as long as the malfunction exists.
When the malfunction indicator is illuminated, the system may not be able to
detect or signal low tire pressure as intended.
TPMS malfunctions may occur for a variety of reasons, including the installation of
replacement or alternate tires or wheels on the vehicle that prevent the TPMS from
functioning properly.
Always check the TPMS malfunction telltale after replacing one or more tires
or wheels on your vehicle to ensure that the replacement or alternate tires and
wheels allow the TPMS to continue to function properly.
Page 88 of 116
170 || 171
HANDLING THE UNEXPECTEDHANDLING THE UNEXPECTED
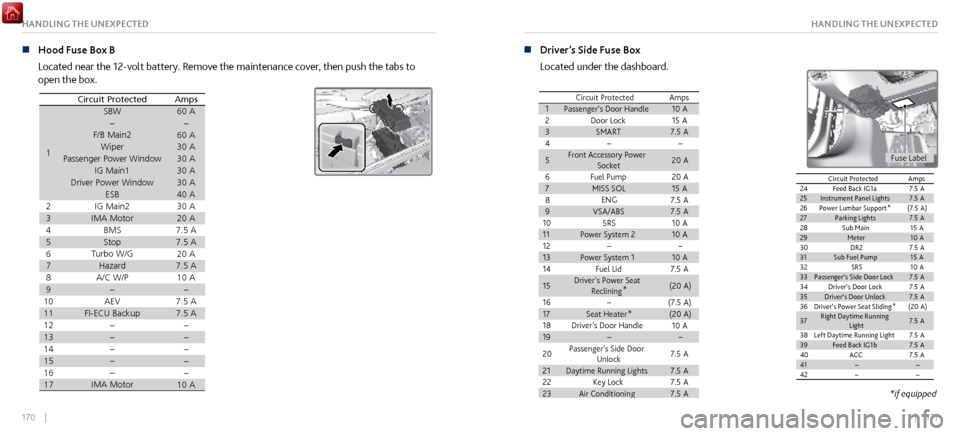
n Hood Fuse Box B
Located near the 12-volt battery
. Remove the maintenance cover, then push the tabs to
open the box.
AmpsCircuit Protected
160 A�60A30A30A30A30A40A
230 A
320 A
47. 5A
5
6 7.
5A20 A
7
8 7.
5A10 A
9�
107. 5A
11
12 7.
5A
�13�
14 �
15�
16 �
1710A
SBW
�
F/B Main 2
Wiper
Passenger Power Window IG Main1
Driver Power Window ESB
IG Main2
IMA Moto r
BM S
Stop
Turbo W/ G
Hazard WA/
C/ P
�
AEV
FI-ECU Backup �
�
�
�
�
IMA Motor
n Driver’s Side Fuse Box
Located under the dashboard.
Circuit Protected Amps110A
215 A
37.5 A
4�
520 A
6
20 A
715 A
87.5 A
97.5 A
1010 A
1110 A
12�1310 A
147.5 A
15
(20A )
16
(7.5 A)
17(20A )
1810 A
19�
207.5 A
21
7.5 A
227.5 A
237.5 A
Passenger’s Door Handle Door LockSMART �
Front Accessory Power Socket
Fuel Pum p
MISS SO L
ENG
VSA/ABS SRS
Power System 2
�
Power System 1
Fuel Lid
Driver’s Power Seat Reclining *
�
Seat Heater *
Driver’s Door Handle �
Passenger’s Side Door Unlock
Daytime Running Lights
Key Lock
Air Conditionin g
24Feed Back IG1a 7.5A
25Instrument Panel Lights7.5A
26Power Lumbar Support *(7.5
A)
27Parking Lights7.5A
28Sub Main15 A29Meter10 A30DR27.5A
31Sub Fuel Pump15 A
32SR S10 A
33Passenger’s Side Door Lock 7.5A34Driver’s Door Lock7.5A
35Driver’s Door Unlock7.5A
36Driver’s Power Seat Sliding *(2
0A )
37
7.5A
Right Daytime Running
Light
38
7.5A39 Left Daytime Running LightFeed Back IG1b7.5A
40ACC7.5A
41��42��
AmpsCircuit Protecte d
Fuse Label
Circuit Protected Amps110A
215 A
37.5 A
4�
520 A
6
20 A
715 A
87.5 A
97.5 A
1010 A
1110 A
12�1310 A
147.5 A
15
(20A )
16
(7.5 A)
17(20A )
1810 A
19�
207.5 A
21
7.5 A
227.5 A
237.5 A
Passenger’s Door Handle Door LockSMART �
Front Accessory Power Socket
Fuel Pum p
MISS SO L
ENG
VSA/ABS SRS
Power System 2
�
Power System 1
Fuel Lid
Driver’s Power Seat Reclining *
�
Seat Heater *
Driver’s Door Handle �
Passenger’s Side Door Unlock
Daytime Running Lights
Key Lock
Air Conditionin g
24Feed Back IG1a 7.5A
25Instrument Panel Lights7.5A
26Power Lumbar Support *(7.5
A)
27Parking Lights7.5A
28Sub Main15 A29Meter10 A30DR27.5A
31Sub Fuel Pump15 A
32SR S10 A
33Passenger’s Side Door Lock 7.5A34Driver’s Door Lock7.5A
35Driver’s Door Unlock7.5A
36Driver’s Power Seat Sliding *(2
0A )
37
7.5A
Right Daytime Running
Light
38
7.5A39 Left Daytime Running LightFeed Back IG1b7.5A
40ACC7.5A
41��42��
AmpsCircuit Protecte d
*if equipped
Page 90 of 116
174 || 175
MAINTENANCEHANDLING THE UNEXPECTED
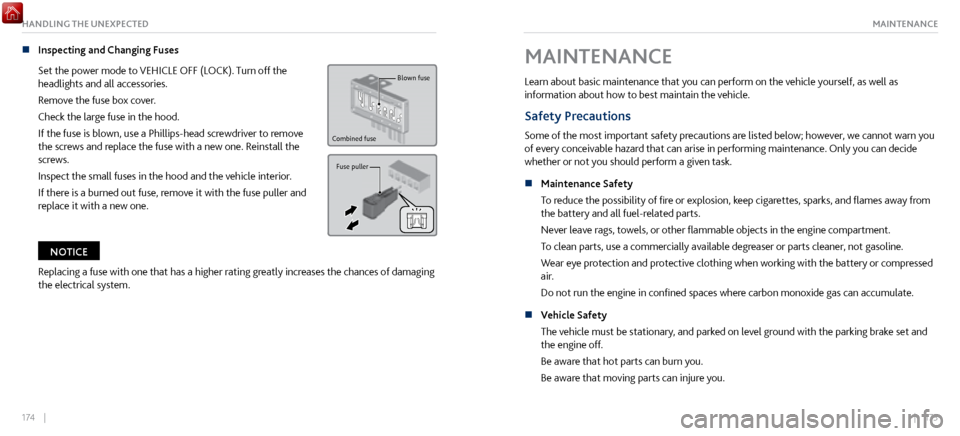
n Inspecting and Changing Fuses
Set the power mode to
VEHICLE OFF (LOCK). Turn off the
headlights and all accessories.
Remove the fuse box cover.
Check the large fuse in the hood.
If the fuse is blown, use a Phillips-head screwdriver to remove
the screws and replace the fuse with a new one. Reinstall the
screws.
Inspect the small fuses in the hood and the vehicle interior.
If there is a burned out fuse, remove it with the fuse puller and
replace it with a new one.
Blown fuse
Combined fuse
Fuse puller
Replacing a fuse with one that has a higher rating greatly increases the chances of damaging
the electrical system.
NOTICE
MAINTENANCE
Learn about basic maintenance that you can perform on the vehicle yourself, as well as
information about how to best maintain the vehicle.
Safety Precautions
Some of the most important safety precautions are listed below; however, we cannot warn you
of every conceivable hazard that can arise in performing maintenance. Only you can decide
whether or not you should perform a given task.
n
Maintenance Safety
To reduce the possibility
of fire or explosion, keep cigarettes, sparks, and flames away from
the battery and all fuel-related parts.
Never leave rags, towels, or other flammable objects in the engine compartment.
To clean parts, use a commercially available degreaser or parts cleaner, not gasoline.
Wear eye protection and protective clothing when working with the battery or compressed
air.
Do not run the engine in confined spaces where carbon monoxide gas can accumulate.
n
Vehicle Safety
The vehicle must be stationary
, and parked on level ground with the parking brake set and
the engine off.
Be aware that hot parts can burn you.
Be aware that moving parts can injure you.
Page 92 of 116
178 || 179
MAINTENANCEMAINTENANCE
Independent of the Maintenance Minder information:
•
Replace the brake
fluid every 3 years.
•
Inspect idle speed every 160,000 miles (256,000 km).
•
Adjust the val
ves during services A, B, 1, 2, or 3 if they are noisy.
•
Inspect the fuel injection systems every 3
years.
•
Inspect tire condition every 3,
100 miles (5,000 km).
For U.S. models: Maintenance, replacement, or repair of emissions control devices and systems may
be done by any automotive repair establishment or individuals using parts that are certified to EPA
standards.
According to state and federal regulations, failure to perform maintenance on the maintenance main items
marked with # will not void your emissions warranties. However, all maintenance services should be performed
in accordance with the intervals indicated by the multi-information display.
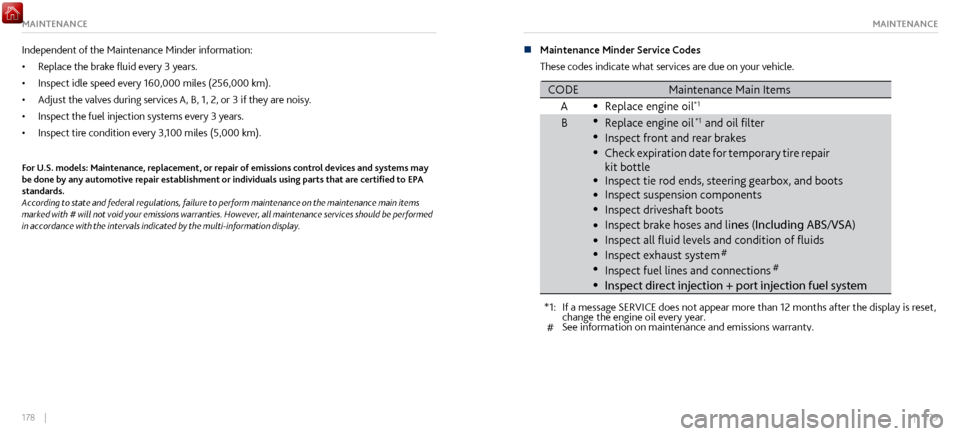
n Maintenance Minder Service Codes
These codes indicate what services are due on your vehicle.
*1: If a message SERVICE does not appear more than 12 months after the displ\
ay is reset,
CODE
change the engine oil every year.
See information on maintenance and emissions warranty.
A Maintenance Main Items
B
Inspect exhaust system#
Inspect fuel lines and connections#
Inspect direct injection + port injection fuel system
Replace engine oi
l*1
Replace engine oil*1 and oil �lter
Inspect front and rear brakes
Check expiration date for temporary tire repair
kit bottle
Inspect tie rod ends, steering gearbox, and boots
Inspect suspension components
Inspect driveshaft boots
Inspect brake hoses and li nes (Including ABS/VSA)
Inspect all �uid levels and condition of �uids
#