buttons ACURA NSX 2020 Owners Manual
[x] Cancel search | Manufacturer: ACURA, Model Year: 2020, Model line: NSX, Model: ACURA NSX 2020Pages: 491, PDF Size: 20.24 MB
Page 6 of 491
4
Quick Reference Guide
Quick Reference Guide
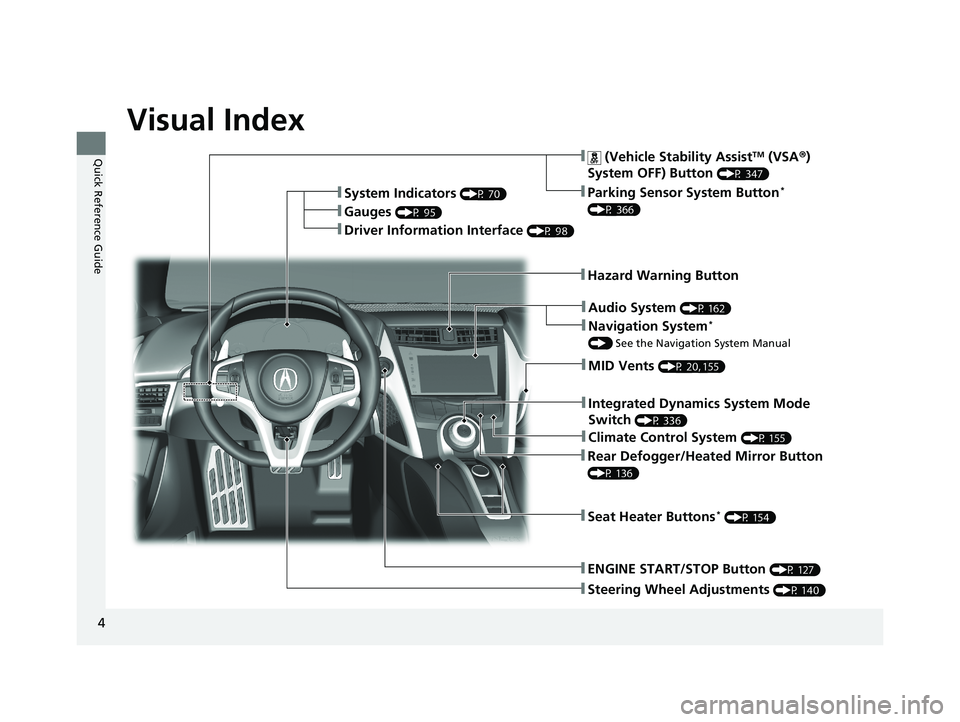
Visual Index
❚Steering Wheel Adjustments (P 140)
❚ENGINE START/STOP Button (P 127)
❚ (Vehicle Stability AssistTM
(VSA ®)
System OFF) Button (P 347)
❚System Indicators
(P 70)
❚Gauges (P 95)
❚Driver Information Interface (P 98)
❚Rear Defogger/Heated Mirror Button
(P 136)
❚Parking Sensor System Button *
(P 366)
❚Hazard Warning Button
❚Seat Heater Buttons *
(P 154)
❚Audio System (P 162)
❚Climate Control System (P 155)
❚MID Vents (P 20, 155)
❚Navigation System *
() See the Navigation System Manual
❚Integrated Dynamics System Mode
Switch (P 336)
20 ACURA NSX PMC-31T6N6300.book 4 ページ 2019年9月11日 水曜日 午後4時51分
Page 7 of 491
5
Quick Reference Guide
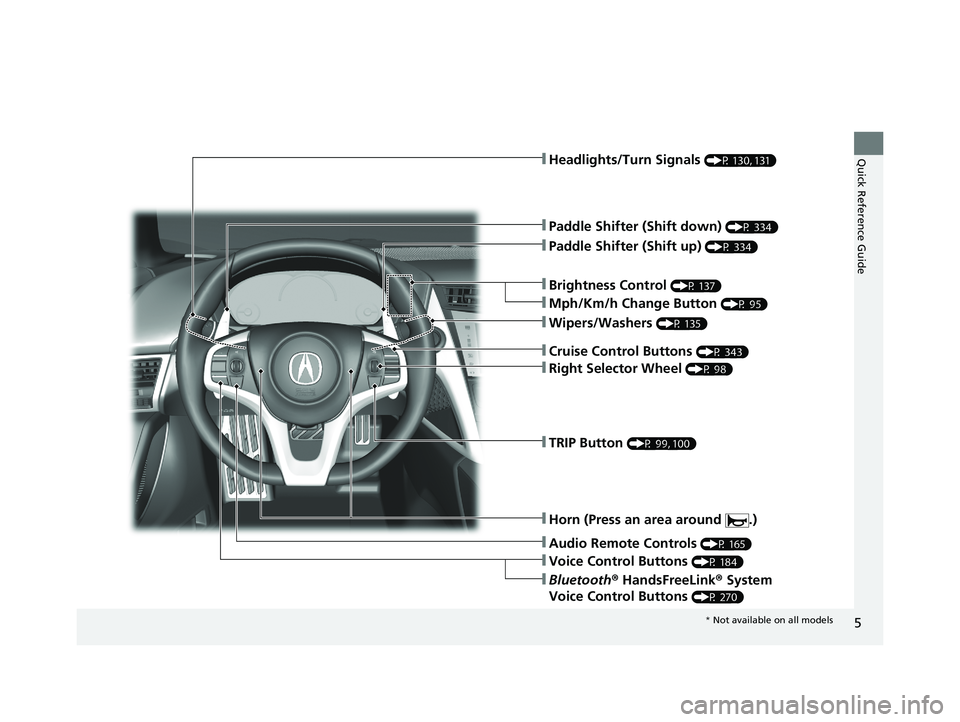
❚Wipers/Washers (P 135)
❚Headlights/Turn Signals (P 130, 131)
❚Paddle Shifter (Shift down) (P 334)
❚Paddle Shifter (Shift up) (P 334)
❚Horn (Press an area around .)
❚Voice Control Buttons (P 184)
❚Bluetooth® HandsFreeLink ® System
Voice Control Buttons (P 270)
❚TRIP Button
(P 99, 100)
❚Right Selector Wheel (P 98)
❚Audio Remote Controls (P 165)
❚Brightness Control (P 137)
❚Mph/Km/h Change Button (P 95)
❚Cruise Control Buttons (P 343)
* Not available on all models
20 ACURA NSX PMC-31T6N6300.book 5 ページ 2019年9月11日 水曜日 午後4時51分
Page 22 of 491

20
Quick Reference Guide
Climate Control System (P 155)
● Press the AUTO button to activate the climate control system.
● Press the button to turn the system on or off.
● Press the button to defrost the windshield.
Passenger side Temperature Control
Buttons (Windshield Defroster) ButtonDriver side Temperature Control
Buttons
(Recirculation) Button
(CLIMATE ) Button
(ON/OFF ) Button
AUTO Button
Audio/Information Touch Screen
SYNC (Synchronization) Button Air flows from floor and
windshield defroster vents. Air flows from floor vents. Air flows from floor and
dashboard vents.
Air flows from dashboard vents.
MID vents provide supplemental
air to the lower body of the
occupant(s). MID vents can be
used together with any other
vent mode.
20 ACURA NSX PMC-31T6N6300.book 20 ページ 2019年9月11日 水曜日 午後4時51分
Page 71 of 491

69
Instrument Panel
This chapter describes the buttons, indicators, and gauges that are used while driving.
Indicators ............................................ 70
Driver Information Interface Warning and Information Messages ...................... 83
Gauges and Displays .......................... 95
Gauges .............................................. 95
Driver Information Interface ............... 98
20 ACURA NSX PMC-31T6N6300.book 69 ページ 2019年9月11日 水曜日 午後4時51分
Page 141 of 491

139
uuOperating the Switches Around the Steering WheeluDriving Position Memory System*
Controls
1.
Set the power mode to ON. Adjust the
driver’s seat and the door mirrors to the
desired position.
2. Press the SET button.
uYou will hear the beeper, and the
memory button indicator light will blink.
3. Press memory button
(1 or (2 within five
seconds of pressing the SET button.
uOnce the seat and the outside mirrors position have been memorized, you will
hear the beeper twic e, and the indicator
light on the button you pressed stays on.
1. Put the transmission into
(P .
2. Apply the parking brake.
3. Press a memory button (
(1 or (2).
uYou will hear the beep, and the indicator
light will blink.
The seat and the door mirrors will
automatically move to the memorized
positions. When it has finished moving, you
will hear the beeper tw ice, and the indicator
light stays on.
■Storing a Position in Memory1Storing a Position in Memory
After you press the SET button, the storing operation
will be canceled when:
• You do not press the memory button within five
seconds.
• You readjust the seat or the outside mirror position
before the double-beep.
• You set the power mode to any position except ON.
SET Button
Memory
Button 1
Memory
Button 2
■Recalling the Stored Position1Recalling the Stored Position
The seat and door mirror s will stop moving if you:
• Press the SET button, or a memory button (
(1 or (2).
• Adjust the seat position or door mirrors.
• Put the transmission into a position other than
(P .
Memory Buttons
20 ACURA NSX PMC-31T6N6300.book 139 ページ 2019年9月11日 水曜日 午後4時51分
Page 157 of 491
155
Continued
Controls
Climate Control System
Using Automatic Climate Control
The automatic climate control
system maintains the interior temperature you select.
The system also selects the proper mix of h eated or cooled air to raise or lower the
interior temperature to your pr eference as quickly as possible.
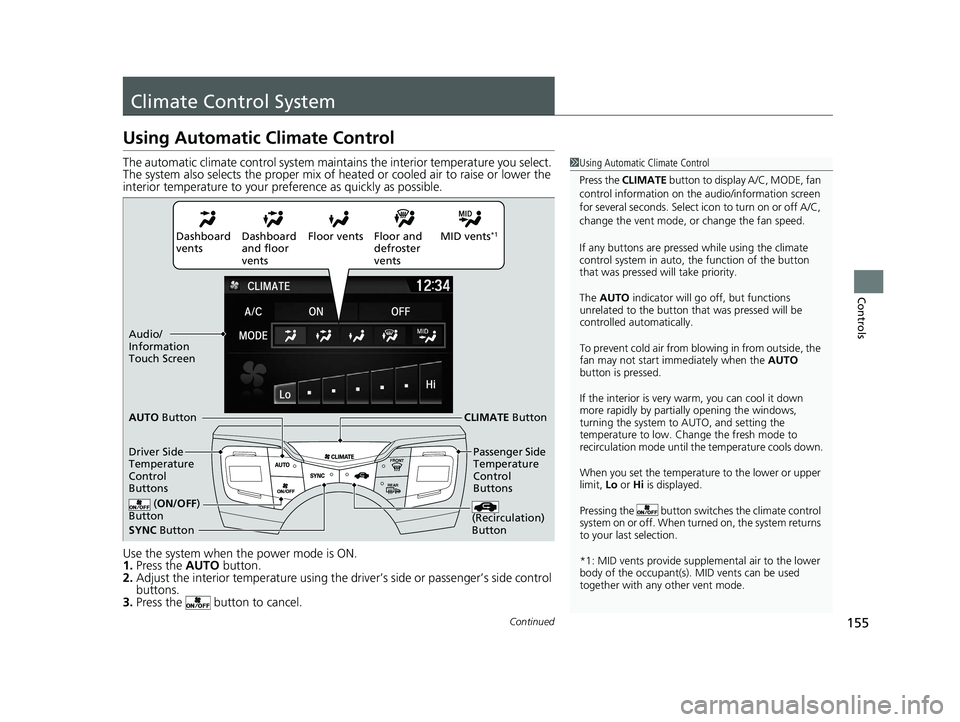
Use the system when the power mode is ON. 1. Press the AUTO button.
2. Adjust the interior temperature using the dr iver’s side or passenger’s side control
buttons.
3. Press the button to cancel.
1Using Automatic Climate Control
Press the CLIMATE button to display A/C, MODE, fan
control information on the audio/information screen
for several seconds. Select icon to turn on or off A/C, change the vent mode, or change the fan speed.
If any buttons are presse d while using the climate
control system in auto, the function of the button
that was pressed will take priority.
The AUTO indicator will go off, but functions
unrelated to the button th at was pressed will be
controlled automatically.
To prevent cold air from bl owing in from outside, the
fan may not start i mmediately when the AUTO
button is pressed.
If the interior is very warm, you can cool it down
more rapidly by partial ly opening the windows,
turning the system to AUTO, and setting the
temperature to low. Change the fresh mode to
recirculation mode until the temperature cools down.
When you set the temperat ure to the lower or upper
limit, Lo or Hi is displayed.
Pressing the button switch es the climate control
system on or off. When tu rned on, the system returns
to your last selection.
*1: MID vents provide supple mental air to the lower
body of the occupant(s). MID vents can be used
together with any other vent mode.
Dashboard
ventsDashboard
and floor
vents Floor vents Floor and
defroster
ventsMID vents
*1
SYNC Button
AUTO
Button
CLIMATE Button
Driver Side Temperature Con
trol
Buttons Passenger Side Temperature
Control
Buttons
(
ON/ OFF
)
Button
(Recirculation) Button
Audio/ Information
Touch Screen
20 ACURA NSX PMC-31T6N6300.book 155 ページ 2019年9月11日 水曜日 午後4時51分
Page 160 of 491

uuClimate Control SystemuUsing Automatic Climate Control
158
Controls
You can set the temperature synchronously fo r the driver’s side and the passenger’s
side in synchronization mode. 1. Press the SYNC button.
uThe system switches to synchronization mode.
2. Adjust the temperature using the driver ’s side temperature control buttons.
Press the SYNC button to return to dual mode.
■Synchronization Mode1Synchronization Mode
When the system is in dua l mode, the driver’s side
temperature and the passe nger’s side temperature
can be set separately.
SYNC Button
Driver’s Side Te
mperature
Control
Buttons Passenger’s
Side
Temperature Control
Buttons
20 ACURA NSX PMC-31T6N6300.book 158 ページ 2019年9月11日 水曜日 午後4時51分
Page 186 of 491

184
uuAudio System Basic OperationuVoice Control Operation
Features
Voice Control Operation
Your vehicle has a voice control system that allows hands-free operation.
The voice control system uses the (Talk) and (hang-up/back) buttons on
the steering wheel and a microphone near the map lights on the ceiling.
To achieve optimum voice recognition when using the voice control system: • Make sure the correct screen is displa yed for the voice command that you are
using.
The system recognizes only certain commands. Available voice commands. 2 Voice Portal Screen P. 185
• Close the windows.
• Adjust the dashboard and side vents so air does not blow onto the microphone
on the ceiling.
• Speak clearly in a natural speaking vo ice without pausing between words.
• Reduce any background noise if possible. The system may misinterpret your
command if more than one person is speaking at the same time.
■Voice Recognition
1Voice Control Operation
When you press the button, a helpful prompt asks what you would like to do. Press and release the
button again to bypass th is prompt and give a
command.
1Voice Recognition
The voice control system can only be used from the driver’s seat because the microphone unit removes
noises from the front passenger’s side.
20 ACURA NSX PMC-31T6N6300.book 184 ページ 2019年9月11日 水曜日 午後4時51分
Page 270 of 491
268
uuHomeLink® Universal TransceiveruTraining HomeLink
Features
Training HomeLink
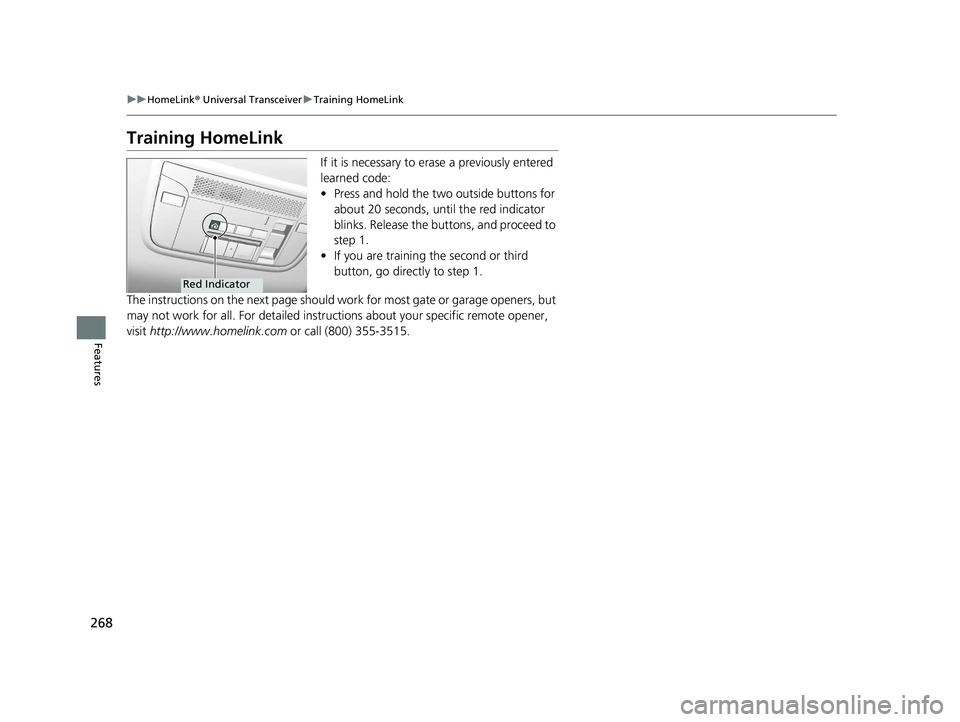
If it is necessary to erase a previously entered
learned code: •Press and hold the two outside buttons for
about 20 seconds, until the red indicator blinks. Release the bu ttons, and proceed to
step 1.
• If you are training the second or third
button, go directly to step 1.
The instructions on the next page should wo rk for most gate or garage openers, but
may not work for all. For detailed instruct ions about your specific remote opener,
visit http://www.homelink.com or call (800) 355-3515.
Red Indicator
20 ACURA NSX PMC-31T6N6300.book 268 ページ 2019年9月11日 水曜日 午後4時51分
Page 271 of 491
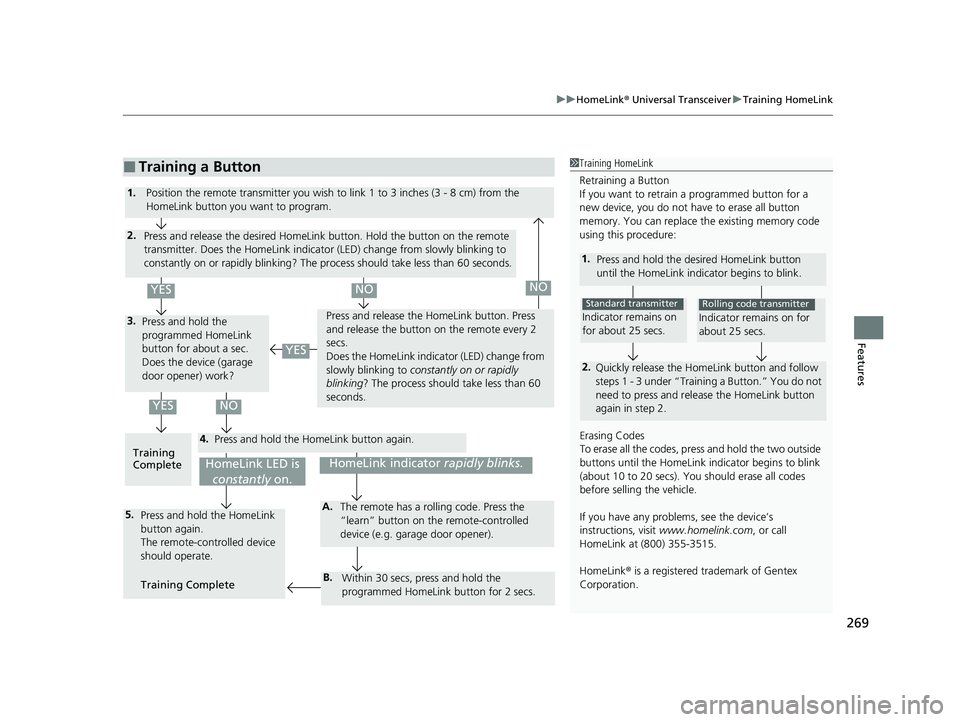
269
uuHomeLink® Universal TransceiveruTraining HomeLink
Features
■Training a Button1Training HomeLink Retraining a Button
If you want to retrain a programmed button for a
new device, you do not ha ve to erase all button
memory. You can replace the existing memory code
using this procedure:
1. Press and hold the desi red HomeLink button
until the HomeLink indi cator begins to blink.
2.
Quickly release the Home Link button and follow
steps 1 - 3 under “Training a Button.” You do not
need to press and rele ase the HomeLink button
again in step 2.
Indicator remains on
for about 25 secs.
Standard transmitter
Indicator remains on for about 25 secs.
Rolling code transmitter
Erasing Codes
To erase all the codes, press and hold the two outside
buttons until the HomeLink i ndicator begins to blink
(about 10 to 20 secs). You should erase all codes
before selling the vehicle.
If you have any problems, see the device’s
instructions, visit www.homelink.com , or call
HomeLink at (800) 355-3515.
HomeLink ® is a registered tra demark of Gentex
Corporation.4.
3.
2.
5.A.
B.
1. Position the remote transmitter you wish to link 1 to 3 inches (3 - 8 cm) from the
HomeLink button you want to program.
Press and release the desi red HomeLink button. Hold the button on the remote
transmitter. Does the HomeLink indicato r (LED) change from slowly blinking to
constantly on or rapidly blinking? The pr ocess should take less than 60 seconds.
Press and hold the
programmed HomeLink
button for about a sec.
Does the device (garage
door opener) work? Press and release the Ho
meLink button. Press
and release the button on the remote every 2
secs.
Does the HomeLink indica tor (LED) change from
slowly blinking to constantly on or rapidly
blinking ? The process should take less than 60
seconds.
Training
Complete Press and hold the HomeLink button again.
Press and hold the HomeLink button again.
The remote-controlled device
should operate.
Training Complete The remote has a ro
lling code. Press the
“learn” button on the remote-controlled
device (e.g. garage door opener).
Within 30 secs, press and hold the
programmed HomeLink button for 2 secs.
HomeLink indicator rapidly blinks.HomeLink LED is
constantly on.
YESNO
YES
YESNONO
20 ACURA NSX PMC-31T6N6300.book 269 ページ 2019年9月11日 水曜日 午後4時51分