display Acura RDX 2011 Navigation Manual
[x] Cancel search | Manufacturer: ACURA, Model Year: 2011, Model line: RDX, Model: Acura RDX 2011Pages: 176, PDF Size: 4.42 MB
Page 101 of 176
100Navigation System
System Setup
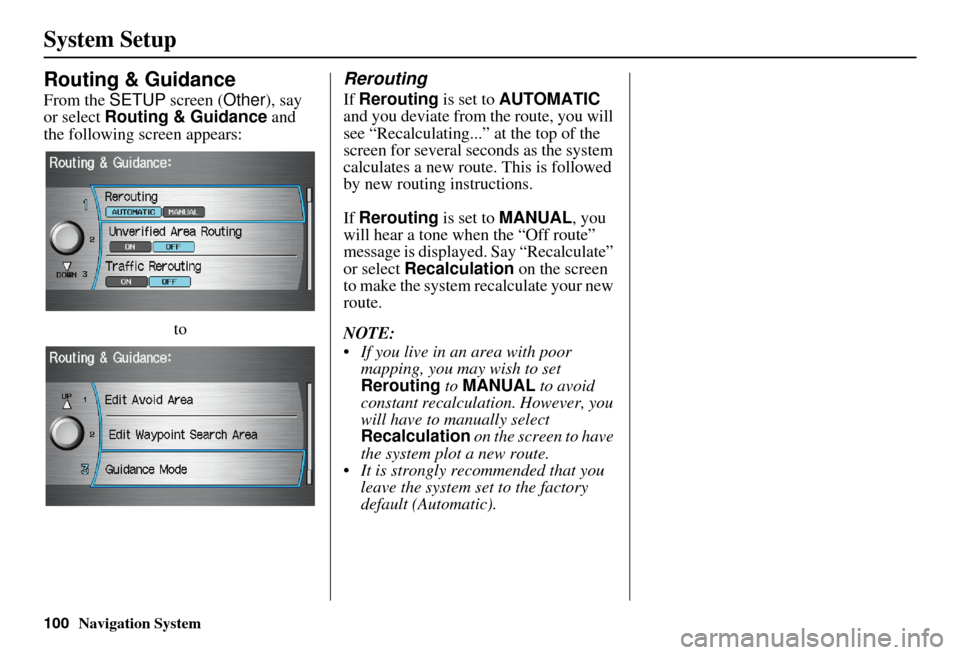
Routing & Guidance
From the SETUP screen ( Other), say
or select Routing & Guidance and
the following screen appears:
to
Rerouting
If Rerouting is set to AUTOMATIC
and you deviate from the route, you will
see “Recalculating...” at the top of the
screen for several seconds as the system
calculates a new route. This is followed
by new routing instructions.
If Rerouting is set to MANUAL , you
will hear a tone wh en the “Off route”
message is displayed. Say “Recalculate”
or select Recalculation on the screen
to make the system recalculate your new
route.
NOTE:
If you live in an area with poor mapping, you may wish to set
Rerouting to MANUAL to avoid
constant recalculation. However, you
will have to manually select
Recalculation on the screen to have
the system plot a new route.
It is strongly recommended that you leave the system set to the factory
default (Automatic).
Page 102 of 176
Navigation System101
System Setup
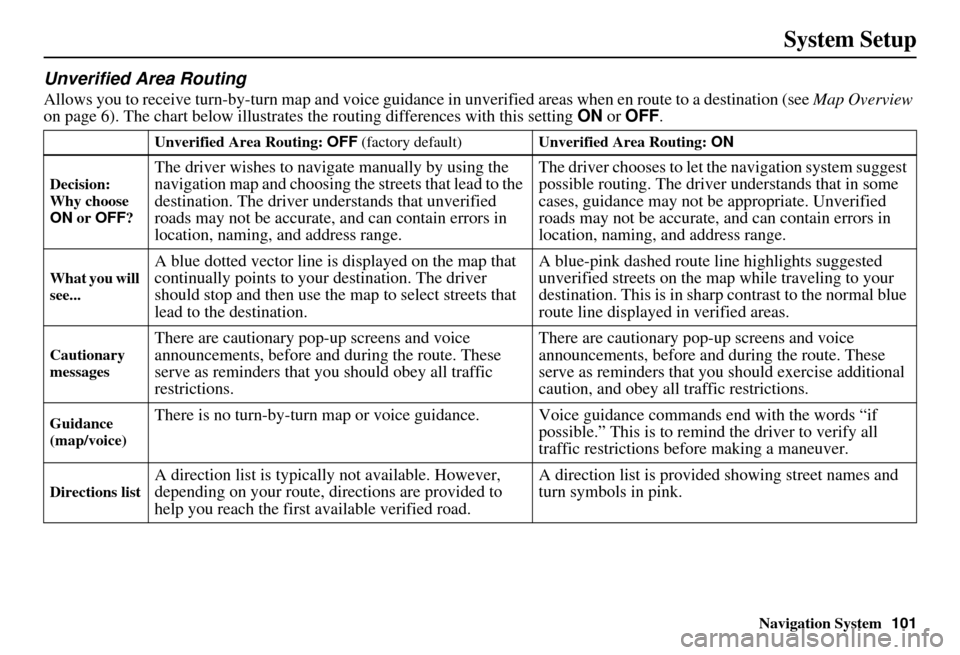
Unverified Area Routing
Allows you to receive turn-by-turn ma p and voice guidance in unverified areas when en route to a destination (see Map Overview
on page 6). The chart below illustrates the routing differences with this setting ON or OFF .
Unverified Area Routing: OFF (factory default) Unverified Area Routing: ON
Decision:
Why choose
ON or OFF ?
The driver wishes to navigate manually by using the
navigation map and choosing th e streets that lead to the
destination. The driver un derstands that unverified
roads may not be accurate, and can contain errors in
location, naming, and address range. The driver chooses to let th
e navigation system suggest
possible routing. The driver understands that in some
cases, guidance may not be appropriate. Unverified
roads may not be accurate, and can contain errors in
location, naming, and address range.
What you will
see...A blue dotted vector line is displayed on the map that
continually points to your destination. The driver
should stop and then use the map to select streets that
lead to the destination. A blue-pink dashed route line highlights suggested
unverified streets
on the map while traveling to your
destination. This is in sharp contrast to the normal blue
route line displayed in verified areas.
Cautionary
messagesThere are cautionary pop-up screens and voice
announcements, before and during the route. These
serve as reminders that you should obey all traffic
restrictions. There are cautionary pop-
up screens and voice
announcements, before and during the route. These
serve as reminders that you should exercise additional
caution, and obey all traffic restrictions.
Guidance
(map/voice)There is no turn-by-turn map or voice guidan ce. Voice guidance commands end with the words “if
possible.” This is to remind the driver to verify all
traffic restrictions before making a maneuver.
Directions listA direction list is typically not available. However,
depending on your route, directions are provided to
help you reach the first available verified road. A direction list is provided showing street names and
turn symbols in pink.
Page 105 of 176
104Navigation System
System Setup
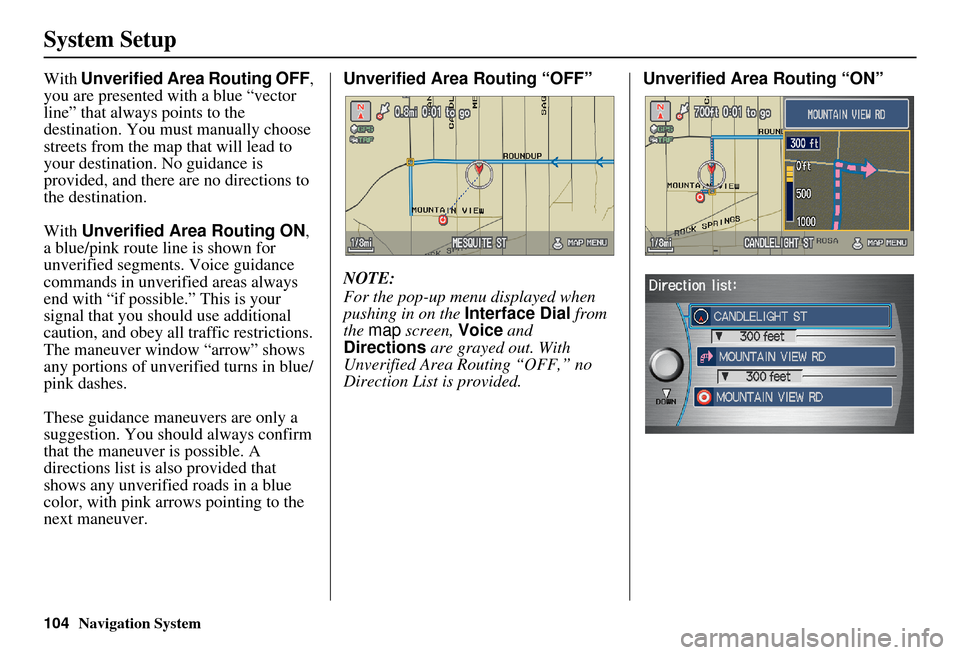
With Unverified Area Routing OFF ,
you are presented with a blue “vector
line” that always points to the
destination. You must manually choose
streets from the map that will lead to
your destination. No guidance is
provided, and there are no directions to
the destination.
With Unverified Area Routing ON,
a blue/pink route line is shown for
unverified segments. Voice guidance
commands in unverified areas always
end with “if possible.” This is your
signal that you should use additional
caution, and obey all traffic restrictions.
The maneuver window “arrow” shows
any portions of unverified turns in blue/
pink dashes.
These guidance maneuvers are only a
suggestion. You should always confirm
that the maneuver is possible. A
directions list is also provided that
shows any unverified roads in a blue
color, with pink arrows pointing to the
next maneuver. Unverified Area Routing “OFF”
NOTE:
For the pop-up menu displayed when
pushing in on the
Interface Dial from
the map screen, Voice and
Directions are grayed out. With
Unverified Area Routing “OFF,” no
Direction List is provided. Unverified Area
Routing “ON”
Page 106 of 176
Navigation System105
System Setup
Traffic Rerouting
When driving en route to your
destination, if Traffic Rerouting is set
to ON and the system finds a faster
route based on traffic flow information
or detects a Road Closed incident, it
automatically recalculates and displays
a pop-up box to signify that the route
has changed.
You can also calculate the detour route
manually by choosing to avoid specific
incidents and/or congestion on your
route (see Traffic Rerouting on
page 72).
When Traffic Rerouting is set to
OFF , the system will neither calculate
the detour route nor display the pop-up
box. The factory default is OFF .
NOTE:
Automatic traffic rerouting may give
inappropriate guidance in metro areas
with limited or incomplete traffic flow
data.
Edit Avoid Area
This function allows you to select areas
you wish to avoid when calculating a
route to your destination. You can select
up to five areas to avoid. You may wish
to set up an “avoid ar ea” to route around
long-term road construction, closures,
or any area you wish to avoid. If you
enter a route that takes you through or
into an “avoid area, ” a pop-up box will
warn you that your route takes you into
one of these areas. However, you can
still choose destinations in an avoided
area.
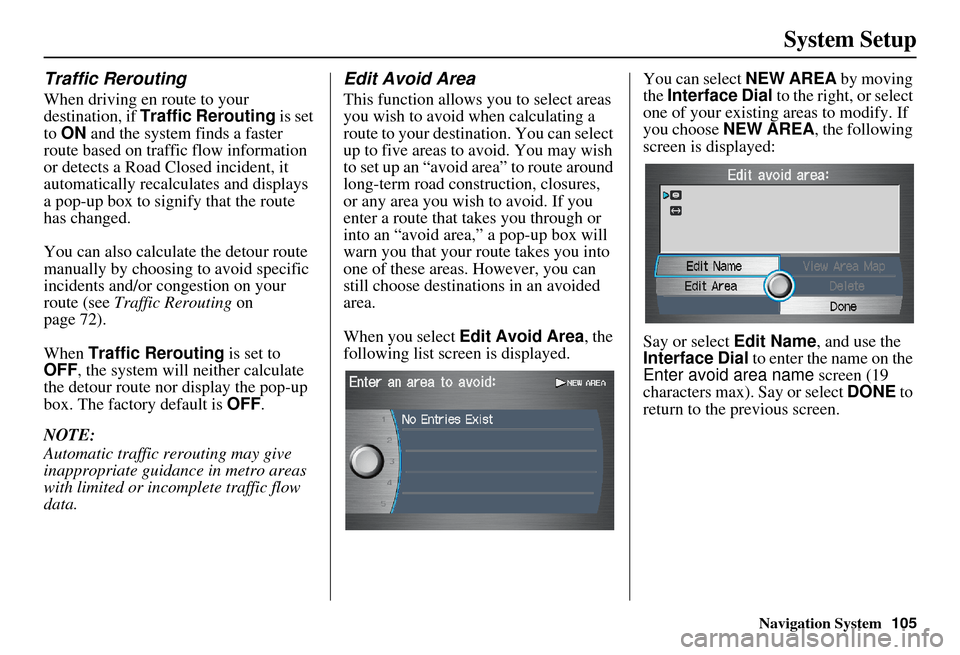
When you select Edit Avoid Area , the
following list screen is displayed. You can select
NEW AREA by moving
the Interface Dial to the right, or select
one of your existing areas to modify. If
you choose NEW AREA , the following
screen is displayed:
Say or select Edit Name, and use the
Interface Dial to enter the name on the
Enter avoid area name screen (19
characters max). Say or select DONE to
return to the previous screen.
Page 107 of 176
106Navigation System
System Setup
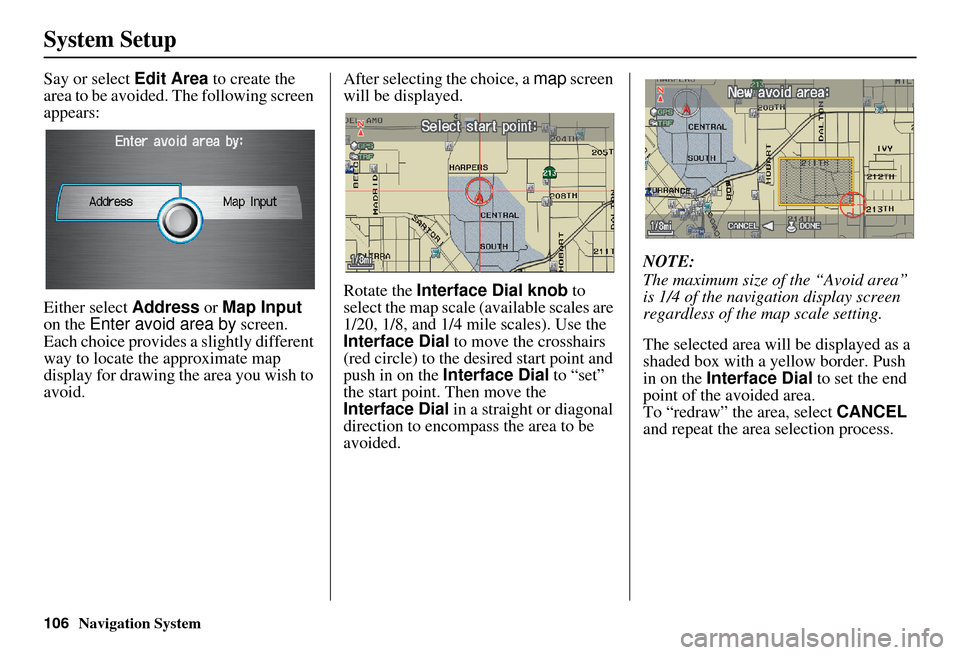
Say or select Edit Area to create the
area to be avoided. The following screen
appears:
Either select Address or Map Input
on the Enter avoid area by screen.
Each choice provides a slightly different
way to locate the approximate map
display for drawing th e area you wish to
avoid. After selecting the choice, a
map screen
will be displayed.
Rotate the Interface Dial knob to
select the map scale (available scales are
1/20, 1/8, and 1/4 mile scales). Use the
Interface Dial to move the crosshairs
(red circle) to the de sired start point and
push in on the Interface Dial to “set”
the start point. Then move the
Interface Dial in a straight or diagonal
direction to encompass the area to be
avoided. NOTE:
The maximum size of the “Avoid area”
is 1/4 of the navigation display screen
regardless of the map scale setting.
The selected area will be displayed as a
shaded box with a yellow border. Push
in on the
Interface Dial to set the end
point of the avoided area.
To “redraw” the area, select CANCEL
and repeat the area selection process.
Page 109 of 176
108Navigation System
System Setup
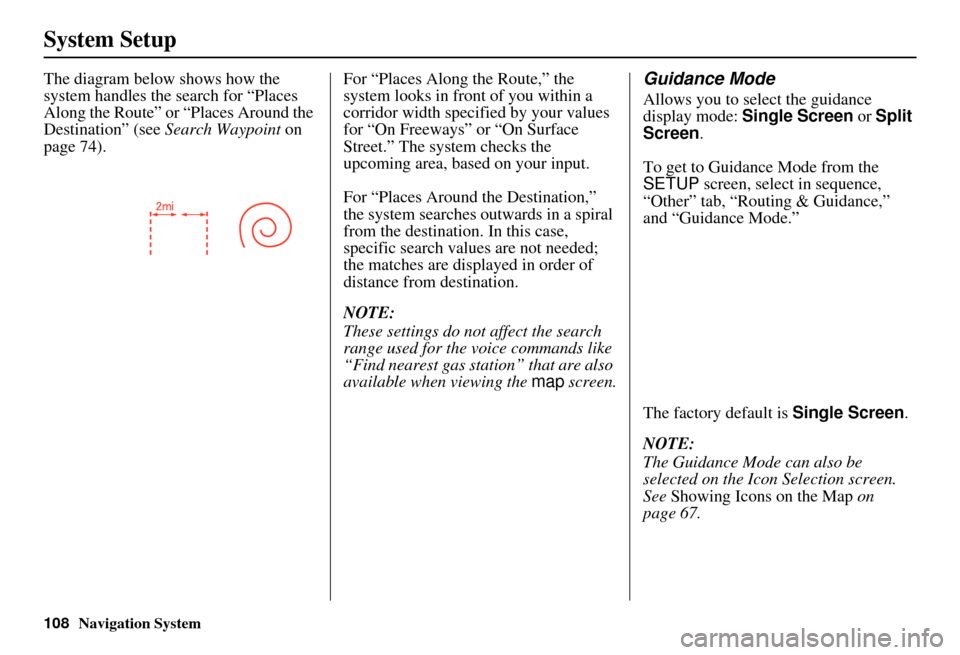
The diagram below shows how the
system handles the search for “Places
Along the Route” or “Places Around the
Destination” (see Search Waypoint on
page 74). For “Places Along the Route,” the
system looks in front
of you within a
corridor width specified by your values
for “On Freeways” or “On Surface
Street.” The system checks the
upcoming area, based on your input.
For “Places Around the Destination,”
the system searches outwards in a spiral
from the destination. In this case,
specific search values are not needed;
the matches are displayed in order of
distance from destination.
NOTE:
These settings do not affect the search
range used for the voice commands like
“Find nearest gas station” that are also
available when viewing the map screen.Guidance Mode
Allows you to select the guidance
display mode: Single Screen or Split
Screen .
To get to Guidance Mode from the
SETUP screen, select in sequence,
“Other” tab, “Routing & Guidance,”
and “Guidance Mode.”
The factory default is Single Screen.
NOTE:
The Guidance Mode can also be
selected on the Icon Selection screen.
See Showing Icons on the Map on
page 67.
Page 111 of 176
Navigation System
System Setup
Auto Time Zone
Sets automatic time zone selection by
GPS to ON or OFF . If you are driving
across the country and passing through
time zones, then this feature will
automatically set the time to the time
zone you are traveling through.
However, if you live and work in two
different time zones, you may want to
turn this feature off.
NOTE:
When driving near a time zone
boundary, the displayed time zone may
fluctuate between the two zone times.
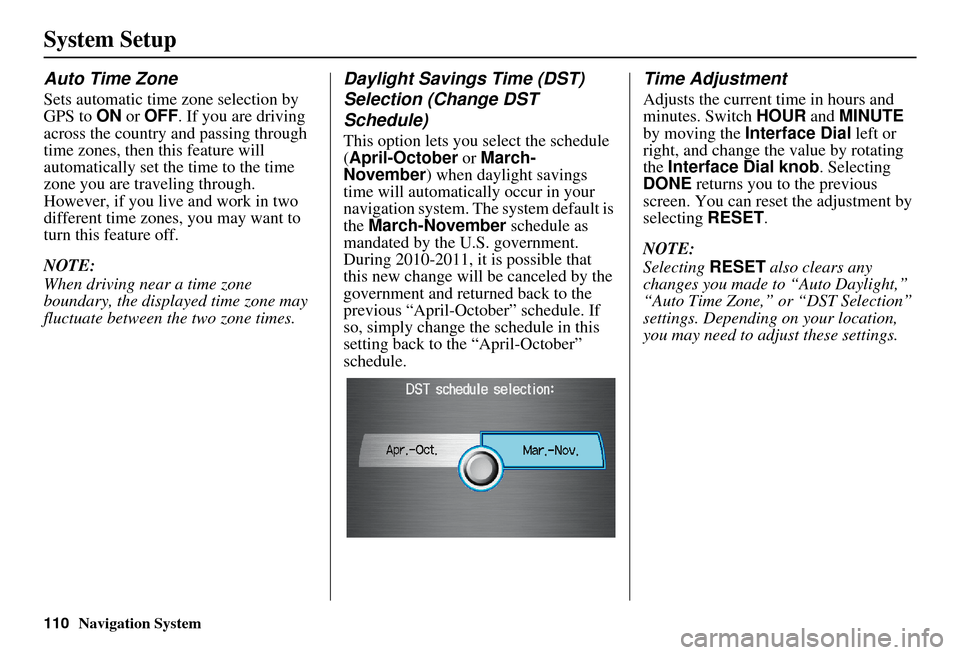
Daylight Savings Time (DST)
Selection (Change DST
Schedule)
This option lets you select the schedule
(April-October or March-
November ) when daylight savings
time will automatically occur in your
navigation system. The system default is
the March-November schedule as
mandated by the U.S. government.
During 2010-2011, it is possible that
this new change will be canceled by the
government and returned back to the
previous “April-October” schedule. If
so, simply change the schedule in this
setting back to the “April-October”
schedule.
Time Adjustment
Adjusts the current time in hours and
minutes. Switch HOUR and MINUTE
by moving the Interface Dial left or
right, and change the value by rotating
the Interface Dial knob . Selecting
DONE returns you to the previous
screen. You can reset the adjustment by
selecting RESET.
NOTE:
Selecting RESET also clears any
changes you made to “Auto Daylight,”
“Auto Time Zone,” or “DST Selection”
settings. Depending on your location,
you may need to adjust these settings.
110
Page 112 of 176
Navigation System111
System Setup
Vehicle
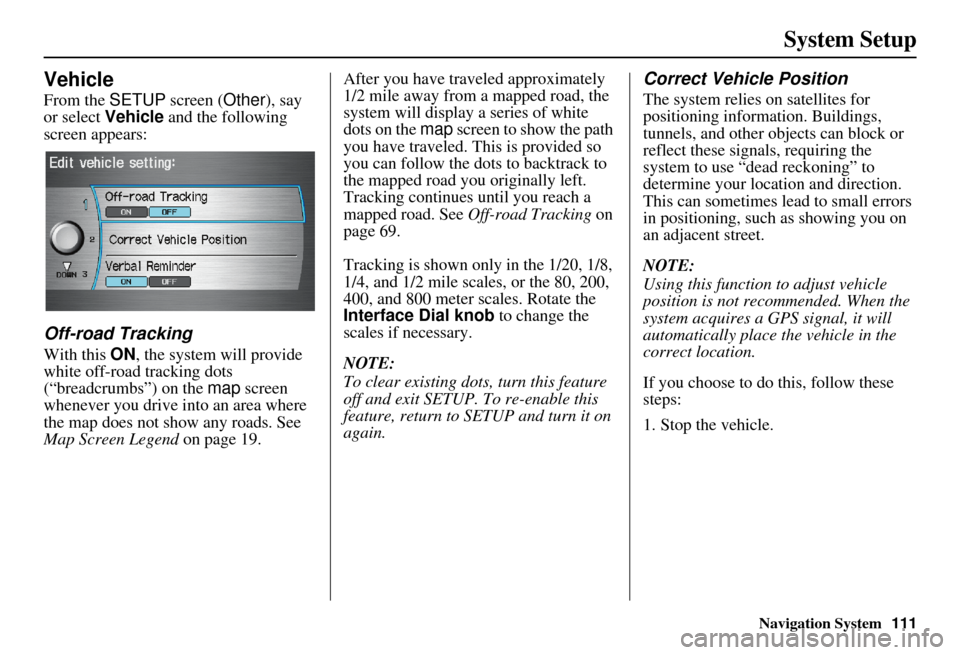
From the SETUP screen ( Other), say
or select Vehicle and the following
screen appears:
Off-road Tracking
With this ON , the system will provide
white off-road tracking dots
(“breadcrumbs”) on the map screen
whenever you drive into an area where
the map does not show any roads. See
Map Screen Legend on page 19. After you have traveled approximately
1/2 mile away from a mapped road, the
system will display a series of white
dots on the map
screen to show the path
you have traveled. This is provided so
you can follow the dots to backtrack to
the mapped road you originally left.
Tracking continues until you reach a
mapped road. See Off-road Tracking on
page 69.
Tracking is shown only in the 1/20, 1/8,
1/4, and 1/2 mile scales, or the 80, 200,
400, and 800 meter scales. Rotate the
Interface Dial knob to change the
scales if necessary.
NOTE:
To clear existing dots, turn this feature
off and exit SETUP. To re-enable this
feature, return to SETUP and turn it on
again.
Correct Vehicle Position
The system relies on satellites for
positioning inform ation. Buildings,
tunnels, and other objects can block or
reflect these signals, requiring the
system to use “dea d reckoning” to
determine your location and direction.
This can sometimes lead to small errors
in positioning, such as showing you on
an adjacent street.
NOTE:
Using this function to adjust vehicle
position is not recommended. When the
system acquires a GPS signal, it will
automatically place the vehicle in the
correct location.
If you choose to do this, follow these
steps:
1. Stop the vehicle.
Page 113 of 176
112Navigation System
System Setup
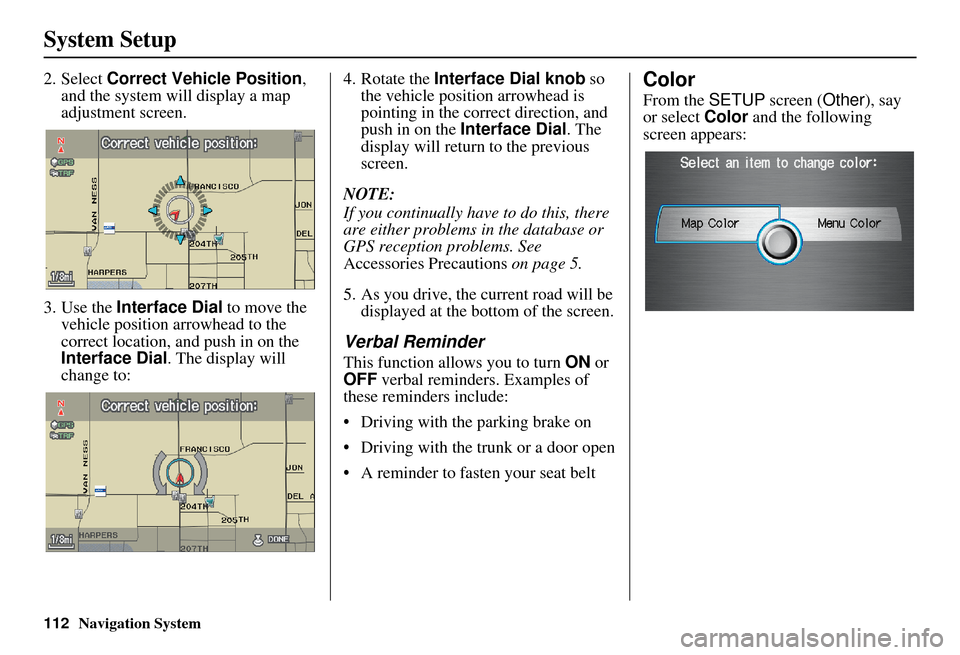
2. Select Correct Vehicle Position ,
and the system will display a map
adjustment screen.
3. Use the Interface Dial to move the
vehicle position arrowhead to the
correct location, an d push in on the
Interface Dial . The display will
change to: 4. Rotate the
Interface Dial knob so
the vehicle position arrowhead is
pointing in the correct direction, and
push in on the Interface Dial . The
display will return to the previous
screen.
NOTE:
If you continually have to do this, there
are either problems in the database or
GPS reception problems. See
Accessories Precautions on page 5.
5. As you drive, the current road will be displayed at the bottom of the screen.
Verbal Reminder
This function allows you to turn ON or
OFF verbal reminders. Examples of
these reminders include:
• Driving with the parking brake on
• Driving with the trunk or a door open
• A reminder to fasten your seat belt
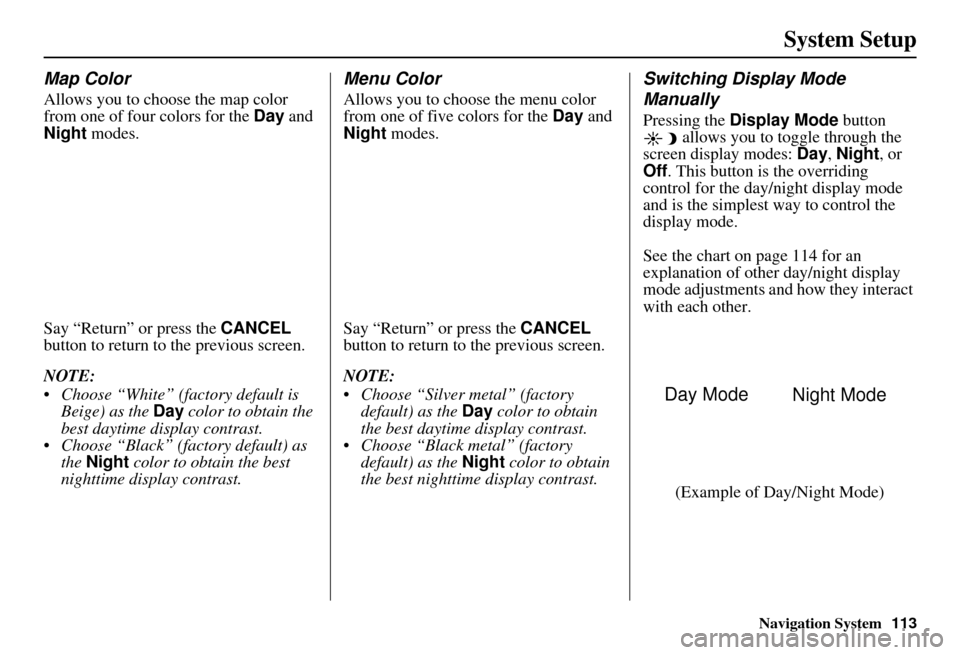
Color
From the SETUP screen ( Other), say
or select Color and the following
screen appears:
Page 114 of 176
Navigation System113
System Setup
Map Color
Allows you to choose the map color
from one of four colors for the Day and
Night modes.
Say “Return” or press the CANCEL
button to return to the previous screen.
NOTE:
Choose “White” (factory default is Beige) as the Day color to obtain the
best daytime di splay contrast.
Choose “Black” (factory default) as the Night color to obtain the best
nighttime display contrast.
Menu Color
Allows you to choose the menu color
from one of five colors for the Day and
Night modes.
Say “Return” or press the CANCEL
button to return to the previous screen.
NOTE:
Choose “Silver metal” (factory default) as the Day color to obtain
the best daytime display contrast.
Choose “Black metal” (factory default) as the Night color to obtain
the best nighttime display contrast.
Switching Display Mode
Manually
Pressing the Display Mode button
allows you to toggle through the
screen display modes: Day, Night , or
Off . This button is the overriding
control for the day/night display mode
and is the simplest way to control the
display mode.
See the chart on page 114 for an
explanation of other day/night display
mode adjustments and how they interact
with each other.
(Example of Day/Night Mode)
Day Mode Night Mode