lock Acura RDX 2012 Owners Manual
[x] Cancel search | Manufacturer: ACURA, Model Year: 2012, Model line: RDX, Model: Acura RDX 2012Pages: 518, PDF Size: 26.43 MB
Page 446 of 518
Check the condition of the wiper
blades at least every six months.
Replace them if you find signs of
cracking in the rubber, areas that are
getting hard, or if they leave streaks
and unwiped areas when used.
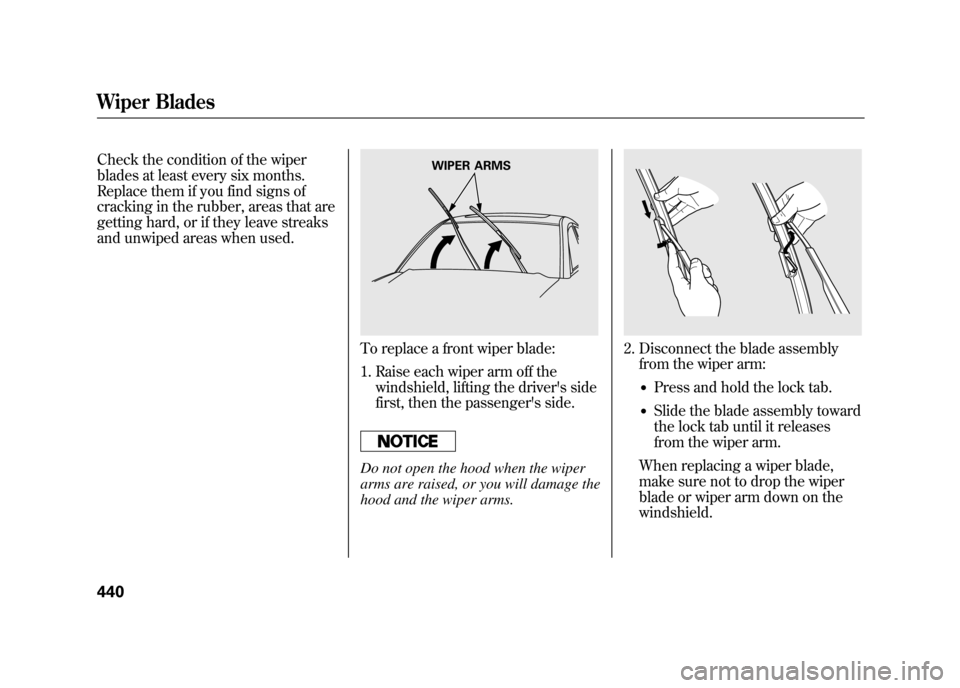
To replace a front wiper blade:
1. Raise each wiper arm off thewindshield, lifting the driver's side
first, then the passenger's side.Do not open the hood when the wiper
arms are raised, or you will damage the
hood and the wiper arms.
2. Disconnect the blade assemblyfrom the wiper arm:
●Press and hold the lock tab.●Slide the blade assembly toward
the lock tab until it releases
from the wiper arm.
When replacing a wiper blade,
make sure not to drop the wiper
blade or wiper arm down on the
windshield.
WIPER ARMS
Wiper Blades44011/06/16 17:42:51 12 ACURA RDX MMC North America Owner's M 50 31STK650 enu
Page 447 of 518
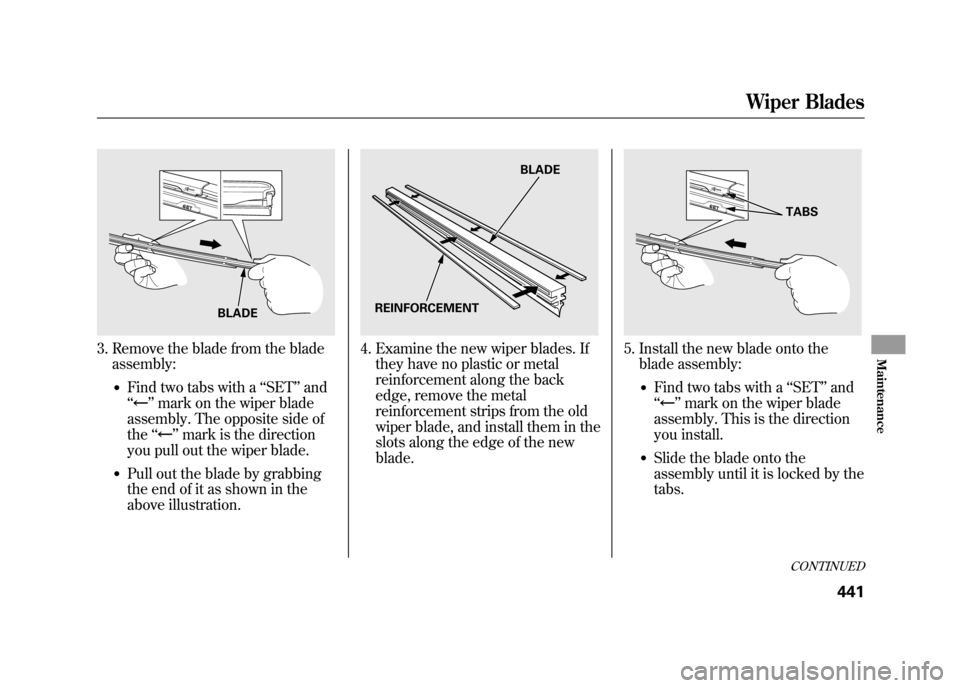
3. Remove the blade from the bladeassembly:
●Find two tabs with a ‘‘SET ’’and
‘‘
’’ mark on the wiper blade
assembly. The opposite side of
the ‘‘
’’mark is the direction
you pull out the wiper blade.
●Pull out the blade by grabbing
the end of it as shown in the
above illustration.
4. Examine the new wiper blades. If they have no plastic or metal
reinforcement along the back
edge, remove the metal
reinforcement strips from the old
wiper blade, and install them in the
slots along the edge of the new
blade.
5. Install the new blade onto theblade assembly:
●Find two tabs with a ‘‘SET ’’and
‘‘
’’ mark on the wiper blade
assembly. This is the direction
you install.
●Slide the blade onto the
assembly until it is locked by the
tabs.
BLADE
BLADE
REINFORCEMENT
TABSCONTINUED
Wiper Blades
441
Maintenance
11/06/16 17:42:51 12 ACURA RDX MMC North America Owner's M 50 31STK650 enu
Page 448 of 518
6. Slide the wiper blade assemblyonto the wiper arm. Make sure it
locks in place.
7. Make sure the blade is completely installed and that its edge is not
bunched up.
8. Lower the wiper arm down against the windshield, the passenger's
side first, then the driver's side.
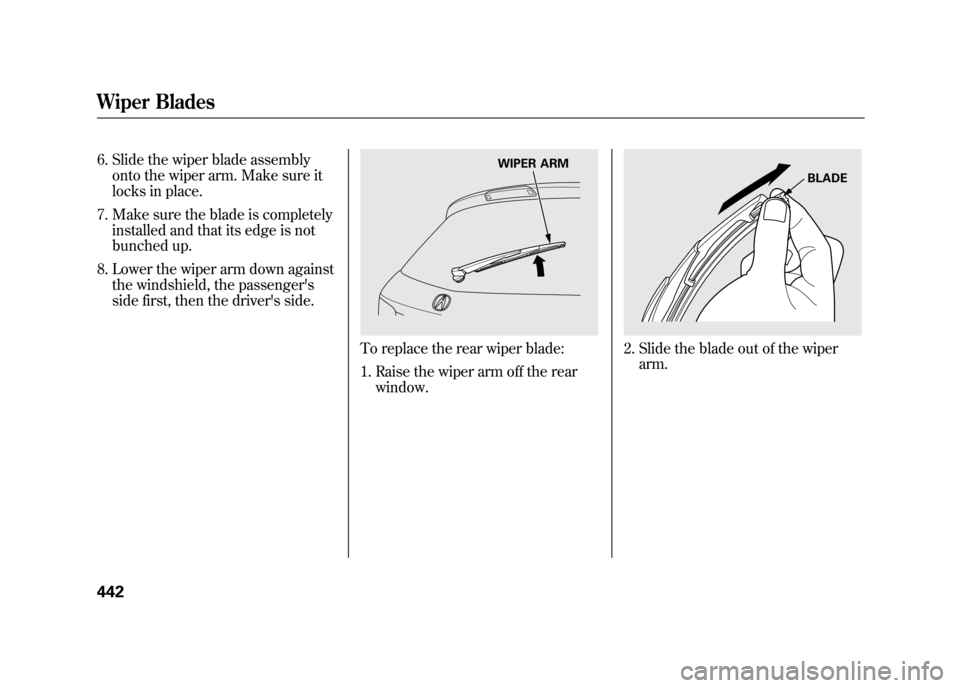
To replace the rear wiper blade:
1. Raise the wiper arm off the rearwindow.
2. Slide the blade out of the wiperarm.
WIPER ARM
BLADE
Wiper Blades44211/06/16 17:42:51 12 ACURA RDX MMC North America Owner's M 50 31STK650 enu
Page 458 of 518

●Block the rear wheels.●If the vehicle is to be stored for a
longer period, it should be
supported on jackstands so the
tires are off the ground.●Leave one window open slightly (if
the vehicle is being stored
indoors).●Disconnect the battery.●Support the front and rear wiper
blade arms with a folded towel or
rag so they do not touch the
windshield.●To minimize sticking, apply a
silicone spray lubricant to all door
and tailgate seals. Also, apply a
vehicle body wax to the painted
surfaces that mate with the door
and tailgate seals.
●Cover the vehicle with a
‘‘breathable ’’cover, one made from
a porous material such as cotton.
Non-porous materials, such as
plastic sheeting, trap moisture,
which can damage the paint.●If possible, periodically run the
engine until it reaches full
operating temperature (the cooling
fans cycle on and off twice).
Preferably, do this once a month. Interior Care
Leather
Vacuum dirt and dust from the
leather frequently. Pay close
attention to the pleats and seams.
Clean the leather with a soft cloth
dampened with a 90% water and 10%
neutral wool detergent solution.
Then buff it with a clean, dry cloth.
Remove any dust or dirt on leather
surfaces immediately.
Vehicle Storage, Interior Care45211/06/16 17:42:51 12 ACURA RDX MMC North America Owner's M 50 31STK650 enu
Page 461 of 518
If you have a flat tire while driving,
stop in a safe place to change it.
Drive slowly along the shoulder until
you get to an exit or an area that is
far away from the traffic lanes.
The vehicle can easily roll off
the jack, seriously injuring
anyone underneath.
Follow the directions for
changing a tire exactly, and
never get under the vehicle
when it is supported only by the
jack.1. Park the vehicle on firm, level, and
non-slippery ground. Put the
transmission in Park. Apply the
parking brake.
If you are towing a trailer, unhitch
it.
2. Turn on the hazard warning lights, and turn the ignition switch to the
LOCK (0) position. Have all
passengers get out of the vehicle
while you change the tire.
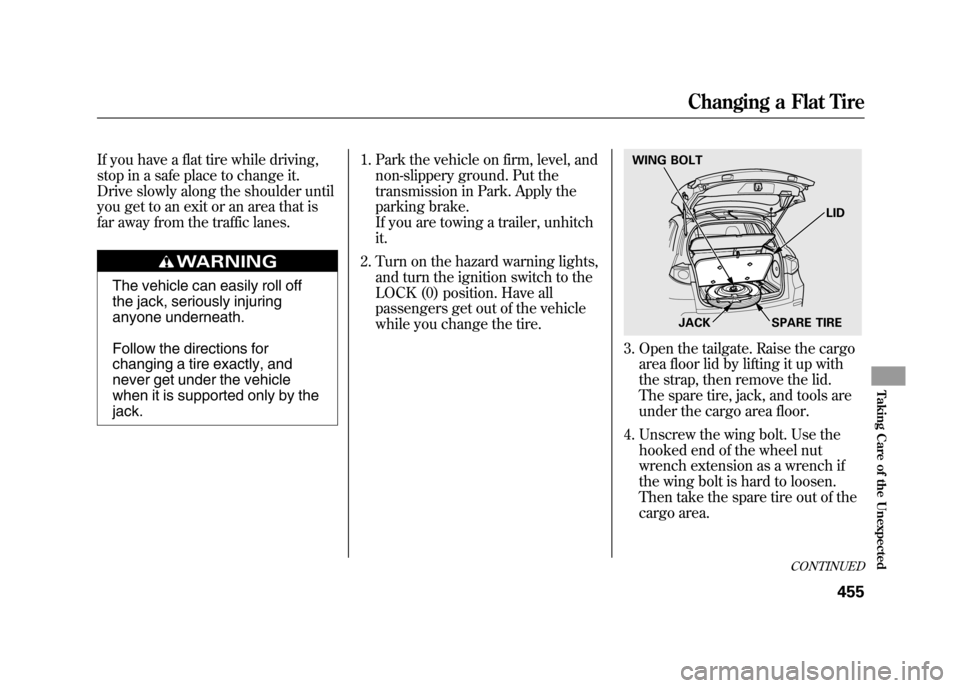
3. Open the tailgate. Raise the cargoarea floor lid by lifting it up with
the strap, then remove the lid.
The spare tire, jack, and tools are
under the cargo area floor.
4. Unscrew the wing bolt. Use the hooked end of the wheel nut
wrench extension as a wrench if
the wing bolt is hard to loosen.
Then take the spare tire out of the
cargo area.WING BOLT
JACK SPARE TIRELID
CONTINUED
Changing a Flat Tire
455
Taking Care of the Unexpected
11/06/16 17:42:51 12 ACURA RDX MMC North America Owner's M 50 31STK650 enu
Page 462 of 518
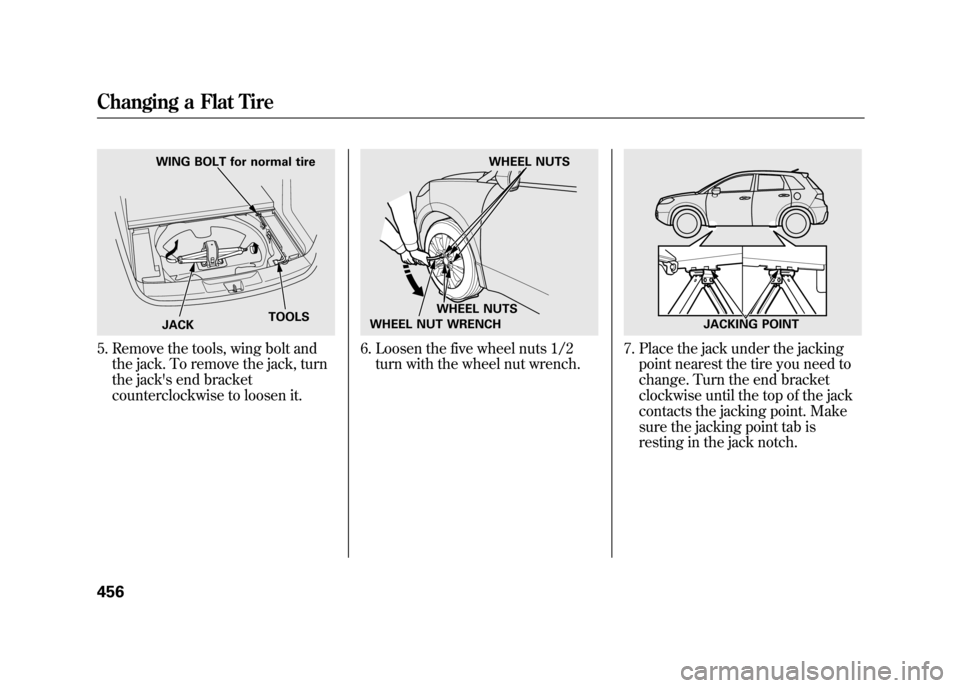
5. Remove the tools, wing bolt andthe jack. To remove the jack, turn
the jack's end bracket
counterclockwise to loosen it.
6. Loosen the five wheel nuts 1/2turn with the wheel nut wrench.
7. Place the jack under the jackingpoint nearest the tire you need to
change. Turn the end bracket
clockwise until the top of the jack
contacts the jacking point. Make
sure the jacking point tab is
resting in the jack notch.
WING BOLT for normal tire
JACK TOOLS
WHEEL NUTS
WHEEL NUTS
WHEEL NUT WRENCH
JACKING POINT
Changing a Flat Tire45611/06/16 17:42:51 12 ACURA RDX MMC North America Owner's M 50 31STK650 enu
Page 464 of 518
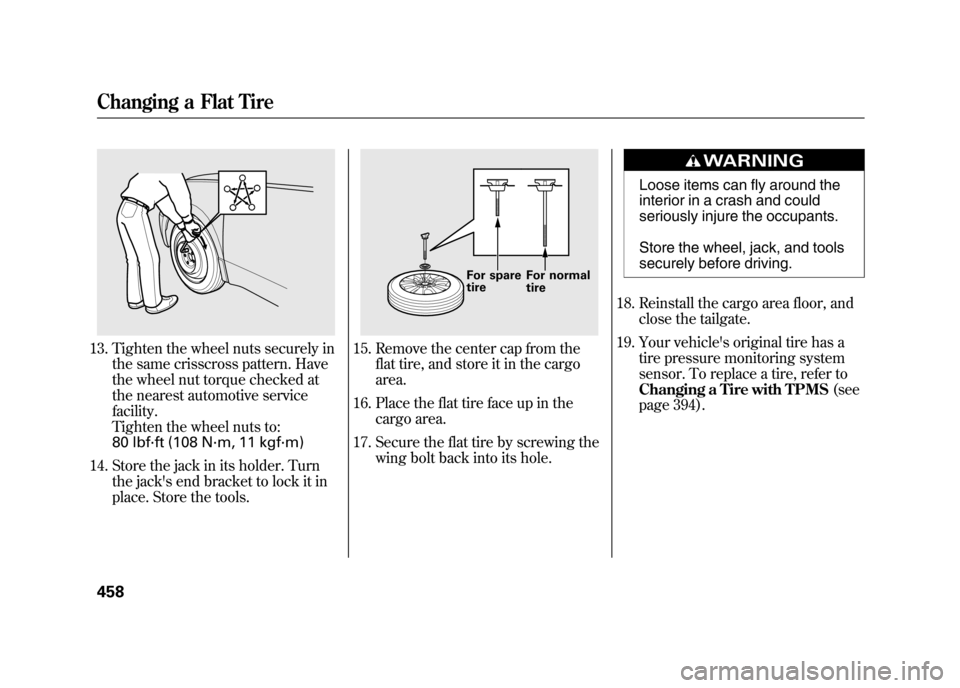
13. Tighten the wheel nuts securely inthe same crisscross pattern. Have
the wheel nut torque checked at
the nearest automotive service
facility.
Tighten the wheel nuts to:
80 lbf·ft (108 N·m, 11 kgf·m)
14. Store the jack in its holder. Turn the jack's end bracket to lock it in
place. Store the tools.
15. Remove the center cap from theflat tire, and store it in the cargo
area.
16. Place the flat tire face up in the cargo area.
17. Secure the flat tire by screwing the wing bolt back into its hole.
Loose items can fly around the
interior in a crash and could
seriously injure the occupants.
Store the wheel, jack, and tools
securely before driving.
18. Reinstall the cargo area floor, and close the tailgate.
19. Your vehicle's original tire has a tire pressure monitoring system
sensor. To replace a tire, refer to
Changing a Tire with TPMS (see
page 394).
For spare
tire For normal
tire
Changing a Flat Tire45811/06/16 17:42:51 12 ACURA RDX MMC North America Owner's M 50 31STK650 enu
Page 465 of 518

Diagnosing why the engine won't
start falls into two areas, depending
on what you hear when you turn the
ignition switch to the START (III)
position:●You hear nothing, or almost
nothing. The engine's starter
motor does not operate at all, or
operates very slowly.●You can hear the starter motor
operating normally, or the starter
motor sounds like it is spinning
faster than normal, but the engine
does not start up and run.Nothing Happens or the Starter
Motor Operates Very Slowly
When you turn the ignition switch to
the START (III) position, you do not
hear the normal noise of the engine
trying to start. You may hear a
clicking sound, a series of clicks, or
nothing at all.
Check these things:
●Check the transmission interlock.
The transmission must be in Park
or neutral or the starter will not
operate.●Turn the ignition switch to the ON
(II) position. Turn on the
headlights, and check their
brightness. If the headlights are
very dim or do not come on at all,
the battery is discharged. See
Jump Starting
on page 461.
●Turn the ignition switch to the
START (III) position. If the
headlights do not dim, check the
condition of the fuses. If the fuses
are OK, there is probably
something wrong with the
electrical circuit for the ignition
switch or starter motor. You will
need a qualified mechanic to
determine the problem (see
Emergency Towing on page 475).
If the headlights dim noticeably or go
out when you try to start the engine,
either the battery is discharged or
the connections are corroded. Check
the condition of the battery and
terminal connections (see page 450).
You can then try jump starting the
vehicle from a booster battery (see
page 461).
CONTINUED
If the Engine Won't Start
459
Taking Care of the Unexpected
11/06/16 17:42:51 12 ACURA RDX MMC North America Owner's M 50 31STK650 enu
Page 470 of 518

5. Look for any obvious coolantleaks, such as a split radiator hose.
Everything is still extremely hot,
so use caution. If you find a leak, it
must be repaired before you
continue driving (see Emergency
Towing on page 475).
6. If you do not find an obvious leak, check the coolant level in the
radiator reserve tank. Add coolant
if the level is below the MIN mark.
7. If there was no coolant in the reserve tank, you may need to add
coolant to the radiator. Let the
engine cool down until the reading
reaches the middle of the
temperature gauge or lower before
checking the radiator.
Removing the radiator cap
while the engine is hot can
cause the coolant to spray out,
seriously scalding you.
Always let the engine and
radiator cool down before
removing the radiator cap.
8. Using gloves or a large heavy cloth, turn the radiator cap
counterclockwise, without pushing
down, to the first stop. After the
pressure releases, push down on
the cap, and turn it until it comes
off. 9. Start the engine, and set the
temperature to maximum heat
(climate control to AUTO at
‘‘
’’). Add coolant to the radiator
up to the base of the filler neck. If
you do not have the proper coolant
mixture available, you can add
plain water. Remember to have the
cooling system drained and refilled
with the proper mixture as soon as
you can.
10. Put the radiator cap back on tightly. Run the engine, and watch
the temperature gauge. If it goes
back to the H mark, the engine
needs repair (see Emergency
Towing on page 475).
11. If the temperature stays normal, check the coolant level in the
radiator reserve tank. If it has gone
down, add coolant to the MAX
mark. Put the cap back on tightly.
If the Engine Overheats46411/06/16 17:42:51 12 ACURA RDX MMC North America Owner's M 50 31STK650 enu
Page 476 of 518
Checking and Replacing Fuses
If something electrical in your
vehicle stops working, the first thing
you should check for is a blown fuse.
Determine from the chart on pages
473 and 474, or the diagram on the
fuse box lid, which fuse or fuses
control that device. Check those
fuses first, but check all the fuses
before deciding that a blown fuse is
the cause. Replace any blown fuses,
and check if the device works.1. Turn the ignition switch to the LOCK (0) position. Make sure the
headlights and all other
accessories are off.
2. (Under-hood fuse boxes) Remove the cover from the fuse
box.
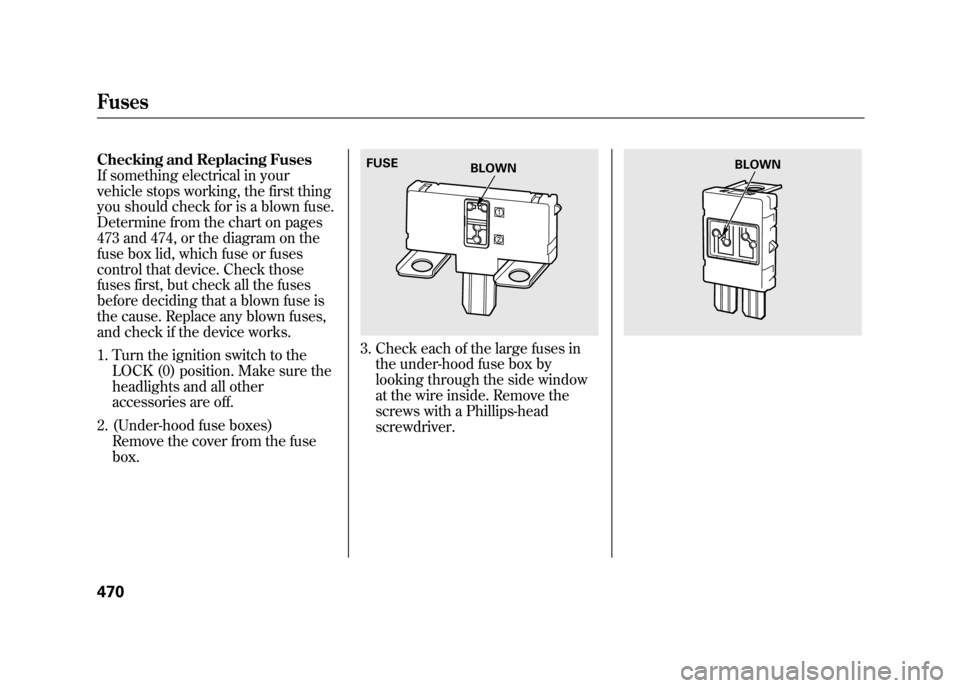
3. Check each of the large fuses inthe under-hood fuse box by
looking through the side window
at the wire inside. Remove the
screws with a Phillips-head
screwdriver.FUSE BLOWN
BLOWN
Fuses47011/06/16 17:42:51 12 ACURA RDX MMC North America Owner's M 50 31STK650 enu