lock Acura RDX 2012 Repair Manual
[x] Cancel search | Manufacturer: ACURA, Model Year: 2012, Model line: RDX, Model: Acura RDX 2012Pages: 518, PDF Size: 26.43 MB
Page 278 of 518

To Play a USB Flash Memory
Device
This audio system can operate the
audio files on a USB flash memory
device with the same controls used
for the in-dash disc changer. To play
a USB flash memory device, connect
it to the USB adapter cable in the
console compartment, then press the
DISC/AUX button. The ignition
switch must be in the ACCESSORY
(I) or ON (II) position.The audio system reads and plays
the audio files on the USB flash
memory device in MP3, WMA or
AAC
ᤳformats. Depending on the
format, the audio control display
shows MP3, WMA or AAC when a
USB flash memory device is playing.
ᤳ : Only AAC format files recorded
with iTunes are playable on this
audio unit. The recommended USB flash
memory devices are 256 MB or
higher, and formatted with the FAT
file system. Some digital audio
players may be compatible as well.
Some USB flash memory devices
(such as devices with security lock-
out features, etc.) will not work in
this audio unit.
Even if recorded in MP3, WMA or
AAC format, unsupported files
cannot be played. If the system finds
it, the audio unit displays
UNPLAYABLE, and then skips to the
next file.
Playing a USB Flash Memory Device (Models with navigation system)27211/06/16 17:42:51 12 ACURA RDX MMC North America Owner's M 50 31STK650 enu
Page 299 of 518

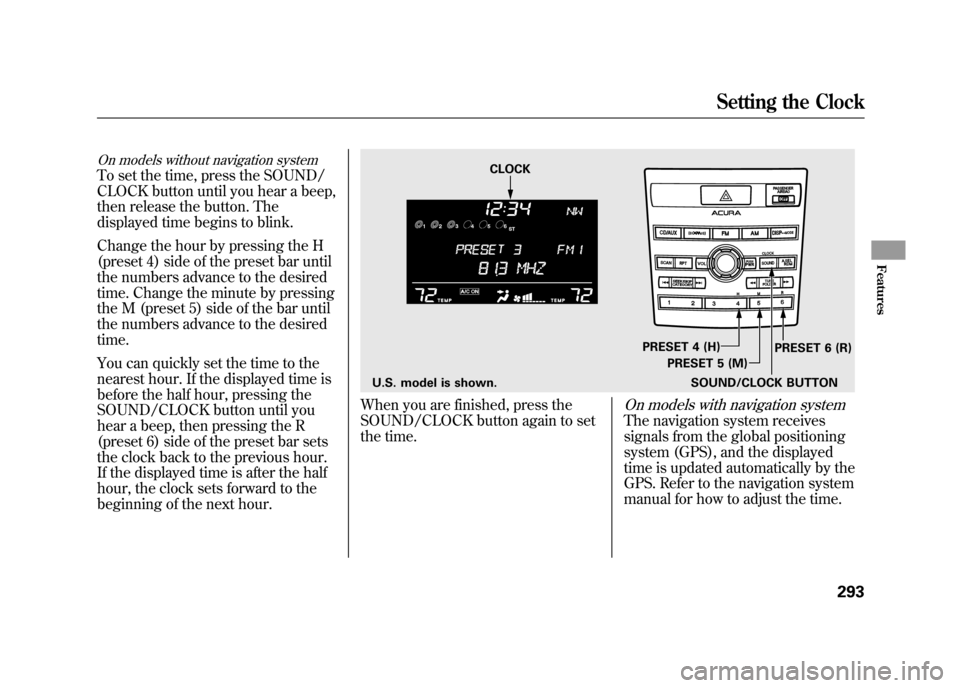
On models without navigation systemTo set the time, press the SOUND/
CLOCK button until you hear a beep,
then release the button. The
displayed time begins to blink.
Change the hour by pressing the H
(preset 4) side of the preset bar until
the numbers advance to the desired
time. Change the minute by pressing
the M (preset 5) side of the bar until
the numbers advance to the desired
time.
You can quickly set the time to the
nearest hour. If the displayed time is
before the half hour, pressing the
SOUND/CLOCK button until you
hear a beep, then pressing the R
(preset 6) side of the preset bar sets
the clock back to the previous hour.
If the displayed time is after the half
hour, the clock sets forward to the
beginning of the next hour.
When you are finished, press the
SOUND/CLOCK button again to set
the time.
On models with navigation systemThe navigation system receives
signals from the global positioning
system (GPS), and the displayed
time is updated automatically by the
GPS. Refer to the navigation system
manual for how to adjust the time.
U.S. model is shown.SOUND/CLOCK BUTTONPRESET 6 (R)
PRESET 4 (H)
PRESET 5 (M)
CLOCK
Setting the Clock
293
Features
11/06/16 17:42:51 12 ACURA RDX MMC North America Owner's M 50 31STK650 enu
Page 300 of 518

The security system helps to protect
your vehicle and valuables from
theft. The horn sounds and a
combination of headlights, parking
lights, side marker lights, and
taillights flashes if someone attempts
to break into your vehicle or remove
the audio unit. This alarm continues
for two minutes, then the system
resets. To deactivate the system
before the two minutes have elapsed,
unlock the driver's door with the key
or the remote transmitter.
The security system automatically
sets 15 seconds after you lock the
doors, hood, and the tailgate. For the
system to activate, you must lock the
doors and the tailgate from the
outside with the key, or use driver's
lock tab, door lock master switch, or
remote transmitter. The security
system indicator on the instrument
panel starts blinking immediately to
show you the system is setting itself.
Once the security system sets,
opening any door, the tailgate, or the
hood without using the key or the
remote transmitter, will cause the
alarm to activate. It also activates if
the audio unit is removed from the
dashboard or the wiring is cut.The alarm also activates if a
passenger inside the locked vehicle
turns the ignition switch on.
The security system does not set if
the hood, tailgate, or any door is not
fully closed. Before you leave the
vehicle, make sure the doors,
tailgate, and hood are securely
closed.
NOTE:
To see if the system is set
after you exit the vehicle, press the
LOCK button on the remote
transmitter within five seconds. If the
system is set, a beep will sound.
Do not attempt to alter this system or
add other devices to it.
SECURITY SYSTEM INDICATOR
Security System29411/06/16 17:42:51 12 ACURA RDX MMC North America Owner's M 50 31STK650 enu
Page 301 of 518

Compass OperationOn models without navigation systemThe compass shows your direction of
travel. It indicates eight directions.
The compass is displayed on the
center display when you turn the
ignition switch to the ON (II) position.
The compass can be affected by
driving near power lines or stations,
across bridges, through tunnels, over
railroad crossings, past large vehicles,
or driving near large objects that
cause magnetic interference. It can
also be affected by accessories such as
antennas and roof racks that are
mounted by magnets.
COMPASSSOUND/CLOCK
BUTTON
RPT BUTTON
PRESET BARS
U.S. model is shown.
CONTINUEDCompass
295
Features
11/06/16 17:42:51 12 ACURA RDX MMC North America Owner's M 50 31STK650 enu
Page 302 of 518

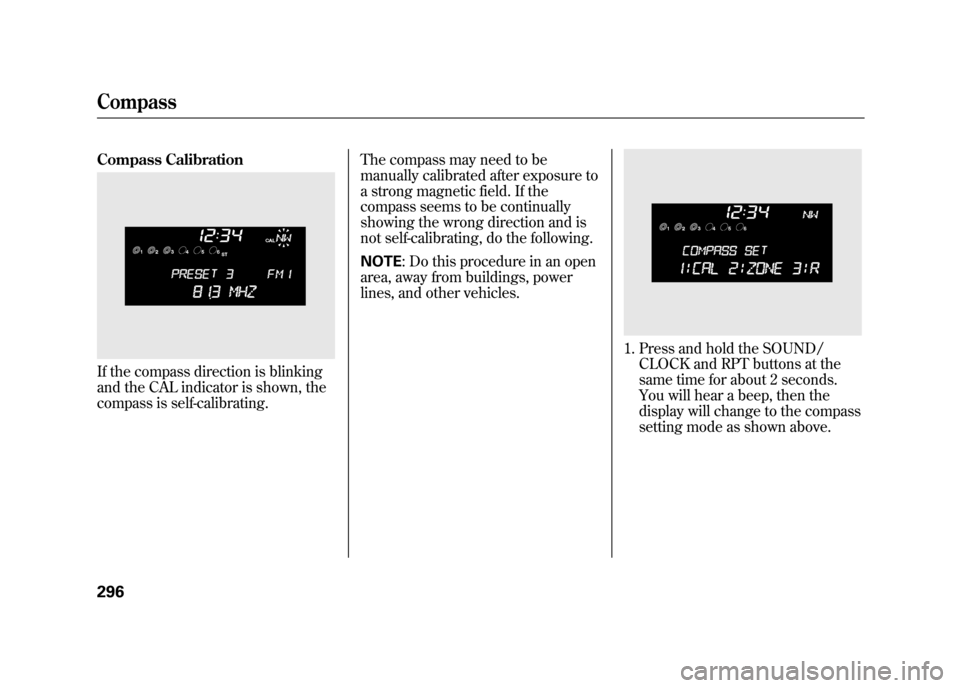
Compass CalibrationIf the compass direction is blinking
and the CAL indicator is shown, the
compass is self-calibrating.The compass may need to be
manually calibrated after exposure to
a strong magnetic field. If the
compass seems to be continually
showing the wrong direction and is
not self-calibrating, do the following.
NOTE
: Do this procedure in an open
area, away from buildings, power
lines, and other vehicles.
1. Press and hold the SOUND/ CLOCK and RPT buttons at the
same time for about 2 seconds.
You will hear a beep, then the
display will change to the compass
setting mode as shown above.
Compass29611/06/16 17:42:51 12 ACURA RDX MMC North America Owner's M 50 31STK650 enu
Page 304 of 518

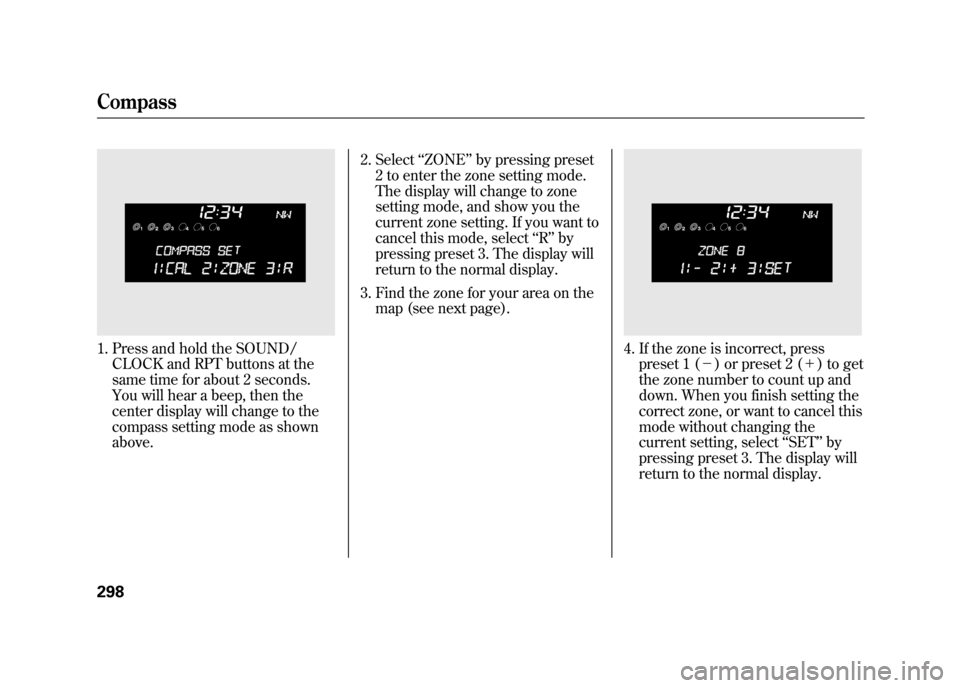
1. Press and hold the SOUND/CLOCK and RPT buttons at the
same time for about 2 seconds.
You will hear a beep, then the
center display will change to the
compass setting mode as shown
above. 2. Select
‘‘ZONE ’’by pressing preset
2 to enter the zone setting mode.
The display will change to zone
setting mode, and show you the
current zone setting. If you want to
cancel this mode, select ‘‘R ’’ by
pressing preset 3. The display will
return to the normal display.
3. Find the zone for your area on the map (see next page).
4. If the zone is incorrect, presspreset 1 (- ) or preset 2 (+ ) to get
the zone number to count up and
down. When you finish setting the
correct zone, or want to cancel this
mode without changing the
current setting, select ‘‘SET ’’by
pressing preset 3. The display will
return to the normal display.
Compass29811/06/16 17:42:51 12 ACURA RDX MMC North America Owner's M 50 31STK650 enu
Page 334 of 518

System Setup
This command group allows you to
change or customize HFL basic
settings.
To set a 4-digit passcode to lock theHFL system for security purposes:Press and release the HFL Talk
button before a command.
1. Say ‘‘System setup .’’
2. Say ‘‘Security ’’after the prompts.
3. Follow the HFL prompts and say the 4-digit passcode you want to
set.
4. Follow the HFL prompts to confirm the number. NOTE
: Once a passcode is set, you
will need to enter it to use HFL each
time you start the vehicle. If you
forget the code, your dealer will have
to reset it for you, or you will have to
clear the entire system (see page
330).
Bluetooth
®HandsFreeLink
®
32811/06/16 17:42:51 12 ACURA RDX MMC North America Owner's M 50 31STK650 enu
Page 369 of 518

Improper accessories or
modifications can affect your
vehicle's handling, stability, and
performance, and cause a
crash in which you can be hurt
or killed.
Follow all instructions in this
owner's manual regarding
accessories and modifications.
When properly installed, cellular
phones, alarms, two-way radios, and
low-powered audio systems should
not interfere with your vehicle's
computer controlled systems, such
as your airbags, anti-lock brakes, and
tire pressure monitoring system. Before installing any accessory:
●Make sure the accessory does not
obscure any lights, or interfere
with proper vehicle operation or
performance.●Be sure electronic accessories do
not overload electrical circuits (see
page 469) or interfere with proper
operation of your vehicle.●Before installing any electronic
accessory, have the installer
contact your dealer for assistance.
If possible, have your dealer
inspect the final installation.●Do not install accessories on the
side pillars or across the rear
windows. Accessories installed in
these areas may interfere with
proper operation of the side
curtain airbags.Modifying Your Vehicle
Removing parts from your vehicle, or
replacing components with non-
Acura components could seriously
affect your vehicle's handling,
stability, and reliability.
Here are some examples:
●Lowering the vehicle with a non-
Acura suspension kit that
significantly reduces ground
clearance can allow the
undercarriage to hit speed bumps
or other raised objects, which
could cause the airbags to deploy.●Raising your vehicle with a non-
Acura suspension kit can affect the
handling, stability, and reliability.
CONTINUED
Accessories and Modifications
363
Before Driving
11/06/16 17:42:51 12 ACURA RDX MMC North America Owner's M 50 31STK650 enu
Page 370 of 518

●Non-Acura wheels, because they
are a universal design, can cause
excessive stress on suspension
components and will not be
compatible with the tire pressure
monitoring system (TPMS).●Larger or smaller wheels and tires
can interfere with the operation of
your vehicle's anti-lock brakes and
other systems.●Modifying your steering wheel or
any other part of your vehicle's
safety features can make the
systems ineffective.
If you plan to modify your vehicle,
consult your dealer.Accessories and Modifications36411/06/16 17:42:51 12 ACURA RDX MMC North America Owner's M 50 31STK650 enu
Page 374 of 518

Carrying Cargo in the Passenger
Compartment●Store or secure all items that could
be thrown around and hurt
someone during a crash.●Be sure items placed on the floor
behind the front seats cannot roll
underneath and interfere with the
proper operation of the seats, the
sensors under the seats, or the
driver's ability to operate the
pedals.
●If you fold the rear seats down, tie
down items that could be thrown
about the vehicle during a crash or
sudden stop. Also, keep all cargo
below the bottom of the windows.
If it is higher, it could interfere
with the proper operation of the
side curtain airbags.●Keep the glove box closed while
driving. If it is open, a passenger
could injure their knees during a
crash or sudden stop.●Do not put any items on top of the
cargo area cover. They can block
your view and be thrown around
the vehicle during a crash.Carrying Cargo in the Cargo Area
or on a Roof Rack
●Distribute cargo evenly on the
floor of the cargo area, placing the
heaviest items on the bottom and
as far forward as possible. Tie
down items that could be thrown
about the vehicle during a crash or
sudden stop.●If you fold the rear seats down, tie
down items that could be thrown
about the vehicle during a crash or
sudden stop. Keep all cargo below
the bottom of the windows. If it is
higher, it could interfere with the
proper operation of the side
curtain airbags.
Carrying Cargo36811/06/16 17:42:51 12 ACURA RDX MMC North America Owner's M 50 31STK650 enu