reset Acura RDX 2013 Navigation Manual
[x] Cancel search | Manufacturer: ACURA, Model Year: 2013, Model line: RDX, Model: Acura RDX 2013Pages: 260, PDF Size: 24.3 MB
Page 138 of 260
137
Audio SystemSystem Theft Protection
Audio
System Theft Protection
The system is disabled when it is disconnected from the power source, such as when
the battery is disconnected or goes dead.
■Reactivating the System
1.
If you set the power mode to ACCESSORY, you will be requested to enter
the security code. See step 3.
2.Press and hold the VOL 9 (Volume/Power) button again for more than two
seconds.
The system is reactivated when the system’s control unit recognizes that the
system is in your vehicle.
If the control unit fails to recognize, “ENTER CODE” appears on the navigation
screen.
3.Enter the security code.
If you do not enter the code correctly after 10 tries, leave the system for one
hour before trying again, or visit a dealer to have the system reset.
1Audio System Theft Protection
Find the audio system’s security code and serial number label in your Owner’s Manual kit.
Do not store the label in your vehicle. If you lose
the label, you must first retrieve the serial number, and then obtain the code from a dealer.
U.S. Only
You can register the security code at My Acura (owners.acura.com.), and find information on
how to retrieve the serial number and obtain the
code at radio-navicode.acura.com.2Entering the Security Code P. 230
RDX_KA-31TX4800.book Page 137 Monday, January 30, 2012 11:32 PM
QRG
Set the power mode to ON and turn on the system.
Page 139 of 260
138
Audio
Playing FM/AM Radio
Selecting FM/AM Mode
1.Press the FM/AM button.
Press the FM/AM button again, if necessary, to select the frequency band (AM,
FM1, FM2).
2. Select a station using the Preset buttons and the bars (SKIP, TUNE, SCAN/A.SEL)
On the FM bands, you can also use the CATEGORY bar and TITLE button to
select a station provided by the Radio Data System (RDS).
The band and frequency are displayed on the display.
Audio Screen Control
H AUDIO button (in FM/AM mode)
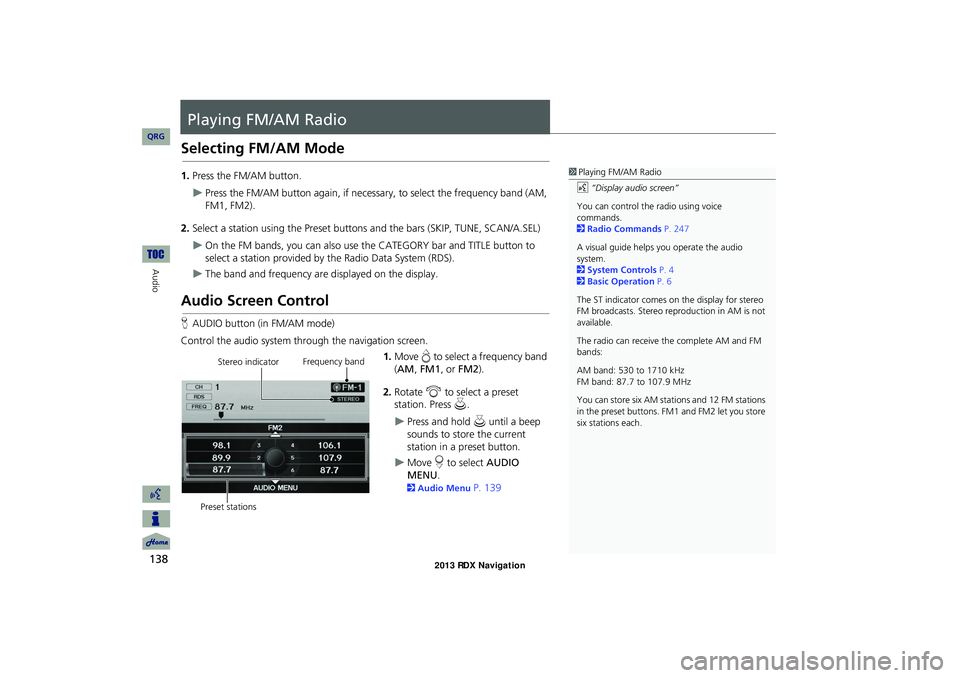
Control the audio system through the navigation screen. 1.Move e to select a frequency band
( AM , FM1 , or FM2 ).
2. Rotate i to select a preset
station. Press u .
Press and hold u until a beep
sounds to store the current
station in a preset button.
Move r to select AUDIO
MENU .
2Audio Menu P. 139
1Playing FM/AM Radio
d “Display audio screen”
You can control the radio using voice
commands.
2 Radio Commands P. 247
A visual guide helps you operate the audio
system.
2 System Controls P. 4
2 Basic Operation P. 6
The ST indicator comes on the display for stereo
FM broadcasts. Stereo re production in AM is not
available.
The radio can receive the complete AM and FM
bands:
AM band: 530 to 1710 kHz
FM band: 87.7 to 107.9 MHz
You can store six AM stati ons and 12 FM stations
in the preset buttons. FM1 and FM2 let you store
six stations each.
Stereo indicator Frequency band
Preset stations
RDX_KA-31TX4800.book Page 138 Monday, January 30, 2012 11:32 PM
QRG
Page 140 of 260
139
Playing FM/AM RadioAudio Menu
Audio
Audio Menu
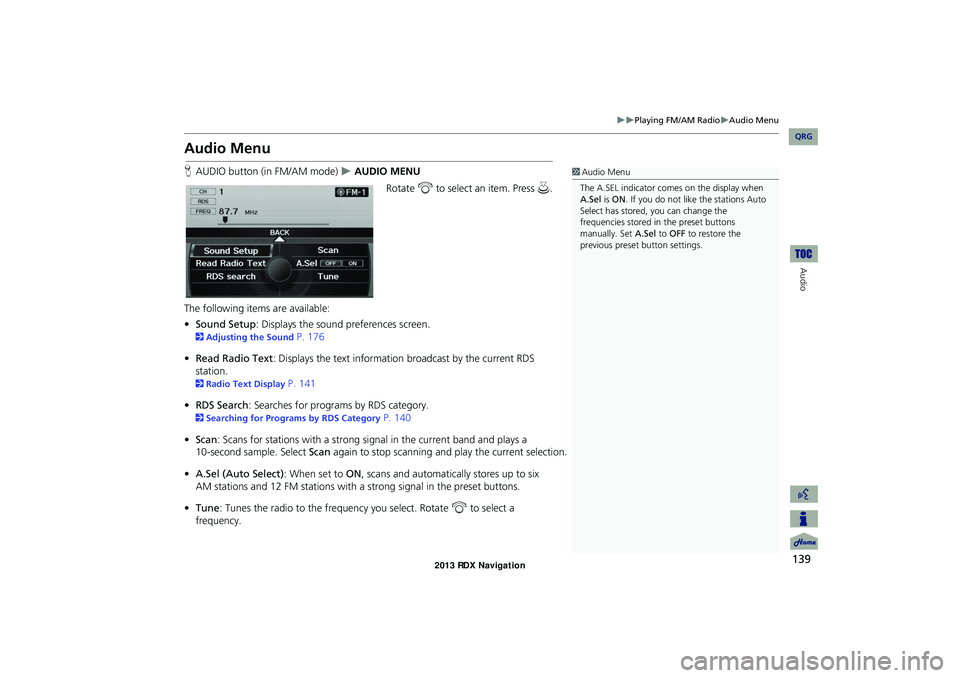
HAUDIO button (in FM/AM mode) AUDIO MENU
Rotate i to select an item. Press u.
The following items are available:
• Sound Setup : Displays the sound preferences screen.
2Adjusting the Sound P. 176
• Read Radio Text : Displays the text information broadcast by the current RDS
station.
2 Radio Text Display P. 141
• RDS Search : Searches for programs by RDS category.
2Searching for Programs by RDS Category P. 140
• Scan : Scans for stations with a strong signal in the current band and plays a
Scan again to stop scanning and play the current selection.
• A.Sel (Auto Select) : When set to ON, scans and automatica lly stores up to six
AM stations and 12 FM stations with a strong signal in the preset buttons.
• Tune : Tunes the radio to the frequency you select. Rotate i to select a
frequency.
1 Audio Menu
The A.SEL indicator comes on the display when
A.Sel is ON . If you do not like the stations Auto
Select has stored, you can change the
frequencies stored in the preset buttons
manually. Set A.Sel to OFF to restore the
previous preset button settings.
RDX_KA-31TX4800.book Page 139 Monday, January 30, 2012 11:32 PM
QRG
10-second sample. Select
Page 143 of 260
142
Audio
Playing XM® Radio
Selecting XM Mode
1.Press the XM button.
Press the XM button again, if necessar y, to select the channel band (XM1,
XM2).
2. Select a channel using the Preset buttons and the bars (SKIP, TUNE, CATEGORY,
SCAN/A.SEL)
The band and channel are displayed.
Audio Screen Control
H AUDIO button (in XM mode)
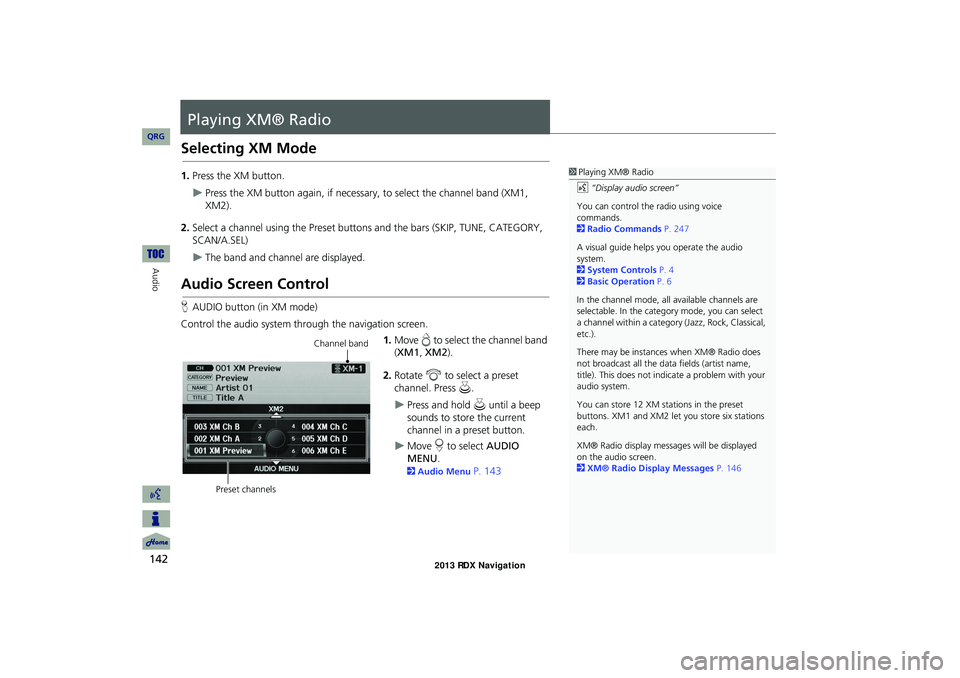
Control the audio system through the navigation screen. 1.Move e to select the channel band
( XM1 , XM2 ).
2. Rotate i to select a preset
channel. Press u.
Press and hold u until a beep
sounds to store the current
channel in a preset button.
Move r to select AUDIO
MENU .
2Audio Menu P. 143
1Playing XM® Radio
d “Display audio screen”
You can control the radio using voice
commands.
2 Radio Commands P. 247
A visual guide helps you operate the audio
system.
2 System Controls P. 4
2 Basic Operation P. 6
In the channel mode, all available channels are
selectable. In the categor y mode, you can select
a channel within a category (Jazz, Rock, Classical,
etc.).
There may be instance s when XM® Radio does
not broadcast all the data fields (artist name,
title). This does not indica te a problem with your
audio system.
You can store 12 XM stat ions in the preset
buttons. XM1 and XM2 let you store six stations
each.
XM® Radio display messag es will be displayed
on the audio screen.
2 XM® Radio Display Messages P. 146
Channel band
Preset channels
RDX_KA-31TX4800.book Page 142 Monday, January 30, 2012 11:32 PM
QRG
Page 148 of 260
147
Audio
Playing a Disc
Selecting Disc Mode
1.Press the DISC button to play a CD or other disc.
2. Insert a disc into the disc slot.
The disc automatically begins playing.
3. Select a track using the bars (S KIP, TUNE, CATEGORY, SCAN/A.SEL).
The track number and elapsed time ar e displayed on the display. Title
information for audio CDs is displayed if found in the Gracenote® Album Info
(Gracenote® Media Database) stored on the built-in hard disc drive (HDD). Text
information stored on MP3/WMA/ AAC discs is also displayed.
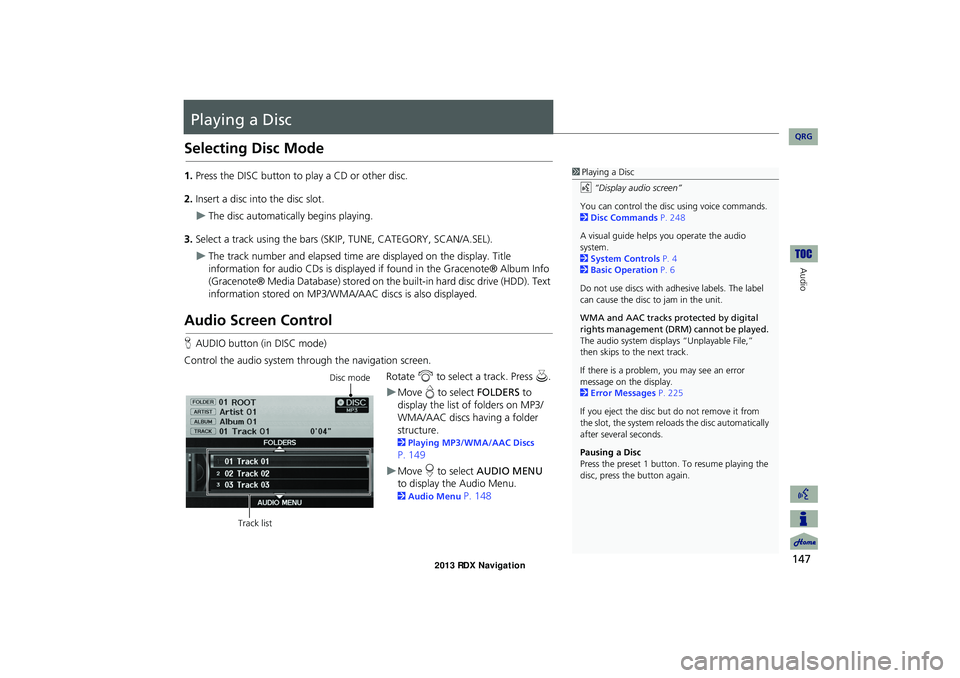
Audio Screen Control
HAUDIO button (in DISC mode)
Control the audio system through the navigation screen. Rotate i to select a track. Press u .
Move e to select FOLDERS to
display the list of folders on MP3/
WMA/AAC discs having a folder
structure.
2 Playing MP3/WMA/AAC Discs
P. 149
Move r to select AUDIO MENU
to display the Audio Menu.
2 Audio Menu P. 148
1Playing a Disc
d “Display audio screen”
You can control the disc using voice commands.
2 Disc Commands P. 248
A visual guide helps you operate the audio
system.
2 System Controls P. 4
2 Basic Operation P. 6
Do not use discs with a dhesive labels. The label
can cause the disc to jam in the unit.
WMA and AAC tracks protected by digital
rights management (DRM) cannot be played.
The audio system displa ys “Unplayable File,”
then skips to the next track.
If there is a problem, you may see an error
message on the display.
2 Error Messages P. 225
If you eject the disc but do not remove it from
the slot, the system reloads the disc automatically
after severa l seconds.
Pausing a Disc
Press the preset 1 button. To resume playing the
disc, press the button again.
Disc mode
Track list
RDX_KA-31TX4800.book Page 147 Monday, January 30, 2012 11:32 PM
QRG
Page 179 of 260
178
Audio Remote ControlsSteering Wheel Controls
Audio
FM/AM, XM
•Press the N (Channel) button to select the next preset station (channel).
• Press the B (Channel) button to select the previous preset station (channel).
• FM/AM: Press and hold for one second to scan for a station with a strong signal.
• XM: Press and hold for one second to skip to the next or previous station
(channel) in the current category.
DISC, HDD, iPod®, USB, Bluetooth® Audio (on some phones)
• Press the N button to skip to the end of the current track.
• Press the B button to skip to the beginning of the current track. Press the B
button again to go to the beginning of the previous track.
• Press and hold to skip forward or backward to the first track of the next folder.
Pandora®
• Press the N button to skip to the next song.
• Press and hold B or N button to select the upper or lower station.
■CH (Channel) Button
RDX_KA-31TX4800.book Page 178 Monday, January 30, 2012 11:32 PM
QRG
Page 220 of 260
219
TroubleshootingMap, Voice, Entering Destinations
Troubleshooting
I cannot select an option using the Interface Dial.To prevent driver distraction, certain onscr een functions and features are limited or
inoperable while the vehicle is moving. Use voice commands or pull over to proceed.
The navigation system pronunciation of street names
in the guidance command or destination address
sounds strange.The basic guidance phrases use a studio- recorded voice, but street names are
pronounced using a machine-generated voice. Consequently, the name may be
mispronounced or sound strange at times.
The screen is bright when I drive at night.1. Check that the nighttime dashboard brig htness control is not set to maximum.
2. Press the INFO button. Select Set up > Other > Color > Map Color . Set the Night
color to Black for the best contrast.
2 Switching Display Mode Manually P. 29
The screen is dark when I drive during the day.Press the INFO button. Select Set up > Other > Color > Map Color . Set the Day color
to White for the best contrast.
2 Switching Display Mode Manually P. 29
How do I change or remove my PIN?1. Press the INFO button. Select Set up > Personal Information > PIN Numer > GO
Home 1 PIN or GO Home 2 PIN or Address Book PIN .
2. Enter your existing PIN. You then have the choice to change or remove the PIN.
2PIN Numbers P. 42
I have forgotten my PIN. How do I reset the PIN for
Home or the PIN for personal addresses (DRIVER 1 or
DRIVER 2)?A dealer must reset the PIN for you.
Why is Call grayed out on the Calculate Route screen?Your phone is not paired to Bluetooth® HandsFreeLink® or, if paired, your phone is in
use.
ProblemSolution
RDX_KA-31TX4800.book Page 219 Monday, January 30, 2012 11:32 PM
QRG
Page 231 of 260

230
Reference Information
System Initialization
The navigation system must be initialized if
power to the navigation system is
interrupted for any reason (e.g., the
battery was disconnected).
Entering the Security Code
Find the navigation system’s security code
and serial number label in your Owner’s
Manual kit. Do not store the label in your
vehicle. If you lose the label, you must first
retrieve the serial number, and then obtain
the code. You can find out about your
serial number and security code from a
dealer.
1.
on the audio system.
If you set the power mode to
ACCESSORY, you will be
requested to enter the security code.
See step 3.
2.Press and hold the VOL 9 (Volume/
Power) button for more than two
seconds.
The system is reactivated when the
system’s control unit recognizes that
the system is in your vehicle.
If the control unit fails to recognize,
“ENTER CODE” appears on the
navigation screen.
3.Enter the security code.
If you do not enter the security code
correctly after 10 tries, leave the
system for one hour before trying
again, or visit a dealer to have the
system reset.
NOTE:
In the U.S. you can register the security
code at My Acura (owners.acura.com.),
and find information on how to retrieve
the serial number and obtain the code at
radio-navicode.acura.com.
Acquiring GPS Information
Depending on the length of time the
power was interrupted, your system may
require GPS initialization.
If initialization is not necessary, the system
proceeds directly to the Startup
Confirmation screen.
If the system fails to locate a sufficient
number of satellites to locate your position
within 10 minutes, the following screen is
displayed.
RDX_KA-31TX4800.book Page 230 Monday, January 30, 2012 11:32 PM
QRG
Set the power mode to ON, and turn
Page 248 of 260

247
Voice CommandsAudio Commands
Voice Commands
Climate control recirculate
Climate control sync on*
Climate control sync off*
Climate control vent
Climate control bi-level (vent and floor)
Climate control floor
Climate control floor and defrost
Fan speed up
Fan speed down
Fan speed # (#: 1 to 7)
Driver temperature # degrees
Passenger temperature # degrees
Driver temperature up
Driver temperature down
Passenger temperature up
Passenger temperature down
Driver temperature max hot
Driver temperature max cold
Passenger temperature max hot
Passenger temperature max cold
Audio Commands
The system accepts these commands on
most screens.
Audio on*
Audio off *
Radio on *
Radio off *
Radio select FM1
Radio select FM2
Radio select AM
Radio tune to # FM (#: frequency,
Radio tune to # AM (#: frequency,
Radio seek up
Radio seek down
Radio next station
Radio preset # (#: 1 to 6)
Radio FM preset # (#: 1 to 6)
Radio FM1 preset # (#: 1 to 6)
Radio FM2 preset # (#: 1 to 6)
Radio AM preset # (#: 1 to 6)
Radio auto select *
Radio scan *
Radio select XM1
■ Radio Commands
Radio select XM2
XM channel # (#: 0 to 255)
XM channel up
XM channel down
XM category up
XM category down
XM preset # (#: 1 to 6)
XM1 preset # (#: 1 to 6)
XM2 preset # (#: 1 to 6)
XM scan *
XM category scan *
XM channel scan *
XM category mode
XM channel mode
NOTE:
Radio volume levels cannot be controlled
using voice control.
Continued
RDX_KA-31TX4800.book Page 247 Monday, January 30, 2012 11:32 PM
Rear defrost off *
Climate control fresh air
* These commands toggle the function on and off, so
the command may not match your intended action.
(#: 57 to 87 °F)
(#: 57 to 87 °F)
* These commands toggle the function on and off, so
the command may not match your intended action. e.g., 95.5)
e.g., 1020)
QRG
Page 257 of 260
256
Clock Adjustment ........................................ 57Adjust Time ................................................. 58
Auto Daylight ..............................................57
Auto Time Zone ..........................................57Resetting ..................................................... 58
Color .............................................................. 27
Map Color ...................................................28Menu Color ................................................28
Community (Place Category) .....................80
Connect to the Acura Server ......................62Continue Trip ............................................. 133
Contrast ......................................................... 24
Coordinate .................................................... 87Correct Vehicle Position ..............................61
Current Location ........................................ 110
Current Position
Editing Address Book ................................. 39
Setting Destination ..................................... 89
Viewing Weather ...................................... 116
D
Day Mode
Map Color
................................................... 28
Menu Color ................................................28Switching Display Mode .............................29
Delete a Phone ........................................... 185
Delete Messages .......................................... 62Dest. Menu 1 ................................................ 68
Dest. Menu 2 ................................................ 68
DEST/ROUTE Button
Changing Route ....................................... 122
Entering a Destination ................................68
Destination List
Adding Waypoint ..................................... 124
Editing ...................................................... 128
Destination Map ......................................... 93Detour ......................................................... 123
Diagnostic Info .......................................... 204
Dial .............................................................. 193Dial Tones ................................................... 195
Direct Dial ..................................................195
Directions ................................................... 102Disc
Playing
...................................................... 147
Voice Commands List ..............................248DISC Button ............................................ 6, 147
Display Voice Command Tips ....................26
E
Edit Album ................................................. 157Edit Avoid Area ........................................... 53
Edit Phone Name/PIN ...............................189
Edit Speed Dial .......................................... 187Edit Track ................................................... 158
Edit Waypoint Search Area ........................55
Emergency (Place Category) ......................80ENT Button ..................................................... 8
Error Messages .......................................... 225
Disc Player ................................................ 226iPod® ....................................................... 227
Navigation System ...................................225
USB Flash Drive ........................................ 228Exit Info ...................................................... 103
F
Favorite Subcategory ..................................82
Feature Guide ............................................ 203
Find Acura Dlr ............................................ 205Find Nearest... ............................................ 129
FM/AM Button ....................................... 6, 138
FM/AM Radio
Playing ...................................................... 138
Voice Commands List ...............................247
Folder List
Disc ........................................................... 149
USB Flash Drive .........................................173
G
Get Album Info .......................................... 159Go Home 1 ................................................... 12
Go Home 1 PIN ............................................ 42
Go Home 2 ................................................... 12Go Home 2 PIN ............................................ 42
Guidance Menu ......................................... 101
Directions ................................................. 102Exit Info .................................................... 103
Guidance Mode ........................................104
Guidance Mode ......................................... 104
H
HDD
Playing
...................................................... 151
Voice Commands List ...............................248HDD Setup
Disc
........................................................... 148
HDD ..........................................................153
RDX_KA-31TX4800.book Page 256 Monday, January 30, 2012 11:32 PM
IndexA B C D E F G H I J K L M N O P Q R S T U V W X Y Z
QRG