child seat Acura RDX 2013 Owner's Guide
[x] Cancel search | Manufacturer: ACURA, Model Year: 2013, Model line: RDX, Model: Acura RDX 2013Pages: 364, PDF Size: 12.54 MB
Page 59 of 364
uuChild Safety uSafety of Infants and Small Children
58Safe Driving
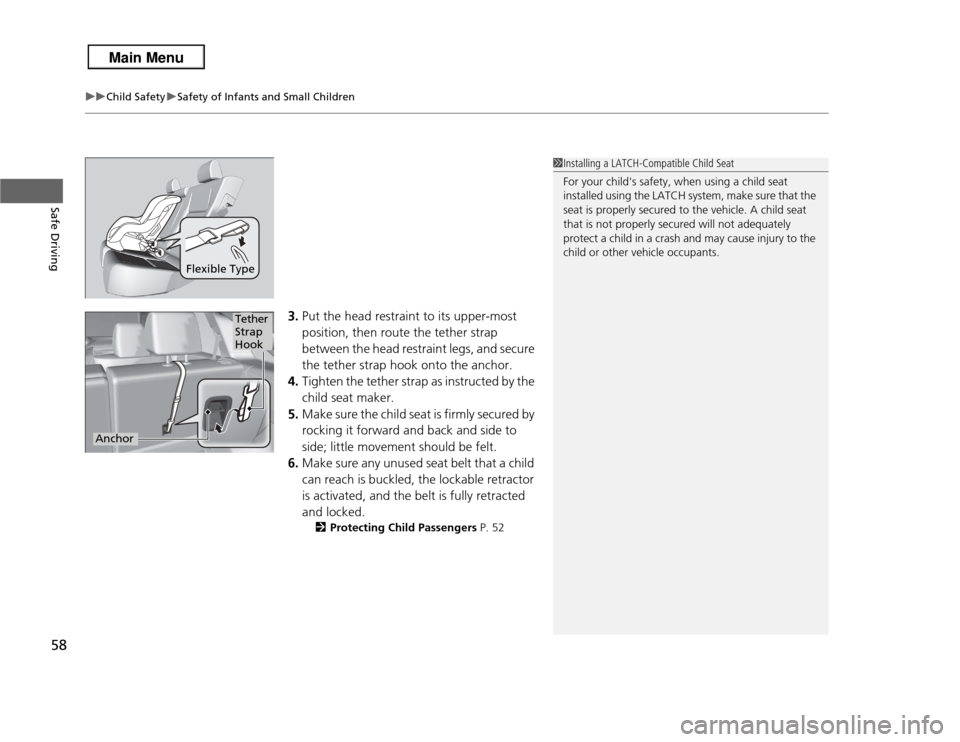
3. Put the head restraint to its upper-most
position, then route the tether strap
between the head restraint legs, and secure
the tether strap hook onto the anchor.
4. Tighten the tether strap as instructed by the
child seat maker.
5. Make sure the child seat is firmly secured by
rocking it forward and back and side to
side; little movement should be felt.
6. Make sure any unused seat belt that a child
can reach is buckled, the lockable retractor
is activated, and the belt is fully retracted
and locked.
2 Protecting Child Passengers P. 52
Flexible Type
1Installing a LATCH-Compatible Child Seat
For your child's safety, when using a child seat
installed using the LATCH system, make sure that the
seat is properly secured to the vehicle. A child seat
that is not properly secured will not adequately
protect a child in a crash and may cause injury to the
child or other vehicle occupants.
Tether
Strap
Hook
Anchor
Page 60 of 364
Continued
59
uuChild Safety uSafety of Infants and Small Children
Safe Driving
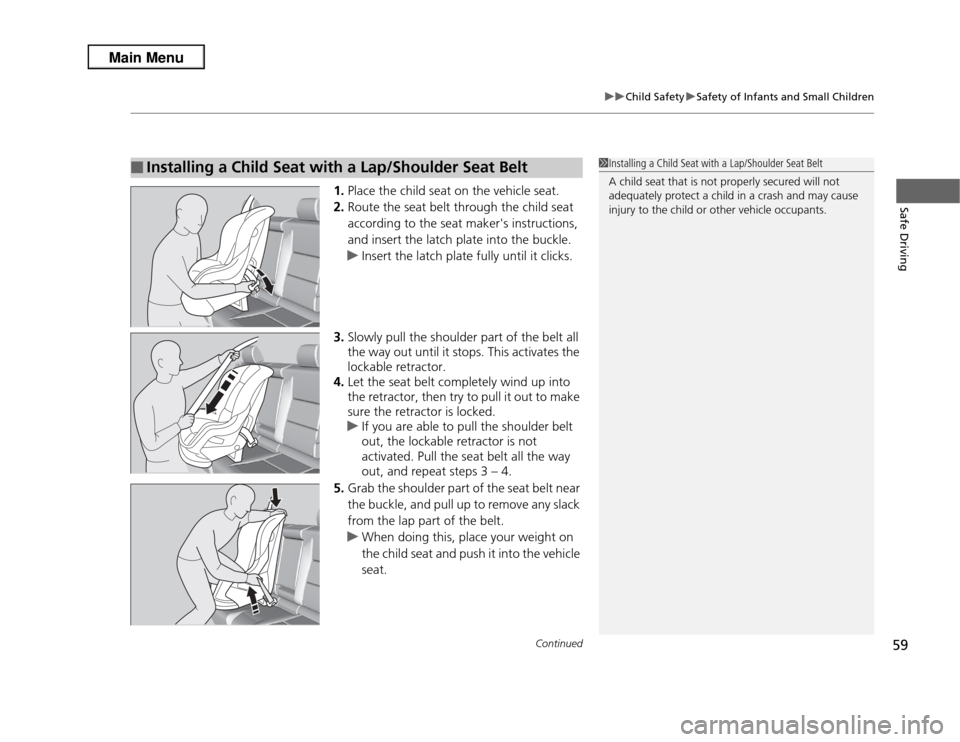
1. Place the child seat on the vehicle seat.
2. Route the seat belt through the child seat
according to the seat maker's instructions,
and insert the latch plate into the buckle.
u Insert the latch plate fully until it clicks.
3. Slowly pull the shoulder part of the belt all
the way out until it stops. This activates the
lockable retractor.
4. Let the seat belt completely wind up into
the retractor, then try to pull it out to make
sure the retractor is locked.
u If you are able to pull the shoulder belt
out, the lockable retractor is not
activated. Pull the seat belt all the way
out, and repeat steps 3 – 4.
5. Grab the shoulder part of the seat belt near
the buckle, and pull up to remove any slack
from the lap part of the belt.
u When doing this, place your weight on
the child seat and push it into the vehicle
seat.
■
Installing a Child Seat with a Lap/Shoulder Seat Belt
1Installing a Child Seat with a Lap/Shoulder Seat Belt
A child seat that is not properly secured will not
adequately protect a child in a crash and may cause
injury to the child or other vehicle occupants.
Page 61 of 364
uuChild Safety uSafety of Infants and Small Children
60Safe Driving
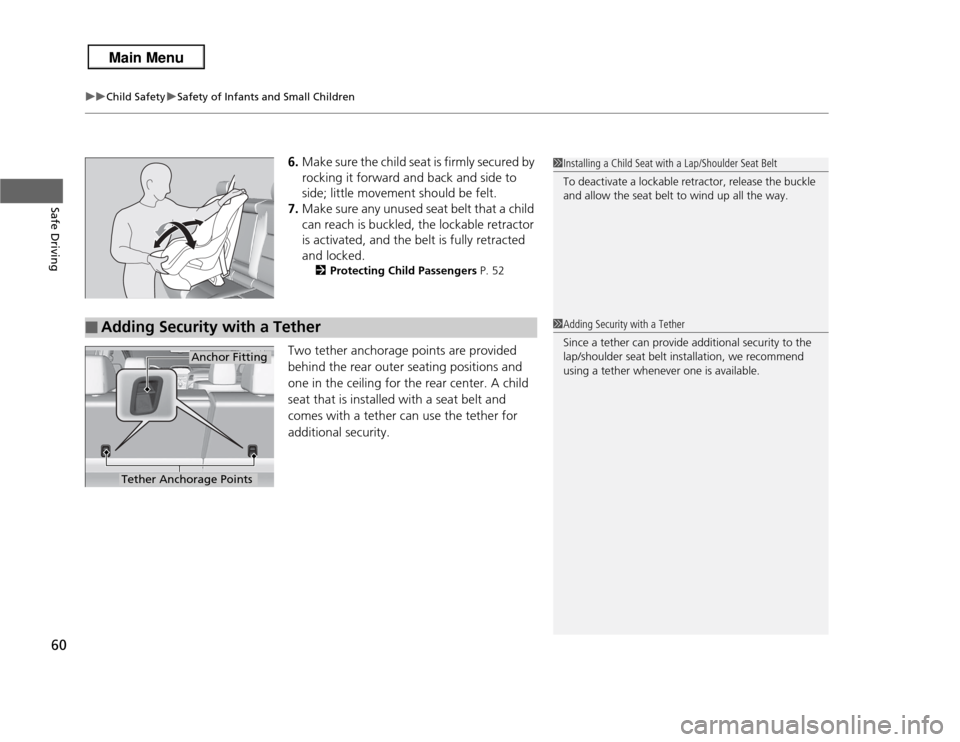
6. Make sure the child seat is firmly secured by
rocking it forward and back and side to
side; little movement should be felt.
7. Make sure any unused seat belt that a child
can reach is buckled, the lockable retractor
is activated, and the belt is fully retracted
and locked.
2 Protecting Child Passengers P. 52
Two tether anchorage points are provided
behind the rear outer seating positions and
one in the ceiling for the rear center. A child
seat that is installed with a seat belt and
comes with a tether can use the tether for
additional security.
1Installing a Child Seat with a Lap/Shoulder Seat Belt
To deactivate a lockable retractor, release the buckle
and allow the seat belt to wind up all the way.
■
Adding Security with a Tether
Tether Anchorage Points
Anchor Fitting
1Adding Security with a Tether
Since a tether can provide additional security to the
lap/shoulder seat belt installation, we recommend
using a tether whenever one is available.
Page 62 of 364

61
uuChild Safety uSafety of Infants and Small Children
Safe Driving
■
Using an outer anchor
1. Put the head restraint to its upper-most
position, then route the tether strap
through the head restraint legs. Make sure
the strap is not twisted.
2. Secure the tether strap hook onto the
anchor.
3. Tighten the tether strap as instructed by the
child seat manufacturer.
■
Using the center anchor
1. Lower the head restraint to its lowest
position.
2. Open the anchor cover.
3. Route the tether strap over the head
restraint. Make sure the strap is not twisted.
4. Secure the tether strap hook onto the
anchor.
5. Tighten the tether strap as instructed by the
child seat manufacturer.
Tether
Strap
Hook
Anchor
Tether Strap
Hook
Anchor
Page 63 of 364

62
uuChild Safety uSafety of Larger Children
Safe Driving
Safety of Larger ChildrenThe following pages give instructions on how to check proper seat belt fit, what kind
of booster seat to use if one is needed, and important precautions for a child who
must sit in front.
When a child is too big for a child seat, secure the child in a rear seat using the lap/
shoulder seat belt. Have the child sit upright and all the way back, then answer the
following questions.
■
Checklist
• Do the child's knees bend comfortably over
the edge of the seat?
• Does the shoulder belt cross between the
child's neck and arm?
• Is the lap part of the seat belt as low as
possible, touching the child's thighs?
• Will the child be able to stay seated like this
for the whole trip?
If you answer yes to all these questions, the child is ready to wear the lap/shoulder
seat belt correctly. If you answer no to any question, the child needs to ride on a
booster seat until the seat belt fits properly without a booster seat.
■
Protecting Larger Children
■
Checking Seat Belt Fit
1 Safety of Larger Children
3
WARNING
Allowing a child age 12 or under to sit in
front can result in injury or death if the
passenger's front airbag inflates.
If a larger child must ride in front, move the
vehicle seat as far to the rear as possible,
have the child sit up properly and wear the
seat belt properly, using a booster seat if
needed.
Page 64 of 364

63
uuChild Safety uSafety of Larger Children
Safe Driving
If a lap/shoulder seat belt cannot be used
properly, position the child in a booster seat in
a rear seating position. For the child's safety,
check that the child meets the booster seat
manufacturer's recommendations.
Your vehicle has a rear seat where children can be properly restrained. If you ever
have to carry a group of children, and a child must ride in front:
• Make sure you read and fully understand the instructions and safety information
in this manual.
• Move the front passenger seat as far back as possible.
• Have the child sit upright and well back in the seat.
• Check that the seat belt is properly positioned so that the child is secure in the
seat.
■
Monitoring child passengers
We strongly recommend that you keep an eye on child passengers. Even older, more
mature children sometimes need to be reminded to fasten their seat belts and sit up
properly.
■
Booster Seats
1 Booster Seats
When installing a booster seat, make sure to read the
instructions that came with it, and install the seat
accordingly.
There are high- and low-type booster seats. Choose a
booster seat that allows the child to wear the seat
belt correctly.
Some U.S. states and Canadian provinces and
territories require children to use a booster seat until
they reach a given age or weight (e.g. 6 years or 60
lbs). Be sure to check current laws in the state or
province, or territory where you intend to drive.
■
Protecting Larger Children-Final Checks
Page 96 of 364
95
Controls
This chapter explains how to operate the various controls necessary for driving.
Setting the Clock................................ 96
Locking and Unlocking the Doors Key Types and Functions ... ................. 97
Locking/Unlocking the Doors from the Outside ............................................ 99Low Keyless Access Remote Signal Strength ..... 103
Locking/Unlocking the Doors from the Inside ... 104Childproof Door Locks ..................... 105
Auto Door Locking/Unlocking .......... 106
Opening and Closing the Tailgate ... 107
Security System ................................ 113
Immobilizer System .......................... 113
Security System Alarm ...................... 113
Opening and Closing the Windows .... 115Opening and Closing the Moonroof
....... 118
Operating the Switches Around the
Steering WheelENGINE START/STOP Button............. 119
Turn Signals ..................................... 122
Light Switches.................................. 122
Fog Lights
*...................................... 125
Daytime Running Lights ................... 125
Wipers and Washers ........................ 126
Brightness Control ........................... 128
Rear Defogger/Heated Door Mirror Button ... 129Driving Position Memory System ...... 130 Adjusting the Steering Wheel .......... 132
Adjusting the Mirrors ....................... 133
Interior Rearview Mirror ................... 133
Power Door Mirrors ......................... 134
Adjusting the Seats .......................... 136
Adjusting the Seat Positions ............. 136
Interior Lights/Interior Convenience Items
...... 143
Interior Lights .................................. 143
Interior Convenience Items .............. 145
Climate Control System ................... 152
Using Automatic Climate Control .... 152
Synchronized Mode ......................... 154Automatic Climate Control Sensors.....155
* Not available on all models
Page 105 of 364
104
uuLocking and Unlocking the Doors uLocking/Unlocking the Doors from the Inside
Controls
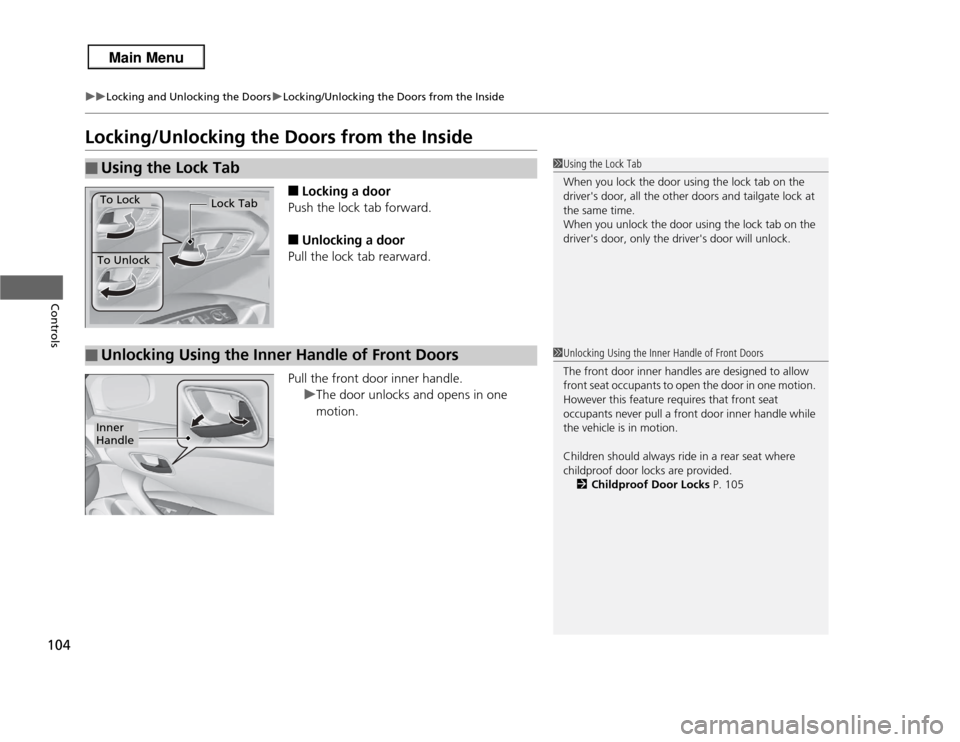
Locking/Unlocking the Doors from the Inside
■
Locking a door
Push the lock tab forward.
■
Unlocking a door
Pull the lock tab rearward.
Pull the front door inner handle. uThe door unlocks and opens in one
motion.
■
Using the Lock Tab
1Using the Lock Tab
When you lock the door using the lock tab on the
driver's door, all the other doors and tailgate lock at
the same time.
When you unlock the door using the lock tab on the
driver's door, only the driver's door will unlock.
To Unlock
Lock Tab
To Lock
■
Unlocking Using the Inner Handle of Front Doors
1Unlocking Using the Inner Handle of Front Doors
The front door inner handles are designed to allow
front seat occupants to open the door in one motion.
However this feature requires that front seat
occupants never pull a front door inner handle while
the vehicle is in motion.
Children should always ride in a rear seat where
childproof door locks are provided.
2 Childproof Door Locks P. 105
Inner
Handle
Page 116 of 364

115
Continued
Controls
Opening and Closing the WindowsOpening/Closing the Power WindowsThe power windows can be opened and closed when the power mode is in ON,
using the switches on the doors. The driver side switches can be used to open and
close all of the windows.
The power window lock button on the driver side must be switched off (not pushed
in, indicator off) to open and close the windows from anywhere other than the
driver's seat.
When the power window lock button is pushed in, the indicator comes on and you
can only operate the driver's window. Turn the power window lock button on when
children are in the vehicle.
■
Automatic operation
To open: Push the switch down firmly.
To close: Pull the switch up firmly.
The window opens or closes completely. To
stop the window at any time, push or pull the
switch briefly.
■
Manual operation
To open: Push the switch down lightly.
To close: Pull the switch up lightly.
Release the switch when the window reaches
the desired position.
■
Opening/Closing Windows with Auto-Open/Close Function
1 Opening/Closing the Power Windows
The power windows can be operated for up to 10
minutes after you set the power mode to VEHICLE
OFF.
Opening either front door cancels this function.
Auto Reverse
If a power window senses resistance when closing
automatically, it will stop closing and reverse
direction.
The driver’s window auto reverse function is disabled
when you continuously pull up the switch.
The auto reverse function stops sensing when the
window is almost closed to ensure that it fully closes.
3
WARNING
Closing a power window on someone's
hands or fingers can cause serious injury.
Make sure your passengers are away from
the windows before closing them.
ON
OFF
Power Window
Lock Button
Indicator
Driver’s
Window
Switch
Front Passenger’s
Window Switch
Page 357 of 364

356Index
Beverage Holders...................................... 147
Bluetooth ® Audio ..................................... 182
Bluetooth ® HandsFreeLink ®..................... 196
Booster Seats (For Children) ....................... 63
Brake System ............................................. 257
Anti-lock Brake System (ABS) ................... 259
Brake Assist System ................................. 260
Brake System Indicator............................... 68
Fluid ........................................................ 285
Foot Brake ............................................... 258
Indicator ............................................ 68, 335
Parking Brake .......................................... 257
Brightness Control (Instrument Panel) .... 128
Bulb Replacement ..................................... 287
Back-Up Light and Taillight ...................... 294
Brake Light, Taillight, Rear Turn Signal Light
and Rear Side Marker Light .................... 292
Fog Lights ................................................ 289
Front Turn Signal/Parking Light and Front Side
Marker Light .......................................... 291
Headlights ............................................... 287
High-Mount Brake Light .......................... 296
Rear License Plate Light............................ 295
Bulb Specifications .................................... 344CCarbon Monoxide Gas ................................ 64
Cargo Hook ............................................... 149
Carrying Cargo .................................. 229, 231
CD Player ................................................... 171 Certification Label
.................................... 346
Changing Bulbs ........................................ 287
Charging System Indicator ................. 69, 333
Child Safety ................................................. 52
Childproof Door Locks............................. 105
Child Seat .................................................... 52
Booster Seats ............................................ 63
Child Seat for Infants................................. 54
Child Seat for Small Children ..................... 55
Installing a Child Seat with a Lap/
Shoulder Seat Belt ................................... 59
Larger Children ......................................... 62
Rear-facing Child Seat ............................... 54
Selecting a Child Seat ................................ 56
Childproof Door Locks ............................. 105
Cleaning the Exterior ............................... 315
Cleaning the Interior ................................ 313
Client Service Information ....................... 354
Climate Control System ............................ 152
Changing the Mode ................................ 152
Defrosting the Windshield and Windows ............................................... 153
Dust and Pollen Filter............................... 312
Recirculation/Fresh Air Mode ..... .............. 152
Sensors ................................................... 155
Synchronized Mode................................. 154
Using Automatic Climate Control ............ 152
Clock ............................................................ 96
Coat Hook ................................................. 149
Compact Spare Tire .......................... 319, 345
Compass .................................................... 225 Console Compartment
............................. 146
Controls ...................................................... 95
Coolant (Engine) ...................................... 282
Adding to the Radiator ...... ..................... 283
Adding to the Reserve Tank .................... 282
Overheating ............................................ 331
Creeping (Automatic Transmission) ........ 243
Cruise Control .......................................... 248
Indicator ................................................... 76
Cup Holders .............................................. 147
Customized Features ................................. 87
DDaytime Running Lights .......................... 125
Dead Battery ............................................ 328
Defrosting the Windshield and Windows ................................................. 153
Detachable Anchor .................................... 34
Devices that Emit Radio Waves ............... 347
Dimming
Headlights .............................................. 122
Rearview Mirror ...................................... 133
Dipstick (Engine Oil) ................................ 278
Directional Signals (Turn Signal) ............. 122
Display Button .......................................... 162
Door Mirrors ............................................. 134
Doors .......................................................... 97
Auto Door Locking.................................. 106
Auto Door Unlocking .............................. 106
Door Open Indicator ........................... 28, 73