window Acura RDX 2013 Owner's Guide
[x] Cancel search | Manufacturer: ACURA, Model Year: 2013, Model line: RDX, Model: Acura RDX 2013Pages: 364, PDF Size: 12.54 MB
Page 153 of 364
152Controls
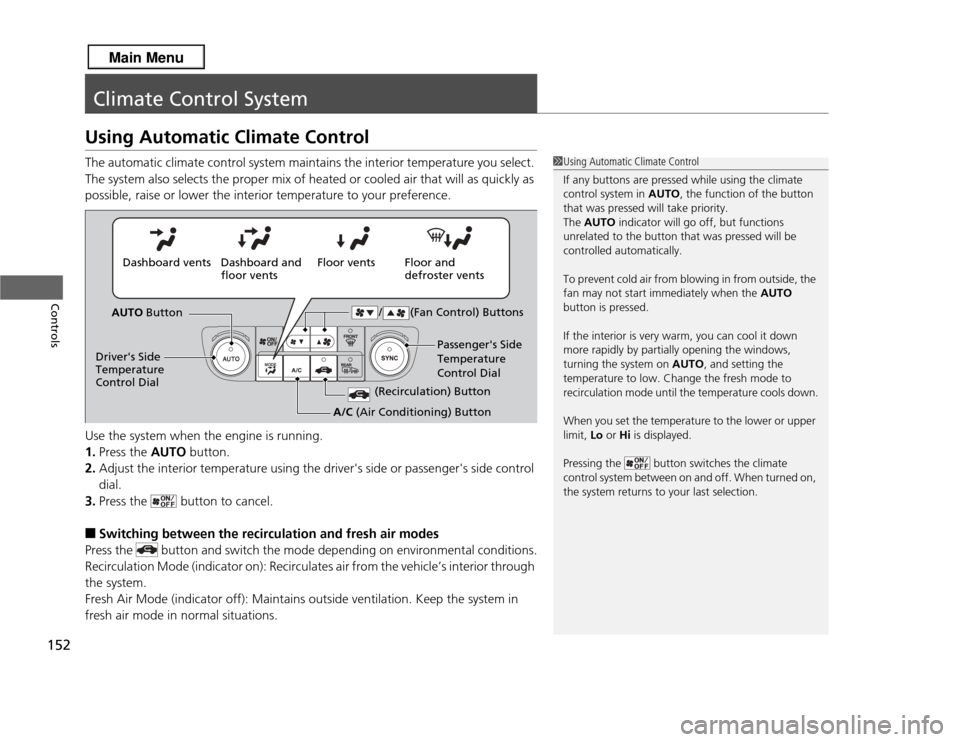
Climate Control SystemUsing Automatic Climate ControlThe automatic climate control system maintains the interior temperature you select.
The system also selects the proper mix of heated or cooled air that will as quickly as
possible, raise or lower the interior temperature to your preference.
Use the system when the engine is running.
1.Press the AUTO button.
2. Adjust the interior temperature using the driver's side or passenger's side control
dial.
3. Press the button to cancel.■
Switching between the recircu lation and fresh air modes
Press the button and switch the mode depending on environmental conditions.
Recirculation Mode (indicator on): Recirculates air from the vehicle’s interior through
the system.
Fresh Air Mode (indicator off): Maintains outside ventilation. Keep the system in
fresh air mode in normal situations.
1 Using Automatic Climate Control
If any buttons are pressed while using the climate
control system in AUTO, the function of the button
that was pressed will take priority.
The AUTO indicator will go off, but functions
unrelated to the button that was pressed will be
controlled automatically.
To prevent cold air from blowing in from outside, the
fan may not start immediately when the AUTO
button is pressed.
If the interior is very warm, you can cool it down
more rapidly by partially opening the windows,
turning the system on AUTO, and setting the
temperature to low. Change the fresh mode to
recirculation mode until the temperature cools down.
When you set the temperature to the lower or upper
limit, Lo or Hi is displayed.
Pressing the button switches the climate
control system between on and off. When turned on,
the system returns to your last selection.
Floor and
defroster vents
Floor vents
Dashboard and
floor vents
Dashboard vents
AUTO Button
Driver's Side
Temperature
Control Dial Passenger's Side
Temperature
Control Dial
/ (Fan Control) Buttons
(Recirculation) Button
A/C (Air Conditioning) Button
Page 154 of 364
153
uuClimate Control System uUsing Automatic Climate Control
Controls
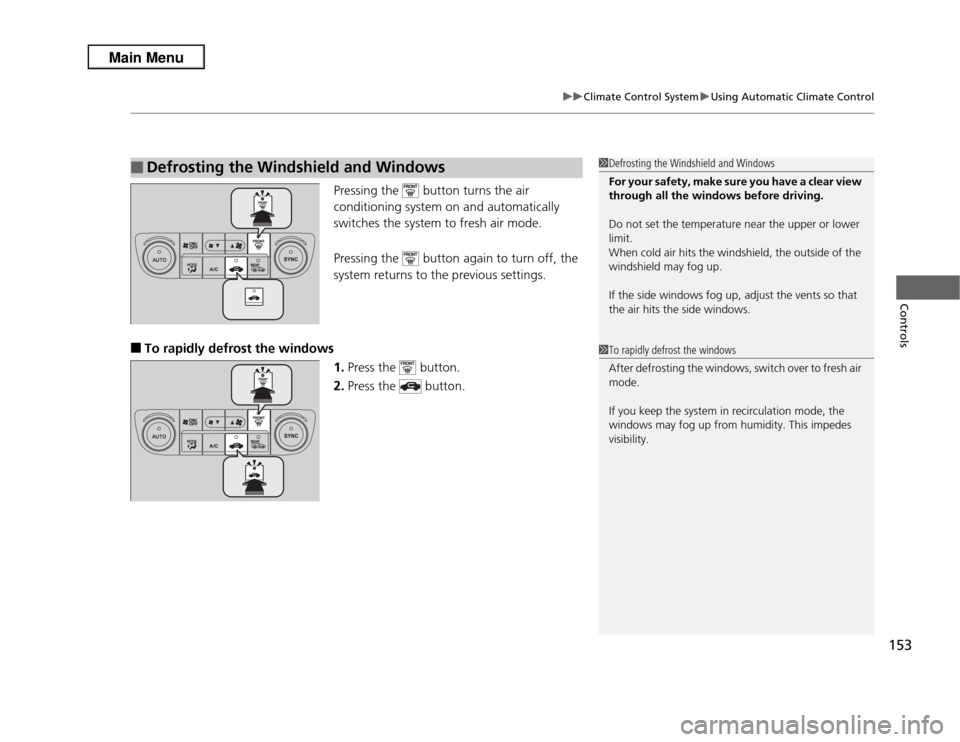
Pressing the button turns the air
conditioning system on and automatically
switches the system to fresh air mode.
Pressing the button again to turn off, the
system returns to the previous settings.
■
To rapidly defrost the windows
1.Press the button.
2. Press the button.
■
Defrosting the Windshield and Windows
1Defrosting the Windshield and Windows
For your safety, make sure you have a clear view
through all the windows before driving.
Do not set the temperature near the upper or lower
limit.
When cold air hits the windshield, the outside of the
windshield may fog up.
If the side windows fog up, adjust the vents so that
the air hits the side windows.1To rapidly defrost the windows
After defrosting the windows, switch over to fresh air
mode.
If you keep the system in recirculation mode, the
windows may fog up from humidity. This impedes
visibility.
Page 197 of 364
196Features
Bluetooth® HandsFreeLink ®For models with navigation system, s ee Navigation System Manual for how to
operate Bluetooth ® HandsFreeLink ®.
Bluetooth ® HandsFreeLink ® (HFL) allows you to place and receive phone calls using
your vehicle's audio system, without handling your cell phone.Using HFL
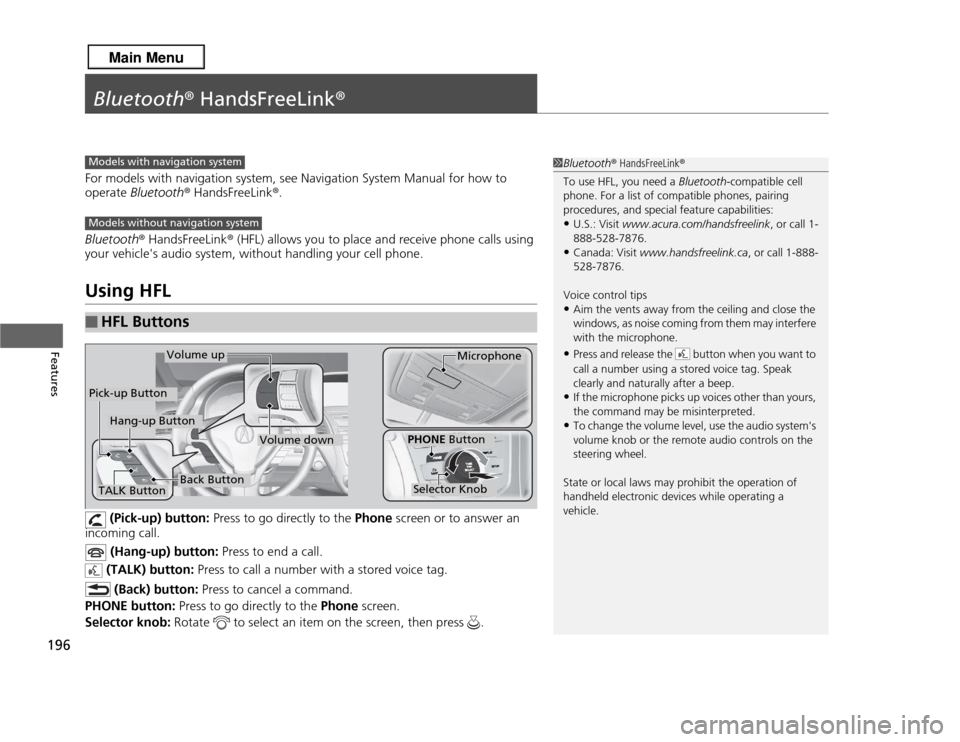
(Pick-up) button: Press to go directly to the Phone screen or to answer an
incoming call.
(Hang-up) button: Press to end a call.
(TALK) button: Press to call a number with a stored voice tag.
(Back) button: Press to cancel a command.
PHONE button: Press to go directly to the Phone screen.
Selector knob: Rotate to select an item on the screen, then press .
■
HFL Buttons
1Bluetooth ® HandsFreeLink ®
To use HFL, you need a Bluetooth-compatible cell
phone. For a list of compatible phones, pairing
procedures, and special feature capabilities:•U.S.: Visit www.acura.com/handsfreelink, or call 1-
888-528-7876.•Canada: Visit www.handsfreelink.ca , or call 1-888-
528-7876.
Voice control tips•Aim the vents away from the ceiling and close the
windows, as noise coming from them may interfere
with the microphone.•Press and release the button when you want to
call a number using a stored voice tag. Speak
clearly and naturally after a beep.•If the microphone picks up voices other than yours,
the command may be misinterpreted.•To change the volume level, use the audio system's
volume knob or the remote audio controls on the
steering wheel.
State or local laws may prohibit the operation of
handheld electronic devices while operating a
vehicle.
Models with navigation systemModels without navigation systemTALK Button
Volume up
Microphone
Hang-up Button
Pick-up Button
Volume down
Selector KnobPHONE Button
Back Button
Page 229 of 364
228Driving
Before DrivingDriving PreparationCheck the following items before you start driving.
•Make sure there are no obstructions on the windows, door mirrors, exterior
lights, or other parts of the vehicle.
u Remove any frost, snow, or ice.
u Remove any snow on the roof, as this can slip down and obstruct your field of
vision while driving. If frozen solid, remove ice once it has softened.
u When removing ice from around the wheels, be sure not to damage the wheel
or wheel components.
• Make sure the hood is securely closed.
u If the hood opens while driving, your front view will be blocked.
• Make sure the tires are in good condition.
u Check air pressures, and check for damage and excessive wear.
2 Checking and Maintaining Tires P. 301
•Make sure there are no people or objects behind or around the vehicle.
u There are blind spots from the inside.■
Exterior Checks
1Exterior Checks
NOTICEWhen doors are frozen shut, use warm water around
the door edges to melt any ice. Do not try to force
them open, as this can damage the rubber trim
around the doors. When done, wipe dry to avoid
further freezing.
Do not pour warm water into the key cylinder.
You will be unable to insert key if the water freezes in
the hole.
Heat from the engine and exhaust can ignite
flammable materials left under the hood, causing a
fire. If you've parked your vehicle for an extended
period, inspect and remove any debris that may have
collected, such as dried grass and leaves that have
fallen or have been carried in for use as a nest by a
small animal.
Also check under the hood for leftover flammable
materials after you or someone else has performed
maintenance on your vehicle.
Page 267 of 364
266Driving
Accessories and ModificationsAccessoriesWhen installing accessories, check the following:
•Do not install accessories on the windshield. They can obstruct your view and
delay your reaction to driving conditions.
• Do not install accessories on the side pillars or across the side windows.
Accessories installed in these areas may interfere with proper operation of the
side curtain airbags.
• Be sure electronic accessories do not overload electrical circuits or interfere with
proper operation of your vehicle.
2 Fuses P. 337
•Before installing any electronic accessory, have the installer contact a dealer for
assistance. If possible, have a dealer inspect the final installation.ModificationsDo not modify your vehicle or use non-Acura components that can affect its
handling, stability, and reliability.
Overall vehicle performance can be affected. Always make sure all equipment is
properly installed and maintained, and that it meets federal, state, province,
territory, and local regulations.
1Accessories and Modifications
Acura Genuine accessories are recommended to
ensure proper operation on your vehicle.
3
WARNING
Improper accessories or modifications can
affect your vehicle's handling, stability, and
performance, and cause a crash in which
you can be seriously hurt or killed.
Follow all instruction s in this owner's
manual regarding accessories and
modifications.
Page 268 of 364
267
Maintenance
This chapter discusses basic maintenance.
Before Performing MaintenanceInspection and Maintenance ............ 268Safety When Performing Maintenance..... 269Parts and Fluids Used in Maintenance Service ........................................... 270
Maintenance Minder
TM..................... 271
Maintenance Under the Hood
Maintenance Items Under the Hood ..... 275Opening the Hood ........................... 276
Recommended Engine Oil ...... .......... 277
Oil Check ......................................... 278
Adding Engine Oil ............................ 279Changing the Engine Oil and Oil Filter ..... 280
Engine Coolant ................................ 282
Transmission Fluid ............................ 284
Brake Fluid ....................................... 285
Refilling Window Washer Fluid......... 286
Replacing Light Bulbs ....................... 287Checking and Maintaining Wiper Blades
.... 297
Checking and Maintaining Tires
Checking Tires ................................. 301Tire and Loading Information Label ...... 302Tire Labeling .................................... 302DOT Tire Quality Grading (U.S. Vehicles)....... 304Wear Indicators................................ 306
Tire Service Life ................................ 306 Tire and Wheel Replacement ........... 307
Tire Rotation .................................... 308
Winter Tires ..................................... 309
Battery ............................................... 310
Remote Transmitter Care Replacing the Button Battery ........... 311
Climate Control System Maintenance
..... 312
Cleaning
Interior Care .................................... 313
Exterior Care.................................... 315
Page 287 of 364
286
uuMaintenance Under the Hood uRefilling Window Washer Fluid
Maintenance
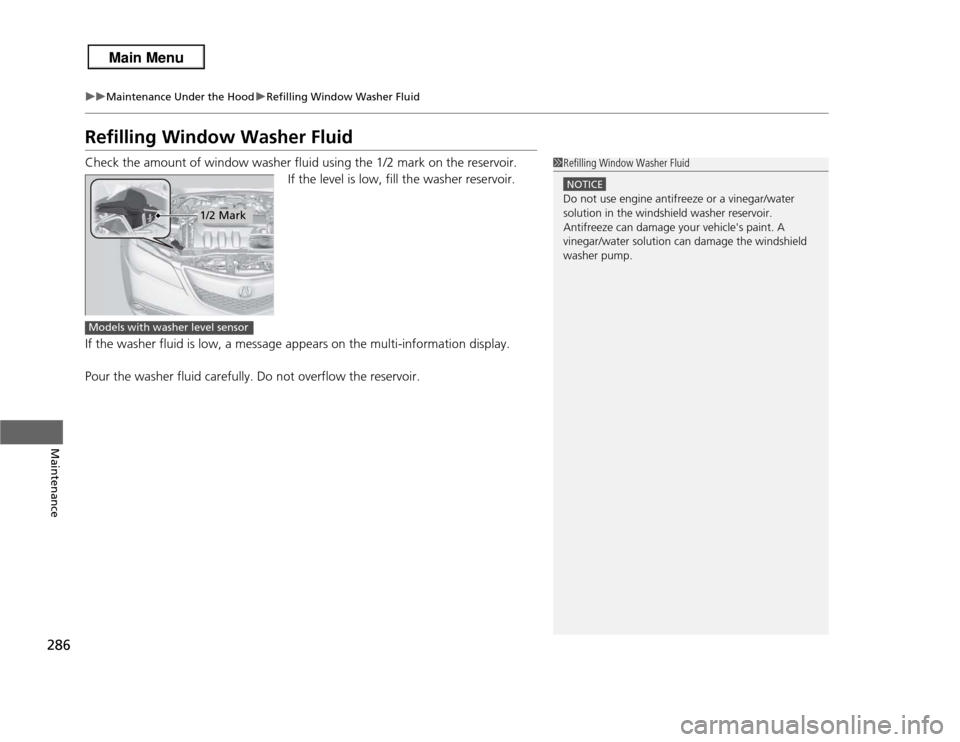
Refilling Window Washer FluidCheck the amount of window washer fluid using the 1/2 mark on the reservoir.
If the level is low, fill the washer reservoir.
If the washer fluid is low, a message appears on the multi-information display.
Pour the washer fluid carefully. Do not overflow the reservoir.
1 Refilling Window Washer Fluid
NOTICEDo not use engine antifreeze or a vinegar/water
solution in the windshield washer reservoir.
Antifreeze can damage your vehicle's paint. A
vinegar/water solution can damage the windshield
washer pump.
1/2 Mark
Models with washer level sensor
Page 298 of 364
297
Continued
Maintenance
Checking and Maintaining Wiper BladesChecking Wiper BladesIf the wiper blade rubber has deteriorated, it will leave streaks and the metal wiper
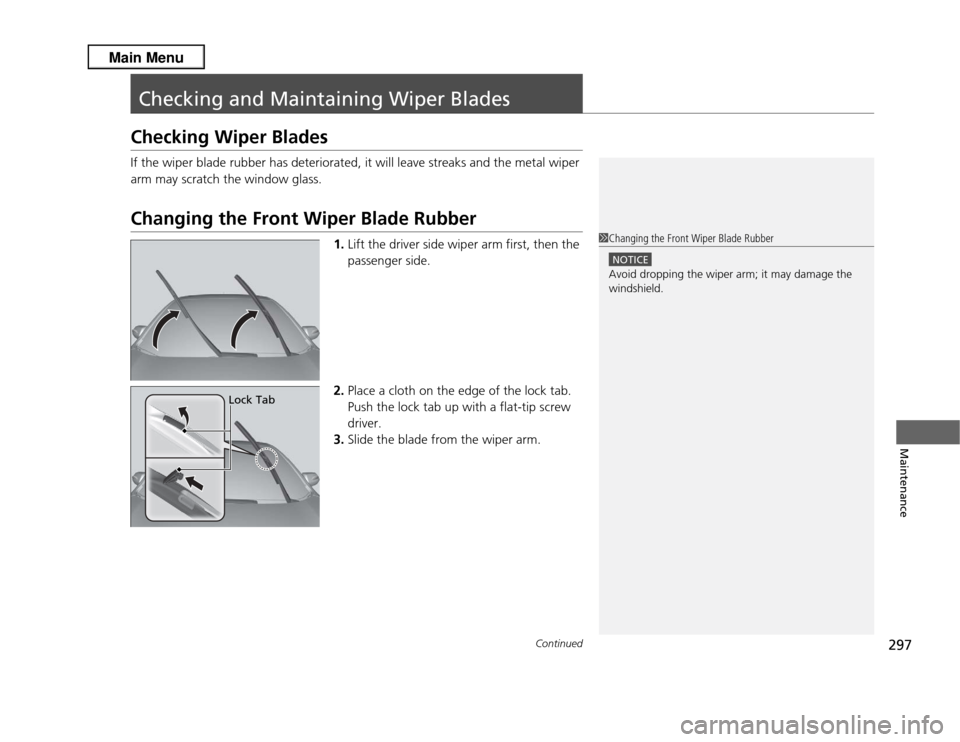
arm may scratch the window glass.Changing the Front Wiper Blade Rubber
1.Lift the driver side wiper arm first, then the
passenger side.
2. Place a cloth on the edge of the lock tab.
Push the lock tab up with a flat-tip screw
driver.
3. Slide the blade from the wiper arm.
1Changing the Front Wiper Blade Rubber
NOTICEAvoid dropping the wiper arm; it may damage the
windshield.
Lock Tab
Page 311 of 364
310Maintenance
BatteryChecking the Battery
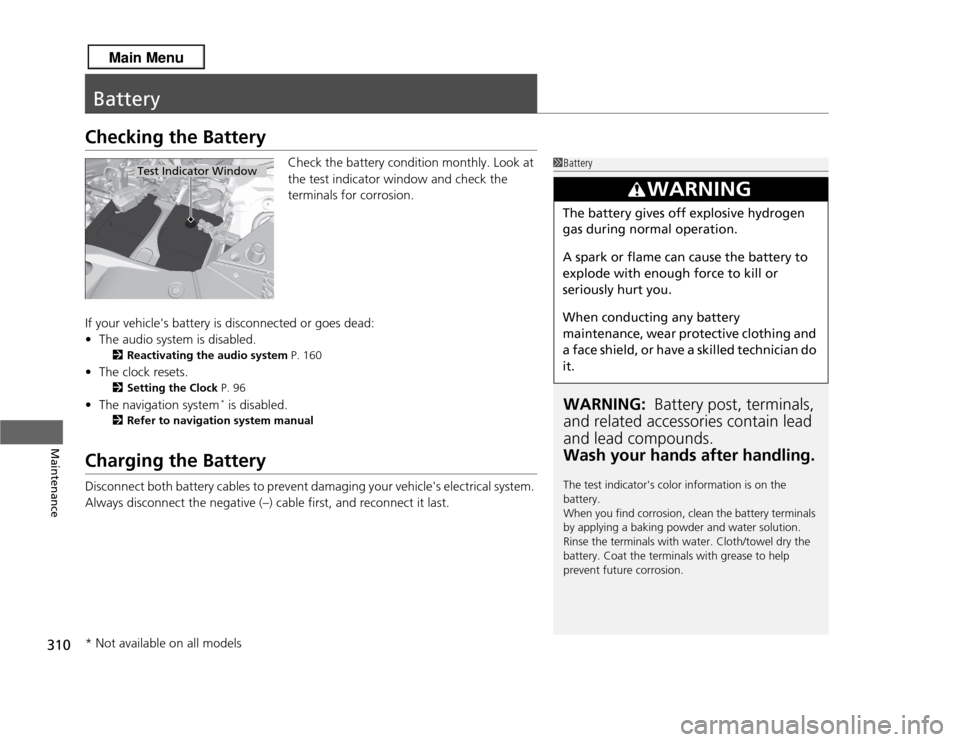
Check the battery condition monthly. Look at
the test indicator window and check the
terminals for corrosion.
If your vehicle's battery is disconnected or goes dead:
• The audio system is disabled.
2 Reactivating the audio system P. 160
•The clock resets.
2 Setting the Clock P. 96
•The navigation system
* is disabled.
2 Refer to navigation system manual
Charging the BatteryDisconnect both battery cables to prevent damaging your vehicle's electrical system.
Always disconnect the negative (–) cab le first, and reconnect it last.
1BatteryWARNING: Battery post, terminals,
and related accessories contain lead
and lead compounds.
Wash your hands after handling.The test indicator's color information is on the
battery.
When you find corrosion, clean the battery terminals
by applying a baking powder and water solution.
Rinse the terminals with water. Cloth/towel dry the
battery. Coat the terminals with grease to help
prevent future corrosion.
3
WARNING
The battery gives off explosive hydrogen
gas during normal operation.
A spark or flame can cause the battery to
explode with enough force to kill or
seriously hurt you.
When conducting any battery
maintenance, wear protective clothing and
a face shield, or have a skilled technician do
it.
Test Indicator Window
* Not available on all models
Page 313 of 364
312Maintenance
Climate Control System MaintenanceDust and Pollen FilterThe climate control system is equipped with a dust and pollen filter that collects
pollen, dust, and other debris in the air. The Maintenance Minder
TM messages will let
you know when to replace the filter.
We recommend that you replace the dust and pollen filter sooner when using your
vehicle in areas with high concentrations of dust.
1 Dust and Pollen Filter
If the airflow from the climate control system
deteriorates noticeably, and the windows fog up
easily, the filter may need to be replaced. Please
contact a dealer for replacement.