fluid Acura RDX 2013 Owner's Manual
[x] Cancel search | Manufacturer: ACURA, Model Year: 2013, Model line: RDX, Model: Acura RDX 2013Pages: 364, PDF Size: 12.54 MB
Page 10 of 364
9Quick Reference Guide
Controls
(P 95)
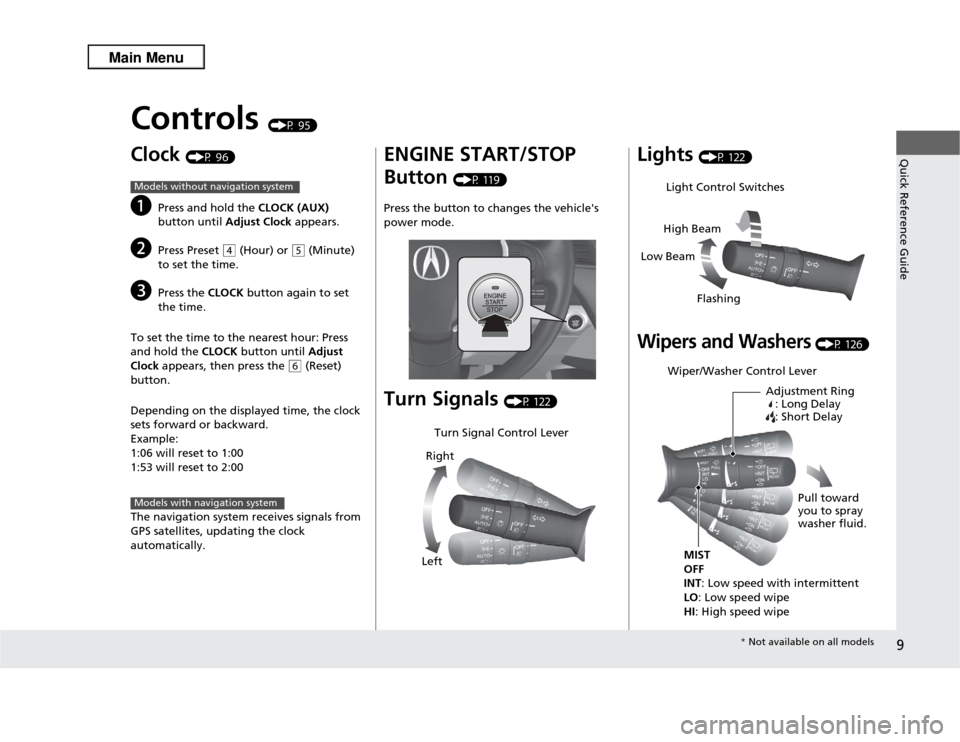
Clock
(P 96)
a
Press and hold the CLOCK (AUX)
button until Adjust Clock appears.
b
Press Preset
(4
(Hour) or
(5
(Minute)
to set the time.
c
Press the CLOCK button again to set
the time.
To set the time to the nearest hour: Press
and hold the CLOCK button until Adjust
Clock appears, then press the
(6
(Reset)
button.
Depending on the displayed time, the clock
sets forward or backward.
Example:
1:06 will reset to 1:00
1:53 will reset to 2:00
The navigation system receives signals from
GPS satellites, updating the clock
automatically.
Models without navigation systemModels with navigation system
ENGINE START/STOP
Button
(P 119)
Press the button to changes the vehicle's
power mode.
Turn Signals
(P 122)
Turn Signal Control Lever
Right
Left
Lights
(P 122)
Wipers and Washers
(P 126)
Light Control Switches
Low Beam High Beam
FlashingWiper/Washer Control Lever Adjustment Ring: Long Delay
: Short Delay
MIST
OFF
INT : Low speed with intermittent
LO : Low speed wipe
HI : High speed wipe Pull toward
you to spray
washer fluid.
*
Not available on all models
Page 17 of 364
16Quick Reference Guide
Maintenance
(P 267)
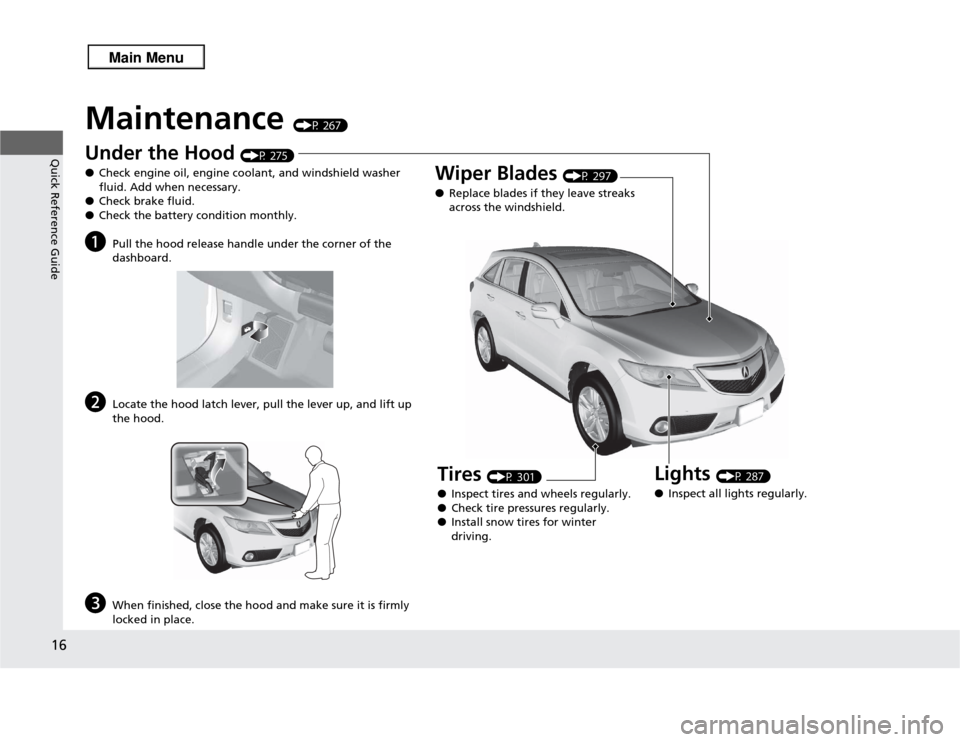
Under the Hood
(P 275)
● Check engine oil, engine coolant, and windshield washer
fluid. Add when necessary.
● Check brake fluid.
● Check the battery condition monthly.
a
Pull the hood release handle under the corner of the
dashboard.
b
Locate the hood latch lever, pull the lever up, and lift up
the hood.
c
When finished, close the hood and make sure it is firmly
locked in place.
Lights
(P 287)
● Inspect all lights regularly.
Wiper Blades
(P 297)
● Replace blades if they leave streaks
across the windshield.
Tires
(P 301)
● Inspect tires and wheels regularly.
● Check tire pressures regularly.
● Install snow tires for winter
driving.
Page 69 of 364
68Instrument Panel
IndicatorsIndicator
Name
On/Blinking
Explanation
Message
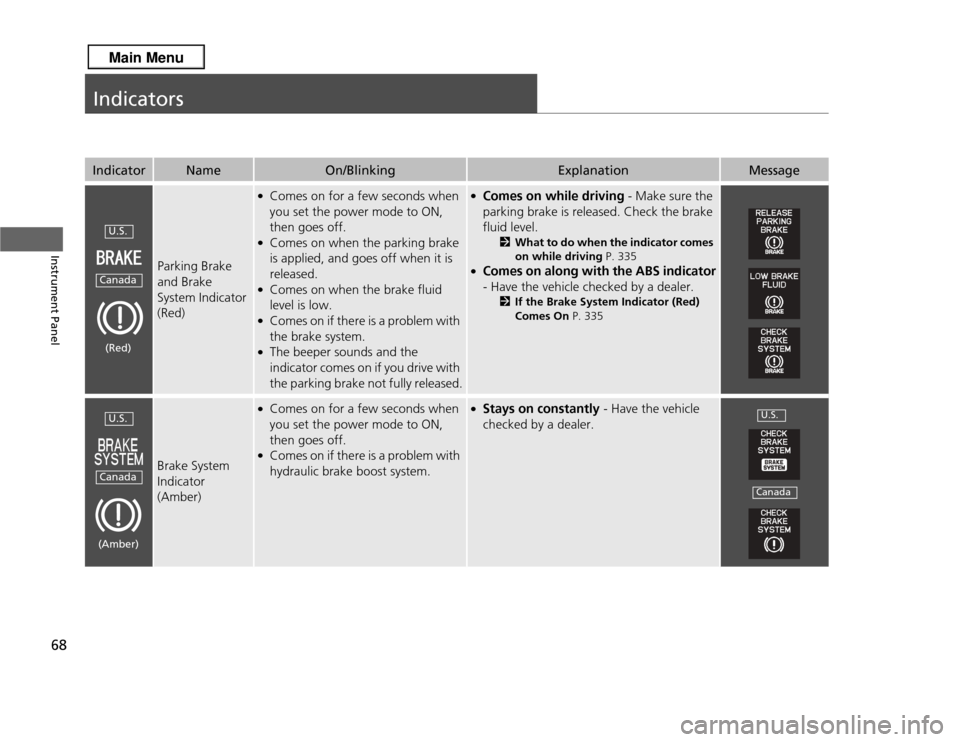
Parking Brake
and Brake
System Indicator
(Red)
●Comes on for a few seconds when
you set the power mode to ON,
then goes off.●Comes on when the parking brake
is applied, and goes off when it is
released.●Comes on when the brake fluid
level is low.●Comes on if there is a problem with
the brake system.●The beeper sounds and the
indicator comes on if you drive with
the parking brake not fully released.
●Comes on while driving - Make sure the
parking brake is released. Check the brake
fluid level.
2 Wh at to d o w hen t he in di cat o r co mes
on while driving P. 335
●Comes on along with the ABS indicator
- Have the vehicle checked by a dealer.
2 If the Brake System Indicator (Red)
Comes On P. 335
Brake System
Indicator
(Amber)
●Comes on for a few seconds when
you set the power mode to ON,
then goes off.●Comes on if there is a problem with
hydraulic brake boost system.
●Stays on constantly - Have the vehicle
checked by a dealer.
U.S.Canada(Red)U.S.Canada(Amber)
U.S.Canada
Page 79 of 364

78
uuIndicators uMulti-Information Display Warning and Information Messages
Instrument Panel
Multi-Information Display Warning and Information MessagesThe following messages appear only on the multi-information display. Press the / (information) button to see the message agai n
with the system message indicator on.
Message
Condition
Explanation
●Appears when the fuel fill cap is loose or is not
installed.
2 Tighten Fuel Cap Message P. 334
●Appears when the washer fluid is low.
●Refill washer fluid.
2Refilling Window Washer Fluid P. 286
●Appears while you are customizing the settings and
the shift lever is moved out of
(P
.
2Customized Features P. 87
Canadian models
Page 127 of 364
126
uuOperating the Switches Around the Steering Wheel uWipers and Washers
Controls
Wipers and Washers
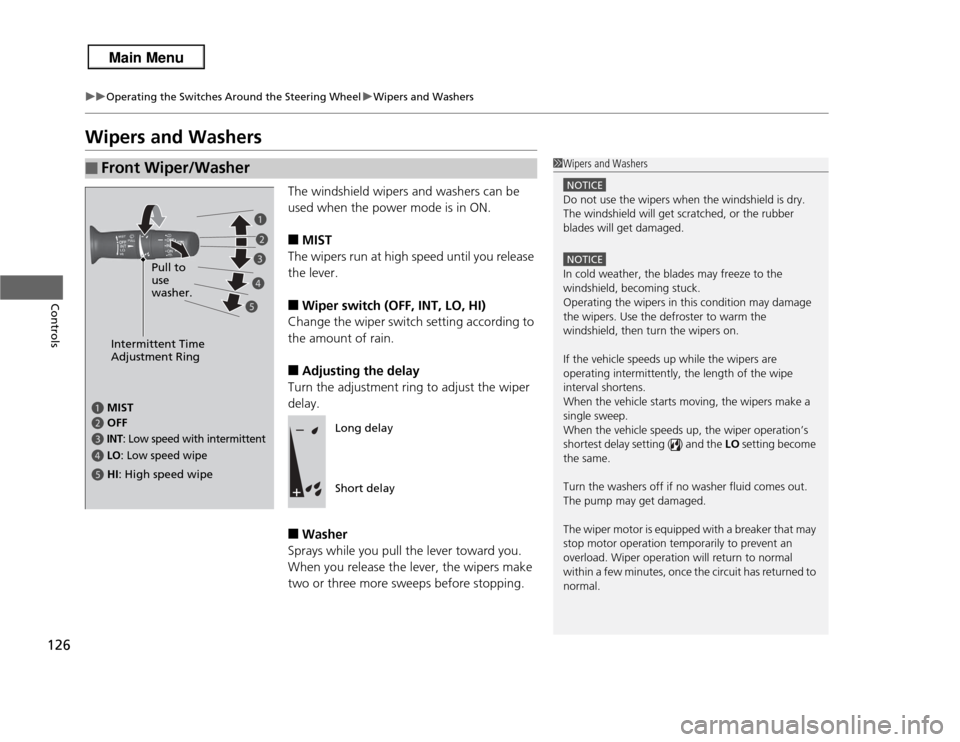
The windshield wipers and washers can be
used when the power mode is in ON.■
MIST
The wipers run at high speed until you release
the lever.
■
Wiper switch (OFF, INT, LO, HI)
Change the wiper switch setting according to
the amount of rain.
■
Adjusting the delay
Turn the adjustment ring to adjust the wiper
delay.
■
Washer
Sprays while you pull the lever toward you.
When you release the lever, the wipers make
two or three more sweeps before stopping.
■
Front Wiper/Washer
1 Wipers and Washers
NOTICEDo not use the wipers when the windshield is dry.
The windshield will get scratched, or the rubber
blades will get damaged.NOTICEIn cold weather, the blades may freeze to the
windshield, becoming stuck.
Operating the wipers in this condition may damage
the wipers. Use the defroster to warm the
windshield, then turn the wipers on.
If the vehicle speeds up while the wipers are
operating intermittently, the length of the wipe
interval shortens.
When the vehicle starts moving, the wipers make a
single sweep.
When the vehicle speeds up, the wiper operation’s
shortest delay setting ( ) and the LO setting become
the same.
Turn the washers off if no washer fluid comes out.
The pump may get damaged.
The wiper motor is equipped with a breaker that may
stop motor operation temporarily to prevent an
overload. Wiper operation will return to normal
within a few minutes, once the circuit has returned to
normal.
Intermittent Time
Adjustment Ring
a
MIST
c
INT
: Low speed with intermittent
b
OFF
d
LO
: Low speed wipe
e
HI : High speed wipe Pull to
use
washer.
a
b
c
d
e
Long delay
Short delay
Page 243 of 364
242
uuWhen Driving uPrecautions While Driving
Driving
Precautions While DrivingUtility vehicles have a significantly higher rollover rate than other types of vehicles.
To prevent rollovers or loss of control:
• Take corners at slower speeds than you would with a passenger vehicle.
• Avoid sharp turns and abrupt maneuvers whenever possible.
• Do not modify your vehicle in any way that you would raise the center of gravity.
• Do not carry heavy cargo on the roof.
Avoid driving in deep water and on flooded roads. This can damage the engine,
driveline, or cause electrical component failure.
If there is a strong impact with something under the vehicle, stop in a safe location.
Check the underside of the vehicle for damage or any fluid leaks.■
Driving Guidelines for Your Utility Vehicle
■
In Rain
■
Other Precautions
1 Driving Guidelines for Your Utility Vehicle
Failure to operate your vehicle correctly might result
in a crash or a rollover.
2 Important Handling Information P. 26
2 Precautions While Driving P. 2421Precautions While Driving
NOTICEDo not operate the shift lever while pressing the
accelerator pedal. You could damage the
transmission.
If the power mode is set to ACCESSORY or VEHICLE
OFF (LOCK) while driving, the engine will shut down
and all steering and brake power assist functions will
stop, making it difficult to control the vehicle.
Do not put the shift lever in
(N
, as you will lose
engine braking (and acceleration) performance.
During the first 600 miles (1,000 km) of operation,
avoid sudden acceleration or full throttle operation so
as not to damage the engine or powertrain.
Avoid hard braking for the first 200 miles (300 km).
You should also follow this when the brake pads are
replaced.
Page 268 of 364
267
Maintenance
This chapter discusses basic maintenance.
Before Performing MaintenanceInspection and Maintenance ............ 268Safety When Performing Maintenance..... 269Parts and Fluids Used in Maintenance Service ........................................... 270
Maintenance Minder
TM..................... 271
Maintenance Under the Hood
Maintenance Items Under the Hood ..... 275Opening the Hood ........................... 276
Recommended Engine Oil ...... .......... 277
Oil Check ......................................... 278
Adding Engine Oil ............................ 279Changing the Engine Oil and Oil Filter ..... 280
Engine Coolant ................................ 282
Transmission Fluid ............................ 284
Brake Fluid ....................................... 285
Refilling Window Washer Fluid......... 286
Replacing Light Bulbs ....................... 287Checking and Maintaining Wiper Blades
.... 297
Checking and Maintaining Tires
Checking Tires ................................. 301Tire and Loading Information Label ...... 302Tire Labeling .................................... 302DOT Tire Quality Grading (U.S. Vehicles)....... 304Wear Indicators................................ 306
Tire Service Life ................................ 306 Tire and Wheel Replacement ........... 307
Tire Rotation .................................... 308
Winter Tires ..................................... 309
Battery ............................................... 310
Remote Transmitter Care Replacing the Button Battery ........... 311
Climate Control System Maintenance
..... 312
Cleaning
Interior Care .................................... 313
Exterior Care.................................... 315
Page 269 of 364
268Maintenance
Before Performing MaintenanceInspection and MaintenanceFor your safety, perform all listed inspections and maintenance to keep your vehicle
in good condition. If you become aware of any abnormality (noise, smell, insufficient
brake fluid, oil residue on the ground, etc.), have your vehicle inspected by a dealer.
(Note, however, that service at a dealer is not mandatory to keep your warranties in
effect.) Refer to the separate maintenance booklet for detailed maintenance and
inspection information.■
Daily inspections
Perform inspections before long distance trips, when washing the vehicle, or when
refueling.
■
Periodic inspections
• Check the automatic transmission fluid level monthly.
2 Automatic Transmission Fluid P. 284
•Check the brake fluid level monthly.
2 Checking the Brake Fluid P. 285
•Check the tire pressure monthly. Examine the tread for wear and foreign objects.
2 Checking and Maintaining Tires P. 301
•Check the operation of the exterior lights monthly.
2 Replacing Light Bulbs P. 287
•Check the condition of the wiper blades at least every six months.
2 Checking and Maintaining Wiper Blades P. 297
■
Types of Inspection and Maintenance
1Inspection and Maintenance
Maintenance, replacement, or repair of
emissions control devices and systems may be
done by any automotive repair establishment or
individuals using parts that are “certified” to
EPA standards.
According to state and federal regulations, failure to
perform maintenance on the maintenance main
items marked with # will not void your emissions
warranties. However, all maintenance services should
be performed in accordance with the intervals
indicated by the multi-information display.
2 Maintenance Service Items P. 273
If you want to perform complex maintenance tasks
that require more skills and tools, you can purchase a
subscription to the Service Express website at
www.techinfo.honda.com .
2 Authorized Manuals P. 353
If you want to perform maintenance yourself, make
sure that you have the necessary tools and skills first.
After performing maintenance, update the records in
the separate maintenance booklet.
U.S. models
Page 271 of 364

270
uuBefore Performing Maintenance uParts and Fluids Used in Maintenance Service
Maintenance
Parts and Fluids Used in Maintenance ServiceThe use of Acura genuine parts and fluids is recommended when maintaining and
servicing your vehicle. Acura genuine parts are manufactured according to the same
high quality standards used in Acura vehicles.
Page 274 of 364
273
uuMaintenance Minder
TMuTo Use Maintenance Minder
TM
Continued
Maintenance
■
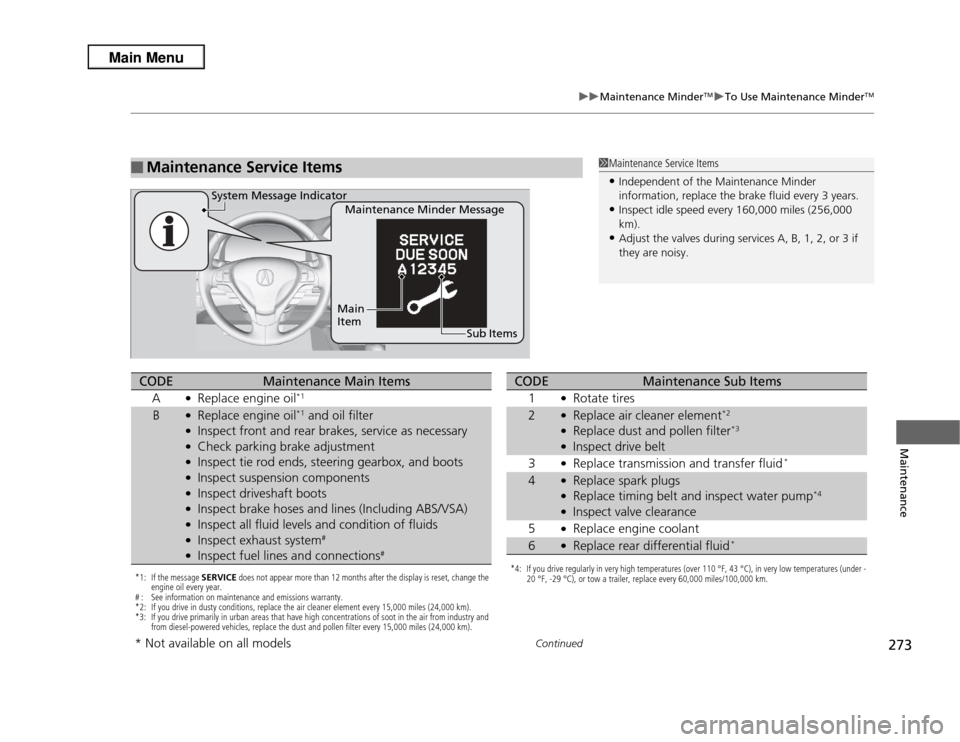
Maintenance Service Items
1Maintenance Service Items•Independent of the Maintenance Minder
information, replace the brake fluid every 3 years.•Inspect idle speed every 160,000 miles (256,000
km).•Adjust the valves during services A, B, 1, 2, or 3 if
they are noisy.
Maintenance Minder Message
System Message Indicator
Sub Items
Main
Item
*1: If the message
SERVICE does not appear more than 12 months after the display is reset, change the
engine oil every year.
# : See information on maintenance and emissions warranty.
*2: If you drive in dusty conditions, replace the air cleaner element every 15,000 miles (24,000 km).
*3: If you drive primarily in urban areas that have high concentrations of soot in the air from industry and from diesel-powered vehicles, replace the dust and pollen filter every 15,000 miles (24,000 km).CODE
Maintenance Main Items
A
●Replace engine oil
*1
B
●Replace engine oil
*1 and oil filter
●Inspect front and rear brakes, service as necessary●Check parking brake adjustment●Inspect tie rod ends, steering gearbox, and boots●Inspect suspension components●Inspect driveshaft boots●Inspect brake hoses and lines (Including ABS/VSA)●Inspect all fluid levels and condition of fluids●Inspect exhaust system
#
●Inspect fuel lines and connections
#
*4: If you drive regularly in very high temperatures (over 110 °F, 43 °C), in very low temperatures (under - 20 °F, -29 °C), or tow a trailer, replace every 60,000 miles/100,000 km.CODE
Maintenance Sub Items
1
●Rotate tires
2
●Replace air cleaner element
*2
●Replace dust and pollen filter
*3
●Inspect drive belt
3●Replace transmission and transfer fluid
*
4
●Replace spark plugs●Replace timing belt and inspect water pump
*4
●Inspect valve clearance
5●Replace engine coolant
6
●Replace rear differential fluid
*
* Not available on all models