phone Acura RDX 2014 Navigation Manual
[x] Cancel search | Manufacturer: ACURA, Model Year: 2014, Model line: RDX, Model: Acura RDX 2014Pages: 260, PDF Size: 10.9 MB
Page 92 of 260
91
Calculating the Route
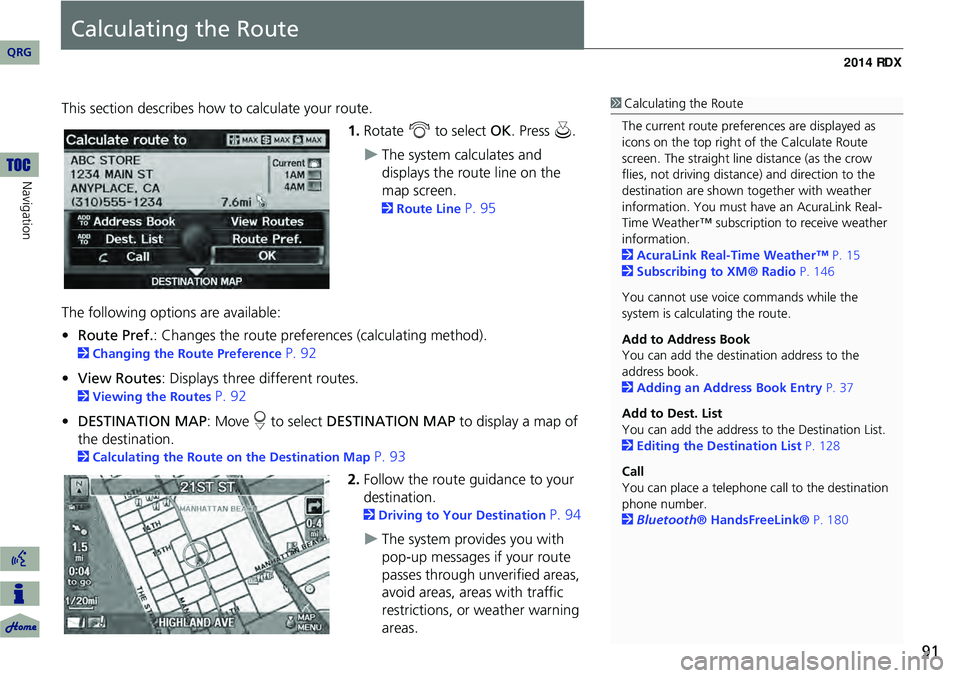
This section describes how to calculate your route.1.Rotate i to select OK. Press u.
The system calculates and
displays the route line on the
map screen.
2Route Line P. 95
The following options are available:
• Route Pref. : Changes the route preferences (calculating method).
2Changing the Route Preference P. 92
• View Routes : Displays three different routes.
2Viewing the Routes P. 92
• DESTINATION MAP : Move r to select DESTINATION MAP to display a map of
the destination.
2 Calculating the Route on the Destination Map P. 93
2. Follow the route guidance to your
destination.
2 Driving to Your Destination P. 94
The system provides you with
pop-up messages if your route
passes through unverified areas,
avoid areas, areas with traffic
restrictions, or weather warning
areas.
1Calculating the Route
The current route prefer ences are displayed as
icons on the top right of the Calculate Route
screen. The straight line distance (as the crow
flies, not driving distan ce) and direction to the
destination are shown t ogether with weather
information. You must have an AcuraLink Real-
Time Weather™ subscripti on to receive weather
information.
2 AcuraLink Real-Time Weather™ P. 15
2 Subscribing to XM® Radio P. 146
You cannot use voice commands while the
system is calculating the route.
Add to Address Book
You can add the destination address to the
address book.
2 Adding an Address Book Entry P. 37
Add to Dest. List
You can add the address to the Destination List.
2 Editing the Destination List P. 128
Call
You can place a telephone ca ll to the destination
phone number.
2 Bluetooth® HandsFreeLink® P. 180
QRG
Navigation
Page 111 of 260
110
Map MenuMap Information
Navigation
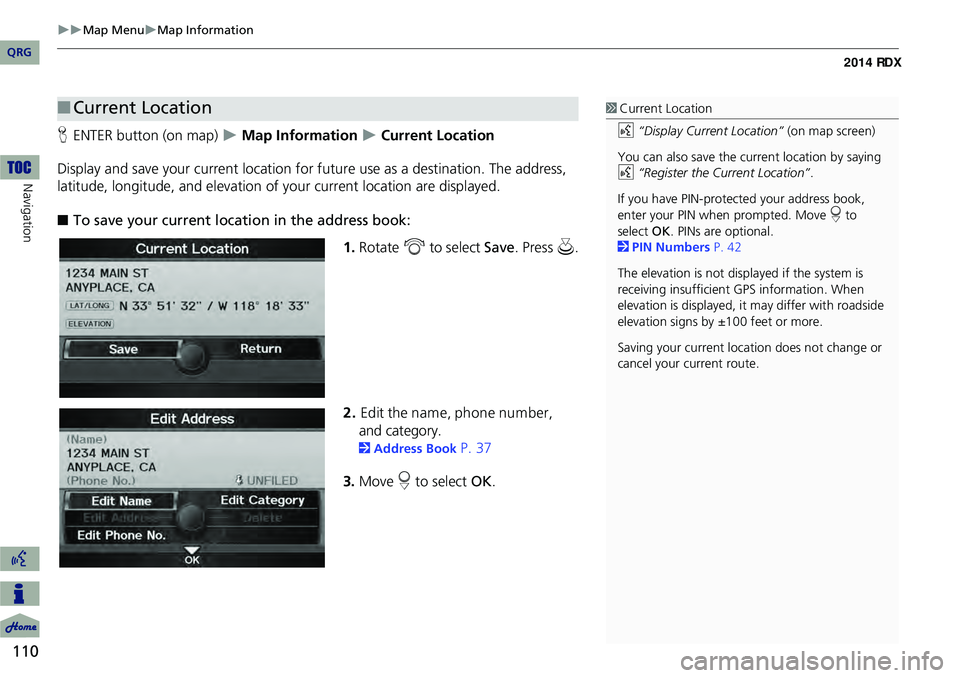
HENTER button (on map) Map Information Current Location
Display and save your current location for fu ture use as a destination. The address,
latitude, longitude, and elevation of your current location are displayed.
■ To save your current loca tion in the address book:
1.Rotate i to select Save . Press u.
2. Edit the nam e, phone num ber,
and category.
2 Address Book P. 37
3. Move r to select OK.
■Current Location1 Current Location
d “Display Current Location” (on map screen)
You can also save the current location by saying
d “Register the Current Location” .
If you have PIN-protec ted your address book,
enter your PIN when prompted. Move r to
select OK. PINs are optional.
2 PIN Numbers P. 42
The elevation is not displayed if the system is
receiving insufficient GPS information. When
elevation is displayed, it may differ with roadside
elevation signs by ±100 feet or more.
Saving your current loca tion does not change or
cancel your current route.
QRG
Page 134 of 260
133
Resuming Your Trip
Stop your vehicle en route (e.g., to rest, stop for gas, etc.), and then continue on
your route.
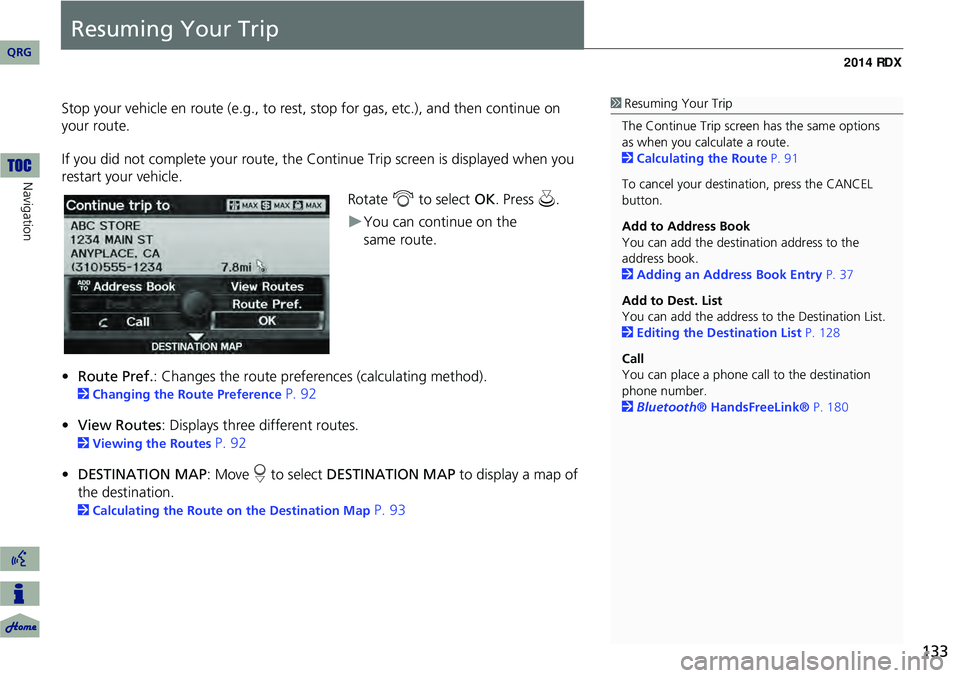
If you did not complete your route, the C ontinue Trip screen is displayed when you
restart your vehicle.
Rotate i to select OK. Press u.
You can continue on the
• Route Pref. : Changes the route preferences (calculating method).
2Changing the Route Preference P. 92
• View Routes : Displays three different routes.
2Viewing the Routes P. 92
• DESTINATION MAP : Move r to select DESTINATION MAP to display a map of
the destination.
2 Calculating the Route on the Destination Map P. 93
1Resuming Your Trip
The Continue Trip screen has the same options
as when you calculate a route.
2 Calculating the Route P. 91
To cancel your destination, press the CANCEL
button.
Add to Address Book
You can add the destination address to the
address book.
2 Adding an Address Book Entry P. 37
Add to Dest. List
You can add the address to the Destination List.
2 Editing the Destination List P. 128
Call
You can place a phone ca ll to the destination
phone number.
2 Bluetooth® HandsFreeLink® P. 180
QRG
Navigation
same route.
Page 137 of 260
136
Audio
Audio System
About Your Audio System
The audio system features FM/AM radio and XM® Radio. It can also play audio discs,
WMA/MP3/AAC tracks, iPod®, USB flash drives, and Bluetooth® devices.
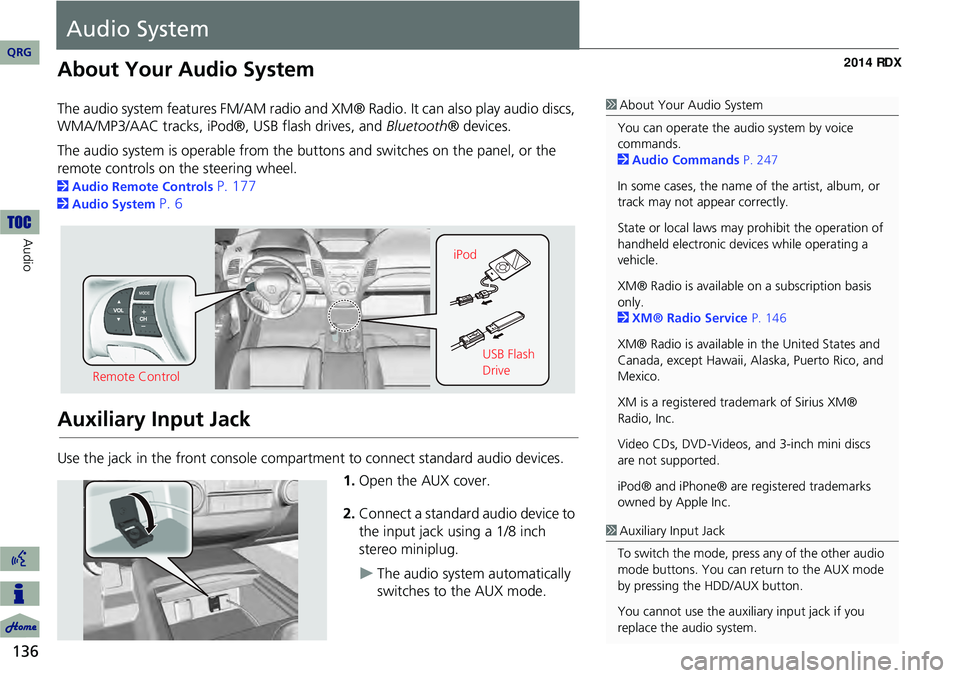
The audio system is operable from the buttons and switches on the panel, or the
remote controls on the steering wheel.
2 Audio Remote Controls P. 177
2Audio System P. 6
Auxiliary Input Jack
Use the jack in the front console compartment to connect standard audio devices.
1.Open the AUX cover.
2. Connect a standard audio device to
the input jack using a 1/8 inch
stereo miniplug.
The audio system automatically
switches to the AUX mode.
1About Your Audio System
You can operate the audio system by voice
commands.
2 Audio Commands P. 247
In some cases, the name of the artist, album, or
track may not appear correctly.
State or local laws may prohibit the operation of
handheld electronic devices while operating a
vehicle.
XM® Radio is available on a subscription basis
only.
2 XM® Radio Service P. 146
XM® Radio is available in the United States and
Canada, except Hawaii, Al aska, Puerto Rico, and
Mexico.
XM is a registered trademark of Sirius XM®
Radio, Inc.
Video CDs, DVD-Videos, and 3-inch mini discs
are not supported.
iPod® and iPhone® are registered trademarks
owned by Apple Inc.
Remote Control iPod
USB Flash
Drive
1Auxiliary Input Jack
To switch the mode, press any of the other audio
mode buttons. You can return to the AUX mode
by pressing the HDD/AUX button.
You cannot use the auxili ary input jack if you
replace the audio system.
QRG
Page 162 of 260
161
Playing an iPod®
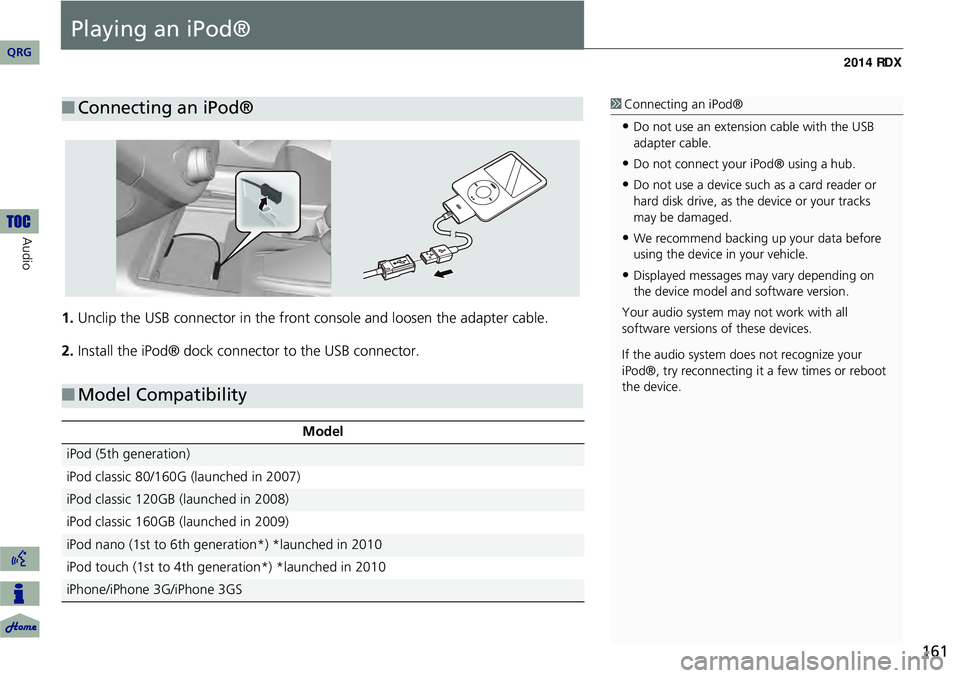
1.Unclip the USB connector in the front console and loosen the adapter cable.
2. Install the iPod® dock connector to the USB connector.
■Connecting an iPod®1 Connecting an iPod®
•Do not use an extension cable with the USB
adapter cable.
•Do not connect your iPod® using a hub.
•Do not use a device such as a card reader or
hard disk drive, as th e device or your tracks
may be damaged.
•We recommend backing up your data before
using the device in your vehicle.
•Displayed messages ma y vary depending on
the device model and software version.
Your audio system ma y not work with all
software versions of these devices.
If the audio system do es not recognize your
iPod®, try reconne cting it a few times or reboot
the device.
■ Model Compatibility
Model
iPod (5th generation)
iPod classic 80/160G (launched in 2007)
iPod classic 120GB (launched in 2008)
iPod classic 160GB (launched in 2009)
iPod nano (1st to 6th generation*) *launched in 2010
iPod touch (1st to 4th generation*) *launched in 2010
iPhone/iPhone 3G/iPhone 3GS
QRG
Au dio
Page 166 of 260
165
Searching for Music Using Song By Voice™ (SBV)
Use Song By Voice™ (SBV) to search for and play music from your HDD or iPod®
device using voice commands.
1.Set Song By Voice to ON in the
system setup.
2 Song By Voice™ (SBV) P. 45
2. Say d “Hard Disc Drive Search” or
d “iPod Search” to activate the
SBV feature for the HDD or iPod®.
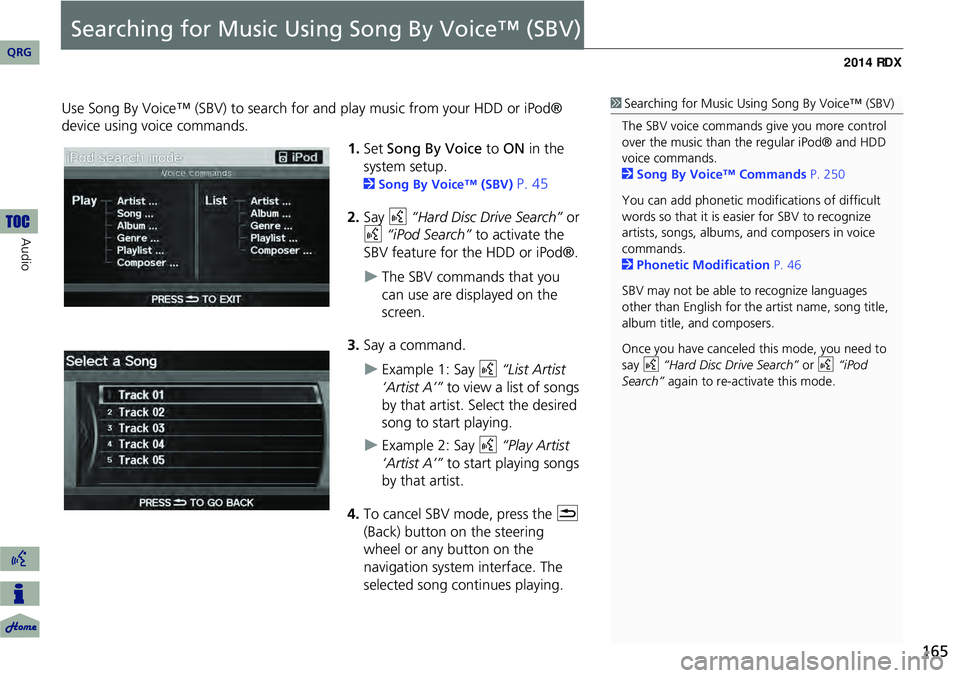
The SBV commands that you
can use are displayed on the
screen.
3. Say a command.
Example 1: Say d “List Artist
‘Artist A’” to view a list of songs
by that artist. Select the desired
song to start playing.
Example 2: Say d “Play Artist
‘Artist A’” to start playing songs
by that artist.
4. To cancel SBV mode, press the K
(Back) button on the steering
wheel or any button on the
navigation system interface. The
selected song continues playing.
1 Searching for Music Using Song By Voice™ (SBV)
The SBV voice commands give you more control
over the music than the regular iPod® and HDD
voice commands.
2 Song By Voice™ Commands P. 250
You can add phonetic modi fications of difficult
words so that it is easier for SBV to recognize
artists, songs, albums, and composers in voice
commands.
2 Phonetic Modification P. 46
SBV may not be able to recognize languages
other than English for the artist name, song title,
album title, and composers.
Once you have canceled this mode, you need to
say d “Hard Disc Drive Search” or d “iPod
Search” again to re-activate this mode.
QRG
Audio
Page 167 of 260
166
Audio
Playing Pandora®
Pandora® is a personalized Internet radio service that selects music based on an
artist, song, or genre a user enters, and streams what is likely to be of interest.
Selecting Pandora® Mode
1. Activate Pandora® on your iPhone®.
2. Connect the iPhone® to the USB adapter cable in the console compartment.
2 Connecting an iPod® P. 161
3. Press the HDD/AUX button until you get to Pandora® mode.
4. Select a station using the CATEGORY bar.
The current station name, artist name, album name, track name, and rating are
displayed.
1 Playing Pandora®
d “Display audio screen” (when in Pandora®
mode)
You can control Pandora® using voice
commands.
2 Pandora® Commands P. 249
A visual guide helps you operate the audio
system.
2 System Controls P. 4
2 Basic Operation P. 6
To use this service in your vehicle, the Pandora®
app must first be installed on your iPhone®. Visit
www.pandora.com for more information.
Pandora® mode and Audi o Screen Control is
only available for iPhone ®. For other phones,
Pandora® can be played through Bluetooth®
Audio.
2 Playing Bluetooth® Audio P. 174
If there is a problem, you may see an error
message on the display.
2 Error Messages P. 225
If Pandora® is not sele cted from your phone,
iPod® music is played.
QRG
Page 169 of 260

168
Playing Pandora®Audio Menu
Audio
Audio Menu
HAUDIO button (in Pandora® mode) AUDIO MENU
Rotate i to select an item. Press u .
The following item s are available:
• Sound Setup: Displays the sound preferences screen.
2 Adjusting the Sound P. 176
• Album Art : Sets whether to display the album artwork on the screen.
ON (factory default): Displays the album artwork.
OFF : Disable the feature.
• BOOKMARK This Song : Bookmarks the current song.
• BOOKMARK This Artist : Bookmarks the current artist.
1Audio Menu
You can only check bookmark information from
your iPhone®.
QRG
Page 175 of 260
174
Audio
Playing Bluetooth ® Audio
Your audio system allows you to listen to music tracks stored on your Bluetooth-
compatible phone.
This function is available when the phone is linked to the vehicle’s Bluetooth®
HandsFreeLink® (HFL) system.
2 Bluetooth® HandsFreeLink® P. 179
Selecting Bluetooth ® Audio Mode
1.Make sure that your phone is on, paired, and linked to HFL.
2Pairing a Phone P. 182
2. Press the HDD/AUX button to select Bluetooth® Audio mode.
A Bluetooth ® message and icon are displaye d on the display and screen.
3. If necessary, follow the cell phone operating instructions for playing audio tracks.
Check the following if the phone is not recognized:
• Another HFL-compatible phone, which is not compatible for Bluetooth® Audio, is
already connected.
1 Playing Bluetooth ® Audio
d “Display audio screen”
You can control the Bluetooth® Audio using
voice commands.
2 Bluetooth ® Audio Commands P. 249
Not all Bluetooth -enabled phones with
streaming audio capabilities are compatible. To
check if your phone is compatible:
•U.S.: Visit www.acura.com/handsfreelink .
•Canada: Visit www.handsfreelink.ca .
•Call HandsFreeLink customer support at
(888) 528-7876.
In some states, it may be illegal to perform some
data device functions while driving.
Only one phone can be used with HFL at a time.
When there are more than two paired phones in
the vehicle, the first paired phone the system
finds will be automatically linked.
Pressing the TITLE button switches the center
display between the Bluetooth® Audio message
and the device name.
QRG
Page 176 of 260
175
Playing Bluetooth® AudioSwitching to HFL Mode
Switching to HFL Mode
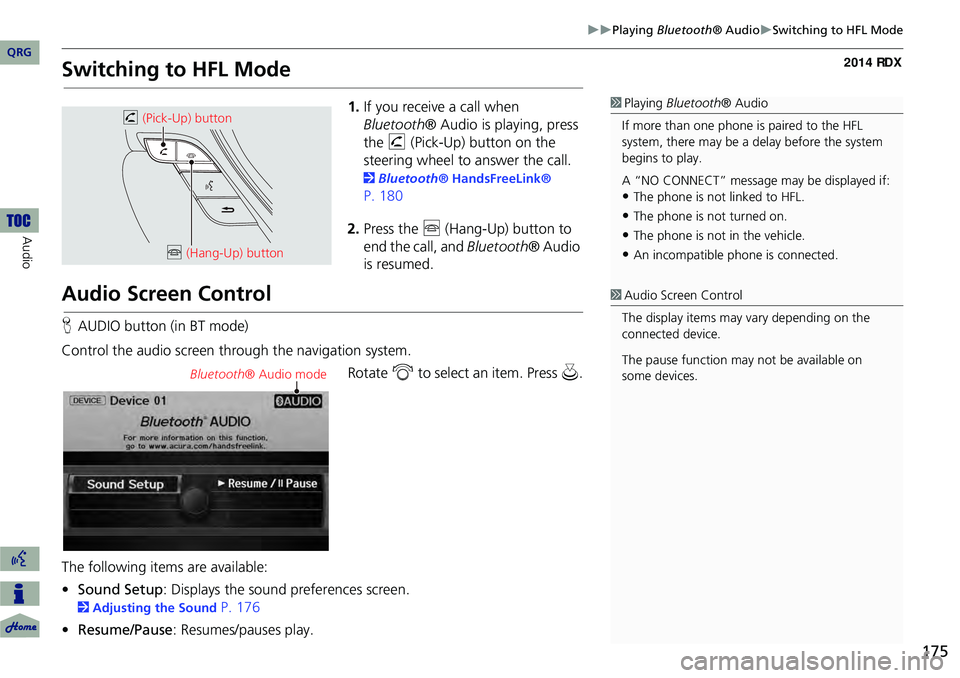
1.If you receive a call when
Bluetooth ® Audio is playing, press
the h (Pick-Up) button on the
steering wheel to answer the call.
2 Bluetooth® HandsFreeLink®
P. 180
2. Press the j (Hang-Up) button to
end the call, and Bluetooth® Audio
is resumed.
Audio Screen Control
H AUDIO button (in BT mode)
Control the audio screen through the navigation system. Rotate i to select an item. Press u.
The following items are available:
• Sound Setup : Displays the sound preferences screen.
2Adjusting the Sound P. 176
• Resume/Pause : Resumes/pauses play.
1Playing Bluetooth ® Audio
If more than one phone is paired to the HFL
system, there may be a delay before the system
begins to play.
A “NO CONNECT” message may be displayed if:
•The phone is not linked to HFL.
•The phone is not turned on.
•The phone is not in the vehicle.
•An incompatible phone is connected.
h (Pick-Up) button
j (Hang-Up) button
1Audio Screen Control
The display items may vary depending on the
connected device.
The pause function may not be available on
some devices.
Bluetooth ® Audio mode
QRG
Audio