ECO mode Acura RDX 2014 Owner's Guide
[x] Cancel search | Manufacturer: ACURA, Model Year: 2014, Model line: RDX, Model: Acura RDX 2014Pages: 363, PDF Size: 13.7 MB
Page 144 of 363
143Continued
Interior Lights/Interior Convenience Items
Interior Lights
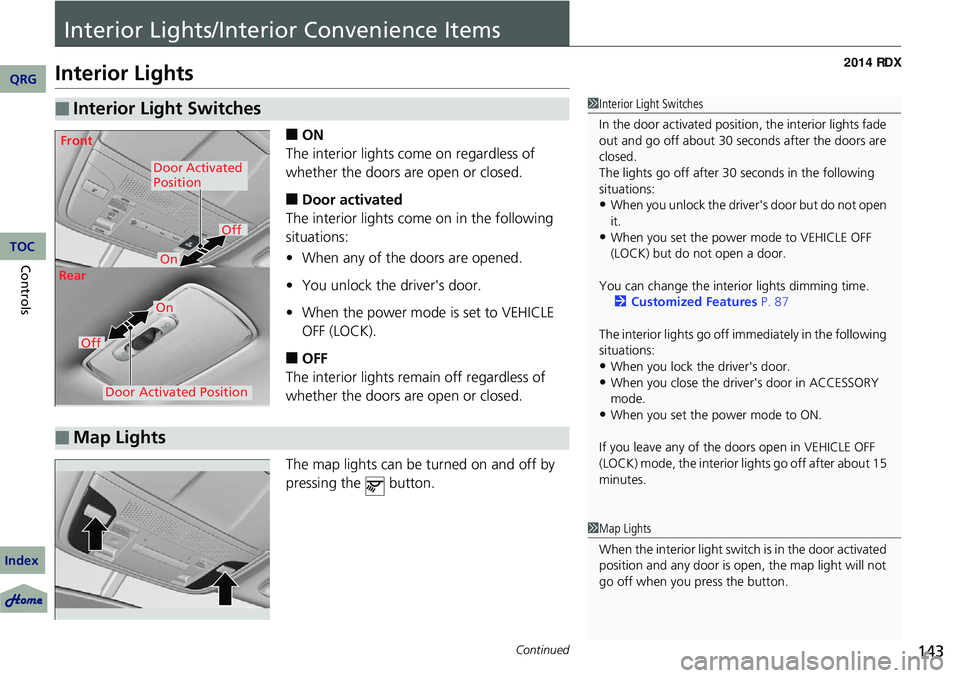
■ON
The interior lights come on regardless of
whether the doors are open or closed.
■Door activated
The interior lights come on in the following
situations:
• When any of the doors are opened.
• You unlock the driver's door.
• When the power mode is set to VEHICLE
OFF (LOCK).
■OFF
The interior lights remain off regardless of
whether the doors are open or closed.
The map lights can be turned on and off by
pressing the button.
■Interior Light Switches1 Interior Light Switches
In the door activated position, the interior lights fade
out and go off about 30 se conds after the doors are
closed.
The lights go off after 30 seconds in the following
situations:
•When you unlock the driver's door but do not open
it.
•When you set the power mode to VEHICLE OFF
(LOCK) but do not open a door.
You can change the interi or lights dimming time.
2 Customized Features P. 87
The interior lights go off i mmediately in the following
situations:
•When you lock the driver's door.
•When you close the driver's door in ACCESSORY
mode.
•When you set the power mode to ON.
If you leave any of the doors open in VEHICLE OFF
(LOCK) mode, the interior lights go off after about 15
minutes.
Door Activated
Position
Off
Front
Door Activated Position
On
Off
Rear
On
■Map Lights
1
Map Lights
When the interior light swit ch is in the door activated
position and any door is open, the map light will not
go off when you press the button.
QRG
Index
ControlsTOC
Page 160 of 363
159
uuAudio System uUSB Adapter Cable
USB Adapter Cable
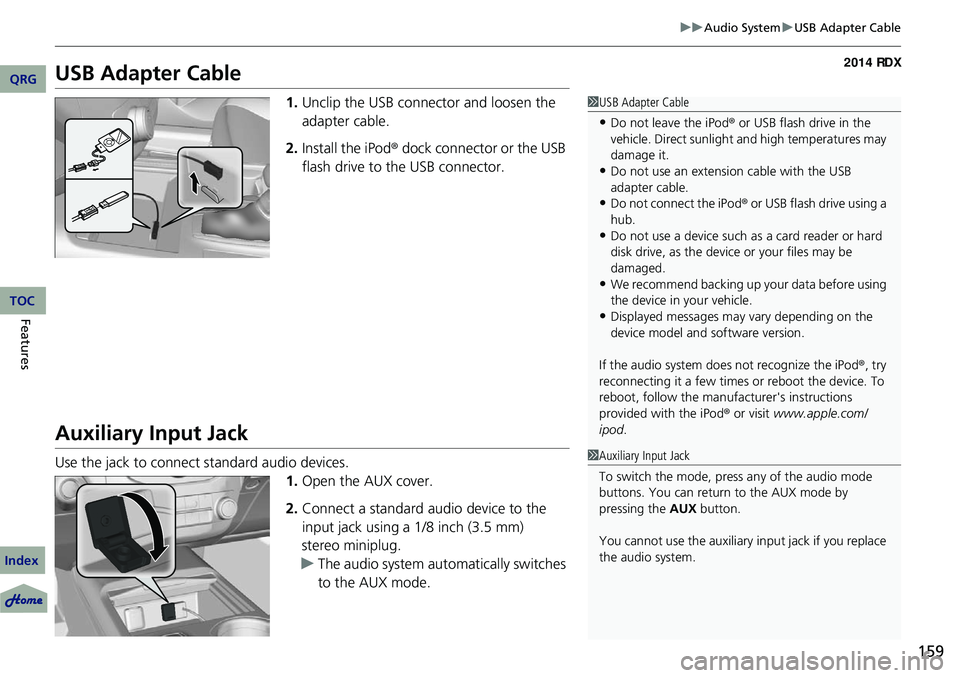
1. Unclip the USB connec tor and loosen the
adapter cable.
2. Install the iPod® dock connector or the USB
flash drive to the USB connector.
Auxiliary Input Jack
Use the jack to connect standard audio devices.
1.Open the AUX cover.
2. Connect a standard audio device to the
input jack using a 1/8 inch (3.5 mm)
stereo miniplug.
u The audio system auto matically switches
to the AUX mode.
1 USB Adapter Cable
•Do not leave the iPod ® or USB flash drive in the
vehicle. Direct sunlight and high temperatures may
damage it.
•Do not use an extension cable with the USB
adapter cable.
•Do not connect the iPod ® or USB flash drive using a
hub.
•Do not use a device such as a card reader or hard
disk drive, as the device or your files may be
damaged.
•We recommend backing up yo ur data before using
the device in your vehicle.
•Displayed messages may vary depending on the
device model and software version.
If the audio system does not recognize the iPod®, try
reconnecting it a few times or reboot the device. To
reboot, follow the manufac turer's instructions
provided with the iPod ® or visit www.apple.com/
ipod .
1Auxiliary Input Jack
To switch the mode, pres s any of the audio mode
buttons. You can return to the AUX mode by
pressing the AUX button.
You cannot use the auxiliary input jack if you replace
the audio system.
QRG
Index
FeaturesTOC
Page 161 of 363
160
uuAudio System uAudio System Theft Protection
Features
Audio System Theft Protection
The audio system is disabled when it is di sconnected from the power source, such as
when the battery is disconnected or goes dead.
■Reactivating th e audio system
1. Set the power mode to ON, and turn on the audio system.
u If you set the power mode to ACCESSORY, you will be requested to enter the
audio security code. See step 3.
2. Press and hold the power button ag ain for more than two seconds.
u The audio system is reactivated when the system’s control unit recognizes that
the system is in your vehicle.
If the control unit fails to recognize, ENTER CODE appears on the audio/
information screen.
3. Enter the audio security code using the pr eset buttons. If you enter an incorrect
digit, continue to the last digit, then try again. If you do not enter the code
correctly after 10 tries, leave the system for one hour before trying again, or visit
a dealer to have the system reset.
1 Audio System Theft Protection
Find the audio system's se curity code and serial
number label in your owner’s manual kit.
We recommend that you write down the serial
number in this owner’s manual.
Do not store the label in your vehicle. If you lose the
label, you must first retrie ve the serial number, and
then obtain the code.
You can find out about your serial number and
security code from a dealer.
You can register the secu rity code at Acura Owners
(owners.acura.com.), and find information on how to
retrieve the serial numbe r and obtain the code at
radio-navicode.acura.com .
U.S. models
QRG
Index
TOC
Page 170 of 363

169
uuAudio System Basic Operation uPlaying the XM ® Radio
Continued
Playing the XM ® Radio
BACK Button
Press to go back to the previous
display. (XM
®) Button
Press to select XM ® Radio.
VOL/ (Power/volume) Knob
Press to turn the audio system on
and off.
Turn to adjust the volume.
SKIP Bar
Press or to the
previous or next channel.
SETUP Button
Press to display menu items.
Selector Knob
Press and turn to select channels. Preset Buttons (1-6)
To store a channel:
1. Tune to the selected channel.
2. Pick a preset button and hold it
until you hear a beep.
To listen to a stored channel, select
XM, then press the preset button.
SCAN Button
Press to sample all channels (in the
channel mode), or channels within a
category (in the category mode).
Each sampling continues for a few
seconds. Press SCAN again to cancel
scanning and continue listening to the
channel. CATEGORY Bar
Press either side to display and select
an XM ® Radio category.
QRG
Index
FeaturesTOC
Page 173 of 363

uuAudio System Basic Operation uPlaying a CD
172
Features
1. Press to switch the display to a folder list.
2. Rotate to select a folder.
3. Press to change the display to a list of
files in that folder.
4. Rotate to select a file, then press .
■How to Select a File from a Folder with the Selector
Knob (MP3/WMA)1Playing a CD
NOTICE
Do not use CDs with adhesive labels. The label can
cause the CD to jam in the unit.
WMA files protected by di gital rights management
(DRM) cannot be played.
The audio system displays Unplayable File, then
skips to the next file.
Text data appears on the di splay under the following
circumstances:
•When you select a new folder, file, or track.
•When you change the audio mode to CD.
•When you insert a CD.
If you eject the CD but do not remove it from the slot,
the system reloads the CD automatically after several
seconds.
Folder Selection
Track Selection
QRG
Index
TOC
Page 184 of 363
183
uuAudio System Basic Operation uPlaying Bluetooth ® Audio
1. Make sure that your phone is paired and
linked to HFL.
2. Press the AUX button.
If the phone is not recognized, another HFL-
compatible phone, which is not compatible
for Bluetooth ® Audio, may be already linked.
■To pause or resume a file
1. Press the SETUP button.
2. Rotate to select Resume/Pause, then press .
Each time you press , the setting switches between Pause and Resume.
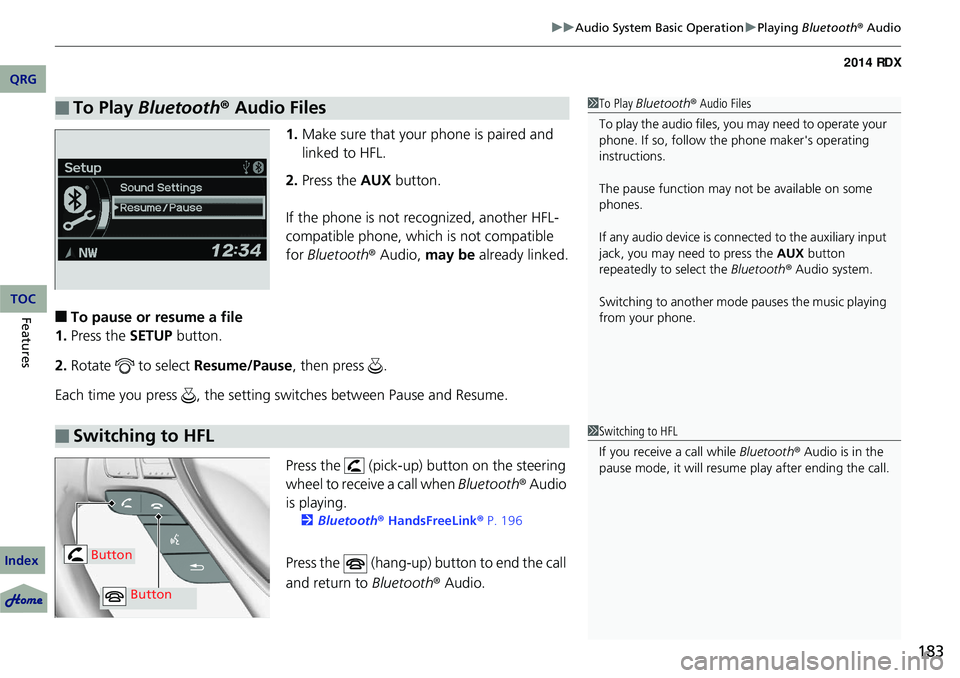
Press the (pick-up) button on the steering
wheel to receive a call when Bluetooth® Audio
is playing.
2 Bluetooth® HandsFreeLink® P. 196
Press the (hang-up) button to end the call
and return to Bluetooth® Audio.
■To Play Bluetooth ® Audio Files1 To Play Bluetooth ® Audio Files
To play the audio files, y ou may need to operate your
phone. If so, follow the phone maker's operating
instructions.
The pause function may no t be available on some
phones.
If any audio device is conne cted to the auxiliary input
jack, you may need to press the AUX button
repeatedly to select the Bluetooth® Audio system.
Switching to another mode pauses the music playing
from your phone.
■Switching to HFL1 Switching to HFL
If you receive a call while Bluetooth® Audio is in the
pause mode, it will resume play after ending the call.
Button
Button
QRG
Index
FeaturesTOC
Page 194 of 363
193
uuGeneral Information on the Audio System uCompatible iPod ®, iPhone ®, and USB Flash Drives
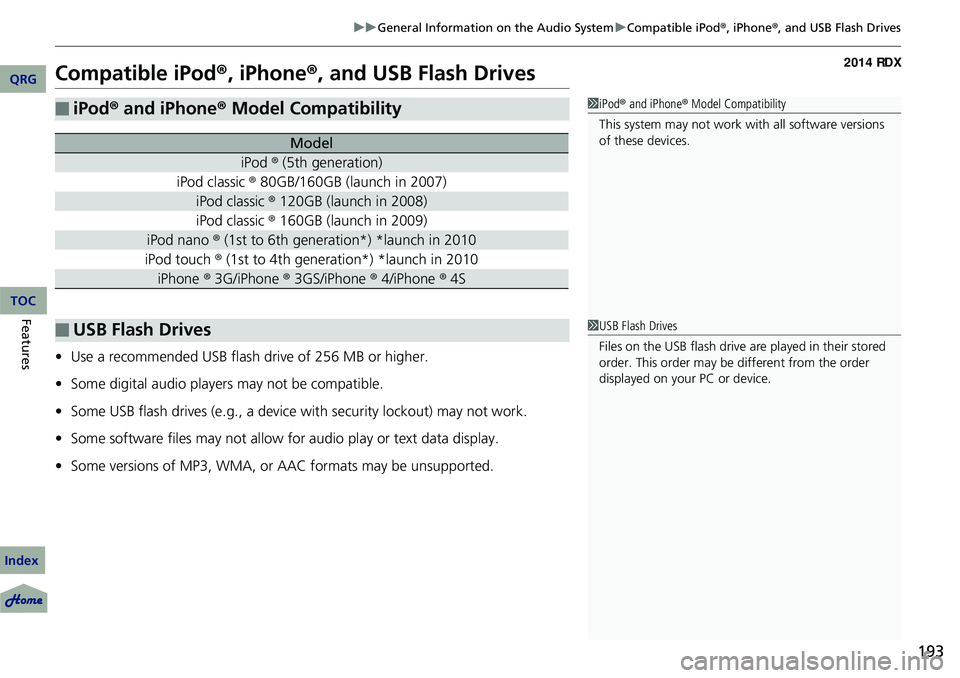
Compatible iPod ®, iPhone® , and USB Flash Drives
•Use a recommended USB flash drive of 256 MB or higher.
• Some digital audio players may not be compatible.
• Some USB flash drives (e.g., a device with security lockout) may not work.
• Some software files may not allow for audio play or text data display.
• Some versions of MP3, WMA, or AAC formats may be unsupported.
■iPod® and iPhone ® Model Compatibility
Model
iPod ® (5th generation)
iPod classic ® 80GB/160GB (launch in 2007)
iPod classic ® 120GB (launch in 2008)
iPod classic ® 160GB (launch in 2009)
iPod nano ® (1st to 6th generation*) *launch in 2010
iPod touch ® (1st to 4th generation*) *launch in 2010
iPhone ® 3G/iPhone ® 3GS/iPhone ® 4/iPhone ® 4S
■USB Flash Drives
1iPod ® and iPhone ® Model Compatibility
This system may not work with all software versions
of these devices.
1 USB Flash Drives
Files on the USB flash drive are played in their stored
order. This order may be different from the order
displayed on your PC or device.
QRG
Index
FeaturesTOC
Page 228 of 363
227
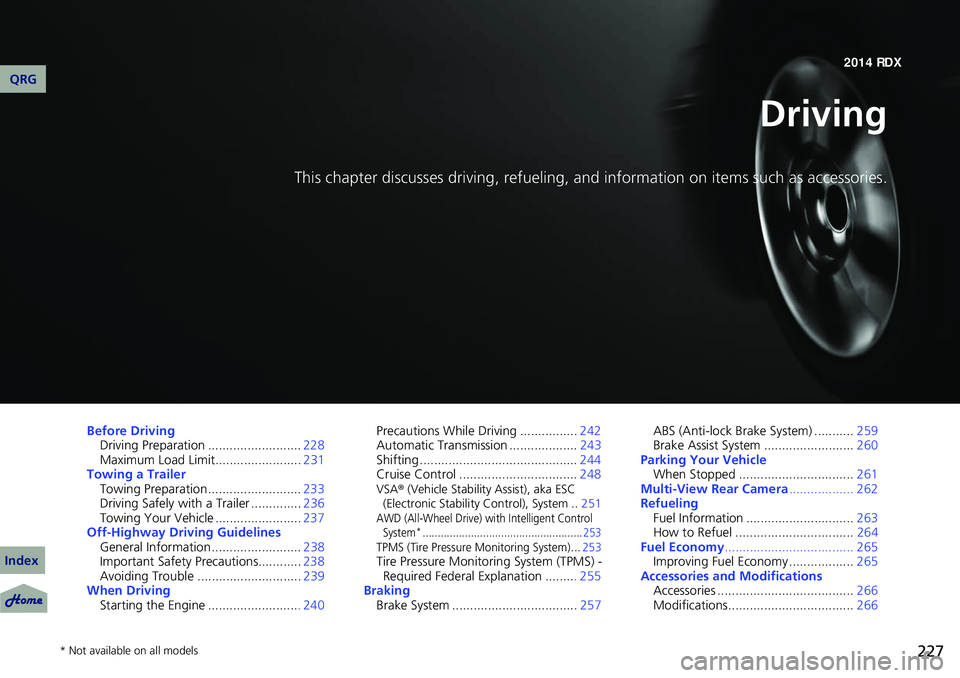
Driving
This chapter discusses driving, refueling, and information on items such as accessories.
Before Driving
Driving Preparation .......................... 228
Maximum Load Limit........................ 231
Towing a Trailer Towing Preparation .......................... 233
Driving Safely with a Trailer .............. 236
Towing Your Vehicle ........................ 237
Off-Highway Driving Guidelines General Information ......................... 238
Important Safety Precautions............ 238
Avoiding Trouble ............................. 239
When Driving Starting the Engine .......................... 240 Precautions While Driving ................
242
Automatic Transmission ................... 243
Shifting ............................................ 244
Cruise Control ................................. 248
VSA® (Vehicle Stability Assist), aka ESC
(Electronic Stability Control), System .. 251
AWD (All-Wheel Drive) with Intelligent Control
System*..................................................... 253TPMS (Tire Pressure Monitoring System) ... 253Tire Pressure Monitoring System (TPMS) -
Required Federal Explanation ......... 255
Braking Brake System ................................... 257ABS (Anti-lock Brake System) ...........
259
Brake Assist System ......................... 260
Parking Your Vehicle When Stopped ................................ 261
Multi-View Rear Camera .................. 262
Refueling Fuel Information .............................. 263
How to Refuel ................................. 264
Fuel Economy .................................... 265
Improving Fuel Economy .................. 265
Accessories and Modifications Accessories ...................................... 266
Modifications................................... 266
* Not available on all models
QRG
Index2014 RDX
Page 247 of 363

246
uuWhen Driving uShifting
Driving
Use the paddle shifters to change between 1st and 6th gears without removing your
hands from the steering wheel. The transmissio n will switch to the sequential shift
mode.
■When the shift lever is in (D:
The vehicle will go into the sequential shi ft mode momentarily, and the gear position
indicator will come on.
Once you start traveling at a constant speed, the sequential shift mode will
automatically switch off, and the gear position indicator will go off.
Hold the
(+ paddle shifter for two seconds to return to normal drive.
■When the shift lever is in (S:
The vehicle will go into the sequential shift mode, and the M (sequential shift mode)
indicator and gear position indicator will come on. At speeds of 6 mph (10 km/h) or
less, the vehicle automatically shifts down into 1st gear. It will not automatically shift
up, even if vehicle speed increases.
You can only pull away in 1st or 2nd gear.
When switching out of the sequential shift mode, move the shift lever from
(S to
(D. When the sequential shif t mode is canceled, the M indicator and gear position
indicator go off.
■Sequential Shift Mode
QRG
Index
TOC
Page 248 of 363

247
uuWhen Driving uShifting
■Second gear lock mode
If you pull the
(+ paddle shifter while stopped or dr iving at 6 mph (10 km/h) or less,
the gear position will be locked in 2nd gear. This makes it easier to pull away on
slippery surfaces such as snow covered roads.
To cancel the 2nd gear lock mode, pull the paddle shifter, or move the shift lever
from
(S to ( D.
■Sequential Shift Mode Operation
-
1 Sequential Shift Mode Operation
Each paddle shift operation makes a single gear
change.
To change gears continuously, release the paddle
shifter before pulling it again for the next gear.
Recommended Shift Points
Use this table as a guideline for efficient fuel
economy and effectiv e emission control.
The gear position indicato r blinks when you cannot
shift up or down. It indicate s that your vehicle speed
is not in its allowabl e gear shifting range.
Slightly accelerate to shift up and decelerate to shift
down while the indi cator is blinking.
Shift Up Normal Acceleration
1st to 2nd15 mph (24 km/h)
2nd to 3rd 25 mph (40 km/h)
3rd to 4th40 mph (64 km/h)
4th to 5th 45 mph (72 km/h)
5th to 6th50 mph (80 km/h)
Paddle Shifter
(Shift down)
Downshifting when
pulling the paddle
shifter.
(Changes to a lower
gear.)
-Upshifting when pulling
the ( + paddle shifter.
(Changes to a higher
gear.)
-(
+
Paddle Shifter
(Shift up)
QRG
Index
DrivingTOC