navigation Acura RDX 2015 Navigation Manual
[x] Cancel search | Manufacturer: ACURA, Model Year: 2015, Model line: RDX, Model: Acura RDX 2015Pages: 258, PDF Size: 11.1 MB
Page 130 of 258
129
Changing Your DestinationEntering a New Destination
Navigation
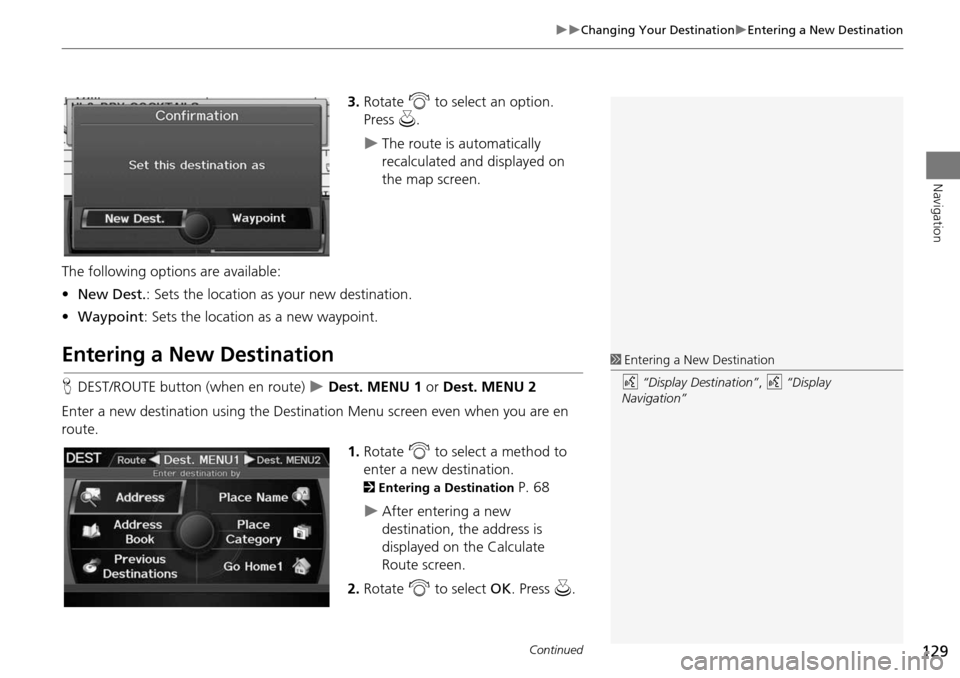
3.Rotate i to select an option.
Press u.
The route is automatically
recalculated and displayed on
the map screen.
The following options are available:
• New Dest. : Sets the location as your new destination.
• Waypoint : Sets the location as a new waypoint.
Entering a New Destination
HDEST/ROUTE button (when en route) Dest. MENU 1 or Dest. MENU 2
Enter a new destination using the Destinat ion Menu screen even when you are en
route.
1.Rotate i to select a method to
enter a new destination.
2 Entering a Destination P. 68
After entering a new
destination, the address is
displayed on the Calculate
Route screen.
2. Rotate i to select OK. Press u.
1Entering a New Destination
d “Display Destination” , d “Display
Navigation”
Continued
Page 131 of 258
130
Changing Your DestinationEntering a New Destination
Navigation
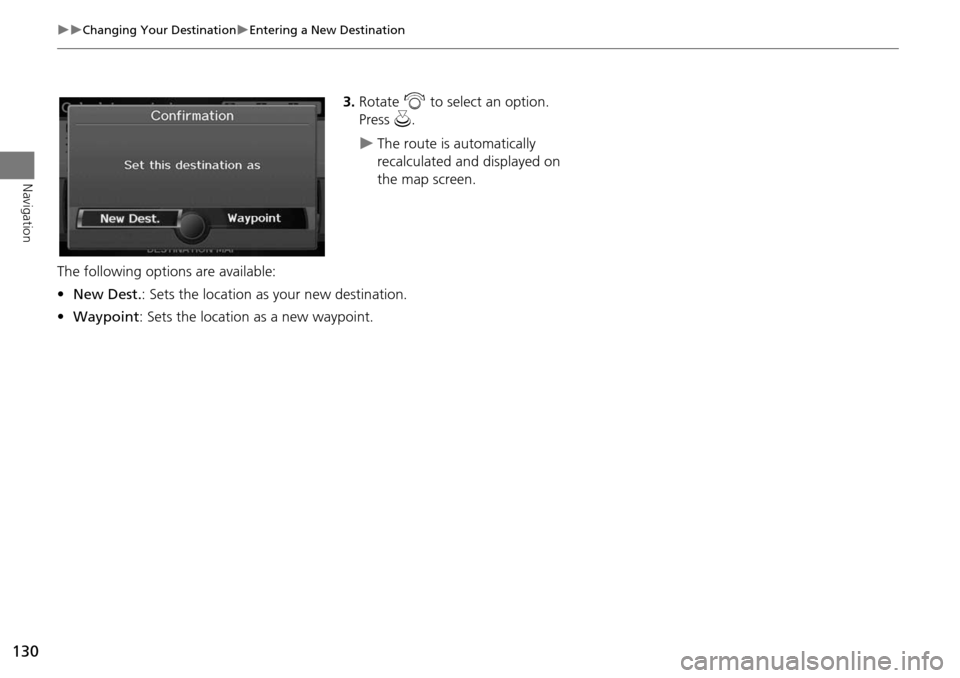
3.Rotate i to select an option.
Press u.
The route is automatically
recalculated and displayed on
the map screen.
The following options are available:
• New Dest. : Sets the location as your new destination.
• Waypoint : Sets the location as a new waypoint.
Page 132 of 258
131
Navigation
Resuming Your Trip
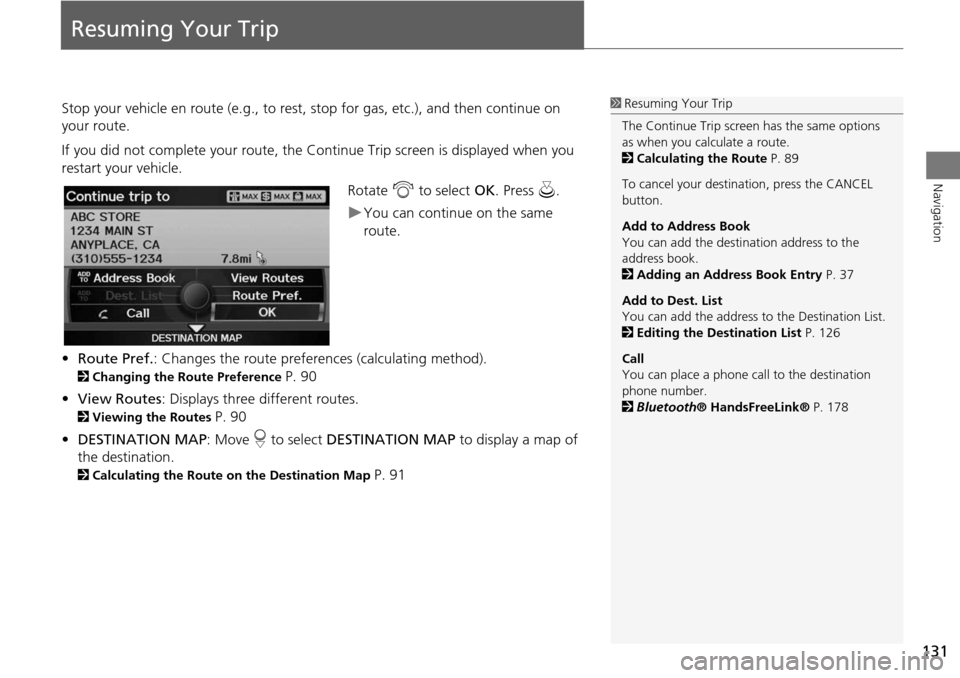
Stop your vehicle en route (e.g., to rest, stop for gas, etc.), and then continue on
your route.
If you did not complete your route, the C ontinue Trip screen is displayed when you
restart your vehicle.
Rotate i to select OK. Press u.
You can continue on the same
route.
• Route Pref. : Changes the route preferences (calculating method).
2Changing the Route Preference P. 90
• View Routes : Displays three different routes.
2Viewing the Routes P. 90
• DESTINATION MAP : Move r to select DESTINATION MAP to display a map of
the destination.
2 Calculating the Route on the Destination Map P. 91
1Resuming Your Trip
The Continue Trip screen has the same options
as when you calculate a route.
2 Calculating the Route P. 89
To cancel your destination, press the CANCEL
button.
Add to Address Book
You can add the destination address to the
address book.
2 Adding an Address Book Entry P. 37
Add to Dest. List
You can add the address to the Destination List.
2 Editing the Destination List P. 126
Call
You can place a phone ca ll to the destination
phone number.
2 Bluetooth ® HandsFreeLink® P. 178
Page 136 of 258
135
Audio SystemSystem Theft Protection
Audio
System Theft Protection
The system is disabled when it is disconnected from the power source, such as when
the battery is disconnected or goes dead.
■ Reactivating the System
1. Set the power mode to ON, and turn on the system.
If you set the power mode to ACCESSORY, you will be requested to enter the
security code. See step 3.
2. Press and hold the VOL 9 (Volume/Power) button again for more than two
seconds.
The system is reactivated when the syst em’s control unit recognizes that the
system is in your vehicle.
If the control unit fails to recognize, “ENTER CODE” appears on the navigation
screen.
3. Enter the security code.
If you do not enter the code correctly after 10 tries, leave the system for one
hour before trying again, or visit a dealer to have the system reset.
1Audio System Theft Protection
Find the audio system’s se curity code and serial
number label in your Owner’s Manual kit.
Do not store the label in y our vehicle. If you lose
the label, you must first retrieve the serial
number, and then obtain the code from a dealer.
U.S. Only
You can register the security code at Acura
Owners (owners.acura.com.), and find
information on how to retr ieve the serial number
and obtain the code at radio-
navicode.acura.com .
2 Entering the Security Code P. 228
Page 137 of 258
136
Audio
Playing FM/AM Radio
Selecting FM/AM Mode
1.Press the FM/AM button.
Press the FM/AM button again, if necessary, to select the frequency band (AM,
FM1, FM2).
2. Select a station using the Preset buttons and the bars (SKIP, TUNE, SCAN/A.SEL)
On the FM bands, you can also use the CATEGORY bar and TITLE button to
select a station provided by the Radio Data System (RDS).
The band and frequency are displayed on the display.
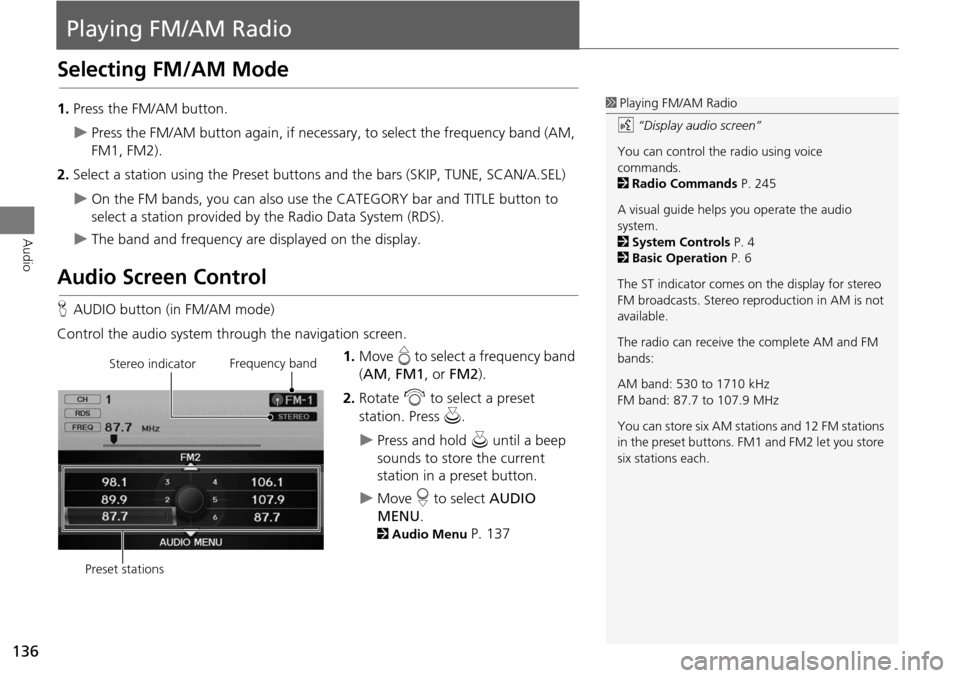
Audio Screen Control
H AUDIO button (in FM/AM mode)
Control the audio system through the navigation screen. 1.Move e to select a frequency band
( AM , FM1 , or FM2 ).
2. Rotate i to select a preset
station. Press u .
Press and hold u until a beep
sounds to store the current
station in a preset button.
Move r to select AUDIO
MENU .
2Audio Menu P. 137
1Playing FM/AM Radio
d “Display audio screen”
You can control the radio using voice
commands.
2 Radio Commands P. 245
A visual guide helps you operate the audio
system.
2 System Controls P. 4
2 Basic Operation P. 6
The ST indicator comes on the display for stereo
FM broadcasts. Stereo re production in AM is not
available.
The radio can receive the complete AM and FM
bands:
AM band: 530 to 1710 kHz
FM band: 87.7 to 107.9 MHz
You can store six AM stati ons and 12 FM stations
in the preset buttons. FM1 and FM2 let you store
six stations each.
Stereo indicator Frequency band
Preset stations
Page 141 of 258
140
Audio
Playing SiriusXM® Radio
Selecting SiriusXM® Mode
1.Press the SiriusXM® button.
Press the SiriusXM® button again, if ne cessary, to select the channel band
(XM1, XM2).
2. Select a channel using the Preset buttons and the bars (SKIP, TUNE, CATEGORY,
SCAN/A.SEL)
The band and channel are displayed.
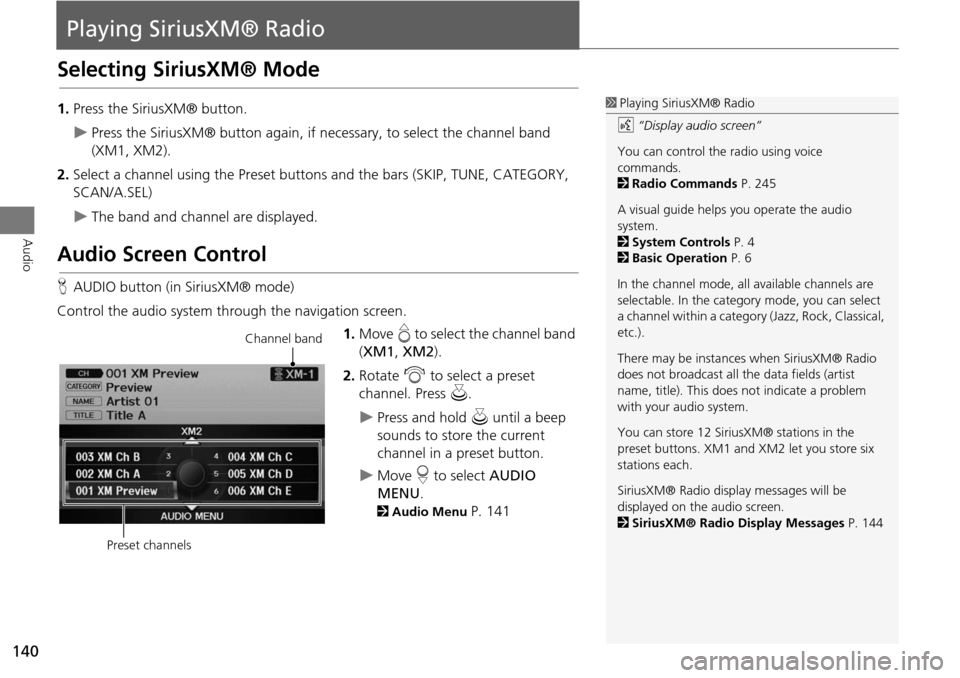
Audio Screen Control
H AUDIO button (in SiriusXM® mode)
Control the audio system through the navigation screen. 1.Move e to select the channel band
( XM1 , XM2 ).
2. Rotate i to select a preset
channel. Press u.
Press and hold u until a beep
sounds to store the current
channel in a preset button.
Move r to select AUDIO
MENU .
2Audio Menu P. 141
1Playing SiriusXM® Radio
d “Display audio screen”
You can control the radio using voice
commands.
2 Radio Commands P. 245
A visual guide helps you operate the audio
system.
2 System Controls P. 4
2 Basic Operation P. 6
In the channel mode, all available channels are
selectable. In the categor y mode, you can select
a channel within a category (Jazz, Rock, Classical,
etc.).
There may be instances when SiriusXM® Radio
does not broadcast all th e data fields (artist
name, title). This does not indicate a problem
with your audio system.
You can store 12 Sirius XM® stations in the
preset buttons. XM1 and XM2 let you store six
stations each.
SiriusXM® Radio displa y messages will be
displayed on the audio screen.
2 SiriusXM® Radio Display Messages P. 144
Channel band
Preset channels
Page 146 of 258
145
Audio
Playing a Disc
Selecting Disc Mode
1.Press the DISC button to play a CD or other disc.
2. Insert a disc into the disc slot.
The disc automatically begins playing.
3. Select a track using the bars (S KIP, TUNE, CATEGORY, SCAN/A.SEL).
The track number and elapsed time ar e displayed on the display. Title
information for audio CDs is displayed if found in the Gracenote® Album Info
(Gracenote® Media Database) stored on the built-in hard disc drive (HDD). Text
information stored on MP3/WMA/ AAC discs is also displayed.
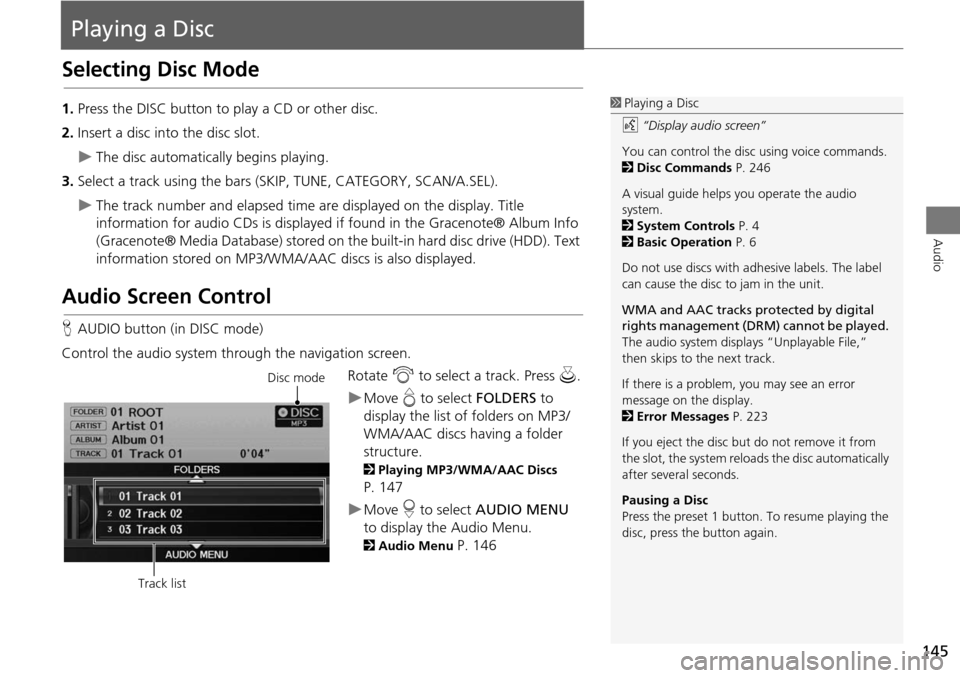
Audio Screen Control
HAUDIO button (in DISC mode)
Control the audio system through the navigation screen. Rotate i to select a track. Press u .
Move e to select FOLDERS to
display the list of folders on MP3/
WMA/AAC discs having a folder
structure.
2 Playing MP3/WMA/AAC Discs
P. 147
Move r to select AUDIO MENU
to display the Audio Menu.
2 Audio Menu P. 146
1Playing a Disc
d “Display audio screen”
You can control the disc using voice commands.
2 Disc Commands P. 246
A visual guide helps you operate the audio
system.
2 System Controls P. 4
2 Basic Operation P. 6
Do not use discs with a dhesive labels. The label
can cause the disc to jam in the unit.
WMA and AAC tracks protected by digital
rights management (DRM) cannot be played.
The audio system displa ys “Unplayable File,”
then skips to the next track.
If there is a problem, you may see an error
message on the display.
2 Error Messages P. 223
If you eject the disc but do not remove it from
the slot, the system reloads the disc automatically
after severa l seconds.
Pausing a Disc
Press the preset 1 button. To resume playing the
disc, press the button again.
Disc mode
Track list
Page 151 of 258
150
Playing Hard Disc Drive (HDD) AudioAudio Screen Control
Audio
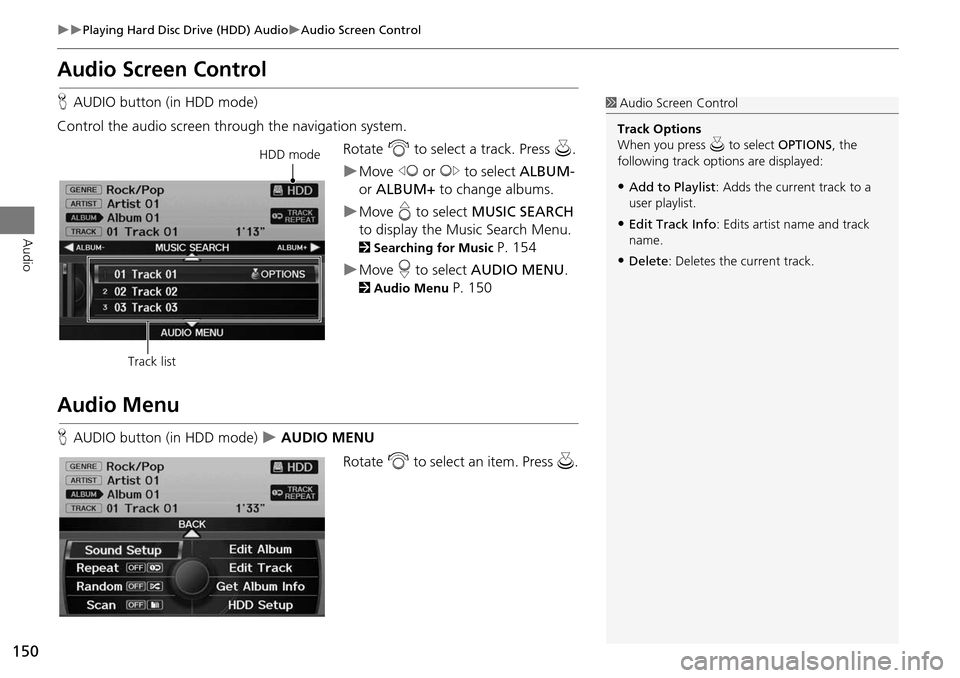
Audio Screen Control
HAUDIO button (in HDD mode)
Control the audio screen through the navigation system. Rotate i to select a track. Press u.
Move w or y to select ALBUM-
or ALBUM+ to change albums.
Move e to select MUSIC SEARCH
to display the Music Search Menu.
2 Searching for Music P. 154
Move r to select AUDIO MENU .
2Audio Menu P. 150
Audio Menu
HAUDIO button (in HDD mode) AUDIO MENU
Rotate i to select an item. Press u .
1Audio Screen Control
Track Options
When you press u to select OPTIONS , the
following track options are displayed:
•Add to Playlist : Adds the current track to a
user playlist.
•Edit Track Info : Edits artist name and track
name.
•Delete : Deletes the current track.
HDD mode
Track list
Page 159 of 258
158
Playing Hard Disc Drive (HDD) AudioUpdating Gracenote® Album Info
Audio
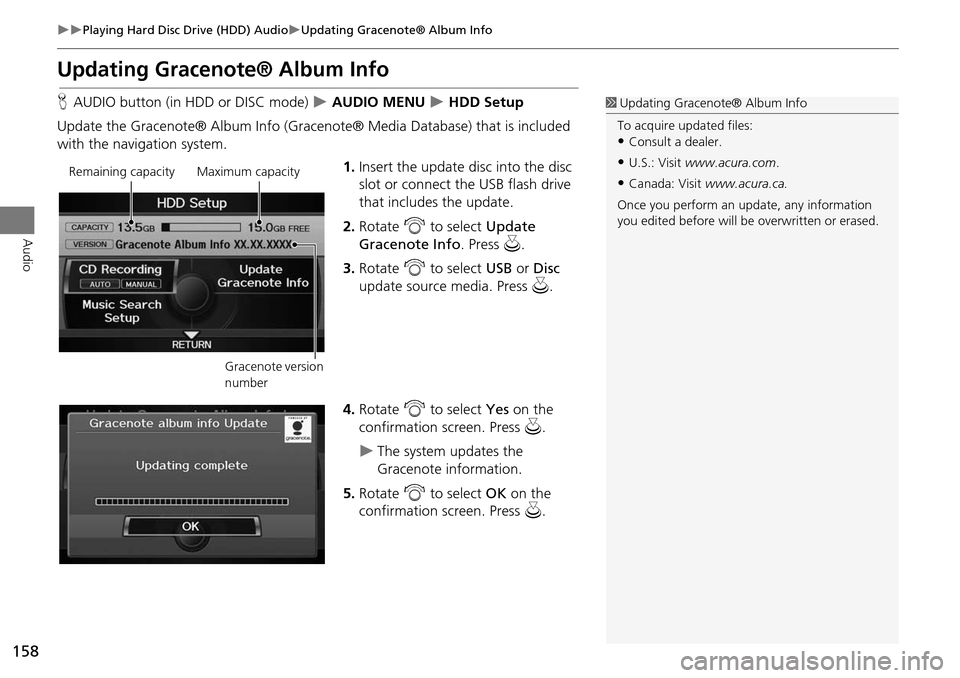
Updating Gracenote® Album Info
HAUDIO button (in HDD or DISC mode) AUDIO MENU HDD Setup
Update the Gracenote® Album Info (Gra cenote® Media Database) that is included
with the navigation system.
1.Insert the update disc into the disc
slot or connect the USB flash drive
that includes the update.
2. Rotate i to select Update
Gracenote Info . Press u.
3. Rotate i to select USB or Disc
update source media. Press u.
4. Rotate i to select Yes on the
confirmation screen. Press u.
The system updates the
Gracenote information.
5. Rotate i to select OK on the
confirmation screen. Press u.
1Updating Gracenote® Album Info
To acquire updated files:
•Consult a dealer.
•U.S.: Visit www.acura.com .
•Canada: Visit www.acura.ca.
Once you perform an update, any information
you edited before will be overwritten or erased.Remaining capacityMaximum capacity
Gracenote version
number
Page 161 of 258
160
Playing an iPod®Selecting iPod® Mode
Audio
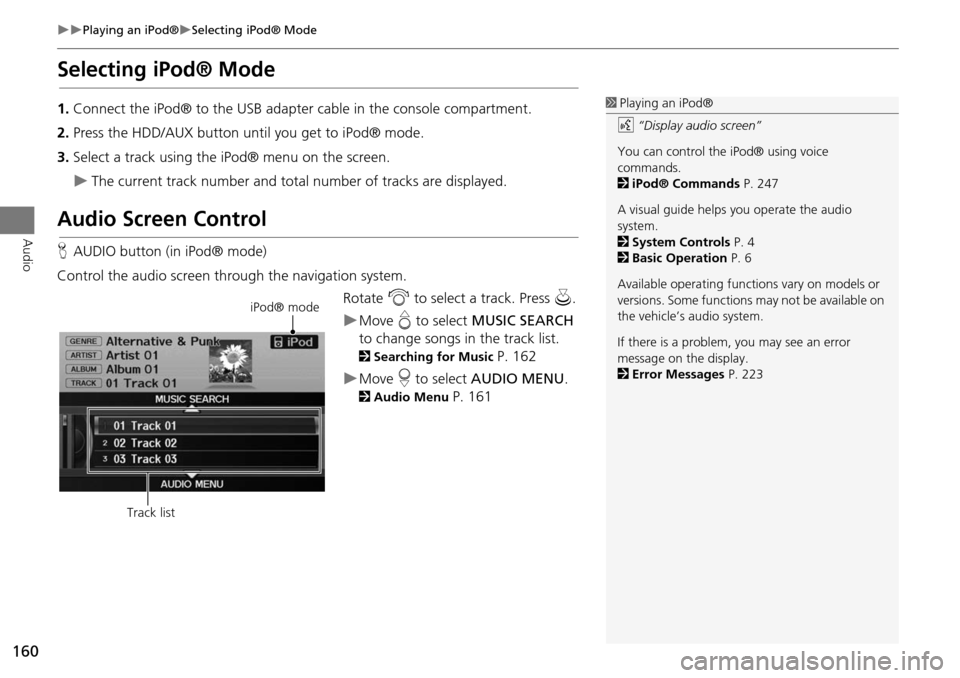
Selecting iPod® Mode
1.Connect the iPod® to the USB adapter cable in the console compartment.
2. Press the HDD/AUX button until you get to iPod® mode.
3. Select a track using the iPod® menu on the screen.
The current track number and total number of tracks are displayed.
Audio Screen Control
HAUDIO button (in iPod® mode)
Control the audio screen through the navigation system. Rotate i to select a track. Press u.
Move e to select MUSIC SEARCH
to change songs in the track list.
2Searching for Music P. 162
Move r to select AUDIO MENU .
2Audio Menu P. 161
1Playing an iPod®
d “Display audio screen”
You can control the iPod® using voice
commands.
2 iPod® Commands P. 247
A visual guide helps you operate the audio
system.
2 System Controls P. 4
2 Basic Operation P. 6
Available operating functi ons vary on models or
versions. Some functions may not be available on
the vehicle’s audio system.
If there is a problem, you may see an error
message on the display.
2 Error Messages P. 223
iPod® mode
Track list