guide Acura RDX 2016 User Guide
[x] Cancel search | Manufacturer: ACURA, Model Year: 2016, Model line: RDX, Model: Acura RDX 2016Pages: 81, PDF Size: 17.94 MB
Page 67 of 81

126 || 127
MAINTENANCE
MAINTENANCE
TABLE OF
CONTENTS
INDEX
VISUAL INDEX
VOICE COMMAND INDEX
SAFETY
INFORMATION
CLIENT
INFORMATION
INSTRUMENT PANEL
SPECIFICATIONS
VEHICLE
CONTROLS
MAINTENANCE
AUDIO AND
CONNECTIVITY
HANDLING THE UNEXPECTED
BLUETOOTH®
HANDSFREELINK®
DRIVING
ACURALINK®
NAVIGATION
Learn about basic maintenance that you can perform on the vehicle yourself, as
well as information about how to best maintain the vehicle.
Safety Precautions
Some of the most important safety precautions are listed below; however,
we cannot warn you of every conceivable hazard that can arise in performing
maintenance. Only you can decide whether or not you should perform a given task.
Maintenance Safety
• To reduce the possibility of fire or explosion, keep cigarettes, sparks, and flames
away from the battery and all fuel-related parts.
• Never leave rags, towels, or other flammable objects under the hood.
• To clean parts, use a commercially available degreaser or parts cleaner, not
gasoline.
• Wear eye protection and protective clothing when working with the battery or
compressed air.
• Do not run the engine in confined spaces where carbon monoxide gas can
accumulate.
Vehicle Safety
• The vehicle must be stationary, and parked on level ground with the parking
brake set and the engine off.
• Be aware that hot parts can burn you.
• Be aware that moving parts can injure you.
MAINTENANCE
Improperly maintaining this vehicle or failing to correct a problem before
driving can cause a crash in which you can be seriously hurt or killed.
Always follow the inspection and maintenance recommendations according
to the schedules in this guide.
WARNING
Failure to properly follow maintenance instructions and precautions can
cause you to be seriously hurt or killed.
Always follow the procedures and precautions in this guide.
WARNING
Maintenance Minder™
When maintenance is due, the system message indicator comes on and the
Maintenance Minder appears on the multi-information display every time you
turn the vehicle on. Press the Info (p/q) buttons on the steering wheel to change
displays.
See page 128 to check the indicated maintenance service(s).
• Independent of the Maintenance Minder information, replace the brake fluid
every 3 years.
• Inspect idle speed every 160,000 miles (256,000 km).
• Adjust the valves during services A, B, 1, 2, or 3 if they are noisy.
U.S. models
Maintenance, replacement, or repair of emissions control devices and systems
may be done by any automotive repair establishment or individuals using parts
that are certified to EPA standards.
According to state and federal regulations, failure to perform maintenance on the
maintenance main items marked with # will not void your emissions warranties.
However, all maintenance services should be performed in accordance with the
intervals indicated by the multi-information display.
System
message
indicator Main
item
Sub item
Maintenance Minder
Main item Sub item
Models with full
color display
Models without
full color display
Page 72 of 81

136 || 137
MAINTENANCE
MAINTENANCE
TABLE OF
CONTENTS
INDEX
VISUAL INDEX
VOICE COMMAND INDEX
SAFETY
INFORMATION
CLIENT
INFORMATION
INSTRUMENT PANEL
SPECIFICATIONS
VEHICLE
CONTROLS
MAINTENANCE
AUDIO AND
CONNECTIVITY
HANDLING THE UNEXPECTED
BLUETOOTH®
HANDSFREELINK®
DRIVING
ACURALINK®
NAVIGATION
Tire Information
To safely operate your vehicle, your tires must be of the proper type and size, in
good condition with adequate tread, and properly inflated.
Inflation Guidelines
• Properly inflated tires provide the best combination of handling, tread life, and
comfort. Refer to the driver’s doorjamb label or the specifications (see page
143) for the specified pressure.
• Underinflated tires wear unevenly, adversely affect handling and fuel economy,
and are more likely to fail from overheating.
• Overinflated tires make your vehicle ride harshly, are more prone to road
hazards, and wear unevenly.
• Every day before you drive, look at each of the tires. If one looks lower than the
others, check the pressure with a tire gauge.
• Measure the air pressure when tires are cold. This means the vehicle has been
parked for at least 3 hours, or driven less than 1 mile (1.6 km). If necessary, add
or release air until the specified pressure is reached. If checked when hot, tire
pressure can be as much as 4-6 psi (30-40 kPa, 0.3-0.5 kgf/cm
2) higher than
checked when cold.
• At least once a month or before long trips, use a gauge to measure the pressure
in all tires, including the spare. Even tires in good condition can lose 1-2 psi
(10-20 kPa, 0.1-0.2 kgf/cm
2) per month.
Inspection Guidelines
Every time you inflate the tires, check for the following:
• Any damage to tires, including bumps, bulges, cuts, splits, or cracks in the side
or tread. Remove any foreign objects and inspect for air leaks. Replace tires if
you see fabric or cord.
• Uneven or excessive tread wear. Have a dealer check the wheel alignment.
• Cracks or other damage around the valve stems.
Wear Indicators
The groove where the wear indicator is located is
1/16 inch (1.6 mm) shallower than elsewhere on the
tire. If the tread has worn so low that the indicator
is exposed, replace the tire. Worn out tires have
poor traction on wet roads.
Example of a wear
indicator mark
Tire and Loading Information Label
The label attached to the driver’s doorjamb provides necessary tire and
loading information. Using
tires that are excessively worn or improperly inflated can cause
a crash in which you can be seriously hurt or killed.
Follow all instructions in this owner’s manual regarding tire inflation
and maintenance.
WARNING
Original
tire sizes Number of
people your
vehicle can carry Proper
cold tire
pressureTotal weight
your vehicle
can carry (do
not exceed)
Tire and Wheel Replacement
Replace your tires with radials of the same size, load range, speed rating, and
maximum cold tire pressure rating (as shown on the tire’s sidewall). Using
tires of a different size or construction can cause certain vehicle systems to
work incorrectly. It is best to replace all four tires at the same time. If that isn’t
possible, replace the front or rear tires in pairs.
If you change or replace a wheel, make sure that the wheel’s specifications match
those of the original wheels. Only use TPMS-specified wheels approved for your
vehicle.
Installing improper tires on your vehicle can affect handling and stability.
This can cause a crash in which you can be seriously hurt or killed.
Always use the size and type of tires recommended in the owner’s manual.
WARNING
Page 73 of 81
138 || 139
MAINTENANCE
MAINTENANCE
TABLE OF
CONTENTS
INDEX
VISUAL INDEX
VOICE COMMAND INDEX
SAFETY
INFORMATION
CLIENT
INFORMATION
INSTRUMENT PANEL
SPECIFICATIONS
VEHICLE
CONTROLS
MAINTENANCE
AUDIO AND
CONNECTIVITY
HANDLING THE UNEXPECTED
BLUETOOTH®
HANDSFREELINK®
DRIVING
ACURALINK®
NAVIGATION
Tire Service Life
The life of your tires is dependent on many factors, including driving habits, road
conditions, vehicle loading, inflation pressure, maintenance history, speed, and
environmental conditions (even when the tires are not in use).
In addition to regular inspections and inflation pressure maintenance, it is
recommended that you have annual inspections performed once the tires reach
five years old. All tires, including the spare, should be removed from service after
10 years from the date of manufacture, regardless of their condition or state of
wear.
Winter Tires
If driving on snowy or frozen roads, mount all season tires marked “M+S”, snow
tires, or tire chains; reduce speed; and maintain sufficient distance between
vehicles when driving. For winter tires, select the size and load ranges that are the
same as the original tires, and mount them to all four wheels.
Tire Chains
Install tire chains on the front tires only. Because your vehicle has limited tire
clearance, we strongly recommend using the following chains:
Cable type: SCC Radial Chain TC2212MM
Mount chains as tightly as you can, and make sure that they do not touch the
brake lines or suspension.
Using the wrong chains, or not properly installing chains, can damage the
brake lines and cause a crash in which you can be seriously injured or killed.
Follow all instructions in this guide regarding the selection and use of tire
chains.
WARNING
Traction devices that are the wrong size or improperly installed can damage
your vehicle’s brake lines, suspension, body, and wheels. Stop driving if they are
hitting any part of the vehicle.
NOTICE
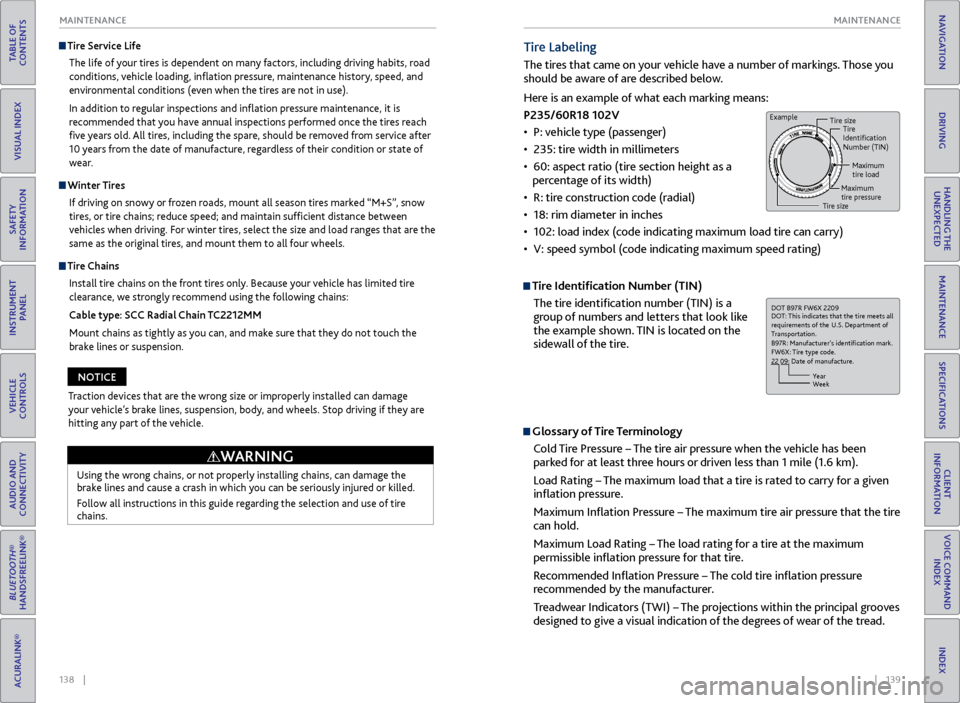
Tire Labeling
The tires that came on your vehicle have a number of markings. Those you
should be aware of are described below.
Tire Identification Number (TIN)
The tire identification number (TIN) is a
group of numbers and letters that look like
the example shown. TIN is located on the
sidewall of the tire.
Glossary of Tire Terminology
Cold Tire Pressure – The tire air pressure when the vehicle has been
parked for at least three hours or driven less than 1 mile (1.6 km).
Load Rating – The maximum load that a tire is rated to carry for a given
inflation pressure.
Maximum Inflation Pressure – The maximum tire air pressure that the tire
can hold.
Maximum Load Rating – The load rating for a tire at the maximum
permissible inflation pressure for that tire.
Recommended Inflation Pressure – The cold tire inflation pressure
recommended by the manufacturer.
Treadwear Indicators (TWI) – The projections within the principal grooves
designed to give a visual indication of the degrees of wear of the tread.
DOT B97R FW6X 2209
DOT: This indicates that the tire meets all
requirements of the U.S. Department of
Transportation.
B97R: Manufacturer’s identication mark .
FW 6X: Tire type code.
22 09: Date of manufacture.
Year
Week
Here is an example of what each marking means:
P235/60R18 102V
• P: vehicle type (passenger)
• 235: tire width in millimeters
• 60: aspect ratio (tire section height as a
percentage of its width)
• R: tire construction code (radial)
• 18: rim diameter in inches
• 102: load index (code indicating maximum load tire can carry)
• V: speed symbol (code indicating maximum speed rating)
Example
Tire size
Tire
Identication
Number (TIN)
Ma ximum
ti re load
Maximum
tire pressure
Tire siz e