acc Acura RDX 2016 Owner's Manual
[x] Cancel search | Manufacturer: ACURA, Model Year: 2016, Model line: RDX, Model: Acura RDX 2016Pages: 81, PDF Size: 17.94 MB
Page 50 of 81
92 || 93
DRIVING
DRIVING
TABLE OF
CONTENTS
INDEX
VISUAL INDEX
VOICE COMMAND INDEX
SAFETY
INFORMATION
CLIENT
INFORMATION
INSTRUMENT PANEL
SPECIFICATIONS
VEHICLE
CONTROLS
MAINTENANCE
AUDIO AND
CONNECTIVITY
HANDLING THE UNEXPECTED
BLUETOOTH®
HANDSFREELINK®
DRIVING
ACURALINK®
NAVIGATION
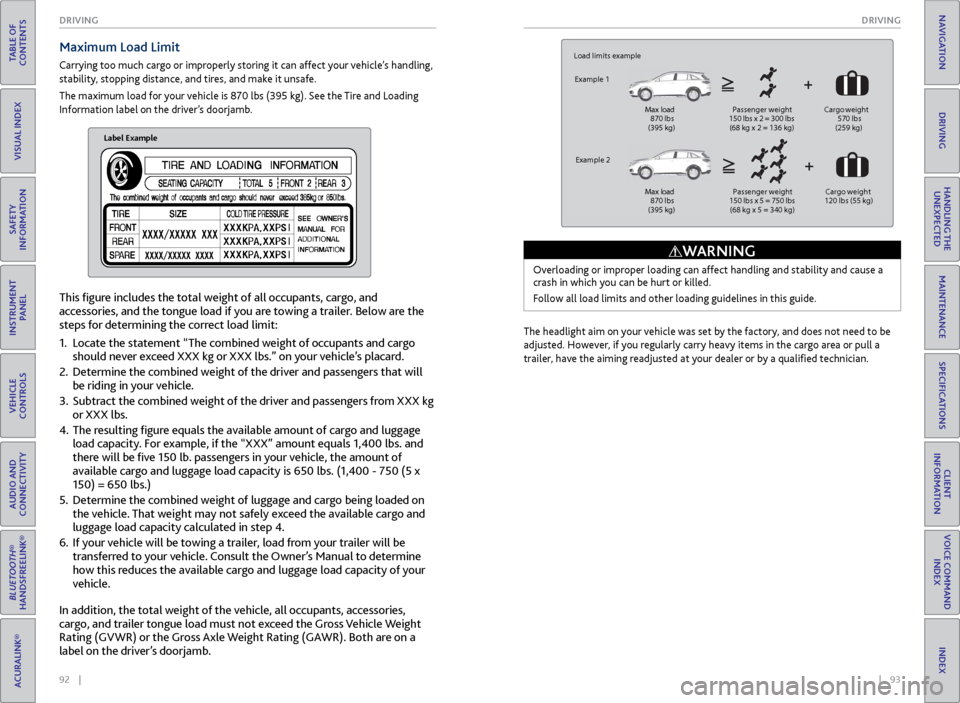
This figure includes the total weight of all occupants, cargo, and
accessories, and the tongue load if you are towing a trailer. Below are the
steps for determining the correct load limit:
1. Locate the statement “The combined weight of occupants and cargo
should never exceed XXX kg or XXX lbs.” on your vehicle’s placard.
2. Determine the combined weight of the driver and passengers that will
be riding in your vehicle.
3. Subtract the combined weight of the driver and passengers from XXX kg
or XXX lbs.
4. The resulting figure equals the available amount of cargo and luggage
load capacity. For example, if the “XXX” amount equals 1,400 lbs. and
there will be five 150 lb. passengers in your vehicle, the amount of
available cargo and luggage load capacity is 650 lbs. (1,400 - 750 (5 x
150) = 650 lbs.)
5. Determine the combined weight of luggage and cargo being loaded on
the vehicle. That weight may not safely exceed the available cargo and
luggage load capacity calculated in step 4.
6. If your vehicle will be towing a trailer, load from your trailer will be
transferred to your vehicle. Consult the Owner’s Manual to determine
how this reduces the available cargo and luggage load capacity of your
vehicle.
Maximum Load Limit
Carrying too much cargo or improperly storing it can affect your vehicle’s handling,
stability, stopping distance, and tires, and make it unsafe.
The maximum load for your vehicle is 870 lbs (395 kg). See the Tire and Loading
Information label on the driver’s doorjamb.
Label Example
Load limits example
Example 1
Max load
870 lbs
(395 kg ) Passenger weight
150 lbs x 2 = 300 lbs
(68 kg x 2 = 136 kg) Cargo
weight
570 lbs
(259 kg)
Example 2
Max load
870 lbs
(395 kg ) Passenger weight
150 lbs x 5 = 750 lbs
(68 kg x 5 = 340 kg) Ca
rgo weight
120 lbs (55 kg )
Overloading or improper loading can affect handling and stability and cause a
crash in which you can be hurt or killed.
Follow all load limits and other loading guidelines in this guide.
WARNING
The headlight aim on your vehicle was set by the factory, and does not need to be
adjusted. However, if you regularly carry heavy items in the cargo area or pull a
trailer, have the aiming readjusted at your dealer or by a qualified technician.
In addition, the total weight of the vehicle, all occupants, accessories,
cargo, and trailer tongue load must not exceed the Gross Vehicle Weight
Rating (GVWR) or the Gross Axle Weight Rating (GAWR). Both are on a
label on the driver’s doorjamb.
Page 52 of 81
96 || 97
DRIVING
DRIVING
TABLE OF
CONTENTS
INDEX
VISUAL INDEX
VOICE COMMAND INDEX
SAFETY
INFORMATION
CLIENT
INFORMATION
INSTRUMENT PANEL
SPECIFICATIONS
VEHICLE
CONTROLS
MAINTENANCE
AUDIO AND
CONNECTIVITY
HANDLING THE UNEXPECTED
BLUETOOTH®
HANDSFREELINK®
DRIVING
ACURALINK®
NAVIGATION
Remote Engine Start*
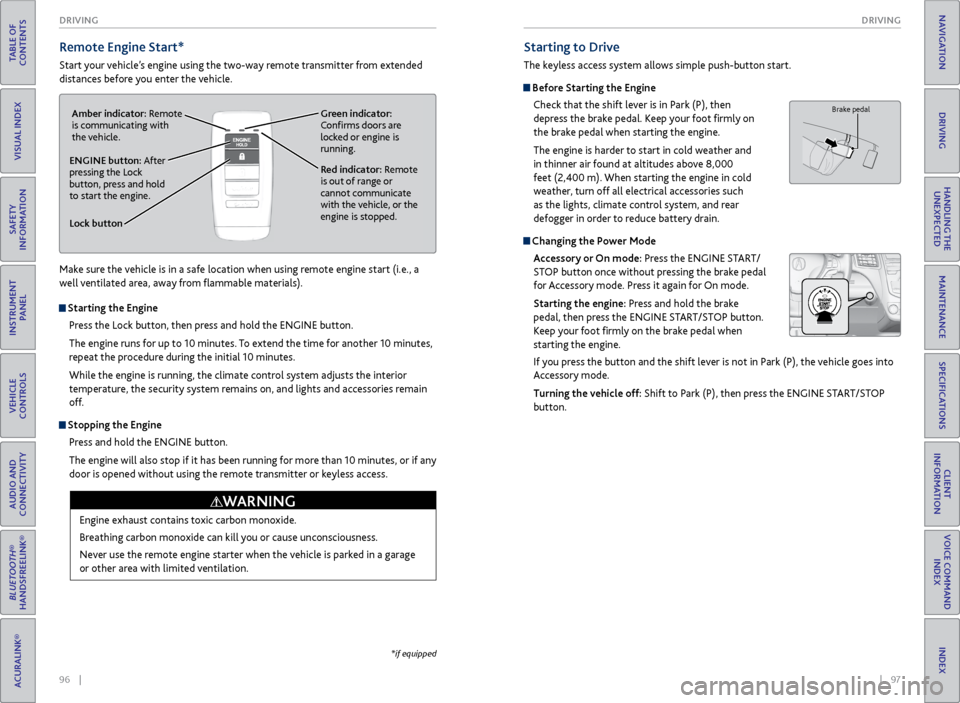
Start your vehicle’s engine using the two-way remote transmitter from extended
distances before you enter the vehicle.
*if equipped
Starting to Drive
The keyless access system allows simple push-button start.
Before Starting the Engine
Check that the shift lever is in Park (P), then
depress the brake pedal. Keep your foot firmly on
the brake pedal when starting the engine.
The engine is harder to start in cold weather and
in thinner air found at altitudes above 8,000
feet (2,400 m). When starting the engine in cold
weather, turn off all electrical accessories such
as the lights, climate control system, and rear
defogger in order to reduce battery drain.
Changing the Power Mode
Accessory or On mode: Press the ENGINE START/
STOP button once without pressing the brake pedal
for Accessory mode. Press it again for On mode.
Starting the engine: Press and hold the brake
pedal, then press the ENGINE START/STOP button.
Keep your foot firmly on the brake pedal when
starting the engine.
If you press the button and the shift lever is not in Park (P), the vehicle goes into
Accessory mode.
Turning the vehicle off: Shift to Park (P), then press the ENGINE START/STOP
button.
Brake pedal
Lock button
ENGINE button: After
pressing the Lock
button, press and hold
to start the engine.Red indicator: Remote
is out of range or
cannot communicate
with the vehicle, or the
engine is stopped.
Amber indicator: Remote
is communicating with
the vehicle.
Green indicator:
Confirms doors are
locked or engine is
running.
Starting the Engine
Press the Lock button, then press and hold the ENGINE button.
The engine runs for up to 10 minutes. To extend the time for another 10 minutes,
repeat the procedure during the initial 10 minutes.
While the engine is running, the climate control system adjusts the interior
temperature, the security system remains on, and lights and accessories remain
off.
Stopping the EnginePress and hold the ENGINE button.
The engine will also stop if it has been running for more than 10 minutes, or if any
door is opened without using the remote transmitter or keyless access.
Engine exhaust contains toxic carbon monoxide.
Breathing carbon monoxide can kill you or cause unconsciousness.
Never use the remote engine starter when the vehicle is parked in a garage
or other area with limited ventilation.
WARNING
Make sure the vehicle is in a safe location when using remote engine start (i.e., a
well ventilated area, away from flammable materials).
Page 53 of 81
98 || 99
DRIVING
DRIVING
TABLE OF
CONTENTS
INDEX
VISUAL INDEX
VOICE COMMAND INDEX
SAFETY
INFORMATION
CLIENT
INFORMATION
INSTRUMENT PANEL
SPECIFICATIONS
VEHICLE
CONTROLS
MAINTENANCE
AUDIO AND
CONNECTIVITY
HANDLING THE UNEXPECTED
BLUETOOTH®
HANDSFREELINK®
DRIVING
ACURALINK®
NAVIGATION
Shifting
Change your vehicle’s gears to begin driving.
Shift Lever
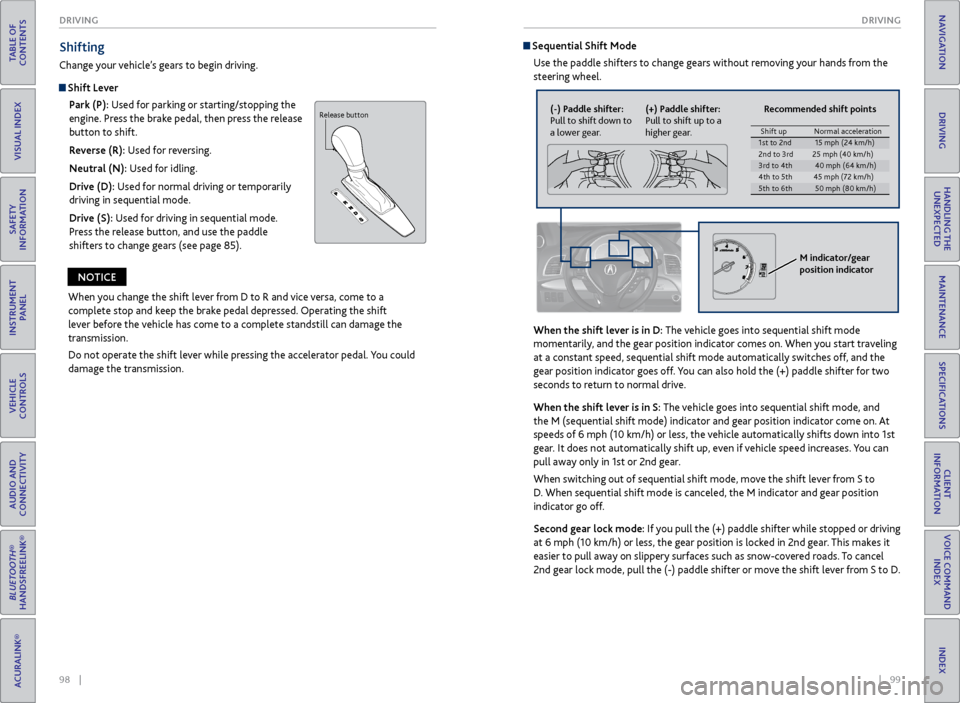
Park (P): Used for parking or starting/stopping the
engine. Press the brake pedal, then press the release
button to shift.
Reverse (R): Used for reversing.
Neutral (N): Used for idling.
Drive (D): Used for normal driving or temporarily
driving in sequential mode.
Drive (S): Used for driving in sequential mode.
Press the release button, and use the paddle
shifters to change gears (see page 85).
When you change the shift lever from D to R and vice versa, come to a
complete stop and keep the brake pedal depressed. Operating the shift
lever before the vehicle has come to a complete standstill can damage the
transmission.
Do not operate the shift lever while pressing the accelerator pedal. You could
damage the transmission.
NOTICE
Sequential Shift Mode
Use the paddle shifters to change gears without removing your hands from the
steering wheel.
When the shift lever is in D: The vehicle goes into sequential shift mode
momentarily, and the gear position indicator comes on. When you start traveling
at a constant speed, sequential shift mode automatically switches off, and the
gear position indicator goes off. You can also hold the (+) paddle shifter for two
seconds to return to normal drive.
When the shift lever is in S: The vehicle goes into sequential shift mode, and
the M (sequential shift mode) indicator and gear position indicator co\
me on. At
speeds of 6 mph (10 km/h) or less, the vehicle automatically shifts down into 1st
gear. It does not automatically shift up, even if vehicle speed increases. You can
pull away only in 1st or 2nd gear.
When switching out of sequential shift mode, move the shift lever from S to
D. When sequential shift mode is canceled, the M indicator and gear position
indicator go off.
Second gear lock mode: If you pull the (+) paddle shifter while stopped or driving
at 6 mph (10 km/h) or less, the gear position is locked in 2nd gear. This makes it
easier to pull away on slippery surfaces such as snow-covered roads. To cancel
2nd gear lock mode, pull the (-) paddle shifter or move the shift lever from S to D.
Release button(-) Paddle shifter:
Pull to shift down to
a lower gear. (+) Paddle shifter:
Pull to shift up to a
higher gear. Recommended shift points
M indicator/gear
position indicator
Shift up
Normal acceleratio n1st to 2n d15 mph (24 km/h)
2nd to 3rd 25 mph (40 km/h )
3rd to 4th40 mph (64 km/h)
4th to 5th 45 mph (72 km/h)
5th to 6th50 mph (80 km/h)
Page 54 of 81
100 || 101
DRIVING
DRIVING
TABLE OF
CONTENTS
INDEX
VISUAL INDEX
VOICE COMMAND INDEX
SAFETY
INFORMATION
CLIENT
INFORMATION
INSTRUMENT PANEL
SPECIFICATIONS
VEHICLE
CONTROLS
MAINTENANCE
AUDIO AND
CONNECTIVITY
HANDLING THE UNEXPECTED
BLUETOOTH®
HANDSFREELINK®
DRIVING
ACURALINK®
NAVIGATION
Braking
Slow down or stop your vehicle, and keep it from moving when parked.
Foot Brake
Press the brake pedal to slow down or stop your
vehicle from moving.
Parking BrakeKeep the vehicle from moving when it is parked.
To apply: Press the parking brake with your foot.
To release: Press the brake pedal, then press the
parking brake until it releases.
Brake Assist SystemDuring hard or emergency braking, the system increases braking force. The brake
pedal may move slightly or make a noise; this is normal. Continue to hold the
brake pedal firmly down.
Anti-Lock Brake System (ABS)
During hard or emergency braking, the system rapidly pumps the brakes to
prevent wheel lockup and help you maintain steering control. The brake pedal
may pulsate slightly during ABS operation; this is normal. Do not pump the brake
pedal, and continue to hold it firmly down.
Parking brake
Release the parking brake fully before driving. The rear brakes and axle can be
damaged if you drive with the parking brake applied.
NOTICE
The ABS may not function correctly if you use an incorrect tire type and size.
NOTICE
Brake pedal
Cruise Control*
Maintain a constant vehicle speed without having to keep your foot on the
accelerator pedal. Use cruise control on freeways or open roads where you can
travel at a constant speed with little acceleration or deceleration.
Improper use of the cruise control can lead to a crash.
Use cruise control only when traveling on open highways in good weather.
WARNING
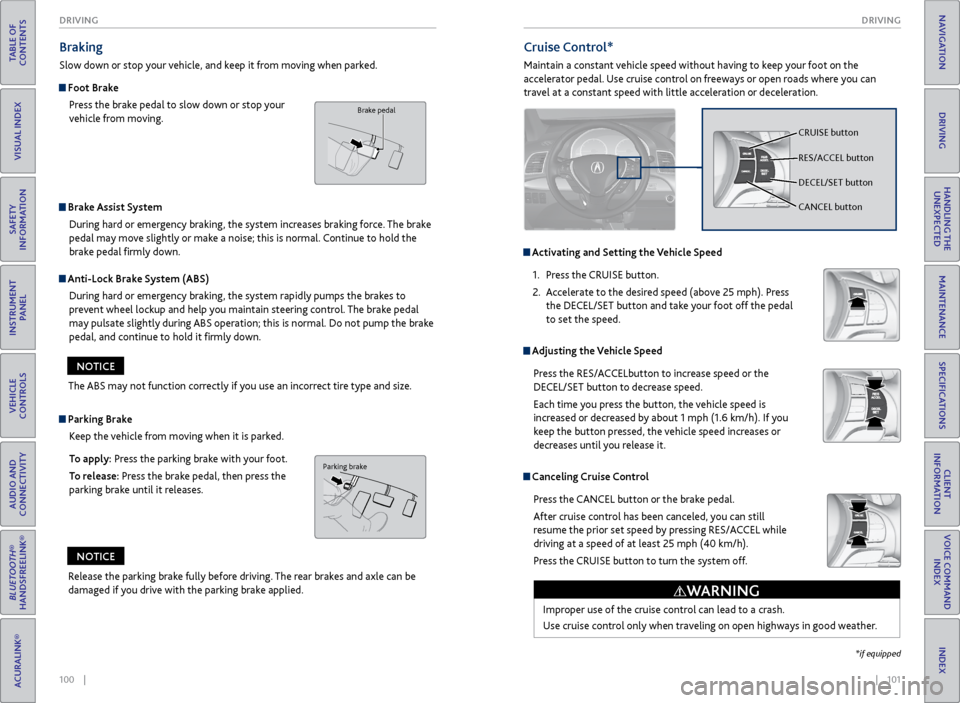
Activating and Setting the Vehicle Speed1. Press the CRUISE button.
2. Accelerate to the desired speed (above 25 mph). Press
the DECEL/SET button and take your foot off the pedal
to set the speed.
Adjusting the Vehicle Speed
Press the RES/ACCELbutton to increase speed or the
DECEL/SET button to decrease speed.
Each time you press the button, the vehicle speed is
increased or decreased by about 1 mph (1.6 km/h). If you
keep the button pressed, the vehicle speed increases or
decreases until you release it.
Canceling Cruise ControlPress the CANCEL button or the brake pedal.
After cruise control has been canceled, you can still
resume the prior set speed by pressing RES/ACCEL while
driving at a speed of at least 25 mph (40 km/h).
Press the CRUISE button to turn the system off.
CRUISE button
RES/ACCEL button
DECEL/SET button
CANCEL button
*if equipped
Page 55 of 81
102 || 103
DRIVING
DRIVING
TABLE OF
CONTENTS
INDEX
VISUAL INDEX
VOICE COMMAND INDEX
SAFETY
INFORMATION
CLIENT
INFORMATION
INSTRUMENT PANEL
SPECIFICATIONS
VEHICLE
CONTROLS
MAINTENANCE
AUDIO AND
CONNECTIVITY
HANDLING THE UNEXPECTED
BLUETOOTH®
HANDSFREELINK®
DRIVING
ACURALINK®
NAVIGATION
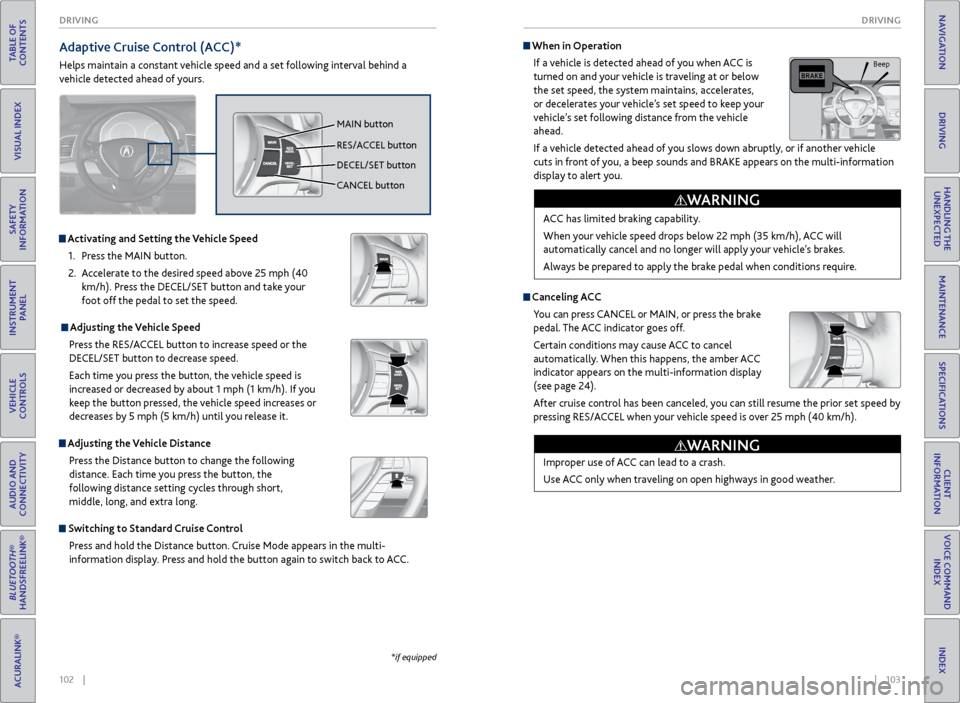
Activating and Setting the Vehicle Speed
1. Press the MAIN button.
2. Accelerate to the desired speed above 25 mph (40
km/h). Press the DECEL/SET button and take your
foot off the pedal to set the speed.
Adjusting the Vehicle Speed Press the RES/ACCEL button to increase speed or the
DECEL/SET button to decrease speed.
Each time you press the button, the vehicle speed is
increased or decreased by about 1 mph (1 km/h). If you
keep the button pressed, the vehicle speed increases or
decreases by 5 mph (5 km/h) until you release it.
Adjusting the Vehicle Distance Press the Distance button to change the following
distance. Each time you press the button, the
following distance setting cycles through short,
middle, long, and extra long.
Switching to Standard Cruise ControlPress and hold the Distance button. Cruise Mode appears in the multi-
information display. Press and hold the button again to switch back to ACC.
Adaptive Cruise Control (ACC)*
Helps maintain a constant vehicle speed and a set following interval behind a
vehicle detected ahead of yours.
*if equipped
MAIN button
RES/ACCEL button
DECEL/SET button
CANCEL button
Canceling ACCYou can press CANCEL or MAIN, or press the brake
pedal. The ACC indicator goes off.
Certain conditions may cause ACC to cancel
automatically. When this happens, the amber ACC
indicator appears on the multi-information display
(see page 24).
After cruise control has been canceled, you can still resume the prior set speed by
pressing RES/ACCEL when your vehicle speed is over 25 mph (40 km/h).
When in Operation
If a vehicle is detected ahead of you when ACC is
turned on and your vehicle is traveling at or below
the set speed, the system maintains, accelerates,
or decelerates your vehicle’s set speed to keep your
vehicle’s set following distance from the vehicle
ahead.
If a vehicle detected ahead of you slows down abruptly, or if another vehicle
cuts in front of you, a beep sounds and BRAKE appears on the multi-information
display to alert you.
Improper use of ACC can lead to a crash.
Use ACC only when traveling on open highways in good weather.
WARNING
ACC has limited braking capability.
When your vehicle speed drops below 22 mph (35 km/h), ACC will
automatically cancel and no longer will apply your vehicle’s brakes.
Always be prepared to apply the brake pedal when conditions require.
WARNING
Beep
Page 58 of 81
108 || 109
DRIVING
DRIVING
TABLE OF
CONTENTS
INDEX
VISUAL INDEX
VOICE COMMAND INDEX
SAFETY
INFORMATION
CLIENT
INFORMATION
INSTRUMENT PANEL
SPECIFICATIONS
VEHICLE
CONTROLS
MAINTENANCE
AUDIO AND
CONNECTIVITY
HANDLING THE UNEXPECTED
BLUETOOTH®
HANDSFREELINK®
DRIVING
ACURALINK®
NAVIGATION
Vehicle Stability Assist (VSA®), aka Electronic Stability Control
(ESC) System
Helps to stabilize the vehicle during cornering if the vehicle turns more or less
than what was intended. It assists in maintaining traction on slippery surfaces by
regulating engine output and selectively applying the brakes.
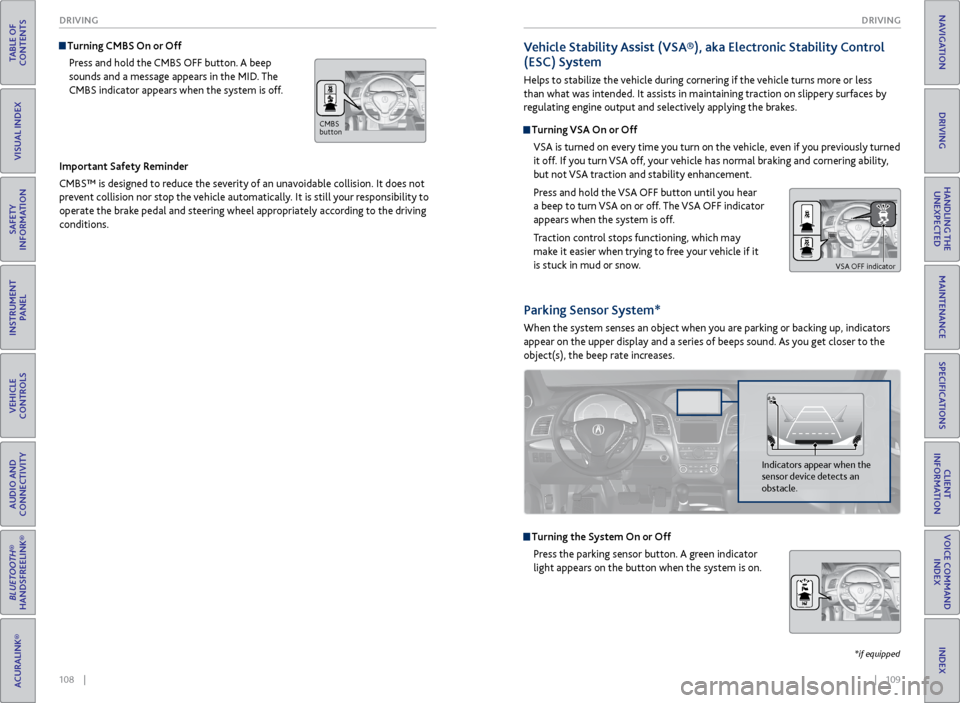
Turning VSA On or Off
VSA is turned on every time you turn on the vehicle, even if you previously turned
it off. If you turn VSA off, your vehicle has normal braking and cornering ability,
but not VSA traction and stability enhancement.
Press and hold the VSA OFF button until you hear
a beep to turn VSA on or off. The VSA OFF indicator
appears when the system is off.
Traction control stops functioning, which may
make it easier when trying to free your vehicle if it
is stuck in mud or snow.
VSA OFF indicator
Turning CMBS On or OffPress and hold the CMBS OFF button. A beep
sounds and a message appears in the MID. The
CMBS indicator appears when the system is off.
Important Safety Reminder
CMBS™ is designed to reduce the severity of an unavoidable collision. It does not
prevent collision nor stop the vehicle automatically. It is still your responsibility to
operate the brake pedal and steering wheel appropriately according to the driving
conditions.
Parking Sensor System*
When the system senses an object when you are parking or backing up, indicators
appear on the upper display and a series of beeps sound. As you get closer to the
object(s), the beep rate increases.
Turning the System On or Off Press the parking sensor button. A green indicator
light appears on the button when the system is on.
Indicators appear when the
sensor device detects an
obstacle.
CMBS
button
*if equipped
Page 60 of 81
112 || 113
HANDLING THE UNEXPECTED
DRIVING
TABLE OF
CONTENTS
INDEX
VISUAL INDEX
VOICE COMMAND INDEX
SAFETY
INFORMATION
CLIENT
INFORMATION
INSTRUMENT PANEL
SPECIFICATIONS
VEHICLE
CONTROLS
MAINTENANCE
AUDIO AND
CONNECTIVITY
HANDLING THE UNEXPECTED
BLUETOOTH®
HANDSFREELINK®
DRIVING
ACURALINK®
NAVIGATION
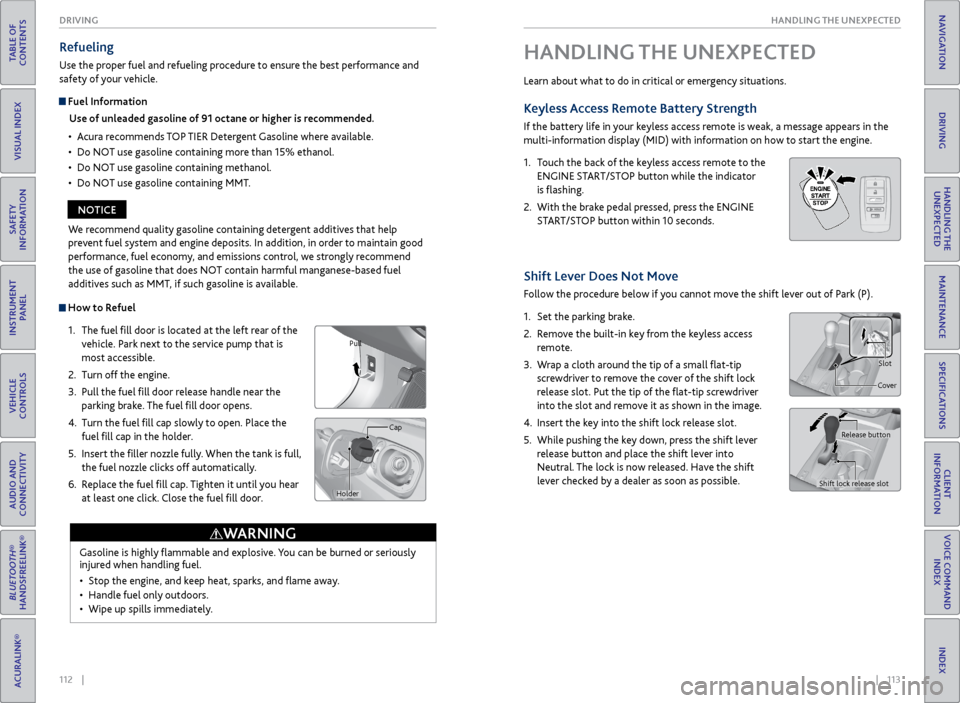
How to Refuel
1. The fuel fill door is located at the left rear of the
vehicle. Park next to the service pump that is
most accessible.
2. Turn off the engine.
3. Pull the fuel fill door release handle near the
parking brake. The fuel fill door opens.
4. Turn the fuel fill cap slowly to open. Place the
fuel fill cap in the holder.
5. Insert the filler nozzle fully. When the tank is full,
the fuel nozzle clicks off automatically.
6. Replace the fuel fill cap. Tighten it until you hear
at least one click. Close the fuel fill door.
Refueling
Use the proper fuel and refueling procedure to ensure the best performance and
safety of your vehicle.
Fuel Information
Use of unleaded gasoline of 91 octane or higher is recommended.
• Acura recommends TOP TIER Detergent Gasoline where available.
• Do NOT use gasoline containing more than 15% ethanol.
• Do NOT use gasoline containing methanol.
• Do NOT use gasoline containing MMT.
Gasoline is highly flammable and explosive. You can be burned or seriously
injured when handling fuel.
• Stop the engine, and keep heat, sparks, and flame away.
• Handle fuel only outdoors.
• Wipe up spills immediately.
WARNING
Pull
Cap
Holder
We recommend quality gasoline containing detergent additives that help
prevent fuel system and engine deposits. In addition, in order to maintain good
performance, fuel economy, and emissions control, we strongly recommend
the use of gasoline that does NOT contain harmful manganese-based fuel
additives such as MMT, if such gasoline is available.
NOTICE Learn about what to do in critical or emergency situations.
Keyless Access
Remote Battery Strength
If the battery life in your keyless access remote is weak, a message appears in the
multi-information display (MID) with information on how to start the engine.
1. Touch the back of the keyless access remote to the
ENGINE START/STOP button while the indicator
is flashing.
2. With the brake pedal pressed, press the ENGINE
START/STOP button within 10 seconds.
HANDLING THE UNEXPECTED
HOLD
Shift Lever Does Not Move
Follow the procedure below if you cannot move the shift lever out of Park (P).
1. Set the parking brake.
2. Remove the built-in key from the keyless access
remote.
3. Wrap a cloth around the tip of a small flat-tip
screwdriver to remove the cover of the shift lock
release slot. Put the tip of the flat-tip screwdriver
into the slot and remove it as shown in the image.
4. Insert the key into the shift lock release slot.
5. While pushing the key down, press the shift lever
release button and place the shift lever into
Neutral. The lock is now released. Have the shift
lever checked by a dealer as soon as possible.
Slot
Cover
Release button
Shift lock release slot
Page 61 of 81
114 || 115
HANDLING THE UNEXPECTED
HANDLING THE UNEXPECTED
TABLE OF
CONTENTS
INDEX
VISUAL INDEX
VOICE COMMAND INDEX
SAFETY
INFORMATION
CLIENT
INFORMATION
INSTRUMENT PANEL
SPECIFICATIONS
VEHICLE
CONTROLS
MAINTENANCE
AUDIO AND
CONNECTIVITY
HANDLING THE UNEXPECTED
BLUETOOTH®
HANDSFREELINK®
DRIVING
ACURALINK®
NAVIGATION
Jump Starting
Turn off the power to electric devices, such as audio and lights. Turn off the engine,
then open the hood.
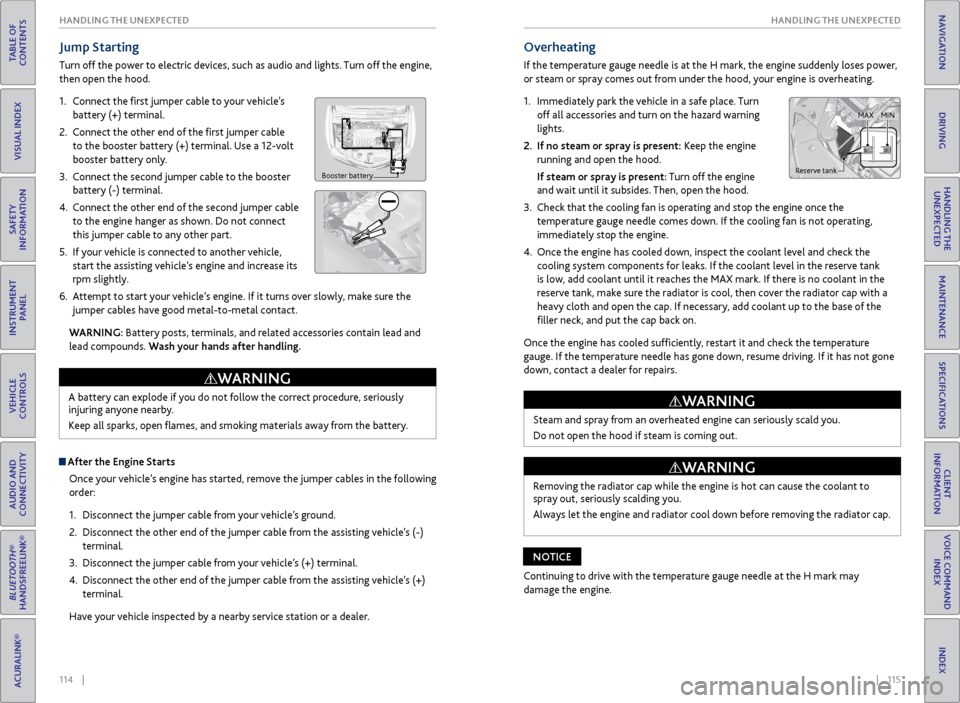
1. Connect the first jumper cable to your vehicle’s
battery (+) terminal.
2. Connect the other end of the first jumper cable
to the booster battery (+) terminal. Use a 12-volt
booster battery only.
3. Connect the second jumper cable to the booster
battery (-) terminal.
4. Connect the other end of the second jumper cable
to the engine hanger as shown. Do not connect
this jumper cable to any other part.
5. If your vehicle is connected to another vehicle,
start the assisting vehicle’s engine and increase its
rpm slightly.
6. Attempt to start your vehicle’s engine. If it turns over slowly, make sure the
jumper cables have good metal-to-metal contact.
WARNING: Battery posts, terminals, and related accessories contain lead and
lead compounds. Wash your hands after handling.
Booster battery
A battery can explode if you do not follow the correct procedure, seriously
injuring anyone nearby.
Keep all sparks, open flames, and smoking materials away from the battery.
WARNING
After the Engine Starts
Once your vehicle’s engine has started, remove the jumper cables in the following
order:
1. Disconnect the jumper cable from your vehicle’s ground.
2. Disconnect the other end of the jumper cable from the assisting vehicle’s (-)
terminal.
3. Disconnect the jumper cable from your vehicle’s (+) terminal.
4. Disconnect the other end of the jumper cable from the assisting vehicle’s (+)
terminal.
Have your vehicle inspected by a nearby service station or a dealer.
Overheating
If the temperature gauge needle is at the H mark, the engine suddenly loses power,
or steam or spray comes out from under the hood, your engine is overheating.
1. Immediately park the vehicle in a safe place. Turn
off all accessories and turn on the hazard warning
lights.
2. If no steam or spray is present: Keep the engine
running and open the hood.
If steam or spray is present: Turn off the engine
and wait until it subsides. Then, open the hood.
3. Check that the cooling fan is operating and stop the engine once the
temperature gauge needle comes down. If the cooling fan is not operating,
immediately stop the engine.
4. Once the engine has cooled down, inspect the coolant level and check the
cooling system components for leaks. If the coolant level in the reserve tank
is low, add coolant until it reaches the MAX mark. If there is no coolant in the
reserve tank, make sure the radiator is cool, then cover the radiator cap with a
heavy cloth and open the cap. If necessary, add coolant up to the base of the
filler neck, and put the cap back on.
Once the engine has cooled sufficiently, restart it and check the temperature
gauge. If the temperature needle has gone down, resume driving. If it has not gone
down, contact a dealer for repairs.
Steam and spray from an overheated engine can seriously scald you.
Do not open the hood if steam is coming out.
WARNING
Removing the radiator cap while the engine is hot can cause the coolant to
spray out, seriously scalding you.
Always let the engine and radiator cool down before removing the radiator cap.
WARNING
Continuing to drive with the temperature gauge needle at the H mark may
damage the engine.
NOTICE
Reserve tank MAX
MIN
Page 62 of 81

116 || 117
HANDLING THE UNEXPECTED
HANDLING THE UNEXPECTED
TABLE OF
CONTENTS
INDEX
VISUAL INDEX
VOICE COMMAND INDEX
SAFETY
INFORMATION
CLIENT
INFORMATION
INSTRUMENT PANEL
SPECIFICATIONS
VEHICLE
CONTROLS
MAINTENANCE
AUDIO AND
CONNECTIVITY
HANDLING THE UNEXPECTED
BLUETOOTH®
HANDSFREELINK®
DRIVING
ACURALINK®
NAVIGATION
Emergency Engine Stop
The ENGINE START/STOP button may be used to stop the engine due to an
emergency situation even while driving. If you must stop the engine, choose one of
the following operations:
• Press and hold the ENGINE START/STOP button for
two seconds, OR
• Firmly press the ENGINE START/STOP button two
times.
The steering wheel will not lock. The power mode changes to ACCESSORY, unless
the shift lever is in Park (P), in which case the power mode changes to VEHICLE OFF.
Because turning off the engine also disables the power assist the engine provides to
the steering and braking systems, it will require significantly more physical effort
and time to steer and slow the vehicle. Downshift gears and use both feet on the
brake pedal, if necessary, to slow the vehicle and stop immediately in a safe place.
Emergency Towing
Call a professional towing service if you need to tow your vehicle.
All models
Flat bed equipment: The operator loads your vehicle on the back of a truck. This is
the best way to transport your vehicle.
2WD models
Wheel lift equipment: The tow truck uses two pivoting arms that go under the front
tires and lift them off the ground. The rear tires remain on the ground. This is an
acceptable way to tow your vehicle.
Trying to lift or tow your vehicle by the bumpers will cause serious damage. The
bumpers are not designed to support the vehicle’s weight.
Improper towing such as towing behind a motorhome or other motor vehicle can
damage the transmission.
NOTICE
Do not press the button while driving unless it is absolutely necessary for the
engine to be switched off.
NOTICE
Tire Pressure Monitoring System (TPMS)
Monitors the tire pressure while you are driving.
If your vehicle’s tire pressure becomes significantly low, the low tire pressure
indicator comes on and a message appears on the multi-information display. Press
the Info button on the steering wheel to view the tire pressure monitor to see
pressure readings for each tire (see page 28).
Driving on an extremely underinflated tire can cause it to overheat. An
overheated tire can fail. Always inflate your tires to the specified pressure.
NOTICE
What to Do
Stop your vehicle in a safe place. Check the tire pressure and adjust the pressure
to the specified level. The specified tire pressure is on a label on the driver’s
doorjamb.
The specific tire
with low pressure is
displayed.
Page 63 of 81

118 || 119
HANDLING THE UNEXPECTED
HANDLING THE UNEXPECTED
TABLE OF
CONTENTS
INDEX
VISUAL INDEX
VOICE COMMAND INDEX
SAFETY
INFORMATION
CLIENT
INFORMATION
INSTRUMENT PANEL
SPECIFICATIONS
VEHICLE
CONTROLS
MAINTENANCE
AUDIO AND
CONNECTIVITY
HANDLING THE UNEXPECTED
BLUETOOTH®
HANDSFREELINK®
DRIVING
ACURALINK®
NAVIGATION
Tire Pressure Monitoring System (TPMS) - Required Federal
Explanation
Each tire, including the spare (if provided), should be checked monthly
when cold and inflated to the inflation pressure recommended by the
vehicle manufacturer on the vehicle placard or tire inflation pressure
label.
(If your vehicle has tires of a different size than the size indicated on the
vehicle placard or tire inflation pressure label, you should determine the
proper tire inflation pressure for those tires.)
As an added safety feature, your vehicle has been equipped with a tire
pressure monitoring system (TPMS) that illuminates a low tire
pressure telltale when one or more of your tires is significantly
under-inflated.
Accordingly, when the low tire pressure telltale illuminates, you should
stop and check your tires as soon as possible, and inflate them to the
proper pressure.
Driving on a significantly under-inflated tire causes the tire to overheat
and can lead to tire failure. Under-inflation also reduces fuel efficiency
and tire tread life, and may affect the vehicle’s handling and stopping
ability.
Please note that the TPMS is not a substitute for proper tire
maintenance, and it is the driver’s responsibility to maintain correct
tire pressure, even if under-inflation has not reached the level to trigger
illumination of the TPMS low tire pressure telltale.
Your vehicle has also been equipped with a TPMS malfunction indicator
to indicate when the system is not operating properly. The TPMS
malfunction indicator is combined with the low tire pressure telltale.
When the system detects a malfunction, the telltale will flash for
approximately one minute and then remain continuously illuminated.
This sequence will continue upon subsequent vehicle start-ups as long as
the malfunction exists.
When the malfunction indicator is illuminated, the system may not be
able to detect or signal low tire pressure as intended.
TPMS malfunctions may occur for a variety of reasons, including the
installation of replacement or alternate tires or wheels on the vehicle
that prevent the TPMS from functioning properly.
Always check the TPMS malfunction telltale after replacing one or
more tires or wheels on your vehicle to ensure that the replacement
or alternate tires and wheels allow the TPMS to continue to function
properly.Tire Repair Kit*
If a tire has a small puncture, you can use the tire repair kit to temporarily repair it.
The puncture must be smaller than 3/16-inch (4 mm) and not in the tire sidewall.
Go to a dealer to have the full-size tire permanently repaired or replaced.
Before Repairing the Tire
1. Park the vehicle on firm, level, non-slippery surface.
2. Make sure the vehicle is in Park (P), and apply the parking brake.
3. Turn on the hazard warning lights, and turn the vehicle off.
Getting Ready to Repair the Tire
1. Open the cargo area floor lid.
2. Take the kit out of the tool box.
3. Place the kit face up on flat ground near the
punctured tire and away from traffic. Do not
place the kit on its side.
4. Follow the instructions in the kit to repair the
tire.
Do not use an unapproved puncture-repairing agent other than the one provided
in the kit that came with your vehicle. If a different agent is used, you may
permanently damage the tire pressure sensor.
NOTICE
Floor lid
Tire repair kit
*if equipped